


JavaSSM_kuang
Mybatis
环境说明:
- jdk 8+
- MySQL 5.7.19
- maven-3.6.0
- IDEA
学习前需要掌握:
- JDBC
- MySQL
- Java 基础
- Maven
- Junit
1、Mybatis简介
[外链图片转存失败,源站可能有防盗链机制,建议将图片保存下来直接上传(img-0sXpzCoE-1667186408339)(D:\个人学习文件夹\Markdown\正在写\Java\mdPics\Java_SSM\image-20221009084934390.png)]
1.1、什么是MyBatis
- Mybatis 是一款优秀的持久层框架
- Mybatis 避免了几乎所有的 JDBC 代码和手动设置参数以及获取结果集的过程
- MyBatis 可以使用简单的 XML 或注解来配置和映射原生信息,将接口和 Java的实用类【Plain Old Java Objects,普通的 Java对象】映射成数据库中的记录。
- MyBatis 本是apache的一个开源项目ibatis,2010年这个项目由apache迁移到了google code,并且改名为MyBatis。
- 2013年11月迁移到Github。
- Mybatis 官方文档:www.mybatis.org/mybatis-3/zh/index.html
- GIthub:GitHub - mybatis/mybatis-3: MyBatis SQL mapper framework for Java
1.2、持久化
- 持久化是将程序数据在持久状态和瞬时状态间转换的机制。
- 即是把数据(如内存中的对象)保存到可永久保存的存储设备中(如磁盘)。持久化的主要应用是将内存中的对象存储在数据库中,或者存储在磁盘文件中、XML数据文件中等等。
- JDBC 就是一种持久化机制。文件IO也是一种持久化机制。
- 在生活中:将鲜肉冷藏,吃的时候再解冻的方法也是。将水果做成罐头的方法也是。
- 为什么需要持久化服务呢?那是由于内存本身的缺陷引起的
- 内存断电后数据会丢失,但有一些对象是无论如何都不能丢失的,比如银行账号等,遗憾的是,人们还无法保证内存永不掉电。
- 内存过于昂贵,与硬盘、光盘等外存相比,内存的价格要高2-3个数量级,而且维持成本也高,至少需要一直供电吧。所以即使对象不需要永久保存,也会因为内存的容量限制不能一直呆在内存中,需要持久化来缓存到外存。
1.3、持久层
- 什么是持久层?
- 完成持久化工作的代码块 . ----> dao层 【DAO (Data Access Object) 数据访问对象】
- 大多数情况下特别是企业级应用,数据持久化往往也就意味着将内存中的数据保存到磁盘上加以固化,而持久化的实现过程则大多通过各种关系数据库来完成。
- 不过这里有一个字需要特别强调,也就是所谓的“层”。对于应用系统而言,数据持久功能大多是必不可少的组成部分。也就是说,我们的系统中,已经天然的具备了“持久层”概念?也许是,但也许实际情况并非如此。之所以要独立出一个“持久层”的概念,而不是“持久模块”,“持久单元”,也就意味着,我们的系统架构中,应该有一个相对独立的逻辑层面,专著于数据持久化逻辑的实现。
- 与系统其他部分相对而言,这个层面应该具有一个较为清晰和严格的逻辑边界。 【说白了就是用来操作数据库存在的!】
1.4、为什么需要Mybatis
- Mybatis就是帮助程序猿将数据存入数据库中 , 和从数据库中取数据。
- 传统的jdbc操作 , 有很多重复代码块 .比如 : 数据取出时的封装 , 数据库的建立连接等等… , 通过框架可以减少重复代码,提高开发效率
- MyBatis 是一个半自动化的ORM框架(Object Relationship Mapping) -->对象关系映射
- 所有的事情,不用Mybatis依旧可以做到,只是用了它,所有实现会更加简单!技术没有高低之分,只有使用这个技术的人有高低之别
- MyBatis的优点
- 简单易学:本身就很小且简单。没有任何第三方依赖,最简单安装只要两个jar文件+配置几个sql映射文件就可以了,易于学习,易于使用,通过文档和源代码,可以比较完全的掌握它的设计思路和实现。
- 灵活:mybatis不会对应用程序或者数据库的现有设计强加任何影响。 sql写在xml里,便于统一管理和优化。通过sql语句可以满足操作数据库的所有需求。
- 解除sql与程序代码的耦合:通过提供DAO层,将业务逻辑和数据访问逻辑分离,使系统的设计更清晰,更易维护,更易单元测试。sql和代码的分离,提高了可维护性。
- 提供xml标签,支持编写动态sql。
- …
- 最重要的一点,使用的人多!公司需要!
2、MyBatis 第一个程序
思路流程:搭建环境–>导入Mybatis–>编写代码—>测试
2.1、代码演示
-
搭建试验数据库
CREATE DATABASE `mybatis`; USE `mybatis`; DROP TABLE IF EXISTS `user`; CREATE TABLE `user` ( `id` int(20) NOT NULL, `name` varchar(30) DEFAULT NULL, `pwd` varchar(30) DEFAULT NULL, PRIMARY KEY (`id`) ) ENGINE=InnoDB DEFAULT CHARSET=utf8; insert into `user`(`id`,`name`,`pwd`) values (1,'狂神','123456'), (2,'张三','abcdef'),(3,'李四','987654'); -
导入MyBatis相关 jar 包
<dependency> <groupId>org.mybatis</groupId> <artifactId>mybatis</artifactId> <version>3.5.2</version> </dependency> <dependency> <groupId>mysql</groupId> <artifactId>mysql-connector-java</artifactId> <version>5.1.47</version> </dependency> -
编写MyBatis核心配置文件
<?xml version="1.0" encoding="UTF-8" ?> <!DOCTYPE configuration PUBLIC "-//mybatis.org//DTD Config 3.0//EN" "http://mybatis.org/dtd/mybatis-3-config.dtd"> <configuration> <environments default="development"> <environment id="development"> <transactionManager type="JDBC"/> <dataSource type="POOLED"> <property name="driver" value="com.mysql.jdbc.Driver"/> <property name="url" value="jdbc:mysql://localhost:3306/mybatis? useSSL=true&useUnicode=true&characterEncoding=utf8"/> <property name="username" value="root"/> <property name="password" value="123456"/> </dataSource> </environment> </environments> <mappers> <mapper resource="com/kuang/dao/userMapper.xml"/> </mappers> </configuration> -
编写MyBatis工具类
public class MybatisUtils { private static SqlSessionFactory sqlSessionFactory; static { try { String resource = "mybatis-config.xml"; InputStream inputStream = Resources.getResourceAsStream(resource); sqlSessionFactory = new SqlSessionFactoryBuilder().build(inputStream); } catch (IOException e) { e.printStackTrace(); } } //获取SqlSession连接 public static SqlSession getSession(){ return sqlSessionFactory.openSession(); } } -
创建实体类
public class User { private int id; //id private String name; //姓名 private String pwd; //密码 //构造,有参,无参 //set/get //toString() } -
编写Mapper接口类
public interface UserMapper { List<User> selectUser(); } -
编写Mapper.xml配置文件
- namespace 十分重要,不能写错!
<?xml version="1.0" encoding="UTF-8" ?> <!DOCTYPE mapper PUBLIC "-//mybatis.org//DTD Mapper 3.0//EN" "http://mybatis.org/dtd/mybatis-3-mapper.dtd"> <mapper namespace="com.kuang.dao.UserMapper"> <select id="selectUser" resultType="com.kuang.pojo.User"> select * from user </select> </mapper> -
编写测试类
- Junit 包测试
public class MyTest { @Test public void selectUser() { SqlSession session = MybatisUtils.getSession(); //方法一: //List<User> users = session.selectList("com.kuang.mapper.UserMapper.selectUser"); //方法二: UserMapper mapper = session.getMapper(UserMapper.class); List<User> users = mapper.selectUser(); for (User user: users){ System.out.println(user); } session.close(); } } -
运行测试
2.2、问题说明
可能出现问题说明:Maven静态资源过滤问题
<resources>
    <resource>
        <directory>src/main/java</directory>
        <includes>
            <include>**/*.properties</include>
            <include>**/*.xml</include>
        </includes>
        <filtering>false</filtering>
    </resource>
    <resource>
        <directory>src/main/resources</directory>
        <includes>
            <include>**/*.properties</include>
            <include>**/*.xml</include>
        </includes>
        <filtering>false</filtering>
    </resource>
</resources>
3、CRUD操作
3.1、namespace
将上面案例中的UserMapper接口改名为 UserDao;
将UserMapper.xml中的namespace改为为UserDao的路径 .
再次测试
结论:
配置文件中namespace中的名称为对应Mapper接口或者Dao接口的完整包名,必须一致!
3.2、select
- select标签是mybatis中最常用的标签之一
- select语句有很多属性可以详细配置每一条SQL语句
- id
- 命名空间中唯一的标识符
- 接口中的方法名与映射文件中的SQL语句ID 一一对应
- parameterType
- 传入SQL语句的参数类型 。【万能的Map,可以多尝试使用】
- resultType
- SQL语句返回值类型。【完整的类名或者别名】
需求:根据id查询用户
-
在UserMapper中添加对应方法
public interface UserMapper { //查询全部用户 List<User> selectUser(); //根据id查询用户 User selectUserById(int id); } -
在UserMapper.xml中添加Select语句
<select id="selectUserById" resultType="com.kuang.pojo.User"> select * from user where id = #{id} </select> -
测试类中测试
@Test
public void tsetSelectUserById() {
    SqlSession session = MybatisUtils.getSession(); //获取SqlSession连接
    UserMapper mapper = session.getMapper(UserMapper.class);
    User user = mapper.selectUserById(1);
    System.out.println(user);
    session.close();
}
课堂练习:根据 密码 和 名字 查询用户
思路一:直接在方法中传递参数
-
在接口方法的参数前加 @Param属性
-
Sql语句编写的时候,直接取@Param中设置的值即可,不需要单独设置参数类型
//通过密码和名字查询用户
User selectUserByNP(@Param("username") String username,@Param("pwd") String pwd);
/*
    <select id="selectUserByNP" resultType="com.kuang.pojo.User">
        select * from user where name = #{username} and pwd = #{pwd}
    </select>
*/
思路二:使用万能的Map
-
在接口方法中,参数直接传递Map;
User selectUserByNP2(Map<String,Object> map); -
编写sql语句的时候,需要传递参数类型,参数类型为map
<select id="selectUserByNP2" parameterType="map" resultType="com.kuang.pojo.User"> select * from user where name = #{username} and pwd = #{pwd} </select> -
在使用方法的时候,Map的 key 为 sql中取的值即可,没有顺序要求!
Map<String, Object> map = new HashMap<String, Object>();
map.put("username","小明");
map.put("pwd","123456");
User user = mapper.selectUserByNP2(map);
总结:
如果参数过多,我们可以考虑直接使用Map实现,如果参数比较少,直接传递参数即可
3.3、insert
我们一般使用insert标签进行插入操作,它的配置和select标签差不多!
需求:给数据库增加一个用户
-
在UserMapper接口中添加对应的方法
//添加一个用户 int addUser(User user); -
在UserMapper.xml中添加insert语句
<insert id="addUser" parameterType="com.kuang.pojo.User"> insert into user (id,name,pwd) values (#{id},#{name},#{pwd}) </insert> -
测试
@Test
public void testAddUser() {
    SqlSession session = MybatisUtils.getSession();
    UserMapper mapper = session.getMapper(UserMapper.class);
    User user = new User(5,"王五","zxcvbn");
    int i = mapper.addUser(user);
    System.out.println(i);
    session.commit(); //提交事务,重点!不写的话不会提交到数据库
    session.close();
}
注意点:增、删、改操作需要提交事务!
3.4、update
我们一般使用update标签进行更新操作,它的配置和select标签差不多!
需求:修改用户的信息
-
在UserMapper接口中添加对应的方法
//修改一个用户 int updateUser(User user); -
在UserMapper.xml中添加insert语句
<update id="updateUser" parameterType="com.kuang.pojo.User"> update user set name=#{name},pwd=#{pwd} where id = #{id} </update> -
测试
@Test
public void testUpdateUser() {
    SqlSession session = MybatisUtils.getSession();
    UserMapper mapper = session.getMapper(UserMapper.class);
    User user = mapper.selectUserById(1);
    user.setPwd("asdfgh");
    int i = mapper.updateUser(user);
    System.out.println(i);
    session.commit(); //提交事务,重点!不写的话不会提交到数据库
    session.close();
}
注意点:增、删、改操作需要提交事务!
3.5、delete
我们一般使用delete标签进行删除操作,它的配置和select标签差不多!
需求:根据id删除一个用户
-
在UserMapper接口中添加对应的方法
//根据id删除用户 int deleteUser(int id); -
在UserMapper.xml中添加insert语句
<delete id="deleteUser" parameterType="int"> delete from user where id = #{id} </delete> -
测试
@Test
public void testDeleteUser() {
    SqlSession session = MybatisUtils.getSession();
    UserMapper mapper = session.getMapper(UserMapper.class);
    int i = mapper.deleteUser(5);
    System.out.println(i);
    session.commit(); //提交事务,重点!不写的话不会提交到数据库
    session.close();
}
注意点:增、删、改操作需要提交事务!
小结:
- 所有的增删改操作都需要提交事务!
- 接口所有的普通参数,尽量都写上@Param参数,尤其是多个参数时,必须写上!
- 有时候根据业务的需求,可以考虑使用map传递参数!
- 为了规范操作,在SQL的配置文件中,我们尽量将Parameter参数和resultType都写上!
3.6、思考题
模糊查询like语句该怎么写?
第1种:在Java代码中添加sql通配符。
string wildcardname = “%smi%”;
list<name> names = mapper.selectlike(wildcardname);
<select id=”selectlike”>
	select * from foo where bar like #{value}
</select>
第2种:在sql语句中拼接通配符,会引起sql注入
string wildcardname = “smi”;
list<name> names = mapper.selectlike(wildcardname);
<select id=”selectlike”>
	select * from foo where bar like "%"#{value}"%"
</select>
4、配置解析
4.1、核心配置文件
- mybatis-confifig.xml 系统核心配置文件
- MyBatis 的配置文件包含了会深深影响 MyBatis 行为的设置和属性信息。
- 能配置的内容如下:
configuration(配置)
    properties(属性)
    settings(设置)
    typeAliases(类型别名)
    typeHandlers(类型处理器)
    objectFactory(对象工厂)
    plugins(插件)
    environments(环境配置)
        environment(环境变量)
            transactionManager(事务管理器)
            dataSource(数据源)
    databaseIdProvider(数据库厂商标识)
    mappers(映射器)
<!-- 注意元素节点的顺序!顺序不对会报错 -->
我们可以阅读 mybatis-confifig.xml 上面的dtd的头文件!【演示】
4.2、environments元素
<environments default="development">
    <environment id="development">
        <transactionManager type="JDBC">
        	<property name="..." value="..."/>
        </transactionManager>
        <dataSource type="POOLED">
            <property name="driver" value="${driver}"/>
            <property name="url" value="${url}"/>
            <property name="username" value="${username}"/>
            <property name="password" value="${password}"/>
        </dataSource>
    </environment>
</environments>
-
配置MyBatis的多套运行环境,将SQL映射到多个不同的数据库上,必须指定其中一个为默认运行环境(通过default指定)
-
子元素节点:environment
-
具体的一套环境,通过设置id进行区别,id保证唯一!
-
子元素节点:transactionManager - [ 事务管理器 ]
<!-- 语法 --> <transactionManager type="[ JDBC | MANAGED ]"/>-
详情: [点击查看官方文档]: https://mybatis.org/mybatis-3/zh/configuration.html#environments
-
这两种事务管理器类型都不需要设置任何属性。
-
-
子元素节点:**数据源(**dataSource)
-
dataSource 元素使用标准的 JDBC 数据源接口来配置 JDBC 连接对象的资源。
-
数据源是必须配置的。
-
有三种内建的数据源类型
type="[UNPOOLED|POOLED|JNDI]") -
unpooled: 这个数据源的实现只是每次被请求时打开和关闭连接。
-
pooled: 这种数据源的实现利用“池”的概念将 JDBC 连接对象组织起来 , 这是一种使得并发 Web 应用快速响应请求的流行处理方式。
-
jndi:这个数据源的实现是为了能在如 Spring 或应用服务器这类容器中使用,容器可以集中或在外部配置数据源,然后放置一个 JNDI 上下文的引用。
-
数据源也有很多第三方的实现,比如dbcp,c3p0,druid等等…
-
-
4.3、mappers元素
4.3.1、mappers
- 映射器:定义映射SQL语句文件
- 既然 MyBatis 的行为其他元素已经配置完了,我们现在就要定义 SQL 映射语句了。但是首先我们需要告诉 MyBatis 到哪里去找到这些语句。Java 在自动查找这方面没有提供一个很好的方法,所以最佳的方式是告诉 MyBatis 到哪里去找映射文件。你可以使用相对类路径的资源引用,或完全限定资源定位符(包括
file://的URL),或类名和包名等。映射器是MyBatis中最核心的组件之一,在MyBatis 3 之前,只支持xml映射器,即:所有的SQL语句都必须在xml文件中配置。而从MyBatis 3开始,还支持接口映射器,这种映射器方式允许以Java代码的方式注解定义SQL语句,非常简洁。
4.3.2、引入资源方式
<!-- 使用相对于类路径的资源引用 -->
<mappers>
    <mapper resource="org/mybatis/builder/PostMapper.xml"/>
</mappers>
<!-- 使用完全限定资源定位符(URL) -->
<mappers>
    <mapper url="file:///var/mappers/AuthorMapper.xml"/>
</mappers>
<!--
使用映射器接口实现类的完全限定类名
需要配置文件名称和接口名称一致,并且位于同一目录下
-->
<mappers>
    <mapper class="org.mybatis.builder.AuthorMapper"/>
</mappers>
<!--
将包内的映射器接口实现全部注册为映射器
但是需要配置文件名称和接口名称一致,并且位于同一目录下
-->
<mappers>
    <package name="org.mybatis.builder"/>
</mappers>
4.3.3、Mapper文件
<?xml version="1.0" encoding="UTF-8" ?>
<!DOCTYPE mapper
    PUBLIC "-//mybatis.org//DTD Mapper 3.0//EN"
    "http://mybatis.org/dtd/mybatis-3-mapper.dtd">
<mapper namespace="com.kuang.mapper.UserMapper">
</mapper>
- namespaace 中文意思:命名空间,作用如下:
- namespace和子元素的id联合保证唯一,区别不同的mapper
- 绑定DAO接口
- namespace的命名必须跟某一个接口同名
- 接口中的方法则与映射文件中的sql语句中的id应该一一对应
- namespace命名规则:包名+类名
MyBatis 的真正强大在于它的映射语句,这是他的魔力所在。由于他的异常强大,映射器的 XML 文件就显得相对简单。如果拿它跟具有相同功能的JDBC代码进行对比,你会立即发现省掉了将近 95% 的代码。MyBatis 为聚焦于 SQL 而构建,以尽可能地为你减少麻烦。
4.4、Properties优化
数据库这些属性都是可外部配置 且动态替换的,既可以在典型的Java属性文件中配置,亦可通过properties 元素的子元素来传递。
我门来优化我们的配置文件
第一步:在资源目录下新建一个db.properties
driver=com.mysql.jdbc.Driver
url=jdbc:mysql://localhost:3306/mybatis?
useSSL=true&useUnicode=true&characterEncoding=utf8
username=root
password=123456
第二步:将文件导入properties 配置文件
<configuration>
    <!--导入properties文件-->
    <properties resource="db.properties"/>
    <environments default="development">
        <environment id="development">
            <transactionManager type="JDBC"/>
            <dataSource type="POOLED">
                <property name="driver" value="${driver}"/>
                <property name="url" value="${url}"/>
                <property name="username" value="${username}"/>
                <property name="password" value="${password}"/>
            </dataSource>
        </environment>
    </environments>
    <mappers>
        <mapper resource="mapper/UserMapper.xml"/>
    </mappers>
</configuration>
更多操作,可以查看官方文档!
- 配置文件优先级问题
- 新特性:使用占位符
4.5、typeAliases优化
类型别名是为 Java类型设置一个短的名字。它只和 XML 配置有关,存在的意义仅在于用来减少类完全限定名的冗余。
<!--配置别名,注意顺序-->
<typeAliases>
    <typeAlias type="com.kuang.pojo.User" alias="User"/>
</typeAliases>
当这样配置时,User 可以在任何使用com.kuang.pojo.User的地方。
也可以指定一个包名,MyBatis 会把包名下面搜索需要的Java Bean,比如:
<typeAliases>
    <package name="com.kuang.pojo"/>
</typeAliases>
没一个在包com.kuang.pojo中的Java Bean,在没有注解的情况下,会使用 Bean 的首字母小写的非限定类名来作为它的别名。
若有注解,则别名为其注解值。见下面的例子:
@Alias("user")
public class User {
    ...
}
【演示】去官网查看一下
4.6、其他配置浏览
4.6.1、设置
- 设置(setting)相关 => 查看帮助文档
- 懒加载
- 日志实现
- 缓存开启关闭
- 一个配置完整的 settings 元素的示例如下:
<settings>
    <setting name="cacheEnabled" value="true"/>
    <setting name="lazyLoadingEnabled" value="true"/>
    <setting name="multipleResultSetsEnabled" value="true"/>
    <setting name="useColumnLabel" value="true"/>
    <setting name="useGeneratedKeys" value="false"/>
    <setting name="autoMappingBehavior" value="PARTIAL"/>
    <setting name="autoMappingUnknownColumnBehavior" value="WARNING"/>
    <setting name="defaultExecutorType" value="SIMPLE"/>
    <setting name="defaultStatementTimeout" value="25"/>
    <setting name="defaultFetchSize" value="100"/>
    <setting name="safeRowBoundsEnabled" value="false"/>
    <setting name="mapUnderscoreToCamelCase" value="false"/>
    <setting name="localCacheScope" value="SESSION"/>
    <setting name="jdbcTypeForNull" value="OTHER"/>
    <setting name="lazyLoadTriggerMethods" value="equals,clone,hashCode,toString"/>
</settings>
4.6.2、类型处理器
- 无论是MyBatis 在预处理语句(PreparedStatement)中设置一个参数时,还是从结果集中取出一个值时,都会用类型处理器将获取的值以合适的方式转换成 Java类型。
- 你可以重写类型处理器或创建你自己的类型处理器来处理不支持的或非标准的类型。【了解即可】
4.6.3、对象工厂
- MyBatis 每次创建结果对象的新实例时,它都会使用一个对象工厂(ObjectFactory)实例来完成。
- 默认的对象工厂需要做的仅仅是实例化目标类,要么通过默认构造方法,要么在参数映射存在的时候通过有参构造方法来实例化。
- 如果想要覆盖对象工厂的默认行为,则可以通过创建自己的对象工厂来实现。【了解即可】
4.7 生命周期和作用域
作用域(Scope)和生命周期
理解我们目前已经讨论过的不同作用域和生命周期类是至关重要的,因为错误的使用会导致非常严重的并发问题。
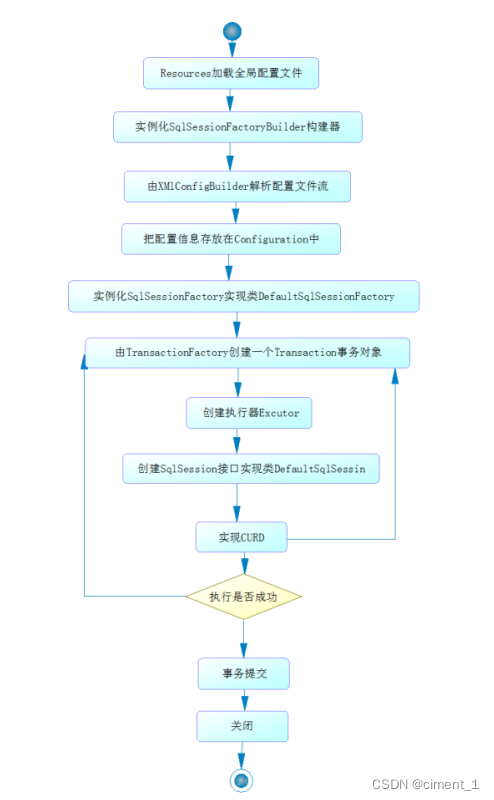
我们可以先画一个流程图,分析一下MyBatis的执行过程!
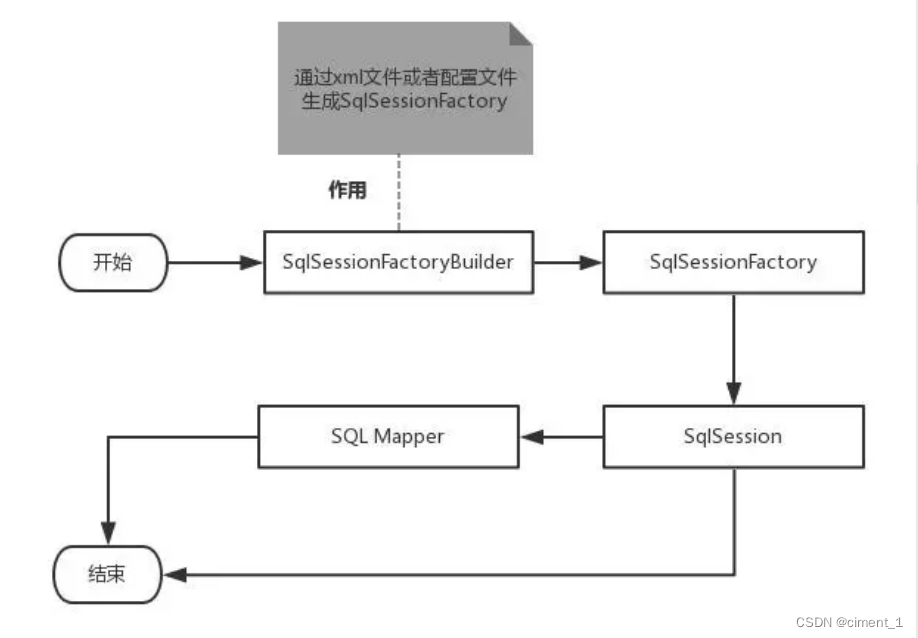
作用域理解
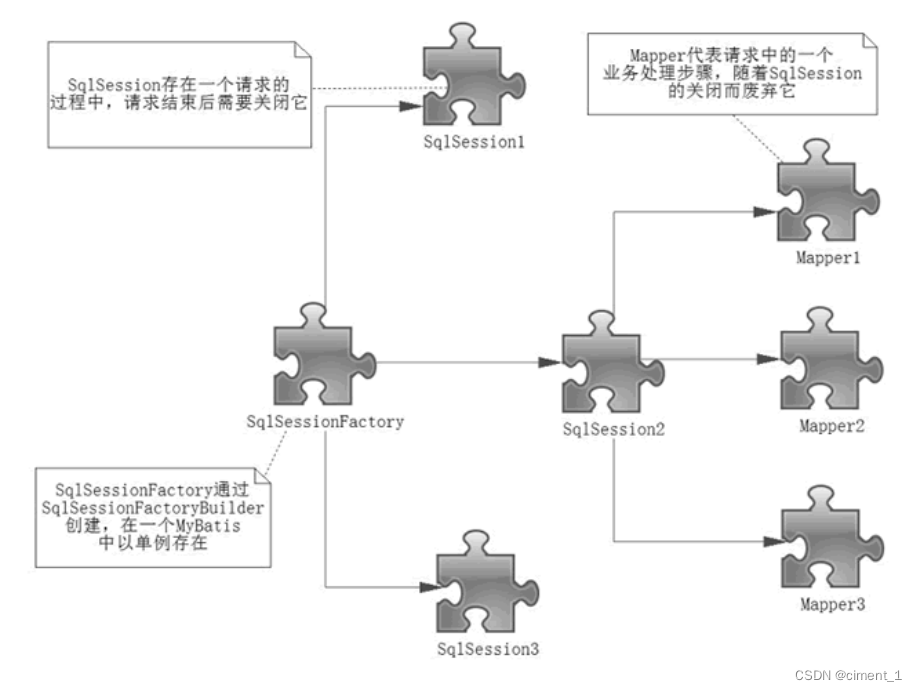
- SqlSessionFactoryBuilder 的作用在于创建 SqlSessionFactory,创建成功后,SqlSessionFactoryBuilder 就失去了作用,所以它只能存在于创建 SqlSessionFactory 的方法中,而不要让其长期存在。因此 SqlSessionFactoryBuilder 实例的最佳作用域是方法作用域(也就是局部方法变量)。
- SqlSessionFactory 可以被认为是一个数据库连接池,它的作用是创建 SqlSession 接口对象。因为MyBatis 的本质就是 Java 对数据库的操作,所以 SqlSessionFactory 的生命周期存在于整个MyBatis 的应用之中,所以一旦创建了 SqlSessionFactory,就要长期保存它,直至不再使用MyBatis 应用,所以可以认为 SqlSessionFactory 的生命周期就等同于 MyBatis 的应用周期。
- 由于 SqlSessionFactory 是一个对数据库的连接池,所以它占据着数据库的连接资源。如果创建多个 SqlSessionFactory,那么就存在多个数据库连接池,这样不利于对数据库资源的控制,也会导致数据库连接资源被消耗光,出现系统宕机等情况,所以尽量避免发生这样的情况。
- 因此在一般的应用中我们往往希望 SqlSessionFactory 作为一个单例,让它在应用中被共享。所以说 SqlSessionFactory 的最佳作用域是应用作用域。
- 如果说 SqlSessionFactory 相当于数据库连接池,那么 SqlSession 就相当于一个数据库连接(Connection 对象),你可以在一个事务里面执行多条 SQL,然后通过它的 commit、rollback等方法,提交或者回滚事务。所以它应该存活在一个业务请求中,处理完整个请求后,应该关闭这条连接,让它归还给 SqlSessionFactory,否则数据库资源就很快被耗费精光,系统就会瘫痪,所以用 try…catch…fifinally… 语句来保证其正确关闭。
- 所以 SqlSession 的最佳的作用域是请求或方法作用域。
5、ResultMap
要解决的问题:属性名和字段名不一致
环境:新建一个项目,将之前的项目拷贝过来
5.1、查询为null问题
-
查看之前的数据库的字段名

-
Java中的实体类设计
public class User { private int id; //id private String name; //姓名 private String password; //密码和数据库不一样! //构造 //set/get //toString() } -
接口
//根据id查询用户 User selectUserById(int id); -
mapper映射文件
<select id="selectUserById" resultType="user"> select * from user where id = #{id} </select> -
测试
@Test
public void testSelectUserById() {
    SqlSession session = MybatisUtils.getSession(); //获取SqlSession连接
    UserMapper mapper = session.getMapper(UserMapper.class);
    User user = mapper.selectUserById(1);
    System.out.println(user);
    session.close();
}
结果:
- User{id=1,name=“ciment”,password=‘null’}
- 查询出来发现 password 为空,说明出现了问题!
分析:
- select * from user where id = #{id}
- mybatis会根据这些查询的列名(会将列名转化为小写,数据库不区分大小写) , 去对应的实体类中查找相应列名的set方法设值 , 由于找不到setPwd() , 所以password返回null ; 【自动映射】
5.2、解决方案
方案一:为列名指定别名 , 别名和java实体类的属性名一致 .
<select id="selectUserById" resultType="User">
    select id , name , pwd as password from user where id = #{id}
</select>
方案二:使用结果集映射->ResultMap 【推荐】
<resultMap id="UserMap" type="User">
    <!-- id为主键 -->
    <id column="id" property="id"/>
    <!-- column是数据库表的列名 , property是对应实体类的属性名 -->
    <result column="name" property="name"/>
    <result column="pwd" property="password"/>
</resultMap>
<select id="selectUserById" resultMap="UserMap">
    select id , name , pwd from user where id = #{id}
</select>
5.3、ResultMap
5.3.1、自动映射
resultMap元素是MyBatis 中最重要最强大的元素。它可以让你从 90% 的 JDBCResultSets数据提取代码中解放出来。- 实际上,在为一些比如连接的复杂语句编写映射代码的时候,一份
resultMap能够代替实现同等功能的长达数千行的代码。 - ResultMap 的设计思想是,对于简单的语句根本不需要配置显式的结果映射,而对于复杂一点的语句只需要描述它们的关系就行了。
你已经见过简单映射语句的示例了,但并没有显式指定 resultMap 。比如:
<select id="selectUserById" resultType="map">
    select id , name , pwd
    from user
    where id = #{id}
</select>
上述语句只是简单地将所有的列映射到 HashMap 的键上,这由 resultType 属性指定。虽然在大部分情况下都够用,但是 HashMap 不是一个很好的模型。你的程序更可能会使用 JavaBean 或POJO(Plain Old Java Objects,普通老式 Java 对象)作为模型。
ResultMap 最优秀的地方在于,虽然你已经对它相当了解了,但是根本就不需要显式地用到他们。
5.3.2、手动映射
-
返回值类型为resultMap
<select id="selectUserById" resultMap="UserMap"> select id , name , pwd from user where id = #{id} </select> -
编写resultMap,实现手动映射!
<resultMap id="UserMap" type="User">
    <!-- id为主键 -->
    <id column="id" property="id"/>
    <!-- column是数据库表的列名 , property是对应实体类的属性名 -->
    <result column="name" property="name"/>
    <result column="pwd" property="password"/>
</resultMap>
如果世界总是这么简单就好了。但是肯定不是的,数据库中,存在一对多,多对一的情况,我们之后会使用到一些高级的结果集映射,association,collection这些,我们将在之后讲解,今天你们需要把这些知识都消化掉才是最重要的!理解结果集映射的这个概念!
6、分页的实现
6.1、日志工厂
思考:我们在测试SQL的时候,要是能够在控制台输出 SQL 的话,是不是就能够有更快的排错效率?
如果一个 数据库相关的操作出现了问题,我们可以根据输出的SQL语句快速排查问题。
对于以往的开发过程,我们会经常使用到debug模式来调节,跟踪我们的代码执行过程。但是现在使用Mybatis是基于接口,配置文件的源代码执行过程。因此,我们必须选择日志工具来作为我们开发,调节程序的工具。
Mybatis内置的日志工厂提供日志功能,具体的日志实现有以下几种工具:
- SLF4J
- Apache Commons Logging
- Log4j 2
- Log4j
- JDK logging
具体选择哪个日志实现工具由MyBatis的内置日志工厂确定。它会使用最先找到的(按上文列举的顺序查找)。 如果一个都未找到,日志功能就会被禁用。
标准日志实现
指定 MyBatis 应该使用哪个日志记录实现。如果此设置不存在,则会自动发现日志记录实现。
<settings>
    <setting name="logImpl" value="STDOUT_LOGGING"/>
</settings>
测试,可以看到控制台有大量的输出!我们可以通过这些输出来判断程序到底哪里出了Bug
6.2、Log4j
简介:
- Log4j是Apache的一个开源项目
- 通过使用Log4j,我们可以控制日志信息输送的目的地:控制台,文本,GUI组件…
- 我们也可以控制每一条日志的输出格式;
- 通过定义每一条日志信息的级别,我们能够更加细致地控制日志的生成过程。最令人感兴趣的就是,这些可以通过一个配置文件来灵活地进行配置,而不需要修改应用的代码。
使用步骤:
-
导入log4j的包
<dependency> <groupId>log4j</groupId> <artifactId>log4j</artifactId> <version>1.2.17</version> </dependency> -
配置文件编写
#将等级为DEBUG的日志信息输出到console和file这两个目的地,console和file的定义在下面的代码 log4j.rootLogger=DEBUG,console,file #控制台输出的相关设置 log4j.appender.console = org.apache.log4j.ConsoleAppender log4j.appender.console.Target = System.out log4j.appender.console.Threshold=DEBUG log4j.appender.console.layout = org.apache.log4j.PatternLayout log4j.appender.console.layout.ConversionPattern=[%c]-%m%n #文件输出的相关设置 log4j.appender.file = org.apache.log4j.RollingFileAppender log4j.appender.file.File=./log/kuang.log log4j.appender.file.MaxFileSize=10mb log4j.appender.file.Threshold=DEBUG log4j.appender.file.layout=org.apache.log4j.PatternLayout log4j.appender.file.layout.ConversionPattern=[%p][%d{yy-MM-dd}][%c]%m%n #日志输出级别 log4j.logger.org.mybatis=DEBUG log4j.logger.java.sql=DEBUG log4j.logger.java.sql.Statement=DEBUG log4j.logger.java.sql.ResultSet=DEBUG log4j.logger.java.sql.PreparedStatement=DEBUG -
setting设置日志实现
<settings> <setting name="logImpl" value="LOG4J"/> </settings> -
在程序中使用Log4j进行输出!
//注意导包:org.apache.log4j.Logger static Logger logger = Logger.getLogger(MyTest.class); @Test public void selectUser() { logger.info("info:进入selectUser方法"); logger.debug("debug:进入selectUser方法"); logger.error("error: 进入selectUser方法"); SqlSession session = MybatisUtils.getSession(); UserMapper mapper = session.getMapper(UserMapper.class); List<User> users = mapper.selectUser(); for (User user: users){ System.out.println(user); } session.close(); } -
测试,看控制台输出!
- 使用Log4j 输出日志
- 可以看到还生成了一个日志的文件【需要修改file的日志级别】
6.3、limit实现分页
思考:为什么需要分页?
在学习mybatis等持久层框架的时候,会经常对数据进行增删改查操作,使用最多的是对数据库进行查询操作,如果查询大量数据的时候,我们往往使用分页进行查询,也就是每次处理小部分数据,这样对数据库压力就在可控范围内。
使用Limit实现分页
#语法
SELECT * FROM table LIMIT stratIndex,pageSize
SELECT * FROM table LIMIT 5,10; // 检索记录行 6-15
#为了检索从某一个偏移量到记录集的结束所有的记录行,可以指定第二个参数为 -1:
SELECT * FROM table LIMIT 95,-1; // 检索记录行 96-last.
#如果只给定一个参数,它表示返回最大的记录行数目:
SELECT * FROM table LIMIT 5; //检索前 5 个记录行

#换句话说,LIMIT n 等价于 LIMIT 0,n。
步骤:
-
修改Mapper文件
<select id="selectUser" parameterType="map" resultType="user"> select * from user limit #{startIndex},#{pageSize} </select> -
Mapper接口,参数为map
//选择全部用户实现分页 List<User> selectUser(Map<String,Integer> map); -
在测试类中传入参数测试
- 推断:起始位置 = (当前页面 - 1 ) * 页面大小
//分页查询 , 两个参数startIndex , pageSize
@Test
public void testSelectUser() {
    SqlSession session = MybatisUtils.getSession();
    UserMapper mapper = session.getMapper(UserMapper.class);
    int currentPage = 1; //第几页
    int pageSize = 2; //每页显示几个
    Map<String,Integer> map = new HashMap<String,Integer>();
    map.put("startIndex",(currentPage-1)*pageSize);
    map.put("pageSize",pageSize);
    List<User> users = mapper.selectUser(map);
    for (User user: users){
        System.out.println(user);
    }
    session.close();
}
6.4、RowBounds分页
我们除了使用Limit在SQL层面实现分页,也可以使用RowBounds在Java代码层面实现分页,当然此种方式作为了解即可。我们来看下如何实现的!
步骤:
-
mapper接口
//选择全部用户RowBounds实现分页 List<User> getUserByRowBounds(); -
mapper文件
<select id="getUserByRowBounds" resultType="user"> select * from user </select> -
测试类
在这里,我们需要使用RowBounds类
@Test
public void testUserByRowBounds() {
    SqlSession session = MybatisUtils.getSession();
    int currentPage = 2; //第几页
    int pageSize = 2; //每页显示几个
    RowBounds rowBounds = new RowBounds((currentPage-1)*pageSize,pageSize);
    //通过session.**方法进行传递rowBounds,[此种方式现在已经不推荐使用了]
    List<User> users = session.selectList("com.kuang.mapper.UserMapper.getUserByRowBounds", null, rowBounds);
    for (User user: users){
        System.out.println(user);
    }
    session.close();
}
6.5、PageHelper

了解即可,可以自己尝试使用
7、使用注解开发
7.1、面向接口编程
- 大家之前都学过面向对象编程,也学习过接口,但在真正的开发中,很多时候我们会选择面向接口编程
- 根本原因 : 解耦 , 可拓展 , 提高复用 , 分层开发中 , 上层不用管具体的实现 , 大家都遵守共同的标准,使得开发变得容易 ,规范性更好
- 在一个面向对象的系统中,系统的各种功能是由许许多多的不同对象协作完成的。在这种情况下,各个对象内部是如何实现自己的,对系统设计人员来讲就不那么重要了;
- 而各个对象之间的协作关系则成为系统设计的关键。小到不同类之间的通信,大到各模块之间的交互,在系统设计之初都是要着重考虑的,这也是系统设计的主要工作内容。面向接口编程就是指按照这种思想来编程。
关于接口的理解
- 接口从更深层次的理解,应是定义(规范,约束)与实现(名实分离的原则)的分离。
- 接口的本身反映了系统设计人员对系统的抽象理解。
- 接口应有两类:
- 第一类是对一个个体的抽象,它可对应为一个抽象体(abstract class);
- 第二类是对一个个体某一方面的抽象,即形成一个抽象面(interface);
- 一个体有可能有多个抽象面。抽象体与抽象面是有区别的。
三个面向区别
- 面向对象是指,我们考虑问题时,以对象为单位,考虑它的属性及方法 .
- 面向过程是指,我们考虑问题时,以一个具体的流程(事务过程)为单位,考虑它的实现
- 接口设计与非接口设计是针对复用技术而言的,与面向对象(过程)不是一个问题.更多的体现就是对系统整体的架构
7.2、利用注解开发
- mybatis最初配置信息是基于 XML ,映射语句(SQL)也是定义在 XML 中的。而到MyBatis 3提供了新的基于注解的配置。不幸的是,Java 注解的的表达力和灵活性十分有限。最强大的 MyBatis 映射并不能用注解来构建
- sql 类型主要分成 :
- @select ()
- @update ()
- @Insert ()
- @delete ()
【注意】利用注解开发就不需要mapper.xml映射文件了
-
我们在我们的接口中添加注解
//查询全部用户 @Select("select id,name,pwd password from user") public List<User> getAllUser(); -
在mybatis的核心配置文件中注入
<!--使用class绑定接口--> <mappers> <mapper class="com.kuang.mapper.UserMapper"/> </mappers> -
我们去进行测试
@Test public void testGetAllUser() { SqlSession session = MybatisUtils.getSession(); //本质上利用了jvm的动态代理机制 UserMapper mapper = session.getMapper(UserMapper.class); List<User> users = mapper.getAllUser(); for (User user : users){ System.out.println(user); } session.close(); } -
利用Debug查看本质
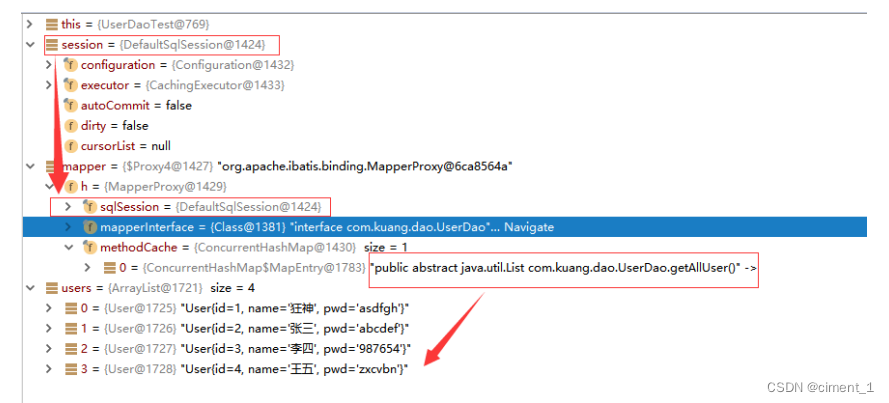
-
本质上利用了jvm的动态代理机制
-
Mybatis详细的执行流程
7.3、注解增删改
改造MybatisUtils工具类的getSession( ) 方法,重载实现。
//获取SqlSession连接
public static SqlSession getSession(){
    return getSession(true); //事务自动提交
}
public static SqlSession getSession(boolean flag){
    return sqlSessionFactory.openSession(flag);
}
【注意】确保实体类和数据库字段对应
查询:
-
编写接口方法注解
//根据id查询用户 @Select("select * from user where id = #{id}") User selectUserById(@Param("id") int id); -
测试
@Test
public void testSelectUserById() {
    SqlSession session = MybatisUtils.getSession();
    UserMapper mapper = session.getMapper(UserMapper.class);
    User user = mapper.selectUserById(1);
    System.out.println(user);
    session.close();
}
新增:
-
编写接口方法注解
//添加一个用户 @Insert("insert into user (id,name,pwd) values (#{id},#{name},#{pwd})") int addUser(User user); -
测试
@Test
public void testAddUser() {
    SqlSession session = MybatisUtils.getSession();
    UserMapper mapper = session.getMapper(UserMapper.class);
    User user = new User(6, "秦疆", "123456");
    mapper.addUser(user);
    session.close();
}
删除:
-
编写接口方法注解
//根据id删除用 @Delete("delete from user where id = #{id}") int deleteUser(@Param("id")int id); -
测试
@Test
public void testDeleteUser() {
    SqlSession session = MybatisUtils.getSession();
    UserMapper mapper = session.getMapper(UserMapper.class);
    mapper.deleteUser(6);
    session.close();
}
修改:
-
编写接口方法注解
//修改一个用户 @Update("update user set name=#{name},pwd=#{pwd} where id = #{id}") int updateUser(User user); -
测试
@Test
public void testUpdateUser() {
    SqlSession session = MybatisUtils.getSession();
    UserMapper mapper = session.getMapper(UserMapper.class);
    User user = new User(6, "秦疆", "zxcvbn");
    mapper.updateUser(user);
    session.close();
}
【注意点:增删改一定记得对事务的处理】
7.4、关于@Param
@Param注解用于给方法参数起一个名字。以下是总结的使用原则:
- 在方法只接受一个参数的情况下,可以不使用@Param。
- 在方法接受多个参数的情况下,建议一定要使用@Param注解给参数命名。
- 如果参数是 JavaBean , 则不能使用@Param。
- 不使用@Param注解时,参数只能有一个,并且是Javabean。
7.5、#与$的区别
-
#{} 的作用主要是替换预编译语句(PrepareStatement)中的占位符? 【推荐使用】
INSERT INTO user (name) VALUES (#{name}); INSERT INTO user (name) VALUES (?); -
${} 的作用是直接进行字符串替换
INSERT INTO user (name) VALUES ('${name}');
INSERT INTO user (name) VALUES ('kuangshen');
8、多对一的处理
多对一的理解
- 多个学生对应一个老师
- 如果对于学生这边,就是一个多对一的现象,即从学生这边关联一个老师
8.1、数据库设计
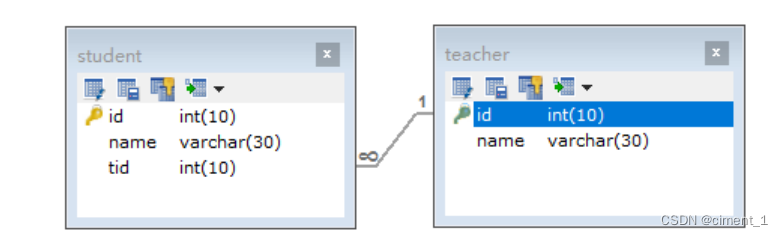
CREATE TABLE `teacher` (
    `id` INT(10) NOT NULL,
    `name` VARCHAR(30) DEFAULT NULL,
    PRIMARY KEY (`id`)
) ENGINE=INNODB DEFAULT CHARSET=utf8

INSERT INTO teacher(`id`, `name`) VALUES (1, '秦老师');

CREATE TABLE `student` (
    `id` INT(10) NOT NULL,
    `name` VARCHAR(30) DEFAULT NULL,
    `tid` INT(10) DEFAULT NULL,
    PRIMARY KEY (`id`),
    KEY `fktid` (`tid`),
    CONSTRAINT `fktid` FOREIGN KEY (`tid`) REFERENCES `teacher` (`id`)
) ENGINE=INNODB DEFAULT CHARSET=utf8

INSERT INTO `student` (`id`, `name`, `tid`) VALUES ('1', '小明', '1');
INSERT INTO `student` (`id`, `name`, `tid`) VALUES ('2', '小红', '1');
INSERT INTO `student` (`id`, `name`, `tid`) VALUES ('3', '小张', '1');
INSERT INTO `student` (`id`, `name`, `tid`) VALUES ('4', '小李', '1');
INSERT INTO `student` (`id`, `name`, `tid`) VALUES ('5', '小王', '1');
8.2、搭建测试环境
【Lombok】
-
IDEA安装Lombok插件
-
引入Maven依赖
<!-- https://mvnrepository.com/artifact/org.projectlombok/lombok --> <dependency> <groupId>org.projectlombok</groupId> <artifactId>lombok</artifactId> <version>1.16.10</version> </dependency> -
在代码中增加注解
@Data //GET,SET,ToString,有参,无参构造
public class Teacher {
    private int id;
    private String name;
}
@Data public class Student { private int id; private String name; //多个学生可以是同一个老师,即多对一 private Teacher teacher; } -
编写实体类对应的Mapper接口【两个】
- 无论有没有需求,都应该写上,以备后来只需!
public interface StudentMapper { } public interface TeacherMapper { } -
编写Mapper接口对应的 mapper.xml 配置文件【两个】
- 无论有没有需求,都应该写上,以备后来之需!
<?xml version="1.0" encoding="UTF-8" ?>
<!DOCTYPE mapper
    PUBLIC "-//mybatis.org//DTD Mapper 3.0//EN"
    "http://mybatis.org/dtd/mybatis-3-mapper.dtd">
<mapper namespace="com.kuang.mapper.StudentMapper">
</mapper>

<?xml version="1.0" encoding="UTF-8" ?>
<!DOCTYPE mapper
    PUBLIC "-//mybatis.org//DTD Mapper 3.0//EN"
    "http://mybatis.org/dtd/mybatis-3-mapper.dtd">
<mapper namespace="com.kuang.mapper.TeacherMapper">
</mapper>
8.3、按查询嵌套处理
-
给StudentMapper接口增加方法
//获取所有学生及对应老师的信息 public List<Student> getStudents(); -
编写对应的Mapper文件
<?xml version="1.0" encoding="UTF-8" ?> <!DOCTYPE mapper PUBLIC "-//mybatis.org//DTD Mapper 3.0//EN" "http://mybatis.org/dtd/mybatis-3-mapper.dtd"> <mapper namespace="com.kuang.mapper.StudentMapper"> <!-- 需求:获取所有学生及对应老师的信息 思路: 1. 获取所有学生的信息 2. 根据获取的学生信息的老师ID->获取该老师的信息 3. 思考问题,这样学生的结果集中应该包含老师,该如何处理呢,数据库中我们一般使用关联查询? 1. 做一个结果集映射:StudentTeacher 2. StudentTeacher结果集的类型为 Student 3. 学生中老师的属性为teacher,对应数据库中为tid。 多个 [1,...)学生关联一个老师=> 一对一,一对多 4. 查看官网找到:association – 一个复杂类型的关联;使用它来处理关联查询 --> <select id="getStudents" resultMap="StudentTeacher"> select * from student </select> <resultMap id="StudentTeacher" type="Student"> <!--association关联属性 property属性名 javaType属性类型 column在多的一方的表中的列名--> <association property="teacher" column="tid" javaType="Teacher" select="getTeacher"/> </resultMap> <!-- 这里传递过来的id,只有一个属性的时候,下面可以写任何值 association中column多参数配置: column="{key=value,key=value}" 其实就是键值对的形式,key是传给下个sql的取值名称,value是片段一中sql查询的字段名。 --> <select id="getTeacher" resultType="teacher"> select * from teacher where id = #{id} </select> </mapper> -
编写完毕去MyBatis配置文件中,注册Mapper!
-
注意点说明:
<resultMap id="StudentTeacher" type="Student"> <!--association关联属性 property属性名 javaType属性类型 column在多的一方的表中的列名--> <association property="teacher" column="{id=tid,name=tid}" javaType="Teacher" select="getTeacher"/> </resultMap> <!-- 这里传递过来的id,只有一个属性的时候,下面可以写任何值 association中column多参数配置: column="{key=value,key=value}" 其实就是键值对的形式,key是传给下个sql的取值名称,value是片段一中sql查询的字段名。 --> <select id="getTeacher" resultType="teacher"> select * from teacher where id = #{id} and name = #{name} </select> -
测试
@Test
public void testGetStudents(){
    SqlSession session = MybatisUtils.getSession();
    StudentMapper mapper = session.getMapper(StudentMapper.class);
    List<Student> students = mapper.getStudents();
    for (Student student : students){
        System.out.println(
            "学生名:"+ student.getName()
            +"\t老师:"+student.getTeacher().getName());
    }
}
8.4、按结果嵌套处理
除了上面这种方式,还有其他思路吗?
我们还可以按照结果进行嵌套处理;
-
接口方法编写
public List<Student> getStudents2(); -
编写对应的mapper文件
<!-- 按查询结果嵌套处理 思路: 1. 直接查询出结果,进行结果集的映射 --> <select id="getStudents2" resultMap="StudentTeacher2" > select s.id sid, s.name sname , t.name tname from student s,teacher t where s.tid = t.id </select> <resultMap id="StudentTeacher2" type="Student"> <id property="id" column="sid"/> <result property="name" column="sname"/> <!--关联对象property 关联对象在Student实体类中的属性--> <association property="teacher" javaType="Teacher"> <result property="name" column="tname"/> </association> </resultMap> -
去mybatis-config文件中注入【此处应该处理过了】
-
测试
@Test
public void testGetStudents2(){
    SqlSession session = MybatisUtils.getSession();
    StudentMapper mapper = session.getMapper(StudentMapper.class);
    List<Student> students = mapper.getStudents2();
    for (Student student : students){
        System.out.println(
            "学生名:"+ student.getName()
            +"\t老师:"+student.getTeacher().getName());
    }
}
8.5、小结
- 按照查询进行嵌套处理就想SQL中的子查询
- 按照结果进行嵌套处理就想SQL中的联表查询
9、一对多的处理
一对多的理解:
- 一个老师拥有多个学生
- 如果对于老师这边,就是一个一对多的现象,即从一个老师下面拥有一群学生(集合)!
9.1、实体类编写
@Data
public class Student {
    private int id;
    private String name;
    private int tid;
}
@Data
public class Teacher {
    private int id;
    private String name;
    //一个老师多个学生
    private List<Student> students;
}
搭建测试的环境!
9.2、按结果嵌套处理
-
TeacherMapper接口编写方法
// 获取指定老师,及老师下的所有学生 public Teacher getTeacher(int id); -
编写接口对应的Mapper配置文件
<mapper namespace="com.kuang.mapper.TeacherMapper"> <!-- 思路: 1. 从学生表和老师表中查出学生id,学生姓名,老师姓名 2. 对查询出来的操作做结果集映射 1. 集合的话,使用collection! JavaType和ofType都是用来指定对象类型的 JavaType是用来指定pojo中属性的类型 ofType指定的是映射到list集合属性中pojo的类型。 --> <select id="getTeacher" resultMap="TeacherStudent"> select s.id sid, s.name sname , t.name tname, t.id tid from student s,teacher t where s.tid = t.id and t.id=#{id} </select> <resultMap id="TeacherStudent" type="Teacher"> <result property="name" column="tname"/> <collection property="students" ofType="Student"> <result property="id" column="sid" /> <result property="name" column="sname" /> <result property="tid" column="tid" /> </collection> </resultMap> </mapper> -
将Mapper文件注册到MyBatis-config文件中
<mappers> <mapper resource="mapper/TeacherMapper.xml"/> </mappers> -
测试
@Test
public void testGetTeacher(){
    SqlSession session = MybatisUtils.getSession();
    TeacherMapper mapper = session.getMapper(TeacherMapper.class);
    Teacher teacher = mapper.getTeacher(1);
    System.out.println(teacher.getName());
    System.out.println(teacher.getStudents());
}
9.3、按查询嵌套处理
-
TeacherMapper接口编写方法
public Teacher getTeacher2(int id); -
编写接口对应的Mapper配置文件
<select id="getTeacher2" resultMap="TeacherStudent2"> select * from teacher where id = #{id} </select> <resultMap id="TeacherStudent2" type="Teacher"> <!--column是一对多的外键 , 写的是一的主键的列名--> <collection property="students" javaType="ArrayList" ofType="Student" column="id" select="getStudentByTeacherId"/> </resultMap> <select id="getStudentByTeacherId" resultType="Student"> select * from student where tid = #{id} </select> -
将Mapper文件注册到MyBatis-confifig文件中
-
测试
@Test
public void testGetTeacher2(){
    SqlSession session = MybatisUtils.getSession();
    TeacherMapper mapper = session.getMapper(TeacherMapper.class);
    Teacher teacher = mapper.getTeacher2(1);
    System.out.println(teacher.getName());
    System.out.println(teacher.getStudents());
}
9.4、小结
- 关联-association
- 集合-collection
- 所以association 是用于一对一和多对一,而collection是用于一对多的关系
- JavaType和ofType都是用来指定对象类型的
- JavaType是用来指定pojo属性的类型
- ofType指定的是映射到list集合属性中pojo的类型
注意说明:
- 保证SQL的可读性,尽量通俗易懂
- 根据实际要求,尽量编写性能更高的SQL语句
- 注意属性名和字段名不一致的问题
- 注意一对多和多对一:字段和属性对应的问题
- 尽量使用Log4j,通过日志来查看自己的错误
10、动态SQL\
www.mybatis.org/mybatis-3/zh/dynamic-sql.html
10.1、介绍
什么是动态SQL:动态SQL指的是根据不用的查询条件,生成不同的Sql语句
官网描述:
    MyBatis 的强大特性之一便是它的动态 SQL。如果你有使用 JDBC 或其它类似框架的经验,你就能体会到根据不同条件拼接 SQL 语句的痛苦。例如拼接时要确保不能忘记添加必要的空格,还要注意去掉列表最后一个列名的逗号。利用动态 SQL 这一特性可以彻底摆脱这种痛苦。
    虽然在以前使用动态 SQL 并非一件易事,但正是 MyBatis 提供了可以被用在任意 SQL 映射语句中的强大的动态 SQL 语言得以改进这种情形。
    动态 SQL 元素和 JSTL 或基于类似 XML 的文本处理器相似。在 MyBatis 之前的版本中,有很多元素需要花时间了解。MyBatis 3 大大精简了元素种类,现在只需学习原来一半的元素便可。MyBatis 采用功能强大的基于 OGNL 的表达式来淘汰其它大部分元素。
    -------------------------------
    - if
    - choose (when, otherwise)
    - trim (where, set)
    - foreach
    -------------------------------
我们之前写的 SQL 语句都比较简单,如果有比较复杂的业务,我们需要写复杂的 SQL 语句,往往需要拼接,而拼接 SQL ,稍微不注意,由于引号,空格等缺失可能都会导致错误。
那么怎么去解决这个问题呢?这就要使用 mybatis 动态SQL,通过 if, choose, when, otherwise,trim, where, set, foreach等标签,可组合成非常灵活的SQL语句,从而在提高 SQL 语句的准确性的同时,也大大提高了开发人员的效率。
10.2、搭建环境
新建一个数据库表:blog
字段:id,title,author,create_time,views
CREATE TABLE `blog` (
    `id` varchar(50) NOT NULL COMMENT '博客id',
    `title` varchar(100) NOT NULL COMMENT '博客标题',
    `author` varchar(30) NOT NULL COMMENT '博客作者',
    `create_time` datetime NOT NULL COMMENT '创建时间',
    `views` int(30) NOT NULL COMMENT '浏览量'
) ENGINE=InnoDB DEFAULT CHARSET=utf8
-
创建MyBatis基础工程
-
IDutil工具类
public class IDUtil { public static String genId(){ return UUID.randomUUID().toString().replaceAll("-",""); } } -
实体类编写【注意set方法作用】
import java.util.Date; public class Blog { private String id; private String title; private String author; private Date createTime; private int views; //set,get.... } -
编写Mapper接口及xml文件
public interface BlogMapper {
}
<?xml version="1.0" encoding="UTF-8" ?> <!DOCTYPE mapper PUBLIC "-//mybatis.org//DTD Mapper 3.0//EN" "http://mybatis.org/dtd/mybatis-3-mapper.dtd"> <mapper namespace="com.kuang.mapper.BlogMapper"> </mapper> -
mybatis核心配置文件,下划线驼峰自动转换
<settings> <setting name="mapUnderscoreToCamelCase" value="true"/> <setting name="logImpl" value="STDOUT_LOGGING"/> </settings> <!--注册Mapper.xml--> <mappers> <mapper resource="mapper/BlogMapper.xml"/> </mappers> -
插入初始数据
-
编写接口
//新增一个博客 int addBlog(Blog blog); -
sql配置文件
<insert id="addBlog" parameterType="blog"> insert into blog (id, title, author, create_time, views) values (#{id},#{title},#{author},#{createTime},#{views}); </insert> -
初始化博客方法
@Test public void addInitBlog(){ SqlSession session = MybatisUtils.getSession(); BlogMapper mapper = session.getMapper(BlogMapper.class); Blog blog = new Blog(); blog.setId(IDUtil.genId()); blog.setTitle("Mybatis如此简单"); blog.setAuthor("狂神说"); blog.setCreateTime(new Date()); blog.setViews(9999); mapper.addBlog(blog); blog.setId(IDUtil.genId()); blog.setTitle("Java如此简单"); mapper.addBlog(blog); blog.setId(IDUtil.genId()); blog.setTitle("Spring如此简单"); mapper.addBlog(blog); blog.setId(IDUtil.genId()); blog.setTitle("微服务如此简单"); mapper.addBlog(blog); session.close(); } -
初始化数据完毕!
-
10.3、if 语句
需求:根据作者名字和博客名字来查询博客!如果作者名字为空,那么只根据博客名字查询,反之,则根据作者名来查询
-
编写接口类
//需求1 List<Blog> queryBlogIf(Map map); -
编写SQL语句
<!--需求1: 根据作者名字和博客名字来查询博客! 如果作者名字为空,那么只根据博客名字查询,反之,则根据作者名来查询 select * from blog where title = #{title} and author = #{author} --> <select id="queryBlogIf" parameterType="map" resultType="blog"> select * from blog where <if test="title != null"> title = #{title} </if> <if test="author != null"> and author = #{author} </if> </select> -
测试
@Test
public void testQueryBlogIf(){
    SqlSession session = MybatisUtils.getSession();
    BlogMapper mapper = session.getMapper(BlogMapper.class);
    HashMap<String, String> map = new HashMap<String, String>();
    map.put("title","Mybatis如此简单");
    map.put("author","狂神说");
    List<Blog> blogs = mapper.queryBlogIf(map);
    System.out.println(blogs);
    session.close();
}
这样写我们可以看到,如果 author 等于 null,那么查询语句为 select * from user where title=#{title},但是如果title为空呢?那么查询语句为 select * from user where and author=#{author},这是错误的SQL 语句,如何解决呢?请看下面的 where 语句!
10.4、Where
修改上面的SQL语句;
<select id="queryBlogIf" parameterType="map" resultType="blog">
    select * from blog
    <where>
        <if test="title != null">
            title = #{title}
        </if>
        <if test="author != null">
            and author = #{author}
        </if>
    </where>
</select>
这个“where”标签会知道如果它包含的标签中有返回值的话,它就插入一个‘where’。此外,如果标签返 回的内容是以AND 或OR 开头的,则它会剔除掉。【这是我们使用的最多的案例】
10.5、Set
同理,上面的对于查询 SQL 语句包含 where 关键字,如果在进行更新操作的时候,含有 set 关键词,我们怎么处理呢?
-
编写接口方法
int updateBlog(Map map); -
sql配置文件
<!--注意set是用的逗号隔开--> <update id="updateBlog" parameterType="map"> update blog <set> <if test="title != null"> title = #{title}, </if> <if test="author != null"> author = #{author} </if> </set> where id = #{id}; </update> -
测试
@Test
public void testUpdateBlog(){
    SqlSession session = MybatisUtils.getSession();
    BlogMapper mapper = session.getMapper(BlogMapper.class);
    HashMap<String, String> map = new HashMap<String, String>();
    map.put("title","动态SQL");
    map.put("author","秦疆");
    map.put("id","9d6a763f5e1347cebda43e2a32687a77");
    mapper.updateBlog(map);
    session.close();
}
【演示】SQL分析
10.6、choose语句
有时候,我们不想用到所有的查询条件,只想选择其中的一个,查询条件有一个满足即可,使用 choose标签可以解决此类问题,类似于 Java 的 switch 语句
-
编写接口方法
List<Blog> queryBlogChoose(Map map); -
sql配置文件
<select id="queryBlogChoose" parameterType="map" resultType="blog"> select * from blog <where> <choose> <when test="title != null"> title = #{title} </when> <when test="author != null"> and author = #{author} </when> <otherwise> and views = #{views} </otherwise> </choose> </where> </select> -
测试类
@Test
public void testQueryBlogChoose(){
    SqlSession session = MybatisUtils.getSession();
    BlogMapper mapper = session.getMapper(BlogMapper.class);
    HashMap<String, Object> map = new HashMap<String, Object>();
    map.put("title","Java如此简单");
    map.put("author","狂神说");
    map.put("views",9999);
    List<Blog> blogs = mapper.queryBlogChoose(map);
    System.out.println(blogs);
    session.close();
}
【演示】SQL分析
10.7、SQL片段
有时候可能某个 sql 语句我们用的特别多,为了增加代码的重用性,简化代码,我们需要将这些代码抽取出来,然后使用时直接调用。
提取SQL片段:
<sql id="if-title-author">
    <if test="title != null">
        title = #{title}
    </if>
    <if test="author != null">
        and author = #{author}
    </if>
</sql>
引用SQL片段:
<select id="queryBlogIf" parameterType="map" resultType="blog">
    select * from blog
    <where>
        <!-- 引用 sql 片段,如果refid 指定的不在本文件中,那么需要在前面加上 namespace-->
        <include refid="if-title-author"></include>
        <!-- 在这里还可以引用其他的 sql 片段 -->
    </where>
</select>
注意:1、最好基于 单表来定义 sql 片段,提高片段的可重用性
2、在sql片段中不要包括 where
10.8、Foreach
将数据库中前三个数据的id修改为1,2,3;
需求:我们需要查询 blog 表中 id分别为 1,2,3的博客信息
-
编写接口
List<Blog> queryBlogForeach(Map map); -
编写SQL语句
<select id="queryBlogForeach" parameterType="map" resultType="blog"> select * from blog <where> <!-- collection:指定输入对象中的集合属性 item:每次遍历生成的对象 open:开始遍历时的拼接字符串 close:结束时拼接的字符串 separator:遍历对象之间需要拼接的字符串 select * from blog where 1=1 and (id=1 or id=2 or id=3) --> <foreach collection="ids" item="id" open="and (" close=")" separator="or"> id=#{id} </foreach> </where> </select> -
测试
@Test
public void testQueryBlogForeach(){
    SqlSession session = MybatisUtils.getSession();
    BlogMapper mapper = session.getMapper(BlogMapper.class);

    HashMap map = new HashMap();
    List<Integer> ids = new ArrayList<Integer>();
    ids.add(1);
    ids.add(2);
    ids.add(3);
    map.put("ids",ids);

    List<Blog> blogs = mapper.queryBlogForeach(map);
    System.out.println(blogs);
    session.close();
}
小结:其实动态 sql 语句的编写往往就是一个拼接的问题,为了保证拼接准确,我们最好首先要写原生的 sql 语句出来,然后在通过 mybatis 动态sql 对照着改,防止出错。多在实践中使用才是熟练掌握它的技巧
11、缓存
11.1、简介
- 什么是缓存【Cache】?
- 存在内存中的临时数据。
- 将用户经常查询的数据放在缓存(内存)中,用户去查询数据就不用从磁盘上(关系型数据库数据文件)查询,从缓存中查询,从而提高查询效率,解决了高并发系统的性能问题。
- 为什么使用缓存?
- 减少和数据库的交互次数,减少系统开销,提高系统效率。
- 什么样的数据能使用缓存?
- 经常查询并且不经常改变的数据。
11.2、MyBatis缓存
- MyBatis包含一个非常强大的查询缓存特性,它可以非常方便地定制和配置缓存。缓存可以极大的提高查询效率。
- MyBatis系统中默认定义了两种缓存:一级缓存和二级缓存
- 默认情况下,只有一级缓存开启。(SqlSession级别的缓存,也称为本地缓存)
- 二级缓存需要手动开启和配置,他是基于namespace 级别的缓存。
- 为了提高拓展性,MyBatis定义了缓存接口Cache。我们可以通过实现Cache接口来自定义二级缓存
11.3、一级缓存
- 一级缓存也叫本地缓存:
- 与数据库同一次回话期间查询到的数据会放在本地缓存中
- 以后如果需要获取相同的数据,直接从缓存中拿,没必须再去查询数据库;
11.3.1、初体验测试
-
在mybatis中加入日志,方便测试结果
-
编写接口方法
//根据id查询用户 User queryUserById(@Param("id") int id); -
接口对应的Mapper文件
<select id="queryUserById" resultType="user"> select * from user where id = #{id} </select> -
测试
@Test public void testQueryUserById(){ SqlSession session = MybatisUtils.getSession(); UserMapper mapper = session.getMapper(UserMapper.class); User user = mapper.queryUserById(1); System.out.println(user); User user2 = mapper.queryUserById(1); System.out.println(user2); System.out.println(user==user2); session.close(); } -
结果分析
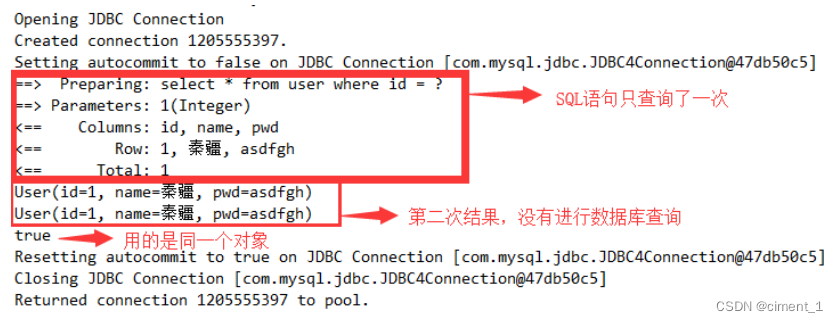
11.3.2、一级缓存失效的四种情况
-
一级缓存是SqlSession级别的缓存,是一直开启的,我们关闭不了它;
-
一级缓存失效情况:没有使用到当前的一级缓存,效果就是,还需要再向数据库中发起一次查询请求!
-
sqlSession不同
@Test
public void testQueryUserById(){
    SqlSession session = MybatisUtils.getSession();
    SqlSession session2 = MybatisUtils.getSession();
    UserMapper mapper = session.getMapper(UserMapper.class);
    UserMapper mapper2 = session2.getMapper(UserMapper.class);

    User user = mapper.queryUserById(1);
    System.out.println(user);
    User user2 = mapper2.queryUserById(1);
    System.out.println(user2);
    System.out.println(user==user2);

    session.close();
    session2.close();
}
观察结果:发现发送了两条SQL语句!
结论:每个sqlSession中的缓存相互独立
-
sqlSession相同,查询条件不同
@Test
public void testQueryUserById(){
    SqlSession session = MybatisUtils.getSession();
    UserMapper mapper = session.getMapper(UserMapper.class);
    UserMapper mapper2 = session.getMapper(UserMapper.class);
    User user = mapper.queryUserById(1);
    System.out.println(user);
    User user2 = mapper2.queryUserById(2);
    System.out.println(user2);
    System.out.println(user==user2);
    session.close();
}
观察结果:发现发送了两条SQL语句!很正常的理解
结论:当前缓存中,不存在这个数据
-
-
sqlSession相同,两次查询之间执行了增删改操作!
-
增加方法
//修改用户 int updateUser(Map map); -
编写SQL
<update id="updateUser" parameterType="map"> update user set name = #{name} where id = #{id} </update> -
测试
@Test
public void testQueryUserById(){
    SqlSession session = MybatisUtils.getSession();
    UserMapper mapper = session.getMapper(UserMapper.class);
    User user = mapper.queryUserById(1);
    System.out.println(user);
    HashMap map = new HashMap();
    map.put("name","kuangshen");
    map.put("id",4);
    mapper.updateUser(map);
    User user2 = mapper.queryUserById(1);
    System.out.println(user2);
    System.out.println(user==user2);
    session.close();
}
观察结果:查询在中间执行了增删改操作后,重新执行了
结论:因为增删改操作可能会对当前数据产生影响
-
-
sqlSession相同,手动清除一级缓存
@Test
public void testQueryUserById(){
    SqlSession session = MybatisUtils.getSession();
    UserMapper mapper = session.getMapper(UserMapper.class);

    User user = mapper.queryUserById(1);
    System.out.println(user);

    session.clearCache();//手动清除缓存

    User user2 = mapper.queryUserById(1);
    System.out.println(user2);

    System.out.println(user==user2);
    session.close();
}
一级缓存就是一个map
11.4、二级缓存
- 二级缓存也叫全局缓存,一级缓存作用域太低了,所以诞生了二级缓存
- 基于namespace级别的缓存,一个名称空间,对应一个二级缓存;
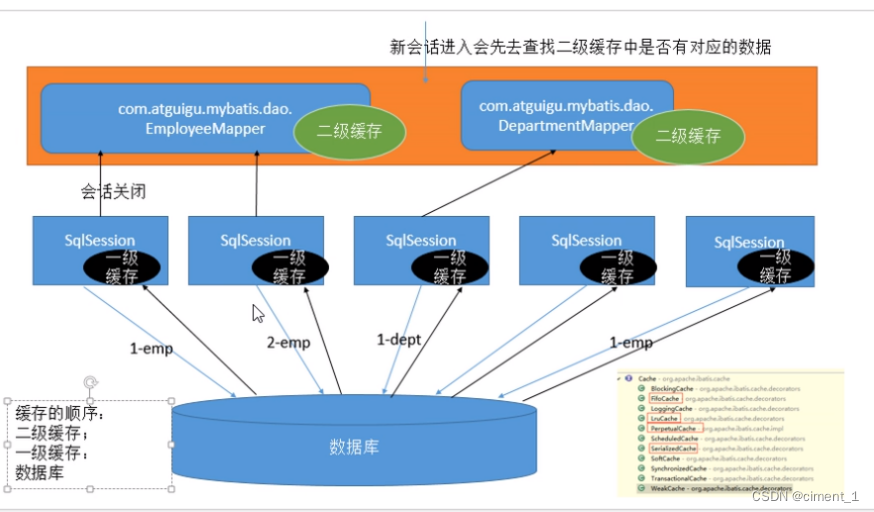
- 工作机制
- 一个会话查询一条数据,这个数据会被放在当前会话的一级缓存中;
- 如果当前会话关闭了,这个会话对应的一级缓存就没了;但是我们想要的是,会话关闭了,一级缓存中的数据被保存到二级缓存中;
- 新的会话查询信息,就可以从二级缓存中获取内容;
- 不同的mapper查出的数据会放在自己对应的缓存(map)中;
11.4.1、使用步骤
-
开启全局缓存【mybatis-config.xml】
<setting name="cacheEnabled" value="true"/> -
去每个mapper.xml中配置使用二级缓存,这个配置非常简单;【xxxMapper.xml】
<cache/> 官方示例=====>查看官方文档 <cache eviction="FIFO" flushInterval="60000" size="512" readOnly="true"/> 这个更高级的配置创建了一个 FIFO 缓存,每隔 60 秒刷新,最多可以存储结果对象或列表的512 个引用,而且返回的对象被认为是只读的,因此对它们进行修改可能会在不同线程中的调用者产生冲突。 -
代码测试
-
所有的实体类先实现序列化接口
-
测试代码
@Test
public void testQueryUserById(){
    SqlSession session = MybatisUtils.getSession();
    SqlSession session2 = MybatisUtils.getSession();
    UserMapper mapper = session.getMapper(UserMapper.class);
    UserMapper mapper2 = session2.getMapper(UserMapper.class);
    User user = mapper.queryUserById(1);
    System.out.println(user);
    session.close();
    User user2 = mapper2.queryUserById(1);
    System.out.println(user2);
    System.out.println(user==user2);
    session2.close();
}
-
11.4.2、结论
- 只要开启了二级缓存,我们再同一个Mapper中查询,可以在二级缓存中拿到数据
- 查出的数据都会被默认放在一个一级缓存中
- 只有会话提交或者关闭以后,一级缓存中的数据才会转到二级缓存中
11.5、缓存原理
11.6、EhCache
第三方缓存实现–EhCache:百度百科
- mybatis-ehcache – MyBatis Ehcache | Reference Documentation
- EhCache是一种广泛使用的java分布式缓存,用于通用缓存;
- 要在应用程序中使用EhCache,需要引入依赖的jar包
<!-- https://mvnrepository.com/artifact/org.mybatis.caches/mybatisehcache -->
<dependency>
<groupId>org.mybatis.caches</groupId>
<artifactId>mybatis-ehcache</artifactId>
<version>1.1.0</version>
</dependency>
-
在mapper.xml中使用对应的缓存即可
<mapper namespace = “org.acme.FooMapper” > <cache type = “org.mybatis.caches.ehcache.EhcacheCache” /> </mapper> -
编写ehcache.xml文件,如果在
加载时未找到/ehcache.xml资源或出现问题,则将使用默认配置。<?xml version="1.0" encoding="UTF-8"?> <ehcache xmlns:xsi="http://www.w3.org/2001/XMLSchema-instance" xsi:noNamespaceSchemaLocation="http://ehcache.org/ehcache.xsd" updateCheck="false"> <!-- diskStore:为缓存路径,ehcache分为内存和磁盘两级,此属性定义磁盘的缓存位置。参数解释如下: user.home – 用户主目录 user.dir – 用户当前工作目录 java.io.tmpdir – 默认临时文件路径 --> <diskStore path="./tmpdir/Tmp_EhCache"/> <defaultCache eternal="false" maxElementsInMemory="10000" overflowToDisk="false" diskPersistent="false" timeToIdleSeconds="1800" timeToLiveSeconds="259200" memoryStoreEvictionPolicy="LRU"/> <cache name="cloud_user" eternal="false" maxElementsInMemory="5000" overflowToDisk="false" diskPersistent="false" timeToIdleSeconds="1800" timeToLiveSeconds="1800" memoryStoreEvictionPolicy="LRU"/> <!-- defaultCache:默认缓存策略,当ehcache找不到定义的缓存时,则使用这个缓存策略。只能定义一个。 --> <!-- name:缓存名称。 maxElementsInMemory:缓存最大数目 maxElementsOnDisk:硬盘最大缓存个数。 eternal:对象是否永久有效,一但设置了,timeout将不起作用。 overflowToDisk:是否保存到磁盘,当系统当机时 timeToIdleSeconds:设置对象在失效前的允许闲置时间(单位:秒)。仅当eternal=false对象不是永久有效时使用,可选属性,默认值是0,也就是可闲置时间无穷大。 timeToLiveSeconds:设置对象在失效前允许存活时间(单位:秒)。最大时间介于创建时间和失效时间之间。仅当eternal=false对象不是永久有效时使用,默认是0.,也就是对象存活时间无穷大。 diskPersistent:是否缓存虚拟机重启期数据 Whether the disk storepersists between restarts of the Virtual Machine. The default value isfalse. diskSpoolBufferSizeMB:这个参数设置DiskStore(磁盘缓存)的缓存区大小。默认是30MB。每个Cache都应该有自己的一个缓冲区。 diskExpiryThreadIntervalSeconds:磁盘失效线程运行时间间隔,默认是120秒。 memoryStoreEvictionPolicy:当达到maxElementsInMemory限制时,Ehcache将会根据指定的策略去清理内存。默认策略是LRU(最近最少使用)。你可以设置为FIFO(先进先出)或是LFU(较少使用)。 clearOnFlush:内存数量最大时是否清除。 memoryStoreEvictionPolicy:可选策略有:LRU(最近最少使用,默认策略)、FIFO(先进先出)、LFU(最少访问次数)。 FIFO,first in first out,这个是大家最熟的,先进先出。 LFU, Less Frequently Used,就是上面例子中使用的策略,直白一点就是讲一直以来最少被使用的。如上面所讲,缓存的元素有一个hit属性,hit值最小的将会被清出缓存。 LRU,Least Recently Used,最近最少使用的,缓存的元素有一个时间戳,当缓存容量满了,而又需要腾出地方来缓存新的元素的时候,那么现有缓存元素中时间戳离当前时间最远的元素将被清出缓存。 --> </ehcache>
Spring
1、Spring概述

1.1 简介
- Spring:春天—>给行业带来了春天
- 2002年,Rod Jahnson首次推出了Spring框架雏形interface21框架。
- 2004年3月24日,Spring框架以interface21框架为基础,经过重新设计,发布了1.0正式版。
- 很难想象Rod Johnson的学历,他是悉尼大学的博士,然而他的专业不是计算机,而是音乐学。
- Spring理念:使现有技术更加实用,本身就是一个大杂烩,整合现有的框架技术。
官方下载地址:JFrog (spring.io)
GitHub:Spring · GitHub
1.2 优点
- Spring是一个开源免费的框架,容器
- Spring是一个轻量级的框架,非入侵式的
- 控制反转 IOC ,面向切面 Aop
- 对事物的支持,对框架的支持。
一句话概括:Spring是一个轻量级的控制反转(IoC)和面向切面(AOP)的容器(框架)。
1.3 组成
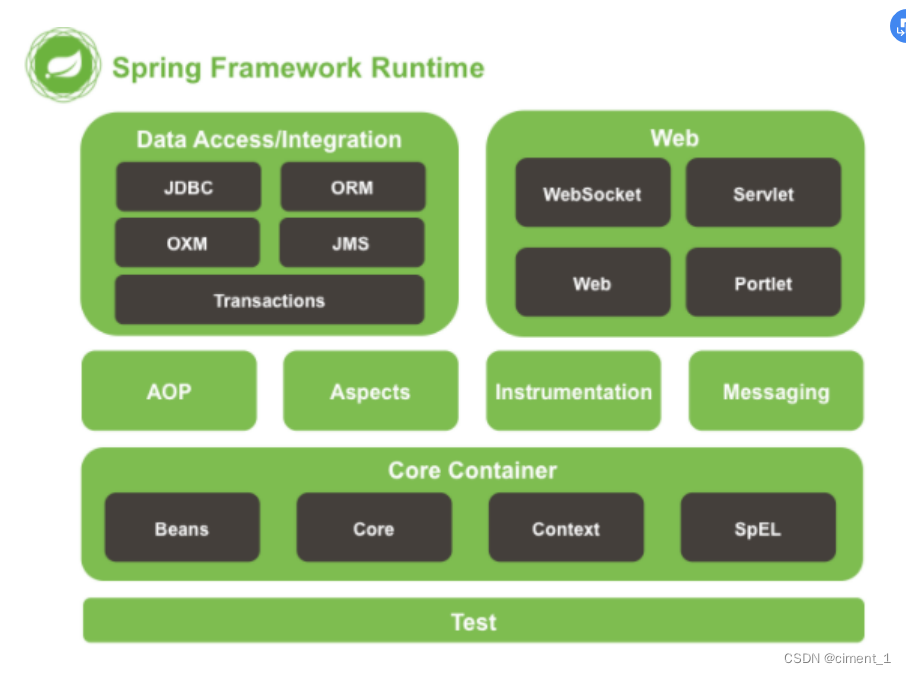
Spring 框架是一个分层架构,由7个定义良好的模块组成。Spring模块构建在核心容器之上,核心容器定义了创建、配置和管理 bean 的方式。
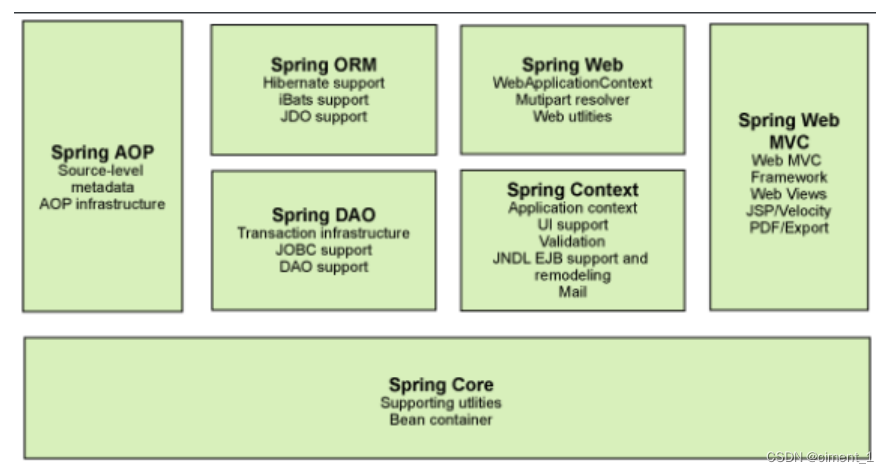
组成 Spring 框架的每个模块(或组件)都可以单独存在,或者与其他一个或多个模块联合实现。每个模块功能如下:
- 核心容器:核心容器提供 Spring 框架的基本功能。核心容器的主要组件是BeanFactory,它是工厂模式的实现。BeanFactory使用*控制反转(IOC)*模式将应用程序的配置和依赖性规范与实际的应用程序代码分开。
- Spring 上下文:Spring 上下文是一个配置文件,向 Spring 框架提供上下文信息。Spring 上下文包括企业服务,例如JNDI、EJB、电子邮件、国际化、校验和调度功能。
- Spring AOP:通过配置管理特性,Spring AOP 模块直接将面向切面的编程功能,集成到了Spring框架中。所以,可以很容易地使 Spring 框架管理任何支持AOP的对象。Spring AOP模块为基于Spring 的应用程序中的对象提供了事务管理服务。通过使用Spring AOP,不用依赖组件,就可以将声明性事务管理集成到应用程序中。
- Spring DAO:JDBC DAO 抽象层提供了有意义的异常层次结构,可用该结构来管理异常处理和不同数据库供应商抛出的错误消息。异常层次结构简化了错误处理,并且极大地降低了需要编写的异常代码数量(例如打开和关闭连接)。Spring DAO 的面向 JDBC 的异常遵从通用的 DAO 异常层次结构。
- Spring ORM:Spring 框架插入了若干个 ORM 框架,从而提供了 ORM 的对象关系工具,其中包括 JDO、Hibernate 和 iBatis SQL Map。所有这些都遵从 Spring 的通用事务和 DAO 异常层次结构。
- Spring Web 模块:Web 上下文模块建立在应用程序上下文模块之上,为基于 Web 的应用程序提供了上下文。所以,Spring 框架支持与 Jakarta Struts 的集成。Web 模块还简化了处理多部分请求以及将请求参数绑定到域对象的工作。
- Spring MVC 框架:MVC 框架是一个全功能的构建 Web 应用程序的 MVC 实现。通过策略接口,MVC 框架变成为高度可配置的,MVC 容纳了大量视图技术,其中包括 JSP、Velocity、Tiles、iText和 POI。
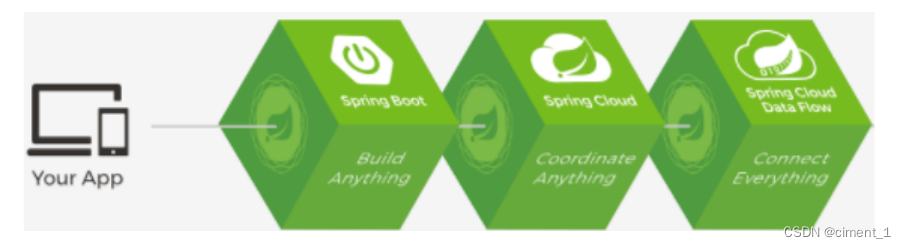
1.4 拓展
Spring Boot与Spring Cloud
- Spring Boot 是 Spring 的一套快速配置脚手架,可以基于Spring Boot 快速开发单个微服务;
- Spring Cloud是基于Spring Boot实现的;
- Spring Boot专注于快速、方便集成的单个微服务个体,Spring Cloud关注全局的服务治理框架;
- Spring Boot使用了约束优于配置的理念,很多集成方案已经帮你选择好了,能不配置就不配置 ,Spring Cloud很大的一部分是基于Spring Boot来实现,Spring Boot可以离开Spring Cloud独立使用开发项目,但是Spring Cloud离不开Spring Boot,属于依赖的关系。
- SpringBoot在SpringClound中起到了承上启下的作用,如果你要学习SpringCloud必须要学习SpringBoot。
2、IoC基础(重点)
新建一个空白的Maven项目
2.1 分析实现
我们先用我们原来的方式写一段代码。
-
先写一个UserDao接口
public interface uerDao { public void getUser(); } -
再去写Dao的实现类
public class UserDaoImpl implements UserDao { @Override public void getUser() { System.out.println("获取用户数据"); } } -
然后去写UserService 的接口
public interface UserService { public void getUser(); } -
最后写Service的实现类
public class UserServiceImpl implements UserService { private UserDao userDao = new UserDaoImpl(); @Override public void getUser() { userDao.getUser(); } } -
测试一下
@Test
public void test(){
    UserService service = new UserServiceImpl();
    service.getUser();
}
这是我们原来的方式 , 开始大家也都是这么去写的对吧 . 那我们现在修改一下
把Userdao的实现类增加一个
public class UserDaoMysqlImpl implements UserDao {
    @Override
    public void getUser() {
        System.out.println("MySQL获取用户数据");
    }
}
紧接着我们要去使用MySQL的话,我们就需要去service实现类里面修改对应的实现。
public class UserServiceImpl implements UserService {
    private UserDao userDao = new UserDaoMysqlImpl();

    @Override
    public void getUser() {
        userDao.getUser();
    }
}
再次假设,我们再增加一个UserDao的实现类。
public class UserDaoOracleImpl implements UserDao {
    @Override
    public void getUser() {
        System.out.println("Oracle获取用户数据");
    }
}
那么我们要使用Oracle , 又需要去service实现类里面修改对应的实现 ,假设我们的这种需求非常大,这种方式就根本不适用了,甚至反人类对吧 ,每次变动 ,都需要修改大量代码,这种设计的耦合性太高了,牵一发而动全身。
那我们如何去解决呢?
我们可以在需要用到他的地方,不去实现它 ,而是留出一个接口 ,利用set ,我们去代码里修改下。
public class UserServiceImpl implements UserService {
    private UserDao userDao;
    // 利用set 实现
    public void setUserDao(UserDao userDao) {
        this.userDao = userDao;
    }

    @Override
    public void getUser() {
        userDao.getUser();
    }
}
现在去我们的测试类里,进行测试;
@Test
public void test(){
    UserServiceImpl service = new UserServiceImpl();
    service.setUserDao(new UserDaoMysqlImpl());
    service.getUser();
    //那我们现在又想用Oracle去实现呢
    service.setUserDao(new UserDaoOracleImpl());
    service.getUser();
}
大家发现了区别没有 ? 可能很多人说没啥区别,但是同学们,他们已经发生了根本性的变化,很多地方都不一样了。 仔细去思考一下,以前所有东西都是由程序去进行控制创建,而现在是由我们自行控制创建对象,把主动权交给了调用者。程序不用去管怎么创建,怎么实现了。它只负责提供一个接口。
这种思想,从本质上解决了问题,我们程序员不再去管理对象的创建了,更多的去关注业务的实现。耦合性大大降低,这也就是IOC的原型!
2.2 IoC本质
控制反转Ioc(Inversion of Control),是一种设计思想,DI(依赖注入)是实现IoC的一种方法,也有人认为DI只是IoC的另一种说法。没有IoC的程序中,我们使用面向对象编程,对象的创建与对象间的依赖关系完全硬编码在程序中,对象的创建由程序自己控制。
控制反转后将对象的创建转移给第三方,个人认为所谓控制反转就是:获得依赖对象的方式反转了。

IoC是Spring框架的核心内容,使用多种方式完美的实现了Ioc,可以使用XML配置,也可以使用注解,新版本的Spring也可以零配置实现Ioc。
Spring容器在初始化时先读取配置文件,根据配置文件或元数据创建与组织对象存入容器中,程序使用时再从Ioc容器中取出需要的对象。
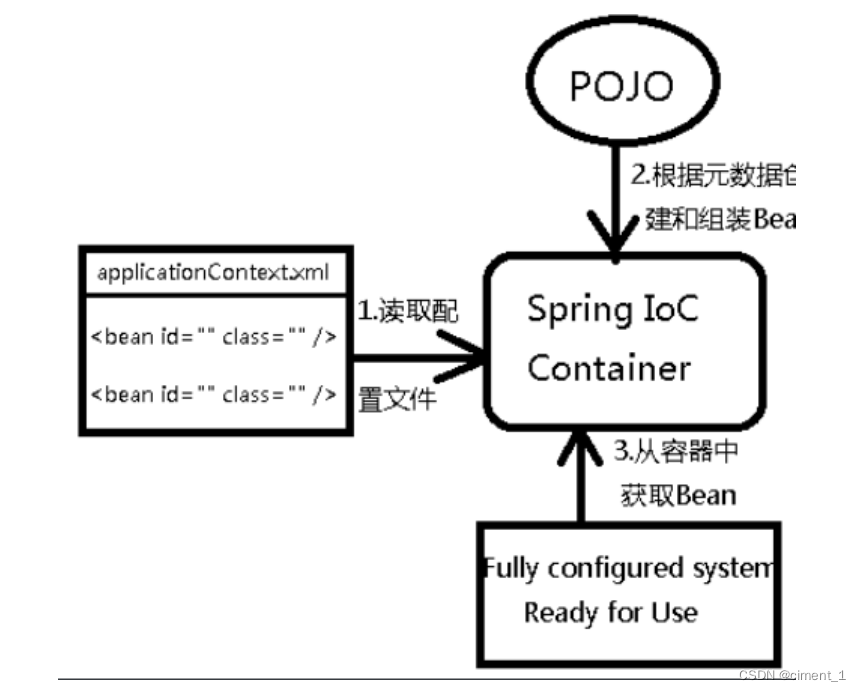
采用XML方式配置Bean的时候,Bean的定义信息是和实现分离的,而采用注解的方式可以把两者合为一体,Bean的定义信息直接以注解的形式定义在实现类中,从而达到了零配置的目的。
控制反转是一种通过描述(XML或注解)并通过第三方去生产或获取特定对象的方式。在Spring中实现
控制反转的是IoC容器,其实现方法是依赖注入(Dependency Injection,DI)。
3、HelloSpring
3.1、导入Jar包
注:spring 需要导入Commons-logging进行日志记录。我们利用maven,他会自动下载对应的依赖项。
<dependency>
    <groupId>org.springframework</groupId>
    <artifactId>spring-webmvc</artifactId>
    <version>5.1.10.RELEASE</version>
</dependency>
3.2、编写代码
-
编写一个Hello实体类
-
a
-
sa
3.3、思考
- Hello 对象是谁创建的?【 Hello 对象是由 Spring创建的 】
- Hello 对象的属性是怎么设置的? 【Hello 对象的属性是由Spring容器设置的 】
这个过程就叫控制反转:
- 控制:谁来控制对象的创建,传统应用程序的对象是由程序本身控制创建的,使用Spring后,对象是由Spring来创建的
- 反转:程序本身不创建对象,而变成被动的接收对象。
依赖注入:就是利用set方法来进行注入的。
IOC是一种编程思想,由主动的编程变成被动的接收。
可以通过newClassPathXmlApplicationContext去浏览一下底层源码。
3.4、修改案例一
我们在案例一中,新增一个Spring配置文件beans.xml
OK , 到了现在 , 我们彻底不用再程序中去改动了 , 要实现不同的操作 , 只需要在xml配置文件中进行修改, 所谓的IoC,一句话搞定 : 对象由Spring 来创建 , 管理 , 装配 !
4、IOC创建对象方式
4.1 通过无参构造方法来创建
- User.java
public class User {
    private String name;

    public User() {
        System.out.prinfln("user无参构造方法");
    }

    public void setName(String name) {
        this.name = name;
    }

    public void show(){
        System.out.println("name="+ name);
    }
}
- beans.xml
<?xml version="1.0" encoding="UTF-8"?>
<beans xmlns="http://www.springframework.org/schema/beans"
       xmlns:xsi="http://www.w3.org/2001/XMLSchema-instance"
       xsi:schemaLocation="http://www.springframework.org/schema/beans
        http://www.springframework.org/schema/beans/spring-beans.xsd">
    <bean id="user" class="com.kuang.pojo.User">
        <property name="name" value="Ciment"/>
    </bean>
</beans>
- 测试类
@Test
public void test(){
    ApplicationContext context = new ClassPathXmlApplicationContext("beans.xml");
    //在执行getBean的时候, user已经创建好了 , 通过无参构造
    User user = (User) context.getBean("user");
    //调用对象的方法 .
    user.show();
}
结果可以发现,在调用show方法之前,User对象已经通过无参构造初始化了!
4.2、通过有参构造方法来创建
- UserT.java
public class UserT {
    private String name;

    public UserT(String name) {
        this.name = name;
    }

    public void setName(String name) {
        this.name = name;
    }

    public void show(){
        System.out.println("name="+ name);
    }
}
- beans.xml 有三种方式编写
<!-- 第一种根据index参数下表设置 -->
<bean id="userT" class="com.kuang.pojo.UserT">
    <!-- index指构造方法,下标从0开始 -->
    <constructor-arg index="0" value="ciment2"/>
<bean>
<!-- 第二种根据参数名字设置 -->
<bean id="userT" class="com.kuang.pojo.UserT">
    <!-- name指参数名 -->
    <constructor-arg name="name" value="ciment2"/>
<bean>
<!-- 第三种根据参数类型设置 -->
<bean id="userT" class="com.kuang.pojo.UserT">
    <constructor-arg type="java.lang.String" value="ciment2"/>
<bean>
- 测试
@Test
public void test(){
    ApplicationContext context = new ClassPathXmlApplicationContext("beans.xml");
    UserT userT = (UserT) context.getBean("userT");
    userT.show();
}
结论:在配置文件加载的时候。其中管理的对象都已经初始化了!
5、Spring配置
5.1、别名
alias 设置别名,为bean设置别名,可以设置多个别名
<!--设置别名:在获取Bean的时候可以使用别名获取-->
<alias name="userT" alias="userNew"/>
5.2、Bean配置
<!--bean就是java对象,由Spring创建和管理-->
<!--
    id 是bean的标识符,要唯一,如果没有配置id,name就是默认标识符
    如果配置id,又配置了name,那么name是别名
    name可以设置多个别名,可以用逗号,分号,空格隔开
    如果不配置id和name,可以根据applicationContext.getBean(.class)获取对象;
    class是bean的全限定名=包名+类名
-->
<bean id="hello" name="hello2 h2,h3;h4" class="com.kuang.pojo.Hello">
    <property name="name" value="Spring"/>
</bean>
5.3、impot
团队的合作通过import来实现
<import resource="{path}/beans.xml"/>
6、依赖注入(DI)
- 依赖注入(Dependency Injection,DI)。
- 依赖:指Bean对象的创建依赖于容器,Bean对象的依赖资源。
- 注入:指Bean对象所依赖的资源,由容器来设置和装配。
6.1 构造器注入
我们在之前的案例4已经详细讲过了
6.2 set注入(重点)
要求被注入的属性,必须有set方法,set方法的方法名由set + 属性首字母大写,如果属性是boolean类型,没有set方法,是is。
测试pojo类:
Address.java
public class Address {
    private String address;

    public String getAddress() {
        return address;
    }

    public void setAddress(String address) {
        this.address = address;
    }
}
Student.java
public class Student {
    private String name;
    private Address address;
    private String[] books;
    private List<String> hobbys;
    private Map<String,String> card;
    private Set<String> games;
    private String wife;
    private Properties info;

    //set 和 get  和 show-----------------------------
}
1、常量注入
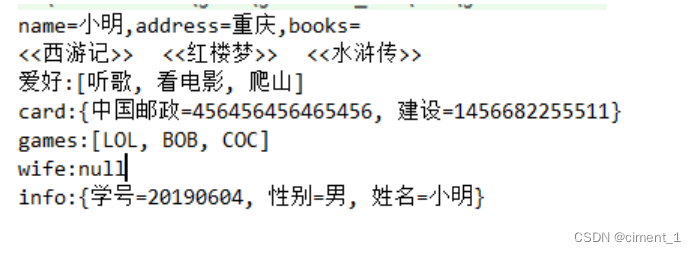
<bean id="student" class="com.kuang.pojo.Student">
    <property name="name" value="小明"/>
</bean>
测试:
@Test
public void test01(){
    ApplicationContext context = new ClassPathXmlApplicationContext("applicationContext.xml");
    Student student = (Student) context.getBean("student");
    System.out.println(student.getName());
}
2、Bean注入
注意点:这里的值是一个引用,ref
<bean id="addr" class="com.kuang.pojo.Address">
    <property name="address" value="重庆"/>
</bean>
<bean id="student" class="com.kuang.pojo.Student">
    <property name="name" value="小明"/>
    <property name="address" ref="addr"/>
</bean>
3、数组注入
<bean id="student" class="com.kuang.pojo.Student">
    <property name="name" value="小明"/>
    <property name="address" ref="addr"/>
    <property name="books">
    	<array>
    		<value>西游记</value>
    		<value>红楼梦</value>
    		<value>水浒传</value>
    	</array>
    </property>
</bean>
4、List注入
<property name="hobbys">
    <list>
        <value>听歌</value>
        <value>看电影</value>
        <value>爬山</value>
    </list>
</property>
5、Map注入
<property name="card">
    <map>
        <entry key="中国邮政" value="456456456465456"/>
        <entry key="建设" value="1456682255511"/>
    </map>
</property>
6、set注入
<property name="games">
    <set>
        <value>LOL</value>
        <value>BOB</value>
        <value>COC</value>
    </set>
</property>
7、Null注入
<property name="wife"><null/></property>
8、Properties注入
<property name="info">
    <props>
        <prop key="学号">20190604</prop>
        <prop key="性别">男</prop>
        <prop key="姓名">小明</prop>
    </props>
</property>
测试结果
6.3 拓展注入实现
先跳过
7、Bean 的自动装配
- 自动装配是使用Spring满足bean依赖的一种方法
- spring会在应用上下文中为某一bean寻找其依赖的bean
Spring 中bean有三种装配机制,分别是:
- 在xml中显式配置;
- 在java中显式配置;
- 隐式的bean发现机制和自动化的装配bean。
这里我们主要将第三种:自动化的装配bean。
Spring的自动装配需要从两个角度来实现,或者说是;两个操作;
- 组件扫描(component scanning):spring会自动发现应用上下文中所创建的bean;
- 自动装配(autowiring):spring自动满足bean之间的依赖,也就是我们说的IoC/DI;
组件扫描配合自动装配组合发挥巨大威力,使得显示的配置降低到最少。
推荐不使用自动装配xml配置,而使用注解【@Component】【@Autowired】
7.1、测试环境搭建
-
新建一个项目
-
新建两个实体类,Cat Dog 都有一个叫的方法
public class Cat {
    public void shout(){
        System.out.println("miao~");
    }
}
public class Dog { public void shout(){ System.out.println("wang~"); } } -
新建一个用户类User
public class User { private Cat cat; private Dog dog; private String str; } -
编写Spring配置文件
<?xml version="1.0" encoding="UTF-8"?> <beans xmlns="http://www.springframework.org/schema/beans" xmlns:xsi="http://www.w3.org/2001/XMLSchema-instance" xsi:schemaLocation="http://www.springframework.org/schema/beans http://www.springframework.org/schema/beans/spring-beans.xsd"> <bean id="dog" class="com.kuang.pojo.Dog"/> <bean id="cat" class="com.kuang.pojo.Cat"/> <bean id="user" class="com.kuang.pojo.User"> <property name="cat" ref="cat"/> <property name="dog" ref="dog"/> <property name="str" value="qinjiang"/> </bean> </beans> -
测试
public class MyTest {
    @Test
    public void testMethodAutowire() {
        ApplicationContext context = new ClassPathXmlApplicationContext("beans.xml");
        User user = (User) context.getBean("user");
        user.getCat().shout();
        user.getDog().shout();
    }
}
结果正常输出,环境OK
7.2、byName
autowire byName(按名称自动装配)
由于在手动配置xml过程中,常常发生字母缺漏和大小写等错误,而无法对其进行检测,使得开发效率降低。
采用自动装配将避免这些错误,并且使配置简单化。
测试:
-
修改bean配置,增加一个属性 autowire=“byName”
<bean id="user" class="com.kuang.pojo.User" autowire="byName"> <property name="str" value="qinjiang"/> </bean> -
再次测试,结果依旧成功输出!
-
我们将cat 的bean id修改为 catXXX
-
再次测试,执行时报空指针java.lang.NullPointerException.因为按byName规则找不到对应set方法,真正的setCat就没执行,对象就没有初始化,所以调用时就会报空指针错误。
小结:
当一个bean节点带有 autowire byName的属性时。
- 将查找其类中所有的set方法名,例如setCat,获得将set去掉并且首字母小写的字符串,即cat。
- 去spring容器中寻找是否有此字符串名称id的对象。
- 如果有,就取出注入;如果没有,就报空指针异常。
7.3、byType
autowire byType(按类型自动装配)
使用autowire byType 首先需要保证:同一类型的对象,在Spring容器中唯一。如果不唯一,会报不唯一的异常。NoUniqueBeanDefinitionException
测试:
-
将user的bean配置修改一下:
autowire="byType" -
测试,正常输出
-
在注册一个cat 的bean对象!
<bean id="dog" class="com.kuang.pojo.Dog"/> <bean id="cat" class="com.kuang.pojo.Cat"/> <bean id="cat2" class="com.kuang.pojo.Cat"/> <bean id="user" class="com.kuang.pojo.User" autowire="byType"> <property name="str" value="ciment"/> </bean> -
测试,报错:NoUniqueBeanDefinitionException
-
删掉cat2,将cat的bean名称改掉!测试!因为是按类型装配,所以并不会报异常,也不影响最后的结果。甚至将id属性去掉,也不影响结果。
这就是按照类型自动装配!
7.4 使用注解
JDK 1.5 开始支持注解,Spring2.5开始全面支持注解。
准备工作:利用注解的方式注入属性。
-
在spring 配置文件中引入context文件头
xmlns:context="http://www.springframework.org/schema/context" http://www.springframework.org/schema/context http://www.springframework.org/schema/context/spring-context.xsd -
开启属性注解支持!
<context:annotation-config/>
7.4.1、@Autowire
在各类代码中一般都是注解
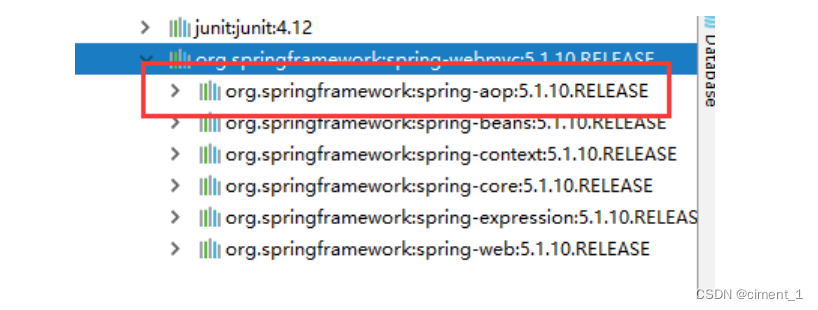
- @Autowire 是按类型自动装配的,不支持id匹配。
- 需要导入 spring-aop 的包!
测试:
-
将User类的中的set方法去掉,使用@Autowire注解
public class User { @Autowired private Cat cat; @Autowired private Dog dog; private String str; public Cat getCat() { return cat; } public Dog getDog() { return dog; } public String getStr() { return str; } } -
此时配置文件内容
<context:annotation-config/> <bean id="dog" class="com.kuang.pojo.Dog"/> <bean id="cat" class="com.kuang.pojo.Cat"/> <bean id="user" class="com.kuang.pojo.User"/> -
测试,成功输出结果!
【科普时间】
@Autowired(required=false) 说明: false,对象可以为null;true,对象必须存对象,不能为null。
//如果允许对象为null,设置required = false,默认为true
@Autowired(required = false)
7.4.2、@Qualifier
学吧
- @Autowired是根据类型自动装配的,加上@Qualififier则可以根据byName的方式自动装配
- @Qualififier不能单独使用。
测试实验步骤:
-
配置文件修改内容,保证类型存在对象。且名字不为类的默认名字!
<bean id="dog1" class="com.kuang.pojo.Dog"/> <bean id="dog2" class="com.kuang.pojo.Dog"/> <bean id="cat1" class="com.kuang.pojo.Cat"/> <bean id="cat2" class="com.kuang.pojo.Cat"/> -
没有加Qualififier测试,直接报错
-
在属性上添加Qualififier注解
@Autowired @Qualifier(value = "cat2") private Cat cat; @Autowired @Qualifier(value = "dog2") private Dog dog; -
测试,成功输出!
7.4.3、@Resource
- @Resource如有指定的name属性,先按该属性进行byName方式查找装配;
- 其次再进行默认的byName方式进行装配;
- 如果以上都不成功,则按byType的方式自动装配。
- 都不成功,则报异常。
实体类:
public class User {
    //如果允许对象为null,设置required = false,默认为true
    @Resource(name = "cat2")
    private Cat cat;
    @Resource
    private Dog dog;
    private String str;
}
beans.xml:
<bean id="dog" class="com.kuang.pojo.Dog"/>
<bean id="cat1" class="com.kuang.pojo.Cat"/>
<bean id="cat2" class="com.kuang.pojo.Cat"/>
<bean id="user" class="com.kuang.pojo.User"/>
测试:结果OK
配置文件2:beans.xml , 删掉cat2
<bean id="dog" class="com.kuang.pojo.Dog"/>
<bean id="cat1" class="com.kuang.pojo.Cat"/>
实体类上只保留注解
@Resource
private Cat cat;
@Resource
private Dog dog;
结果:OK
结论:先进行byName查找,失败;再进行byType查找,成功。
7.5、小结
@Autowired与@Resource异同:
-
Autowired与@Resource都可以用来装配bean。都可以写在字段上,或写在setter方法上。?
-
@Autowired默认按类型装配(属于spring规范),默认情况下必须要求依赖对象必须存在,如果要允许null 值,可以设置它的required属性为false,如:@Autowired(required=false) ,如果我们想使用名称装配可以结合@Qualififier注解进行使用
-
@Resource(属于J2EE复返),默认按照名称进行装配,名称可以通过name属性进行指定。如果没有指定name属性,当注解写在字段上时,默认取字段名进行按照名称查找,如果注解写在setter方法上默认取属性名进行装配。 当找不到与名称匹配的bean时才按照类型进行装配。但是需要注意的是,如果name属性一旦指定,就只会按照名称进行装配。
它们的作用相同都是用注解方式注入对象,但执行顺序不同。@Autowired先byType,@Resource先 byName。
8、使用注解开发
8.1、说明
在spring4之后,想要使用注解形式,必须得要引入aop的包
在配置文件当中,还得要引入一个context约束
<?xml version="1.0" encoding="UTF-8"?>
<beans xmlns="http://www.springframework.org/schema/beans"
       xmlns:xsi="http://www.w3.org/2001/XMLSchema-instance"
       xmlns:context="http://www.springframework.org/schema/context"
       xsi:schemaLocation="http://www.springframework.org/schema/beans
                           http://www.springframework.org/schema/beans/spring-beans.xsd
                           http://www.springframework.org/schema/context
                           http://www.springframework.org/schema/context/spring-context.xsd">
</beans>
8.2、Bean的实现
我们之前都是使用 bean 的标签进行bean注入,但是实际开发中,我们一般都会使用注解!
-
配置扫描哪些包下的注解
<!--指定注解扫描包--> <context:component-scan base-package="com.kuang.pojo"/> -
在指定包下编写类,增加注解
@Component("user") // 相当于配置文件中 <bean id="user" class="当前注解的类"/> public class User { public String name = "秦疆"; } -
测试
@Test
public void test(){
    ApplicationContext applicationContext = new ClassPathXmlApplicationContext("beans.xml");
    User user = (User) applicationContext.getBean("user");
    System.out.println(user.name);
}
8.3、属性注入
使用注解注入属性
-
可以不用提供set方法,直接在直接名上添加@value(“值”)
@Component("user") // 相当于配置文件中 <bean id="user" class="当前注解的类"/> public class User { @Value("秦疆") // 相当于配置文件中 <property name="name" value="秦疆"/> public String name; } -
如果提供了set方法,在set方法上添加@value(“值”);
@Component("user")
public class User {
    public String name;

    @Value("秦疆")
    public void setName(String name) {
        this.name = name;
    }
}
8.4、衍生注解
我们这些注解,就是替代了在配置文件当中配置步骤而已!更加的方便快捷!
@Component三个衍生注解
为了更好的进行分层,Spring可以使用其它三个注解,功能一样,目前使用哪一个功能都一样。
- @Controller:web层
- @Service:service层
- @Repository:dao层
写上这些注解,就相当于将这个类交给Spring管理装配了!
8.5、自动装配注解
在Bean的自动装配已经讲过了,可以回顾!
8.6、作用域
@scope
- singleton:默认的,Spring会采用单例模式创建这个对象。关闭工厂 ,所有的对象都会销毁。
- prototype:多例模式。关闭工厂 ,所有的对象不会销毁。内部的垃圾回收机制会回收
@Controller("user")
@Scope("prototype")
public class User {
    @Value("秦疆")
    public String name;
}
8.7、小结
XML与注解比较
- XML可以适用任何场景 ,结构清晰,维护方便
- 注解不是自己提供的类使用不了,开发简单方便
xml与注解整合开发:推荐最佳实践
- xml管理Bean
- 注解完成属性注入
- 使用过程中, 可以不用扫描,扫描是为了类上的注解
<context:annotation-config/>
作用:
- 进行注解驱动注册,从而使注解生效
- 用于激活那些已经在spring容器里注册过的bean上面的注解,也就是显示的向Spring注册
- 如果不扫描包,就需要手动配置bean
- 如果不加注解驱动,则注入的值为null!
8.8、基于Java类进行配置
JavaConfifig 原来是 Spring 的一个子项目,它通过 Java 类的方式提供 Bean 的定义信息,在 Spring4 的版本, JavaConfifig 已正式成为 Spring4 的核心功能 。
测试:
-
编写一个实体类,Dog
@Component //将这个类标注为Spring的一个组件,放到容器中! public class Dog { public String name = "dog"; } -
新建一个confifig配置包,编写一个MyConfifig配置类
@Configuration //代表这是一个配置类 public class MyConfig { @Bean //通过方法注册一个bean,这里的返回值就Bean的类型,方法名就是bean的id! public Dog dog(){ return new Dog(); } } -
测试
@Test public void test2(){ ApplicationContext applicationContext = new AnnotationConfigApplicationContext(MyConfig.class); Dog dog = (Dog) applicationContext.getBean("dog"); System.out.println(dog.name); } -
成功输出结果!
导入其他配置如何做呢?
-
我们再编写一个配置类!
@Configuration //代表这是一个配置类 public class MyConfig2 { } -
在之前的配置类中我们来选择导入这个配置类
@Configuration
@Import(MyConfig2.class) //导入合并其他配置类,类似于配置文件中的 inculde 标签
public class MyConfig {
    @Bean
    public Dog dog(){
        return new Dog();
    }
}
关于这种Java类的配置方式,我们在之后的SpringBoot 和 SpringCloud中还会大量看到,我们需要知道这些注解的作用即可!
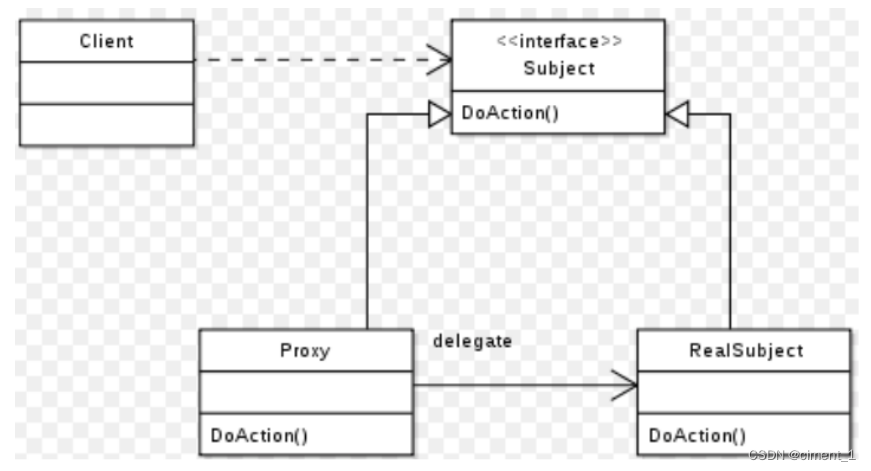
9、代理模式
为什么要学习代理模式,因为AOP的底层机制就是动态代理!
代理模式:
- 静态代理
- 动态代理
学习aop之前 , 我们要先了解一下代理模式!
9.1、静态代理
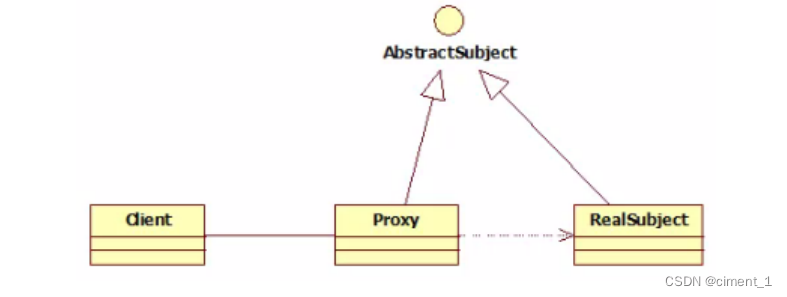
静态代理角色分析
- 抽象角色 : 一般使用接口或者抽象类来实现
- 真实角色 : 被代理的角色
- 代理角色 : 代理真实角色 ; 代理真实角色后 , 一般会做一些附属的操作 .
- 客户 : 使用代理角色来进行一些操作 .
代码实现
Rent . java 即抽象角色
//抽象角色:租房
public interface Rent {
	public void rent();
}
Host . java 即真实角色
//真实角色: 房东,房东要出租房子
public class Host implements Rent{
    public void rent() {
        System.out.println("房屋出租");
    }
}
Proxy . java 即代理角色
//代理角色:中介
public class Proxy implements Rent {
    private Host host;
    public Proxy() { }
    public Proxy(Host host) {
    	this.host = host;
    }
    //租房
    public void rent(){
        seeHouse();
        host.rent();
        fare();
    }
    //看房
    public void seeHouse(){
    	System.out.println("带房客看房");
    }
    //收中介费
    public void fare(){
    	System.out.println("收中介费");
	}
}
Client . java 即客户
//客户类,一般客户都会去找代理!
public class Client {
    public static void main(String[] args) {
        //房东要租房
        Host host = new Host();
        //中介帮助房东
        Proxy proxy = new Proxy(host);
        //你去找中介!
        proxy.rent();
    }
}
分析: 在这个过程中,你直接接触的就是中介,就如同现实生活中的样子,你看不到房东,但是你依旧租到了房东的房子通过代理,这就是所谓的代理模式,程序源自于生活,所以学编程的人,一般能够更加抽象的看待生活中发生的事情。
9.2、静态代理的好处
- 可以使得我们的真实角色更加纯粹 . 不再去关注一些公共的事情 .
- 公共的业务由代理来完成 . 实现了业务的分工 ,
- 公共业务发生扩展时变得更加集中和方便 .
缺点 :
- 类多了 , 多了代理类 , 工作量变大了 . 开发效率降低 .
我们想要静态代理的好处,又不想要静态代理的缺点,所以 , 就有了动态代理 !
9.3、静态代理再理解
同学们练习完毕后,我们再来举一个例子,巩固大家的学习!
练习步骤:
-
创建一个抽象角色,比如咋们平时做的用户业务,抽象起来就是增删改查!
//抽象角色:增删改查业务 public interface UserService { void add(); void delete(); void update(); void query(); } -
我们需要一个真实对象来完成这些增删改查操作
//真实对象,完成增删改查操作的人 public class UserServiceImpl implements UserService { public void add() { System.out.println("增加了一个用户"); } public void delete() { System.out.println("删除了一个用户"); } public void update() { System.out.println("更新了一个用户"); } public void query() { System.out.println("查询了一个用户"); } } -
需求来了,现在我们需要增加一个日志功能,怎么实现!
- 思路1 :在实现类上增加代码 【麻烦!】
- 思路2:使用代理来做,能够不改变原来的业务情况下,实现此功能就是最好的了!
-
设置一个代理类来处理日志! 代理角色
//代理角色,在这里面增加日志的实现 public class UserServiceProxy implements UserService { private UserServiceImpl userService; public void setUserService(UserServiceImpl userService) { this.userService = userService; } public void add() { log("add"); userService.add(); } public void delete() { log("delete"); userService.delete(); } public void update() { log("update"); userService.update(); } public void query() { log("query"); userService.query(); } public void log(String msg){ System.out.println("执行了"+msg+"方法"); } } -
测试访问类:
public class Client {
    public static void main(String[] args) {
        //真实业务
        UserServiceImpl userService = new UserServiceImpl();
        //代理类
        UserServiceProxy proxy = new UserServiceProxy();
        //使用代理类实现日志功能!
        proxy.setUserService(userService);
        proxy.add();
    }
}
OK,到了现在代理模式大家应该都没有什么问题了,重点大家需要理解其中的思想;
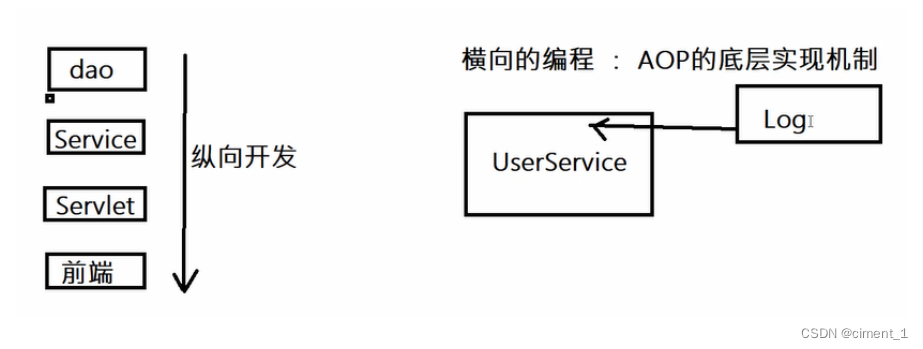
我们在不改变原来的代码的情况下,实现了对原有功能的增强,这是AOP中最核心的思想
【聊聊AOP:纵向开发,横向开发】
9.4、动态代理
动态代理的角色和静态代理的一样 .
动态代理的代理类是动态生成的 . 静态代理的代理类是我们提前写好的
动态代理分为两类 : 一类是基于接口动态代理 , 一类是基于类的动态代理
基于接口的动态代理----JDK动态代理
基于类的动态代理–cglib
现在用的比较多的是 javasist 来生成动态代理 . 百度一下javasist
我们这里使用JDK的原生代码来实现,其余的道理都是一样的!
JDK的动态代理需要了解两个类
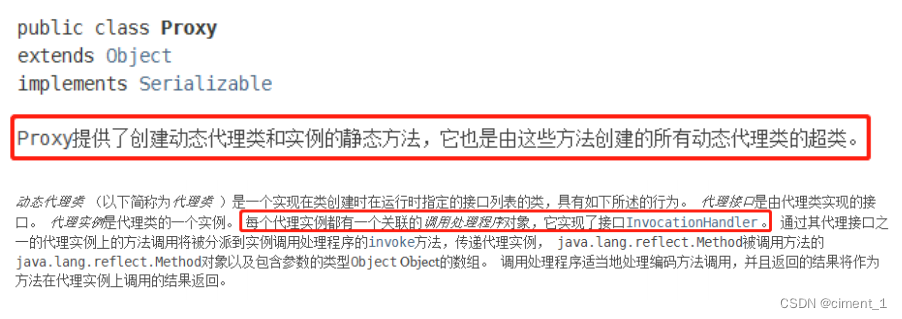
核心 : InvocationHandler 和 Proxy , 打开JDK帮助文档看看
【InvocationHandler:调用处理程序】

Object invoke(Object proxy, 方法 method, Object[] args);
//参数
//proxy - 调用该方法的代理实例
//method -所述方法对应于调用代理实例上的接口方法的实例。 方法对象的声明类将是该方法声明的接口,它可以是代理类继承该方法的代理接口的超级接口。
//args -包含的方法调用传递代理实例的参数值的对象的阵列,或null如果接口方法没有参数。 原始类型
【Proxy : 代理】
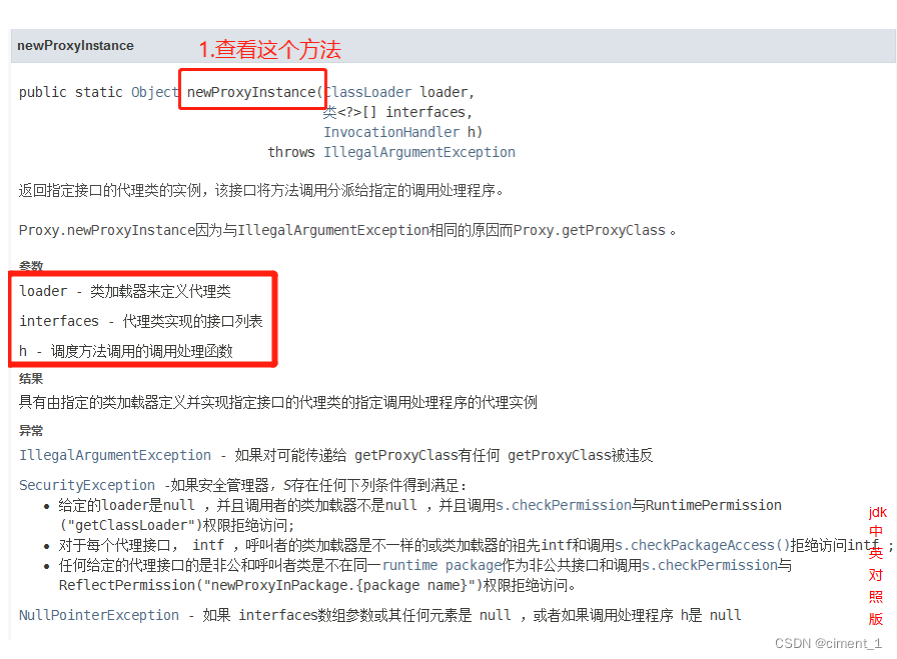
//生成代理类
public Object getProxy(){
    return Proxy.newProxyInstance(this.getClass().getClassLoader(),
    rent.getClass().getInterfaces(),this);
}
代码实现
抽象角色和真实角色和之前的一样!
Rent . java 即抽象角色
//抽象角色:租房
public interface Rent {
public void rent();
}
Host . java 即真实角色
//真实角色: 房东,房东要出租房子
public class Host implements Rent{
public void rent() {
System.out.println("房屋出租");
}
}
ProxyInvocationHandler. java 即代理角色
public class ProxyInvocationHandler implements InvocationHandler {
private Rent rent;
public void setRent(Rent rent) {
this.rent = rent;
}
//生成代理类,重点是第二个参数,获取要代理的抽象角色!之前都是一个角色,现在可以代理一
类角色
public Object getProxy(){
return Proxy.newProxyInstance(this.getClass().getClassLoader(),
rent.getClass().getInterfaces(),this);
}
// proxy : 代理类 method : 代理类的调用处理程序的方法对象.
// 处理代理实例上的方法调用并返回结果
@Override
public Object invoke(Object proxy, Method method, Object[] args) throws Throwable {
seeHouse();
//核心:本质利用反射实现!
Object result = method.invoke(rent, args);
fare();
return result;
}
//看房
public void seeHouse(){
System.out.println("带房客看房");
}
//收中介费
public void fare(){
System.out.println("收中介费");
}
}
Client . java
//租客
public class Client {
public static void main(String[] args) {
//真实角色
Host host = new Host();
//代理实例的调用处理程序
ProxyInvocationHandler pih = new ProxyInvocationHandler();
pih.setRent(host); //将真实角色放置进去!
Rent proxy = (Rent)pih.getProxy(); //动态生成对应的代理类!
proxy.rent();
}
}
核心:一个动态代理 , 一般代理某一类业务 , 一个动态代理可以代理多个类,代理的是接口!、
9.5、深化理解
我们来使用动态代理实现代理我们后面写的UserService!
我们也可以编写一个通用的动态代理实现的类!所有的代理对象设置为Object即可!
public class ProxyInvocationHandler implements InvocationHandler {
private Object target;
public void setTarget(Object target) {
this.target = target;
}
//生成代理类
public Object getProxy(){
return Proxy.newProxyInstance(this.getClass().getClassLoader(),
target.getClass().getInterfaces(),this);
}
// proxy : 代理类
// method : 代理类的调用处理程序的方法对象.
public Object invoke(Object proxy, Method method, Object[] args) throws Throwable {
log(method.getName());
Object result = method.invoke(target, args);
return result;
}
public void log(String methodName){
System.out.println("执行了"+methodName+"方法");
}
}
测试!
public class Test {
public static void main(String[] args) {
//真实对象
UserServiceImpl userService = new UserServiceImpl();
//代理对象的调用处理程序
ProxyInvocationHandler pih = new ProxyInvocationHandler();
pih.setTarget(userService); //设置要代理的对象
UserService proxy = (UserService)pih.getProxy(); //动态生成代理类!
proxy.delete();
}
}
【测试,增删改查,查看结果】
9.6、动态代理的好处
静态代理有的它都有,静态代理没有的,它也有!
- 可以使得我们的真实角色更加纯粹 . 不再去关注一些公共的事情 .
- 公共的业务由代理来完成 . 实现了业务的分工 ,
- 公共业务发生扩展时变得更加集中和方便 .
- 一个动态代理 , 一般代理某一类业务
- 一个动态代理可以代理多个类,代理的是接口!
10、AOP
10.1 什么是AOP
AOP(Aspect Oriented Programming)意为:面向切面编程,通过预编译方式和运行期动态代理实现程序功能的统一维护的一种技术。AOP是OOP的延续,是软件开发中的一个热点,也是Spring框架中的一个重要内容,是函数式编程的一种衍生范型。利用AOP可以对业务逻辑的各个部分进行隔离,从而使得业务逻辑各部分之间的耦合度降低,提高程序的可重用性,同时提高了开发的效率。

10.2 Aop在Spring中的作用
提供声明式事务;允许用户自定义切面
- 横切关注点:跨越应用程序多个模块的方法或功能。即是,与我们业务逻辑无关的,但是我们需要关注的部分,就是横切关注点。如日志 , 安全 , 缓存 , 事务等等 …
- 切面(ASPECT):横切关注点 被模块化 的特殊对象。即,它是一个类。
- 通知(Advice):切面必须要完成的工作。即,它是类中的一个方法。
- 目标(Target):被通知对象。
- 代理(Proxy):向目标对象应用通知之后创建的对象。
- 切入点(PointCut):切面通知 执行的 “地点”的定义。
- 连接点(JointPoint):与切入点匹配的执行点。
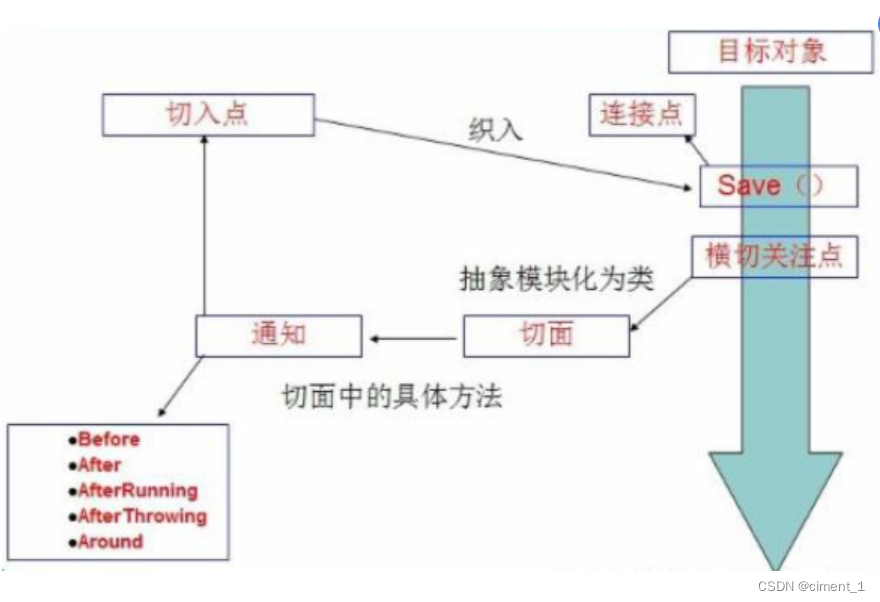
SpringAOP中,通过Advice定义横切逻辑,Spring中支持5种类型的Advice:
![[外链图片转存失败,源站可能有防盗链机制,建议将图片保存下来直接上传(img-UbIXDKAh-1667186408346)(D:\个人学习文件夹\Markdown\正在写\Java\mdPics\Java_SSM\image-20221012162543527.png)]](https://i-blog.csdnimg.cn/blog_migrate/ca17b016bf860898a4f5a81c3a88d106.png)
即 Aop 在 不改变原有代码的情况下 , 去增加新的功能 .
10.3 使用Spring实现Aop
【重点】使用AOP织入,需要导入一个依赖包!
<!-- https://mvnrepository.com/artifact/org.aspectj/aspectjweaver -->
<dependency>
<groupId>org.aspectj</groupId>
<artifactId>aspectjweaver</artifactId>
<version>1.9.4</version>
</dependency>
第一种方式
通过 Spring API 实现
首先编写我们的业务接口和实现类
public interface UserService {
public void add();
public void delete();
public void update();
public void search();
}
public class UserServiceImpl implements UserService{
@Override
public void add() {
System.out.println("增加用户");
}
@Override
public void delete() {
System.out.println("删除用户");
}
@Override
public void update() {
System.out.println("更新用户");
}
@Override
public void search() {
System.out.println("查询用户");
}
}
然后去写我们的增强类 , 我们编写两个 , 一个前置增强 一个后置增强
public class Log implements MethodBeforeAdvice {
//method : 要执行的目标对象的方法
//objects : 被调用的方法的参数
//Object : 目标对象
@Override
public void before(Method method, Object[] objects, Object o) throws Throwable {
System.out.println( o.getClass().getName() + "的" + method.getName() + "方法被执行了");
}
}
public class AfterLog implements AfterReturningAdvice {
//returnValue 返回值
//method被调用的方法
//args 被调用的方法的对象的参数
//target 被调用的目标对象
@Override
public void afterReturning(Object returnValue, Method method, Object[] args, Object target) throws Throwable {
System.out.println("执行了" + target.getClass().getName()
+"的"+method.getName()+"方法,"
+"返回值:"+returnValue);
}
}
最后去spring的文件中注册 , 并实现aop切入实现 , 注意导入约束 .
<?xml version="1.0" encoding="UTF-8"?>
<beans xmlns="http://www.springframework.org/schema/beans"
xmlns:xsi="http://www.w3.org/2001/XMLSchema-instance"
xmlns:aop="http://www.springframework.org/schema/aop"
xsi:schemaLocation="http://www.springframework.org/schema/beans
http://www.springframework.org/schema/beans/spring-beans.xsd
http://www.springframework.org/schema/aop
http://www.springframework.org/schema/aop/spring-aop.xsd">
<!--注册bean-->
<bean id="userService" class="com.kuang.service.UserServiceImpl"/>
<bean id="log" class="com.kuang.log.Log"/>
<bean id="afterLog" class="com.kuang.log.AfterLog"/>
<!--aop的配置-->
<aop:config>
<!--切入点 expression:表达式匹配要执行的方法-->
<aop:pointcut id="pointcut" expression="execution(* com.kuang.service.UserServiceImpl.*(..))"/>
<!--执行环绕; advice-ref执行方法 . pointcut-ref切入点-->
<aop:advisor advice-ref="log" pointcut-ref="pointcut"/>
<aop:advisor advice-ref="afterLog" pointcut-ref="pointcut"/>
</aop:config>
</beans>
测试
public class MyTest {
@Test
public void test(){
ApplicationContext context = new ClassPathXmlApplicationContext("beans.xml");
UserService userService = (UserService) context.getBean("userService");
userService.search();
}
}
Aop的重要性 : 很重要 . 一定要理解其中的思路 , 主要是思想的理解这一块 .
Spring的Aop就是将公共的业务 (日志 , 安全等) 和领域业务结合起来 , 当执行领域业务时 , 将会把公共业务加进来 . 实现公共业务的重复利用 . 领域业务更纯粹 , 程序猿专注领域业务 , 其本质还是动态代理 .
第二种方式
自定义类来实现Aop
目标业务类不变依旧是userServiceImpl
第一步 : 写我们自己的一个切入类
ublic class DiyPointcut {
public void before(){
System.out.println("---------方法执行前---------");
}
public void after(){
System.out.println("---------方法执行后---------");
}
}
去spring中配置
<!--第二种方式自定义实现-->
<!--注册bean-->
<bean id="diy" class="com.kuang.config.DiyPointcut"/>
<!--aop的配置-->
<aop:config>
<!--第二种方式:使用AOP的标签实现-->
<aop:aspect ref="diy">
<aop:pointcut id="diyPonitcut" expression="execution(* com.kuang.service.UserServiceImpl.*(..))"/>
<aop:before pointcut-ref="diyPonitcut" method="before"/>
<aop:after pointcut-ref="diyPonitcut" method="after"/>
</aop:aspect>
</aop:config>
测试:
public class MyTest {
@Test
public void test(){
ApplicationContext context = new ClassPathXmlApplicationContext("beans.xml");
UserService userService = (UserService) context.getBean("userService");
userService.add();
}
}
第三种方式
使用注解实现
第一步:编写一个注解实现的增强类
@Aspect
public class AnnotationPointcut {
@Before("execution(* com.kuang.service.UserServiceImpl.*(..))")
public void before(){
System.out.println("---------方法执行前---------");
}
@After("execution(* com.kuang.service.UserServiceImpl.*(..))")
public void after(){
System.out.println("---------方法执行后---------");
}
@Around("execution(* com.kuang.service.UserServiceImpl.*(..))")
public void around(ProceedingJoinPoint jp) throws Throwable {
System.out.println("环绕前");
System.out.println("签名:"+jp.getSignature());
//执行目标方法proceed
Object proceed = jp.proceed();
System.out.println("环绕后");
System.out.println(proceed);
}
}
第二步:在Spring配置文件中,注册bean,并增加支持注解的配置
<!--第三种方式:注解实现-->
<bean id="annotationPointcut" class="com.kuang.config.AnnotationPointcut"/>
<aop:aspectj-autoproxy/>
aop:aspectj-autoproxy:说明
通过aop命名空间的<aop:aspectj-autoproxy />声明自动为spring容器中那些配置@aspectJ切面的bean创建代理,织入切面。当然,spring 在内部依旧采用AnnotationAwareAspectJAutoProxyCreator进行自动代理的创建工作,但具体实现的细节已经被<aop:aspectj-autoproxy />隐藏起来了
<aop:aspectj-autoproxy />有一个proxy-target-class属性,默认为false,表示使用jdk动态代理织入增强,当配为<aop:aspectj-autoproxy poxy-target-class="true"/>时,表示使用CGLib动态代理技术织入增强。不过即使proxy-target-class设置为false,如果目标类没有声明接口,则spring将自动使用CGLib动态代理。
11、整合Mybatis
步骤:
-
导入相关jar包
<dependency> <groupId>junit</groupId> <artifactId>junit</artifactId> <version>4.12</version> </dependency> <dependency> <groupId>org.mybatis</groupId> <artifactId>mybatis</artifactId> <version>3.5.2</version> </dependency> <dependency> <groupId>mysql</groupId> <artifactId>mysql-connector-java</artifactId> <version>5.1.47</version> </dependency> <dependency> <groupId>org.springframework</groupId> <artifactId>spring-webmvc</artifactId> <version>5.1.10.RELEASE</version> </dependency> <dependency> <groupId>org.springframework</groupId> <artifactId>spring-jdbc</artifactId> <version>5.1.10.RELEASE</version> </dependency> <!-- https://mvnrepository.com/artifact/org.aspectj/aspectjweaver --> <dependency> <groupId>org.aspectj</groupId> <artifactId>aspectjweaver</artifactId> <version>1.9.4</version> </dependency> <!-- mybatis-spring整合包 【重点】 --> <dependency> <groupId>org.mybatis</groupId> <artifactId>mybatis-spring</artifactId> <version>2.0.2</version> </dependency> -------------------------------- <build> <resources> <resource> <directory>src/main/java</directory> <includes> <include>**/*.properties</include> <include>**/*.xml</include> </includes> <filtering>true</filtering> </resource> </resources> </build> -
编写配置文件
-
代码实现
回忆MyBatis
编写pojo实体类
public class User {
private int id; //id
private String name; //姓名
private String pwd; //密码
}
实现mybatis的配置文件
<?xml version="1.0" encoding="UTF-8" ?>
<!DOCTYPE configuration
PUBLIC "-//mybatis.org//DTD Config 3.0//EN"
"http://mybatis.org/dtd/mybatis-3-config.dtd">
<configuration>
<typeAliases>
<package name="com.kuang.pojo"/>
</typeAliases>
<environments default="development">
<environment id="development">
<transactionManager type="JDBC"/>
<dataSource type="POOLED">
<property name="driver" value="com.mysql.jdbc.Driver"/>
<property name="url" value="jdbc:mysql://localhost:3306/mybatis?useSSL=true&useUnicode=true&characterEncoding=utf8"/>
<property name="username" value="root"/>
<property name="password" value="123456"/>
</dataSource>
</environment>
</environments>
<mappers>
<package name="com.kuang.dao"/>
</mappers>
</configuration>
UserDao接口编写
public interface UserMapper {
public List<User> selectUser();
}
接口对应的Mapper映射文件
<?xml version="1.0" encoding="UTF-8" ?>
<!DOCTYPE mapper
PUBLIC "-//mybatis.org//DTD Mapper 3.0//EN"
"http://mybatis.org/dtd/mybatis-3-mapper.dtd">
<mapper namespace="com.kuang.dao.UserMapper">
<select id="selectUser" resultType="User">
select * from user
</select>
</mapper>
测试类
@Test
public void selectUser() throws IOException {
String resource = "mybatis-config.xml";
InputStream inputStream = Resources.getResourceAsStream(resource);
SqlSessionFactory sqlSessionFactory = new
SqlSessionFactoryBuilder().build(inputStream);
SqlSession sqlSession = sqlSessionFactory.openSession();
UserMapper mapper = sqlSession.getMapper(UserMapper.class);
List<User> userList = mapper.selectUser();
for (User user: userList){
System.out.println(user);
}
sqlSession.close();
}
MyBatis-Spring学习
引入Spring之前需要了解mybatis-spring包中的一些重要类;
http://www.mybatis.org/spring/zh/index.html

什么是 MyBatis-Spring?
MyBatis-Spring 会帮助你将 MyBatis 代码无缝地整合到 Spring 中。
知识基础
在开始使用 MyBatis-Spring 之前,你需要先熟悉 Spring 和 MyBatis 这两个框架和有关它们的术语。这
很重要
MyBatis-Spring 需要以下版本:
| MyBatis-Spring | MyBatis | Spring 框架 | Spring Batch | Java |
|---|---|---|---|---|
| 2.0 | 3.5+ | 5.0+ | 4.0+ | Java 8+ |
| 1.3 | 3.4+ | 3.22+ | 2.1+ | Java 6+ |
如果使用 Maven 作为构建工具,仅需要在 pom.xml 中加入以下代码即可:
<dependency>
<groupId>org.mybatis</groupId>
<artifactId>mybatis-spring</artifactId>
<version>2.0.2</version>
</dependency>
要和 Spring 一起使用 MyBatis,需要在 Spring 应用上下文中定义至少两样东西:一个SqlSessionFactory 和至少一个数据映射器类。
在 MyBatis-Spring 中,可使用 SqlSessionFactoryBean 来创建 SqlSessionFactory 。 要配置这个工厂 bean,只需要把下面代码放在 Spring 的 XML 配置文件中:
<bean id="sqlSessionFactory" class="org.mybatis.spring.SqlSessionFactoryBean">
<property name="dataSource" ref="dataSource" />
</bean>
注意: SqlSessionFactory 需要一个 DataSource (数据源)。 这可以是任意的DataSource ,只需要和配置其它 Spring 数据库连接一样配置它就可以了。
在基础的 MyBatis 用法中,是通过 SqlSessionFactoryBuilder 来创建 SqlSessionFactory的。 而在 MyBatis-Spring 中,则使用 SqlSessionFactoryBean 来创建。
在 MyBatis 中,你可以使用 SqlsessionFactory 来创建 SqlSession。一旦你获得一个session 之后,你可以使用它来执行映射了的语句,提交或回滚连接,最后,当不再需要它的时候,你可以关闭 session。
SqlSessionFactory 有一个唯一的必要属性:用于 JDBC 的 DataSource。这可以是任意的DataSource对象,它的配置方法和其他 Spring 数据库连接是一样的。
一个常用的属性是configLocation,它用来指定 MyBatis 的 XML 配置文件路径。它在需要修改MyBatis 的基础配置非常有用。通常,基础配置指的是<settings> 或 <typeAliases>元素。
需要注意的是,这个配置文件并不需要是一个完整的 MyBatis 配置。确切地说,任何环境配置(environments),数据源(DataSource)和 MyBatis 的事务管理器(transactionManager) 都会被忽略,SqlSessionFactoryBean 会创建它自有的 MyBatis 环境配置(Environment),并按要求设置自定义环境的值。
SqlSessionTemplate 是 MyBatis-Spring 的核心。作为 SqlSession 的一个实现,这意味着可以使用它无缝代替你代码中已经使用的SqlSession。
模版可以参与到 Spring 的事务管理中,并且由于其是线程安全的,可以供多个映射器类使用,你应该总是用SqlSessionTemplate 来替代 MyBatis 默认的 DefaultSqlSession 实现。在同一应用程序中的不同类之间混杂使用可能会引起数据一致性的问题。
可以使用 SqlSessionFactory 作为构造方法的参数来创建 SqlSessionTemplate 对象。
<bean id="sqlSession" class="org.mybatis.spring.SqlSessionTemplate">
<constructor-arg index="0" ref="sqlSessionFactory" />
</bean>
现在,这个 bean 就可以直接注入到你的 DAO bean中了。你需要在你的 bean 中添加一个 SqlSession 属性,就想下面这样:
public class UserDaoImpl implements UserDao {
private SqlSession sqlSession;
public void setSqlSession(SqlSession sqlSession) {
this.sqlSession = sqlSession;
}
public User getUser(String userId) {
return sqlSession.getMapper...;
}
}
按下面这样,注入 SqlSessionTemplate
<bean id="userDao" class="org.mybatis.spring.sample.dao.UserDaoImpl">
<property name="sqlSession" ref="sqlSession" />
</bean>
整合实现一
1、引入Spring配置文件beans.xml
<?xml version="1.0" encoding="UTF-8"?>
<beans xmlns="http://www.springframework.org/schema/beans"
xmlns:xsi="http://www.w3.org/2001/XMLSchema-instance"
xsi:schemaLocation="http://www.springframework.org/schema/beans
http://www.springframework.org/schema/beans/spring-beans.xsd">
2、配置数据源替换mybatis的数据源
<!--配置数据源:数据源有非常多,可以使用第三方的,也可使使用Spring的-->
<bean id="dataSource"
class="org.springframework.jdbc.datasource.DriverManagerDataSource">
<property name="driverClassName" value="com.mysql.jdbc.Driver"/>
<property name="url" value="jdbc:mysql://localhost:3306/mybatis?
useSSL=true&useUnicode=true&characterEncoding=utf8"/>
<property name="username" value="root"/>
<property name="password" value="123456"/>
</bean>
3、配置SqlSessionFactory,关联MyBatis
<!--配置SqlSessionFactory-->
<bean id="sqlSessionFactory" class="org.mybatis.spring.SqlSessionFactoryBean">
<property name="dataSource" ref="dataSource"/>
<!--关联Mybatis-->
<property name="configLocation" value="classpath:mybatisconfig.xml"/>
<property name="mapperLocations" value="classpath:com/kuang/dao/*.xml"/>
</bean>
4、注册sqlSessionTemplate,关联sqlSessionFactory;
<!--注册sqlSessionTemplate , 关联sqlSessionFactory-->
<bean id="sqlSession" class="org.mybatis.spring.SqlSessionTemplate">
<!--利用构造器注入-->
<constructor-arg index="0" ref="sqlSessionFactory"/>
</bean>
5、增加Dao接口的实现类;私有化sqlSessionTemplate
public class UserDaoImpl implements UserMapper {
//sqlSession不用我们自己创建了,Spring来管理
private SqlSessionTemplate sqlSession;
public void setSqlSession(SqlSessionTemplate sqlSession) {
this.sqlSession = sqlSession;
}
public List<User> selectUser() {
UserMapper mapper = sqlSession.getMapper(UserMapper.class);
return mapper.selectUser();
}
}
6、注册bean实现
<bean id="userDao" class="com.kuang.dao.UserDaoImpl">
<property name="sqlSession" ref="sqlSession"/>
</bean>
7、测试
@Test
public void test2(){
ApplicationContext context = new ClassPathXmlApplicationContext("beans.xml");
UserMapper mapper = (UserMapper) context.getBean("userDao");
List<User> user = mapper.selectUser();
System.out.println(user);
}
结果成功输出!现在我们的Mybatis配置文件的状态!发现都可以被Spring整合!
<?xml version="1.0" encoding="UTF-8" ?>
<!DOCTYPE configuration
PUBLIC "-//mybatis.org//DTD Config 3.0//EN"
"http://mybatis.org/dtd/mybatis-3-config.dtd">
<configuration>
<typeAliases>
<package name="com.kuang.pojo"/>
</typeAliases>
</configuration>
整合实现二
mybatis-spring1.2.3版以上的才有这个。
官方文档截图:
dao继承Support类,直接利用getSqlSession() 获得,然后直接注入SqlSessionFactory。比起方式一,不需要管理SqlSessionTemplate,而且对事务的支持更加友好,可跟踪源码查看
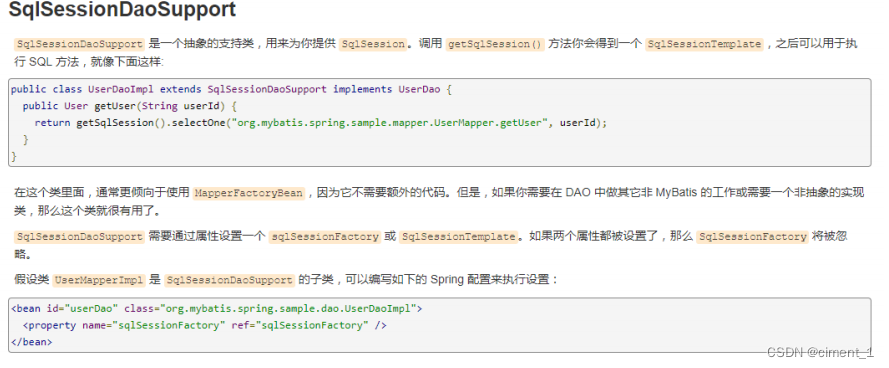
测试:
-
将我们上面写的UserDaoImpl修改一下
public class UserDaoImpl extends SqlSessionDaoSupport implements UserMapper { public List<User> selectUser() { UserMapper mapper = getSqlSession().getMapper(UserMapper.class); return mapper.selectUser(); } } -
修改bean的配置
<bean id="userDao" class="com.kuang.dao.UserDaoImpl"> <property name="sqlSessionFactory" ref="sqlSessionFactory" /> </bean> -
测试
@Test public void test2(){ ApplicationContext context = new ClassPathXmlApplicationContext("beans.xml"); UserMapper mapper = (UserMapper) context.getBean("userDao"); List<User> user = mapper.selectUser(); System.out.println(user); }
总结:整合到spring中以后可以完全不要mybatis的配置文件,除了这些方式可以实现整合之外,我们还可以使用注解来实现,这个等我们后面学习SpringBoot的时候还会测试整合!!!
12、声明式事务
12.1、回顾事务
事务就是把一系列的动作当成一个独立的工作单元,这些动作要么全部完成,要么全部不起作用。
- 事务在项目开发过程非常重要,涉及到数据的一致性的问题,不容马虎!
- 事务管理是企业级应用程序开发中必备技术,用来确保数据的完整性和一致性。
事务四个属性ACID
-
原子性(atomicity)
- 事务是原子性操作,由一系列动作组成,事务的原子性确保动作要么全部完成,要么完全不起作用
-
一致性(consistency)
- 一旦所有事务动作完成,事务就要被提交。数据和资源处于一种满足业务规则的一致性状态中
-
隔离性(isolation)
- 可能多个事务会同时处理相同的数据,因此每个事务都应该与其他事务隔离开来,防止数据损坏
-
持久性(durability)
- 事务一旦完成,无论系统发生什么错误,结果都不会受到影响。通常情况下,事务的结果被写到持久化存储器中
12.2、测试
将上面的代码拷贝到一个新项目中
在之前的案例中,我们给userDao接口新增两个方法,删除和增加用户;
//添加一个用户
int addUser(User user);
//根据id删除用户
int deleteUser(int id);
mapper文件,我们故意把 deletes写错,测试!
<insert id="addUser" parameterType="com.kuang.pojo.User">
insert into user (id,name,pwd) values (#{id},#{name},#{pwd})
</insert>
<delete id="deleteUser" parameterType="int">
deletes from user where id = #{id}
</delete>
编写接口的实现类,在实现类中我们去操作一波
public class UserDaoImpl extends SqlSessionDaoSupport implements UserMapper
{
//增加一些操作
public List<User> selectUser() {
User user = new User(4,"小明","123456");
UserMapper mapper = getSqlSession().getMapper(UserMapper.class);
mapper.addUser(user);
mapper.deleteUser(4);
return mapper.selectUser();
}
//新增
public int addUser(User user) {
UserMapper mapper = getSqlSession().getMapper(UserMapper.class);
return mapper.addUser(user);
}
//删除
public int deleteUser(int id) {
UserMapper mapper = getSqlSession().getMapper(UserMapper.class);
return mapper.deleteUser(id);
}
}
测试
@Test
public void test2(){
ApplicationContext context = new ClassPathXmlApplicationContext("beans.xml");
UserMapper mapper = (UserMapper) context.getBean("userDao");
List<User> user = mapper.selectUser();
System.out.println(user);
}
报错:sql异常,deleye写错了
结果:插入成功吧!
没有进行事务的管理;我们想让他们都成功才成功,有一个失败就都失败,我们就应该需要事务!
以前我们都需要自己手动管理事务,十分麻烦!
但是Spring 给我们提供了事务管理,我们只需要配置即可;
12.3、Spring中的事务管理
Spring在不同的事务管理API之上定义了一个抽象层,使得开发人员不必了解底层的事务管理API就可以使用Spring的事务管理机制。Spring支持编程式事务管理和声明式的事务管理。
编程式事务管理
- 将事务管理代码嵌到业务方法中来控制事务的提交和回滚
- 缺点:必须在每个事务操作业务逻辑中包含额外的事务管理代码
声明式事务管理
- 一般情况下比编程式事务好用。
- 将事务管理代码从业务方法中分离出来,以声明的方式来实现事务管理。
- 将事务管理作为横切关注点,通过aop方法模块化。Spring中通过Spring AOP框架支持声明式事务管理。
使用Spring管理事务,注意头文件的约束导入:tx
xmlns:tx="http://www.springframework.org/schema/tx"
http://www.springframework.org/schema/tx
http://www.springframework.org/schema/tx/spring-tx.xsd">
事务管理器
- 无论使用Spring的哪种事务管理策略(编程式或者声明式)事务管理器都是必须的。
- 就是 Spring的核心事务管理抽象,管理封装了一组独立于技术的方法。
JDBC事务
<bean id="transactionManager"
class="org.springframework.jdbc.datasource.DataSourceTransactionManager">
<property name="dataSource" ref="dataSource" />
</bean>
配置好事务管理器后我们需要去配置事务的通知
<!--配置事务通知-->
<tx:advice id="txAdvice" transaction-manager="transactionManager">
<tx:attributes>
<!--配置哪些方法使用什么样的事务,配置事务的传播特性-->
<tx:method name="add" propagation="REQUIRED"/>
<tx:method name="delete" propagation="REQUIRED"/>
<tx:method name="update" propagation="REQUIRED"/>
<tx:method name="search*" propagation="REQUIRED"/>
<tx:method name="get" read-only="true"/>
<tx:method name="*" propagation="REQUIRED"/>
</tx:attributes>
</tx:advice>
spring事务传播特性:
事务传播行为就是多个事务方法相互调用时,事务如何在这些方法间传播。spring支持7种事务传播行为:
- propagation_requierd:如果当前没有事务,就新建一个事务,如果已存在一个事务中,加入到这个事务中,这是最常见的选择。
- propagation_supports:支持当前事务,如果没有当前事务,就以非事务方法执行。
- propagation_mandatory:使用当前事务,如果没有当前事务,就抛出异常。
- propagation_required_new:新建事务,如果当前存在事务,把当前事务挂起。
- propagation_not_supported:以非事务方式执行操作,如果当前存在事务,就把当前事务挂起。
- propagation_never:以非事务方式执行操作,如果当前事务存在则抛出异常。
- propagation_nested:如果当前存在事务,则在嵌套事务内执行。如果当前没有事务,则执行与propagation_required类似的操作
Spring 默认的事务传播行为是 PROPAGATION_REQUIRED,它适合于绝大多数的情况。
假设 ServiveX#methodX() 都工作在事务环境下(即都被 Spring 事务增强了),假设程序中存在如下的调用链:Service1#method1()->Service2#method2()->Service3#method3(),那么这 3 个服务类的 3个方法通过 Spring 的事务传播机制都工作在同一个事务中。
就好比,我们刚才的几个方法存在调用,所以会被放在一组事务当中!
配置AOP
导入aop的头文件!
<!--配置aop织入事务-->
<aop:config>
<aop:pointcut id="txPointcut" expression="execution(* com.kuang.dao.*.*
(..))"/>
<aop:advisor advice-ref="txAdvice" pointcut-ref="txPointcut"/>
</aop:config>
进行测试
删掉刚才插入的数据,再次测试!
@Test
public void test2(){
ApplicationContext context = new ClassPathXmlApplicationContext("beans.xml");
UserMapper mapper = (UserMapper) context.getBean("userDao");
List<User> user = mapper.selectUser();
System.out.println(user);
}
思考问题?
为什么需要配置事务?
- 如果不配置,就需要我们手动提交控制事务;
- 事务在项目开发过程非常重要,涉及到数据的一致性的问题,不容马虎!
SpringMVC
1、回顾MVC
1.1 什么是MVC
- MVC是(Model)、视图(View)、控制器(Controller)的简写,是一种软件设计规范。
- 是将业务逻辑、数据、显示分离的方法来组织代码。
- MVC主要作用是降低了视图与业务逻辑间的双向耦合。
- MVC不是一种设计模式,MVC是一种架构模式。当然不同的MVC存在差异。
Model(模型):数据模型,提供要展示的数据,因此包含数据和行为,可以认为是领域模型或JavaBean组件(包含数据和行为),不过现在一般都分离开来:Value Object (数据Dao)和服务层(行为Service)。也就是模型提供了模型数据查询和模型数据的状态更新等功能,包括数据和业务。
View(视图):负责进行模型的展示,一般就是我们见到的用户界面,客户想看到的东西。
Controller(控制器):接收用户请求,委托给模型进行处理(状态改变),处理完毕后把返回的模型数据返回给视图,由视图负责展示。也就是说控制器做了个调度员的工作。
最经典的MVC就是JSP + servlet + JavaBean 的模型
**![[外链图片转存失败,源站可能有防盗链机制,建议将图片保存下来直接上传(img-698GOI2l-1667186408347)(D:\个人学习文件夹\Markdown\正在写\Java\mdPics\Java_SSM\image-20221009150330441.png)]](https://i-blog.csdnimg.cn/blog_migrate/4d204ccf4dcafe33a3992cade2e978ce.png)
**
1.2、Model1时代
- 在web早期的开发中,通常采用的都是Model1.
- Model1中,主要分为两层,视图层和模型层。
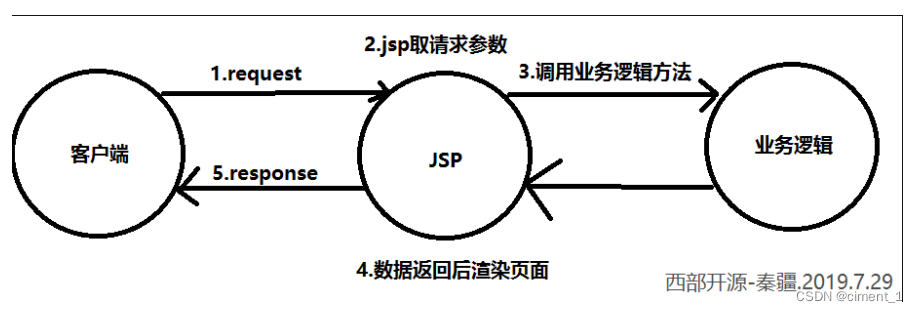
Model1优点:架构简单,比较适合小型项目开发
Model1缺点:JSP职责不单一,职责过重,不便于维护
1.3、Model2时代
Model2把一个项目分成三部分,包括视图、控制、模型。
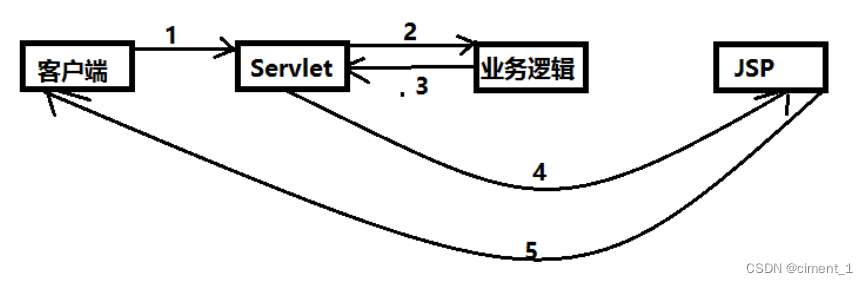
- 用户发请求
- Servlet接收请求数据,并调用对应的业务逻辑方法
- 业务处理完毕,返回更新后的数据给servlet
- servlet转向到JSP,由JSP来渲染页面
- 响应给前端更新后的页面
职责分析:
- Controller:控制器
- 取得表单数据
- 调用业务逻辑
- 转向指定的页面
- Model:模型
- 业务逻辑
- 保存数据的状态
- View:视图
- 显示页面
Model2这样不仅提高的代码的复用率与项目的扩展性,且大大降低了项目的维护成本。Model 1模式的实现比较简单,适用于快速开发小规模项目,Model1中JSP页面身兼View和Controller两种角色,将控制逻辑和表现逻辑混杂在一起,从而导致代码的重用性非常低,增加了应用的扩展性和维护的难度。Model2消除了Model1的缺点
1.4、回顾Servlet
-
新建一个Maven工程当做父工程! pom依赖!
<dependencies> <dependency> <groupId>junit</groupId> <artifactId>junit</artifactId> <version>4.12</version> </dependency> <dependency> <groupId>org.springframework</groupId> <artifactId>spring-webmvc</artifactId> <version>5.1.9.RELEASE</version> </dependency> <dependency> <groupId>javax.servlet</groupId> <artifactId>servlet-api</artifactId> <version>2.5</version> </dependency> <dependency> <groupId>javax.servlet.jsp</groupId> <artifactId>jsp-api</artifactId> <version>2.2</version> </dependency> <dependency> <groupId>javax.servlet</groupId> <artifactId>jstl</artifactId> <version>1.2</version> </dependency> </dependencies> -
建立一个Moudle:springmvc-01-servlet , 添加Web app的支持!
-
导入servlet 和 jsp 的 jar 依赖
<dependency> <groupId>javax.servlet</groupId> <artifactId>servlet-api</artifactId> <version>2.5</version> </dependency> <dependency> <groupId>javax.servlet.jsp</groupId> <artifactId>jsp-api</artifactId> <version>2.2</version> </dependency> -
编写一个Servlet类,用来处理用户的请求
package com.kuang.servlet; //实现Servlet接口 public class HelloServlet extends HttpServlet { @Override protected void doGet(HttpServletRequest req, HttpServletResponse resp) throws ServletException, IOException { //取得参数 String method = req.getParameter("method"); if (method.equals("add")){ req.getSession().setAttribute("msg","执行了add方法"); }if (method.equals("delete")){ req.getSession().setAttribute("msg","执行了delete方法"); } //业务逻辑 //视图跳转 req.getRequestDispatcher("/WEB- INF/jsp/hello.jsp").forward(req,resp); } @Override protected void doPost(HttpServletRequest req, HttpServletResponse resp) throws ServletException, IOException { doGet(req,resp); } } -
编写Hello.jsp,在WEB-INF目录下新建一个jsp的文件夹,新建hello.jsp
<%@ page contentType="text/html;charset=UTF-8" language="java" %> <html> <head> <title>Kuangshen</title> </head> <body> ${msg} </body> </html> -
在web.xml中注册Servlet
<?xml version="1.0" encoding="UTF-8"?> <web-app xmlns="http://xmlns.jcp.org/xml/ns/javaee" xmlns:xsi="http://www.w3.org/2001/XMLSchema-instance" xsi:schemaLocation="http://xmlns.jcp.org/xml/ns/javaee http://xmlns.jcp.org/xml/ns/javaee/web-app_4_0.xsd" version="4.0"> <servlet> <servlet-name>HelloServlet</servlet-name> <servlet-class>com.kuang.servlet.HelloServlet</servlet-class> </servlet> <servlet-mapping> <servlet-name>HelloServlet</servlet-name> <url-pattern>/user</url-pattern> </servlet-mapping> </web-app> -
配置Tomcat,并启动测试
- localhost:8080/user?method=add
- localhost:8080/user?method=delete
MVC****框架要做哪些事情
-
将url映射到java类或java类的方法 .
-
封装用户提交的数据 .
-
处理请求–调用相关的业务处理–封装响应数据 .
-
将响应的数据进行渲染 . jsp / html 等表示层数据 .
说明:
常见的服务器端MVC框架有:Struts、Spring MVC、ASP.NET MVC、Zend Framework、JSF;常见前端MVC框架:vue、angularjs、react、backbone;由MVC演化出了另外一些模式如:MVP、MVVM等等…
2、什么是SpringMVC
2.1、概述

Spring MVC是Spring Framework的一部分,是基于Java实现MVC的轻量级Web框架。
官方文档:Web on Servlet Stack (spring.io)
我们为什么要学习SpringMVC呢?
SpringMVC 的特点:
- 轻量级,简单易学
- 高效,基于请求响应的MVC框架
- 与Spring兼容性好,无缝结合
- 约定优于配置
- 功能强大:RESTful、数据验证、格式化、本地化、主题等
- 简洁灵活
Spring的Web框架围绕DispatcherServlet【调度Servlet】设计。
DispatcherServlet 的作用是将请求分发到不同的处理器。从Spring 2.5开始,使用Java 5或者以上版本的用户可以采用基于注解形式进行开发,十分简洁;
正因为SpringMVC好,简单 , 便捷 , 易学 , 天生和Spring无缝集成(使用SpringIoC和Aop) , 使用约定优于配置 。能够进行简单的junit测试 . 支持Restful风格 .异常处理 , 本地化 , 国际化 , 数据验证 , 类型转换 , 拦截器 等等…所以我们要学习 。
最重要的一点还是用的人多,使用的公司多 .
2.2、中心控制器
Spring的web框架围绕DispatcherServlet设计。DispatcherServlet的作用是将请求分发到不同的处理器。从Spring 2.5开始,使用Java 5或者以上版本的用户可以采用基于注解的controller声明方式。
Spring MVC框架像许多其他MVC框架一样, 以请求为驱动 , 围绕一个中心Servlet分派请求及提供其他功能,DispatcherServlet是一个实际的Servlet (它继承自HttpServlet 基类)。
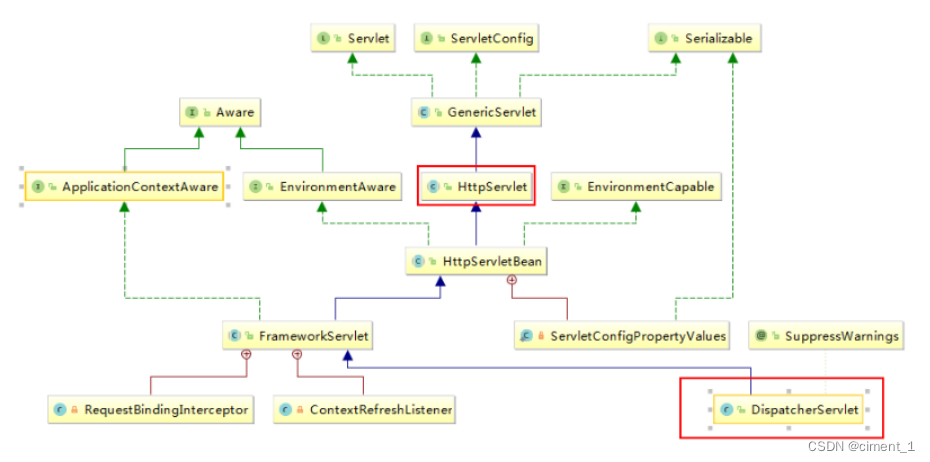
SpringMVC 的原理如下图所示:
当发起请求时被前置的控制器拦截到请求,根据请求参数生成代理请求,找到请求对应的实际控制器,控制器处理请求,创建数据模型,访问数据库,将模型响应给中心控制器,控制器使用模型与视图渲染视图结果,将结果返回给中心控制器,再将结果返回给请求者。
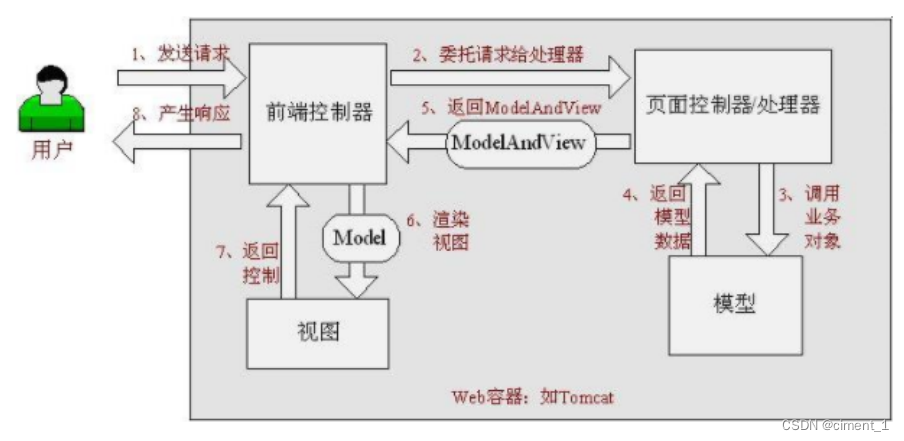
2.3、SpringMVC 执行原理
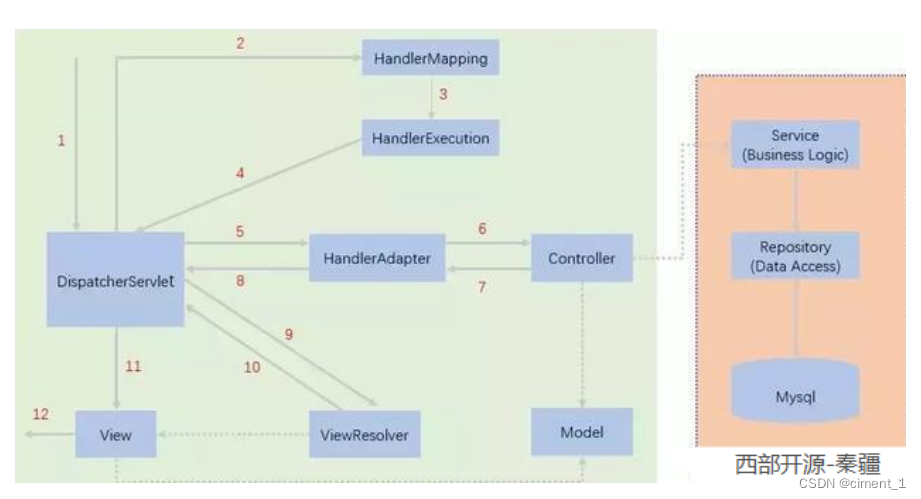
图为SpringMVC的一个较完整的流程图,实线表示SpringMVC框架提供的技术,不需要开发者实现,虚线表示需要开发者实现。
简要分析执行流程
-
DispatcherServlet 表示前置控制器,是整个SpringMVC的控制中心。用户发出请求,DispatcherServlet接收请求并拦截请求。
-
HandlerMapping为处理器映射。DispatcherServlet调用HandlerMapping,HandlerMapping根据请求url查找Handler。
-
HandlerExecution表示具体的Handler,其主要作用是根据url查找控制器,如上url被查找控制器为:hello。
-
HandlerExecution将解析后的信息传递给DispatcherServlet,如解析控制器映射等。
-
HandlerAdapter表示处理器适配器,其按照特定的规则去执行Handler。
-
Handler让具体的Controller执行。
-
Controller将具体的执行信息返回给HandlerAdapter,如ModelAndView。
-
HandlerAdapter将视图逻辑名或模型传递给DispatcherServlet。
-
DispatcherServlet调用视图解析器(ViewResolver)来解析HandlerAdapter传递的逻辑视图名。
-
视图解析器将解析的逻辑视图名传给DispatcherServlet。
-
DispatcherServlet根据视图解析器解析的视图结果,调用具体的视图。
-
最终视图呈现给用户。
在这里先听一遍原理,不理解没有关系,我们马上来写一个对应的代码实现大家就明白了,如果不明白,那就写10遍,没有笨人,只有懒人!
3、HelloSpring
3.1、配置版
-
新建一个Moudle , springmvc-02-hello , 添加web的支持!
-
确定导入了SpringMVC 的依赖!
-
配置web.xml , 注册DispatcherServlet
<?xml version="1.0" encoding="UTF-8"?> <web-app xmlns="http://xmlns.jcp.org/xml/ns/javaee" xmlns:xsi="http://www.w3.org/2001/XMLSchema-instance" xsi:schemaLocation="http://xmlns.jcp.org/xml/ns/javaee http://xmlns.jcp.org/xml/ns/javaee/web-app_4_0.xsd" version="4.0"> <!--1.注册DispatcherServlet--> <servlet> <servlet-name>springmvc</servlet-name> <servlet-class>org.springframework.web.servlet.DispatcherServlet</servlet-class> <!--关联一个springmvc的配置文件:【servlet-name】-servlet.xml--> <init-param> <param-name>contextConfigLocation</param-name> <param-value>classpath:springmvc-servlet.xml</param-value> </init-param> <!--启动级别-1--> <load-on-startup>1</load-on-startup> </servlet> <!--/ 匹配所有的请求;(不包括.jsp)--> <!--/* 匹配所有的请求;(包括.jsp)--> <servlet-mapping> <servlet-name>springmvc</servlet-name> <url-pattern>/</url-pattern> </servlet-mapping> </web-app> -
编写SpringMVC 的 配置文件!名称:springmvc-servlet.xml : [servletname]-servlet.xml
说明,这里的名称要求是按照官方来的
<?xml version="1.0" encoding="UTF-8"?> <beans xmlns="http://www.springframework.org/schema/beans" xmlns:xsi="http://www.w3.org/2001/XMLSchema-instance" xsi:schemaLocation="http://www.springframework.org/schema/beans http://www.springframework.org/schema/beans/spring-beans.xsd"> </beans> -
添加 处理映射器
<bean class="org.springframework.web.servlet.handler.BeanNameUrlHandlerMapping" /> -
添加 处理器适配器
<bean class="org.springframework.web.servlet.mvc.SimpleControllerHandlerAdapter "/> -
添加 视图解析器
<!--视图解析器:DispatcherServlet给他的ModelAndView--> <bean class="org.springframework.web.servlet.view.InternalResourceViewResolver" id="InternalResourceViewResolver"> <!--前缀--> <property name="prefix" value="/WEB-INF/jsp/"/> <!--后缀--> <property name="suffix" value=".jsp"/> </bean> -
编写我们要操作业务Controller ,要么实现Controller接口,要么增加注解;需要返回一个
ModelAndView,装数据,封视图;
package com.kuang.controller; import org.springframework.web.servlet.ModelAndView; import org.springframework.web.servlet.mvc.Controller; import javax.servlet.http.HttpServletRequest; import javax.servlet.http.HttpServletResponse; //注意:这里我们先导入Controller接口 public class HelloController implements Controller { public ModelAndView handleRequest(HttpServletRequest request, HttpServletResponse response) throws Exception { //ModelAndView 模型和视图 ModelAndView mv = new ModelAndView(); //封装对象,放在ModelAndView中。 Model mv.addObject("msg","HelloSpringMVC!"); //封装要跳转的视图,放在ModelAndView中 mv.setViewName("hello"); //: /WEB-INF/jsp/hello.jsp return mv; } } -
将自己的类交给SpringIOC容器,注册bean
<!--Handler--> <bean id="/hello" class="com.kuang.controller.HelloController"/> -
写要跳转的jsp页面,显示ModelandView存放的数据,以及我们的正常页面;
<%@ page contentType="text/html;charset=UTF-8" language="java" %> <html> <head> <title>Kuangshen</title> </head> <body> ${msg} </body> </html> -
配置Tomcat 启动测试!
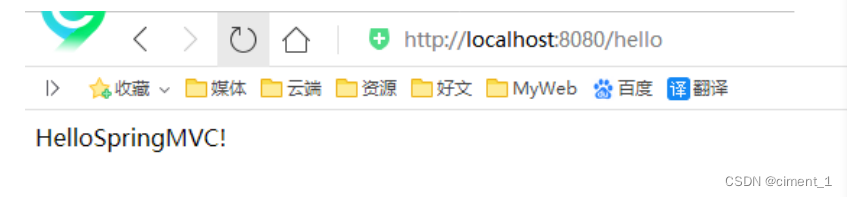
可能遇到的问题:访问出现404,排查步骤:
-
查看控制台输出,看一下是不是缺少了什么jar包。
-
如果jar包存在,显示无法输出,就在IDEA的项目发布中,添加lib依赖!
-
重启Tomcat 即可解决!
小结:看这个估计大部分同学都能理解其中的原理了,但是我们实际开发才不会这么写,不然就疯了,还学这个玩意干嘛!我们来看个注解版实现,这才是SpringMVC的精髓,到底有多么简单,看这个图就知道了。

3.2、注解版
-
新建一个Moudle,springmvc-03-hello-annotation 。添加web支持!
建立包结构 com.kuang.controller -
由于Maven可能存在资源过滤的问题,我们将配置完善
<build> <resources> <resource> <directory>src/main/java</directory> <includes> <include>**/*.properties</include> <include>**/*.xml</include> </includes> <filtering>false</filtering> </resource> <resource> <directory>src/main/resources</directory> <includes> <include>**/*.properties</include> <include>**/*.xml</include> </includes> <filtering>false</filtering> </resource> </resources> </build> -
在pom.xml文件引入相关的依赖:主要有Spring框架核心库、Spring MVC、servlet , JSTL等。我们在父依赖中已经引入了!
-
配置web.xml
注意点:
- 注意web.xml版本问题,要最新版!
- 注册DispatcherServlet
- 关联SpringMVC的配置文件
- 启动级别为1
- 映射路径为 / 【不要用/*,会404】
/ 和 /* 的区别:
< url-pattern > / </ url-pattern > 不会匹配到.jsp, 只针对我们编写的请求;
即:.jsp 不会进入spring的 DispatcherServlet类 。
< url-pattern > /* </ url-pattern > 会匹配 *.jsp,
会出现返回 jsp视图 时再次进入spring的DispatcherServlet 类,导致找不到对应的controller所以
报404错
-
添加Spring MVC配置文件
- 让IOC的注解生效
- 静态资源过滤 :HTML . JS . CSS . 图片 , 视频 …
- MVC的注解驱动
- 配置视图解析器
在resource目录下添加springmvc-servlet.xml配置文件,配置的形式与Spring容器配置基本类似,为了支持基于注解的IOC,设置了自动扫描包的功能,具体配置信息如下:
在视图解析器中我们把所有的视图都存放在/WEB-INF/目录下,这样可以保证视图安全,因为这个目录下的文件,客户端不能直接访问。
-
创建Controller
编写一个Java控制类: com.kuang.controller.HelloController , 注意编码规范
package com.kuang.controller; import org.springframework.stereotype.Controller; import org.springframework.ui.Model; import org.springframework.web.bind.annotation.RequestMapping; @Controller @RequestMapping("/HelloController") public class HelloController { //真实访问地址 : 项目名/HelloController/hello @RequestMapping("/hello") public String sayHello(Model model){ //向模型中添加属性msg与值,可以在JSP页面中取出并渲染 model.addAttribute("msg","hello,SpringMVC"); //web-inf/jsp/hello.jsp return "hello"; } }- @Controller是为了让Spring IOC容器初始化时自动扫描到;
- @RequestMapping是为了映射请求路径,这里因为类与方法上都有映射所以访问时应该是/HelloController/hello;
- 方法中声明Model类型的参数是为了把Action中的数据带到视图中;
- 方法返回的结果是视图的名称hello,加上配置文件中的前后缀变成WEB-INF/jsp/hello.jsp。
-
创建视图层
在WEB-INF/ jsp目录中创建hello.jsp , 视图可以直接取出并展示从Controller带回的信息;可以通过EL表示取出Model中存放的值,或者对象;
<%@ page contentType="text/html;charset=UTF-8" language="java" %> <html> <head> <title>SpringMVC</title> </head> <body> ${msg} </body> </html> -
配置Tomcat运行
配置Tomcat , 开启服务器 , 访问 对应的请求路径!
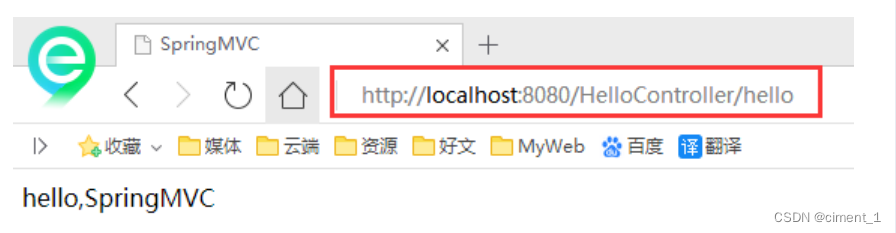
OK,运行成功!
3.3、小结
实现步骤其实非常的简单:
新建一个web项目
导入相关jar包
编写web.xml , 注册DispatcherServlet
编写springmvc配置文件
接下来就是去创建对应的控制类 , controller
最后完善前端视图和controller之间的对应
测试运行调试
使用springMVC必须配置的三大件:
处理器映射器、处理器适配器、视图解析器
通常,我们只需要手动配置视图解析器,而处理器映射器和处理器适配器只需要开启注解驱动即可,而
省去了大段的xml配置
4、Controller 及 RestFul
4.1、控制器Controller
- 控制器复杂提供访问应用程序的行为,通常通过接口定义或注解定义两种方法实现。
- 控制器负责解析用户的请求并将其转换为一个模型。
- 在Spring MVC中一个控制器类可以包含多个方法
- 在Spring MVC中,对于Controller的配置方式有很多种
我们来看看有哪些方式可以实现:
4.2、实现Controller接口
Controller是一个接口,在org.springframework.web.servlet.mvc包下,接口中只有一个方法;
//实现该接口的类获得控制器功能
public interface Controller {
//处理请求且返回一个模型与视图对象
ModelAndView handleRequest(HttpServletRequest var1, HttpServletResponse var2) throws Exception;
}
测试
-
新建一个Moudle,springmvc-04-controller 。 将刚才的03 拷贝一份, 我们进行操作!
- 删掉HelloControlle
- mvc的配置文件只留下 视图解析器!
-
编写一个Controller类,ControllerTest1
//定义控制器 //注意点:不要导错包,实现Controller接口,重写方法; public class ControllerTest1 implements Controller { public ModelAndView handleRequest(HttpServletRequest httpServletRequest, HttpServletResponse httpServletResponse) throws Exception { //返回一个模型视图对象 ModelAndView mv = new ModelAndView(); mv.addObject("msg","Test1Controller"); mv.setViewName("test"); return mv; } } -
编写完毕后,去Spring配置文件中注册请求的bean;name对应请求路径,class对应处理请求的类
<bean name="/t1" class="com.kuang.controller.ControllerTest1"/> -
编写前端test.jsp,注意在WEB-INF/jsp目录下编写,对应我们的视图解析器
<%@ page contentType="text/html;charset=UTF-8" language="java" %> <html> <head> <title>Kuangshen</title> </head> <body> ${msg} </body> </html> -
配置Tomcat运行测试,我这里没有项目发布名配置的就是一个 / ,所以请求不用加项目名,OK!
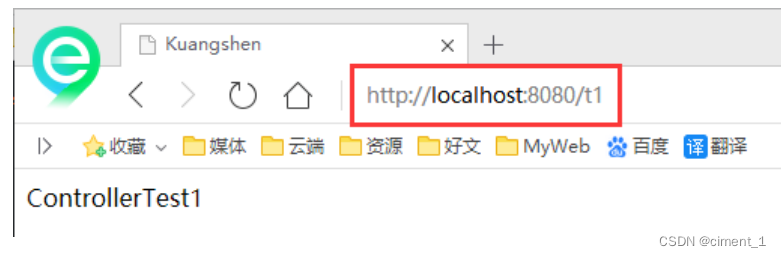
说明:
- 实现接口Controller定义控制器是较老的办法
- 缺点是:一个控制器中只有一个方法,如果要多个方法则需要定义多个Controller;定义的方式比较麻烦;
4.3、使用注解@Controller
-
@Controller注解类型用于声明Spring类的实例是一个控制器(在讲IOC时还提到了另外3个注解);
-
Spring可以使用扫描机制来找到应用程序中所有基于注解的控制器类,为了保证Spring能找到你的控制器,需要在配置文件中声明组件扫描。
<!-- 自动扫描指定的包,下面所有注解类交给IOC容器管理 --> <context:component-scan base-package="com.kuang.controller"/> -
增加一个ControllerTest2类,使用注解实现;
//@Controller注解的类会自动添加到Spring上下文中 @Controller public class ControllerTest2{ //映射访问路径 @RequestMapping("/t2") public String index(Model model){ //Spring MVC会自动实例化一个Model对象用于向视图中传值 model.addAttribute("msg", "ControllerTest2"); //返回视图位置 return "test"; } } -
运行tomcat测试
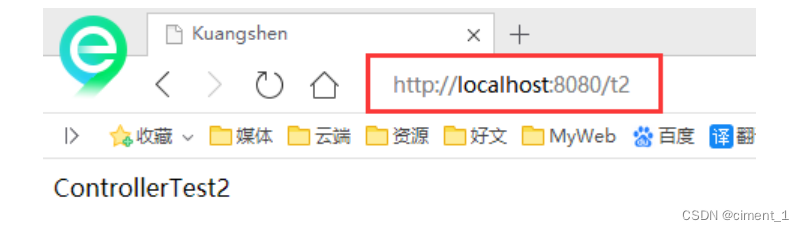
可以发现,我们的两个请求都可以指向一个视图,但是页面结果的结果是不一样的,从这里可以看出视图是被复用的,而控制器与视图之间是弱偶合关系。
4.4、RequestMapping
@RequestMapping
-
@RequestMapping注解用于映射url到控制器类或一个特定的处理程序方法。可用于类或方法上。用于类上,表示类中的所有响应请求的方法都是以该地址作为父路径。
-
为了测试结论更加准确,我们可以加上一个项目名测试 myweb
-
只注解在方法上面
@Controller public class TestController { @RequestMapping("/h1") public String test(){ return "test"; } }访问路径:http://localhost:8080 / 项目名 / h1
-
同时注解类与方法
@Controller @RequestMapping("/admin") public class TestController { @RequestMapping("/h1") public String test(){ return "test"; } }访问路径:http://localhost:8080 / 项目名/ admin /h1 , 需要先指定类的路径再指定方法的路径;
4.5、RestFul 风格
概念
- Restful就是一个资源定位及资源操作的风格。不是标准也不是协议,只是一种风格。基于这个风格设计的软件可以更简洁,更有层次,更易于实现缓存等机制。
功能
- 资源:互联网所有的事物都可以被抽象为资源
- 资源操作:使用POST、DELETE、PUT、GET,使用不同方法对资源进行操作。
- 分别对应 添加、 删除、修改、查询
传统方式操作资源 :通过不同的参数来实现不同的效果!方法单一,post 和 get
- http://127.0.0.1/item/queryItem.action?id=1 查询,GET
- http://127.0.0.1/item/saveItem.action 新增,POST
- http://127.0.0.1/item/updateItem.action 更新,POST
- http://127.0.0.1/item/deleteItem.action?id=1 删除,GET或POST
使用RESTful操作资源 : 可以通过不同的请求方式来实现不同的效果!如下:请求地址一样,但是功能可以不同!
- http://127.0.0.1/item/1 查询,GET
- http://127.0.0.1/item 新增,POST
- http://127.0.0.1/item 更新,PUT
- http://127.0.0.1/item/1 删除,DELETE
学习测试
-
在新建一个类 RestFulController
@Controller public class RestFulController { } -
在Spring MVC中可以使用 @PathVariable 注解,让方法参数的值对应绑定到一个URI模板变量
上。
@Controller public class RestFulController { //映射访问路径 @RequestMapping("/commit/{p1}/{p2}") public String index(@PathVariable int p1, @PathVariable int p2, Model model){ int result = p1+p2; //Spring MVC会自动实例化一个Model对象用于向视图中传值 model.addAttribute("msg", "结果:"+result); //返回视图位置 return "test"; } } -
我们来测试请求查看下
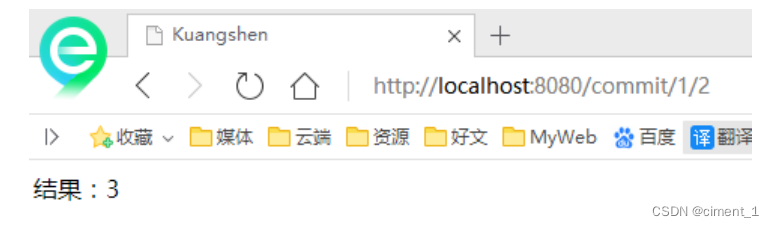
思考:使用路径变量的好处?
-
使路径变得更加简洁;
-
获得参数更加方便,框架会自动进行类型转换。
-
通过路径变量的类型可以约束访问参数,如果类型不一样,则访问不到对应的请求方法,如这里访问是的路径是/commit/1/a,则路径与方法不匹配,而不会是参数转换失败。
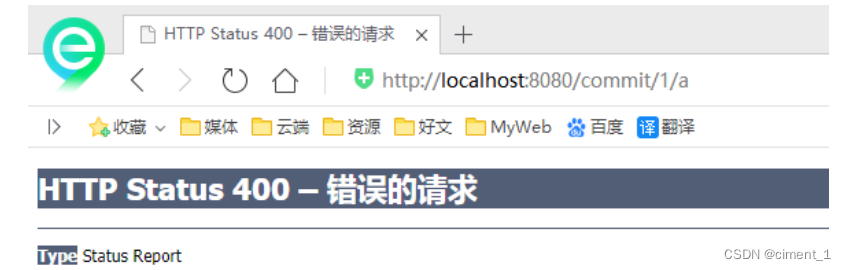
-
-
我们来修改下对应的参数类型,再次测试
//映射访问路径 @RequestMapping("/commit/{p1}/{p2}") public String index(@PathVariable int p1, @PathVariable String p2, Model model){ String result = p1+p2; //Spring MVC会自动实例化一个Model对象用于向视图中传值 model.addAttribute("msg", "结果:"+result); //返回视图位置 return "test"; }
使用method属性指定请求类型
用于约束请求的类型,可以收窄请求范围。指定请求谓词的类型如GET, POST, HEAD, OPTIONS, PUT, PATCH, DELETE, TRACE等
我们来测试一下:
-
增加一个方法
//映射访问路径,必须是POST请求 @RequestMapping(value = "/hello",method = {RequestMethod.POST}) public String index2(Model model){ model.addAttribute("msg", "hello!"); return "test"; } -
我们使用浏览器地址栏进行访问默认是Get请求,会报错405:
-
如果将POST修改为GET则正常了;
//映射访问路径,必须是Get请求 @RequestMapping(value = "/hello",method = {RequestMethod.GET}) public String index2(Model model){ model.addAttribute("msg", "hello!"); return "test"; }
小结:
Spring MVC 的 @RequestMapping 注解能够处理 HTTP 请求的方法, 比如 GET, PUT, POST, DELETE 以 及 PATCH。
所有的地址栏请求默认都会是HTTP GET类型的。
方法级别的注解变体有如下几个: 组合注解
@GetMapping
@PostMapping
@PutMapping
@DeleteMapping
@PatchMapping
@GetMapping 是一个组合注解
它所扮演的是 @RequestMapping(method =RequestMethod.GET) 的一个快捷方式。
平时使用的会比较多
4.6、小黄鸭调试法
场景一:我们都有过向别人(甚至可能向完全不会编程的人)提问及解释编程问题的经历,但是很多时 候就在我们解释的过程中自己却想到了问题的解决方案,然后对方却一脸茫然。
场景二:你的同行跑来问你一个问题,但是当他自己把问题说完,或说到一半的时候就想出答案走了,留下一脸茫然的你。
其实上面两种场景现象就是所谓的小黄鸭调试法(Rubber Duck Debuging),又称橡皮鸭调试法,它是我们软件工程中最常使用调试方法之一。
此概念据说来自《程序员修炼之道》书中的一个故事,传说程序大师随身携带一只小黄鸭,在调试代码的时候会在桌上放上这只小黄鸭,然后详细地向鸭子解释每行代码,然后很快就将问题定位修复了。
我可以做一套视频,个人讲解实战项目
5、结果跳转方式
5.1、ModelAndView
设置ModelAndView对象 , 根据view的名称 , 和视图解析器跳到指定的页面 .
页面 : {视图解析器前缀} + viewName +{视图解析器后缀}
<!-- 视图解析器 -->
<bean class="org.springframework.web.servlet.view.InternalResourceViewResolver"
id="internalResourceViewResolver">
<!-- 前缀 -->
<property name="prefix" value="/WEB-INF/jsp/" />
<!-- 后缀 -->
<property name="suffix" value=".jsp" />
</bean>
对应的controller类
public class ControllerTest1 implements Controller {
public ModelAndView handleRequest(HttpServletRequest httpServletRequest, HttpServletResponse httpServletResponse) throws Exception {
//返回一个模型视图对象
ModelAndView mv = new ModelAndView();
mv.addObject("msg","ControllerTest1");
mv.setViewName("test");
return mv;
}
}
5.2、ServletAPI
通过设置ServletAPI , 不需要视图解析器 .
-
通过HttpServletResponse进行输出
-
通过HttpServletResponse实现重定向
-
通过HttpServletResponse实现转发
@Controller
public class ResultGo {
@RequestMapping("/result/t1")
public void test1(HttpServletRequest req, HttpServletResponse rsp) throws IOException {
rsp.getWriter().println("Hello,Spring BY servlet API");
}
@RequestMapping("/result/t2")
public void test2(HttpServletRequest req, HttpServletResponse rsp) throws IOException {
rsp.sendRedirect("/index.jsp");
}
@RequestMapping("/result/t3")
public void test3(HttpServletRequest req, HttpServletResponse rsp) throws Exception {
//转发
req.setAttribute("msg","/result/t3");
req.getRequestDispatcher("/WEB-INF/jsp/test.jsp").forward(req,rsp);
}
}
5.3、SpringMVC
通过SpringMVC来实现转发和重定向 - 无需视图解析器;
测试前,需要将视图解析器注释掉
@Controller public class ResultSpringMVC {
@RequestMapping("/rsm/t1")
public String test1(){
//转发
return "/index.jsp";
}
@RequestMapping("/rsm/t2")
public String test2(){
//转发二
return "forward:/index.jsp";
}
@RequestMapping("/rsm/t3")
public String test3(){
//重定向
return "redirect:/index.jsp";
}
}
通过SpringMVC来实现转发和重定向 - 有视图解析器;
重定向 , 不需要视图解析器 , 本质就是重新请求一个新地方嘛 , 所以注意路径问题.
可以重定向到另外一个请求实现 .
@Controller public class ResultSpringMVC2 {
@RequestMapping("/rsm2/t1")
public String test1(){
//转发
return "test";
}
@RequestMapping("/rsm2/t2")
public String test2(){
//重定向
return "redirect:/index.jsp";
//return "redirect:hello.do"; //hello.do为另一个请求/
}
}
6、数据处理
6.1、处理提交数据
1、提交的域名称和处理方法的参数名一致
提交数据 : http://localhost:8080/hello?name=kuangshen
处理方法 :
@RequestMapping("/hello")
public String hello(String name){
System.out.println(name);
return "hello";
}
输出:kuangshen
2、提交的域名称和处理方法的参数名不一致
提交数据 : http://localhost:8080/hello?username=kuangshen
处理方法 :
//@RequestParam("username") : username提交的域的名称 .
@RequestMapping("/hello")
public String hello(@RequestParam("username") String name){
System.out.println(name);
return "hello";
}
后台输出 : kuangshen
3、提交的是一个对象
要求提交的表单域和对象的属性名一致 , 参数使用对象即可
-
实体类
public class User { private int id; private String name; private int age; //构造 //get/set //tostring() } -
提交数据 : http://localhost:8080/mvc04/user?name=kuangshen&id=1&age=15
-
处理方法 :
@RequestMapping("/user") public String user(User user){ System.out.println(user); return "hello"; }后台输出 : User { id=1, name=‘kuangshen’, age=15 }
说明:如果使用对象的话,前端传递的参数名和对象名必须一致,否则就是null。
6.2、数据显示到前端
第一种 : 通过ModelAndView
我们前面一直都是如此 . 就不过多解释
public class ControllerTest1 implements Controller {
public ModelAndView handleRequest(HttpServletRequest httpServletRequest,HttpServletResponse httpServletResponse) throws Exception {
//返回一个模型视图对象
ModelAndView mv = new ModelAndView();
mv.addObject("msg","ControllerTest1");
mv.setViewName("test");
return mv;
}
}
第二种 : 通过ModelMap
ModelMap
@RequestMapping("/hello")
public String hello(@RequestParam("username") String name, ModelMap model){
//封装要显示到视图中的数据
//相当于req.setAttribute("name",name);
model.addAttribute("name",name);
System.out.println(name);
return "hello";
}
第三种 :通过Model
Model
@RequestMapping("/ct2/hello")
public String hello(@RequestParam("username") String name, Model model){
//封装要显示到视图中的数据
//相当于req.setAttribute("name",name);
model.addAttribute("msg",name);
System.out.println(name);
return "test";
}
6.3、对比
就对于新手而言简单来说使用区别就是:
Model 只有寥寥几个方法只适合用于储存数据,简化了新手对于Model对象的操作和理解;
ModelMap 继承了 LinkedMap ,除了实现了自身的一些方法,同样的继承 LinkedMap 的方法和特性;
ModelAndView 可以在储存数据的同时,可以进行设置返回的逻辑视图,进行控制展示层的跳转。
当然更多的以后开发考虑的更多的是性能和优化,就不能单单仅限于此的了解。
请使用80%的时间打好扎实的基础,剩下18%的时间研究框架,2%的时间去学点英文,框架的官方文档永远是最好的教程。
6.4、乱码问题()
测试步骤:
-
我们可以在首页编写一个提交的表单
<form action="/e/t" method="post"> <input type="text" name="name"> <input type="submit"> </form> -
后台编写对应的处理类
@Controller public class Encoding { @RequestMapping("/e/t") public String test(Model model,String name){ model.addAttribute("msg",name); //获取表单提交的值 return "test"; //跳转到test页面显示输入的值 } }
歇一下
7、整合SSM
7.1、环境要求
环境:
- IDEA
- MySQL 5.7.19
- Tomcat 9
- Maven 3.6
要求:
- 需要熟练掌握MySQL数据库,Spring,JavaWeb及MyBatis知识,简单的前端知识;
7.2、数据库环境
创建一个存放书籍数据的数据库表
CREATE DATABASE `ssmbuild`;
USE `ssmbuild`;
DROP TABLE IF EXISTS `books`;
CREATE TABLE `books` (
`bookID` INT(10) NOT NULL AUTO_INCREMENT COMMENT '书id',
`bookName` VARCHAR(100) NOT NULL COMMENT '书名',
`bookCounts` INT(11) NOT NULL COMMENT '数量',
`detail` VARCHAR(200) NOT NULL COMMENT '描述',
KEY `bookID` (`bookID`)
) ENGINE=INNODB DEFAULT CHARSET=utf8
INSERT INTO `books`(`bookID`,`bookName`,`bookCounts`,`detail`)VALUES
(1,'Java',1,'从入门到放弃'),
(2,'MySQL',10,'从删库到跑路'),
(3,'Linux',5,'从进门到进牢');
7.3、基本环境搭建
-
新建一Maven项目! ssmbuild , 添加web的支持
-
导入相关的pom依赖!
<dependencies> <!--Junit--> <dependency> <groupId>junit</groupId> <artifactId>junit</artifactId> <version>4.12</version> </dependency> <!--数据库驱动--> <dependency> <groupId>mysql</groupId> <artifactId>mysql-connector-java</artifactId> <version>5.1.47</version> </dependency> <!-- 数据库连接池 --> <dependency> <groupId>com.mchange</groupId> <artifactId>c3p0</artifactId> <version>0.9.5.2</version> </dependency> <!--Servlet - JSP --> <dependency> <groupId>javax.servlet</groupId> <artifactId>servlet-api</artifactId> <version>2.5</version> </dependency> <dependency> <groupId>javax.servlet.jsp</groupId> <artifactId>jsp-api</artifactId> <version>2.2</version> </dependency> <dependency> <groupId>javax.servlet</groupId> <artifactId>jstl</artifactId> <version>1.2</version> </dependency> <!--Mybatis--> <dependency> <groupId>org.mybatis</groupId> <artifactId>mybatis</artifactId> <version>3.5.2</version> </dependency> <dependency> <groupId>org.mybatis</groupId> <artifactId>mybatis-spring</artifactId> <version>2.0.2</version> </dependency> <!--Spring--> <dependency> <groupId>org.springframework</groupId> <artifactId>spring-webmvc</artifactId> <version>5.1.9.RELEASE</version> </dependency> <dependency> <groupId>org.springframework</groupId> <artifactId>spring-jdbc</artifactId> <version>5.1.9.RELEASE</version> </dependency> </dependencies> -
Maven资源过滤设置
<build> <resources> <resource> <directory>src/main/java</directory> <includes> <include>**/*.properties</include> <include>**/*.xml</include> </includes> <filtering>false</filtering> </resource> <resource> <directory>src/main/resources</directory> <includes> <include>**/*.properties</include> <include>**/*.xml</include> </includes> <filtering>false</filtering> </resource> </resources> </build> -
建立基本结构和配置框架!
-
com.kuang.pojo
-
com.kuang.dao
-
com.kuang.service
-
com.kuang.controller
-
mybatis-confifig
<?xml version="1.0" encoding="UTF-8" ?> <!DOCTYPE configuration PUBLIC "-//mybatis.org//DTD Config 3.0//EN" "http://mybatis.org/dtd/mybatis-3-config.dtd"> <configuration> </configuration> -
applicationContext.xml
<?xml version="1.0" encoding="UTF-8"?> <beans xmlns="http://www.springframework.org/schema/beans" xmlns:xsi="http://www.w3.org/2001/XMLSchema-instance" xsi:schemaLocation="http://www.springframework.org/schema/beans http://www.springframework.org/schema/beans/springbeans.xsd"> </beans>
-
7.4、Mybatis层编写
-
数据库配置文件 database.properties
jdbc.driver=com.mysql.jdbc.Driver jdbc.url=jdbc:mysql://localhost:3306/ssmbuild? useSSL=true&useUnicode=true&characterEncoding=utf8 jdbc.username=root jdbc.password=123456 -
IDEA关联数据库
-
编写MyBatis的核心配置文件
<?xml version="1.0" encoding="UTF-8" ?> <!DOCTYPE configuration PUBLIC "-//mybatis.org//DTD Config 3.0//EN" "http://mybatis.org/dtd/mybatis-3-config.dtd"> <configuration> <typeAliases> <package name="com.kuang.pojo"/> </typeAliases> <mappers> <mapper resource="com/kuang/dao/BookMapper.xml"/> </mappers> </configuration> -
编写数据库对应的实体类 com.kuang.pojo.Books
使用lombok插件!@Data @AllArgsConstructor @NoArgsConstructor public class Books { private int bookID; private String bookName; private int bookCounts; private String detail; } -
编写Dao层的 Mapper接口!
public interface BookMapper { //增加一个Book int addBook(Books book); //根据id删除一个Book int deleteBookById(int id); //更新Book int updateBook(Books books); //根据id查询,返回一个Book Books queryBookById(int id); //查询全部Book,返回list集合 List<Books> queryAllBook(); } -
编写接口对应的 Mapper.xml 文件。需要导入MyBatis的包;
<?xml version="1.0" encoding="UTF-8" ?> <!DOCTYPE mapper PUBLIC "-//mybatis.org//DTD Mapper 3.0//EN" "http://mybatis.org/dtd/mybatis-3-mapper.dtd"> <mapper namespace="com.kuang.dao.BookMapper"> <!--增加一个Book--> <insert id="addBook" parameterType="Books"> insert into ssmbuild.books(bookName,bookCounts,detail) values (#{bookName}, #{bookCounts}, #{detail}) </insert> <!--根据id删除一个Book--> <delete id="deleteBookById" parameterType="int"> delete from ssmbuild.books where bookID=#{bookID} </delete> <!--更新Book--> <update id="updateBook" parameterType="Books"> update ssmbuild.books set bookName = #{bookName},bookCounts = #{bookCounts},detail = #{detail} where bookID = #{bookID} </update> <!--根据id查询,返回一个Book--> <select id="queryBookById" resultType="Books"> select * from ssmbuild.books where bookID = #{bookID} </select> <!--查询全部Book--> <select id="queryAllBook" resultType="Books"> SELECT * from ssmbuild.books </select> </mapper> -
编写Service层的接口和实现类
//BookService:底下需要去实现,调用dao层 public interface BookService { //增加一个Book int addBook(Books book); //根据id删除一个Book int deleteBookById(int id); //更新Book int updateBook(Books books); //根据id查询,返回一个Book Books queryBookById(int id); //查询全部Book,返回list集合 List<Books> queryAllBook(); }public class BookServiceImpl implements BookService { //调用dao层的操作,设置一个set接口,方便Spring管理 private BookMapper bookMapper; public void setBookMapper(BookMapper bookMapper) { this.bookMapper = bookMapper; } public int addBook(Books book) { return bookMapper.addBook(book); } public int deleteBookById(int id) { return bookMapper.deleteBookById(id); } public int updateBook(Books books) { return bookMapper.updateBook(books); } public Books queryBookById(int id) { return bookMapper.queryBookById(id); } public List<Books> queryAllBook() { return bookMapper.queryAllBook(); } }
OK,到此,底层需求操作编写完毕!
7.5、Spring层
-
配置Spring整合MyBatis,我们这里数据源使用c3p0连接池;
-
我们去编写Spring整合Mybatis的相关的配置文件; spring-dao.xml
<?xml version="1.0" encoding="UTF-8"?> <beans xmlns="http://www.springframework.org/schema/beans" xmlns:xsi="http://www.w3.org/2001/XMLSchema-instance" xmlns:context="http://www.springframework.org/schema/context" xsi:schemaLocation="http://www.springframework.org/schema/beans http://www.springframework.org/schema/beans/spring-beans.xsd http://www.springframework.org/schema/context https://www.springframework.org/schema/context/springcontext.xsd"> <!-- 配置整合mybatis --> <!-- 1.关联数据库文件 --> <context:property-placeholder location="classpath:database.properties"/> <!-- 2.数据库连接池 --> <!--数据库连接池 dbcp 半自动化操作 不能自动连接 c3p0 自动化操作(自动的加载配置文件 并且设置到对象里面) --> <bean id="dataSource" class="com.mchange.v2.c3p0.ComboPooledDataSource"> <!-- 配置连接池属性 --> <property name="driverClass" value="${jdbc.driver}"/> <property name="jdbcUrl" value="${jdbc.url}"/> <property name="user" value="${jdbc.username}"/> <property name="password" value="${jdbc.password}"/> <!-- c3p0连接池的私有属性 --> <property name="maxPoolSize" value="30"/> <property name="minPoolSize" value="10"/> <!-- 关闭连接后不自动commit --> <property name="autoCommitOnClose" value="false"/> <!-- 获取连接超时时间 --> <property name="checkoutTimeout" value="10000"/> <!-- 当获取连接失败重试次数 --> <property name="acquireRetryAttempts" value="2"/> </bean> <!-- 3.配置SqlSessionFactory对象 --> <bean id="sqlSessionFactory" class="org.mybatis.spring.SqlSessionFactoryBean"> <!-- 注入数据库连接池 --> <property name="dataSource" ref="dataSource"/> <!-- 配置MyBaties全局配置文件:mybatis-config.xml --> <property name="configLocation" value="classpath:mybatisconfig.xml"/> </bean> <!-- 4.配置扫描Dao接口包,动态实现Dao接口注入到spring容器中 --> <!--解释 : https://www.cnblogs.com/jpfss/p/7799806.html--> <bean class="org.mybatis.spring.mapper.MapperScannerConfigurer"> <!-- 注入sqlSessionFactory --> <property name="sqlSessionFactoryBeanName" value="sqlSessionFactory"/> <!-- 给出需要扫描Dao接口包 --> <property name="basePackage" value="com.kuang.dao"/> </bean> </beans> -
Spring整合service层
<?xml version="1.0" encoding="UTF-8"?> <beans xmlns="http://www.springframework.org/schema/beans" xmlns:xsi="http://www.w3.org/2001/XMLSchema-instance" xmlns:context="http://www.springframework.org/schema/context" xsi:schemaLocation="http://www.springframework.org/schema/beans http://www.springframework.org/schema/beans/spring-beans.xsd http://www.springframework.org/schema/context http://www.springframework.org/schema/context/spring-context.xsd"> <!-- 扫描service相关的bean --> <context:component-scan base-package="com.kuang.service" /> <!--BookServiceImpl注入到IOC容器中--> <bean id="BookServiceImpl" class="com.kuang.service.BookServiceImpl"> <property name="bookMapper" ref="bookMapper"/> </bean> <!-- 配置事务管理器 --> <bean id="transactionManager" class="org.springframework.jdbc.datasource.DataSourceTransactionManager"> <!-- 注入数据库连接池 --> <property name="dataSource" ref="dataSource" /> </bean> </beans>
Spring层搞定!再次理解一下,Spring就是一个大杂烩,一个容器!对吧!
7.6、SpringMVC层
-
web.xml
<?xml version="1.0" encoding="UTF-8"?> <web-app xmlns="http://xmlns.jcp.org/xml/ns/javaee" xmlns:xsi="http://www.w3.org/2001/XMLSchema-instance" xsi:schemaLocation="http://xmlns.jcp.org/xml/ns/javaee http://xmlns.jcp.org/xml/ns/javaee/web-app_4_0.xsd" version="4.0"> <!--DispatcherServlet--> <servlet> <servlet-name>DispatcherServlet</servlet-name> <servlet-class>org.springframework.web.servlet.DispatcherServlet</servlet-class> <init-param> <param-name>contextConfigLocation</param-name> <!--一定要注意:我们这里加载的是总的配置文件,之前被这里坑了!--> <param-value>classpath:applicationContext.xml</param-value> </init-param> <load-on-startup>1</load-on-startup> </servlet> <servlet-mapping> <servlet-name>DispatcherServlet</servlet-name> <url-pattern>/</url-pattern> </servlet-mapping> <!--encodingFilter--> <filter> <filter-name>encodingFilter</filter-name> <filter-class> org.springframework.web.filter.CharacterEncodingFilter </filter-class> <init-param> <param-name>encoding</param-name> <param-value>utf-8</param-value> </init-param> </filter> <filter-mapping> <filter-name>encodingFilter</filter-name> <url-pattern>/*</url-pattern> </filter-mapping> <!--Session过期时间--> <session-config> <session-timeout>15</session-timeout> </session-config> </web-app> -
spring-mvc.xml
<?xml version="1.0" encoding="UTF-8"?> <beans xmlns="http://www.springframework.org/schema/beans" xmlns:xsi="http://www.w3.org/2001/XMLSchema-instance" xmlns:context="http://www.springframework.org/schema/context" xmlns:mvc="http://www.springframework.org/schema/mvc" xsi:schemaLocation="http://www.springframework.org/schema/beans http://www.springframework.org/schema/beans/spring-beans.xsd http://www.springframework.org/schema/context http://www.springframework.org/schema/context/spring-context.xsd http://www.springframework.org/schema/mvc https://www.springframework.org/schema/mvc/spring-mvc.xsd"> <!-- 配置SpringMVC --> <!-- 1.开启SpringMVC注解驱动 --> <mvc:annotation-driven /> <!-- 2.静态资源默认servlet配置--> <mvc:default-servlet-handler/> <!-- 3.配置jsp 显示ViewResolver视图解析器 --> <bean class="org.springframework.web.servlet.view.InternalResourceViewResolver"> <property name="viewClass" value="org.springframework.web.servlet.view.JstlView" /> <property name="prefix" value="/WEB-INF/jsp/" /> <property name="suffix" value=".jsp" /> </bean> <!-- 4.扫描web相关的bean --> <context:component-scan base-package="com.kuang.controller" /> </beans> -
Spring配置整合文件,applicationContext.xml
<?xml version="1.0" encoding="UTF-8"?> <beans xmlns="http://www.springframework.org/schema/beans" xmlns:xsi="http://www.w3.org/2001/XMLSchema-instance" xsi:schemaLocation="http://www.springframework.org/schema/beans http://www.springframework.org/schema/beans/spring-beans.xsd"> <import resource="spring-dao.xml"/> <import resource="spring-service.xml"/> <import resource="spring-mvc.xml"/> </beans>
**配置文件,暂时结束!**Controller 和 视图层编写
-
BookController 类编写 , 方法一:查询全部书籍
@Controller @RequestMapping("/book") public class BookController { @Autowired @Qualifier("BookServiceImpl") private BookService bookService; @RequestMapping("/allBook") public String list(Model model) { List<Books> list = bookService.queryAllBook(); model.addAttribute("list", list); return "allBook"; } } -
编写首页 index.jsp
<%@ page language="java" contentType="text/html; charset=UTF-8" pageEncoding="UTF-8" %> <!DOCTYPE HTML> <html> <head> <title>首页</title> <style type="text/css"> a { text-decoration: none; color: black; font-size: 18px; } h3 { width: 180px; height: 38px; margin: 100px auto; text-align: center; line-height: 38px; background: deepskyblue; border-radius: 4px; } </style> </head> <body> <h3> <a href="${pageContext.request.contextPath}/book/allBook">点击进入列表页</a> </h3> </body> </html> -
书籍列表页面 allbook.jsp
<%@ taglib prefix="c" uri="http://java.sun.com/jsp/jstl/core" %> <%@ page contentType="text/html;charset=UTF-8" language="java" %> <html> <head> <title>书籍列表</title> <meta name="viewport" content="width=device-width, initial-scale=1.0"> <!-- 引入 Bootstrap --> <link href="https://cdn.bootcss.com/bootstrap/3.3.7/css/bootstrap.min.css" rel="stylesheet"> </head> <body> <div class="container"> <div class="row clearfix"> <div class="col-md-12 column"> <div class="page-header"> <h1> <small>书籍列表 —— 显示所有书籍</small> </h1> </div> </div> </div> <div class="row"> <div class="col-md-4 column"> <a class="btn btn-primary" href="${pageContext.request.contextPath}/book/toAddBook">新增</a> </div> </div> <div class="row clearfix"> <div class="col-md-12 column"> <table class="table table-hover table-striped"> <thead> <tr> <th>书籍编号</th> <th>书籍名字</th> <th>书籍数量</th> <th>书籍详情</th> <th>操作</th> </tr> </thead> <tbody> <c:forEach var="book" items="${requestScope.get('list')}"> <tr> <td>${book.getBookID()}</td> <td>${book.getBookName()}</td> <td>${book.getBookCounts()}</td> <td>${book.getDetail()}</td> <td> <a href="${pageContext.request.contextPath}/book/toUpdateBook?id=${book.getBookID()}">更改</a> | <a href="${pageContext.request.contextPath}/book/del/${book.getBookID()}">删除</a> </td> </tr> </c:forEach> </tbody> </table> </div> </div> </div> -
BookController 类编写 , 方法二:添加书籍
@RequestMapping("/toAddBook") public String toAddPaper() { return "addBook"; } @RequestMapping("/addBook") public String addPaper(Books books) { System.out.println(books); bookService.addBook(books); return "redirect:/book/allBook"; } -
添加书籍页面:addBook.jsp
<%@ taglib prefix="c" uri="http://java.sun.com/jsp/jstl/core" %> <%@ page contentType="text/html;charset=UTF-8" language="java" %> <html> <head> <title>新增书籍</title> <meta name="viewport" content="width=device-width, initial-scale=1.0"> <!-- 引入 Bootstrap --> <link href="https://cdn.bootcss.com/bootstrap/3.3.7/css/bootstrap.min.css"rel="stylesheet"> </head> <body> <div class="container"> <div class="row clearfix"> <div class="col-md-12 column"> <div class="page-header"> <h1> <small>新增书籍</small> </h1> </div> </div> </div> <form action="${pageContext.request.contextPath}/book/addBook" method="post"> 书籍名称:<input type="text" name="bookName"><br><br><br> 书籍数量:<input type="text" name="bookCounts"><br><br><br> 书籍详情:<input type="text" name="detail"><br><br><br> <input type="submit" value="添加"> </form> </div> -
BookController 类编写 , 方法三:修改书籍
@RequestMapping("/toUpdateBook") public String toUpdateBook(Model model, int id) { Books books = bookService.queryBookById(id); System.out.println(books); model.addAttribute("book",books ); return "updateBook"; } @RequestMapping("/updateBook") public String updateBook(Model model, Books book) { System.out.println(book); bookService.updateBook(book); Books books = bookService.queryBookById(book.getBookID()); model.addAttribute("books", books); return "redirect:/book/allBook"; } -
修改书籍页面 updateBook.jsp
<%@ taglib prefix="c" uri="http://java.sun.com/jsp/jstl/core" %> <%@ page contentType="text/html;charset=UTF-8" language="java" %> <html> <head> <title>修改信息</title> <meta name="viewport" content="width=device-width, initial-scale=1.0"> <!-- 引入 Bootstrap --> <link href="https://cdn.bootcss.com/bootstrap/3.3.7/css/bootstrap.min.css" rel="stylesheet"> </head> <body> <div class="container"> <div class="row clearfix"> <div class="col-md-12 column"> <div class="page-header"> <h1> <small>修改信息</small> </h1> </div> </div> </div> <form action="${pageContext.request.contextPath}/book/updateBook" method="post"> <input type="hidden" name="bookID" value="${book.getBookID()}"/> 书籍名称:<input type="text" name="bookName" value="${book.getBookName()}"/> 书籍数量:<input type="text" name="bookCounts" value="${book.getBookCounts()}"/> 书籍详情:<input type="text" name="detail" value="${book.getDetail() }"/> <input type="submit" value="提交"/> </form> </div> -
BookController 类编写 , 方法四:删除书籍
@RequestMapping("/del/{bookId}") public String deleteBook(@PathVariable("bookId") int id) { bookService.deleteBookById(id); return "redirect:/book/allBook"; }
配置Tomcat,进行运行!
到目前为止,这个SSM项目整合已经完全的OK了,可以直接运行进行测试!这个练习十分的重要,大家需要保证,不看任何东西,自己也可以完整的实现出来!
项目结构图
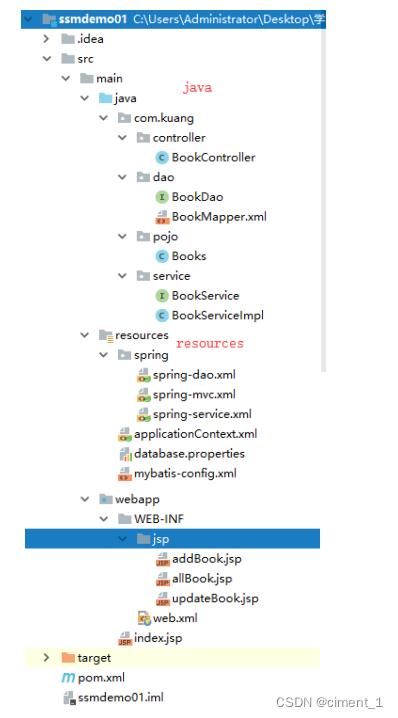
7.7、小结及展望
这个是同学们的第一个SSM整合案例,一定要烂熟于心!
SSM框架的重要程度是不言而喻的,学到这里,大家已经可以进行基本网站的单独开发。但是这只是增删改查的基本操作。可以说学到这里,大家才算是真正的步入了后台开发的门。也就是能找一个后台相关工作的底线。
或许很多人,工作就做这些事情,但是对于个人的提高来说,还远远不够!
我们后面还要学习一些 SpringMVC 的知识!
- Ajax 和 Json
- 文件上传和下载
- 拦截器
SpringBoot、SpringCloud开发!
7.8、实现查询书籍功能
-
前端页面增加一个输入框和查询按钮
<div class="col-md-4 column"></div> <div class="col-md-4 column"> <form class="form-inline" action="/book/queryBook" method="post" style="float: right"> <input type="text" name="queryBookName" class="form-control" placeholder="输入查询书名" required> <input type="submit" value="查询" class="btn btn-primary"> </form> </div> -
编写查询的Controller
@RequestMapping("/queryBook") public String queryBook(String queryBookName,Model model){ System.out.println("要查询的书籍:"+queryBookName); //业务逻辑还没有写 return "allBook"; } -
由于底层没有实现,所以我们要将底层代码先搞定
-
Mapper接口
//根据id查询,返回一个Book Books queryBookByName(String bookName); -
Mapper.xml
<!--根据书名查询,返回一个Book--> <select id="queryBookByName" resultType="Books"> select * from ssmbuild.books where bookName = #{bookName} </select> -
Service接口
//根据id查询,返回一个Book Books queryBookByName(String bookName); -
Service实现类
public Books queryBookByName(String bookName) { return bookMapper.queryBookByName(bookName); } -
完善Controller
@RequestMapping("/queryBook") public String queryBook(String queryBookName,Model model){ System.out.println("要查询的书籍:"+queryBookName); Books books = bookService.queryBookByName(queryBookName); List<Books> list = new ArrayList<Books>(); list.add(books); model.addAttribute("list", list); return "allBook"; } -
测试,查询功能OK!
-
无聊优化!我们发现查询的东西不存在的时候,查出来的页面是空的,我们可以提高一下用户的体验性!
-
在前端添加一个展示全部书籍的按钮
[外链图片转存失败,源站可能有防盗链机制,建议将图片保存下来直接上传(img-GDahFVak-1667186408352)(D:\个人学习文件夹\Markdown\正在写\Java\mdPics\Java_SSM\image-20221012113940442.png)]
-
并在后台增加一些判断性的代码!
@RequestMapping("/queryBook") public String queryBook(String queryBookName,Model model){ System.out.println("要查询的书籍:"+queryBookName); //如果查询的数据存在空格,则优化 Books books = bookService.queryBookByName(queryBookName.trim()); List<Books> list = new ArrayList<Books>(); list.add(books); //如果没有查出来书籍,则返回全部书籍列表 if (books==null){ list = bookService.queryAllBook(); model.addAttribute("error", "没有找到本书!"); } model.addAttribute("list", list); return "allBook"; } -
将错误信息展示在前台页面!完整的查询栏代码
<div class="row"> <div class="col-md-4 column"> <a class="btn btn-primary" href="${pageContext.request.contextPath}/book/toAddBook">新增</a> <a class="btn btn-primary" href="${pageContext.request.contextPath}/book/allBook">显示全部书籍</a> </div> <div class="col-md-8 column"> <form class="form-inline" action="/book/queryBook" method="post" style="float: right"> <span style="color:red;font-weight: bold">${error}</span> <input type="text" name="queryBookName" class="form-control" placeholder="输入查询书名" required> <input type="submit" value="查询" class="btn btn-primary"> </form> </div> </div>
-
8、Json
8.1、什么是JSON?
- JSON(JavaScript Object Notation, JS 对象标记) 是一种轻量级的数据交换格式,目前使用特别广泛。
- 采用完全独立于编程语言的文本格式来存储和表示数据。
- 简洁和清晰的层次结构使得 JSON 成为理想的数据交换语言。
- 易于人阅读和编写,同时也易于机器解析和生成,并有效地提升网络传输效率。
在 JavaScript 语言中,一切都是对象。因此,任何JavaScript 支持的类型都可以通过 JSON 来表示,例如字符串、数字、对象、数组等。看看他的要求和语法格式:
- 对象表示为键值对,数据由逗号分隔
- 花括号保存对象
- 方括号保存数组
JSON 键值对是用来保存 JavaScript 对象的一种方式,和 JavaScript 对象的写法也大同小异,键/值对组合中的键名写在前面并用双引号 “” 包裹,使用冒号 : 分隔,然后紧接着值:
{"name": "QinJiang"}
{"age": "3"}
{"sex": "男"}
很多人搞不清楚 JSON 和 JavaScript 对象的关系,甚至连谁是谁都不清楚。其实,可以这么理解:
-
JSON 是 JavaScript 对象的字符串表示法,它使用文本表示一个 JS 对象的信息,本质是一个字符串。
var obj = {a: 'Hello', b: 'World'}; //这是一个对象,注意键名也是可以使用引号包裹的 var json = '{"a": "Hello", "b": "World"}'; //这是一个 JSON 字符串,本质是一个字符串
JSON 和 JavaScript 对象互转
-
要实现从JSON字符串转换为JavaScript对象,使用JSON.parse 方法:
var obj = JSON.parse('{"a": "Hello", "b": "World"}'); //结果是 {a: 'Hello', b: 'World'} -
要实现从JavaScript 对象转换为JSON字符串,使用 JSON.stringify() 方法:
var json = JSON.stringify({a: 'Hello', b: 'World'}); //结果是 '{"a": "Hello", "b": "World"}'
代码测试
-
新建一个module,springmvc-05-json,添加web的支持
-
在web目录下新建一个json-1.html,编写测试内容
<!DOCTYPE html> <html lang="en"> <head> <meta charset="UTF-8"> <title>JSON_秦疆</title> </head> <body> <script type="text/javascript"> //编写一个js的对象 var user = { name:"秦疆", age:3, sex:"男" }; //将js对象转换成json字符串 var str = JSON.stringify(user); console.log(str); //将json字符串转换为js对象 var user2 = JSON.parse(str); console.log(user2.age,user2.name,user2.sex); </script> </body> </html> -
在IDEA中使用浏览器打开,查看控制台输出!

8.2、Controller 返回JSON数据
-
jackson应该是目前比较好的json解析工具了
-
当然工具不止这一个,比如还有阿里巴巴的 fastjson 等等。
-
我们这里使用 jackson,使用它需要导入它的jar包;
<!--https://mvnrepository.com/artifact/com.fasterxml.jackson.core/jackson-core --> <dependency> <groupId>com.fasterxml.jackson.core</groupId> <artifactId>jackson-databind</artifactId> <version>2.9.8</version> </dependency> -
配置SpringMVC需要的配置
web.xml
<?xml version="1.0" encoding="UTF-8"?> <web-app xmlns="http://xmlns.jcp.org/xml/ns/javaee" xmlns:xsi="http://www.w3.org/2001/XMLSchema-instance" xsi:schemaLocation="http://xmlns.jcp.org/xml/ns/javaee http://xmlns.jcp.org/xml/ns/javaee/web-app_4_0.xsd" version="4.0"> <!--1.注册servlet--> <servlet> <servlet-name>SpringMVC</servlet-name> <servlet-class>org.springframework.web.servlet.DispatcherServlet</servlet-class> <!--通过初始化参数指定SpringMVC配置文件的位置,进行关联--> <init-param> <param-name>contextConfigLocation</param-name> <param-value>classpath:springmvc-servlet.xml</param-value> </init-param> <!-- 启动顺序,数字越小,启动越早 --> <load-on-startup>1</load-on-startup> </servlet> <!--所有请求都会被springmvc拦截 --> <servlet-mapping> <servlet-name>SpringMVC</servlet-name> <url-pattern>/</url-pattern> </servlet-mapping> <filter> <filter-name>encoding</filter-name> <filter-class>org.springframework.web.filter.CharacterEncodingFilter</filter-class> <init-param> <param-name>encoding</param-name> <param-value>utf-8</param-value> </init-param> </filter> <filter-mapping> <filter-name>encoding</filter-name> <url-pattern>/</url-pattern> </filter-mapping> </web-app>springmvc-servlet.xml
<?xml version="1.0" encoding="UTF-8"?> <beans xmlns="http://www.springframework.org/schema/beans" xmlns:xsi="http://www.w3.org/2001/XMLSchema-instance" xmlns:context="http://www.springframework.org/schema/context" xmlns:mvc="http://www.springframework.org/schema/mvc" xsi:schemaLocation="http://www.springframework.org/schema/beans http://www.springframework.org/schema/beans/spring-beans.xsd http://www.springframework.org/schema/context https://www.springframework.org/schema/context/spring-context.xsd http://www.springframework.org/schema/mvc https://www.springframework.org/schema/mvc/spring-mvc.xsd"> <!-- 自动扫描指定的包,下面所有注解类交给IOC容器管理 --> <context:component-scan base-package="com.kuang.controller"/> <!-- 视图解析器 --> <bean class="org.springframework.web.servlet.view.InternalResourceViewResolver " id="internalResourceViewResolver"> <!-- 前缀 --> <property name="prefix" value="/WEB-INF/jsp/" /> <!-- 后缀 --> <property name="suffix" value=".jsp" /> </bean> </beans> -
我们随便编写一个User的实体类,然后我们去编写我们的测试Controller;
@Data @AllArgsConstructor @NoArgsConstructor public class User { private String name; private int age; private String sex; } -
这里我们需要两个新东西,一个是@ResponseBody,一个是ObjectMapper对象,我们看下具体的用法
编写一个Controller
@Controller public class UserController { @RequestMapping("/json1") @ResponseBody public String json1() throws JsonProcessingException { //创建一个jackson的对象映射器,用来解析数据 ObjectMapper mapper = new ObjectMapper(); //创建一个对象 User user = new User("秦疆1号", 3, "男"); //将我们的对象解析成为json格式 String str = mapper.writeValueAsString(user); //由于@ResponseBody注解,这里会将str转成json格式返回;十分方便 return str; } } -
配置Tomcat,启动测试一下!
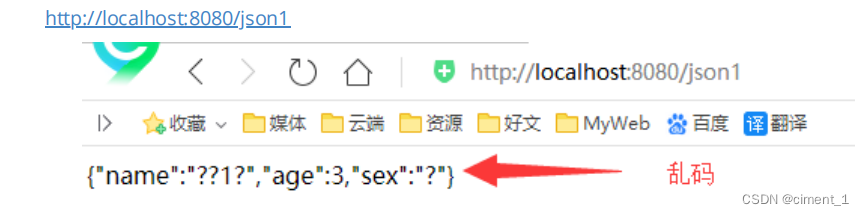
-
发现出现了乱码问题,我们需要设置一下他的编码格式utf-8,以及它返回的类型;
-
通过@RequestMapping的produces属性来实现,修改下代码
//produces:指定响应体返回类型和编码 @RequestMapping(value = "/json1",produces = "application/json;charset=utf-8") -
再次测试,乱码问题解决!
【注意:使用json记得处理乱码问题】
8.3、代码优化
乱码统一解决
上一种方法比较麻烦,如果项目中有许多请求则每一个都要添加,可以通过Spring配置统一指定,这样就不用每次都去处理了!
我们可以在springmvc的配置文件上添加一段消息StringHttpMessageConverter转换配置
<mvc:annotation-driven>
<mvc:message-converters register-defaults="true">
<bean class="org.springframework.http.converter.StringHttpMessageConverter">
<constructor-arg value="UTF-8"/>
</bean>
<bean class="org.springframework.http.converter.json.MappingJackson2HttpMessageConverter">
<property name="objectMapper">
<bean class="org.springframework.http.converter.json.Jackson2ObjectMapperFactoryBean">
<property name="failOnEmptyBeans" value="false"/>
</bean>
</property>
</bean>
</mvc:message-converters>
</mvc:annotation-driven>
返回json字符串统一解决
在类上直接使用 @RestController ,这样子,里面所有的方法都只会返回 json 字符串了,不用再每一个都添加@ResponseBody !我们在前后端分离开发中,一般都使用@RestController ,十分便捷!
@RestController
public class UserController {
//produces:指定响应体返回类型和编码
@RequestMapping(value = "/json1")
public String json1() throws JsonProcessingException {
//创建一个jackson的对象映射器,用来解析数据
ObjectMapper mapper = new ObjectMapper();
//创建一个对象
User user = new User("秦疆1号", 3, "男");
//将我们的对象解析成为json格式
String str = mapper.writeValueAsString(user);
//由于@ResponseBody注解,这里会将str转成json格式返回;十分方便
return str;
}
}
启动tomcat测试,结果都正常输出!
8.4、测试集合输出
增加一个新的方法
@RequestMapping("/json2")
public String json2() throws JsonProcessingException {
//创建一个jackson的对象映射器,用来解析数据
ObjectMapper mapper = new ObjectMapper();
//创建一个对象
User user1 = new User("秦疆1号", 3, "男");
User user2 = new User("秦疆2号", 3, "男");
User user3 = new User("秦疆3号", 3, "男");
User user4 = new User("秦疆4号", 3, "男");
List<User> list = new ArrayList<User>();
list.add(user1);
list.add(user2);
list.add(user3);
list.add(user4);
//将我们的对象解析成为json格式
String str = mapper.writeValueAsString(list);
return str;
}
运行结果 : 十分完美,没有任何问题!
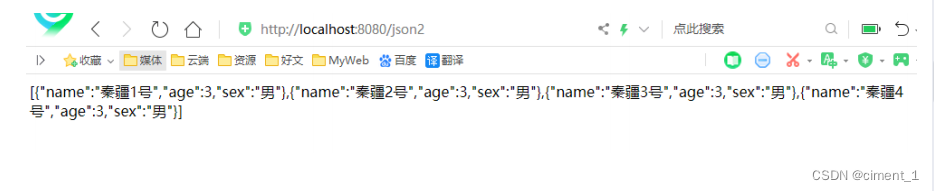
8.5、输出时间对象
增加一个新的方法
@RequestMapping("/json3")
public String json3() throws JsonProcessingException {
ObjectMapper mapper = new ObjectMapper();
//创建时间一个对象,java.util.Date
Date date = new Date();
//将我们的对象解析成为json格式
String str = mapper.writeValueAsString(date);
return str;
}
运行结果:
- 默认日期格式会变成一个数字,是1970年1月1日到当前日期的毫秒数!
- Jackson 默认是会把时间转成 timestamps 形式
解决方案:取消 timestamp 形式,自定义时间格式
@RequestMapping("/json4")
public String json4() throws JsonProcessingException {
ObjectMapper mapper = new ObjectMapper();
//不使用时间戳的方式
mapper.configure(SerializationFeature.WRITE_DATES_AS_TIMESTAMPS, false);
//自定义日期格式对象
SimpleDateFormat sdf = new SimpleDateFormat("yyyy-MM-dd HH:mm:ss");
//指定日期格式
mapper.setDateFormat(sdf);
Date date = new Date();
String str = mapper.writeValueAsString(date);
return str;
}
运行结果:成功的输出了时间!
8.6、抽取为工具类
如果要经常使用的话,这样是比较麻烦的,我们可以将这些代码封装到一个工具类中;我们去编写下
public class JsonUtils {
public static String getJson(Object object) {
return getJson(object,"yyyy-MM-dd HH:mm:ss");
}
public static String getJson(Object object,String dateFormat) {
ObjectMapper mapper = new ObjectMapper();
//不使用时间差的方式
mapper.configure(SerializationFeature.WRITE_DATES_AS_TIMESTAMPS, false);
//自定义日期格式对象
SimpleDateFormat sdf = new SimpleDateFormat(dateFormat);
//指定日期格式
mapper.setDateFormat(sdf);
try {
return mapper.writeValueAsString(object);
} catch (JsonProcessingException e) {
e.printStackTrace();
}
return null;
}
}
我们使用工具类,代码就更加简洁了!
@RequestMapping("/json5")
public String json5() throws JsonProcessingException {
Date date = new Date();
String json = JsonUtils.getJson(date);
return json;
}
大功告成!完美
8.7、FastJson
fastjson.jar是阿里开发的一款专门用于Java开发的包,可以方便的实现json对象与JavaBean对象的转换,实现JavaBean对象与json字符串的转换,实现json对象与json字符串的转换。实现json的转换方法很多,最后的实现结果都是一样的。
fastjson 的 pom依赖!
<dependency>
<groupId>com.alibaba</groupId>
<artifactId>fastjson</artifactId>
<version>1.2.60</version>
</dependency>
fastjson 三个主要的类:
- 【JSONObject 代表 json 对象】
- JSONObject实现了Map接口,猜想 JSONObject 底层操作是由Map实现的
- JSONObject对应json对象,通过各种形式的get()方法可以获取json对象中的数据,也可利用诸如size(),isEmpty()等方法获取"键:值"对的个数和判断是否为空。其本质是通过实现Map接口并调用接口中的方法完成的。
9、Ajax
9.1、简介
AJAX = Asynchronous JavaScript and XML (异步的 JavaScript 和 XML)。
AJAX 是一种在无需重新加载整个网页的情况下,能够更新部分网页的技术。
AJAX 不是一种新的编程语言,而是一种用于创建更好更快以及交互性更强的Web应用程序的技术。
在 2005 年,Google 通过其 Google Suggest 使AJAX 变得流行起来。Google Suggest能够自动帮你完成搜索单词。
Google Suggest 使用 AJAX 创造出动态性较强的 Web 界面:当您在谷歌的搜索框输入关键字时,JavaScript 会把这些字符发送到服务器,然后服务器会放回一个搜索建议的列表。
就和国内百度的搜索框一样:(bing)
传统的网页(即不用ajax技术的网页),想要更新内容或者提交一个表单,都需要重新加载整个网页。
使用ajax技术的网页,通过在后台服务器进行少量的数据交换,就可以实现异步局部更新。
使用Ajax,用户可以创建接近本地桌面应用的直接、高可用、更丰富、更动态的Web用户界面。
9.2、伪造Ajax
我们可以使用前端的一个标签来伪造一个ajax的样子。iframe标签
-
新建一个module:springmvc-06-ajax,导入web支持!
-
编写一个ajax-frame.html 使用 iframe 测试,感受下效果
<!DOCTYPE html> <html> <head lang="en"> <meta charset="UTF-8"> <title>kuangshen</title> </head> <body> <script type="text/javascript"> window.onload = function(){ var myDate = new Date(); document.getElementById('currentTime').innerText = myDate.getTime(); }; function LoadPage(){ var targetUrl = document.getElementById('url').value; console.log(targetUrl); document.getElementById("iframePosition").src = targetUrl; } </script> <div> <p>请输入要加载的地址:<span id="currentTime"></span></p> <p> <input id="url" type="text" value="https://www.baidu.com/"/> <input type="button" value="提交" onclick="LoadPage()"> </p> </div> <div> <h3>加载页面位置:</h3> <iframe id="iframePosition" style="width: 100%;height: 500px;"></iframe> </div> </body> </html>3、使用IDEA开浏览器测试一下!
利用AJAX 可以做
- 注册时,输入用户名自动检测用户是否已经存在。
- 登陆时,提示用户名密码错误
- 删除数据行时,将行ID发送到后台,后台在数据库中删除,数据库删除成功后,在页面DOM中将数据行也删除。
- …等等
9.3、jQuery.ajax
- 纯JS原生实现Ajax我们不去讲解这里,直接使用jquery提供的,方便学习和使用,避免重复造轮子,有兴趣的同学可以去了解一下JS原生XMLHttpRequest!
- Ajax的核心是XMLHttpRequest对象(XHR)。XHR为向服务器发送请求和解析服务器响应提供了接口。能够以异步方式从服务器获取新数据。
- jQuery提供多个与AJAX 有关的方法。
- 通过 jQuery AJAX方法,您能够使用 HTTP Get 和 HTTP Post 从远程服务器上请求文本、HTML、XML或 JSON - 同时您能够这些外部数据直接载入网页的被选元素中。
- jQuery Ajax 本质就是 XMLHttpRequest,对他进行了封装,方便调用!
jQuery.ajax(...)
部分参数:
url:请求地址
type:请求方式,GET、POST(1.9.0之后用method)
headers:请求头
data:要发送的数据
contentType:即将发送信息至服务器的内容编码类型(默认: "application/x-www-form-urlencoded; charset=UTF-8")
async:是否异步
timeout:设置请求超时时间(毫秒)
beforeSend:发送请求前执行的函数(全局)
complete:完成之后执行的回调函数(全局)
success:成功之后执行的回调函数(全局)
error:失败之后执行的回调函数(全局)
accepts:通过请求头发送给服务器,告诉服务器当前客户端课接受的数据类型
dataType:将服务器端返回的数据转换成指定类型
"xml": 将服务器端返回的内容转换成xml格式
"text": 将服务器端返回的内容转换成普通文本格式
"html": 将服务器端返回的内容转换成普通文本格式,在插入DOM中时,如果包含JavaScript标签,则会尝试去执行。
"script": 尝试将返回值当作JavaScript去执行,然后再将服务器端返回的内容转换成普通文本格式
"json": 将服务器端返回的内容转换成相应的JavaScript对象
"jsonp": JSONP 格式使用 JSONP 形式调用函数时,如 "myurl?callback=?" jQuery 将自动替换 ? 为正确的函数名,以执行回调函数
我们来个简单的测试,使用最原始
我们来个简单的测试,使用最原始的HttpServletResponse处理,最简单,最通用
-
配置web.xml 和 springmvc的配置文件,复制上面案例的即可【记得静态资源过滤和注解驱动配置上】
<?xml version="1.0" encoding="UTF-8"?> <beans xmlns="http://www.springframework.org/schema/beans" xmlns:xsi="http://www.w3.org/2001/XMLSchema-instance" xmlns:context="http://www.springframework.org/schema/context" xmlns:mvc="http://www.springframework.org/schema/mvc" xsi:schemaLocation="http://www.springframework.org/schema/beans http://www.springframework.org/schema/beans/spring-beans.xsd http://www.springframework.org/schema/context https://www.springframework.org/schema/context/springcontext.xsd http://www.springframework.org/schema/mvc https://www.springframework.org/schema/mvc/spring-mvc.xsd"> <!-- 自动扫描指定的包,下面所有注解类交给IOC容器管理 --> <context:component-scan base-package="com.kuang.controller"/> <mvc:default-servlet-handler /> <mvc:annotation-driven /> <!-- 视图解析器 --> <bean class="org.springframework.web.servlet.view.InternalResourceViewResolver " id="internalResourceViewResolver"> <!-- 前缀 --> <property name="prefix" value="/WEB-INF/jsp/" /> <!-- 后缀 --> <property name="suffix" value=".jsp" /> </bean> </bean> -
编写一个AjaxController
@Controller public class AjaxController { @RequestMapping("/a1") public void ajax1(String name , HttpServletResponse response) throws IOException { if ("admin".equals(name)){ response.getWriter().print("true"); }else{ response.getWriter().print("false"); } } } -
导入jquery,可以使用在线的CDN,也可以下载导入
<script src="https://code.jquery.com/jquery-3.1.1.min.js"></script> <script src="${pageContext.request.contextPath}/statics/js/jquery- 3.1.1.min.js"></script> -
编写index.jsp测试
<%@ page contentType="text/html;charset=UTF-8" language="java" %> <html> <head> <title>$Title$</title> <%--<script src="https://code.jquery.com/jquery-3.1.1.min.js"></script>--%> <script src="${pageContext.request.contextPath}/statics/js/jquery-3.1.1.min.js"></script> <script> function a1(){ $.post({ url:"${pageContext.request.contextPath}/a1", data:{'name':$("#txtName").val()}, success:function (data,status) { alert(data); alert(status); } }); } </script> </head> <body> <%--onblur:失去焦点触发事件--%> 用户名:<input type="text" id="txtName" οnblur="a1()"/> </body> </html> -
启动tomacat测试!打开浏览器的控制台,当我们鼠标离开输入框的时候,可以看到发出了一个ajax的请求!是后台返回给我们的结果!测试成功!
Springmvc 实现
实体类user
@Data
@AllArgsConstructor
@NoArgsConstructor
public class User {
private String name;
private int age;
private String sex;
}
我们来获取一个集合对象,展示到前端页面
@RequestMapping("/a2")
public List<User> ajax2(){
List<User> list = new ArrayList<User>();
list.add(new User("秦疆1号",3,"男"));
list.add(new User("秦疆2号",3,"男"));
list.add(new User("秦疆3号",3,"男"));
return list; //由于@RestController注解,将list转成json格式返回
}
前端页面
<%@ page contentType="text/html;charset=UTF-8" language="java" %>
<html>
<head>
<title>Title</title>
</head>
<body>
<input type="button" id="btn" value="获取数据"/>
<table width="80%" align="center">
<tr>
<td>姓名</td>
<td>年龄</td>
<td>性别</td>
</tr>
<tbody id="content">
</tbody>
</table>
<script src="${pageContext.request.contextPath}/statics/js/jquery-
3.1.1.min.js"></script>
<script>
$(function () {
$("#btn").click(function () {
$.post("${pageContext.request.contextPath}/a2",function (data) {
console.log(data)
var html="";
for (var i = 0; i <data.length ; i++) {
html+= "<tr>" +
"<td>" + data[i].name + "</td>" +
"<td>" + data[i].age + "</td>" +
"<td>" + data[i].sex + "</td>" +
"</tr>"
}
$("#content").html(html);
});
})
})
</script>
</body>
</html>
成功实现了数据回显!可以体会一下Ajax的好处!
9.4、注册提示效果
我们再测试一个小Demo,思考一下我们平时注册时候,输入框后面的实时提示怎么做到的;如何优化我们写一个Controller
@RequestMapping("/a3")
public String ajax3(String name,String pwd){
String msg = "";
//模拟数据库中存在数据
if (name!=null){
if ("admin".equals(name)){
msg = "OK";
}else {
msg = "用户名输入错误";
}
}
if (pwd!=null){
if ("123456".equals(pwd)){
msg = "OK";
}else {
msg = "密码输入有误";
}
}
return msg; //由于@RestController注解,将msg转成json格式返回
}
前端页面 login.jsp
<%@ page contentType="text/html;charset=UTF-8" language="java" %>
<html>
<head>
<title>ajax</title>
<script src="${pageContext.request.contextPath}/statics/js/jquery- 3.1.1.min.js"></script>
<script>
function a1(){
$.post({
url:"${pageContext.request.contextPath}/a3",
data:{'name':$("#name").val()},
success:function (data) {
if (data.toString()=='OK'){
$("#userInfo").css("color","green");
}else {
$("#userInfo").css("color","red");
}
$("#userInfo").html(data);
}
});
}
function a2(){
$.post({
url:"${pageContext.request.contextPath}/a3",
data:{'pwd':$("#pwd").val()},
success:function (data) {
if (data.toString()=='OK'){
$("#pwdInfo").css("color","green");
}else {
$("#pwdInfo").css("color","red");
}
$("#pwdInfo").html(data);
}
});
}
</script>
</head>
<body>
<p>
用户名:<input type="text" id="name" οnblur="a1()"/>
<span id="userInfo"></span>
</p>
<p>
密码:<input type="text" id="pwd" οnblur="a2()"/>
<span id="pwdInfo"></span>
</p>
</body>
</html>
【记得处理json乱码问题】
测试一下效果,动态请求相应,局部刷新,就是如此!
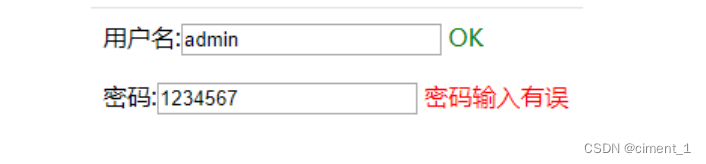
9.5、获取baidu接口Demo
<!DOCTYPE HTML>
<html>
<head>
<meta http-equiv="Content-Type" content="text/html; charset=utf-8">
<title>JSONP百度搜索</title>
<style>
#q{
width: 500px;
height: 30px;
border:1px solid #ddd;
line-height: 30px;
display: block;
margin: 0 auto;
padding: 0 10px;
font-size: 14px;
}
#ul{
width: 520px;
list-style: none;
margin: 0 auto;
padding: 0;
border:1px solid #ddd;
margin-top: -1px;
display: none;
}
#ul li{
line-height: 30px;
padding: 0 10px;
}
#ul li:hover{
background-color: #f60;
color: #fff;
}
</style>
<script>
// 2.步骤二
// 定义demo函数 (分析接口、数据)
function demo(data){
var Ul = document.getElementById('ul');
var html = '';
// 如果搜索数据存在 把内容添加进去
if (data.s.length) {
// 隐藏掉的ul显示出来
Ul.style.display = 'block';
// 搜索到的数据循环追加到li里
for(var i = 0;i<data.s.length;i++){
html += '<li>'+data.s[i]+'</li>';
}
// 循环的li写入ul
Ul.innerHTML = html;
}
}
// 1.步骤一
window.onload = function(){
// 获取输入框和ul
var Q = document.getElementById('q');
var Ul = document.getElementById('ul');
// 事件鼠标抬起时候
Q.onkeyup = function(){
// 如果输入框不等于空
if (this.value != '') {
// ☆☆☆☆☆☆☆☆☆☆☆☆☆☆☆☆☆☆JSONPz重点☆☆☆☆☆☆☆☆☆☆☆☆☆☆☆☆☆☆☆☆
// 创建标签
var script = document.createElement('script');
//给定要跨域的地址 赋值给src
//这里是要请求的跨域的地址 我写的是百度搜索的跨域地址
script.src = 'https://sp0.baidu.com/5a1Fazu8AA54nxGko9WTAnF6hhy/su?wd='+this.value+'&cb=demo';
// 将组合好的带src的script标签追加到body里
document.body.appendChild(script);
}
}
}
</script>
</head>
<body>
<input type="text" id="q" />
<ul id="ul">
</ul>
</body>
</html>
10、拦截器
10.1、概述
SpringMVC的处理器拦截器类似于Servlet 开发中的过滤器Filter,用于对处理器进行预处理和后处理。开发者可以自己定义一些拦截器来实现特定的功能。
**过滤器与拦截器的区别:**拦截器是AOP思想的具体应用。
过滤器
- servlet规范中的一部分,任何java web工程都可以使用
- 在url-pattern中配置/*之后,可以对所有要访问的资源进行拦截
拦截器:
- 拦截器是SpringMVC框架自己的,只有使用了SpringMVC框架的工程才能使用
- 拦截器只会拦截访问的控制器方法,如果访问的是jsp/html/css/image/js是不会进行拦截的
10.2、自定义拦截器
那如何实现拦截器呢?
想要自定义拦截器,必须实现 HandlerIntercept 接口。
-
新建一个Moudule,springmvc-07-Interceptor,添加web支持
-
配置web.xml 和 springmvc-servlet.xml 文件
-
编写一个拦截器
public class MyInterceptor implements HandlerInterceptor { //在请求处理的方法之前执行 //如果返回true执行下一个拦截器 //如果返回false就不执行下一个拦截器 public boolean preHandle(HttpServletRequest httpServletRequest,HttpServletResponse httpServletResponse, Object o) throws Exception { System.out.println("------------处理前------------"); return true; } //在请求处理方法执行之后执行 public void postHandle(HttpServletRequest httpServletRequest, HttpServletResponse httpServletResponse, Object o, ModelAndView modelAndView) throws Exception { System.out.println("------------处理后------------"); } //在dispatcherServlet处理后执行,做清理工作. public void afterCompletion(HttpServletRequest httpServletRequest, HttpServletResponse httpServletResponse, Object o, Exception e) throwsException { System.out.println("------------清理------------"); } } -
在springmvc的配置文件中配置拦截器
<!--关于拦截器的配置--> <mvc:interceptors> <mvc:interceptor> <!--/** 包括路径及其子路径--> <!--/admin/* 拦截的是/admin/add等等这种 , /admin/add/user不会被拦截--> <!--/admin/** 拦截的是/admin/下的所有--> <mvc:mapping path="/**"/> <!--bean配置的就是拦截器--> <bean class="com.kuang.interceptor.MyInterceptor"/> </mvc:interceptor> </mvc:interceptors> -
编写一个Controller,接收请求
//测试拦截器的控制器 @Controller public class InterceptorController { @RequestMapping("/interceptor") @ResponseBody public String testFunction() { System.out.println("控制器中的方法执行了"); return "hello"; } } -
前端 index.jsp
<a href="${pageContext.request.contextPath}/interceptor">拦截器测试</a> -
启动tomcat 测试一下!
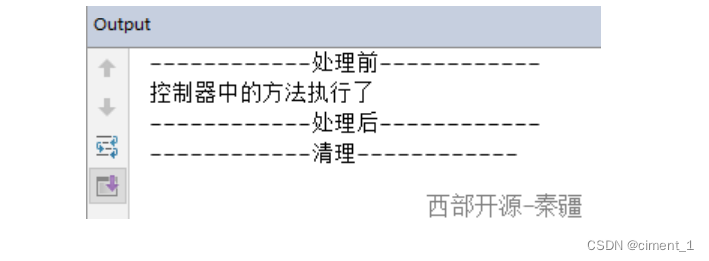
10.3、验证用户是否登录(认证用户)
实现思路
-
有一个登录页面,需要写一个controller访问页面。
-
登陆页面有一提交表单的动作。需要在controller中处理。判断用户名密码是否正确。如果正确,向session中写入用户信息。返回登陆成功。
-
拦截用户请求,判断用户是否登陆。如果用户已经登陆。放行,如果用户未登陆,跳转到登录页面
-
编写一个登陆页面 login.jsp
<%@ page contentType="text/html;charset=UTF-8" language="java" %> <html> <head> <title>Title</title> </head> <h1>登录页面</h1> <hr> <body> <form action="${pageContext.request.contextPath}/user/login"> 用户名:<input type="text" name="username"> <br> 密码: <input type="password" name="pwd"> <br> <input type="submit" value="提交"> </form> </body> </html> -
编写一个Controller处理请求
@Controller @RequestMapping("/user") public class UserController { //跳转到登陆页面 @RequestMapping("/jumplogin") public String jumpLogin() throws Exception { return "login"; } //跳转到成功页面 @RequestMapping("/jumpSuccess") public String jumpSuccess() throws Exception { return "success"; } //登陆提交 @RequestMapping("/login") public String login(HttpSession session, String username, String pwd) throws Exception { // 向session记录用户身份信息 System.out.println("接收前端==="+username); session.setAttribute("user", username); return "success"; } //退出登陆 @RequestMapping("logout") public String logout(HttpSession session) throws Exception { // session 过期 session.invalidate(); return "login"; } } -
编写一个登陆成功的页面 success.jsp
<%@ page contentType="text/html;charset=UTF-8" language="java" %> <html> <head> <title>Title</title> </head> <body> <h1>登录成功页面</h1> <hr> ${user} <a href="${pageContext.request.contextPath}/user/logout">注销</a> </body> </html> -
在 index 页面上测试跳转!启动Tomcat 测试,未登录也可以进入主页!
<%@ page contentType="text/html;charset=UTF-8" language="java" %> <html> <head> <title>$Title$</title> </head> <body> <h1>首页</h1> <hr> <%--登录--%> <a href="${pageContext.request.contextPath}/user/jumplogin">登录</a> <a href="${pageContext.request.contextPath}/user/jumpSuccess">成功页面</a> </body> </html> -
编写用户登录拦截器
public class LoginInterceptor implements HandlerInterceptor { public boolean preHandle(HttpServletRequest request, HttpServletResponse response, Object handler) throws ServletException, IOException { // 如果是登陆页面则放行 System.out.println("uri: " + request.getRequestURI()); if (request.getRequestURI().contains("login")) { return true; } HttpSession session = request.getSession(); // 如果用户已登陆也放行 if(session.getAttribute("user") != null) { return true; } // 用户没有登陆跳转到登陆页面 request.getRequestDispatcher("/WEB-INF/jsp/login.jsp").forward(request, response); return false; } public void postHandle(HttpServletRequest httpServletRequest, HttpServletResponse httpServletResponse, Object o, ModelAndView modelAndView) throws Exception { } public void afterCompletion(HttpServletRequest httpServletRequest, HttpServletResponse httpServletResponse, Object o, Exception e) throws Exception { } } -
在Springmvc的配置文件中注册拦截器
<!--关于拦截器的配置--> <mvc:interceptors> <mvc:interceptor> <mvc:mapping path="/**"/> <bean id="loginInterceptor" class="com.kuang.interceptor.LoginInterceptor"/> </mvc:interceptor> </mvc:interceptors> -
再次重启Tomcat测试!
OK,测试登陆拦截功能无误。
11、文件上传和下载
11.1、准备工作
文件上传是项目开发中最常用的功能之一,SpringMVC 可以很好的支持文件上传,但是SpringMVC上下文中默认没有装配MultipartResolver,因此默认情况下其不能处理文件上传工作。如果想使用Spring的文件上传功能,则需要在上下文中配置MultipartResolver。
前端表单要求:为了能上传文件,必须将表单的method设置为POST,并将enctype设置为multipart/form-data。只有在这样的情况下,浏览器才会把用户选择的文件以二进制数据发送给服务器;
对表单中的 enctype 属性做个详细的说明:
- application/x-www=form-urlencoded:默认方式,只处理表单域中的 value 属性值,采用这种编码方式的表单会将表单域中的值处理成 URL 编码方式。
- multipart/form-data:这种编码方式会以二进制流的方式来处理表单数据,这种编码方式会把文件域指定文件的内容也封装到请求参数中,不会对字符编码。
- text/plain:除了把空格转换为 “+” 号外,其他字符都不做编码处理,这种方式适用直接通过表单发送邮件。
<form action="" enctype="multipart/form-data" method="post">
<input type="file" name="file"/>
<input type="submit">
</form>
一旦设置了enctype为multipart/form-data,浏览器即会采用二进制流的方式来处理表单数据,而对于文件上传的处理则涉及在服务器端解析原始的HTTP响应。在2003年,Apache Software Foundation发布了开源的Commons FileUpload组件,其很快成为Servlet/JSP程序员上传文件的最佳选择。
- Servlet3.0规范已经提供方法来处理文件上传,但这种上传需要在Servlet中完成。
- 而Spring MVC则提供了更简单的封装。
- Spring MVC为文件上传提供了直接的支持,这种支持是用即插即用的MultipartResolver实现的。
- Spring MVC使用Apache Commons FileUpload技术实现了一个MultipartResolver实现类:CommonsMultipartResolver。因此,SpringMVC的文件上传还需要依赖Apache CommonsFileUpload的组件。
11.2、文件上传
-
导入文件上传的jar包,commons-fifileupload , Maven会自动帮我们导入他的依赖包 commons-io包;
<!--文件上传--> <dependency> <groupId>commons-fileupload</groupId> <artifactId>commons-fileupload</artifactId> <version>1.3.3</version> </dependency> <!--servlet-api导入高版本的--> <dependency> <groupId>javax.servlet</groupId> <artifactId>javax.servlet-api</artifactId> <version>4.0.1</version> </dependency> -
配置bean:multipartResolver
【注意!!!这个bena的id必须为:multipartResolver , 否则上传文件会报400的错误!在这里栽过坑,教训!】<!--文件上传配置--> <bean id="multipartResolver" class="org.springframework.web.multipart.commons.CommonsMultipartResolver"> <!-- 请求的编码格式,必须和jSP的pageEncoding属性一致,以便正确读取表单的内容,默认为ISO-8859-1 --> <property name="defaultEncoding" value="utf-8"/> <!-- 上传文件大小上限,单位为字节(10485760=10M) --> <property name="maxUploadSize" value="10485760"/> <property name="maxInMemorySize" value="40960"/> </bean>CommonsMultipartFile 的 常用方法:
- String getOriginalFilename():获取上传文件的原名
- InputStream getInputStream():获取文件流
- void transferTo(File dest):将上传文件保存到一个目录文件中
我们去实际测试一下
-
编写前端页面
<form action="/upload" enctype="multipart/form-data" method="post"> <input type="file" name="file"/> <input type="submit" value="upload"> </form> -
Controller
@Controller public class FileController { //@RequestParam("file") 将name=file控件得到的文件封装成CommonsMultipartFile 对象 //批量上传CommonsMultipartFile则为数组即可 @RequestMapping("/upload") public String fileUpload(@RequestParam("file") CommonsMultipartFile file , HttpServletRequest request) throws IOException { //获取文件名 : file.getOriginalFilename(); String uploadFileName = file.getOriginalFilename(); //如果文件名为空,直接回到首页! if ("".equals(uploadFileName)){ return "redirect:/index.jsp"; } System.out.println("上传文件名 : "+uploadFileName); //上传路径保存设置 String path = request.getServletContext().getRealPath("/upload"); //如果路径不存在,创建一个 File realPath = new File(path); if (!realPath.exists()){ realPath.mkdir(); } System.out.println("上传文件保存地址:"+realPath); InputStream is = file.getInputStream(); //文件输入流 OutputStream os = new FileOutputStream(new File(realPath,uploadFileName)); //文件输出流 //读取写出 int len=0; byte[] buffer = new byte[1024]; while ((len=is.read(buffer))!=-1){ os.write(buffer,0,len); os.flush(); } os.close(); is.close(); return "redirect:/index.jsp"; } } -
测试上传文件,OK!
采用file.Transto 来保存上传的文件
-
编写Controller
/* * 采用file.Transto 来保存上传的文件 */ @RequestMapping("/upload2") public String fileUpload2(@RequestParam("file") CommonsMultipartFile file, HttpServletRequest request) throws IOException { //上传路径保存设置 String path = request.getServletContext().getRealPath("/upload"); File realPath = new File(path); if (!realPath.exists()){ realPath.mkdir(); } //上传文件地址 System.out.println("上传文件保存地址:"+realPath); //通过CommonsMultipartFile的方法直接写文件(注意这个时候) file.transferTo(new File(realPath +"/"+ file.getOriginalFilename())); return "redirect:/index.jsp"; } -
前端表单提交地址修改
-
访问提交测试,OK!
11.3、文件下载
文件下载步骤:
- 设置 response 响应头
- 读取文件 – InputStream
- 写出文件 – OutputStream
- 执行操作
- 关闭流(先开后关)
代码实现
@RequestMapping(value="/download")
public String downloads(HttpServletResponse response ,HttpServletRequest request) throws Exception{
//要下载的图片地址
String path = request.getServletContext().getRealPath("/upload");
String fileName = "基础语法.jpg";
//1、设置response 响应头
response.reset(); //设置页面不缓存,清空buffer
response.setCharacterEncoding("UTF-8"); //字符编码
response.setContentType("multipart/form-data"); //二进制传输数据
//设置响应头
response.setHeader("Content-Disposition",
"attachment;fileName="+URLEncoder.encode(fileName, "UTF-8"));
File file = new File(path,fileName);
//2、 读取文件--输入流
InputStream input=new FileInputStream(file);
//3、 写出文件--输出流
OutputStream out = response.getOutputStream();
byte[] buff =new byte[1024];
int index=0;
//4、执行 写出操作
while((index= input.read(buff))!= -1){
out.write(buff, 0, index);
out.flush();
}
out.close();
input.close();
return null;
}
前端
<a href="/download">点击下载</a>
测试,文件下载OK,大家可以和之前学习的JavaWeb原生的方式对比一下,就可以知道这个便捷多了!!!


 4239
4239

 被折叠的 条评论
为什么被折叠?
被折叠的 条评论
为什么被折叠?
 到【灌水乐园】发言


