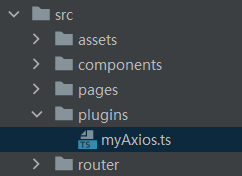
前端整合 Axios,并自定义 Axios 实例,完成请求。
官网:https://www.axios-http.cn/docs/intro
调用后端接口时需要使用Axios
步骤
- 安装 Axios
npm install axios
- 创建实例
创建 plugins 目录

坐标:plugins/myAxios.ts
import axios from "axios";

const instance = axios.create({
  baseURL: "http://localhost:9090/api",
  timeout: 10000,
  headers: {},
});

export default instance;
- 测试请求响应
坐标:pages/IndexPage.vue
<script setup lang="ts">
    import myAxios from "@/plugins/myAxios";
    myAxios.post("/post/get/vo?id=" + "123456").then((res) => {
      	console.log(res);
    });
</script>
- 可以通过 res.data 获取数据,但是每个接口都要写一次,比较麻烦。因此添加全局响应拦截器
Axios 拦截器:https://www.axios-http.cn/docs/interceptors
坐标:plugins/myAxios.ts
// 添加响应拦截器
axios.interceptors.response.use(
    function (response) {
        // 2xx 范围内的状态码都会触发该函数。
        // 对响应数据做点什么
        return response;
    }, function (error) {
        // 超出 2xx 范围的状态码都会触发该函数。
        // 对响应错误做点什么
        return Promise.reject(error);
	}
);
完整代码
import axios from "axios";

const instance = axios.create({
  baseURL: "http://localhost:8102/api",
  timeout: 10000,
  headers: {},
});

// 添加响应拦截器
instance.interceptors.response.use(
  function (response) {
    // 2xx 范围内的状态码都会触发该函数。
    // 对响应数据做点什么
    const data = response.data;
    if (data.code === 0) {
      return data.data;
    }
    console.error("request error: " + data);
    return response.data;
  },
  function (error) {
    // 超出 2xx 范围的状态码都会触发该函数。
    // 对响应错误做点什么
    return Promise.reject(error);
  }
);

export default instance;
然后接下来前端向后端发送请求
例子:
编写获取文章接口
坐标:pages/IndexPage.vue
<template>
  {{ JSON.stringify(postList) }}
</template>

<script setup lang="ts">
import myAxios from "@/plugins/myAxios";

myAxios.post("/post/list/page/vo", {}).then((res: any) => {
    postList.value = res.records;
});
</script>
后面应该有更精简的写法的!封装的更简洁


 695
695

 被折叠的 条评论
为什么被折叠?


