一 android基本架构
1.1 架构图直观
下面这张图展示了Android系统的主要组成部分:
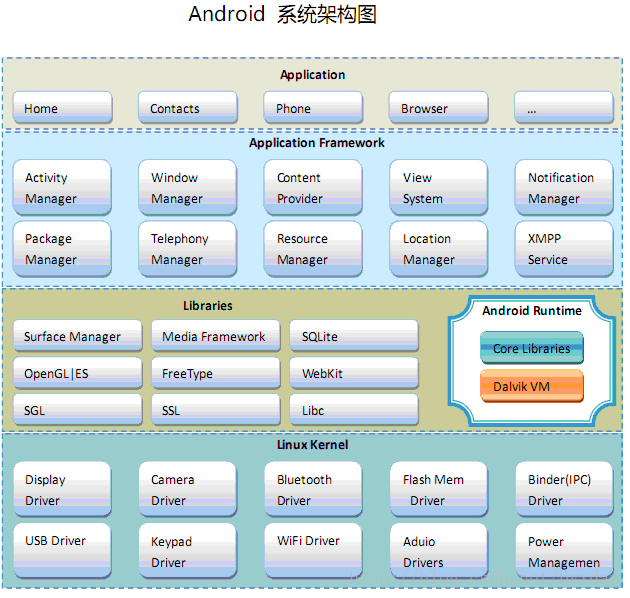
可以很明显看出,Android系统架构由5部分组成,分别是:Linux Kernel、Android Runtime、Libraries、Application Framework、Applications。第二部分将详细介绍这5个部分。
1.2 架构详解
现在我们拿起手术刀来剖析各个部分。其实这部分SDK文档已经帮我们做得很好了,我们要做的就是拿来主义,然后再加上自己理解。下面自底向上分析各层。
1.2.1 Linux Kernel
Android基于Linux 2.6提供核心系统服务,例如:安全、内存管理、进程管理、网络堆栈、驱动模型。Linux Kernel也作为硬件和软件之间的抽象层,它隐藏具体硬件细节而为上层提供统一的服务。
如果你学过计算机网络知道OSI/RM,就会知道分层的好处就是使用下层提供的服务而为上层提供统一的服务,屏蔽本层及以下层的差异,当本层及以下层发生了变化不会影响到上层。也就是说各层各司其职,各层提供固定的SAP(Service Access Point),专业点可以说是高内聚、低耦合。
如果你只是做应用开发,就不需要深入了解Linux Kernel层。
1.2.2 Android Runtime
Android包含一个核心库的集合,提供大部分在Java编程语言核心类库中可用的功能。每一个Android应用程序是Dalvik虚拟机中的实例,运行在他们自己的进程中。Dalvik虚拟机设计成,在一个设备可以高效地运行多个虚拟机。Dalvik虚拟机可执行文件格式是.dex,dex格式是专为Dalvik设计的一种压缩格式,适合内存和处理器速度有限的系统。
大多数虚拟机包括JVM都是基于栈的,而Dalvik虚拟机则是基于寄存器的。两种架构各有优劣,一般而言,基于栈的机器需要更多指令,而基于寄存器的机器指令更大。dx 是一套工具,可以將 Java .class 转换成 .dex 格式。一个dex文件通常会有多个.class。由于dex有時必须进行最佳化,会使文件大小增加1-4倍,以ODEX结尾。
Dalvik虚拟机依赖于Linux 内核提供基本功能,如线程和底层内存管理。
1.2.3 Libraries
Android包含一个C/C++库的集合,供Android系统的各个组件使用。这些功能通过Android的应用程序框架(application framework)暴露给开发者。下面列出一些核心库:
- 系统C库——标准C系统库(libc)的BSD衍生,调整为基于嵌入式Linux设备
- 媒体库——基于PacketVideo的OpenCORE。这些库支持播放和录制许多流行的音频和视频格式,以及静态图像文件,包括MPEG4、 H.264、 MP3、 AAC、 AMR、JPG、 PNG
- 界面管理——管理访问显示子系统和无缝组合多个应用程序的二维和三维图形层
- LibWebCore——新式的Web浏览器引擎,驱动Android 浏览器和内嵌的web视图
- SGL——基本的2D图形引擎
- 3D库——基于OpenGL ES 1.0 APIs的实现。库使用硬件3D加速或包含高度优化的3D软件光栅
- FreeType ——位图和矢量字体渲染
- SQLite ——所有应用程序都可以使用的强大而轻量级的关系数据库引擎
1.2.4 Application Framework
通过提供开放的开发平台,Android使开发者能够编制极其丰富和新颖的应用程序。开发者可以自由地利用设备硬件优势、访问位置信息、运行后台服务、设置闹钟、向状态栏添加通知等等,很多很多。
开发者可以完全使用核心应用程序所使用的框架APIs。应用程序的体系结构旨在简化组件的重用,任何应用程序都能发布他的功能且任何其他应用程序可以使用这些功能(需要服从框架执行的安全限制)。这一机制允许用户替换组件。
所有的应用程序其实是一组服务和系统,包括:
- 视图(View)——丰富的、可扩展的视图集合,可用于构建一个应用程序。包括包括列表、网格、文本框、按钮,甚至是内嵌的网页浏览器
- 内容提供者(Content Providers)——使应用程序能访问其他应用程序(如通讯录)的数据,或共享自己的数据
- 资源管理器(Resource Manager)——提供访问非代码资源,如本地化字符串、图形和布局文件
- 通知管理器(Notification Manager)——使所有的应用程序能够在状态栏显示自定义警告
- 活动管理器(Activity Manager)——管理应用程序生命周期,提供通用的导航回退功能
1.2.5 Applications
Android装配一个核心应用程序集合,包括电子邮件客户端、SMS程序、日历、地图、浏览器、联系人和其他设置。所有应用程序都是用Java编程语言写的。更加丰富的应用程序有待我们去开发!
1.3 总结
从上面我们知道Android的架构是分层的,非常清晰,分工很明确。Android本身是一套软件堆叠(Software Stack),或称为「软件叠层架构」,叠层主要分成三层:操作系统、中间件、应用程序。从上面我们也看到了开源的力量,一个个熟悉的开源软件在这里贡献了自己的一份力量。
二 android dialog
public void showBluetoothCheckDialog(final Context context) {
dialog = new AlertDialog.Builder(context).create()
viewReconnectBluetooth = ((Activity) context).getLayoutInflater()
.inflate(R.layout.dialog_confirm_bluetooth, null)
messagetext = (TextView) viewReconnectBluetooth.findViewById(R.id.message)
dialog.setCancelable(false)
messagetext.setText("当前是蓝牙模式,但是蓝牙设备已断开连接,请选择操作。")
View reconnect = viewReconnectBluetooth.findViewById(R.id.reconnect)
reconnect.setOnClickListener(new View.OnClickListener() {
@Override
public void onClick(View v) {
Intent intent = new Intent(context,
DeviceListActivity.class)
context.startActivity(intent)
dialog.dismiss()
}
})
View cancel = viewReconnectBluetooth.findViewById(R.id.cancel)
cancel.setOnClickListener(new View.OnClickListener() {
@Override
public void onClick(View v) {
// nothing to do
dialog.dismiss()
}
})
View shutdown = viewReconnectBluetooth.findViewById(R.id.shutdown)
shutdown.setOnClickListener(new View.OnClickListener() {
@Override
public void onClick(View arg0) {
// Auto-generated method stub
Util.savePreferences(Constants.BLUE_TOOTH, 0, context)
bluetoothAdapter.disable()
app.setVersion(app.getVersion() + 1)
dialog.dismiss()
Toast.makeText(context, "蓝牙模式已关闭", Toast.LENGTH_SHORT).show()
}
})
dialog.setView(viewReconnectBluetooth, 0, 0, 0, 0)
// Service&Application弹出对话框或WindowManager添加view时,要设置window type为TYPE_SYSTEM_ALERT
dialog.getWindow().setType(WindowManager.LayoutParams.TYPE_SYSTEM_ALERT)
dialog.show()
}
- 1
- 2
- 3
- 4
- 5
- 6
- 7
- 8
- 9
- 10
- 11
- 12
- 13
- 14
- 15
- 16
- 17
- 18
- 19
- 20
- 21
- 22
- 23
- 24
- 25
- 26
- 27
- 28
- 29
- 30
- 31
- 32
- 33
- 34
- 35
- 36
- 37
- 38
- 39
- 40
- 41
- 42
- 43
- 44
- 45
- 1
- 2
- 3
- 4
- 5
- 6
- 7
- 8
- 9
- 10
- 11
- 12
- 13
- 14
- 15
- 16
- 17
- 18
- 19
- 20
- 21
- 22
- 23
- 24
- 25
- 26
- 27
- 28
- 29
- 30
- 31
- 32
- 33
- 34
- 35
- 36
- 37
- 38
- 39
- 40
- 41
- 42
- 43
- 44
- 45
三 图片
MediaStore.Images.Media.getBitmap(ContentResolver cr,Uri url)方法可以从一个已知的图片Uri中获得图片的bitmap对象,其中ContentResolver通常可以通过在Activity中调用的getContentResolver()方法中获取。Uri地址就是类似 content://media/external/images/media/2 的地址,也就是Content Provider定义的地址形式。但是这种获取bitmap的方式在图片较大的时候并不可取。为什么呢?
从getBitmap的参数可以看出,我们没有传递所要得到的bitmap大小信息,那么getBitmap的返回的bitmap究竟有多大我们就无从知晓,完全取决于getBitmap本身,最乐观的结果是getBitmap能智能的判断我们的需求,返回一个合适的bitmap,但是可能性很小。到底getBitmap中做了什么还是直接去看他的实现源码吧:
android.provider.MediaStore中找到Images.Media的getBitmap方法:
public static final Bitmap getBitmap(ContentResolver cr, Uri url)
        throws FileNotFoundException, IOException {
    InputStream input = cr.openInputStream(url);
    Bitmap bitmap = BitmapFactory.decodeStream(input);
    input.close();
    return bitmap;
}
其实它很简单很粗暴,返回的是原始大小的bitmap。
MediaStore.Images.Media自身的getBitmap不是很可靠。那我们来自定义一个getBitmap吧:
取名叫getThumbnail,他能返回一个指定大小的bitmap:
public static Bitmap getThumbnail(Uri uri,int size) throws FileNotFoundException, IOException{
InputStream input = this.getContentResolver().openInputStream(uri);
BitmapFactory.Options onlyBoundsOptions = new BitmapFactory.Options();
onlyBoundsOptions.inJustDecodeBounds = true;
onlyBoundsOptions.inDither=true;
onlyBoundsOptions.inPreferredConfig=Bitmap.Config.ARGB_8888;
BitmapFactory.decodeStream(input, null, onlyBoundsOptions);
input.close();
if ((onlyBoundsOptions.outWidth == -1) || (onlyBoundsOptions.outHeight == -1))
return null;
int originalSize = (onlyBoundsOptions.outHeight > onlyBoundsOptions.outWidth) ? onlyBoundsOptions.outHeight : onlyBoundsOptions.outWidth;
double ratio = (originalSize > size) ? (originalSize / size) : 1.0;
BitmapFactory.Options bitmapOptions = new BitmapFactory.Options();
bitmapOptions.inSampleSize = getPowerOfTwoForSampleRatio(ratio);
bitmapOptions.inDither=true;
bitmapOptions.inPreferredConfig=Bitmap.Config.ARGB_8888;
input = this.getContentResolver().openInputStream(uri);
Bitmap bitmap = BitmapFactory.decodeStream(input, null, bitmapOptions);
input.close();
return bitmap;
}
private static int getPowerOfTwoForSampleRatio(double ratio){
int k = Integer.highestOneBit((int)Math.floor(ratio));
if(k==0) return 1;
else return k;
}
- 1
- 2
- 3
- 4
- 5
- 6
- 7
- 8
- 9
- 10
- 11
- 12
- 13
- 14
- 15
- 16
- 17
- 18
- 19
- 20
- 21
- 22
- 23
- 24
- 25
- 26
- 1
- 2
- 3
- 4
- 5
- 6
- 7
- 8
- 9
- 10
- 11
- 12
- 13
- 14
- 15
- 16
- 17
- 18
- 19
- 20
- 21
- 22
- 23
- 24
- 25
- 26
3.2 uri,file,path互转
3.2.1 uri转path
private String getPath(Uri uri) {
String[] projection = {MediaStore.Video.Media.DATA}
Cursor cursor = managedQuery(uri, projection, null, null, null)
int column_index = cursor
.getColumnIndexOrThrow(MediaStore.Audio.Media.DATA)
cursor.moveToFirst()
return cursor.getString(column_index)
}
3.2.2 path转uri
Uri uri = Uri.parse(path);
3.2.3 file转path
String path = file.getPath()
3.2.4 path转file
File file = new File(path)
3.3 Bitmap、file互转(Bitmap转file即保存图片到本地),Bitmap、Uri互转,Bitmap、path互转
3.3.1 Bitmap转file即保存图片到本地
3.3.1.1 Bitmap转file
/**
* 将图片Bitmap保存到本地返回File
* @param bmp
*/
public File saveBmpToFile(Bitmap bmp) {
Log.v("TakePhoteActivity.this","将图片保存到本地时进行压缩开始时间"+getTime());
ByteArrayOutputStream baos = new ByteArrayOutputStream();
int options = 100;
bmp.compress(Bitmap.CompressFormat.JPEG, options, baos);
long dateTaken = System.currentTimeMillis();
SimpleDateFormat formatter = new SimpleDateFormat("yyyy-MM-dd HH.mm.ss.SSS");
String formatStr =formatter.format(dateTaken);
String filename = formatStr + ".JPEG";
File parent =new File(PATH);
if (!parent.exists()) {
parent.mkdirs();
}
File file = new File(PATH, filename);
if(file.exists()){
file.delete();
}
try {
FileOutputStream fos = new FileOutputStream(file);
fos.write(baos.toByteArray());
fos.flush();
fos.close();
} catch (Exception e) {
e.printStackTrace();
}
return file;
}
- 1
- 2
- 3
- 4
- 5
- 6
- 7
- 8
- 9
- 10
- 11
- 12
- 13
- 14
- 15
- 16
- 17
- 18
- 19
- 20
- 21
- 22
- 23
- 24
- 25
- 26
- 27
- 28
- 29
- 30
- 31
- 32
- 33
- 34
- 35
- 36
- 1
- 2
- 3
- 4
- 5
- 6
- 7
- 8
- 9
- 10
- 11
- 12
- 13
- 14
- 15
- 16
- 17
- 18
- 19
- 20
- 21
- 22
- 23
- 24
- 25
- 26
- 27
- 28
- 29
- 30
- 31
- 32
- 33
- 34
- 35
- 36
3.3.1.2 Bitmap转file即保存图片到本地,并将图片信息添加入媒体数据库
3.3.1.2.1算法定义
private Uri insertImage(ContentResolver cr, String name, long dateTaken,
String directory, String filename, Bitmap source, byte[] jpegData) {
OutputStream outputStream = null
String filePath = directory + filename
try {
File dir = new File(directory)
if (!dir.exists()) {
dir.mkdirs()
}
File file = new File(directory, filename)
if (file.createNewFile()) {
outputStream = new FileOutputStream(file)
if (source != null) {
source.compress(Bitmap.CompressFormat.JPEG, 100, outputStream)
} else {
outputStream.write(jpegData)
}
}
} catch (FileNotFoundException e) {
Log.e(TAG, e.getMessage())
return null
} catch (IOException e) {
Log.e(TAG, e.getMessage())
return null
} finally {
if (outputStream != null) {
try {
outputStream.close()
} catch (Throwable t) {
}
}
}
try {
ContentValues values = new ContentValues(7)
values.put(MediaStore.Images.Media.TITLE, name)
values.put(MediaStore.Images.Media.DISPLAY_NAME, filename)
values.put(MediaStore.Images.Media.DATE_TAKEN, dateTaken)
values.put(MediaStore.Images.Media.MIME_TYPE, "image/JPEG")
values.put(MediaStore.Images.Media.DATA, filePath)
return cr.insert(IMAGE_URI, values)
} catch (Exception e) {
String packageName = "com.android.providers.downloads"
Intent intent = new Intent(Settings.ACTION_APPLICATION_DETAILS_SETTINGS)
intent.setData(Uri.parse("package:" + packageName))
startActivity(intent)
Toast.makeText(TakePhoteActivity.this, "请开启下载服务!", Toast.LENGTH_SHORT).show()
ContentValues values = new ContentValues(7)
values.put(MediaStore.Images.Media.TITLE, name)
values.put(MediaStore.Images.Media.DISPLAY_NAME, filename)
values.put(MediaStore.Images.Media.DATE_TAKEN, dateTaken)
values.put(MediaStore.Images.Media.MIME_TYPE, "image/JPEG")
values.put(MediaStore.Images.Media.DATA, filePath)
return cr.insert(IMAGE_URI, values)
}
}
- 1
- 2
- 3
- 4
- 5
- 6
- 7
- 8
- 9
- 10
- 11
- 12
- 13
- 14
- 15
- 16
- 17
- 18
- 19
- 20
- 21
- 22
- 23
- 24
- 25
- 26
- 27
- 28
- 29
- 30
- 31
- 32
- 33
- 34
- 35
- 36
- 37
- 38
- 39
- 40
- 41
- 42
- 43
- 44
- 45
- 46
- 47
- 48
- 49
- 50
- 51
- 52
- 53
- 54
- 55
- 56
- 57
- 58
- 59
- 60
- 61
- 62
- 63
- 64
3.3.1.2.1算法引用
public static final String PATH = Environment.getExternalStorageDirectory()
.toString() + "/AndroidMedia/";
long dateTaken = System.currentTimeMillis();
SimpleDateFormat formatter = new SimpleDateFormat("yyyy-MM-dd HH.mm.ss.SSS");
String formatStr = formatter.format(dateTaken);
String filename = formatStr + ".JPEG";
byte[] jpegData = Bitmap2Bytes(bitmap);
Uri uri = insertImage(getContentResolver(), filename, dateTaken, PATH, bitmap, jpegData);
/**
* Bitmap → byte[]
* @param bm
* @return
*/
public byte[] Bitmap2Bytes(Bitmap bm) {
ByteArrayOutputStream baos = new ByteArrayOutputStream();
bm.compress(Bitmap.CompressFormat.PNG, 100, baos);
return baos.toByteArray();
}
- 1
- 2
- 3
- 4
- 5
- 6
- 7
- 8
- 9
- 10
- 11
- 12
- 13
- 14
- 15
- 16
- 17
- 18
- 19
- 20
- 21
- 22
- 23
- 1
- 2
- 3
- 4
- 5
- 6
- 7
- 8
- 9
- 10
- 11
- 12
- 13
- 14
- 15
- 16
- 17
- 18
- 19
- 20
- 21
- 22
- 23
3.3.2 file转Bitmap
Bitmap bt = BitmapFactory.decodeFile(file.getPath())
3.3.3 Uri转Bitmap
Bitmap mBitmap = MediaStore.Images.Media.getBitmap(this.getContentResolver(), uri)
3.3.4 Bitmap转Uri
Uri uri = Uri.parse(MediaStore.Images.Media.insertImage(getContentResolver(), bitmap, null,null))
3.4 图片压缩
3.4.1 将图片按自己要求宽高像素缩放
3.4.1.1 一次性缩放
private Bitmap zoomImage(Bitmap bm,int newWidth,int newHeight){
int width = bm.getWidth()
int height = bm.getHeight();
float scaleWidth = ((float) newWidth) / width;
float scaleHeight = ((float) newHeight) / height;
Matrix matrix = new Matrix();
matrix.postScale(scaleWidth, scaleHeight);
Bitmap newbm = Bitmap.createBitmap(bm, 0, 0, width, height, matrix,
true);
return newbm;
}
3.4.1.2 循环缩放
private Bitmap comp(Bitmap image) {
        Matrix matrix = new Matrix();
        Bitmap bitmap = image;
        while (bitmap.getWidth() > 512 || bitmap.getHeight() > 1024) {
            matrix.setScale(0.9f, 0.9f);
            bitmap = Bitmap.createBitmap(bitmap, 0, 0, bitmap.getWidth(), bitmap.getHeight(), matrix, true);
        }
        return bitmap;
    }
3.4.2 将图片按质量压缩
3.4.2.1 将图片保存到本地后进行一次性质量压缩
/**
* 将图片保存到本地时进行压缩
*
* @param bmp
*/
public Bitmap compressBmpToFile(Bitmap bmp) {
ByteArrayOutputStream baos = new ByteArrayOutputStream();
int options = 60;
bmp.compress(Bitmap.CompressFormat.JPEG, options, baos);
long dateTaken = System.currentTimeMillis();
SimpleDateFormat formatter = new SimpleDateFormat("yyyy-MM-dd HH.mm.ss.SSS");
String formatStr = formatter.format(dateTaken);
String filename = formatStr + ".JPEG";
File parent = new File(PATH);
if (!parent.exists()) {
parent.mkdirs();
}
File file = new File(PATH, filename);
if (file.exists()) {
file.delete();
}
try {
FileOutputStream fos = new FileOutputStream(file);
fos.write(baos.toByteArray());
fos.flush();
fos.close();
} catch (Exception e) {
e.printStackTrace();
}
String filePath = PATH + filename;
Bitmap scanBitmap = BitmapFactory.decodeFile(filePath);
return scanBitmap;
}
- 1
- 2
- 3
- 4
- 5
- 6
- 7
- 8
- 9
- 10
- 11
- 12
- 13
- 14
- 15
- 16
- 17
- 18
- 19
- 20
- 21
- 22
- 23
- 24
- 25
- 26
- 27
- 28
- 29
- 30
- 31
- 32
- 33
- 34
- 35
- 1
- 2
- 3
- 4
- 5
- 6
- 7
- 8
- 9
- 10
- 11
- 12
- 13
- 14
- 15
- 16
- 17
- 18
- 19
- 20
- 21
- 22
- 23
- 24
- 25
- 26
- 27
- 28
- 29
- 30
- 31
- 32
- 33
- 34
- 35
3.4.2.2 将图片保存到本地后进行循环质量压缩
/**
* 将图片保存到本地时进行压缩
* @param bmp
*/
public Bitmap compressBmpToFile(Bitmap bmp){
ByteArrayOutputStream baos = new ByteArrayOutputStream();
int options = 80;
bmp.compress(Bitmap.CompressFormat.JPEG, options, baos);
while (baos.toByteArray().length / 1024 > 50) {
baos.reset();
options -= 5;
bmp.compress(Bitmap.CompressFormat.JPEG, options, baos);
}
long dateTaken = System.currentTimeMillis();
String filename = DateFormat.format("yyyy-MM-dd kk.mm.ss", dateTaken)
.toString() + ".jpg";
File file = new File(PATH, filename);
try {
FileOutputStream fos = new FileOutputStream(file);
fos.write(baos.toByteArray());
fos.flush();
fos.close();
} catch (Exception e) {
e.printStackTrace();
}
String filePath=PATH + filename;
Bitmap bitmap=BitmapFactory.decodeFile(filePath);
return bitmap;
}
- 1
- 2
- 3
- 4
- 5
- 6
- 7
- 8
- 9
- 10
- 11
- 12
- 13
- 14
- 15
- 16
- 17
- 18
- 19
- 20
- 21
- 22
- 23
- 24
- 25
- 26
- 27
- 28
- 29
- 30
- 31
- 32
- 1
- 2
- 3
- 4
- 5
- 6
- 7
- 8
- 9
- 10
- 11
- 12
- 13
- 14
- 15
- 16
- 17
- 18
- 19
- 20
- 21
- 22
- 23
- 24
- 25
- 26
- 27
- 28
- 29
- 30
- 31
- 32
3.4.3 Luban:可能是最接近微信朋友圈的图片压缩算法
Curzibn/Luban
3.5 Bitmap,byte[]互转
3.5.1 Bitmap → byte[]
private byte[] Bitmap2Bytes(Bitmap bm){
    ByteArrayOutputStream baos = new ByteArrayOutputStream();
    bm.compress(Bitmap.CompressFormat.PNG, 100, baos);
    return baos.toByteArray();
}
3.5.2 byte[] → Bitmap
private Bitmap Bytes2Bimap(byte[] b){
    if(b.length!=0){
        return BitmapFactory.decodeByteArray(b, 0, b.length);
    }else {
        return null;
    }
}
3.6 从资源中获取Bitmap
Resources res=getResources()
Bitmap bmp=BitmapFactory.decodeResource(res, R.drawable.pic)
3.7 从相册中选择图片
public static final int CHOOSE_PHOTO = 2;
Button chooseFromAlbum.setOnClickListener(new View.OnClickListener() {
@Override
public void onClick(View v) {
if (ContextCompat.checkSelfPermission(MainActivity.this, Manifest.permission.WRITE_EXTERNAL_STORAGE) != PackageManager.PERMISSION_GRANTED) {
ActivityCompat.requestPermissions(MainActivity.this, new String[]{ Manifest.permission. WRITE_EXTERNAL_STORAGE }, 1);
} else {
openAlbum();
}
}
});
private void openAlbum() {
Intent intent = new Intent("android.intent.action.GET_CONTENT");
intent.setType("image/*");
startActivityForResult(intent, CHOOSE_PHOTO);
}
@Override
public void onRequestPermissionsResult(int requestCode, String[] permissions, int[] grantResults) {
switch (requestCode) {
case 1:
if (grantResults.length > 0 && grantResults[0] == PackageManager.PERMISSION_GRANTED) {
openAlbum();
} else {
Toast.makeText(this, "权限被拒绝", Toast.LENGTH_SHORT).show();
}
break;
default:
}
}
@Override
protected void onActivityResult(int requestCode, int resultCode, Intent data) {
switch (requestCode) {
case CHOOSE_PHOTO:
if (resultCode == RESULT_OK) {
if (Build.VERSION.SDK_INT >= 19) {
handleImageOnKitKat(data);
} else {
handleImageBeforeKitKat(data);
}
}
break;
default:
break;
}
}
@TargetApi(19)
private void handleImageOnKitKat(Intent data) {
String imagePath = null;
Uri uri = data.getData();
Log.d("TAG", "handleImageOnKitKat: uri is " + uri);
if (DocumentsContract.isDocumentUri(this, uri)) {
String docId = DocumentsContract.getDocumentId(uri);
if("com.android.providers.media.documents".equals(uri.getAuthority())) {
String id = docId.split(":")[1];
String selection = MediaStore.Images.Media._ID + "=" + id;
imagePath = getImagePath(MediaStore.Images.Media.EXTERNAL_CONTENT_URI, selection);
} else if ("com.android.providers.downloads.documents".equals(uri.getAuthority())) {
Uri contentUri = ContentUris.withAppendedId(Uri.parse("content://downloads/public_downloads"), Long.valueOf(docId));
imagePath = getImagePath(contentUri, null);
}
} else if ("content".equalsIgnoreCase(uri.getScheme())) {
imagePath = getImagePath(uri, null);
} else if ("file".equalsIgnoreCase(uri.getScheme())) {
imagePath = uri.getPath();
}
displayImage(imagePath);
}
private void handleImageBeforeKitKat(Intent data) {
Uri uri = data.getData();
String imagePath = getImagePath(uri, null);
displayImage(imagePath);
}
private String getImagePath(Uri uri, String selection) {
String path = null;
Cursor cursor = getContentResolver().query(uri, null, selection, null, null);
if (cursor != null) {
if (cursor.moveToFirst()) {
path = cursor.getString(cursor.getColumnIndex(MediaStore.Images.Media.DATA));
}
cursor.close();
}
return path;
}
private void displayImage(String imagePath) {
if (imagePath != null) {
Bitmap bitmap = BitmapFactory.decodeFile(imagePath);
ImageView picture.setImageBitmap(bitmap);
} else {
Toast.makeText(this, "获取图片失败", Toast.LENGTH_SHORT).show();
}
}
- 1
- 2
- 3
- 4
- 5
- 6
- 7
- 8
- 9
- 10
- 11
- 12
- 13
- 14
- 15
- 16
- 17
- 18
- 19
- 20
- 21
- 22
- 23
- 24
- 25
- 26
- 27
- 28
- 29
- 30
- 31
- 32
- 33
- 34
- 35
- 36
- 37
- 38
- 39
- 40
- 41
- 42
- 43
- 44
- 45
- 46
- 47
- 48
- 49
- 50
- 51
- 52
- 53
- 54
- 55
- 56
- 57
- 58
- 59
- 60
- 61
- 62
- 63
- 64
- 65
- 66
- 67
- 68
- 69
- 70
- 71
- 72
- 73
- 74
- 75
- 76
- 77
- 78
- 79
- 80
- 81
- 82
- 83
- 84
- 85
- 86
- 87
- 88
- 89
- 90
- 91
- 92
- 93
- 94
- 95
- 96
- 97
- 98
- 99
- 100
- 101
- 102
- 103
- 104
- 105
- 106
四 开启通知栏权限
4.1 获取通知栏权限是否开启
/**
* @Class: NotificationsUtils
* @Description:
* @author: BG235144/AMOSCXY
* @Date: 2017/3/13
*/
public class NotificationsUtils {
private static final String CHECK_OP_NO_THROW = "checkOpNoThrow";
private static final String OP_POST_NOTIFICATION = "OP_POST_NOTIFICATION";
@SuppressLint("NewApi")
public static boolean isNotificationEnabled(Context context) {
AppOpsManager mAppOps = (AppOpsManager) context.getSystemService(Context.APP_OPS_SERVICE);
ApplicationInfo appInfo = context.getApplicationInfo();
String pkg = context.getApplicationContext().getPackageName();
int uid = appInfo.uid;
Class appOpsClass = null;
try {
appOpsClass = Class.forName(AppOpsManager.class.getName());
Method checkOpNoThrowMethod = appOpsClass.getMethod(CHECK_OP_NO_THROW, Integer.TYPE, Integer.TYPE,
String.class);
Field opPostNotificationValue = appOpsClass.getDeclaredField(OP_POST_NOTIFICATION);
int value = (Integer) opPostNotificationValue.get(Integer.class);
return ((Integer) checkOpNoThrowMethod.invoke(mAppOps, value, uid, pkg) == AppOpsManager.MODE_ALLOWED);
} catch (ClassNotFoundException e) {
e.printStackTrace();
} catch (NoSuchMethodException e) {
e.printStackTrace();
} catch (NoSuchFieldException e) {
e.printStackTrace();
} catch (InvocationTargetException e) {
e.printStackTrace();
} catch (IllegalAccessException e) {
e.printStackTrace();
}
return false;
}
}
- 1
- 2
- 3
- 4
- 5
- 6
- 7
- 8
- 9
- 10
- 11
- 12
- 13
- 14
- 15
- 16
- 17
- 18
- 19
- 20
- 21
- 22
- 23
- 24
- 25
- 26
- 27
- 28
- 29
- 30
- 31
- 32
- 33
- 34
- 35
- 36
- 37
- 38
- 39
- 40
- 41
- 42
- 43
- 1
- 2
- 3
- 4
- 5
- 6
- 7
- 8
- 9
- 10
- 11
- 12
- 13
- 14
- 15
- 16
- 17
- 18
- 19
- 20
- 21
- 22
- 23
- 24
- 25
- 26
- 27
- 28
- 29
- 30
- 31
- 32
- 33
- 34
- 35
- 36
- 37
- 38
- 39
- 40
- 41
- 42
- 43
注意:Build.VERSION.SDK_INT>=19时才能使用
4.2 仿qq进入软件应用信息页面,用于用户手动开启通知权限
Intent intent = new Intent("android.settings.APPLICATION_DETAILS_SETTINGS")
String pkg = "com.android.settings"
String cls = "com.android.settings.applications.InstalledAppDetails"
intent.setComponent(new ComponentName(pkg, cls))
intent.setData(Uri.parse("package:" + mContext.getPackageName()))
startActivity(intent)
五 android6.0程序在运行时申请权限
5.1 共9组24个危险时权限
| 权限组名 | 权限名 |
|---|
| CALENDAR | READ_CALENDAR 、WRITE_CALENDAR |
| CAMERA | CAMERA |
| CONTACTS | READ_CONTACTS 、WRITE_CONTACTS、 GET_ACCOUNTS |
| LOCATION | ACCESS_FINE_LOCATION、ACCESS_COARSE_LOCATION |
| MICROPHONE | RECORD_AUDIO |
| PHONE | READ_PHONE_STATE、CALL_PHONE、READ_CALL_LOG、WRITE_CALL_LOG、ADD_VOICEMAIL、USE_SIP、PROCESS_OUTGOING_CALLS |
| SENSOPS | BODY_SENSORS |
| SMS | SEND_SMS、RECEIVE_SMS、READ_SMS、RECEIVE_WAP_PUSH、RECEIVE_SMS |
| STORAGE | READ_EXTERNAL_STORAGE、WRITE_EXTERNAL_STORAGE |
5.2 运行时权限运用方案(以文件读写权限为例)
if (ContextCompat.checkSelfPermission(MainActivity.this, Manifest.permission.WRITE_EXTERNAL_STORAGE) != PackageManager.PERMISSION_GRANTED) {
ActivityCompat.requestPermissions(MainActivity.this, new String[]{ Manifest.permission. WRITE_EXTERNAL_STORAGE }, 1);
} else {
openAlbum();
}
@Override
public void onRequestPermissionsResult(int requestCode, String[] permissions, int[] grantResults) {
switch (requestCode) {
case 1:
if (grantResults.length > 0 && grantResults[0] == PackageManager.PERMISSION_GRANTED) {
openAlbum();
} else {
Toast.makeText(this, "权限被拒绝", Toast.LENGTH_SHORT).show();
}
break;
default:
}
}
- 1
- 2
- 3
- 4
- 5
- 6
- 7
- 8
- 9
- 10
- 11
- 12
- 13
- 14
- 15
- 16
- 17
- 18
- 19
- 20
- 21
- 22
- 1
- 2
- 3
- 4
- 5
- 6
- 7
- 8
- 9
- 10
- 11
- 12
- 13
- 14
- 15
- 16
- 17
- 18
- 19
- 20
- 21
- 22
六 获取项目参数
6.1 applicationId
String callingApp = context.getPackageManager().getNameForUid(Binder.getCallingUid())
6.2 获取项目名称
PackageManager pm = this.getPackageManager()
String appName = getApplicationInfo().loadLabel(pm).toString()
6.3 android aar获取整个项目的versionName和versionCode
private String getAppInfo() {
   try {
      String pkName = this.getPackageName();
      String versionName = this.getPackageManager().getPackageInfo(
            pkName, 0).versionName;
      int versionCode = this.getPackageManager()
            .getPackageInfo(pkName, 0).versionCode;
      return pkName + "   " + versionName + "  " + versionCode;
   } catch (Exception e) {
   }
   return null;
}
6.4 android aar获取用户手机系统版本号
String systemVersion = android.os.Build.VERSION.RELEASE
七 Android四大启动模式
7.1 task容器栈
就是Activity的一个容器集合,所有的Activity实例都是存放在这个容器栈里面。其实就是数据结构中栈是一个原理:先进后出,后进先出,所有操作都是发生在栈顶。
7.2 启动模式作用
launchMode在多个Activity跳转的过程中扮演着重要的角色,它可以决定是否生成新的Activity实例,是否重用已存在的Activity实例,是否和其他Activity实例公用一个task里
7.3 用法
android:launchMode="standard"
7.4 分别介绍
7.4.1 standard
默认启动模式,每次激活Activity时都会创建Activity,并放入任务栈中。
7.4.2 singleTop
如果在任务的栈顶正好存在该Activity的实例, 就重用该实例,否者就会创建新的实例并放入栈顶(即使栈中已经存在该Activity实例,只要不在栈顶,都会创建实例)。
7.4.3 singleTask
如果在栈中已经有该Activity的实例,就重用该实例(会调用实例的onNewIntent())。重用时,会让该实例回到栈顶,因此在它上面的实例将会被移除栈。如果栈中不存在该实例,将会创建新的实例放入栈中。
7.4.4 singleInstance
在一个新栈中创建该Activity实例,并让多个应用共享改栈中的该Activity实例。一旦改模式的Activity的实例存在于某个栈中,任何应用再激活改Activity时都会重用该栈中的实例,其效果相当于多个应用程序共享一个应用,不管谁激活该Activity都会进入同一个应用中。
7.4.5 onNewIntent(Intent intent)方法
大家遇到一个应用的Activity供多种方式调用启动的情况,多个调用希望只有一个Activity的实例存在,这就需要Activity的onNewIntent(Intent intent)方法了。只要在Activity中加入自己的onNewIntent(intent)的实现加上Manifest中对Activity设置lanuchMode=“singleTask”就可以。
onNewIntent()非常好用,Activity第一启动的时候执行onCreate()—->onStart()—->onResume()等后续生命周期函数,也就时说第一次启动Activity并不会执行到onNewIntent(). 而后面如果再有想启动Activity的时候,那就是执行onNewIntent()—->onResart()——>onStart()—–>onResume(). 如果android系统由于内存不足把已存在Activity释放掉了,那么再次调用的时候会重新启动Activity即执行onCreate()—->onStart()—->onResume()等。
当调用到onNewIntent(intent)的时候,需要在onNewIntent() 中使用setIntent(intent)赋值给Activity的Intent.否则,后续的getIntent()都是得到老的Intent。
八 android中的dp,px深度解析
8.1 dp
设备无关像素,不同设备有不同的显示效果,这个和设备硬件有关,一般我们为了支持WVGA、HVGA和QVGA 推荐使用这个,不依赖像素。
8.2 px
像素点
px = dp(densityDpi/160)
density
缩放系数,值为densityDpi/160
8.3 dpi
一英寸多少个像素点,一般称作像素密度
安卓规定,在160dpi屏幕上,1dp等于1px.这样在160dpi屏幕上指定的1dp宽度按钮,到了320dpi屏幕,宽度自动变成2px,保持了所占屏幕比例。
注意:该值对应于DisplayMetrics类中属性densityDpi的值。
8.4 分辨率
指屏幕横纵方向上的像素个数
8.5 sp
与密度和字体缩放度无关的像素,主要用于字体显示
8.6 dp和px转换
/**
 * dp、sp 转换为 px 的工具类
 *
 * @author fxsky 2012.11.12
 *
 */
public class DisplayUtil {
    /**
     * 将px值转换为dip或dp值,保证尺寸大小不变
     *
     * @param pxValue
     * @param scale
     *            (DisplayMetrics类中属性density)
     * @return
     */
    public static int px2dip(Context context, float pxValue) {
        final float scale = context.getResources().getDisplayMetrics().density;
        return (int) (pxValue / scale + 0.5f);
    }

    /**
     * 将dip或dp值转换为px值,保证尺寸大小不变
     *
     * @param dipValue
     * @param scale
     *            (DisplayMetrics类中属性density)
     * @return
     */
    public static int dip2px(Context context, float dipValue) {
        final float scale = context.getResources().getDisplayMetrics().density;
        return (int) (dipValue * scale + 0.5f);
    }

    /**
     * 将px值转换为sp值,保证文字大小不变
     *
     * @param pxValue
     * @param fontScale
     *            (DisplayMetrics类中属性scaledDensity)
     * @return
     */
    public static int px2sp(Context context, float pxValue) {
        final float fontScale = context.getResources().getDisplayMetrics().scaledDensity;
        return (int) (pxValue / fontScale + 0.5f);
    }

    /**
     * 将sp值转换为px值,保证文字大小不变
     *
     * @param spValue
     * @param fontScale
     *            (DisplayMetrics类中属性scaledDensity)
     * @return
     */
    public static int sp2px(Context context, float spValue) {
        final float fontScale = context.getResources().getDisplayMetrics().scaledDensity;
        return (int) (spValue * fontScale + 0.5f);
    }
}
- 1
- 2
- 3
- 4
- 5
- 6
- 7
- 8
- 9
- 10
- 11
- 12
- 13
- 14
- 15
- 16
- 17
- 18
- 19
- 20
- 21
- 22
- 23
- 24
- 25
- 26
- 27
- 28
- 29
- 30
- 31
- 32
- 33
- 34
- 35
- 36
- 37
- 38
- 39
- 40
- 41
- 42
- 43
- 44
- 45
- 46
- 47
- 48
- 49
- 50
- 51
- 52
- 53
- 54
- 55
- 56
- 57
- 58
- 59
- 1
- 2
- 3
- 4
- 5
- 6
- 7
- 8
- 9
- 10
- 11
- 12
- 13
- 14
- 15
- 16
- 17
- 18
- 19
- 20
- 21
- 22
- 23
- 24
- 25
- 26
- 27
- 28
- 29
- 30
- 31
- 32
- 33
- 34
- 35
- 36
- 37
- 38
- 39
- 40
- 41
- 42
- 43
- 44
- 45
- 46
- 47
- 48
- 49
- 50
- 51
- 52
- 53
- 54
- 55
- 56
- 57
- 58
- 59
九 时间相关
9.1 获得当前时间
public Long getTime()
{
    return System.currentTimeMillis();
}
9.2 判断当前与上次时间是否在is以外
public boolean getInterval(Long refreshTime,float i) {
    if(System.currentTimeMillis()-refreshTime>=i*1000){
        return true;
    }
    return false;
}
十 截屏监听(OcrService)
10.1 截屏监听类
public class ScreenShotListenManager {
private static final String TAG = "ScreenShotListenManager";
/** 读取媒体数据库时需要读取的列 */
private static final String[] MEDIA_PROJECTIONS = {
MediaStore.Images.ImageColumns.DATA,
MediaStore.Images.ImageColumns.DATE_TAKEN,
};
/** 读取媒体数据库时需要读取的列, 其中 WIDTH 和 HEIGHT 字段在 API 16 以后才有 */
private static final String[] MEDIA_PROJECTIONS_API_16 = {
MediaStore.Images.ImageColumns.DATA,
MediaStore.Images.ImageColumns.DATE_TAKEN,
MediaStore.Images.ImageColumns.WIDTH,
MediaStore.Images.ImageColumns.HEIGHT,
};
/** 截屏依据中的路径判断关键字 */
private static final String[] KEYWORDS = {
"screenshot", "screen_shot", "screen-shot", "screen shot",
"screencapture", "screen_capture", "screen-capture", "screen capture",
"screencap", "screen_cap", "screen-cap", "screen cap"
};
private static Point sScreenRealSize;
/** 已回调过的路径 */
private final List<String> sHasCallbackPaths = new ArrayList<String>();
private Context mContext;
private OnScreenShotListener mListener;
private long mStartListenTime;
/** 运行在 UI 线程的 Handler, 用于运行监听器回调 */
private final Handler mUiHandler = new Handler(Looper.getMainLooper());
/** 内部存储器内容观察者 */
private MediaContentObserver mInternalObserver = new MediaContentObserver(MediaStore.Images.Media.INTERNAL_CONTENT_URI, mUiHandler);
/** 外部存储器内容观察者 */
private MediaContentObserver mExternalObserver;
private ScreenShotListenManager(Context context) {
if (context == null) {
throw new IllegalArgumentException("The context must not be null.");
}
mContext = context;
if (sScreenRealSize == null) {
sScreenRealSize = getRealScreenSize();
if (sScreenRealSize != null) {
Log.d(TAG, "Screen Real Size: " + sScreenRealSize.x + " * " + sScreenRealSize.y);
} else {
Log.w(TAG, "Get screen real size failed.");
}
}
}
public static ScreenShotListenManager newInstance(Context context) {
assertInMainThread();
return new ScreenShotListenManager(context);
}
/**
* 启动监听
*/
public void startListen() {
assertInMainThread();
sHasCallbackPaths.clear();
mStartListenTime = System.currentTimeMillis();
mInternalObserver = new MediaContentObserver(MediaStore.Images.Media.INTERNAL_CONTENT_URI, mUiHandler);
mExternalObserver = new MediaContentObserver(MediaStore.Images.Media.EXTERNAL_CONTENT_URI, mUiHandler);
mContext.getContentResolver().registerContentObserver(
MediaStore.Images.Media.INTERNAL_CONTENT_URI,
false,
mInternalObserver
);
mContext.getContentResolver().registerContentObserver(
MediaStore.Images.Media.EXTERNAL_CONTENT_URI,
false,
mExternalObserver
);
}
/**
* 停止监听
*/
public void stopListen() {
assertInMainThread();
if (mInternalObserver != null) {
try {
mContext.getContentResolver().unregisterContentObserver(mInternalObserver);
} catch (Exception e) {
e.printStackTrace();
}
mInternalObserver = null;
}
if (mExternalObserver != null) {
try {
mContext.getContentResolver().unregisterContentObserver(mExternalObserver);
} catch (Exception e) {
e.printStackTrace();
}
mExternalObserver = null;
}
mStartListenTime = 0;
sHasCallbackPaths.clear();
}
/**
* 处理媒体数据库的内容改变
*/
private void handleMediaContentChange(Uri contentUri) {
Cursor cursor = null;
try {
cursor = mContext.getContentResolver().query(
contentUri,
Build.VERSION.SDK_INT < 16 ? MEDIA_PROJECTIONS : MEDIA_PROJECTIONS_API_16,
null,
null,
MediaStore.Images.ImageColumns.DATE_ADDED + " desc limit 1"
);
if (cursor == null) {
Log.e(TAG, "Deviant logic.");
return;
}
if (!cursor.moveToFirst()) {
Log.d(TAG, "Cursor no data.");
return;
}
int dataIndex = cursor.getColumnIndex(MediaStore.Images.ImageColumns.DATA);
int dateTakenIndex = cursor.getColumnIndex(MediaStore.Images.ImageColumns.DATE_TAKEN);
int widthIndex = -1;
int heightIndex = -1;
if (Build.VERSION.SDK_INT >= 16) {
widthIndex = cursor.getColumnIndex(MediaStore.Images.ImageColumns.WIDTH);
heightIndex = cursor.getColumnIndex(MediaStore.Images.ImageColumns.HEIGHT);
}
String data = cursor.getString(dataIndex);
long dateTaken = cursor.getLong(dateTakenIndex);
int width = 0;
int height = 0;
if (widthIndex >= 0 && heightIndex >= 0) {
width = cursor.getInt(widthIndex);
height = cursor.getInt(heightIndex);
} else {
Point size = getImageSize(data);
width = size.x;
height = size.y;
}
handleMediaRowData(data, dateTaken, width, height);
} catch (Exception e) {
e.printStackTrace();
} finally {
if (cursor != null && !cursor.isClosed()) {
cursor.close();
}
}
}
private Point getImageSize(String imagePath) {
BitmapFactory.Options options = new BitmapFactory.Options();
options.inJustDecodeBounds = true;
BitmapFactory.decodeFile(imagePath, options);
return new Point(options.outWidth, options.outHeight);
}
/**
* 处理获取到的一行数据
*/
private void handleMediaRowData(String data, long dateTaken, int width, int height) {
if (checkScreenShot(data, dateTaken, width, height)) {
Log.d(TAG, "ScreenShot: path = " + data + "; size = " + width + " * " + height
+ "; date = " + dateTaken);
if (mListener != null && !checkCallback(data)) {
mListener.onShot(data);
}
} else {
Log.w(TAG, "Media content changed, but not screenshot: path = " + data
+ "; size = " + width + " * " + height + "; date = " + dateTaken);
}
}
/**
* 判断指定的数据行是否符合截屏条件
*/
private boolean checkScreenShot(String data, long dateTaken, int width, int height) {
if (dateTaken < mStartListenTime || (System.currentTimeMillis() - dateTaken) > 10 * 1000) {
return false;
}
if (sScreenRealSize != null) {
if (
!(
(width <= sScreenRealSize.x && height <= sScreenRealSize.y)
||
(height <= sScreenRealSize.x && width <= sScreenRealSize.y)
)) {
return false;
}
}
if (TextUtils.isEmpty(data)) {
return false;
}
data = data.toLowerCase();
for (String keyWork : KEYWORDS) {
if (data.contains(keyWork)) {
return true;
}
}
return false;
}
/**
* 判断是否已回调过, 某些手机ROM截屏一次会发出多次内容改变的通知; <br/>
* 删除一个图片也会发通知, 同时防止删除图片时误将上一张符合截屏规则的图片当做是当前截屏.
*/
private boolean checkCallback(String imagePath) {
if (sHasCallbackPaths.contains(imagePath)) {
return true;
}
if (sHasCallbackPaths.size() >= 20) {
for (int i = 0; i < 5; i++) {
sHasCallbackPaths.remove(0);
}
}
sHasCallbackPaths.add(imagePath);
return false;
}
/**
* 获取屏幕分辨率
*/
private Point getRealScreenSize() {
Point screenSize = null;
try {
screenSize = new Point();
WindowManager windowManager = (WindowManager) mContext.getSystemService(Context.WINDOW_SERVICE);
Display defaultDisplay = windowManager.getDefaultDisplay();
if (Build.VERSION.SDK_INT >= Build.VERSION_CODES.JELLY_BEAN_MR1) {
defaultDisplay.getRealSize(screenSize);
} else {
try {
Method mGetRawW = Display.class.getMethod("getRawWidth");
Method mGetRawH = Display.class.getMethod("getRawHeight");
screenSize.set(
(Integer) mGetRawW.invoke(defaultDisplay),
(Integer) mGetRawH.invoke(defaultDisplay)
);
} catch (Exception e) {
screenSize.set(defaultDisplay.getWidth(), defaultDisplay.getHeight());
e.printStackTrace();
}
}
} catch (Exception e) {
e.printStackTrace();
}
return screenSize;
}
/**
* 设置截屏监听器
*/
public void setListener(OnScreenShotListener listener) {
mListener = listener;
}
public static interface OnScreenShotListener {
public void onShot(String imagePath);
}
private static void assertInMainThread() {
if (Looper.myLooper() != Looper.getMainLooper()) {
StackTraceElement[] elements = Thread.currentThread().getStackTrace();
String methodMsg = null;
if (elements != null && elements.length >= 4) {
methodMsg = elements[3].toString();
}
throw new IllegalStateException("Call the method must be in main thread: " + methodMsg);
}
}
/**
* 媒体内容观察者(观察媒体数据库的改变)
*/
private class MediaContentObserver extends ContentObserver {
private Uri mContentUri;
public MediaContentObserver(Uri contentUri, Handler handler) {
super(handler);
mContentUri = contentUri;
}
@Override
public void onChange(boolean selfChange) {
super.onChange(selfChange);
handleMediaContentChange(mContentUri);
}
}
}
- 1
- 2
- 3
- 4
- 5
- 6
- 7
- 8
- 9
- 10
- 11
- 12
- 13
- 14
- 15
- 16
- 17
- 18
- 19
- 20
- 21
- 22
- 23
- 24
- 25
- 26
- 27
- 28
- 29
- 30
- 31
- 32
- 33
- 34
- 35
- 36
- 37
- 38
- 39
- 40
- 41
- 42
- 43
- 44
- 45
- 46
- 47
- 48
- 49
- 50
- 51
- 52
- 53
- 54
- 55
- 56
- 57
- 58
- 59
- 60
- 61
- 62
- 63
- 64
- 65
- 66
- 67
- 68
- 69
- 70
- 71
- 72
- 73
- 74
- 75
- 76
- 77
- 78
- 79
- 80
- 81
- 82
- 83
- 84
- 85
- 86
- 87
- 88
- 89
- 90
- 91
- 92
- 93
- 94
- 95
- 96
- 97
- 98
- 99
- 100
- 101
- 102
- 103
- 104
- 105
- 106
- 107
- 108
- 109
- 110
- 111
- 112
- 113
- 114
- 115
- 116
- 117
- 118
- 119
- 120
- 121
- 122
- 123
- 124
- 125
- 126
- 127
- 128
- 129
- 130
- 131
- 132
- 133
- 134
- 135
- 136
- 137
- 138
- 139
- 140
- 141
- 142
- 143
- 144
- 145
- 146
- 147
- 148
- 149
- 150
- 151
- 152
- 153
- 154
- 155
- 156
- 157
- 158
- 159
- 160
- 161
- 162
- 163
- 164
- 165
- 166
- 167
- 168
- 169
- 170
- 171
- 172
- 173
- 174
- 175
- 176
- 177
- 178
- 179
- 180
- 181
- 182
- 183
- 184
- 185
- 186
- 187
- 188
- 189
- 190
- 191
- 192
- 193
- 194
- 195
- 196
- 197
- 198
- 199
- 200
- 201
- 202
- 203
- 204
- 205
- 206
- 207
- 208
- 209
- 210
- 211
- 212
- 213
- 214
- 215
- 216
- 217
- 218
- 219
- 220
- 221
- 222
- 223
- 224
- 225
- 226
- 227
- 228
- 229
- 230
- 231
- 232
- 233
- 234
- 235
- 236
- 237
- 238
- 239
- 240
- 241
- 242
- 243
- 244
- 245
- 246
- 247
- 248
- 249
- 250
- 251
- 252
- 253
- 254
- 255
- 256
- 257
- 258
- 259
- 260
- 261
- 262
- 263
- 264
- 265
- 266
- 267
- 268
- 269
- 270
- 271
- 272
- 273
- 274
- 275
- 276
- 277
- 278
- 279
- 280
- 281
- 282
- 283
- 284
- 285
- 286
- 287
- 288
- 289
- 290
- 291
- 292
- 293
- 294
- 295
- 296
- 297
- 298
- 299
- 300
- 301
- 302
- 303
- 304
- 305
- 306
- 307
- 308
- 309
- 310
- 311
- 312
- 313
- 314
- 315
- 316
- 317
- 318
- 319
- 320
- 321
- 322
- 323
- 324
- 325
- 326
- 327
- 328
- 329
- 330
- 331
- 332
- 333
- 334
- 335
- 336
- 337
- 338
- 339
- 340
- 341
10.2 截屏监听类的引用
package com.ziniu.mobile.module.androidocrcamera
import android.app.AlertDialog
import android.app.Notification
import android.app.PendingIntent
import android.app.Service
import android.content.DialogInterface
import android.content.Intent
import android.graphics.BitmapFactory
import android.os.Handler
import android.os.IBinder
import android.os.Looper
import android.support.v4.app.NotificationCompat
import android.view.LayoutInflater
import android.view.View
import android.view.WindowManager
import android.widget.RelativeLayout
import android.widget.TextView
import android.widget.Toast
import com.ziniu.logistics.mobile.protocol.util.StringUtil
import com.ziniu.mobile.module.R
import com.ziniu.mobile.module.common.Util
import com.ziniu.mobile.module.ui.BillChooseActivity
import com.ziniu.mobile.module.ui.TakePhoteActivity
public class OcrService extends Service {
private ScreenShotListenManager manager
public OcrService() {
}
@Override
public IBinder onBind(Intent intent) {
// TODO: Return the communication channel to the service.
throw new UnsupportedOperationException("Not yet implemented")
}
@Override
public void onCreate() {
super.onCreate()
Intent intent = new Intent(OcrService.this, BillChooseActivity.class)
PendingIntent pi = PendingIntent.getActivity(OcrService.this, 0, intent, 0)
Notification notification = new NotificationCompat.Builder(OcrService.this)
.setContentTitle("物流来了")
.setContentText("截屏监听已开启")
.setWhen(System.currentTimeMillis())
.setSmallIcon(R.mipmap.ic_launcher)
.setLargeIcon(BitmapFactory.decodeResource(getResources(), R.mipmap.ic_launcher))
.setContentIntent(pi)
.build()
startForeground(1, notification)
}
@Override
public int onStartCommand(Intent intent, int flags, int startId) {
if(manager==null){
manager = ScreenShotListenManager.newInstance(OcrService.this)
}
manager.startListen()
manager.setListener(
new ScreenShotListenManager.OnScreenShotListener() {
public void onShot(String imagePath) {
if(Util.isLogin(OcrService.this)||Util.isRlszLogin(OcrService.this)){
if(StringUtil.isEmpty(imagePath)){
Handler handler = new Handler(Looper.getMainLooper())
handler.post(new Runnable() {
public void run() {
Toast.makeText(OcrService.this, "没有找到截屏图片,请重试!", Toast.LENGTH_SHORT).show()
}
})
}else{
Intent intent = new Intent(OcrService.this,
TakePhoteActivity.class)
intent.setFlags(Intent.FLAG_ACTIVITY_NEW_TASK)
intent.putExtra("imagePath",imagePath)
OcrService.this.startActivity(intent)
}
}else{
Handler handler = new Handler(Looper.getMainLooper())
handler.post(new Runnable() {
public void run() {
Toast.makeText(OcrService.this, "请登录!", Toast.LENGTH_SHORT).show()
}
})
}
}
}
)
// START_NOT_STICKY:“非粘性的”。使用这个返回值时,如果在执行完onStartCommand后,服务被异常kill掉,系统不会自动重启服务该
return START_NOT_STICKY
}
@Override
public void onDestroy() {
if(manager!=null){
manager.stopListen()
manager.setListener(null)
}
super.onDestroy()
}
}
- 1
- 2
- 3
- 4
- 5
- 6
- 7
- 8
- 9
- 10
- 11
- 12
- 13
- 14
- 15
- 16
- 17
- 18
- 19
- 20
- 21
- 22
- 23
- 24
- 25
- 26
- 27
- 28
- 29
- 30
- 31
- 32
- 33
- 34
- 35
- 36
- 37
- 38
- 39
- 40
- 41
- 42
- 43
- 44
- 45
- 46
- 47
- 48
- 49
- 50
- 51
- 52
- 53
- 54
- 55
- 56
- 57
- 58
- 59
- 60
- 61
- 62
- 63
- 64
- 65
- 66
- 67
- 68
- 69
- 70
- 71
- 72
- 73
- 74
- 75
- 76
- 77
- 78
- 79
- 80
- 81
- 82
- 83
- 84
- 85
- 86
- 87
- 88
- 89
- 90
- 91
- 92
- 93
- 94
- 95
- 96
- 97
- 98
- 99
- 100
- 101
- 102
十一 android在Service中弹出提示
11.1 android service Toast
Handler handler = new Handler(Looper.getMainLooper());
handler.post(new Runnable() {
    public void run() {
        Toast.makeText(BaseActivity.this, "请登录!", Toast.LENGTH_SHORT).show();
    }
});
11.2 android在Service中弹出Dialog对话框,即全局性对话框
写好Alter功能块后,在alter.show()语句前加入:
alert.getWindow().setType(WindowManager.LayoutParams.TYPE_SYSTEM_ALERT)
注:alter为AlertDialog类型对象
然后在AndroidManifest.xml中加入权限:
<uses-permission android:name="android.permission.SYSTEM_ALERT_WINDOW"></uses-permission>
下面进行简单的解释:
如果只在Service中写入常在Activity中使用的创建Alter的代码,运行时是会发生错误的,因为Alter的显示需要依附于一个确定的Activity类。而以上做法就是声明我们要弹出的这个提示框是一个系统的提示框,即全局性质的提示框,所以只要手机处于开机状态,无论它现在处于何种界面之下,只要调用alter.show(),就会弹出提示框来。
十二 android性能优化
12.1 检测工具
12.1.2
12.2 优化方案
12.2.2
十三 Android 判断是开发debug模式,还是发布release模式
/**
     * 但是当我们没在AndroidManifest.xml中设置其debug属性时:
     * 使用Eclipse运行这种方式打包时其debug属性为true,使用Eclipse导出这种方式打包时其debug属性为法false.
     * 在使用ant打包时,其值就取决于ant的打包参数是release还是debug.
     * 因此在AndroidMainifest.xml中最好不设置android:debuggable属性置,而是由打包方式来决定其值.
     * 跑码运行时isApkDebugable为true,只有release打包时isApkDebugable为false
     * @param context
     * @return
     * @author SHANHY
     * @date   2015-8-7
     */
    public static boolean isApkDebugable(Context context) {
        try {
            ApplicationInfo info= context.getApplicationInfo();
                return (info.flags&ApplicationInfo.FLAG_DEBUGGABLE)!=0;
        } catch (Exception e) {

        }
        return false;
    }
- 1
- 2
- 3
- 4
- 5
- 6
- 7
- 8
- 9
- 10
- 11
- 12
- 13
- 14
- 15
- 16
- 17
- 18
- 19
- 20
- 1
- 2
- 3
- 4
- 5
- 6
- 7
- 8
- 9
- 10
- 11
- 12
- 13
- 14
- 15
- 16
- 17
- 18
- 19
- 20
十四 暂停1s
14.1
SystemClock.sleep(1000);
14.2
try {
    Thread.sleep(1000);
} catch (InterruptedException e) {
    e.printStackTrace();
}
十五 部分Android手机拍照后照片被旋转的解决方案
在部分Android手机(如MT788、Note2)上,使用Camera拍照以后,得到的照片会被自动旋转(90°、180°、270°),这个情况很不符合预期。仔细分析了一下,因为照片属性中是存储了旋转信息的,所以要解决这个问题,可以在onActivityResult方法中,获取到照片数据后,读取它的旋转信息,如果不是0,说明这个照片已经被旋转过了,那么再使用android.graphics.Matrix将照片旋转回去即可。
15.1 读取图片的旋转属性
/**
* 读取图片的旋转的角度
*
* @param path
* 图片绝对路径
* @return 图片的旋转角度
*/
private int getBitmapDegree(String path) {
int degree = 0;
try {
ExifInterface exifInterface = new ExifInterface(path);
int orientation = exifInterface.getAttributeInt(ExifInterface.TAG_ORIENTATION,
ExifInterface.ORIENTATION_NORMAL);
switch (orientation) {
case ExifInterface.ORIENTATION_ROTATE_90:
degree = 90;
break;
case ExifInterface.ORIENTATION_ROTATE_180:
degree = 180;
break;
case ExifInterface.ORIENTATION_ROTATE_270:
degree = 270;
break;
}
} catch (IOException e) {
e.printStackTrace();
}
return degree;
}
- 1
- 2
- 3
- 4
- 5
- 6
- 7
- 8
- 9
- 10
- 11
- 12
- 13
- 14
- 15
- 16
- 17
- 18
- 19
- 20
- 21
- 22
- 23
- 24
- 25
- 26
- 27
- 28
- 29
- 30
- 31
- 1
- 2
- 3
- 4
- 5
- 6
- 7
- 8
- 9
- 10
- 11
- 12
- 13
- 14
- 15
- 16
- 17
- 18
- 19
- 20
- 21
- 22
- 23
- 24
- 25
- 26
- 27
- 28
- 29
- 30
- 31
15.2 将图片按照某个角度顺时针旋转
/**
* 将图片按照某个角度进行旋转
*
* @param bm
* 需要旋转的图片
* @param degree
* 旋转角度
* @return 旋转后的图片
*/
public static Bitmap rotateBitmapByDegree(Bitmap bm, int degree) {
Bitmap returnBm = null;
Matrix matrix = new Matrix();
matrix.postRotate(degree);
try {
returnBm = Bitmap.createBitmap(bm, 0, 0, bm.getWidth(), bm.getHeight(), matrix, true);
} catch (OutOfMemoryError e) {
}
if (returnBm == null) {
returnBm = bm;
}
if (bm != returnBm) {
bm.recycle();
}
return returnBm;
}
- 1
- 2
- 3
- 4
- 5
- 6
- 7
- 8
- 9
- 10
- 11
- 12
- 13
- 14
- 15
- 16
- 17
- 18
- 19
- 20
- 21
- 22
- 23
- 24
- 25
- 26
- 27
- 28
- 1
- 2
- 3
- 4
- 5
- 6
- 7
- 8
- 9
- 10
- 11
- 12
- 13
- 14
- 15
- 16
- 17
- 18
- 19
- 20
- 21
- 22
- 23
- 24
- 25
- 26
- 27
- 28
十六 Android中显示照片的Exif信息
try {
//android读取图片EXIF信息,path为图片的绝对路径,ExifInterface专门用来读写JPEG图片文件Exif信息的类
ExifInterface exifInterface=new ExifInterface(path)
String smodel=exifInterface.getAttribute(ExifInterface.TAG_MODEL)
String width=exifInterface.getAttribute(ExifInterface.TAG_IMAGE_WIDTH)
String height=exifInterface.getAttribute(ExifInterface.TAG_IMAGE_LENGTH)
Toast.makeText(MainActivity.this, smodel+" "+width+"*"+height, Toast.LENGTH_LONG).show()
} catch (Exception e) {
e.printStackTrace()
}
- 1
- 2
- 3
- 4
- 5
- 6
- 7
- 8
- 9
- 10
- 11
- 12
- 13
- 14
- 15
- 16
- 17
- 18
- 19
- 20
- 21
- 22
- 23
- 24
- 25
- 26
- 27
- 28
- 29
- 30
- 1
- 2
- 3
- 4
- 5
- 6
- 7
- 8
- 9
- 10
- 11
- 12
- 13
- 14
- 15
- 16
- 17
- 18
- 19
- 20
- 21
- 22
- 23
- 24
- 25
- 26
- 27
- 28
- 29
- 30
十七 Activity继承自 android.support.v7.app.AppCompatActivity,而不是 android.app.Activity时要注意的事
想继承自AppCompatActivity,那么根据提示来使用AppCompat的theme,即将AndroidManifest.xml文件中关于Activity的主题配置改成:
android:theme="@style/Theme.AppCompat.Light.NoActionBar"
完整代码:
<activity android:name=".RlszMainActivity"
    android:theme="@style/ZINIU_THEME">
</activity>
十八 用Base64加密数据解决json传输数据中特殊字符问题
在用json进行远程同步数据时,json中的数据有特殊字符时,容易造成json解析不了。用对特殊字符进行转义,实现太麻烦(个人觉得)。于是想到了对属性值进行加密处理,而且加密后的数据不会有特殊字符。而base64非常适合(个人觉得base64的出现就是为了解决数据传输特殊字符的问题)。
/**
* Base64.DEFAULT:当字符串过长(一般超过76)时会自动在中间加一个换行符
* Base64.NO_WRAP:这个参数意思是略去所有的换行符
*/
public class Base64Utils {
public static String getBase64(String str) {
String result = "";
if( str != null) {
try {
result = new String(Base64.encode(str.getBytes("utf-8"), Base64.NO_WRAP),"utf-8");
} catch (UnsupportedEncodingException e) {
e.printStackTrace();
}
}
return result;
}
public static String getFromBase64(String str) {
String result = "";
if (str != null) {
try {
result = new String(Base64.decode(str, Base64.NO_WRAP), "utf-8");
} catch (UnsupportedEncodingException e) {
e.printStackTrace();
}
}
return result;
}
}
- 1
- 2
- 3
- 4
- 5
- 6
- 7
- 8
- 9
- 10
- 11
- 12
- 13
- 14
- 15
- 16
- 17
- 18
- 19
- 20
- 21
- 22
- 23
- 24
- 25
- 26
- 27
- 28
- 29
- 30
- 31
- 1
- 2
- 3
- 4
- 5
- 6
- 7
- 8
- 9
- 10
- 11
- 12
- 13
- 14
- 15
- 16
- 17
- 18
- 19
- 20
- 21
- 22
- 23
- 24
- 25
- 26
- 27
- 28
- 29
- 30
- 31
十九 Json
19.1 不知道Json相关Bean类,知道Json字符串结构,求各元素值
JSONObject resultJson = new JSONObject(JsonString);
String sendeName = resultJson.getJSONObject("sender").optString("name");
String senderPhone = resultJson.optString("phone");
二十一 android 项目Gradle配置
android {
signingConfigs {
release {
storeFile file('56laile')
storePassword 'zi111111niu'
keyAlias '56laile'
keyPassword 'zi111111niu'
}
debug {
keyAlias '56laile'
keyPassword 'zi111111niu'
storeFile file('56laile')
storePassword 'zi111111niu'
}
}
compileSdkVersion 24
buildToolsVersion '25.0.2'
defaultConfig {
applicationId "com.ziniu.mobile"
minSdkVersion 14
targetSdkVersion 24
versionCode 30
versionName "1.2.6"
ndk {
abiFilters "armeabi", "armeabi-v7a", "x86", "mips"
}
}
buildTypes {
release {
zipAlignEnabled true
debuggable false
shrinkResources false
jniDebuggable false
multiDexEnabled true
proguardFiles getDefaultProguardFile('proguard-android.txt'), 'proguard-rules.pro'
buildConfigField("boolean", "LOG_DEBUG", "false")
signingConfig signingConfigs.release
}
debug {
zipAlignEnabled true
debuggable true
shrinkResources false
jniDebuggable false
multiDexEnabled true
proguardFiles getDefaultProguardFile('proguard-android.txt'), 'proguard-rules.pro'
buildConfigField("boolean", "LOG_DEBUG", "true")
signingConfig signingConfigs.debug
}
}
packagingOptions {
exclude 'META-INF/ASL2.0'
exclude 'META-INF/LICENSE'
}
dexOptions {
javaMaxHeapSize "4g"
maxProcessCount 8
}
lintOptions {
abortOnError false
disable 'MissingTranslation'
}
}
- 1
- 2
- 3
- 4
- 5
- 6
- 7
- 8
- 9
- 10
- 11
- 12
- 13
- 14
- 15
- 16
- 17
- 18
- 19
- 20
- 21
- 22
- 23
- 24
- 25
- 26
- 27
- 28
- 29
- 30
- 31
- 32
- 33
- 34
- 35
- 36
- 37
- 38
- 39
- 40
- 41
- 42
- 43
- 44
- 45
- 46
- 47
- 48
- 49
- 50
- 51
- 52
- 53
- 54
- 55
- 56
- 57
- 58
- 59
- 60
- 61
- 62
- 63
- 64
- 65
- 66
- 67
- 68
- 69
- 70
- 71
- 72
- 73
- 74
- 75
- 76
- 77
- 78
- 79
- 80
- 81
- 82
- 83
- 84
- 85
- 86
- 87
二十二 android方法
22.1 Android getWindow().setFlags方法
//设置窗体全屏
getWindow().setFlags(WindowManager.LayoutParams.FLAG_FULLSCREEN, WindowManager.LayoutParams.FLAG_FULLSCREEN)
//设置窗体始终点亮
getWindow().setFlags(WindowManager.LayoutParams.FLAG_KEEP_SCREEN_ON, WindowManager.LayoutParams.FLAG_KEEP_SCREEN_ON)
//设置窗体背景模糊
getWindow().setFlags(WindowManager.LayoutParams.FLAG_BLUR_BEHIND WindowManager.LayoutParams.FLAG_BLUR_BEHIND)
// 开启windows层硬件加速
getWindow().setFlags(WindowManager.LayoutParams.FLAG_HARDWARE_ACCELERATED, WindowManager.LayoutParams.FLAG_HARDWARE_ACCELERATED)
22.2 隐藏标题栏
requestWindowFeature(Window.FEATURE_NO_TITLE);
22.3 控制音量
android开发中,有时需要使用音量控制键来设置程序的音量大小。通过Activity中的函数 setVolumeControlStream(int streamType)可以设置该Activity中音量控制键控制的音频流,一般在onCreate函数中设置。Android中有如下几种音频流(streamType是需要调整音量的类型):
AudioManager.STREAM_MUSIC
AudioManager.STREAM_RING
AudioManager.STREAM_ALARM
AudioManager.STREAM_NOTIFICATION
AudioManager.STREAM_SYSTEM
AudioManager.STREAM_VOICECALL
AudioManager.STREAM_DTMF
AudioManager可以修改系统Android系统的音量,下面介绍几个AudioManager的几个音量调整方面的方法.首先是得到AudioManager实例:
AudioManager am=(AudioManager)getSystemService(Context.AUDIO_SERVICE);
调整音量方法有两种,一种是渐进式,即像手动按音量键一样,一步一步增加或减少,另一种是直接设置音量值.
22.3.1 渐进式
public void adjustStreamVolume (int streamType, int direction, int flags)

am.adjustStreamVolume (AudioManager.STREAM_MUSIC,AudioManager.ADJUST_RAISE, AudioManager.FLAG_SHOW_UI);
解释一下三个参数:
*第一个streamType是需要调整音量的类型,这里设的是媒体音量,可以是:
STREAM_ALARM 警报
STREAM_MUSIC 音乐回放即媒体音量
STREAM_NOTIFICATION 窗口顶部状态栏Notification,
STREAM_RING 铃声
STREAM_SYSTEM 系统
STREAM_VOICE_CALL 通话
STREAM_DTMF 双音多频,不是很明白什么东西
*第二个direction,是调整的方向,增加或减少,可以是:
ADJUST_LOWER 降低音量
ADJUST_RAISE 升高音量
ADJUST_SAME 保持不变,这个主要用于向用户展示当前的音量
*第三个flags是一些附加参数,只介绍两个常用的
FLAG_PLAY_SOUND 调整音量时播放声音
FLAG_SHOW_UI 调整时显示音量条,就是按音量键出现的那个
0表示什么也没有
22.3.2 直接设置音量值的方法:
public void setStreamVolume (intstreamType, intindex, intflags)
am.setStreamVolume(AudioManager.STREAM_MUSIC, am.getStreamMaxVolume(AudioManager.STREAM_MUSIC), AudioManager.FLAG_PLAY_SOUND)
am.getStreamMaxVolume(AudioManager.STREAM_VOICE_CALL)
am.getStreamVolume(AudioManager.STREAM_VOICE_CALL)
第一个和第三个参数与上面的相同第二个参数是一个音量的int值,getStreamMaxVolume(int streamType)得到的是该类型音量的最大值,可以根据这个值计算你需要的音量,我这里直接调到最大.
二十三 java继承作用
23.1 运用父类作为形参,多种子类作为实参,达到一个函数多种实现
父类BaseActivity:
public void callback() {

}
方法(父类作为形参):
public void connect(BaseActivity baseActivity, final String mac, final boolean failCheck, final List<HPRTBlueTooth> list){
if(!isBlueToothEnable()){
EnableBluetooth();
}
if(!getHPRTPrinterHelper().IsOpened())
{
ConnectAsyncTask task = new ConnectAsyncTask(baseActivity, mac, list, failCheck);
task.execute();
}else{
Toast.makeText(context,"蓝牙设备已连接成功",Toast.LENGTH_SHORT).show();
baseActivity.callback();
}
}
private class ConnectAsyncTask extends AsyncTask<Void,String,String> {
private BaseActivity context;
private String mac;
private List<HPRTBlueTooth> list;
private boolean failCheck;
ConnectAsyncTask(BaseActivity context, String mac, List<HPRTBlueTooth> list, boolean failCheck) {
this.context = context;
this.mac = mac;
this.list = list;
this.failCheck = failCheck;
}
@Override
protected void onPreExecute() {
super.onPreExecute();
startBluetoothProgressDialog(this.context, "正在连接蓝牙设备");
}
@Override
protected String doInBackground(Void... params) {
try {
int result = HPRTPrinterHelper.PortOpen("Bluetooth," + mac);
if(result == 0){
return "SUCCESS";
}
} catch (Exception e) {
e.printStackTrace();
}
return "FAIL";
}
@Override
protected void onPostExecute(String result) {
stopBluetoothProgressDialog();
if(result.equals("FAIL")){
if(failCheck){
showBluetoothCheckDialog(this.context);
}else {
Toast.makeText(this.context, "连接蓝牙设备失败", Toast.LENGTH_SHORT).show();
}
}else {
if (list == null || list.isEmpty()) {
Toast.makeText(this.context,"连接蓝牙设备成功",Toast.LENGTH_SHORT).show();
this.context.callback();
}else{
for(HPRTBlueTooth ele: list){
print(ele);
}
}
}
}
}
- 1
- 2
- 3
- 4
- 5
- 6
- 7
- 8
- 9
- 10
- 11
- 12
- 13
- 14
- 15
- 16
- 17
- 18
- 19
- 20
- 21
- 22
- 23
- 24
- 25
- 26
- 27
- 28
- 29
- 30
- 31
- 32
- 33
- 34
- 35
- 36
- 37
- 38
- 39
- 40
- 41
- 42
- 43
- 44
- 45
- 46
- 47
- 48
- 49
- 50
- 51
- 52
- 53
- 54
- 55
- 56
- 57
- 58
- 59
- 60
- 61
- 62
- 63
- 64
- 65
- 66
- 67
- 68
- 69
- 70
- 71
- 72
子类中调用该方法(子类作为实参):
hprtBlueToothService.connect(DeviceListActivity.this, toothAddress, false, null);
@Override
public void callback() {
super.callback();
this.finish();
}
二十四 EditText总结
24.1 EditText软键盘Enter键变为回车键,点击回车键可以执行事件
24.1.1 指定输入法窗口中的回车键的功能
android:imeOptions
可选值为normal,actionUnspecified,actionNone,actionGo,actionSearch,actionSend,actionNext,actionDone。
部分输入法对此的支持可能不够好。
<EditText
    android:id="@+id/search_edit"
    android:background="@null"
    style="@style/text_s24_818181"
    android:digits="1234567890."
    android:layout_width="match_parent"
    android:layout_height="match_parent"
    android:singleLine="true"
    android:layout_centerVertical="true"
    android:imeOptions="actionSearch"
    android:hint="请输入12位号段对接码"/>
24.1.2 点击回车键可以执行事件
mSearchEdit.setOnEditorActionListener(new TextView.OnEditorActionListener() {
@Override
public boolean onEditorAction(TextView v, int actionId, KeyEvent event) {
if (actionId == EditorInfo.IME_ACTION_DONE || (event != null && event.getKeyCode() == KeyEvent.KEYCODE_ENTER)) {
String keywords = mSearchEdit.getText().toString().trim();
if (StringUtil.isEmpty(keywords)) {
Toast.makeText(ShoppingCodeActivity.this, "请输入12位号段对接码", Toast.LENGTH_SHORT).show();
} else {
submit();
}
return true;
}
return false;
}
});
24.2 指定输入法的类型
android:inputType
可以用|选择多个,取值包括 text, textUri, phone, number, numberDecimal, textEmailAddress等。
24.3 Android中的EditText默认时不弹出软键盘的方法
在 父 Activity 中 onCreate 中加上
getWindow().setSoftInputMode(WindowManager.LayoutParams.SOFT_INPUT_STATE_HIDDEN)
二十五 TextView
25.1 TextView只显示一行,对显示不完的内容使用省略号替代。
// 设置文本最大的显示行数
android:lines=”1”
// 设置单行显示,当文本不能显示全部内容时后面使用省略号替代显示
android:singleLine=”true”
二十六 遍历 Map
String selectAccount = intent.getStringExtra("selectAccount");
private Map<String, String> accountList = intent.getStringExtra("stringAccountList");
for (Map.Entry<String, String> entry : accountList.entrySet()) {
    if ((entry.getKey()).equals(selectAccount)) {
        Long selectUserId = Long.parseLong(entry.getValue());
    }
}
二十七 bugly渠道
strategy.setAppChannel("56laile_with_bluetooth")


 2185
2185

 被折叠的 条评论
为什么被折叠?
被折叠的 条评论
为什么被折叠?
 到【灌水乐园】发言


