


RabbitMQ延时队列
延时队列概念
延时队列中的元素是希望
在指定时间到了以后或之前取出和处理,简单来说,延时队列就是用来存放需要在指定时间被处理的
元素的队列。
演示队列使用场景
- 订单在十分钟之内未支付则自动取消
- 新创建的店铺,如果在十天内都没有上传过商品,则自动发送消息提醒。
- 用户注册成功后,如果三天内没有登陆则进行短信提醒。
- 用户发起退款,如果三天内没有得到处理则通知相关运营人员。
- 预定会议后,需要在预定的时间点前十分钟通知各个与会人员参加会议
RabbitMQ中的TTL
TTL时RabbitMQ中一个消息或者队列的属性,表明一条消息或者队列中所有消息的最大存活时间,单位时毫秒。也就是说,若一个消息设置了TTL属性或者进入了设置TTL属性的队列。那么该消息若来TTL时间内没被消费将会变成死信,若同时配置了消息和队列的TTL则较小的哪个值会被使用。
消息设置TTL
rabbitTemplate.converAndSend("X","XC",message,correlationData->{
	correlationData.getMessageProperties().setExpiration(ttlTime);
	return correlationData;
});
队列设置TTL
args.put("x-message-ttl",5000);
return QueueBuilder.durable(QUEUE_A).withArguments(args).build();
两者的区别
如果设置了队列的 TTL 属性,那么一旦消息过期,就会被队列丢弃(如果配置了死信队列被丢到死信队
列中),而第二种方式,消息即使过期,也不一定会被马上丢弃,因为消息是否过期是在即将投递到消费者之前判定的,如果当前队列有严重的消息积压情况,则已过期的消息也许还能存活较长时间;另外,还需要注意的一点是,如果不设置 TTL,表示消息永远不会过期,如果将 TTL 设置为 0,则表示除非此时可以直接投递该消息到消费者,否则该消息将会被丢弃。
整合springboot
pom配置依赖
<?xml version="1.0" encoding="UTF-8"?>
<project xmlns="http://maven.apache.org/POM/4.0.0"
         xmlns:xsi="http://www.w3.org/2001/XMLSchema-instance"
         xsi:schemaLocation="http://maven.apache.org/POM/4.0.0 http://maven.apache.org/xsd/maven-4.0.0.xsd">
    <parent>
        <artifactId>RabbitMQ-study</artifactId>
        <groupId>org.example</groupId>
        <version>1.0-SNAPSHOT</version>
    </parent>
    <modelVersion>4.0.0</modelVersion>

    <artifactId>yanshiQ</artifactId>

    <properties>
        <maven.compiler.source>8</maven.compiler.source>
        <maven.compiler.target>8</maven.compiler.target>
    </properties>

    <dependencies>
        <!--RabbitMQ 依赖-->
        <!-- https://mvnrepository.com/artifact/org.springframework.boot/spring-boot-starter-amqp -->
        <dependency>
            <groupId>org.springframework.boot</groupId>
            <artifactId>spring-boot-starter-amqp</artifactId>
            <version>2.7.3</version>
        </dependency>

        <!-- https://mvnrepository.com/artifact/org.springframework.boot/spring-boot-starter-web -->
        <dependency>
            <groupId>org.springframework.boot</groupId>
            <artifactId>spring-boot-starter-web</artifactId>
            <version>2.7.3</version>
        </dependency>

        <!-- https://mvnrepository.com/artifact/org.springframework.boot/spring-boot-starter-test -->
        <dependency>
            <groupId>org.springframework.boot</groupId>
            <artifactId>spring-boot-starter-test</artifactId>
            <version>2.7.3</version>
            <scope>test</scope>
        </dependency>

        <dependency>
            <groupId>com.alibaba</groupId>
            <artifactId>fastjson</artifactId>
            <version>1.2.47</version>
        </dependency>
        <!-- https://mvnrepository.com/artifact/org.projectlombok/lombok -->
        <dependency>
            <groupId>org.projectlombok</groupId>
            <artifactId>lombok</artifactId>
            <version>1.18.24</version>
            <scope>provided</scope>
        </dependency>

        <!--swagger-->
        <dependency>
            <groupId>io.springfox</groupId>
            <artifactId>springfox-swagger2</artifactId>
            <version>2.9.2</version>
        </dependency>
        <dependency>
            <groupId>io.springfox</groupId>
            <artifactId>springfox-swagger-ui</artifactId>
            <version>2.9.2</version>
        </dependency>
        <!--RabbitMQ 测试依赖-->
        <!-- https://mvnrepository.com/artifact/org.springframework.amqp/spring-rabbit-test -->
        <dependency>
            <groupId>org.springframework.amqp</groupId>
            <artifactId>spring-rabbit-test</artifactId>
            <version>2.4.6</version>
            <scope>test</scope>
        </dependency>

    </dependencies>

</project>
修改配置文件
spring.rabbitmq.host=182.92.234.71
spring.rabbitmq.port=5672
spring.rabbitmq.username=admin
spring.rabbitmq.password=123
添加Swagger配置类
public class Swagger {
    public Docket webApiConfig(){
        return new Docket(DocumentationType.SWAGGER_2)
                .groupName("wabApi")
                .apiInfo(webApiInfo())
                .select()
                .build();
    }

    private ApiInfo webApiInfo() {
        return new ApiInfoBuilder()
                .title("rabbitmqjie接口文档")
                .description("本文档描述了rabbitmq微服务接口定义")
                .version("1.0")
                .contact(new Contact("enjoy6288","http://baidu.com","1376058561@qq.com"))
                .build();
    }
}
队列TTL
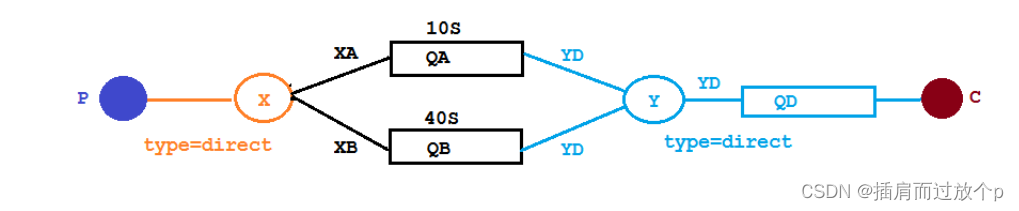
代码架构图
创建两个队列 QA 和 QB,两者队列 TTL 分别设置为 10S 和 40S,然后在创建一个交换机 X 和死信交换机 Y,它们的类型都是 direct,创建一个死信队列 QD,它们的绑定关系如下:
配置文件类代码
@Configuration
public class TtlQueueConfig {
 public static final String X_EXCHANGE = "X";
 public static final String QUEUE_A = "QA";
 public static final String QUEUE_B = "QB";
 public static final String Y_DEAD_LETTER_EXCHANGE = "Y";
 public static final String DEAD_LETTER_QUEUE = "QD";
 // 声明 xExchange
 @Bean("xExchange")
 public DirectExchange xExchange(){
 return new DirectExchange(X_EXCHANGE);
 }
 // 声明 xExchange
 @Bean("yExchange")
 public DirectExchange yExchange(){
 return new DirectExchange(Y_DEAD_LETTER_EXCHANGE);
 }
 //声明队列 A ttl 为 10s 并绑定到对应的死信交换机
 @Bean("queueA")
 public Queue queueA(){
 Map<String, Object> args = new HashMap<>(3);
 //声明当前队列绑定的死信交换机
 args.put("x-dead-letter-exchange", Y_DEAD_LETTER_EXCHANGE);
 //声明当前队列的死信路由 key
 args.put("x-dead-letter-routing-key", "YD");
 //声明队列的 TTL
 args.put("x-message-ttl", 10000);
 return QueueBuilder.durable(QUEUE_A).withArguments(args).build();
 }
 // 声明队列 A 绑定 X 交换机
 @Bean
 public Binding queueaBindingX(@Qualifier("queueA") Queue queueA,
 @Qualifier("xExchange") DirectExchange xExchange){
 return BindingBuilder.bind(queueA).to(xExchange).with("XA");
 }
 //声明队列 B ttl 为 40s 并绑定到对应的死信交换机
 @Bean("queueB")
 public Queue queueB(){
 Map<String, Object> args = new HashMap<>(3);
 //声明当前队列绑定的死信交换机
 args.put("x-dead-letter-exchange", Y_DEAD_LETTER_EXCHANGE);
 //声明当前队列的死信路由 key
 args.put("x-dead-letter-routing-key", "YD");
 //声明队列的 TTL
 args.put("x-message-ttl", 40000);
 return QueueBuilder.durable(QUEUE_B).withArguments(args).build();
 }
 //声明队列 B 绑定 X 交换机
 @Bean
 public Binding queuebBindingX(@Qualifier("queueB") Queue queue1B,
 @Qualifier("xExchange") DirectExchange xExchange){
 return BindingBuilder.bind(queue1B).to(xExchange).with("XB");
 }
 //声明死信队列 QD
 @Bean("queueD")
 public Queue queueD(){
 return new Queue(DEAD_LETTER_QUEUE);
 }
 //声明死信队列 QD 绑定关系
 @Bean
 public Binding deadLetterBindingQAD(@Qualifier("queueD") Queue queueD,
 @Qualifier("yExchange") DirectExchange yExchange){
 return BindingBuilder.bind(queueD).to(yExchange).with("YD");
 }
}
消息生产者代码
@Slf4j
@RequestMapping("ttl")
@RestController
public class SendMsgController {
 @Autowired
 private RabbitTemplate rabbitTemplate;
 @GetMapping("sendMsg/{message}")
 public void sendMsg(@PathVariable String message){
 log.info("当前时间:{},发送一条信息给两个 TTL 队列:{}", new Date(), message);
 rabbitTemplate.convertAndSend("X", "XA", "消息来自 ttl 为 10S 的队列: "+message);
 rabbitTemplate.convertAndSend("X", "XB", "消息来自 ttl 为 40S 的队列: "+message);
 }
}
消费者代码
@Slf4j
@Component
public class DeadLetterQueueConsumer {
 @RabbitListener(queues = "QD")
 public void receiveD(Message message, Channel channel) throws IOException {
 String msg = new String(message.getBody());
 log.info("当前时间:{},收到死信队列信息{}", new Date().toString(), msg);
 }
}


 1287
1287


 被折叠的 条评论
为什么被折叠?
被折叠的 条评论
为什么被折叠?
 到【灌水乐园】发言


