UWP的UI主要由布局容器和内容控件(ContentControl)组成。布局容器是指Grid、StackPanel等继承自Panel,可以拥有多个子元素的类。与此相对,ContentControl则只能包含单个子元素。
在UWP中,Button、CheckBox、ScrollViewer、Frame、ToolTip等都继承自ContentControl,其它控件则不是在ContentTemplate中使用ContentControl,就是被ContentControl使用,可以说ContentControl是UWP中最重要的控件。
ContentControl的定义并不复杂,它主要包含这四个属性:Content,ContentTemplate,ContentTemplateSelector,ContentTransitions。
1. Content
Content支持任何类型,它的值即ContentControl要显示的对象。可以将Content的类型大致分为两大类:
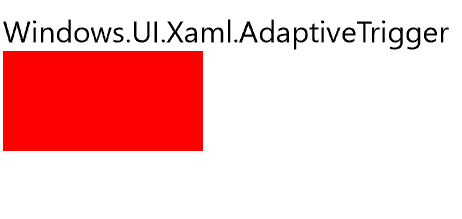
* 未继承自UIElement的类型: ContentControl调用这些类的ToString()方法获取文本然后显示。
* 继承自UIElement的类型: ContentControl直接将它显示在UI上。
<StackPanel>
    <ContentControl>
        <AdaptiveTrigger />
    </ContentControl>
    <ContentControl>
        <Rectangle Height="50"
                   Fill="Red" />
    </ContentControl>
</StackPanel>

2. ContentTemplate
要将ContentControl的内容按自己的想法显示出来,可以使用ContentTemplate属性public DataTemplate ContentTemplate { get; set; })。DataTemplate是定义如何显示绑定的数据对象的XAML标记。DataTemplate定义的XAML块中元素的DataContext相当于所在ContentControl的Content。
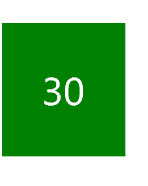
下面的示例演示了怎么将ScoreModel显示在UI上。
<Grid Background="{ThemeResource ApplicationPageBackgroundThemeBrush}">
    <Grid.Resources>
        <DataTemplate x:Key="PassTemplate">
            <Border Background="Green">
                <TextBlock Text="{Binding Score}"
                           Foreground="White"
                           FontSize="20"
                           Margin="20"
                           HorizontalAlignment="Center" />
            </Border>
        </DataTemplate>
    </Grid.Resources>
    <ContentControl ContentTemplate="{StaticResource PassTemplate}">
        <local:ScoreModel Score="30" />
    </ContentControl>
</Grid>

3. ContentTemplateSelector
如果需要根据Content动态地选择要使用的ContentTemplate,其中一个方法就是 public DataTemplateSelector ContentTemplateSelector { get; set; } 属性。
要使用ContentTemplateSelector,首先实现一个继承DataTemplateSelector的类,并重写protected override DataTemplate SelectTemplateCore(object item, DependencyObject container) 函数,在此函数中返回选中的DataTemplate。
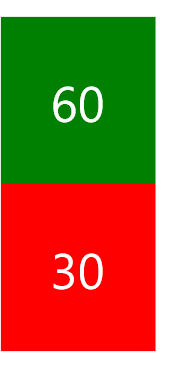
以下的示例演示了SimpleDataTemplateSelector的功能,它通过判断Score是否大于60,从而选择返回PassTemplate或者FailTemplate。PassTemplate和FailTemplate都是SimpleDataTemplateSelector 的public属性,并在XAML中注入到SimpleDataTemplateSelector。
public class SimpleDataTemplateSelector : DataTemplateSelector
{
    public DataTemplate PassTemplate { get; set; }

    public DataTemplate FailTemplate { get; set; }

    protected override DataTemplate SelectTemplateCore(object item, DependencyObject container)
    {
        var model = item as ScoreModel;
        if (model == null)
            return null;

        if (model.Score >= 60)
            return PassTemplate;
        else
            return FailTemplate;
    }
}
<StackPanel>
    <StackPanel.Resources>
        <DataTemplate x:Key="PassTemplate">
            <Border Background="Green">
                <TextBlock Text="{Binding Score}"
                           Foreground="White"
                           FontSize="20"
                           Margin="20"
                           HorizontalAlignment="Center" />
            </Border>
        </DataTemplate>
        <DataTemplate x:Key="FailTemplate">
            <Border Background="Red">
                <TextBlock Text="{Binding Score}"
                           Foreground="White"
                           FontSize="20"
                           Margin="20"
                           HorizontalAlignment="Center" />
            </Border>
        </DataTemplate>
        <local:SimpleDataTemplateSelector PassTemplate="{StaticResource PassTemplate}"
                                          FailTemplate="{StaticResource FailTemplate}"
                                          x:Key="DataTemplateSelector" />
        <Style TargetType="ContentControl">
            <Setter Property="ContentTemplateSelector"
                    Value="{StaticResource DataTemplateSelector}" />
        </Style>
    </StackPanel.Resources>
    <ContentControl>
        <local:ScoreModel Score="60" />
    </ContentControl>
    <ContentControl>
        <local:ScoreModel Score="30" />
    </ContentControl>
</StackPanel>

**注意:**ContentTemplateSelector的缺点是需要创建多个模板,通常同一组数据的模板只有少部分的差别,可以在同一个模板中通过IValueConverter等方式显示不同的格式。
4. ContentTransitions
public TransitionCollection ContentTransitions { get; set; } 是类型为Transition的集合,提供Content改变时的过渡动画。
<ContentControl x:Name="ContentControl">
    <ContentControl.ContentTransitions>
        <TransitionCollection>
            <AddDeleteThemeTransition  />
        </TransitionCollection>
    </ContentControl.ContentTransitions>
</ContentControl>
UWP提供了很多优秀的动画效果,适当使用可以给人很好的用户体验。如果没有优秀的UI设计,老老实实用默认的ContentTransitions就不会错。


 922
922


 被折叠的 条评论
为什么被折叠?


