


 本文深入探讨自定义ViewGroup的实现原理,包括View的绘制流程、MeasureSpec的使用及自定义布局的创建过程。通过实例代码,详细讲解如何计算子View的尺寸、位置摆放以及自适应布局的实现。
一、.首先 在自定义view方面需要 android 最基础的知识也就是View的绘制流程了
measure、layout、draw的三个执行流程
measure:测量,测量自己有多大,如果是ViewGroup的话会同时测量里面的子控件的大小
layout:摆放里面的子控件
draw:绘制 (重写onDraw)
MeasureSpec:测量规格
int 32位:010111100011100
拿前面两位当做mode,后面30位当做值。
1.mode:
1) EXACTLY: 精确的。比如给了一个确定的值 20dp(Match_parent)
2) AT_MOST: 根据父容器当前的大小,结合你指定的尺寸参考值来考虑你应该是多大尺寸,需要计算(wrap_content就是属于这种)
3) UNSPECIFIED: 最多的意思。根据当前的情况,结合你制定的尺寸参考值来考虑,在不超过父容器给你限定的只存的前提下,来测量你的一个恰好的内容尺寸。 用的比较少,一般见于ScrollView,ListView(大小不确定,同时大小还是变的。会通过多次测量才能真正决定好宽高。)
2.value:宽高的值。
经过大量测量以后,最终确定了自己的宽高,需要调用:setMeasuredDimension(w,h)
写自定义控件的时候,我们要去获得自己的宽高来进行一些计算,必须先经过measure,才能获得到宽高---不是getWidth(),而是getMeasuredWidth()
也就是当我们重写onMeasure的时候,我们需要在里面调用child.measure()才能获取child的宽高。
从规格当中获取mode和value:
final int widthMode = MeasureSpec.getMode(widthMeasureSpec);
final int heightMode = MeasureSpec.getMode(heightMeasureSpec);
int widthSize = MeasureSpec.getSize(widthMeasureSpec);
int heightSize = MeasureSpec.getSize(heightMeasureSpec);
反过来将mode和value合成一个规格呢:
MeasureSpec.makeMeasureSpec(resultSize, resultMode);
总结
玩自定义viewGroup需要记住以下几点 就可以很好的做好自定义控件了
//1.测量自己的尺寸
ViewGroup.onMeasure();
//1.1 为每一个child计算测量规格信息(MeasureSpec)
ViewGroup.getChildMeasureSpec();
//1.2 将上面测量后的结果,传给每一个子View,子view测量自己的尺寸
child.measure();
//1.3 子View测量完,ViewGroup就可以拿到这个子View的测量后的尺寸了
child.getChildMeasuredSize();//child.getMeasuredWidth()和child.getMeasuredHeight()
//1.4ViewGroup自己就可以根据自身的情况(Padding等等),来计算自己的尺寸
ViewGroup.calculateSelfSize();
//2.保存自己的尺寸
ViewGroup.setMeasuredDimension(size);
以下案例:
自定义viewGroup
package com.roy.widgetdemo;

import android.content.Context;
import android.content.res.TypedArray;
import android.util.AttributeSet;
import android.view.View;
import android.view.ViewGroup;
import android.widget.BaseAdapter;

public class CustomLayout extends ViewGroup {
    private static int spac = 100;
    public CustomLayout(Context context) {
        this(context,null);
    }

    public CustomLayout(Context context, AttributeSet attrs) {
        this(context, attrs,0);
    }

    public CustomLayout(Context context, AttributeSet attrs, int defStyleAttr) {
        super(context, attrs, defStyleAttr);
        TypedArray typedArray = context.getTheme().obtainStyledAttributes(attrs, R.styleable.CustomLayout, defStyleAttr, 0);
        for (int i = 0; i < typedArray.length(); i++) {
            int index = typedArray.getIndex(i);
            switch (index){
                case R.styleable.CustomLayout_horizontal_spacing:
                    spac = typedArray.getDimensionPixelSize(index,spac);
                    break;
            }
        }
        typedArray.recycle();
    }

    @Override
    protected void onLayout(boolean changed, int l, int t, int r, int b) {
        int childCount = getChildCount();
        int top =0;
        int bottom = 0;
        int left = 0;
        int right =0 ;
        int lineFeedIndex =0;
        for (int i = 0; i < childCount; i++) {
            View childAt = getChildAt(i);
            if(i!=0){
                View previousView =  getChildAt(i-1);  //上一个view
                left = left+ spac  + previousView.getMeasuredWidth() ;
            }

            right = left + childAt.getMeasuredWidth();
            if(right>getMeasuredWidth()){
                lineFeedIndex = 0;
                top = top + childAt.getMeasuredHeight();
                left = 0;
            }
            bottom = top + childAt.getMeasuredHeight();
             childAt.layout(left,top,right,bottom);  //位置摆放
            lineFeedIndex ++ ;
        }
    }


    @Override
    protected void onMeasure(int widthMeasureSpec, int heightMeasureSpec) {
        super.onMeasure(widthMeasureSpec, heightMeasureSpec);
        int widthMode = MeasureSpec.getMode(widthMeasureSpec);
       int widthMeasure = MeasureSpec.getSize(widthMeasureSpec);
        int heightMode = MeasureSpec.getMode(heightMeasureSpec);
        int heightMeasure = MeasureSpec.getSize(heightMeasureSpec);
        //测量子view
           int count = getChildCount(); //获取子view的个数
        for (int i = 0; i < count; i++) {
           View  view = getChildAt(i);  //获取子view
            LayoutParams layoutParams = view.getLayoutParams();
            int childWidthMeasureSpec =  getChildMeasureSpec(widthMeasureSpec,0,layoutParams.width);     //获取子view测量规格
            int childHeightMeaureSpec = getChildMeasureSpec(heightMeasureSpec,0,layoutParams.height);
            view.measure(childWidthMeasureSpec,childHeightMeaureSpec); //测量子view
        }

        int width =0;
        int height =0;
        int childCount = getChildCount();
        //开始测量自己
        switch (widthMode){
            case MeasureSpec.EXACTLY:
                 width = widthMeasure;   //父容器多大我就多大
                break;
                case MeasureSpec.AT_MOST:
                case MeasureSpec.UNSPECIFIED:

                    for (int i = 0; i < childCount; i++) {
                         View view =  getChildAt(i);
                        width = width+ i*spac + view.getMeasuredWidth();
                    }
                    if(width >widthMeasure){
                        width = widthMeasure;
                    }
                        break;
        }

        switch (heightMode){
            case MeasureSpec.EXACTLY:
                height = heightMeasure;   //父容器多大我就多大
                break;
            case MeasureSpec.AT_MOST:
            case MeasureSpec.UNSPECIFIED:
                for (int i = 0; i < childCount; i++) {
                    View view =  getChildAt(i);
                    height = height + view.getMeasuredHeight();
                }
                break;
        }
        setMeasuredDimension(width,height); //保存测量的值
    }


    public void setAdapter(BaseAdapter baseAdapter){
             if(baseAdapter !=null){
                 for (int i = 0; i < baseAdapter.getCount(); i++) {
                    View child =    baseAdapter.getView(i,null,this);
                       addView(child);
                 }

                 if (getChildCount() > 0) {
                     requestLayout();
                     invalidate();
                 }
             }
    }
}
attrs文件 在布局可以通过 以下属性设置间距
 <declare-styleable name="CustomLayout">
        <attr name="horizontal_spacing" format="dimension" />

    </declare-styleable>
drawable 文件 可以给view设置样式
<shape xmlns:android="http://schemas.android.com/apk/res/android">
  <corners android:radius="5dp"/>
    <stroke android:color="@color/colorAccent" android:width="2dp"/>
   <solid android:color="#fff"/>
</shape>
子view的话就不自己自定义一个了 就利用BaseAdapter类添加view了
public abstract class CommonAdapter<T> extends BaseAdapter{
	protected Context mContext;
	protected List<T> mDatas;
	protected LayoutInflater mInflater;
	protected int mLayoutIds;


	public CommonAdapter(Context context, List<T> datas, int LayoutIds) {
		this.mContext = context;
		mInflater = LayoutInflater.from(context);
		this.mDatas = datas;
		this.mLayoutIds = LayoutIds;

	}

	@Override
	public int getCount() {

		return mDatas.size();
	}

	@Override
	public T getItem(int position) {

		return mDatas.get(position);
	}

	public void refreshData(List<T> datas){
		this.mDatas = datas;
		notifyDataSetChanged();
	}

	@Override
	public long getItemId(int position) {

		return position;
	}

	@Override
	public View getView(int position, View convertView, ViewGroup parent){
		ViewHolder holder = ViewHolder.get(mContext, convertView, parent, mLayoutIds, position);
		convert(holder, getItem(position), position);
		return holder.getConvertView();
	}


	public abstract void convert(ViewHolder holder, T t, int pos);
}
所需要的ViewHolder
package com.roy.widgetdemo;

import android.content.Context;
import android.util.Log;
import android.util.SparseArray;
import android.view.LayoutInflater;
import android.view.View;
import android.view.ViewGroup;
import android.widget.CheckBox;
import android.widget.ImageView;
import android.widget.TextView;

public class ViewHolder {

	private SparseArray<View> mViews;
	private int mPosition;
	private View mConvertView;

	public ViewHolder(Context context, ViewGroup parent, int layoutId, int position) {
		this.mPosition = position;
		this.mViews = new SparseArray<View>();
		this.mConvertView = LayoutInflater.from(context).inflate(layoutId, parent, false);
		mConvertView.setTag(this);
	}

	public static ViewHolder get(Context context, View convertView, ViewGroup parent, int layoutId, int position){

		if (convertView == null) {

			return new ViewHolder(context, parent, layoutId, position);
		}else {
			ViewHolder holder = (ViewHolder) convertView.getTag();
			holder.mPosition = position;
			return holder;
		}
	}
	/**
	 * 通过viewId获取控件
	 * @param viewId
	 * @return
	 */
	@SuppressWarnings("unchecked")
	public <T extends View> T getView(int viewId){
		View view = mViews.get(viewId);
		if (view == null) {
			view = mConvertView.findViewById(viewId);
			mViews.put(viewId, view);
		}
		Log.d("debug", "(T) view =" + (T) view);
		return (T) view;
	}

	public View getConvertView() {

		return mConvertView;
	}

	/**
	 * 设置TextView的值
	 * @param viewId
	 * @param text
	 * @return
	 *
	 * 可以根据项目item需要控件的需求添加设置各种控件的方法
	 */
	public ViewHolder setText(int viewId, String text){
		TextView tv = getView(viewId);
		tv.setText(text);
		return this;

	}

	/**
	 * 设置本地图片资源
	 * @param viewId
	 * @param resId
	 * @return
	 */
	public ViewHolder setImageResource(int viewId, int resId){
		ImageView iv = getView(viewId);
		iv.setImageResource(resId);
		return this;

	}
	/**
	 * 设置CheckBox的选择状态
	 * @param viewId
	 * @param resId
	 * @return
	 */
	public ViewHolder setCheckd(int viewId, Boolean b){
		CheckBox cb = getView(viewId);
		cb.setChecked(b);
		return this;

	}
}
写的item布局
<?xml version="1.0" encoding="utf-8"?>
<android.support.constraint.ConstraintLayout
    xmlns:android="http://schemas.android.com/apk/res/android"
    android:layout_width="wrap_content"
    android:layout_height="wrap_content"
    android:padding="3dp"
    >
    <TextView
        android:id="@+id/tv"
        android:layout_width="wrap_content"
        android:layout_height="wrap_content"
        android:text="adsfsdfsdfsdfsdfsdf"
        android:background="@drawable/rec"
        android:padding="5dp"
        />
</android.support.constraint.ConstraintLayout>
测试布局
<?xml version="1.0" encoding="utf-8"?>
<android.support.constraint.ConstraintLayout xmlns:android="http://schemas.android.com/apk/res/android"
    xmlns:app="http://schemas.android.com/apk/res-auto"
    xmlns:tools="http://schemas.android.com/tools"
    android:layout_width="match_parent"
    android:layout_height="match_parent"
    tools:context=".MainActivity">

    <com.roy.widgetdemo.CustomLayout
        android:id="@+id/custom"
        android:layout_width="match_parent"
        android:layout_height="match_parent"
        app:horizontal_spacing="10dp"
        >

    </com.roy.widgetdemo.CustomLayout>

</android.support.constraint.ConstraintLayout>
来测试以下代码
package com.roy.widgetdemo;

import android.support.v7.app.AppCompatActivity;
import android.os.Bundle;
import android.widget.TextView;

import java.util.ArrayList;
import java.util.List;

public class MainActivity extends AppCompatActivity {

    @Override
    protected void onCreate(Bundle savedInstanceState) {
        super.onCreate(savedInstanceState);
        setContentView(R.layout.activity_main);
        CustomLayout customLayout =  findViewById(R.id.custom);

        List<String>  list = new ArrayList<>();
        for (int i = 0; i <5; i++) {
            list.add("你好啊美女");
            list.add("美女有空吗约吗");
            list.add("你几个啊");
            list.add("不想");
            list.add("你为啥呢");
        }

        CommonAdapter<String>   commonAdapter = new CommonAdapter<String>(this,list,R.layout.item) {
            @Override
            public void convert(ViewHolder holder, String s, int pos) {
             TextView tv = holder.getView(R.id.tv);
              tv.setText(s);
            }
        };
        customLayout.setAdapter(commonAdapter);

    }
}
效果:
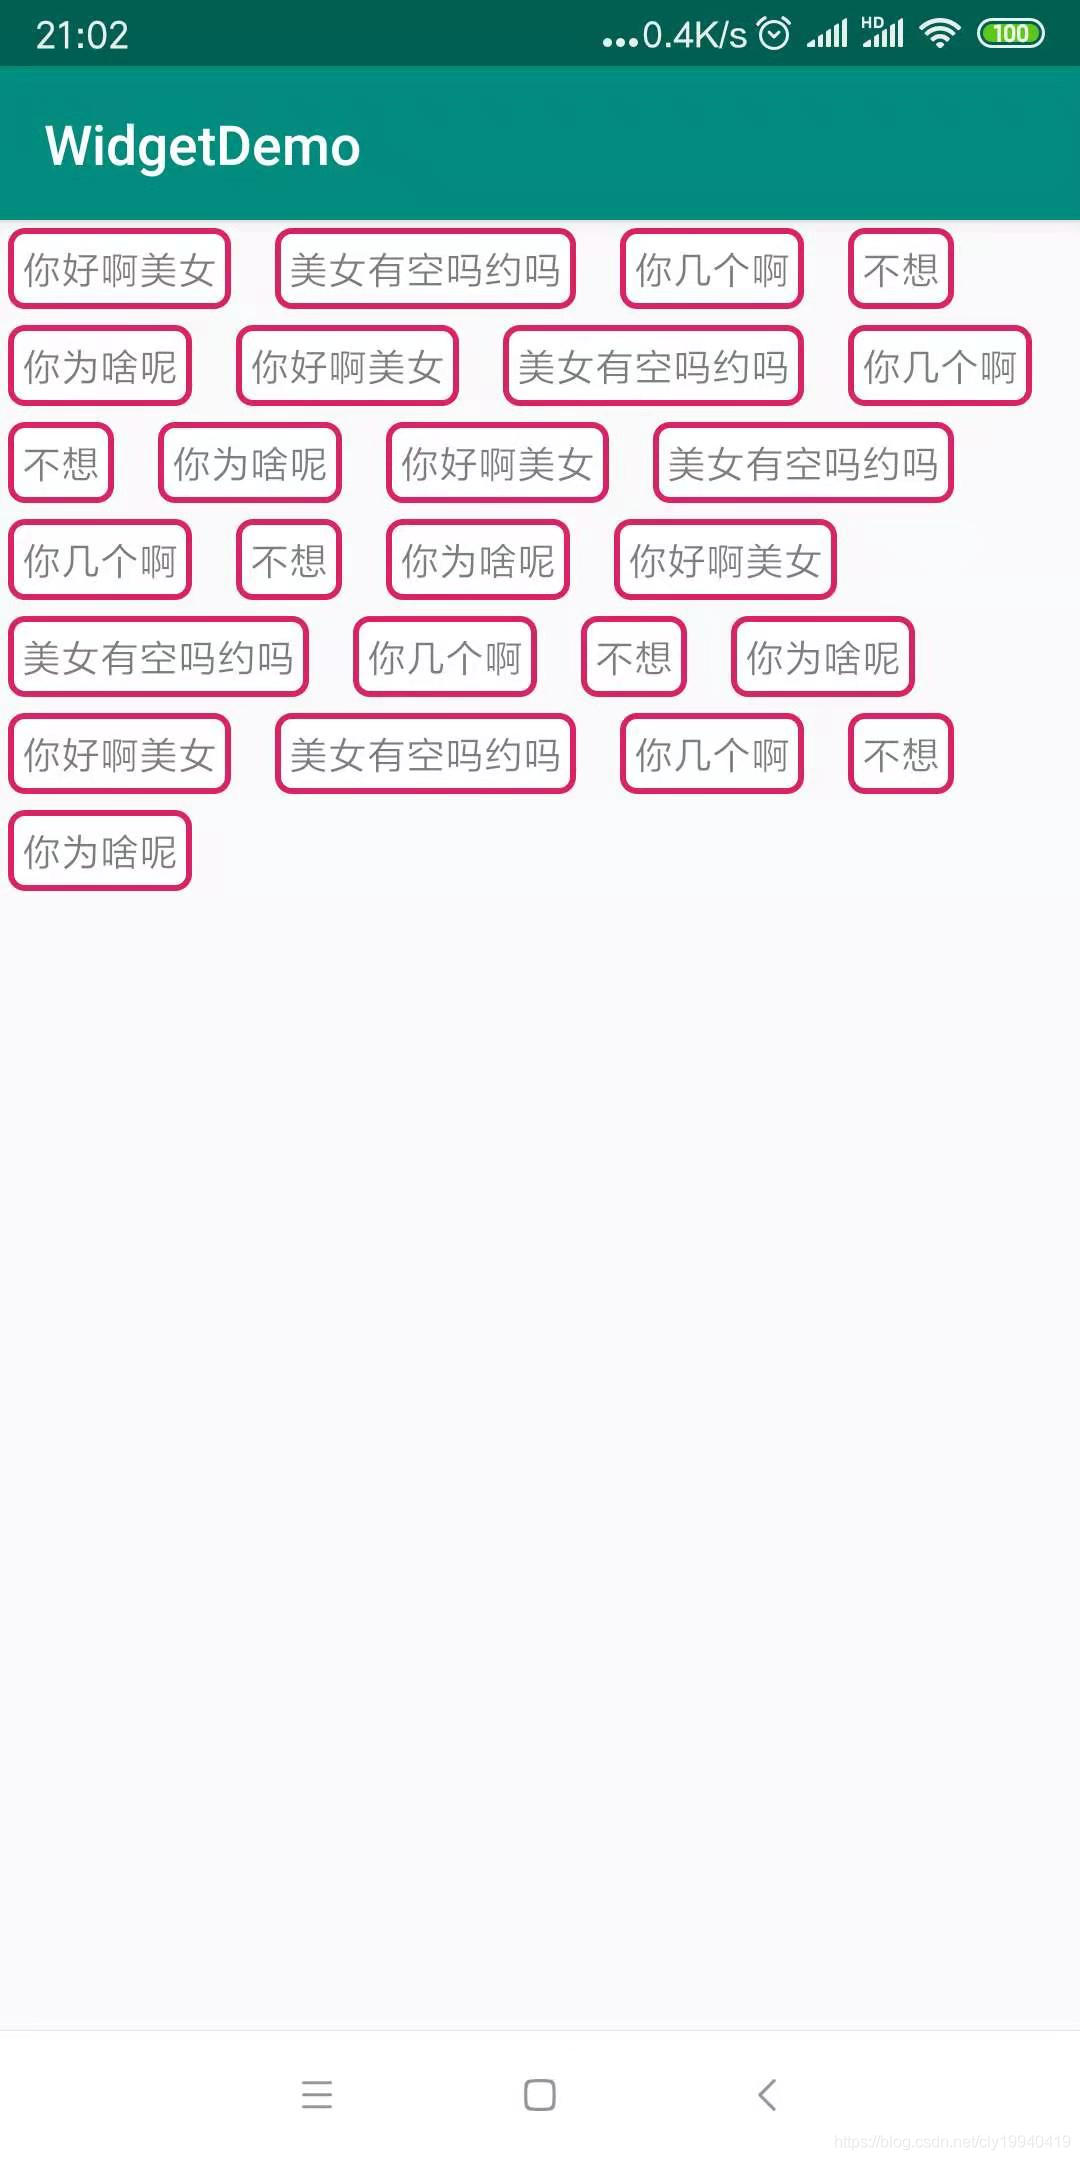
demo:下载地址


 383
383

 被折叠的 条评论
为什么被折叠?
被折叠的 条评论
为什么被折叠?
 到【灌水乐园】发言


