


--在使用spring-boot的时候踩过太多的坑,很多都是因为不懂spring真正的原理造成的,所以写下这么篇文章,希望这篇文章能够帮助大家理解spring真正原理少走弯路
一:启动原理
--每个程序都有一个主入口,也就是main方法,main里面调用SpringApplication.run()启动整个spring-boot程序
- eg:一个最简单的spring-boot启动类
- @SpringBootApplication
- public class Springrun{
- public static void main(String[] args) {
- SpringApplication.run(Springrun.class, args);
- }
- }
--@SpringBootApplication继承了@Configuration、@EnableAutoConfiguration、@ComponentScan,这三个注解的特性后面会讲到,默认扫描的包是以SpringApplication.run(Springrun.class, args) 参数springrun.class所在的包作为base package。
注意:如果想要启动整个程序,这个类必须要放到根包里面去。
run方法执行顺序:
1.初始化SpringApplicationRunListeners并且开始监听
2.加载StandardEnvironment(包括系统参数 环境变量参数 properties/yml文件 profiles)
3.把environment set到Listeners里面
4.默认通过AnnotationConfigApplicationContext扫描所有的注解类,创建并且注册bean(默认都是创建的单列)
5.创建context,并且把environment set到context里面
1.初始化SpringApplicationRunListeners并且开始监听
2.加载StandardEnvironment(包括系统参数 环境变量参数 properties/yml文件 profiles)
3.把environment set到Listeners里面
4.默认通过AnnotationConfigApplicationContext扫描所有的注解类,创建并且注册bean(默认都是创建的单列)
5.创建context,并且把environment set到context里面
备注:如果需要初始化spring-boot即将完成的时候马上去做一些事情,我们可以实现CommandLineRunner该接口
分析:
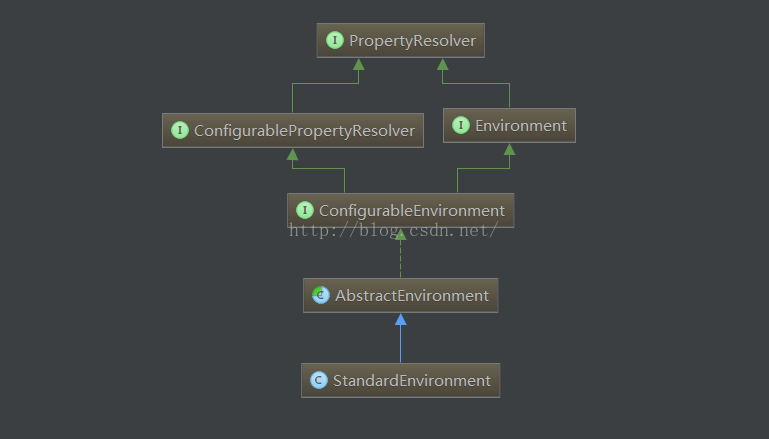
SpringApplication在初始化的时候,会去创建environment,这里默认是创建的StandardEnvironment,接着这个类会去加载sources,其uml图如下
接着会创建spring的启动模式,spring的启动模式有很多:xml配置启动、annotation启动、文件启动、web启动等等如下
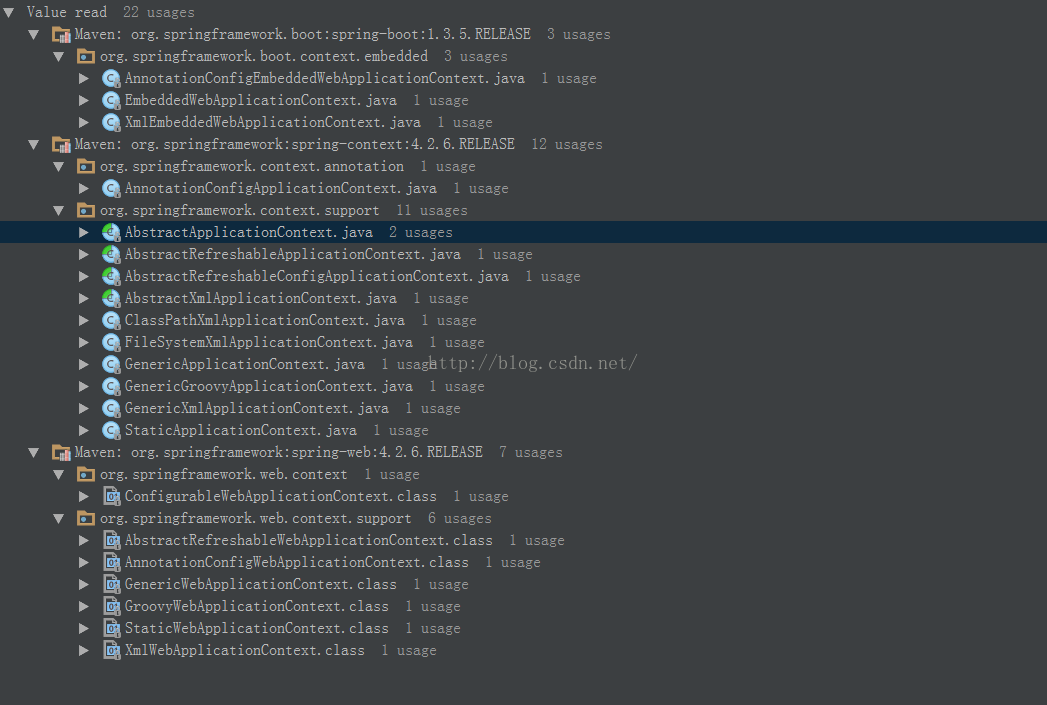
spring-boot默认是选择AnnotationConfigApplicationContext启动上下文,其类图如下
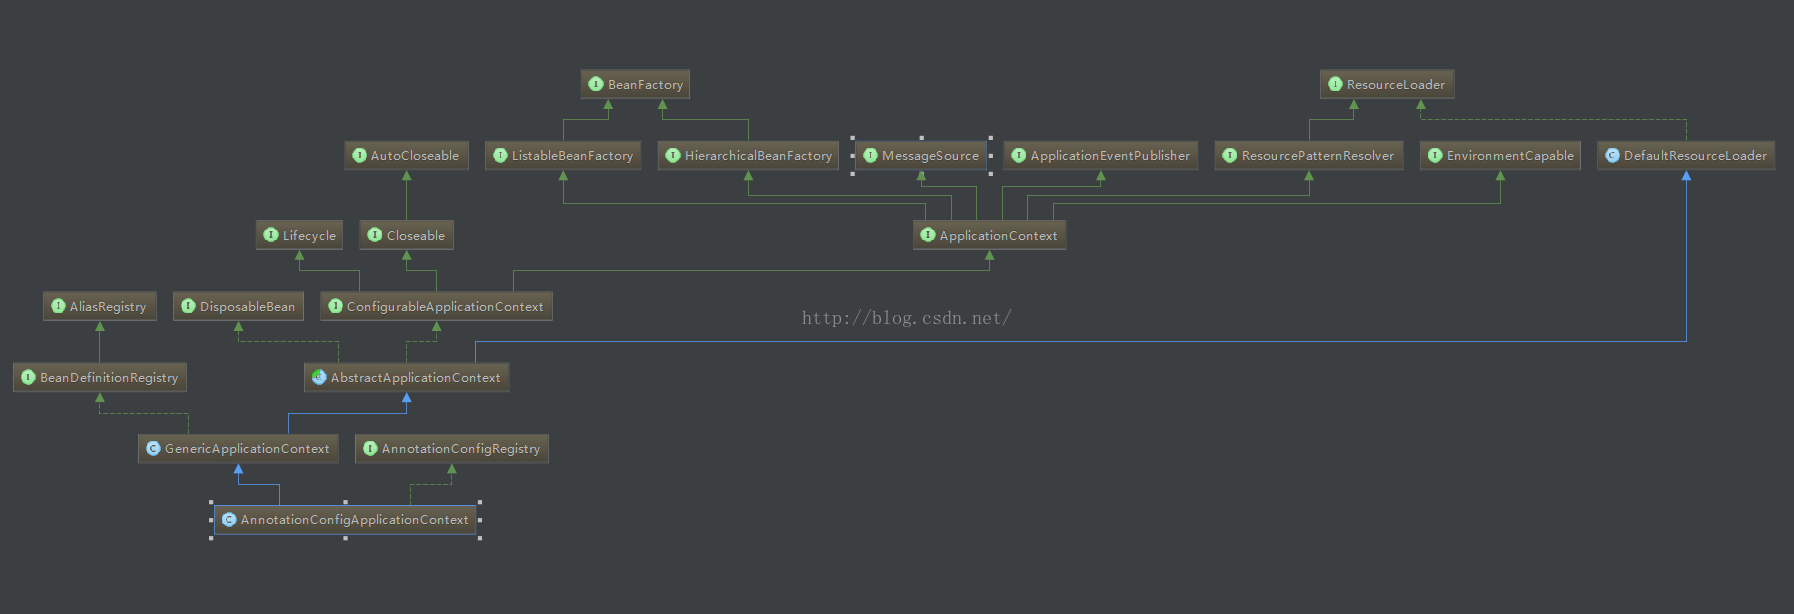
这个类直接间接实现了很多接口,包括beanFactory、resourceresolver、evenPublisher等等,集成所有spring需要的东西。
接着会去调用其父类AbstactApplicationContext.refresh()创建bean,这个方法只能调用一次。该方法执行的内容如下
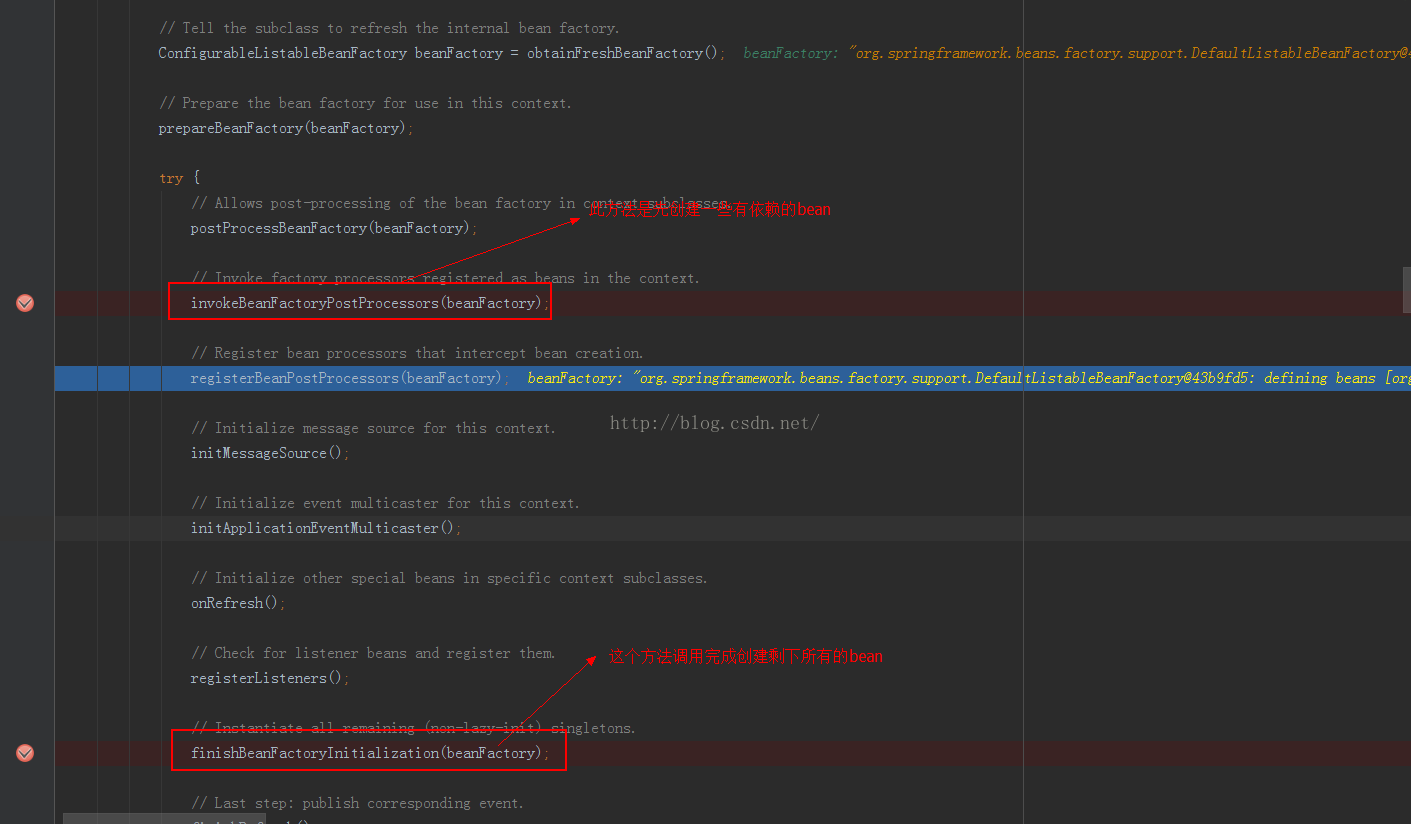
其方法里面所使用的beanFactory是DefaultListableBeanFactory,次类的类图如下:

这个类解决的问题是创建bean,包括一些简单的bean,还有一些有依赖的bean。
注意:
在运行main经常程序会退出,抛出Process finished with exit code 0,原因是程序运行main方法结束退出,出现这样的原因是maven导入jar出错没有导入依赖的容器(jetty or tomcat),最简单的跑起main方法并且不停止,只需要在maven引入
<dependency>
<groupId>org.springframework.boot</groupId>
<artifactId>spring-boot-starter-web</artifactId>
<version>1.3.3.RELEASE</version>
</dependency>
在运行main经常程序会退出,抛出Process finished with exit code 0,原因是程序运行main方法结束退出,出现这样的原因是maven导入jar出错没有导入依赖的容器(jetty or tomcat),最简单的跑起main方法并且不停止,只需要在maven引入
<dependency>
<groupId>org.springframework.boot</groupId>
<artifactId>spring-boot-starter-web</artifactId>
<version>1.3.3.RELEASE</version>
</dependency>
二:配置属性加载
spring-boot 属性分为两种:
1.spring-boot默认属性(application.properties或者application.yml 系统属性 环境变量属性)
2.自定义加载属性
spring-boot启动的时候会默认扫描resources目录下面的application.properties或者application.yml,扫瞄结束后会把值放入到Environment。
初始化bean的时候需要用到配置的值,我们可以根据这三种方式去获取:
1).继承EnvironmentAware获取Environment
2).通过注解@value进行填充值
3).注入environment 通过environment获取
具体代码:
如果需要改造加载方式,比如先去远程或者数据库获取配置项,没有的话再读取本地的application.properties,
需要用到PropertyPlaceholderConfigurer这个类,此类所适用的@Value("${jdbc.url}")占位符,占位符先去PropertyPlaceholderConfigurer资源类找,
找不到的话再去Environment环境里面找
如果需要修改Environment里面的属性我们可以这么做:
1.spring-boot默认属性(application.properties或者application.yml 系统属性 环境变量属性)
2.自定义加载属性
spring-boot启动的时候会默认扫描resources目录下面的application.properties或者application.yml,扫瞄结束后会把值放入到Environment。
初始化bean的时候需要用到配置的值,我们可以根据这三种方式去获取:
1).继承EnvironmentAware获取Environment
2).通过注解@value进行填充值
3).注入environment 通过environment获取
具体代码:
- @Configuration
- public class MyProperty implements EnvironmentAware {
- public void setEnvironment(Environment environment) {
- //方案一 继承EnvironmentAware 获取yml里面的值
- RelaxedPropertyResolver propertyResolver = new RelaxedPropertyResolver(environment, "jdbc.");
- String url = propertyResolver.getProperty("url");
- }
- //方案二 通过注解value进行填充值
- @Value("${jdbc.url}")
- private String url;
- //方案三 注入environment 通过environment获取
- @Autowired
- private Environment environment;
- public void init(){
- RelaxedPropertyResolver propertyResolver = new RelaxedPropertyResolver(environment, "jdbc.");
- String url = environment.getProperty("url");
- }
- }
如果需要改造加载方式,比如先去远程或者数据库获取配置项,没有的话再读取本地的application.properties,
需要用到PropertyPlaceholderConfigurer这个类,此类所适用的@Value("${jdbc.url}")占位符,占位符先去PropertyPlaceholderConfigurer资源类找,
找不到的话再去Environment环境里面找
- /**
- *此类优先加载级别非常高,所以不需要担心其它需要用到属性值的类无法获取属性值
- */
- @Configuration
- public class ConfigConfiguration {
- @Bean
- public PropertyPlaceholderConfigurer initPropertyPlaceholder() {
- //创建占位符类
- PropertyPlaceholderConfigurer ppc = new PropertyPlaceholderConfigurer();
- Properties[] properties = new Properties[3];
- //TODO add properties
- ppc.setPropertiesArray(properties);
- return ppc;
- }
- }
如果需要修改Environment里面的属性我们可以这么做:
- /**
- *spring 会自动注入applicationContext 到此方法参数
- */
- @Bean
- public String changeEnvironment(PropertiesCache propertiesCache, ApplicationContext applicationContext){
- //支持Environment获取 修改容器里面StandardServletEnvironment
- StandardEnvironment standardEnvironment =applicationContext.getBean(StandardEnvironment.class);
- standardEnvironment.getPropertySources().addLast(new PropertiesPropertySource(null, null));
- return null;
- }
三:annotation总结分析
--初始装载
@SpringBootApplication spring-boot程序入口标志类
@Configuration 自动配置,类似于加载spring加载xml 装配所有的bean事务等 所标识的类里面可以使用@Bean 并且启动的时候会初始化bean
@EnableAutoConfiguration Spring-Boot 根据应用所声明的依赖来对Spring框架进行自动配置
@ComponentScan 规定扫描包的范围
@PropertySources property扫描加载
--业务区分
@Component 定义该bean为一个普通组件
@Repository 定义该bean是一个仓储,用于数据库、mq、redis以及其它一些远程访问的资源
@Service 定义该bean是一个业务逻辑
@Controller 定义该bean是一个控制页面访问层
--加载条件
@Order 配置加载顺序
@ConditionalOnClass 该注解的参数对应的类必须存在,否则不解析该注解修饰的配置类;
@ConditionalOnMissingBean 该注解表示,如果存在它修饰的类的bean,则不需要再创建这个bean;可以给该注解传入参数例如@ConditionOnMissingBean(name = "example"),这个表示如果name为“example”的bean存在,这该注解修饰的代码块不执行。
@AutoConfigureAfter 在摸个自动装载类之后装载
基于属性的注解:
@Value 加载配置属性的值
@Autowired 自动注入bean
@Qualifier 当存在多个bean注入时,需要通过name进行过滤
@Resource 获取当前jvm的resource 也类似依赖注入
@Inject 字段注入bean
基于方法的注解:
@Bean 发布一个返回object类型的bean,类似配置xml发布一个bean
@PostConstruct 指定当类加载完成的时候就会执行该方法
四:mybatis集成
- public class MybatisConfiguration {
- private static Log logger = LogFactory.getLog(MybatisConfiguration.class);
- //创建DataSource
- @Bean
- public DataSource dataSource(Environment env) {
- DruidDataSource druidDataSource = new DruidDataSource();
- druidDataSource.setPassword(env.getProperty("jdbc.password"));
- druidDataSource.setUsername(env.getProperty("jdbc.username"));
- druidDataSource.setUrl(env.getProperty("jdbc.url"));
- druidDataSource.setDriverClassName(env.getProperty("jdbc.driver"));
- druidDataSource.setMaxActive(Integer.parseInt(env.getProperty("jdbc.poolMaximumActiveConnections")));
- return druidDataSource;
- }
- //创建SqlSessionFactory DataSource spring会自动导入到参数
- @Bean
- public SqlSessionFactory sqlSessionFactory(DataSource dataSource) {
- try {
- SqlSessionFactoryBean sessionFactory = new SqlSessionFactoryBean();
- sessionFactory.setDataSource(dataSource);
- //set map.xml的路径
- sessionFactory.setMapperLocations(new PathMatchingResourcePatternResolver()
- .getResources("classpath:mapping/*.xml"));
- return sessionFactory.getObject();
- } catch (Exception e) {
- logger.error("not install sessionFactory", e);
- throw new RuntimeException("not install sessionFactory");
- }
- }
- //创建事务 DataSource spring会自动导入到参数
- @Bean
- public DataSourceTransactionManager transaction(DataSource dataSource) {
- return new DataSourceTransactionManager(dataSource);
- }
- }


 3万+
3万+

 被折叠的 条评论
为什么被折叠?
被折叠的 条评论
为什么被折叠?
 到【灌水乐园】发言


