


axios有一个很棒的功能,就是对请求和响应进行拦截,那么如何在我们封装的代码中添加拦截器呢
首先文章1中可以看出,我们想使用axios,只能传入一个config参数,但是文章1中的config是AxiosRequestConfig类型的,我们进入源码看一下,
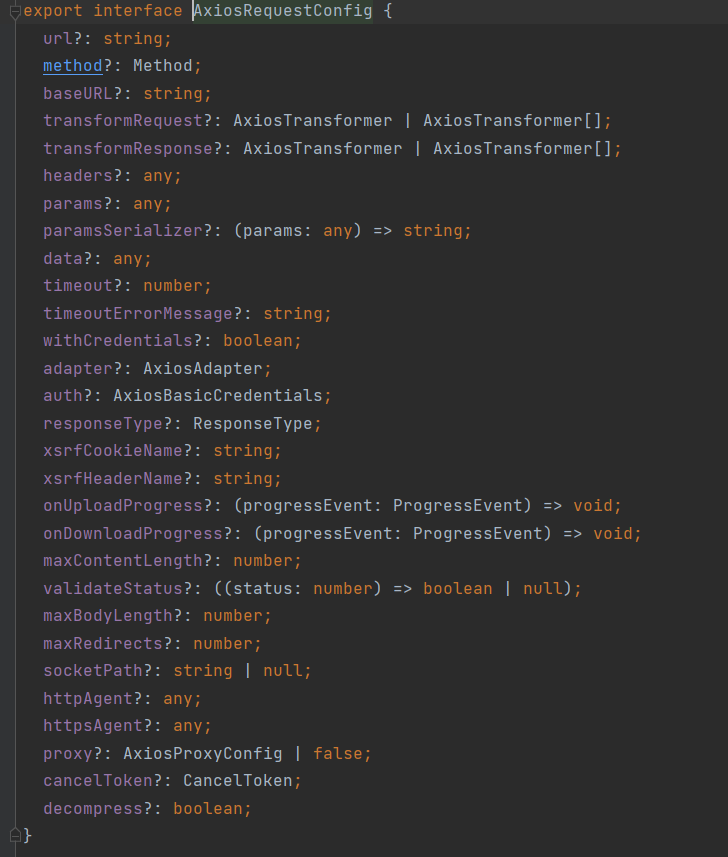
&n 浙江干部培训学校 www.nxganxun.cn bsp;
没有看到interceptor相关的属性,但是AxiosInstance实例中却又interceptors这个属性
interceptors: { request: AxiosInterceptorManager<AxiosRequestConfig>; response: AxiosInterceptorManager<AxiosResponse>;};export interface AxiosInterceptorManager<V> { use(onFulfilled?: (value: V) => V | Promise<V>, onRejected?: (error: any) => any): number; eject(id: number): void;}
这是AxiosInstance的interceptors的源码部分,如果我们要使用它,即
this.instance.interceptors.request.use()
这里不知道instance是什么的可以去看文章1
很明显在源码中的use()有两个可选的函数作为参数,当use中的某个函数被传入一个参数,那么这个函数会把这个参数作为返回值返回
并且,需要两种不同类型的函数,一个是request,一个是response,由于是封装代码,我们可以写全一点,把它们都写上,避免日后投入使用再频繁修改
但是request和response并不在AxiosRequestConfig中
那我们只有自己定义接口,将含有request和response的config传入axios.create()中.
首先,在核心文件中定义两个接口
import { AxiosRequestConfig, AxiosResponse } from 'axios'interface KXRequestInterceptors { requestInterceptor?: (config: AxiosRequestConfig) => AxiosRequestConfig requestInterceptorCatch?: (error: any) => any responseInterceptor?: (res: AxiosResponse) => AxiosResponse responseInterceptorCatch?: (error: any) => any}interface KXRequestConfig extends AxiosRequestConfig { interceptors?: KXRequestInterceptors}
先看第一个接口KXRequestInterceptors
其中有四个属性,分别对应的是请求成功/失败,响应成功/失败
其中请求request成功的参数是AxiosRequestConfig,响应response成功的参数是AxiosResponse,对应上面的源码中use()的两个函数
第二个接口KXRequestConfig是继承了AxiosRequestConfig,因此它具有AxiosRequestConfig中的属性,
并且他有一个属性interceptors,类型就是上面定义的KXRequestInterceptors
两个接口定义完成后,在使用axios.create创建实例时,可以将带有interceptors属性的KXRequestConfig传入,这样一来,instance也就有了interceptors的属性,
在构造器中的代码如下
constructor(config: KXRequestConfig) { this.instance = axios.create(config) this.interceptors = config.interceptors this.instance.interceptors.request.use( this.interceptors?.requestInterceptor, this.interceptors?.requestInterceptorCatch, ) this.instance.interceptors.response.use( this.interceptors?.responseInterceptor, this.interceptors?.responseInterceptorCatch, ) }
在出口文件中
const kxRequest = new KXRequest({ baseURL: BASE_URL, timeout: TIME_OUT, headers: [], interceptors: { requestInterceptor: (config) => { console.log('请求成功的拦截') return config }, requestInterceptorCatch: (err) => { console.log('请求失败的拦截') return err }, responseInterceptor: (res) => { console.log('响应成功的拦截') return res }, responseInterceptorCatch: (err) => { console.log('响应失败的拦截') return err }, },})
我们可以在出口文件中编写我们需要的操作
至此,对于interceptor的简单封装就完成了.
细节补充:
也许有的请求并不需要interceptor,所以我们可以将这个属性设置为可选类型,
由于是定义的接口,可以将他放在另一个文件内进行导入,是代码看起来更简洁
下面是完整的代码
核心文件
import type { AxiosInstance, AxiosRequestConfig } from 'axios'import axios from 'axios'import type { KXRequestConfig, KXRequestInterceptors } from './types'class KXRequest { // AxiosInstance有interceptors属性,interceptors中又有request, instance: AxiosInstance interceptors?: KXRequestInterceptors //要将config.interceptors保存到interceptors中,但是AxiosRequestConfig没有interceptors属性 //所以传入具有interceptors和AxiosRequestConfig属性的KXRequestInterceptors constructor(config: KXRequestConfig) { this.instance = axios.create(config) this.interceptors = config.interceptors this.instance.interceptors.request.use( this.interceptors?.requestInterceptor, this.interceptors?.requestInterceptorCatch, ) this.instance.interceptors.response.use( this.interceptors?.responseInterceptor, this.interceptors?.responseInterceptorCatch, ) } request(config: AxiosRequestConfig): void { this.instance.request(config).then((res) => { console.log(res) }) }}export default KXRequest
接口文件
import { AxiosRequestConfig, AxiosResponse } from 'axios'// use(onFulfilled?: (value: V) => V | Promise<V>, onRejected?: (error: any) => any): number;//上面是源码,当use中的某个函数被传入一个参数,那么这个函数会把这个参数作为返回值返回//这个接口的目的:...(下面的use需要传入这几个参数,所以指定类型)interface KXRequestInterceptors { requestInterceptor?: (config: AxiosRequestConfig) => AxiosRequestConfig requestInterceptorCatch?: (error: any) => any responseInterceptor?: (res: AxiosResponse) => AxiosResponse responseInterceptorCatch?: (error: any) => any}//这个接口的目的//KXRequestConfig继承AxiosRequestConfig后,//KXRequestConfig就有了AxiosRequestConfig中的属性,//并且KXRequestConfig自带一个KXRequestInterceptor类型的interceptors属性//将config:AxiosRequestConfig替换为KXRequestConfig// 这样一来,原本不带有interceptor的config就拥有了这个属性interface KXRequestConfig extends AxiosRequestConfig { interceptors?: KXRequestInterceptors}export { KXRequestInterceptors, KXRequestConfig }
出口文件
//统一的出口import KXRequest from './request'const kxRequest = new KXRequest({ baseURL:'127.0.0.1:8080' timeout: 100000, headers: [], interceptors: { requestInterceptor: (config) => { console.log('请求成功的拦截') return config }, requestInterceptorCatch: (err) => { console.log('请求失败的拦截') return err }, responseInterceptor: (res) => { console.log('响应成功的拦截') return res }, responseInterceptorCatch: (err) => { console.log('响应失败的拦截') return err }, },})export default kxRequest


 471
471


 被折叠的 条评论
为什么被折叠?
被折叠的 条评论
为什么被折叠?
 到【灌水乐园】发言


