


接着上一篇路由继续记录。
路由常见方法
router.push
router.push()方法就相当于,router.push()会向history增加一个新的记录,当点击浏览器的后退按钮会回到上一个页面。
<template>
  <button @click="show">router</button>
</template>

<script setup>
import router from '../utils/router/index.js'
function show(){
  router.push('/user/info')
  //router.push({path: '/user/info'}) 可以是一个路径对象
}
</script>
当点击按钮会触发这个show函数,router.push会跳转到UserInfo这个组件。
router.replace
router.repalce和router.push有点类似,但是router.replace不会向history增加新的记录,它只会替换当前的path,点击浏览器的回退按钮不会回到上一个页面。
router.replace({path: '/user/info'})
history跳转
router.go()方法相当于window.history.go()方法,可以去往下一个页面或者回退到上一个页面。
//前进一个页面 和router.forward()一样
router.go(1)

//回退到上一个页面 和router.back()一样
router.go(-1)
命名视图
有时候我们想要在同一个页面上显示不同的路由组件,在页面上放多个,这时我们就要给起名字来区分。如果没有起名字默认就是default。
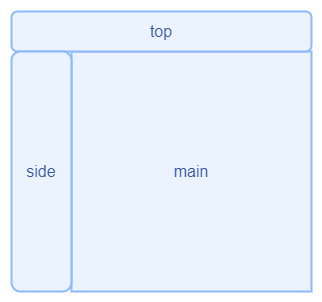
例如我们要将多个组件渲染在同一个页面上,可以对起名字。
可以看到在一个组件中有3个,我们分别给它们起名字,对于默认的名字为default。有多个添加class要用div包它包起来。
<template>
  <div class="top">
    <router-view name="top"></router-view>
  </div>
  <div class="box">
    <div class="side"><router-view name="side"></router-view></div>
    <router-view class="main"></router-view>
  </div>
</template>

<style scoped>
.top {
  width: 1000px;
  height: 50px;
  border: 1px solid red;
}
.box {
  display: flex;
}
.main {
  flex: 1;
  height: 300px;
  border: 1px solid greenyellow;
}
.side {
  border: 1px solid blue;
}
</style>
然后在路由配置中要把component改为components,然后用名字映射到不同的组件。
import {createWebHistory,createRouter} from 'vue-router'

const routes=[
  {
    path: '/',
    components: {
      default:()=>import('../../components/Home.vue'),
      side: ()=>import('../../components/Side.vue'),
      top: ()=>import('../../components/Top.vue')
    }
  }
]
const router=createRouter({
  history: createWebHistory(),
  routes
})
export default router
结果如下:

重定向
重定向的意思是现在访问的是/,但是它会把path替换成’/login’,从而把页面跳转到登录页。
const routes=[
    {path: '/',redirect: '/login'},
    {path: '/login',component:Login}
]

//重定向目标是一个命名路由
const routes=[
    {path: '/',redirect: {name: 'login'}},
    {path: '/login',name:'login',component:Login}
]

//动态重定向
const routes=[
    path: '/',
    redirect: to=>{
      return {path: '/login'}
    },
    {path: '/login',component:Login}
]
别名
别名就是说给这个path一个花名,path和花名都是指向同一个组件。例如我给path: '/home'起了一个花名/abc,无论我是访问127.0.0.1:8080/home还是127.0.0.1:8080/abc都是Home这个组件。
const routes=[
    {
        path: '/home',
        component:()=>import('../../components/Home.vue'),
        alias: '/abc'
    },
]
路由组件传参
在组件中我们可以通过$route.params来拿到路由参数,除此之外我们还可以通过props配置来获取路由参数。
<template>
  <div>{{$route.params.id}}</div>
</template>
const routes=[
    {path: '/user/:id',component: User,}
]
原来的代码是这样的,我们在routes中添加一个属性props=true,route.params就会被设置为组件的props。要在组件中声明props,并且props名字要和路由参数一样。
<template>
  <div>{{id}}</div>
</template>

<script setup>
defineProps(['id']) //声明props
</script>
const routes=[
    {path: '/user/:id',component: User,props: true}
]


 1176
1176


 被折叠的 条评论
为什么被折叠?
被折叠的 条评论
为什么被折叠?
 到【灌水乐园】发言


