


生命周期
Vue 生命周期

Vue 生命周期函数
Vue 生命周期过程中,会自动运行一些函数,被称为"生命周期钩子",让开发者可以在特定阶段运行自己的代码

- created 应用演示
<body>
  <div class="box">
    <ul v-for="item in list" :key="item.id">
      <li><img :src="item.img"></li>
      <li>{{ item.title }}</li>
      <li>{{ item.source }}</li>
      <li>{{ item.time }}</li>
      <hr>
    </ul>
  </div>

  <script src="https://unpkg.com/axios/dist/axios.min.js"></script>
  <script src="./js/vue.js"></script>
  <script>
    const boxObj = new Vue({
      el: '.box',
      data: {
        list: []
      },
      // created 应用演示
      async created() {
        const res = await axios.get('http://hmajax.itheima.net/api/news/')
        this.list = res.data.data
      }
    })
  </script>
</body>
- mounted 应用演示
<body>
  <div class="box">
    <input type="text" v-model="words" class="search">
    <button @click=" words='' ">搜索一下</button>
  </div>

  <script src="https://unpkg.com/axios/dist/axios.min.js"></script>
  <script src="./js/vue.js"></script>
  <script>
    const boxObj = new Vue({
      el: '.box',
      data: {
        words: ''
      },
      // mounted 应用演示
      // 等输入框渲染出来后,获取输入框焦点
      mounted() {
        document.querySelector('.search').focus()
      }
    })
  </script>
</body>
Vue CLI
基本介绍
Vue CLI 是 Vue 官方提供的一个全局命令工具,它可以帮助我们快速创建一个开发 Vue 项目的标准化基础架子(集成了 webpack 配置)
使用步骤
- 打开终端,全局安装 (一次):
yarn global add @vue/cli或npm i @vue/cli -g - 查看 Vue 版本:
vue --version - 创建项目架子:
vue create 项目名称(项目名称不能用中文) - 启动项目:
yarn serve或npm run serve(在 package.json 文件中可自定义命令)
目录文件介绍

组件化开发
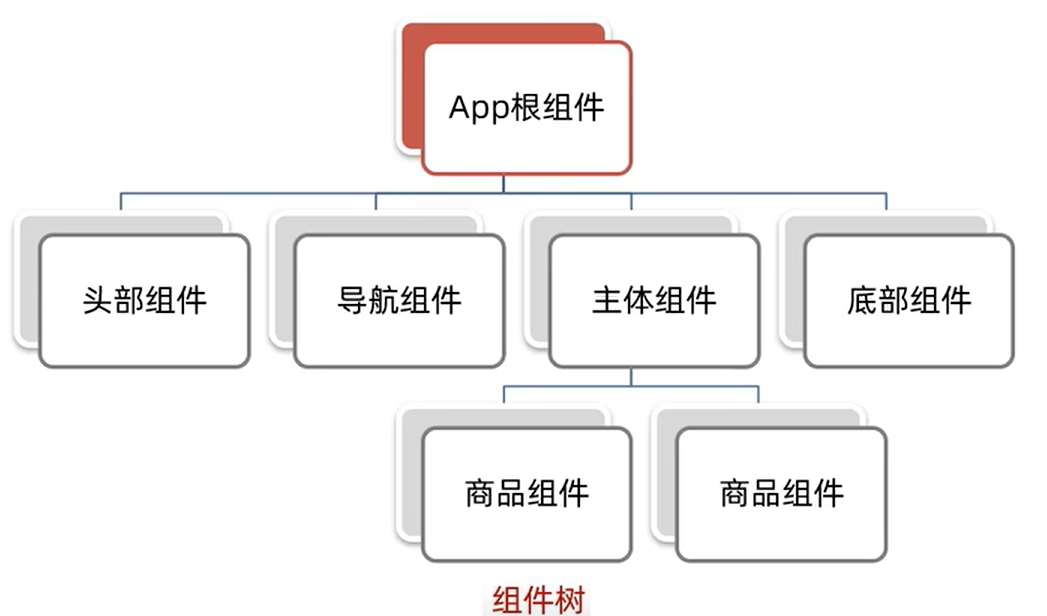
认识组件化
- 什么是组件化
一个页面可以拆分成一个个组件 (部分),每个组件有着自己独立的结构、样式、行为
- 组件化的好处
便于维护,利于复用,提升了开发效率
- 分类
1.根组件(App.vue)
2.普通组件
- 组件的三个构成部分
template 结构 (有且只能有一个根元素)
script   行为 (写js逻辑)
style    样式 (可支持less,需要安装包)
在 style 中使用 less 语法的具体操作:
	1.安装依赖包 less 和 less-loader
	  输入命令即可:	yarn add less less-loader -D
	  其中 -D 的意思是只在开发时使用
	2.设置属性,例如: <style lang="less">...</style>

组件的注册使用
方式分类
方式一:局部注册,只能在注册的组件内使用
- 创建 .vue 文件(三个组成部分)
- 在使用的组件内导入并注册
方式二:全局注册,所有组件内都能使用
注意事项
组件名规范,采用大驼峰命名法
局部注册
- 文件路径:src/App.vue
<template>
  <div class="App">
    <!-- 头部组件 -->
    <Header></Header>
    <!-- 主体组件 -->
    <Main></Main>
    <!-- 底部组件 -->
    <Footer></Footer>
  </div>
</template>

<script>
// 导入普通组件
import JackHeader from "./components/JackHeader.vue";
import JackMain from "./components/JackMain.vue";
import JackFooter from "./components/JackFooter.vue";

// 导出的默认配置
export default {
  components: {
    // '组件名':组件对象
    Header: JackHeader,
    Main: JackMain,
    Footer: JackFooter
  },
};
</script>

<style>
.App {
  width: 600px;
  height: 700px;
  background-color: #87ceeb;
  margin: 0 auto;
  padding: 20px;
}
</style>
- 文件路径:src/components/JackHeader.vue
<template>
  <div class="header">头部</div>
</template>

<script>
export default {

};
</script>

<style>
.header {
  height: 100px;
  line-height: 100px;
  text-align: center;
  font-size: 30px;
  background-color: #8064a2;
  color: white;
}
</style>
- 文件路径:src/components/JackMain.vue
<template>
  <div class="main">主体</div>
</template>

<script>
export default {

};
</script>

<style>
.main {
  height: 400px;
  line-height: 400px;
  text-align: center;
  font-size: 30px;
  background-color: #f79646;
  color: white;
  margin: 20px 0;
}
</style>
- 文件路径:src/components/JackFooter.vue
<template>
  <div class="footer">底部</div>
</template>

<script>
export default {

};
</script>

<style>
.footer {
  height: 100px;
  line-height: 100px;
  text-align: center;
  font-size: 30px;
  background-color: #4f81bd;
  color: white;
}
</style>
全局注册
- 文件路径:src/main.js
// 本文件的核心作用:导入 App.vue 文件,基于 App.vue 文件创建结构渲染 index.html

// 1. 导入 Vue 核心包
import Vue from 'vue'

// 2. 导入 App.vue 根组件
import App from './App.vue'

// 5. 导入组件
import JackButton from "./components/JackButton.vue"

// 3. 提示:当前处于什么环境(生产环境 / 开发环境)
Vue.config.productionTip = false

// 6. 对组件进行全局注册
// Vue.component(组件名, 组件对象)
Vue.component('MyButton', JackButton)

// 4. Vue 实例化,提供 render 方法,基于 App.vue 创建结构渲染 index.html
// new Vue({
//   el: '#app',
//   render: (createElement) => { return createElement(App) }
// })
// 上面的代码等价于下面代码
new Vue({
  render: createElement => createElement(App)
}).$mount('#app')
组件的样式冲突
冲突问题:
默认情况下,写在组件中的样式会"全局生效",因此,很容易造成多个组件之间的样式冲突问题发生
解决办法:
可以给组件中的 style 标签加上 scoped 属性,这样可以让该组件的 style 样式只作用于当前组件,例如 `<style scoped>...</style>`
data 函数
<template>
  <div>
    <button @click="count--">-</button>
    <span>{{ count }}</span>
    <button @click="count++">+</button>
  </div>
</template>

<script>
export default {
  // data 函数保证每一个组件实例,维护一个独立的数据对象
  data() {
    return {
      count: 99,
    };
  },
};
</script>

<style scoped>
div {
  margin: 20px;
}
span {
  margin: 10px;
}
</style>
组件通信
基本内容
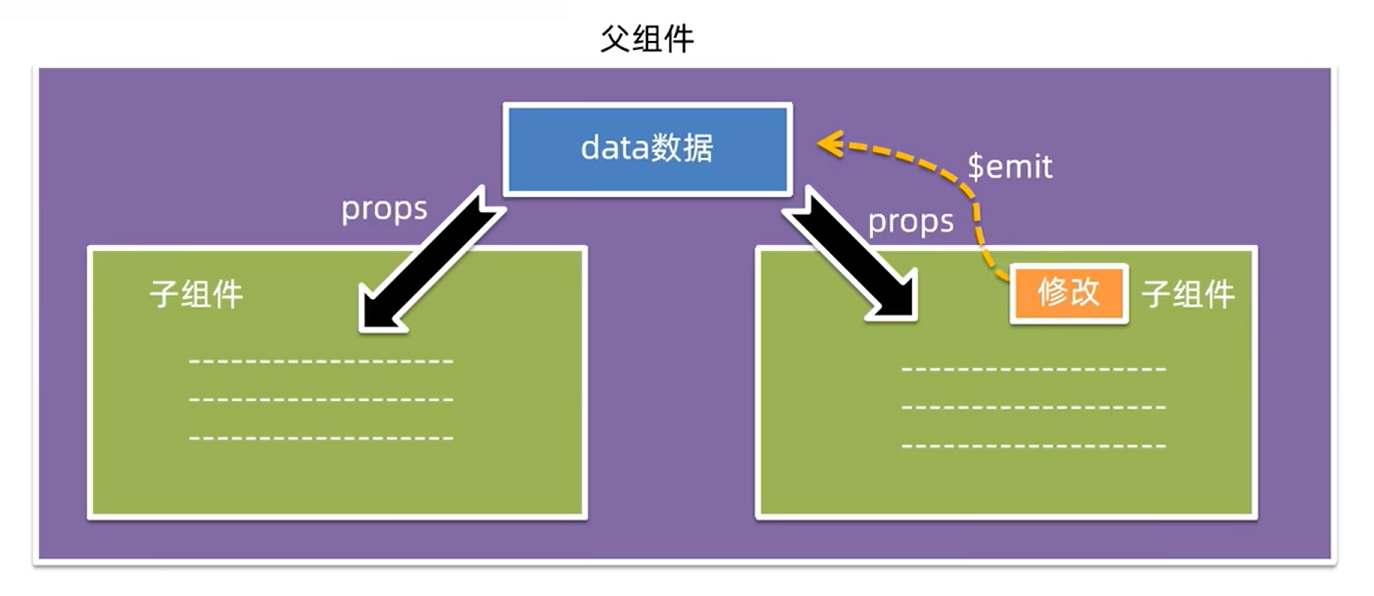
含义介绍:组件通信,就是指"组件与组件"之间的数据传递
组件关系:
- 父子关系
- 非父子关系
通信方案:
- 父子关系 =》使用 props & $emit
- 非父子关系 =》使用 provide & inject 或者 event bus
- 通用解决方案 =》使用 Vuex(适合复杂业务场景)
父子通信
- 文件路径:src/App.vue
<template>
  <div>
    <!-- 通过"自定义属性"向子组件发送数据 -->
    <BaseTest
      title="这是来自'父组件'的数据"
      :username="username"
      :age="age"
      :isSingle="isSingle"
      :hobby="hobby"
      @content="infoFn"
    ></BaseTest>
    <!-- 展示来自"子组件"的数据 -->
    <div class="box">{{ something }}</div>
  </div>
</template>

<script>
import BaseTest from "./components/BaseTest.vue";
export default {
  data() {
    return {
      something:'',
      // 假设从服务器端获得了数据
      username: "Jack",
      age: 30,
      isSingle: true,
      hobby: ["code", "run", "swim"],
    };
  },
  methods: {
    // 接收来自"子组件"的数据
    infoFn(info) {
      this.something = info
    },
  },
  components: {
    BaseTest,
  },
};
</script>

<style>
</style>
- 文件路径:src/components/BaseTest.vue
<template>
  <div>
    <hr />
    <h3>{{ title }}</h3>
    <p>姓名:{{ username }}</p>
    <p>年龄:{{ age }}</p>
    <p>是否单身:{{ isSingle ? "是" : "否" }}</p>
    <p>兴趣爱好:{{ hobby.join("、") }}</p>
    <button @click="func">确认收到</button>
    <hr />
  </div>
</template>

<script>
export default {
  // prop 是在组件上注册的一些自定义属性
  // 通过 props 进行接收这些属性
  props: ["title", "username", "age", "isSingle", "hobby"],
  methods: {
    func() {
      // 通过 $emit 向"父组件"发送消息
      this.$emit("content", "子组件已确认收到消息");
    },
  },
};
</script>

<style scoped>
</style>
props 验证
- 文件路径:src/App.vue
<template>
  <div>
    <!-- 通过"自定义属性"向子组件发送数据 -->
    <BaseTest :w="width"></BaseTest>
  </div>
</template>

<script>
import BaseTest from "./components/BaseTest.vue";
export default {
  data() {
    return {
      width: 300,
    };
  },
  components: {
    BaseTest,
  },
};
</script>

<style>
</style>
- 文件路径:src/components/BaseTest.vue
<template>
  <div>
    <div class="base-progress">
      <div class="inner" :style="'width:' + w + '%'"></div>
    </div>
    <span>{{ w }}%</span>
  </div>
</template>

<script>
export default {
  // 通过 props 接收自定义属性,然后对其进行校验,如果校验失败,则控制台报错
  // 1. 基础写法(类型校验)
  // props: {
  //   w: Number,  // 约束传递过来的数据的类型
  // },
  // 2. 完整写法(更多校验)
  props: {
    w: {
      type: Number, // 类型
      required: true, // 是否必须(非空判断)
      default: 0, // 默认值
      validator(value) {
        if (value < 0 && value > 100) return true;
        else {
          console.error("数据范围必须是0~100");
          return false; // false 代表没有通过校验
        }
      },
    },
  },
};
</script>

<style scoped>
.base-progress {
  height: 26px;
  width: 400px;
  border-radius: 15px;
  background-color: #272425;
  border: 3px solid #272425;
  box-sizing: border-box;
  margin-bottom: 10px;
}
.inner {
  height: 90%;
  background-color: rgb(124, 193, 246);
  border-radius: 15px;
  border: 1px solid #272425;
}
</style>
非父子通信
- 文件路径:utils/EventBus.js
// 1. 创建一个事件总线(空的 Vue 实例)
import Vue from 'vue'
const Bus = new Vue()
// 2. 导出事件总线
export default Bus
- 文件路径:src/App.vue
<template>
  <div>
    <BaseA></BaseA>
    <BaseB></BaseB>
  </div>
</template>

<script>
import BaseA from "./components/BaseA.vue"
import BaseB from "./components/BaseB.vue"
export default {
  components: {
    BaseA,
    BaseB,
  },
};
</script>

<style>
</style>
- 文件路径:src/components/BaseB.vue
<template>
  <div>
    <span>BaseB</span>
    <button @click="sendMsg">发布消息</button>
  </div>
</template>

<script>
import Bus from "../utils/EventBus.js";
export default {
  methods: {
    sendMsg(){
      // 发布消息,该消息可以被多个组件同时接收
      Bus.$emit('B_Send_Msg','Hello, How are you?')
    }
  },
};
</script>

<style>
</style>
- 文件路径:src/components/BaseA.vue
<template>
  <div>
    <span>BaseA</span>
  </div>
</template>

<script>
import Bus from "../utils/EventBus.js";
export default {
  // 钩子函数(详情回顾:生命周期知识点)
  created() {
    // 监听 Bus 事件
    Bus.$on("B_Send_Msg", (msg) => {
      alert("来自B发送的信息: " + msg);
    });
  },
};
</script>

<style>
</style>
跨层级非父子通信
- 文件路径:src/App.vue
<template>
  <div>
    <BaseA></BaseA>
  </div>
</template>

<script>
import BaseA from "./components/BaseA.vue";
export default {
  // 所有的子孙后代都能共享这些数据
  provide() {
    return {
      color: this.color, // 传递"简单类型"是非响应式的,即数据不会更新
      userInfo: this.userInfo, // 传递"复杂类型"是响应式的,数据可以动态变化(推荐)
    };
  },
  data() {
    return {
      color: "pink",
      userInfo: {
        name: "Jack",
        age: 30,
      },
    };
  },
  components: {
    BaseA,
  },
};
</script>

<style>
</style>
- 文件路径:src/components/BaseA.vue
<template>
  <div>
    <p>{{ color }}</p>
    <p>{{ userInfo.name }}</p>
    <p>{{ userInfo.age }}</p>
  </div>
</template>

<script>
export default {
  inject: ["color", "userInfo"],
};
</script>

<style>
</style>
v-model 原理
原理解析:
v-model 本质上是一个"语法糖"(即:value 属性 和 input 事件的合写)
作用:提供数据的双向绑定
- 数据变化,视图跟着变化
- 视图变化,数据跟着变化
注意:$event 用于模板中,获取事件的形参
<template>
   <div>
    <input v-model="msg" type="text" />
    <!-- 上面的代码本质是下面的代码 -->
    <input :value="msg" @input="msg = $event.target.value" type="text" />
  </div>
</template>
表单类组件封装
数据绑定问题
在开发中,我们需要对"表单类组件"进行封装,而这个"子组件"的数据是来自"父组件"的,我们无法直接对"子组件"的"表单类标签"使用 v-model 进行双向的数据绑定,所以我们需要使用 `v-model拆解` 实现绑定数据
具体解决
- 文件路径:src/App.vue
<template>
  <div>
    <BaseSelect
    :cityId="selectId"
    @changeId="selectId = $event"
    ></BaseSelect>
  </div>
</template>

<script>
import BaseSelect from "./components/BaseSelect.vue";
export default {
  data() {
    return {
      selectId: "102",	// 城市编号
    };
  },
  components: {
    BaseSelect,
  },
};
</script>

<style>
</style>
- 文件路径:src/components/BaseSelect.vue
<template>
  <div>
    <select :value="cityId" @change="handleChange">
      <option value="101">北京</option>
      <option value="102">上海</option>
      <option value="103">广州</option>
      <option value="104">深圳</option>
      <option value="105">重庆</option>
    </select>
  </div>
</template>

<script>
export default {
  props: {
    cityId: String,
  },
  methods: {
    handleChange(e) {
      this.$emit("changeId", e.target.value);
    },
  },
};
</script>

<style>
</style>
组件数据双向绑定
.sync 修饰符
作用:可以实现"子组件"与"父组件"的双向绑定,简化代码
特定:prop 属性名,可以自定义,不用固定为 value
具体演示
- 文件路径:src/App.vue
<template>
  <div>
    <button @click="isShow = true">确认付款</button>
    <!-- <BaseDialog :visible="isShow" @update:visible="isShow = $event"></BaseDialog> -->
    <!-- :visible.sync => :visible + @update:visible 化简后结果如下所示:-->
    <BaseDialog :visible.sync="isShow"></BaseDialog>
  </div>
</template>

<script>
import BaseDialog from "./components/BaseDialog.vue";
export default {
  data() {
    return {
      isShow: false,
    };
  },
  components: {
    BaseDialog,
  },
};
</script>

<style>
</style>
- 文件路径:src/components/BaseDialog.vue
<template>
  <div>
    <div v-show="visible" class="dialog">
      <p>你是否确定要付款?</p>
      <button @click="close">确定</button>
      <button @click="close">取消</button>
    </div>
  </div>
</template>

<script>
export default {
  props: {
    visible: Boolean,
  },
  methods: {
    close() {
      this.$emit("update:visible", false);
    },
  },
};
</script>

<style>
.dialog {
  margin: 0 auto;
  width: 200px;
  border: 5px solid #000;
  border-radius: 10px;
}
</style>
ref 和 $refs
通过 ref 与 $refs 获取 dom 元素
<template>
  <div>
    <div class="box" ref="myBox"></div>
  </div>
</template>

<script>
export default {
  mounted() {
    // 通过 ref 与 $refs 获取 dom 元素,防止 document.querySelector() 从全局中获取元素产生冲突
    const myBox = this.$refs.myBox;
  },
};
</script>

<style>
</style>
通过 ref 与 $refs 获取"组件实例"
- 第一步:给目标组件添加 ref 属性
<BaseForm ref="hhh"></BaseForm>
- 第二步:使用 this.$refs.xxx 获取目标组件(同时可以调用其方法)
this.$refs.hhh.组件方法
Vue 异步更新
问题解析:
Vue 为了提高性能,修改了 dom 并不会立即更新,而是会等待一会儿再集中一起更新。如果在 dom 还没有更新的时候,代码继续执行下去,可能会出现找不到某个 dom 元素的问题。
解决方案:
使用 $nextTick 后,等 DOM 更新后,才会触发执行此方法里的函数体
this.$nextTick(()=>{
	// 这里写 DOM 更新后,要执行的代码
})


 被折叠的 条评论
为什么被折叠?
被折叠的 条评论
为什么被折叠?
 到【灌水乐园】发言


