


mysql5.7数据库安装及性能测试
记录Centos7.9下安装mysql 5.7并利用benchmark工具简单测试mysql的性能。
测试机:centos7.9
配置:4C8G40G
1. 下安装mysql5.7
安装mysql5.7:
# 通过官方镜像源安装
$ wget http://dev.mysql.com/get/mysql57-community-release-el7-11.noarch.rpm
$ sudo yum -y install mysql57-community-release-el7-11.noarch.rpm
$ sudo yum -y install mysql mysql-server mysql-devel

# 启动mysql并查看root密码
$ sudo systemctl start mysqld
$ sudo systemctl enable mysqld
$ sudo grep "password" /var/log/mysqld.log
2024-03-22T07:07:13.872300Z 1 [Note] A temporary password is generated for root@localhost: fO08,4R?b2%;

# 由上述日志看出mysql的root密码为fO08,4R?b2%;

# 修改密码
$ mysql -uroot -p
Enter password:
Welcome to the MySQL monitor.  Commands end with ; or \g.
Your MySQL connection id is 6
Server version: 5.7.44

Copyright (c) 2000, 2023, Oracle and/or its affiliates.

Oracle is a registered trademark of Oracle Corporation and/or its
affiliates. Other names may be trademarks of their respective
owners.

Type 'help;' or '\h' for help. Type '\c' to clear the current input statement.

# 配置密码复杂度,可以设置简单密码
mysql> set global validate_password_length=3;
Query OK, 0 rows affected (0.00 sec)

mysql> set global validate_password_policy=0;
Query OK, 0 rows affected (0.00 sec)

mysql> ALTER USER 'root'@'localhost' IDENTIFIED BY '123456';
Query OK, 0 rows affected (0.00 sec)

mysql> SHOW VARIABLES LIKE 'validate_password%';
+--------------------------------------+-------+
| Variable_name                        | Value |
+--------------------------------------+-------+
| validate_password_check_user_name    | OFF   |
| validate_password_dictionary_file    |       |
| validate_password_length             | 4     |
| validate_password_mixed_case_count   | 1     |
| validate_password_number_count       | 1     |
| validate_password_policy             | LOW   |
| validate_password_special_char_count | 1     |
+--------------------------------------+-------+
7 rows in set (0.01 sec)

# 配置root允许其他主机进行连接
mysql> use mysql
Reading table information for completion of table and column names
You can turn off this feature to get a quicker startup with -A

Database changed
mysql> select `user`,authentication_string,`Host` from `user`;
+---------------+-------------------------------------------+-----------+
| user          | authentication_string                     | Host      |
+---------------+-------------------------------------------+-----------+
| root          | *6BB4837EB74329105EE4568DDA7DC67ED2CA2AD9 | localhost |
| mysql.session | *THISISNOTAVALIDPASSWORDTHATCANBEUSEDHERE | localhost |
| mysql.sys     | *THISISNOTAVALIDPASSWORDTHATCANBEUSEDHERE | localhost |
+---------------+-------------------------------------------+-----------+
3 rows in set (0.00 sec)

mysql> GRANT ALL PRIVILEGES ON *.* TO 'root'@'%' IDENTIFIED BY '123456';
Query OK, 0 rows affected, 1 warning (0.00 sec)

mysql> flush privileges;
Query OK, 0 rows affected (0.00 sec)

mysql> select `user`,authentication_string,`Host` from `user`;
+---------------+-------------------------------------------+-----------+
| user          | authentication_string                     | Host      |
+---------------+-------------------------------------------+-----------+
| root          | *6BB4837EB74329105EE4568DDA7DC67ED2CA2AD9 | localhost |
| mysql.session | *THISISNOTAVALIDPASSWORDTHATCANBEUSEDHERE | localhost |
| mysql.sys     | *THISISNOTAVALIDPASSWORDTHATCANBEUSEDHERE | localhost |
| root          | *6BB4837EB74329105EE4568DDA7DC67ED2CA2AD9 | %         |
+---------------+-------------------------------------------+-----------+
4 rows in set (0.00 sec)
mysql>
安装mysql5.7如果遇到如下GPG密钥问题:
The GPG keys listed for the "MySQL 5.7 Community Server" repository are already installed but they are not correct for this package.
使用如下命令解决:
rpm --import https://repo.mysql.com/RPM-GPG-KEY-mysql-2022
2. sysbench测试mysql性能
2.1 sysbench安装
# 镜像源安装
$ sudo yum install -y sysbench

# 源码编译安装
# CentOS安装依赖
$ sudo yum -y install make automake libtool pkgconfig libaio-devel
# For MySQL support, replace with mysql-devel on RHEL/CentOS 5
$ sudo yum -y install mariadb-devel openssl-devel

# 下载源码编译安装
$ wget https://github.com/akopytov/sysbench/archive/master.zip
$ unzip master.zip
$ cd sysbench-master/
$ sudo ./autogen.sh
$ sudo ./configure
$ sudo make && sudo make install

# 如果之前安装的sysbench没有添加mysql支持,可以在源码解压的文件夹里通过如下命令卸载,然后重新执行上面的安装流程:
$ sudo make uninstall
./configure说明:
sysbench默认是支持MySQL的benchmarking的,如果不加任何选项则要求保证MySQL的安装路径都是默认的标准路径,headfile位于/usr/include目录下,libraries位于/usr/lib/目录下。如果MySQL是源码编译安装的,安装路径放在/usr/local/mysql下,要添加相应的选项命令:
–with-mysql-includes=/usr/local/mysql/include/mysql/
–with-mysql-libs=/usr/local/mysql/lib/mysql/mysql安装在自定义路径,不在PATH下,可以使用–with-mysql-includes和–with-mysql-libs指定mysql路径。
2.2 sysbench oltp测试参数说明
sysbench 中常用的参数如下:
  --oltp-tables-count=1:表数量
  --oltp-table-size=10000000:每个表产生的记录行数
  --oltp-read-only=off:是否生成只读SQL,默认 off,如果设置为 on,则 oltp 模型不会生成 update, delete, insert 的 SQL 语句
  --oltp-skip-trx=[on|off]:省略 BEGIN / COMMIT 语句。默认是 off
  --rand-init=on:是否随机初始化数据,如果不随机化那么初始好的数据每行内容除了主键不同外其他完全相同
  --num-threads=12: 并发线程数,可以理解为模拟的客户端并发连接数
  --report-interval=10:表示每 10s 输出一次性能数据
  --max-requests=0:压力测试产生请求的总数,如果以下面的 max-time 来记,这个值设为 0 即可
  --max-time=120:测试的持续时间
  --oltp_auto_inc=off:id 是否为自增列
  --oltp_secondary=on:将 id 设置为非主键防止主键冲突
  --oltp_range_size=5: 连续取值 5 个,必定走到 5 个分片
  --mysql_table_options='dbpartition by hash(id) tbpartition by hash(id) tbpartitions 2':DRDS 支持拆分表,在建表的时候需要指定拆分方式

  安装完成会自带几个lua脚本文件,路径在/usr/local/share/sysbench 或 /usr/share/sysbench/tests/include/oltp_legacy下
2.3 测试执行
提前在mysql中创建数据库,名为sysbench。
# 创建测试数据库tpcc
$ mysql -uroot -p
mysql> create database sysbench;
mysql> exit
Bye

# 1、数据准备,在sysbench库中创建10张表,每个表有1000000条记录。
$ sysbench /usr/share/sysbench/tests/include/oltp_legacy/oltp.lua --oltp-table-size=1000000 --oltp_tables_count=10 --threads=4 --db-driver=mysql --mysql-db=sysbench --mysql-host=172.16.0.9 --mysql-user=root --mysql-password=123456 prepare
sysbench 1.0.17 (using system LuaJIT 2.0.4)

Creating table 'sbtest1'...
Inserting 1000000 records into 'sbtest1'
Creating secondary indexes on 'sbtest1'...
Creating table 'sbtest2'...
Inserting 1000000 records into 'sbtest2'
Creating secondary indexes on 'sbtest2'...
Creating table 'sbtest3'...
Inserting 1000000 records into 'sbtest3'
Creating secondary indexes on 'sbtest3'...
Creating table 'sbtest4'...
Inserting 1000000 records into 'sbtest4'
Creating secondary indexes on 'sbtest4'...
Creating table 'sbtest5'...
Inserting 1000000 records into 'sbtest5'
Creating secondary indexes on 'sbtest5'...
Creating table 'sbtest6'...
Inserting 1000000 records into 'sbtest6'
Creating secondary indexes on 'sbtest6'...
Creating table 'sbtest7'...
Inserting 1000000 records into 'sbtest7'
Creating secondary indexes on 'sbtest7'...
Creating table 'sbtest8'...
Inserting 1000000 records into 'sbtest8'
Creating secondary indexes on 'sbtest8'...
Creating table 'sbtest9'...
Inserting 1000000 records into 'sbtest9'
Creating secondary indexes on 'sbtest9'...
Creating table 'sbtest10'...
Inserting 1000000 records into 'sbtest10'
Creating secondary indexes on 'sbtest10'...

# 2、进行write_only测试
$ sysbench /usr/share/sysbench/tests/include/oltp_legacy/oltp.lua --oltp-table-size=1000000 --oltp_tables_count=10 --threads=4 --db-driver=mysql --mysql-db=sysbench --mysql-host=172.16.0.9 --mysql-user=root --mysql-password=123456 run
sysbench 1.0.17 (using system LuaJIT 2.0.4)

Running the test with following options:
Number of threads: 4
Initializing random number generator from current time


Initializing worker threads...

Threads started!

SQL statistics:
    queries performed:
        read:                            19432
        write:                           5552
        other:                           2776
        total:                           27760
    transactions:                        1388   (137.58 per sec.)
    queries:                             27760  (2751.55 per sec.)
    ignored errors:                      0      (0.00 per sec.)
    reconnects:                          0      (0.00 per sec.)

General statistics:
    total time:                          10.0875s
    total number of events:              1388

Latency (ms):
         min:                                    5.66
         avg:                                   28.89
         max:                                 1817.12
         95th percentile:                      104.84
         sum:                                40095.22

Threads fairness:
    events (avg/stddev):           347.0000/1.22
    execution time (avg/stddev):   10.0238/0.04

# 3、清除数据
$ sysbench /usr/share/sysbench/tests/include/oltp_legacy/oltp.lua --oltp-table-size=1000000 --oltp_tables_count=10 --threads=4 --db-driver=mysql --mysql-db=sysbench --mysql-host=172.16.0.9 --mysql-user=root --mysql-password=123456 cleanup
sysbench 1.0.17 (using system LuaJIT 2.0.4)

Dropping table 'sbtest1'...
Dropping table 'sbtest2'...
Dropping table 'sbtest3'...
Dropping table 'sbtest4'...
Dropping table 'sbtest5'...
Dropping table 'sbtest6'...
Dropping table 'sbtest7'...
Dropping table 'sbtest8'...
Dropping table 'sbtest9'...
Dropping table 'sbtest10'...
参考:
3. mysqlslap测试mysql性能
mysqlslap是MySQL官方提供的一个性能测试工具,用于模拟多个客户端对MySQL数据库进行并发访问,从而测试数据库在高负载下的性能表现。通过mysqlslap,我们可以测试数据库的查询性能、插入性能、更新性能等,从而评估数据库的性能瓶颈和提升空间。
3.1 mysqlslap参数说明
mysqlslap常用参数:

—auto-generate-sql, -a:自动生成测试表和数据。这是mysqlslap最常用的参数之一,可以让我们无需手动创建测试数据,快速进行测试。

—auto-generate-sql-load-type=type:测试语句的类型。这个参数可以指定测试语句的类型,包括read(读操作)、key(键值查询)、write(写操作)、update(更新操作)和mixed(混合操作)等。默认值为mixed,表示混合类型的测试语句。

—number-char-cols=N, -x N:自动生成的测试表中包含多少个字符类型的列。默认值为1,表示自动生成一个字符类型的列。

—number-int-cols=N, -y N:自动生成的测试表中包含多少个数字类型的列。默认值为1,表示自动生成一个数字类型的列。

—number-of-queries=N:总的测试查询次数(并发客户数×每客户查询次数)。这个参数可以指定总的测试查询次数,从而控制测试的时间和强度。

—query=’SQL’,(—query缩写为-q):使用自定义脚本执行测试。这个参数允许我们使用自定义的SQL语句进行测试,从而更灵活地模拟实际应用场景。
3.2 执行测试
在测试客户端上执行mysqlslap命令,指定要测试的MySQL服务器地址、用户名、密码等参数,以及要使用的测试选项。例如,我们可以使用以下命令进行混合类型的性能测试:
$ mysqlslap --auto-generate-sql --auto-generate-sql-load-type=mixed --number-of-queries=10000 --concurrency=10 --engine=innodb --user=root --password=123456 --host=localhost --port=3306
mysqlslap: [Warning] Using a password on the command line interface can be insecure.
Benchmark
        Running for engine innodb
        Average number of seconds to run all queries: 7.546 seconds
        Minimum number of seconds to run all queries: 7.546 seconds
        Maximum number of seconds to run all queries: 7.546 seconds
        Number of clients running queries: 10
        Average number of queries per client: 1000
上述命令中,—concurrency参数指定了并发客户端的数量,—engine参数指定了存储引擎类型(这里使用InnoDB),—user和—password参数指定了连接MySQL服务器所需的用户名和密码,—host和—port参数指定了MySQL服务器的地址和端口号。
执行完mysqlslap命令后,将输出测试结果,包括每秒查询数(QPS)、平均响应时间等性能指标。我们可以根据这些指标来分析数据库的性能表现,找出潜在的性能瓶颈,并进行相应的优化。
4. benchmarksql测试mysql性能
benchmarksql是一款符合TPC-C基准压力测试工具,TPC-C是衡量在线事务处理的基准。
TPC-C模型是模拟一个商品批发公司的销售模型,这个模型涵盖了一个批发公司面向客户对一系列商品进行销售的过程,这包括管理订单,管理库存,管理账号收支等操作。这些操作涉及到仓库、商品、客户、订单等概念,围绕这些概念,构造了数据表格,以及相应的数据库操作。
官网:https://benchmarksql.readthedocs.io/en/latest/
4.1 安装benchmarksql
benchmarksql编译安装,官方benchmarksql最新版本不支持mysql测试,本文使用pingcap的仓库进行编译安装:
# 安装依赖
$ sudo yum install java-1.8.0-openjdk
$ sudo yum -y install ant

# 下载安装
$ git clone -b 5.0-mysql-support-opt-2.1 https://github.com/pingcap/benchmarksql.git
# 构建
$ cd benchmarksql/
$ ant
Buildfile: /home/test/tools/db/benchmarksql/build.xml

init:
    [mkdir] Created dir: /home/test/tools/db/benchmarksql/build

compile:
    [javac] Compiling 12 source files to /home/test/tools/db/benchmarksql/build

dist:
    [mkdir] Created dir: /home/test/tools/db/benchmarksql/dist
      [jar] Building jar: /home/test/tools/db/benchmarksql/dist/BenchmarkSQL-5.0.jar

BUILD SUCCESSFUL
Total time: 1 second
4.2 测试数据准备及执行
# 创建测试数据库tpcc
$ mysql -uroot -p
mysql> create database tpcc;
# 删除数据库
# mysql> drop database tpcc;
mysql> exit
Bye

# 修改mysql测试文件。
$ sudo vi benchmarksql/run/props.mysql
db=mysql
driver=com.mysql.jdbc.Driver
conn=jdbc:mysql://localhost:3306/tpcc?useSSL=false&useServerPrepStmts=true&useConfigs=maxPerformance&rewriteBatchedStatements=true&cachePrepStmts=true&prepStmtCacheSize=1000&prepStmtCacheSqlLimit=2048
user=root
password=123456

warehouses=20
loadWorkers=8

terminals=20
//To run specified transactions per terminal- runMins must equal zero
runTxnsPerTerminal=0
//To run for specified minutes- runTxnsPerTerminal must equal zero
runMins=10
//Number of total transactions per minute
limitTxnsPerMin=0

//Set to true to run in 4.x compatible mode. Set to false to use the
//entire configured database evenly.
terminalWarehouseFixed=true

//The following five values must add up to 100
//The default percentages of 45, 43, 4, 4 & 4 match the TPC-C spec
newOrderWeight=45
paymentWeight=43
orderStatusWeight=4
deliveryWeight=4
stockLevelWeight=4

// Directory name to create for collecting detailed result data.
// Comment this out to suppress.
resultDirectory=my_result_%tY-%tm-%td_%tH%tM%tS
//osCollectorScript=./misc/os_collector_linux.py
//osCollectorInterval=1
//osCollectorSSHAddr=user@dbhost
//osCollectorDevices=net_eth0 blk_vda
参数说明:
-
db=mysql: 指定数据库类型,当前类型为mysql
-
driver=com.mysql.jdbc.Driver: mysql数据库JDBC驱动
-
conn=jdbc:mysql://localhost:3306/tpcc?useSSL=false…:mysql的连接字符串
-
user=root:连接mysql的用户名
-
password=123456:连接mysql的密码
-
Warehouses: 代表仓库数,每个 Warehouse 的数据量,其大小约为 76823.04KB。可以根据每个Warehouse的数据量,计算测试过程中的数据总量。
计算公式为:数据总量(KB)≈ Warehouse个数*76823.04KB
以10个Warehouse的数据量为例计算其数据总量大小约为:768230.4KB -
loadWorkers=8:用于在数据库中初始化数据的加载进程数量,默认为4,实际使用过程中可以根据实际情况调整,加载速度会随worker数量的增加而有所提升
-
terminals=20:终端数,即并发客户端数量,通常设置为CPU线程总数的2~6倍
-
runTxnsPerTerminal=0:每个终端(terminal)运行的固定事务数量,例如:如果该值设置为10,意味着每个terminal运行10个事务,如果有32个终端,那整体运行320个事务后,测试结束。该参数配置为非0值时,下面的runMins参数必须设置为0
-
runMins=10: 要测试的整体时间,单位为分钟,如果runMins设置为60,那么测试持续1小时候结束。该值设置为非0值时,runTxnsPerTerminal参数必须设置为0。这两个参数不能同时设置为正整数,如果设置其中一个,另一个必须为0,主要区别是runMins定义时间长度来控制测试时间;runTxnsPerTerminal定义事务总数来控制时间。
-
limitTxnsPerMin=0: 每分钟事务总数限制,该参数主要控制每分钟处理的事务数,事务数受terminals参数的影响,limitTxnsPerMin/terminals的值必须是正整数。
-
terminalWarehouseFixed=true: 终端和仓库的绑定模式,设置为true时可以运行4.x兼容模式,意思为每个终端都有一个固定的仓库。设置为false时可以均匀的使用数据库整体配置。TPCC规定每个终端都必须有一个绑定的仓库,所以一般使用默认值true。
-
下面五个值的总和必须等于100,默认值为:45, 43, 4, 4,4 ,与TPC-C测试定义的比例一致,实际操作过程中,可以调整比重来适应各种场景.
- newOrderWeight=45 新订单事务占总事务的45%
- paymentWeight=43 支付订单事务占总事务的43%
- orderStatusWeight=4 订单状态事务占总事务的4%
- deliveryWeight=4 到货日期事务占总事务的4%
- stockLevelWeight=4 查看现存货品的事务占总事务的4%
-
resultDirectory=my_result_%tY-%tm-%td_%tH%tM%tS 压测期间收集系统性能数据的目录(无需修改)
-
osCollectorScript=./misc/os_collector_linux.py: 操作系统性能收集脚本(无需修改)
-
osCollectorInterval=1: 操作系统收集操作间隔,默认为1秒
-
osCollectorSSHAddr=user@dbhost: 需要收集系统性能的主机
-
osCollectorDevices=net_eth0 blk_vda: 操作系统中被收集服务器的网卡名称和磁盘名称,根据个人环境进行调整
# 建立仓库,完成创建表并导入数据
$ pwd
/home/test/tools/db/benchmarksql/run
$ ./runDatabaseBuild.sh props.mysql
# 执行benchmark测试
$ ./runBenchmark.sh props.mysql
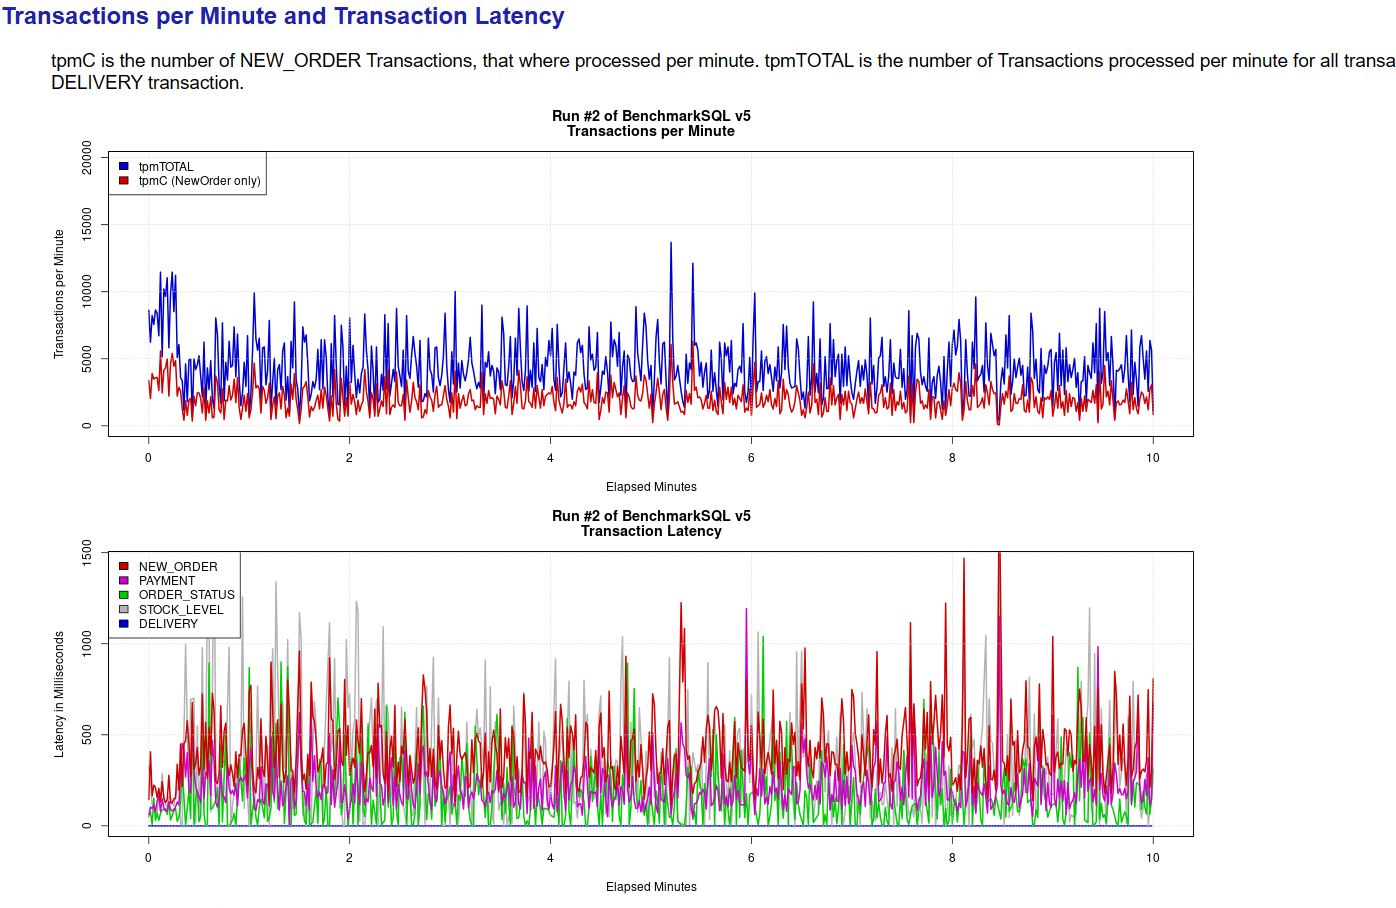
4.3 结果解读
4.3.1 runBenchmark.sh运行结果
# 运行结果
13:52:03,667 [Thread-5] INFO   jTPCC : Term-00, Measured tpmC (NewOrders) = 1995.21
13:52:03,667 [Thread-5] INFO   jTPCC : Term-00, Measured tpmTOTAL = 4408.1
13:52:03,667 [Thread-5] INFO   jTPCC : Term-00, Session Start     = 2024-05-07 13:42:02
13:52:03,667 [Thread-5] INFO   jTPCC : Term-00, Session End       = 2024-05-07 13:52:03
13:52:03,667 [Thread-5] INFO   jTPCC : Term-00, Transaction Count = 44135
主要关注如下几项结果:
tpmC(NewOrder): 每分钟1995.21笔订单
tpmTOTAL:订单总数4408.1笔
Transaction Count 执行10min,执行了44135笔订单(每分钟4413.5笔订单)
4.3.2 html报告查看
# 安装R语言环境
$ sudo yum install R -y

# 生成html报告
$ sudo ./generateReport.sh my_result_2024-05-07_151402/
# 将my_result_2024-05-07_151402/下载到终端,使用浏览器即可打开html版本的报告
备注:
html报告中系统资源(CPU、disk)无数据输出,待排查原因。
参考:


 2万+
2万+


 被折叠的 条评论
为什么被折叠?
被折叠的 条评论
为什么被折叠?
 到【灌水乐园】发言


