


目录
- JUnit5.x
- 1、概述
- 2、Junit4迁移到JUnit Jupiter
- 3、生命周期方法
- 4、@TestInstance(生命周期模式)
- 5、显示测试名称
- 6、条件测试
- 7、执行顺序
- 8、@Disabled(禁用测试)
- 9、@Nested(嵌套测试)
- 10、@Tag(标记测试)
- 11、@RepeatedTest(重复测试)
- 12、参数化测试
- 13、@TestFactory(动态测试)
- 14、套件测试
- 15、@Timeout(超时测试)
- 16、@Execution(并发测试)
- 17、@ResourceLock(并发中的同步)
- 18、Assertions断言
- 19、Hamcrest匹配器
- 20、Assumptions假设
- 21、ParameterResolver(参数解析器)
- 22、扩展
JUnit5.x
1、概述
1.1、简介
JUnit 5 与以前版本的 JUnit 不同,拆分成由三个不同子项目的几个不同模块组成。
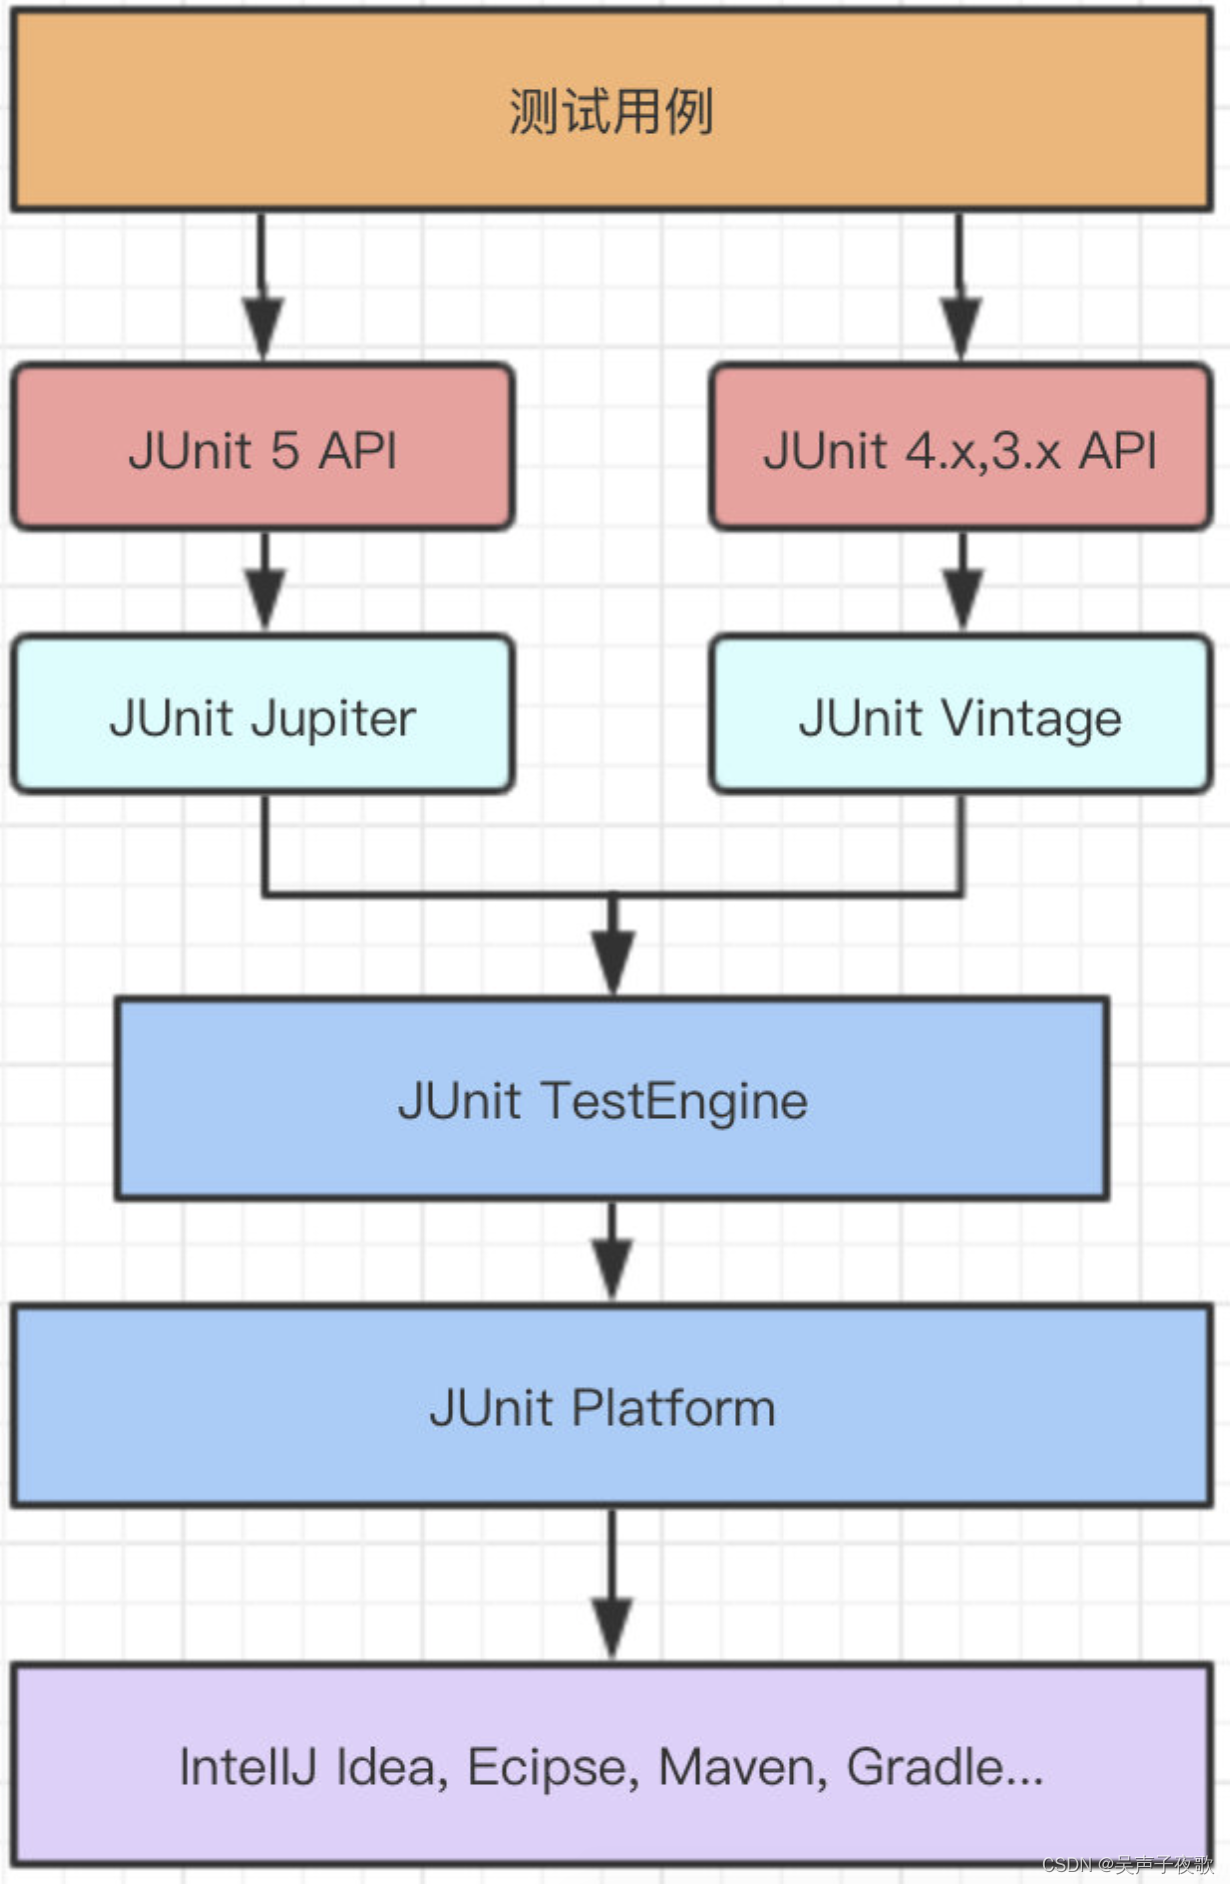
- JUnit Platform:其主要作用是在 JVM 上启动测试框架。它定义了一个抽象的 TestEngine API 来定义运行在平台上的测试框架;也就是说其他的自动化测试引擎或开发人员⾃⼰定制的引擎都可以接入 Junit 实现对接和执行。同时还支持通过命令行、Gradle 和 Maven 来运行平台。
- JUnit Jupiter:这是 Junit5 的核心,可以看作是承载 Junit4 原有功能的演进,包含了 JUnit 5 最新的编程模型和扩展机制;很多丰富的新特性使 JUnit ⾃动化测试更加方便、功能更加丰富和强大。也是测试需要重点学习的地方;Jupiter 本身也是⼀一个基于 Junit Platform 的引擎实现。
- JUnit Vintage3:Junit 发展了10数年,Junit 3 和 Junit 4 都积累了大量的⽤用户,作为新一代框 架,这个模块是对 JUnit3,JUnit4 版本兼容的测试引擎,使旧版本 junit 的⾃动化测试脚本也可以顺畅运行在 Junit5 下,它也可以看作是基于 Junit Platform 实现的引擎范例。
1.2、Maven依赖
<!--junit5-->
<dependency>
    <groupId>org.junit.jupiter</groupId>
    <artifactId>junit-jupiter</artifactId>
    <version>5.8.2</version>
</dependency>
<dependency>
    <groupId>org.junit.platform</groupId>
    <artifactId>junit-platform-runner</artifactId>
    <version>1.8.2</version>
</dependency>
<dependency>
    <groupId>org.junit.platform</groupId>
    <artifactId>junit-platform-launcher</artifactId>
    <version>1.8.2</version>
    <scope>test</scope>
</dependency>
<dependency>
    <groupId>org.junit.platform</groupId>
    <artifactId>junit-platform-console-standalone</artifactId>
    <version>1.8.2</version>
    <scope>test</scope>
</dependency>
如果要从命令行运行测试,可以配置一个maven surefire插件:
<build>
    <plugins>
         <plugin>
             <artifactId>maven-surefire-plugin</artifactId>
             <version>2.22.2</version>
         </plugin>
    </plugins>
</build>
1.3、核心概念
- 测试类:可以是
顶级类、静态成员类、或使用@Nested注解的包含一个或多个测试方法的内部类。测试类不能是抽象的,必须有单一的构造方法。构造方法必须不带参数,或者所带参数能够通过依赖注入在运行时动态解析。作为可见性的最低要求,测试类允许是包私有的,不再像JUnit4.x那样要求测试类是共有类。 - 测试方法:是用@Test、@RepeatedTest、@ParameterizedTest、@TestFactory或TestTemplate等注解标注的实例方法。测试方法不能是抽象的,也不能有返回值,即返回值类型应该是void。
- 生命周期方法:是用@BeforeAll、@AfterAll、@BeforeEach或@AfterEach等注解的方法。
2、Junit4迁移到JUnit Jupiter
- 注释位于
org.junit.jupiter.api包中 - 断言位于
org.junit.jupiter.api.Assertions类中- 可以继续使用来自org.junit.Assert任何其他断言库的断言方法,例如AssertJ、Hamcrest、Truth等
- 假设位于
org.junit.jupiter.api.Assumptions类中 - @Before并且@After不再存在;使用
@BeforeEachand和@AfterEach代替 - @BeforeClass并且@AfterClass不再存在;使用
@BeforeAlland和@AfterAll代替 - @Ignore不再存在:使用
@Disabled或其他内置执行条件之一代替 - @Category不复存在;
@Tag代替使用 - @RunWith不复存在; 被
@ExtendWith取代 - @Rule并且@ClassRule不再存在;被
@ExtendWith和@RegisterExtension取代 - @Test(expected = …)并且ExpectedException规则不再存在;被
Assertions.assertThrows(…)代替使用 - JUnit Jupiter 中的断言和假设接受失败消息作为它们的最后一个参数而不是第一个参数
3、生命周期方法
- @BeforeEach:在每个测试方法之前执行
- @AfterEach:在每个测试方法之后执行
- @BeforeAll:在所有测试方法之前执行(必须是静态方法)
- @AfterAll:在所有测试方法之后执行(必须静态方法)
public class LifeCycleTest {

    @BeforeEach
    public void beforeEach() {
        System.out.println("BeforeEach");
    }

    @AfterEach
    public void afterEach() {
        System.out.println("AfterEach");
    }

    @BeforeAll
    public static void beforeAll() {
        System.out.println("BeforeAll");
    }

    @AfterAll
    public static void afterAll() {
        System.out.println("AfterAll");
    }

    @Test
    public void test1() {
        System.out.println("test1");
    }

    @Test
    public void test2() {
        System.out.println("test2");
    }

}
BeforeAll

BeforeEach
test1
AfterEach


BeforeEach
test2
AfterEach

AfterAll
4、@TestInstance(生命周期模式)
JUnit在调用每个@Test标注的方法之前创建测试类的一个新实例,以确保测试方法的独立性,并防止测试代码中出现意想不到的副作用。另外,测试得到的结果必须与运行顺序无关。因为每个测试方法都在测试类的一个新实例上运行所以不能跨测试方法重用实例变量值。为要运行的每个测试方法创建测试类的一个实例,这是JUnit5和之前所有版本的默认行为。
如果用@TestInstance(Lifecycle.PER_CLASS)标注测试类,JUnit5将在同一个测试类实例上运行所有测试方法。使用该注解,可以为每个测试类创建一个新的测试实例。
生命周期模式有两个:
- Lifecycle.PER_METHOD:(默认)每个测试方法将创建一个新的测试实例
- Lifecycle.PER_CLASS:每个测试类将创建一个新的测试实例
@TestInstance(TestInstance.Lifecycle.PER_CLASS)
public class InstanceTest {

    private int num = 0;

    @Test
    public void test1() {
        num++;
        System.out.println("test1 num:" + num);
    }

    @Test
    public void test2() {
        num++;
        System.out.println("test2 num:" + num);
    }
}
test1 num:1
test2 num:2
5、显示测试名称
测试类或方法的显示名称是根据以下优先规则确定的:
- 注释的值@DisplayName(如果存在)
- 通过调用注释DisplayNameGenerator中指定的@DisplayNameGeneration (如果存在)
- DisplayNameGenerator通过调用通过配置参数配置的默认值(如果存在)
5.1、@DisplayName
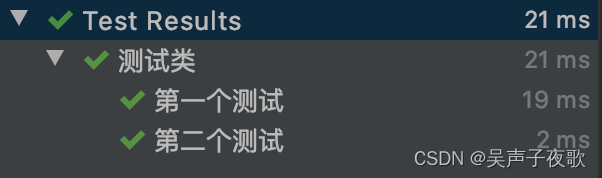
@DisplayName注解可用于类和测试方法。该注解可以让Tested Data Systerms公司的开发人员为一个测试类或测试方法指定显示名称。通常,该注解用于IDE和构建工具的测试报告中。@DisplayName注解的字符串参数可以包含空格、特殊字符,甚至是表情符号。
@DisplayName("测试类")
public class DisplayNameTest {

    @Test
    @DisplayName("第一个测试")
    public void test1() {
        System.out.println("test1");
    }

    @Test
    @DisplayName("第二个测试")
    public void test2() {
        System.out.println("test2");
    }
}
5.2、@DisplayNameGeneration
JUnit Jupiter 支持可以通过 @DisplayNameGeneration注释进行配置的自定义显示名称生成器。通过注释提供的值@DisplayName始终优先于DisplayNameGenerator。
默认的生成器:
- Standard:匹配自 JUnit Jupiter 5.0 发布以来的标准显示名称生成行为
- Simple:删除没有参数的方法的尾括号
- ReplaceUnderscores:将下划线替换为空格
- IndicativeSentences:连接测试名称和其它生成类
public class DisplayNameGeneratorTest {

    @Nested
    @DisplayNameGeneration(DisplayNameGenerator.Standard.class)
    class TestA {

        @Test
        void test_A_test() {
            System.out.println("testA.test");
        }
    }

    @Nested
    @DisplayNameGeneration(DisplayNameGenerator.Simple.class)
    class TestB {

        @ParameterizedTest(name = "TestB.test, arg is {0}")
        @ValueSource(ints = {1, 2})
        void test_B_test(int arg) {
            System.out.println("testB.test");
        }
    }


    @Nested
    @DisplayNameGeneration(DisplayNameGenerator.ReplaceUnderscores.class)
    class TestC {

        @Test
        void test_C_test() {
            System.out.println("testC.test");
        }
    }

    @Nested
    @IndicativeSentencesGeneration(separator = "->", generator = DisplayNameGenerator.ReplaceUnderscores.class)
    class TestD {

        @Test
        void test_D_test() {
            System.out.println("testD.test");
        }
    }

}

可以通过配置文件指定默认名称生成器:
junit.jupiter.displayname.generator.default = org.junit.jupiter.api.DisplayNameGenerator$ReplaceUnderscores
6、条件测试
6.1、操作系统条件
- @EnabledOnOs:在指定操作系统上启用
- @DisabledOnOs:在指定操作系统上禁用
public class OsTest {

    @Test
    @EnabledOnOs({OS.MAC})
    public void test1() {
        System.out.println("test1");
    }

    @Test
    @DisabledOnOs(OS.WINDOWS)
    public void test2() {
        System.out.println("test2");
    }
}
test1
test2
6.2、Java运行环境条件
- @EnabledOnJre:在指定的JRE中启用
- @DisabledOnJre:在指定的JRE中禁用
- @EnabledForJreRange:在指定的JRE范围中启用
- @DisabledForJreRange:在指定的JRE范围中禁用
public class JreTest {

    @Test
    @EnabledOnJre({JRE.JAVA_8})
    public void test1() {
        System.out.println("test1");
    }

    @Test
    @DisabledOnJre({JRE.JAVA_12})
    public void test2() {
        System.out.println("test2");
    }

    @Test
    @EnabledForJreRange(min = JRE.JAVA_8, max = JRE.JAVA_9)
    public void test3() {
        System.out.println("test3");
    }

    @Test
    @DisabledForJreRange(min = JRE.JAVA_9, max = JRE.JAVA_12)
    public void test4() {
        System.out.println("test4");
    }
}
test1
test2
test3
test4
6.3、系统属性条件
- @EnabledIfSystemProperty:单个系统属性值匹配时启用
- @DisabledIfSystemProperty:单个系统属性匹配时禁用
- @EnabledIfSystemProperties:多个系统属性值匹配时启用
- @DisabledIfSystemProperties:多个系统属性值匹配时禁用
public class SysTest {

    @Test
    @EnabledIfSystemProperty(named = "os.arch", matches = ".*64.*")
    public void test1() {
        System.out.println(System.getProperty("os.arch"));
    }

    @Test
    @DisabledIfSystemProperty(named = "os.name", matches = "linux")
    public void test2() {
        System.out.println(System.getProperty("os.name"));
    }

    @Test
    @EnabledIfSystemProperties({
            @EnabledIfSystemProperty(named = "os.arch", matches = ".*64.*"),
            @EnabledIfSystemProperty(named = "os.name", matches = "Mac.*")
    })
    public void test3() {
        System.out.println("test3");
    }

    @Test
    @DisabledIfSystemProperties({
            @DisabledIfSystemProperty(named = "os.arch", matches = ".*32.*"),
            @DisabledIfSystemProperty(named = "os.name", matches = "linux")
    })
    public void test4() {
        System.out.println("test4");
    }
}
x86_64
Mac OS X
test3
test4
6.4、环境变量条件
- @EnabledIfEnvironmentVariable:单个环境变量值匹配时启用
- @DisabledIfEnvironmentVariable:单个环境变量值匹配时禁用
- @EnabledIfEnvironmentVariables:多个环境变量值匹配时启用
- @DisabledIfEnvironmentVariables:多个环境变量值匹配时禁用
public class EnvTest {

    @Test
    @EnabledIfEnvironmentVariable(named = "JAVA_HOME", matches = ".*home")
    public void test1() {
        System.out.println("test1");
    }

    @Test
    @DisabledIfEnvironmentVariable(named = "JAVA_HOME", matches = ".*home")
    public void test2() {
        System.out.println("test2");
    }

    @Test
    @EnabledIfEnvironmentVariables({
            @EnabledIfEnvironmentVariable(named = "JAVA_HOME", matches = ".*home"),
            @EnabledIfEnvironmentVariable(named = "MAVEN_HOME", matches = ".*home")
    })
    public void test3() {
        System.out.println("test3");
    }

    @Test
    @DisabledIfEnvironmentVariables({
            @DisabledIfEnvironmentVariable(named = "JAVA_HOME", matches = ".*home"),
            @DisabledIfEnvironmentVariable(named = "MAVEN_HOME", matches = ".*home")
    })
    public void test4() {
        System.out.println("test4");
    }

}
Environment variable [JAVA_HOME] with value [/Library/Java/JavaVirtualMachines/jdk1.8.0_211.jdk/Contents/Home] does not match regular expression [.*home]

test2

Environment variable [JAVA_HOME] with value [/Library/Java/JavaVirtualMachines/jdk1.8.0_211.jdk/Contents/Home] does not match regular expression [.*home]

test4
6.5、自定义条件
- @EnabledIf:根据自定义条件启用
- @DisabledIf:根据自定义条件禁用
public class IfTest {

    @Test
    @EnabledIf("enabledCondition")
    public void test1() {
        System.out.println("test1");
    }

    @Test
    @DisabledIf("demo.IfTest$MyCondition#disabledCondition")
    public void test2() {
        System.out.println("test2");
    }

    boolean enabledCondition() {
        return true;
    }

    static class MyCondition {
        static boolean disabledCondition() {
            return false;
        }
    }
}
test1
test2
在多种情况下,需要使用条件方法static:
- 当@EnabledIf或@DisabledIf在类级别使用时
- 当@EnabledIfor@DisabledIf用于 a@ParameterizedTest或 @TestTemplate方法时
- 当条件方法位于外部类中时
7、执行顺序
默认情况下,测试类和方法将使用确定性但故意不明显的算法进行排序。这确保了测试套件的后续运行以相同的顺序执行测试类和测试方法,从而允许可重复的构建。
7.1、@TestMethodOrder(方法顺序)
@TestMethodOrder注解通过指定MethodOrderer实现定义方法的执行顺序。
内置的MethodOrderer如下:
- MethodOrderer.Alphanumeric:根据测试方法的名称和形式参数列表按字母数字顺序对测试方法进行排序
- MethodOrderer.DisplayName:根据显示名称按字母数字顺序对测试方法进行排序
- MethodOrderer.MethodName:根据测试方法的名称和形式参数列表按字母数字顺序对测试方法进行排序
- MethodOrderer.OrderAnnotation:根据通过@Order注释指定的值对测试方法进行数字排序
- MethodOrderer.Random:伪随机命令测试方法并支持自定义种子的配置
public class MethodOrderTest {

    @Nested
    @TestMethodOrder(MethodOrderer.OrderAnnotation.class)
    class A {

        @Test
        @Order(10)
        public void test1() {
            System.out.println("A.test1");
        }

        @Test
        @Order(100)
        public void test2() {
            System.out.println("A.test2");
        }
    }

    @Nested
    @TestMethodOrder(MethodOrderer.DisplayName.class)
    class B {

        @Test
        @DisplayName("test1")
        public void test1() {
            System.out.println("B.test1");
        }

        @Test
        @DisplayName("test2")
        public void test2() {
            System.out.println("B.test2");
        }
    }
}
B.test1
B.test2

A.test1
A.test2
可以使用junit.jupiter.testmethod.order.default 配置参数MethodOrderer来指定默认情况下要使用的完全限定类名 。就像通过@TestMethodOrder注释配置的排序者一样,提供的类必须实现该 MethodOrderer接口。默认排序程序将用于所有测试,除非 @TestMethodOrder注释出现在封闭的测试类或测试接口上。
junit.jupiter.testmethod.order.default = org.junit.jupiter.api.MethodOrderer$OrderAnnotation
7.2、@TestClassOrder(类顺序)
@TestClassOrder注解通过指定ClassOrderer实现定义类的执行顺序。
内置的ClassOrderer实现类如下:
- ClassOrderer.ClassName:根据测试类的完全限定类名按字母数字顺序对测试类进行排序
- ClassOrderer.DisplayName:根据显示名称按字母数字顺序对测试类进行排序
- ClassOrderer.OrderAnnotation:根据通过注释指定的值对测试类进行数字排序
- ClassOrderer.Random:伪随机地订购测试类并支持自定义种子的配置
@TestClassOrder(ClassOrderer.OrderAnnotation.class)
public class ClassOrderTest {

    @Nested
    @Order(1000)
    class A {
        @Test
        public void test() {
            System.out.println("A.test");
        }
    }

    @Nested
    @Order(100)
    class B {
        @Test
        public void test() {
            System.out.println("B.test");
        }
    }

    @Nested
    @Order(10)
    class C {
        @Test
        public void test() {
            System.out.println("C.test");
        }
    }
}
C.test
B.test
A.test
8、@Disabled(禁用测试)
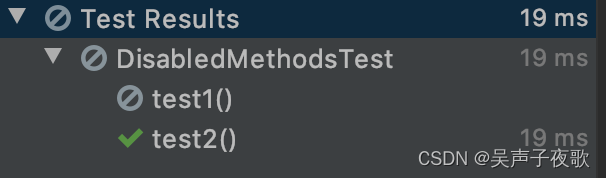
@Disabled注解可用于测试类和方法,表示禁用测试类或测试方法不予以运行。开发人员用这个注解给出禁用一个测试的理由,以便团队的其他成员确切地知道为什么要这么做。如果该注解用在一个类上,将禁用该测试类的所有方法。此外,当开发人员在IDE运行测试时,被禁用的测试及禁用原因在不同的控制台上显示的内容也有所不同。
禁用整个测试类:
@Disabled("禁用整个测试类")
public class DisabledClassTest {

    @Test
    public void test1() {
        System.out.println("test1");
    }

    @Test
    public void test2() {
        System.out.println("test2");
    }
}
禁用方法:
public class DisabledMethodsTest {

    @Test
    @Disabled("禁用test1")
    public void test1() {
        System.out.println("test1");
    }

    @Test
    public void test2() {
        System.out.println("test2");
    }
}
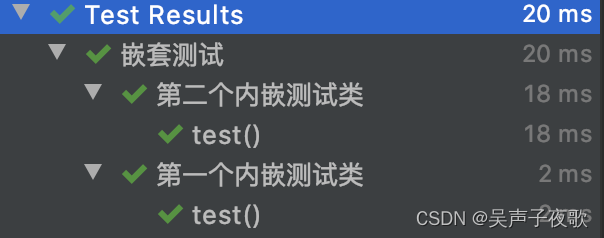
9、@Nested(嵌套测试)
当我们编写的类和代码逐渐增多,随之而来的需要测试的对应测试类也会越来越多。为了解决测试类数量爆炸的问题,JUnit 5提供了@Nested 注解,能够以静态内部成员类的形式对测试用例类进行逻辑分组。
并且每个静态内部类都可以有自己的生命周期方法, 这些方法将按从外到内层次顺序执行。 此外,嵌套的类也可以用@DisplayName 标记,这样我们就可以使用正确的测试名称。
@DisplayName("嵌套测试")
public class NestClassTest {

    @BeforeEach
    public void init() {
        System.out.println("before each");
    }

    @Nested
    @DisplayName("第一个内嵌测试类")
    class FirstNestTest {
        @Test
        void test() {
            System.out.println("first class test");
        }
    }

    @Nested
    @DisplayName("第二个内嵌测试类")
    class SecondNestTest {
        @Test
        void test() {
            System.out.println("second class test");
        }
    }
}
before each
second class test


before each
first class test
10、@Tag(标记测试)
可以在类和测试方法上是使用@Tag注解标记,安后可以利用这些标记过滤测试的发现和运行。
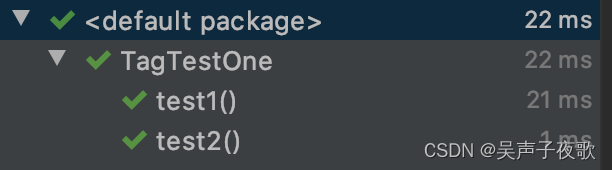
@Tag("testOne")
public class TagTestOne {

    @Test
    public void test1() {
        System.out.println("test1");
    }

    @Test
    public void test2() {
        System.out.println("test2");
    }
}

@Tag("testTwo")
public class TagTestTwo {

    @Test
    public void test1() {
        System.out.println("test1");
    }

    @Test
    public void test2() {
        System.out.println("test2");
    }
}
激活这些标记测试类的方法有两种:
一种是在pom.xml配置文件上配置:
<build>
    <plugins>
        <plugin>
            <groupId>org.apache.maven.plugins</groupId>
            <artifactId>maven-surefire-plugin</artifactId>
            <version>2.19</version>
            <configuration>
                <groups>testOne</groups>
                <excludedGroups>testTwo</excludedGroups>
            </configuration>
        </plugin>
    </plugins>
</build>
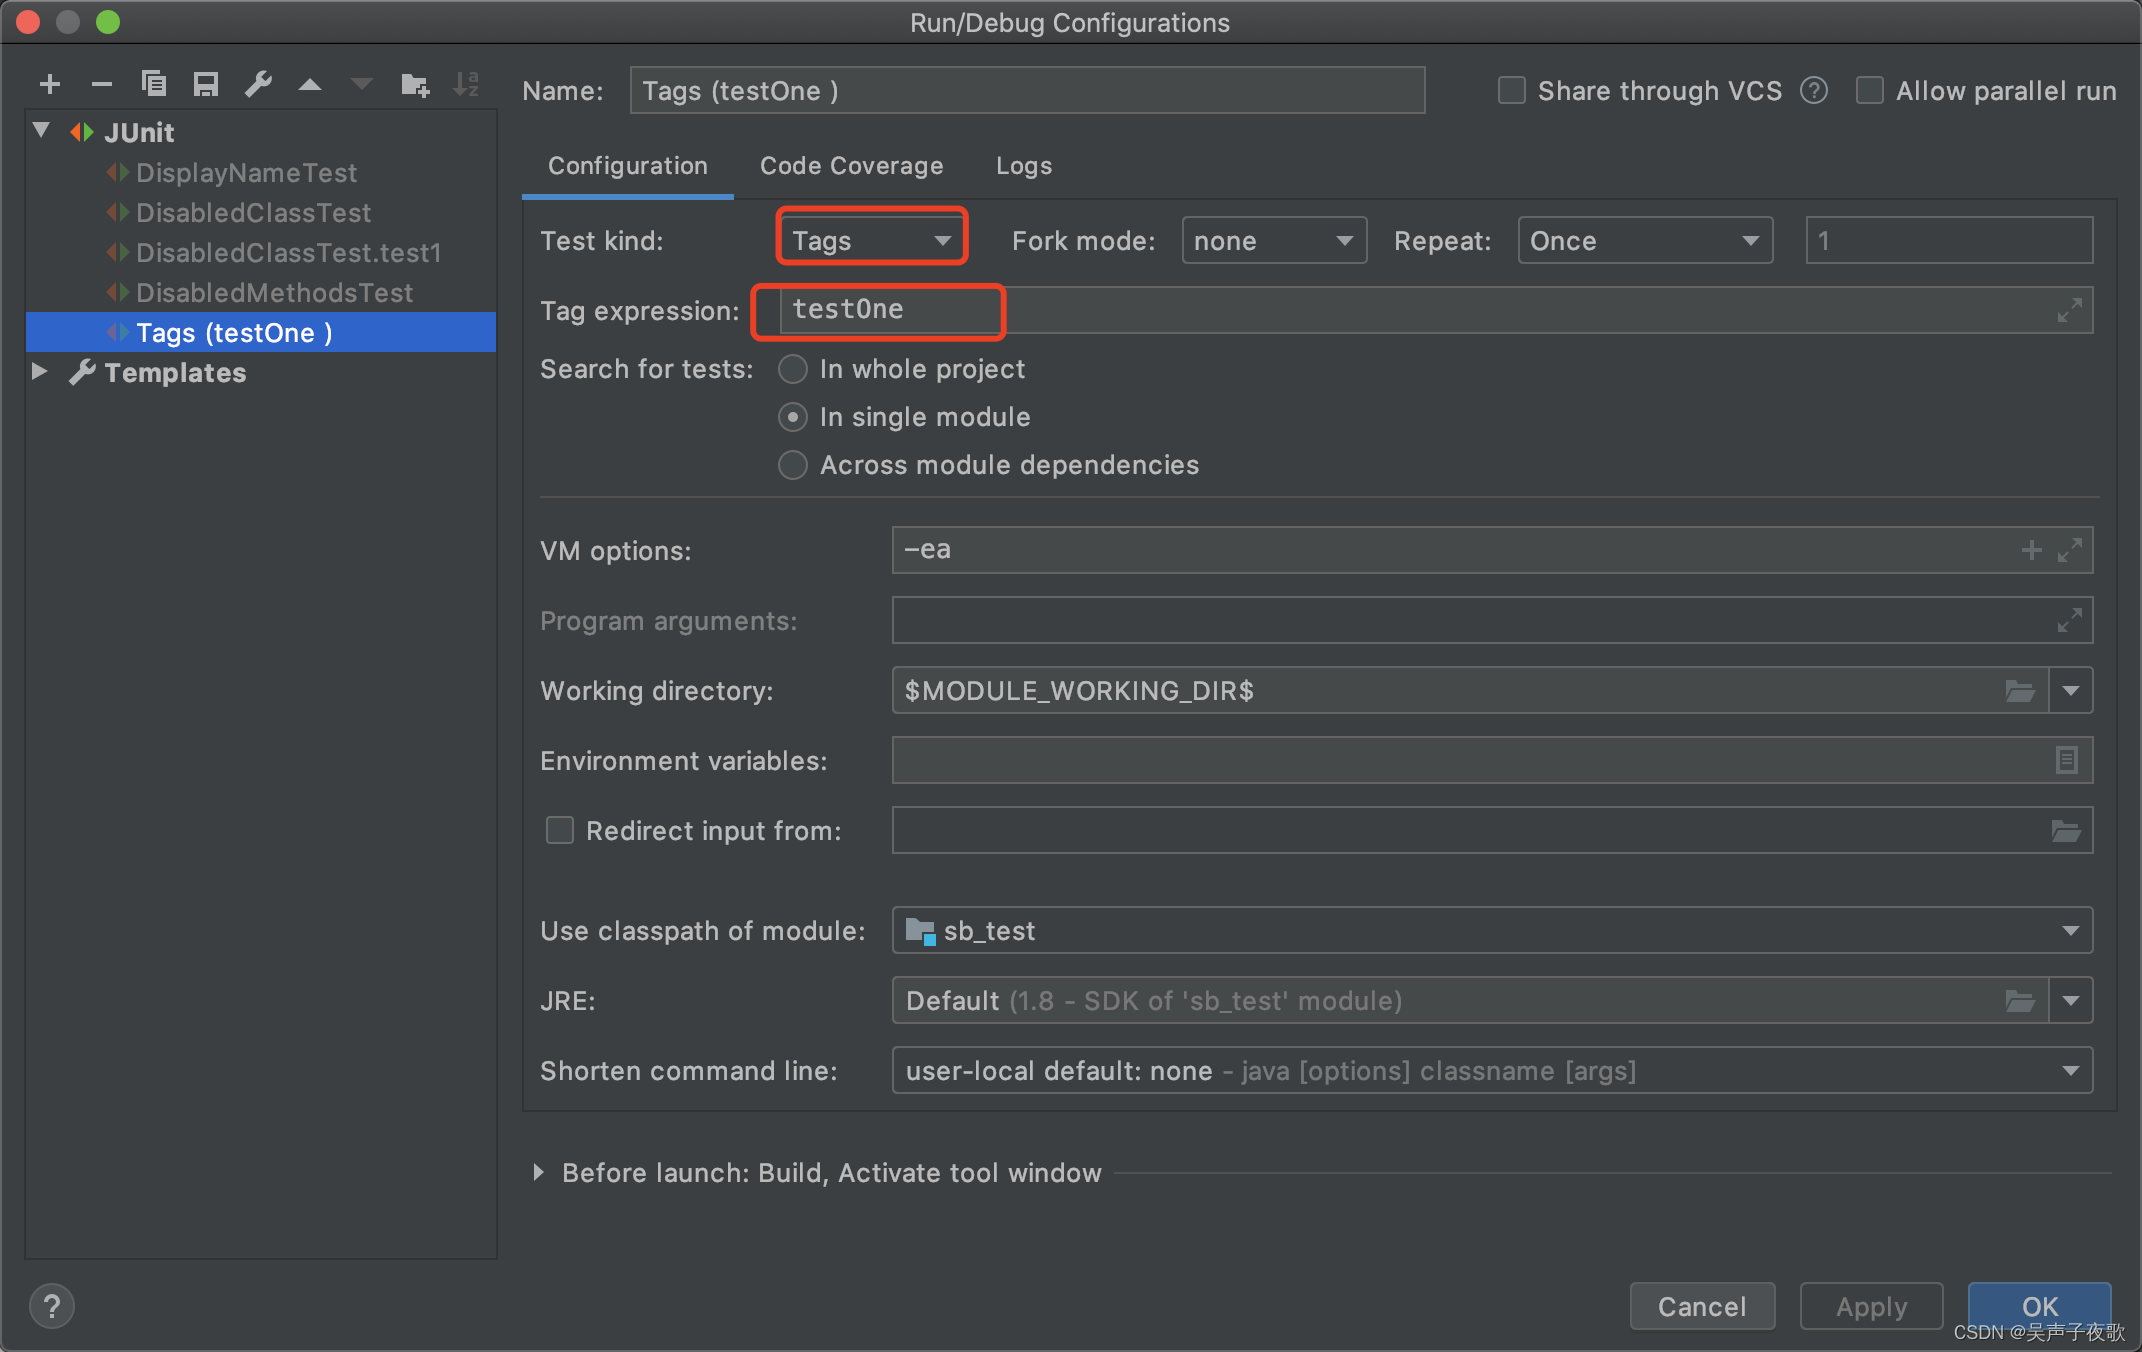
另一种方法是子IDEA中选择Run>Edit Configurations>Tags(JUnit5)作为测试类型,创建一个配置:
11、@RepeatedTest(重复测试)
JUnit5允许使用@RepeatedTest注解指定一个测试重复运行的次数,该注解需要指定重复的次数作为参数。当从一次测试运行到另一次测试时,测试条件可能改变,此特性将非常有用。例如,一些影响成功测试的数据可能在同一测试的两次运行之间发生改变,而对数据的意外修改将产生一个需要修复的错误。
可以用@RepeatedTest注解的name属性为每次重复测试配置自定义显示名称,该注解支持以下占位符:
{displayName}:待@Repeatedtest注解的方法的显示名称{currentRepetition}:当前重复次数{totalRepetitions}:总重复次数
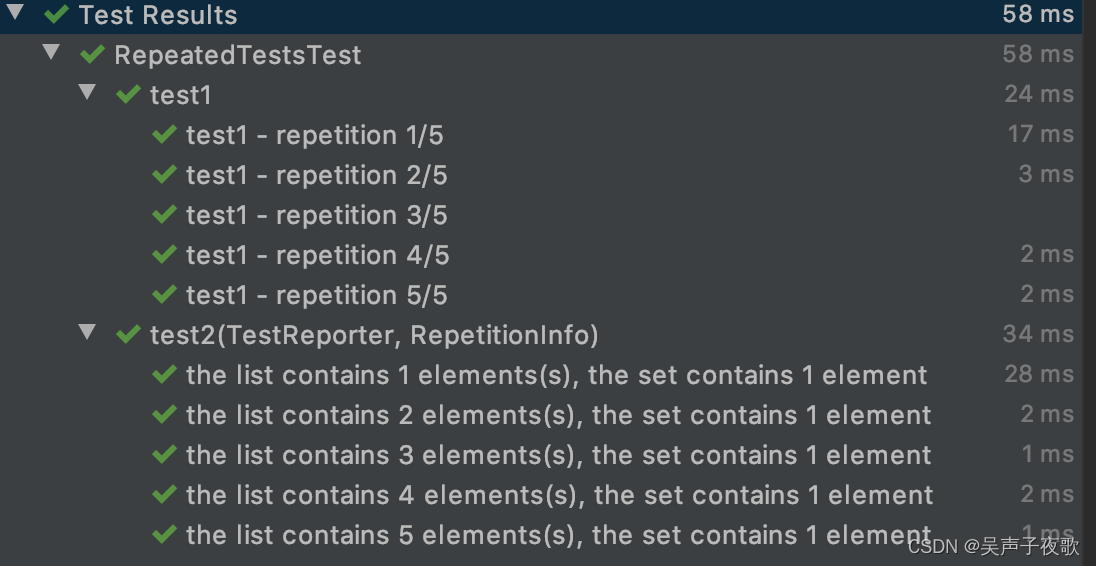
public class RepeatedTestsTest {

    private static Set<Integer> integerSet = new HashSet<>();
    private static List<Integer> integerList = new ArrayList<>();

    /**
     * 第一个测试重复5次,每次重复输出显示名称、当前重复次数和总重复次数
     */
    @RepeatedTest(value = 5, name = "{displayName} - repetition {currentRepetition}/{totalRepetitions}")
    @DisplayName("test1")
    public void test1() {
        System.out.println("test1");
    }

    /**
     * 第二个次数重复5次,每次重复都会显示列表中的元素数量(当前重复次数),并检查集合是否总是只有一个元素
     * 每次重复第二个测试时,重复次数都会显示出来,因为重复次数已经被注入RepetitionInfo参数中
     */
    @RepeatedTest(value = 5, name = "the list contains {currentRepetition} elements(s), the set contains 1 element")
    public void test2(TestReporter testReporter, RepetitionInfo repetitionInfo) {
        integerSet.add(1);
        integerList.add(repetitionInfo.getCurrentRepetition());

        testReporter.publishEntry("Repetition number", String.valueOf(repetitionInfo.getCurrentRepetition()));
        assertEquals(1, integerSet.size());
        assertEquals(repetitionInfo.getCurrentRepetition(), integerList.size());
    }
}
test1
test1
test1
test1
test1

timestamp = 2024-01-11T01:00:48.307, Repetition number = 1
timestamp = 2024-01-11T01:00:48.316, Repetition number = 2
timestamp = 2024-01-11T01:00:48.319, Repetition number = 3
timestamp = 2024-01-11T01:00:48.322, Repetition number = 4
timestamp = 2024-01-11T01:00:48.328, Repetition number = 5
12、参数化测试
参数化测试允许使用不同的参数多次运行一个测试。这样做的最大好处是,可以编写测试,然后使用参数来运行测试。这些参数用于检查各种输入数据。参数化测试方法使用@ParameterizedTest注解。必须至少声明一个为每次调用提供参数的源,然后将参数传递给测试方法。
@ParameterizedTest注解包含以下属性:
- name:(默认DEFAULT_DISPLAY_NAME)显示名称,包含如下占位符
{displayName}:@DisplayName注解指定的显示名称{index}:方法的当前调用次数(1开始){arguments}:方法的当前调用的完整逗号分隔参数列表{argumentsWithNames}:方法的当前调用的完整、comm-aseparated命名参数列表
- autoCloseArguments:(默认true)配置参数化测试的所有参数是否将在为当前参数化测试调用调用了AfterEach和AfterEachCallback扩展之后关闭。
12.1、@ValueSource(字面值数组)
@ValueSource注解需要指定一个字面值数组。在运行时,此数组为参数化测试的每次调用提供一个参数。支持 Java 的八大基本类型和字符串及Class,使用时赋值给注解上对应类型属性。
@ValueSource包含如下属性,用于指定各个类型的参数:
shortsbytesintslongsfloatsdoublescharsbooleansstringsclasses
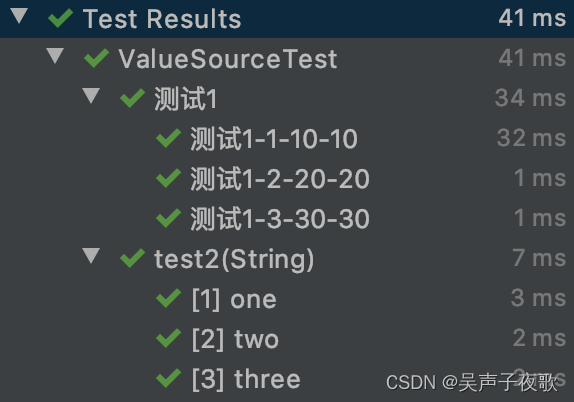
public class ValueSourceTest {

    @DisplayName("测试1")
    @ParameterizedTest(name = "{displayName}-{index}-{arguments}-{argumentsWithNames}")
    @ValueSource(ints = {10, 20, 30})
    public void test1(int num) {
        System.out.println(num);
    }

    @ParameterizedTest
    @ValueSource(strings = {"one", "two", "three"})
    public void test2(String name) {
        System.out.println(name);
    }
}
10
20
30
one
two
three
12.2、@EnumSource(枚举参数)
@EnumSource注解让我们能够使用enum实例,并提供了一个可选的names参数,以指定必须使用或排除哪些实例。默认情况下,使用所有的enum实例。
@EnumSource包含如下属性:
- value:(默认NullEnum.class)用作枚举常量源的枚举类型
- names:要提供的枚举常量的名称,或要选择的正则表达式。如果未指定名称或正则表达式,则将提供在指定的中声明的所有枚举常量。mode属性决定了如何解释这些名称
- mode:(默认Mode.INCLUDE)匹配模式
INCLUDE:仅选择那些通过提供名称的枚举常量EXCLUDE:排除那些通过提供名称的枚举常量MATCH_ALL:仅选择那些名称与通过属性提供的所有模式匹配的枚举常量。MATCH_ANY:仅选择那些名称与通过属性提供的任何模式匹配的枚举常量。
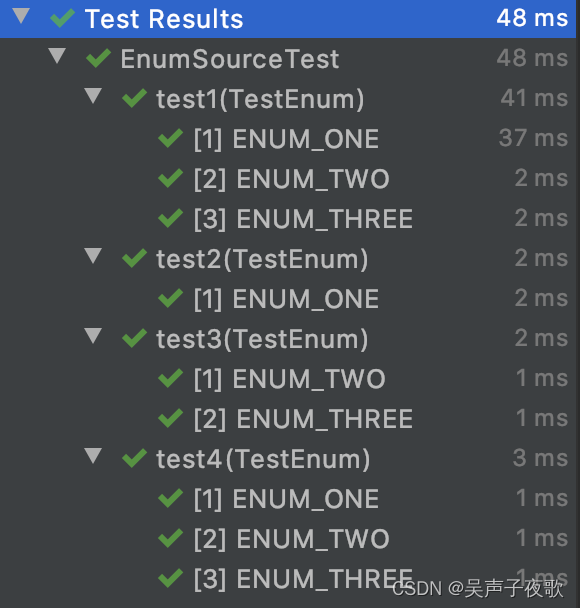
public class EnumSourceTest {

    @ParameterizedTest
    @EnumSource(value = TestEnum.class)
    public void test1(TestEnum testEnum) {
        System.out.println(testEnum.value());
    }

    @ParameterizedTest
    @EnumSource(value = TestEnum.class, mode = EnumSource.Mode.INCLUDE, names = {"ENUM_ONE"})
    public void test2(TestEnum testEnum) {
        System.out.println(testEnum.value());
    }

    @ParameterizedTest
    @EnumSource(value = TestEnum.class, mode = EnumSource.Mode.EXCLUDE, names = {"ENUM_ONE"})
    public void test3(TestEnum testEnum) {
        System.out.println(testEnum.value());
    }

    @ParameterizedTest
    @EnumSource(value = TestEnum.class, mode = EnumSource.Mode.MATCH_ALL, names = {"ENUM.*"})
    public void test4(TestEnum testEnum) {
        System.out.println(testEnum.value());
    }

    enum TestEnum {
        ENUM_ONE("one"),
        ENUM_TWO("tow"),
        ENUM_THREE("three");

        private final String word;

        TestEnum(String word) {
            this.word = word;
        }

        public String value() {
            return word;
        }
    }
}
one
tow
three

one

tow
three

one
tow
three
12.3、@CsvFileSource(CSV文件参数)
@CsvFileSource允许从类路径中使用CSV文件。参数化测试对CSV文件的每一行运行一次。
@CsvFileSource包含一下属性:
- resources:要用作参数源的CSV类路径资源
- files:要用作参数来源的CSV文件
- encoding:(默认UTF-8)读取CSV文件时要使用的编码;必须是有效的字符集
- lineSeparator:(默认\n)读取CSV文件时使用的行分隔符;必须由1或2个字符组成
- useHeadersInDisplayName:(默认false)配置是否应将第一条CSV记录视为列的标题名称
- quoteCharacter:(默认
\')用于带引号的字符串的引用的字符 - delimiter:(默认\0)读取CSV文件时要使用的列分隔符
- delimiterString:读取CSV文件时要使用的列分隔符字符串
- numLinesToSkip:读取CSV文件时要跳过的行数
- emptyValue:(默认"")读取CSV文件时要使用的空值。此值将替换从输入中读取的带引号的空字符串
- nullValues:应解释为null引用的字符串列表
- maxCharsPerColumn:(默认4096)每个CSV列允许的最大字符数
- ignoreLeadingAndTrailingWhitespace:(默认true)控制是否应忽略无引号CSV列的前导和尾部空白字符
public class CsvFileSourceTest {

    @ParameterizedTest
    @CsvFileSource(files = "param.csv")
    public void test1(int num, String name) {
        System.out.println(num + ":" + name);
    }

    @ParameterizedTest
    @CsvFileSource(files = "resource.cvs", delimiterString = "*")
    public void test2(String name, int age, double height) {
        System.out.println(name + ":" + age + ":" + height);
    }
}
param.cvs
10,tom
20,jerry
30,mike
resource.cvs
tom*18*1.82
jerry*22*1.77
mike*25*1.88
10:tom
20:jerry
30:mike

tom:18:1.82
jerry:22:1.77
mike:25:1.88
12.4、@CsvSource(csv文本格式参数)
@CsvSource提供csv格式的多参数源,@CsvSource属性如下:
- value:要用作参数源的CSV记录;不得为空
- textBlock:要用作参数源的CSV记录,作为单个文本块提供;不得为空。
- useHeadersInDisplayName:(默认false)配置是否应将第一条CSV记录视为列的标题名称
- quoteCharacter:用于带引号的字符串的引号字符
- delimiter:(默认\0)读取值记录时要使用的列分隔符
- delimiterString:读取值记录时要使用的列分隔符字符串
- emptyValue:(默认"")读取CSV文件时要使用的空值。此值将替换从输入中读取的带引号的空字符串
- nullValues:应解释为null引用的字符串列表
- maxCharsPerColumn:(默认4096)每个CSV列允许的最大字符数
- ignoreLeadingAndTrailingWhitespace:(默认true)控制是否应忽略无引号CSV列的前导和尾部空白字符
public class CvsSourceTest {


    @ParameterizedTest
    @CsvSource(value = {
            "tom,18,1.82",
            "jerry,22,1.77",
            "mike,33,1.69"
    })
    public void test1(String name, int age, double height) {
        System.out.println(name + ":" + age + ":" + height);
    }


    @ParameterizedTest
    @CsvSource(delimiterString = "*", useHeadersInDisplayName = true, quoteCharacter = '"', textBlock = """
            name*      age*    height
            tom*       18*     1.82
            jerry*     22*     1.77
            mike*      33*     1.69
            """)
    public void test2(String name, int age, double height) {
        System.out.println(name + ":" + age + ":" + height);
    }
}
12.5、@MethodSource(方法提供参数)
- 通过@MethodSource注解引用方法作为参数化的数据源信息
- 在 @MethodSource 注解的参数必须是静态的工厂方法,除非测试类被注释为
@TestInstance(Lifecycle.PER_CLASS) - 静态工厂方法的返回值需要和测试方法的参数对应
- 如果在 @MethodSource 注解中未指明方法名,会自动调用与测试方法同名的静态方法
测试方法参数对应的工厂方法返回值:
| @ParameterizedTest 方法 | 工厂方法 |
|---|---|
| void test(int) | static int[] factory() |
| void test(int) | static IntStream factory() |
| void test(String) | static String[] factory() |
| void test(String) | static List<String> factory() |
| void test(String) | static Stream<String> factory() |
| void test(String, String) | static String[][] factory() |
| void test(String, int) | static Object[][] factory() |
| void test(String, int) | static Stream<Object[]> factory() |
| void test(String, int) | static Stream<Arguments> factory() |
| void test(int[]) | static int[][] factory() |
| void test(int[]) | static Stream<int[]> factory() |
| void test(int[][]) | static Stream<int[][]> factory() |
| void test(Object[][]) | static Stream<Object[][]> factory() |
public class MethodSourceTest {


    /**
     * 指定参数方法名
     */
    @MethodSource("method1")
    @ParameterizedTest
    public void test1(String name, int age, double height) {
        System.out.println(name + ":" + age + ":" + height);
    }

    static Stream<Object[]> method1() {
        return Stream.of(
                new Object[]{"tom", 18, 1.88},
                new Object[]{"jerry", 20, 1.77},
                new Object[]{"mike", 22, 1.65}
        );
    }

    /**
     * 不指定参数方法名,默认查找同名方法
     */
    @MethodSource
    @ParameterizedTest
    public void test2(String name, String city) {
        System.out.println(name + ":" + city);
    }

    static String[][] test2() {
        return new String[][] {
                {"tom", "beijing"},
                {"jerry", "shanghai"},
                {"mike", "chengdu"}
        };
    }

	/**
     * 多个参数也可以返回Arguments实例的集合
     */
    @MethodSource("method3")
    @ParameterizedTest
    public void test3(String name, int age, double height) {
        System.out.println(name + ":" + age + ":" + height);
    }

    static Stream<Arguments> method3() {
        return Stream.of(
                Arguments.of("tom", 18, 1.88),
                Arguments.of("jerry", 20, 1.77),
                Arguments.of("mike", 22, 1.65)
        );
    }
}
tom:18:1.88
jerry:20:1.77
mike:22:1.65

tom:beijing
jerry:shanghai
mike:chengdu

tom:18:1.88
jerry:20:1.77
mike:22:1.65
12.6、@ArgumentSource(自定义参数提供者)
@ArgumentsSource 可以用来指定一个自定义且能够复用的ArgumentsProvider。
public class ArgumentsSourceTest {


    @ParameterizedTest
    @ArgumentsSource(MyArgumentsProvider.class)
    public void test(String a, String b, int c) {
        System.out.println(a + ":" + b + ":" + c);
    }

    static class MyArgumentsProvider implements ArgumentsProvider {

        @Override
        public Stream<? extends Arguments> provideArguments(ExtensionContext context) throws Exception {
            return Stream.of(
                Arguments.of("a", "b", 1),
                Arguments.of("c", "d", 2)
            );
        }
    }
}
a:b:1
c:d:2
12.7、@NullSource/@EmptySource(空参)
为了检查极端情况并验证我们的软件在提供错误输入null时的正确行为,向我们的参数化测试提供空值可能会很有用。以下注释用作null接受单个参数的参数化测试的源和空值。
- @NullSource:提供单个Null参数,不能用于基本类型的参数
- @EmptySource:为String、Colection、List、Set、Map和数组等提供单个空参数(容量为0)
- @NullAndEmptySource:组合和上述两个注解的功能
public class NullTest {

    @ParameterizedTest
    @NullSource
    public void test1(String str) {
        Assertions.assertNull(str);
    }

    @ParameterizedTest
    @EmptySource
    public void test2(int[] arr) {
        Assertions.assertEquals(0, arr.length);
    }

    @ParameterizedTest
    @NullAndEmptySource
    @ValueSource(strings = { " ", "   ", "\t", "\n" })
    public void test3(String text) {
        Assertions.assertTrue(text == null || text.trim().isEmpty());
    }
}
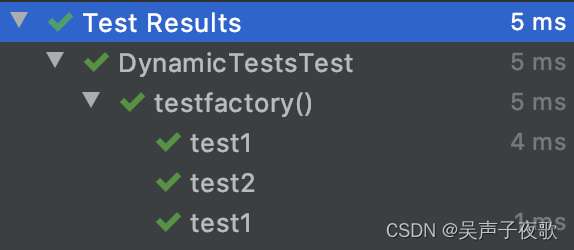
13、@TestFactory(动态测试)
JUnit5中引入了一种新的动态编程模型,可以在运行时生成测试。编写一个工厂方法,在运行时该方法会创建一系列要运行的测试。这样的工厂方法必须使用@TestFactory注解。使用@TestFactory注解的方法不是常规测试,而是一个生成测试的工厂。
使用@TestFactory标注的方法必须返回以下内容之一:
- DynamicNode(一个抽象类,DynamicContainer和DynamicTest是可实例化的具体类)
- DynamicNode对象数组
- DynamicNode对象流
- DynamicNode对象的集合
- DynamicNode对象的Iterable
- DynamicNode对象的Iterator
与用@Test标注方法的要求一样,作为可见性的最低要求,@TestFactory标注的方法允许是包私有的,但不能是私有的或静态的,还可以声明由一个ParameterResolver}解析的参数。
DynamicTest是在运行时生成的测试用例,由一个显示名称和一个Executable组成。Executable是Java8的一个函数式接口。动态测试的实现可以作为Lambda表达式或方法引用来提供。
动态测试与用@Test标注的标准测试有不同的生命周期。标注了@BeforeEach和@AfterEach的方法是针对@TestFactory标注的方法来运行的,而不是针对每个动态测试。除了这些方法,没有针对单个动态测试的生命
周期回调。@BeforeA和@AfterAll的行为保持不变,即在所有测试运行之前和所有测试运行之后运行。
public class DynamicTestsTest {

    //所有测试开始前运行一次
    @BeforeAll
    static void beforeAll() {
        System.out.println("beforeAll");
    }

    //所有测试结束后运行一次
    @AfterAll
    static void afterAll() {
        System.out.println("afterAll");
    }

    //在@TestFactory方法之前运行一次
    @BeforeEach
    public void beforeEach() {
        System.out.println("beforeEach");
    }

    //在@TestFactory方法之后运行一次
    @AfterEach
    public void afterEach() {
        System.out.println("afterEach");
    }

    @TestFactory
    Iterator<DynamicTest> testfactory() {
        return Arrays.asList(
                DynamicTest.dynamicTest("test1", () -> {
                    System.out.println("test1");
                }),
                DynamicTest.dynamicTest("test2", () -> {
                    System.out.println("test2");
                }),
                DynamicTest.dynamicTest("test3", () -> {
                    System.out.println("test3");
                })
        ).iterator();
    }
}
beforeAll
beforeEach
afterEach
test1
test2
test3
afterAll
14、套件测试
通过selectXXX来创建套件,通过包、类、和方法三个维度来选择需要执行的测试用例。所有条件是且的关系,求的是交集。
- @RunWith(JUnitPlatform.class):执行套件
- @SelectPackage({“com.packageA”,“com.packageB”}):根据包创建套件
- @IncludePackage(“包名”):在套件中,过滤需要执行的测试包
- @ExcludePackages(“包名”):在套件中,过滤剔除不需要执行的测试包
- @SelectClasses( {a.class,b.class,c.class} ):根据类创建套件
- @IncludeClassNamePatterns(“类名”):在套件中,过滤需要执行的测试类
- @ExcludeClassNamePatterns(“类名”):在套件中,过滤剔除不需要执行的测试类
- @IncludeTags(“tag”):在套件中,过滤需要执行的测试方法
- @ExcludeTags(“tag”):在套件中,过滤剔除不需要执行的测试方法
package pers.zhang.suite;

import org.junit.jupiter.api.Tag;
import org.junit.jupiter.api.Test;

public class TestA {

    @Test
    @Tag("A1")
    public void test1() {
        System.out.println("TestA.test1");
    }

    @Test
    public void test2() {
        System.out.println("TestA.test2");
    }
}
package pers.zhang.suite;

import org.junit.jupiter.api.Tag;
import org.junit.jupiter.api.Test;

public class TestB {

    @Test
    public void test1() {
        System.out.println("TestB.test1");
    }

    @Test
    @Tag("B2")
    public void test2() {
        System.out.println("TestB.test2");
    }
}
// 1 @RunWith+@SelectPackages+@IncludePackages+@ExcludePackages
// @SelectPackages 选择需要执行的测试包
// @IncludePackages 只执行选中的测试包  需要与@SelectPackages配合使用
// @ExcludePackages过滤掉所选择的测试包
@RunWith(JUnitPlatform.class)
@SelectPackages({"pers.zhang"})
@IncludePackages({"pers.zhang.suite"})
@ExcludePackages({"pers.zhang.junit5"})
public class Suite1 {

}
TestB.test1
TestB.test2
TestA.test1
TestA.test2
// 2 @RunWith+@SelectClasses
// @SelectClasses选中需要执行的测试类
@RunWith(JUnitPlatform.class)
@SelectClasses({pers.zhang.suite.TestA.class})
public class Suite2 {
}
TestA.test1
TestA.test2
// 3  @RunWith+@SelectPackages+@IncludeClassNamePatterns+@ExcludeClassNamePatterns
// @SelectPackages 选中需要执行的测试包
// @IncludeClassNamePatterns 只执行测试包中对应的测试类 与@SelectPackages配合使用
// @ExcludeClassNamePatterns 过滤掉测试包中的测试类
@RunWith(JUnitPlatform.class)
@SelectPackages({"pers.zhang.suite"})
@IncludeClassNamePatterns("pers.zhang.suite.TestB")
@ExcludeClassNamePatterns("pers.zhang.suite.TestA")
public class Suite3 {
}
TestB.test1
TestB.test2
// 4 @RunWith+@SelectPackages+@IncludeTags+@ExcludeTags
// @SelectPackages选中需要执行的测试包
// @IncludeTags 执行包含标签的用例 ,标签打在测试用例前
// @ExcludeTags 过滤掉包含标签的用例
@RunWith(JUnitPlatform.class)
@SelectPackages({ "pers.zhang.suite"})
@IncludeTags({ "A1"})
@ExcludeTags({ "B2"})
public class Suite4 {
}
TestA.test1
15、@Timeout(超时测试)
@Timeout注释允许声明如果测试、测试工厂、测试模板或生命周期方法的执行时间超过给定的持续时间,则该测试、测试工厂、测试模板或生命周期方法应该失败。持续时间的时间单位默认为秒,但可以配置。
@Timeout注解包含两个属性:
- value:时间值
- unit:时间单位(默认秒)
public class TimeoutTest {

    @Test
    @Timeout(5)
    public void test1() {
        try {
            Thread.sleep(4000);
        } catch (InterruptedException e) {
            e.printStackTrace();
        }
    }

    @Test
    @Timeout(value = 10, unit = TimeUnit.MILLISECONDS)
    public void test2() {
        try {
            Thread.sleep(8);
        } catch (InterruptedException e) {
            e.printStackTrace();
        }
    }
}
要将相同的超时应用于测试类及其所有@Nested 类中的所有测试方法,您可以@Timeout在类级别声明注释。然后,它将应用于该类及其类中的所有测试、测试工厂和测试模板方法 ,除非被特定方法或类上的注释 @Nested覆盖。请注意,在类级别声明的注释不适用于生命周期方法。
@Timeout在方法上声明@TestFactory会检查工厂方法是否在指定的持续时间内返回,但不会验证 DynamicTest工厂生成的每个单独的执行时间。
16、@Execution(并发测试)
junit5 从5.3开始支持多线程并发测试,需要在配置文件junit-platform.properties配置相关信息,配合@RepeatedTest注解使用。
@Execution只有一个属性,取值为ExecutionMode枚举类:
- SAME_THREAD:强制在与父节点相同的线程中执行
- CONCURRENT:允许与任何其他节点并行执行
test/resources 目录下,增加 junit-platform.properties 文件,内容如下:
# 是否允许并行执行true/false
junit.jupiter.execution.parallel.enabled=true
#是否支持方法级别多线程same_thread/concurrent
junit.jupiter.execution.parallel.mode.default=concurrent
#是否支持类级别多线程same_thread/concurrent
junit.jupiter.execution.parallel.mode.classes.default=concurrent
#线程池策略
junit.jupiter.execution.parallel.config.strategy=fixed
junit.jupiter.execution.parallel.config.fixed.parallelism=5
public class ConcurrentTest {

    @RepeatedTest(10)
    @Execution(ExecutionMode.CONCURRENT)
    public void test() {
        System.out.println(Thread.currentThread().getName());
    }
}
ForkJoinPool-1-worker-5
ForkJoinPool-1-worker-2
ForkJoinPool-1-worker-1
ForkJoinPool-1-worker-3
ForkJoinPool-1-worker-4
ForkJoinPool-1-worker-2
ForkJoinPool-1-worker-4
ForkJoinPool-1-worker-3
ForkJoinPool-1-worker-5
ForkJoinPool-1-worker-1
17、@ResourceLock(并发中的同步)
除了使用@Execution注解来控制执行模式之外,JUnit Jupiter 还提供了另一种基于注解的声明式同步机制。该 @ResourceLock注释允许您声明测试类或方法使用需要同步访问的特定共享资源以确保可靠的测试执行。
共享资源由唯一的名称标识,该名称是String. 该名称可以是用户定义的或org.junit.jupiter.api.parallel.Resources中的预定义常量之一:
- SYSTEM_PROPERTIES:表示Java的系统属性
- SYSTEM_OUT:表示当前进程的标准输出流
- SYSTEM_ERR:表示当前进程的标准错误流
- LOCALE:表示JVM当前实例的默认区域设置
- TIME_ZONE:表示JVM当前实例的默认时区
除了String唯一标识共享资源之外,还可以指定访问模式:
- READ:访问共享资源的两个测试可以彼此并行运行
- READ_WRITE:访问同一共享资源的任何其他测试正在运行时则不能并行运行
@Execution(ExecutionMode.CONCURRENT)
public class ResourceLockTest {

    private static int num = 20;

    @ResourceLock(value = Resources.SYSTEM_PROPERTIES, mode = ResourceAccessMode.READ_WRITE)
    @RepeatedTest(10)
    public void test1() {
        num--;
        System.out.println("test1->" + Thread.currentThread().getName() + " num=" + num);
    }

    @ResourceLock(value = Resources.SYSTEM_PROPERTIES, mode = ResourceAccessMode.READ_WRITE)
    @RepeatedTest(10)
    public void test2() {
        num--;
        System.out.println("test2->" + Thread.currentThread().getName() + " num=" + num);
    }
}
test1->ForkJoinPool-1-worker-2 num=19
test1->ForkJoinPool-1-worker-2 num=18
test1->ForkJoinPool-1-worker-2 num=17
test1->ForkJoinPool-1-worker-2 num=16
test1->ForkJoinPool-1-worker-2 num=15
test1->ForkJoinPool-1-worker-2 num=14
test1->ForkJoinPool-1-worker-2 num=13
test1->ForkJoinPool-1-worker-2 num=12
test1->ForkJoinPool-1-worker-2 num=11
test1->ForkJoinPool-1-worker-2 num=10
test2->ForkJoinPool-1-worker-3 num=9
test2->ForkJoinPool-1-worker-3 num=8
test2->ForkJoinPool-1-worker-3 num=7
test2->ForkJoinPool-1-worker-3 num=6
test2->ForkJoinPool-1-worker-3 num=5
test2->ForkJoinPool-1-worker-3 num=4
test2->ForkJoinPool-1-worker-3 num=3
test2->ForkJoinPool-1-worker-3 num=2
test2->ForkJoinPool-1-worker-3 num=1
test2->ForkJoinPool-1-worker-3 num=0
如果您的大多数测试类可以并行运行而无需任何同步,但您有一些测试类需要隔离运行,则可以使用注释标记后者 @Isolated。此类中的测试按顺序执行,不会同时运行任何其他测试。
18、Assertions断言
org.junit.jupiter.api.Assertions是JUnit5自带的断言,该类提供了许多重载的断言方法,以及很多从JUnit4中获得的断言,还添加了一些可以使用Java8 Lambda表达式的断言方法。
- fail:测试快速失败
- assertTrue:断言条件为真
- assertFalse:断言条件为假
- assertNull:断言为null
- assertNotNull:断言非null
- assertEquals:断言相等
- assertArrayEquals:断言数组相等
- assertIterableEquals:断言可迭代对象相等
- assertLinesMatch:断言行匹配
- assertNotEquals:断言不相等
- assertSame:断言相同引用
- assertNotSame:断言不是相同引用
- assertAll:断言组
- assertThrowsExactly:断言抛出异常,必须完全一致
- assertThrows:断言抛出异常,可以是子类异常
- assertDoesNotThrow:断言不抛出异常
- assertTimeout:断言所提供的执行在超过给定之前完成
- assertInstanceOf:断言提供的actualValue是expectedType的实例
import org.junit.jupiter.api.Test;

import java.time.Duration;
import java.time.temporal.ChronoUnit;
import java.util.Arrays;

import static org.junit.jupiter.api.Assertions.*;

public class AssertionsTest {

    @Test
    public void test() {
        //断言为真
        assertTrue(true);
        assertTrue(() -> {return true;},"lambda");

        //断言为假
        assertFalse(false);
        assertFalse(() -> {return false;});

        //断言为null
        assertNull(null);

        //断言非null
        assertNotNull(new Object());

        //断言相等
        assertEquals(1, 1);
        assertEquals("a", "a");

        //断言数组相等
        assertArrayEquals(new int[]{1, 2, 3}, new int[]{1, 2, 3});
        assertArrayEquals(new String[]{"a", "b", "c"}, new String[]{"a", "b", "c"});

        //断言可迭代对象相等
        assertIterableEquals(Arrays.asList(1, 2, 3), Arrays.asList(1, 2, 3));

        //断言行匹配
        assertLinesMatch(Arrays.asList("hello", "world"), Arrays.asList("hello", "world"));

        //断言不相等
        assertNotEquals(1, 2);
        assertNotEquals("a", "b");

        //断言相同引用
        assertSame("hello", "hello");
        assertSame(Integer.valueOf(1), Integer.valueOf(1));

        //断言不是相同引用
        assertNotSame(new Object(), new Object());
        assertNotSame(Integer.valueOf(128), Integer.valueOf(128));

        //断言组
        assertAll(() -> {
            assertTrue(true);
            assertFalse(false);
        });

        //断言抛出异常,必须完全一致(不可以是子类)
        assertThrowsExactly(NullPointerException.class, () -> {
           throw new NullPointerException();
        });

        //断言抛出异常,可以是子类
        assertThrows(Exception.class, () -> {
           throw new NullPointerException();
        });

        //断言不抛出异常
        assertDoesNotThrow(() -> {

        });

        //断言超时
        assertTimeout(Duration.of(10, ChronoUnit.SECONDS), () -> {
                Thread.sleep(9000);
        });

        //断言类型
        assertInstanceOf(Number.class, 1);
    }
}
19、Hamcrest匹配器
JUnit4自带了Hamcrest匹配器,可以使用org.junit.Assert类的assertThat方法。但是,JUnit5中移除了Hamcrest库的依赖,Assertions类也没有提供assertThat方法,所以需要先引入Hamcrest库的依赖。
<dependency>
    <groupId>org.hamcrest</groupId>
    <artifactId>hamcrest-library</artifactId>
    <version>2.1</version>
    <scope>test</scope>
</dependency>
如果要使用Hamcrest库,就必须使用org.hamcrest.MatcherAssert类的assertThat方法,重载的方法带有2个或3个参数:
- 断言失败时显示的错误消息(可选)
- 实际值或对象
- 预期值的Matcher对象
要创建Matcher对象,需要使用org.hamcrest.Matchers类提供的静态工厂方法:
- 一般匹配:
anything:绝对匹配。若要使asserti语句更具可读性,此方法非常有用nullValue,notNullValue:测试空值或非空值closeTo、greaterThan、greaterThanOrEqualTo、lessThan、lessThanOrEqualTo:测试给定的数字是否接近、大于、大于或等于、小于、小于或等于给定的值equalTo、equalToObject:相等匹配,其中equalToObject不要求两个对象类型相同notANumber:当检查的Double不是数字时进行匹配comparesEqualTo:通过Compare比较是否相等
- 数组匹配:
array:用于匹配元素由指定匹配器满足的数组。仅当指定的匹配器的数量等于所检查数组的长度并且每个匹配器[i]都由数组[i]满足时,才匹配hasItemInArray:当检查的数组至少包含一个由指定的匹配的项时,该匹配器就会匹配arrayContaining:当检查数组中的每个项都满足指定匹配器中的对应匹配器时,该匹配器就会匹配arrayContainingInAnyOrder:为数组创建一个与顺序无关的匹配器,当检查的数组中的每个项都满足指定匹配器中任意位置的一个匹配器时,该匹配器就会匹配arrayWithSize:当数组的长度满足指定的匹配器时进行匹配emptyArray:空数组
- 逻辑匹配:
anyOf:测试是否与任一包含的匹配器相匹配(相当于引‖运算符)both:当两个指定的匹配器都与检查的对象匹配时进行匹配allOf:测试是否与所有包含的匹配器相匹配(相当于&运算符)either:当指定的匹配器中的任何一个与检查对象匹配时进行匹配not:与包含的匹配器的含义相反(如Java中的!运算符)
- 对象相关匹配:
hasProperty:测试JavaBeans是否具有某个属性(实际匹配getter方法)hasToString:匹配toString方法返回的内容typeCompatibleWith:该匹配器在指定的baseType是可从检查的类赋值时匹配samePropertyValuesAs:当被检查对象的所有JavaBean属性的值等于指定bean的相应值时进行匹配。如果任何属性被标记为已忽略,那么它们将从预期的和实际的bean中删除hasXPath:Node的xpath匹配
- 集合相关匹配:
hasEntry、hasKey、hasValue:测试给定映射是否具有给定条目、键或值hasltem、hasltems:测试给定集合中是否存在一个或多个项everyItem:每一项都匹配aMapWithSize:当size方法返回满足指定匹配器的值时,该匹配器匹配anEmptyMap:空maphasSize:该匹配器在size方法返回满足指定匹配器的值时匹配empty、emptyCollectionOf、emptyIterable:空集合contains:为Iterable创建一个匹配器,当对检查的Iterable进行一次遍历时,该匹配器将生成一系列项,每个项在逻辑上等于指定项中的对应项。对于正匹配,检查的可迭代项的长度必须与指定项的数量相同containsInAnyOrder:为Iterable创建一个顺序不可知的匹配器,当一次遍历所检查的Iterable产生一系列项时,该匹配器匹配,每个项在指定的匹配器中的任何位置都满足一个匹配器。对于正匹配,检查的可迭代项的长度必须与指定匹配符的数量相同containsInRelativeOrder:为Iterable创建一个匹配器,当对检查的Iterable进行一次遍历时,该匹配器将生成一系列项,这些项在逻辑上与指定项中的对应项相等,且具有相同的相对顺序iterableWithSize:匹配指定iterable容量in:包含oneOf:当检查的对象等于指定的元素之一时进行匹配
- 类型相关匹配:
any:当检查对象是指定类型的实例时进行匹配instanceOf:当检查对象是指定类型的实例时进行匹配samelnstance:测试对象是否是同一实例theInstance:该匹配器仅在检查对象与指定目标对象是同一实例时匹配
- 字符串匹配:
equalTolgnoringCase:测试给定字符串是否等于另一个字符串,忽略大小写equalToIgnoringWhiteSpace:测试给定字符串是否等于另一个字符串,忽略空白containsString、endsWith、startsWith:测试给定字符串是否包含特定字符串、以特定字符串开始或结束matchesRegex:使用正则表达式验证字符串emptyOrNullString:匹配null或空串emptyString:匹配空串blankOrNullString:匹配null或者包含零个或多个空白字符而不包含其他字符的串blankString:匹配字符串包含零个或多个空白字符而没有其他字符的串matchesPattern:正则匹配stringContainsInOrder:按顺序匹配子串hasLength:匹配指定长度的字符串
- 其它匹配:
is:仅用于提高语句的可读性isA:instanceOf(SomeClass.class)的语法糖describedAs:包装现有的匹配器,用指定的描述覆盖其描述
public class Book {

    String name;
    Double price;

    public Book() {
    }

    public Book(String name, Double price) {
        this.name = name;
        this.price = price;
    }

    public String getName() {
        return name;
    }

    public void setName(String name) {
        this.name = name;
    }

    public Double getPrice() {
        return price;
    }

    public void setPrice(Double price) {
        this.price = price;
    }

    @Override
    public String toString() {
        return name + ":" + price;
    }
}
import org.junit.jupiter.api.Test;

import java.io.Serializable;
import java.util.ArrayList;
import java.util.HashMap;
import java.util.HashSet;
import java.util.regex.Pattern;

import static org.hamcrest.Matchers.*;
import static org.hamcrest.MatcherAssert.assertThat;


public class HamcrestMatcherAssertTest {

    //一般匹配
    @Test
    public void test1() {
        //绝对匹配
        assertThat(1, anything());

        //空值、非空
        assertThat(null, nullValue());
        assertThat(new Object(), notNullValue());

        //数值比较
        assertThat(1.03, is(closeTo(1.0, 0.5)));
        assertThat(5, greaterThan(1));
        assertThat(5, lessThan(9));
        assertThat(5, greaterThanOrEqualTo(5));
        assertThat(5, lessThanOrEqualTo(5));

        //相等
        assertThat(1, equalTo(1));
        assertThat(new String[] {"foo", "bar"}, equalTo(new String[] {"foo", "bar"}));
        assertThat(1, comparesEqualTo(1));

        //不是一个数字
        assertThat(Double.NaN, notANumber());
    }

    //数组
    @Test
    public void test2() {
        //完全匹配
        assertThat(new Integer[]{1,2,3}, array(equalTo(1), equalTo(2), equalTo(3)));

        //至少包含一个
        assertThat(new Integer[]{1,2,3}, hasItemInArray(1));

        //每个项都匹配
        assertThat(new Integer[]{1,2,3}, arrayContaining(1, 2, 3));

        //无需的且每个项都匹配
        assertThat(new Integer[]{1,2,3}, arrayContainingInAnyOrder(3, 2, 1));

        //数组长度匹配
        assertThat(new Integer[]{1,2,3}, arrayWithSize(3));

        //空数组
        assertThat(new Integer[]{}, emptyArray());
    }

    //逻辑组合
    @Test
    public void test3() {
        //逻辑或
        assertThat(1, anyOf(
                equalTo(1),
                nullValue()
        ));

        //逻辑与
        assertThat(1, allOf(
                equalTo(1),
                notNullValue(),
                lessThan(10)
        ));

        //逻辑非
        assertThat(1, not(nullValue()));

        //both
        assertThat(1, both(equalTo(1)).and(notNullValue()));

        //either
        assertThat(1, either(equalTo(1)).or(nullValue()));
    }


    //对象相关
    @Test
    public void test4() {
        Book a = new Book("XXX", 11.11);
        Book b = new Book("XXX", 11.11);

        //包含属性
        assertThat(a, hasProperty("name"));
        assertThat(a, hasProperty("name", is("XXX")));

        //匹配toString方法返回值
        assertThat(a, hasToString("XXX:11.11"));

        //检查是否可赋值
        assertThat(Number.class, typeCompatibleWith(Serializable.class));

        //对象属性值相等匹配
        assertThat(a, samePropertyValuesAs(b, "name", "price"));
    }

    //集合相关
    @Test
    public void test5() {
        HashSet<Integer> set = new HashSet();
        set.add(1);
        set.add(2);
        HashMap<String, Integer> map = new HashMap();
        map.put("a", 1);
        map.put("b", 2);
        ArrayList<Integer> list = new ArrayList();
        list.add(1);
        list.add(2);

        assertThat(map, hasKey("a"));
        assertThat(map, hasValue(1));
        assertThat(map, hasEntry("a", 1));
        assertThat(new HashMap<>(), anEmptyMap());

        assertThat(set, hasItem(1));
        assertThat(set, hasItems(1, 2));
        assertThat(set, hasSize(2));
        assertThat(new HashSet<>(), empty());
        assertThat(new HashSet<>(), emptyIterable());
        assertThat(new HashSet<Integer>(), emptyCollectionOf(Integer.class));

        assertThat(set, contains(1, 2));
        assertThat(set, containsInAnyOrder(2, 1));
        assertThat(set, containsInRelativeOrder(1, 2));
        assertThat(set, iterableWithSize(2));

        assertThat(1, in(list));
        assertThat(1,oneOf(1, 2, 3));
    }

    //类型相关
    @Test
    public void test6() {
        assertThat(Integer.valueOf(1), any(Integer.class));
        assertThat(Integer.valueOf(1), instanceOf(Integer.class));
        assertThat(Integer.valueOf(1), sameInstance(Integer.valueOf(1)));
        assertThat(Integer.valueOf(1), theInstance(Integer.valueOf(1)));
    }

    //字符串匹配
    @Test
    public void test7() {
        //忽略大小写
        assertThat("aaa", equalToIgnoringCase("Aaa"));
        //忽略空白符
        assertThat("   my\tfoo  bar ", equalToIgnoringWhiteSpace(" my  foo bar"));
        //包含、以..开头、以...结尾
        assertThat("hello world", containsString("o w"));
        assertThat("hello world", startsWith("he"));
        assertThat("hello world", endsWith("ld"));

        //正则匹配
        assertThat("hello world", matchesRegex(Pattern.compile("^he.*")));
        assertThat("hello world", matchesPattern("^he.*"));

        //空串
        assertThat(null, emptyOrNullString());
        assertThat("", emptyString());
        assertThat("\t", blankString());

        //按顺序匹配子串
        assertThat("myfoobarbaz", stringContainsInOrder( "foo", "bar"));

        //长度
        assertThat("hello world", hasLength(11));
    }

    //其它
    @Test
    public void test8() {
        assertThat("hello", is(equalTo("hello")));
        assertThat(1, isA(Number.class));
        assertThat(1, describedAs("相等", equalTo(1)));
    }
}
20、Assumptions假设
Assumptions(假设)用来验证对测试所必需的先决条件的满足情况。当继续运行一个给定的测试方法没有意义时,可以使用假设。在测试报告中,这些测试被标记为中止。
JUnit5包含一组假设方法,位于org.junit.jupiter.api.Assumptions类中,适合与Java8的Lambda表达式一起使用:
- assumeTrue:该方法验证给定假设为真,如果假设为真,则测试继续进行,否则,测试执行将中止
- assumeFalse:该方法验证给定假设为假,如果假设为假,则测试继续,否则,测试执行被中止
- assumingThat:该方法执行提供的lambda,但前提是提供的假设有效。与其他假设方法不同,此方法不会中止测试。如果该假设无效,则该方法不起任何作用
public class AssumptionsTest {

    @BeforeEach
    public void beforeEach() {
        //如果系统为mac os 则执行
        final String osName = System.getProperty("os.name");
        Assumptions.assumeTrue(() -> "Mac OS X".equals(osName));
        System.out.println(osName);
    }

    @Test
    public void test() {
        //如果jdk不是1.7则执行
        final String javaVersion = System.getProperty("java.vm.specification.version");
        Assumptions.assumingThat(false, () -> "1.7".equals(javaVersion));
        System.out.println(javaVersion);
    }

    @AfterEach
    public void afterEach() {
        //如果是x86_64架构则执行
        final String osArch = System.getProperty("os.arch");
        Assumptions.assumeTrue(() -> "x86_64".equals(osArch));
        System.out.println(osArch);
    }
}
Mac OS X
1.8
x86_64
21、ParameterResolver(参数解析器)
在所有以前的 JUnit 版本中,测试构造函数或方法不允许有参数(至少在标准Runner实现中不允许)。作为 JUnit Jupiter 的主要变化之一,测试构造函数和方法现在都允许具有参数。这提供了更大的灵活性,并为构造函数和方法启用依赖注入。
ParameterResolver为希望在运行时动态 解析参数的测试扩展定义 API。如果测试类构造函数、测试方法或 生命周期方法接受参数,则该参数必须在运行时由注册的ParameterResolver。
目前有三个自动注册的内置解析器:
- TestInfoParameterResolver:如果构造函数或方法参数的类型为 TestInfo,则将TestInfoParameterResolver提供与当前容器或测试相对应的实例TestInfo 作为参数的值。然后 TestInfo可用于检索有关当前容器或测试的信息,例如显示名称、测试类、测试方法和关联标签。显示名称可以是技术名称,例如测试类或测试方法的名称,也可以是通过配置的自定义名称@DisplayName。
- RepetitionExtension:如果@RepeatedTest、@BeforeEach、 或@AfterEach方法中的方法参数属于类型RepetitionInfo,则将RepetitionExtension提供 的实例RepetitionInfo。RepetitionInfo然后可用于检索有关当前重复、重复总数、失败的重复次数以及相应 的失败阈值的信息。
- TestReporterParameterResolver:例 TestReporter。可TestReporter用于发布有关当前测试运行的附加数据。
21.1、TestInfoParameterResolver
@DisplayName("TestInfo Demo")
public class TestInfoDemo {

    public TestInfoDemo(TestInfo testInfo) {
        Assertions.assertEquals("TestInfo Demo", testInfo.getDisplayName());
    }

    @BeforeEach
    public void init(TestInfo testInfo) {
        String displayName = testInfo.getDisplayName();
        Assertions.assertTrue(displayName.equals("TEST 1") || displayName.equals("test2()"));
    }

    @Test
    @DisplayName("TEST 1")
    @Tag("my-tag")
    void test1(TestInfo testInfo) {
        Assertions.assertEquals("TEST 1", testInfo.getDisplayName());
        Assertions.assertTrue(testInfo.getTags().contains("my-tag"));
    }

    @Test
    void test2() {
    }
}
21.2、RepetitionExtension
public class RepetitionInfoDemo {

    @RepeatedTest(10)
    public void test(RepetitionInfo repetitionInfo) {
        System.out.println(repetitionInfo.getCurrentRepetition() + "/" + repetitionInfo.getTotalRepetitions());
    }
}
2/10
4/10
1/10
3/10
10/10
8/10
5/10
6/10
7/10
9/10
21.3、TestReporterParameterResolver
public class TestReporterDemo {
    @Test
    void reportSingleValue(TestReporter testReporter) {
        testReporter.publishEntry("a status message");
    }

    @Test
    void reportKeyValuePair(TestReporter testReporter) {
        testReporter.publishEntry("a key", "a value");
    }

    @Test
    void reportMultipleKeyValuePairs(TestReporter testReporter) {
        Map<String, String> values = new HashMap<>();
        values.put("user name", "dk38");
        values.put("award year", "1974");

        testReporter.publishEntry(values);
    }
}
timestamp = 2024-01-14T21:32:36.405, a key = a value
timestamp = 2024-01-14T21:32:36.405, user name = dk38, award year = 1974
timestamp = 2024-01-14T21:32:36.405, value = a status message
22、扩展
在org.junit.jupiter.api.extension包下,JUnit5提供了丰富的扩展接口,通过实现这些接口,我们可以定制自己的扩展并注册到JUnit中来实现功能扩展。Extension接口是JUnit5所有扩展接口的父接口。
22.1、扩展点
Extension的子接口如下:
- ExecutionCondition:条件测试,当注册多个ExecutionCondition扩展时,一旦其中一个条件返回disabled ,容器或测试就会被禁用。
- AfterAllCallback:在所有测试执行后执行
- BeforeAllCallback:在所有测试之前执行
- AfterEachCallback:在每个测试之后执行
- BeforeEachCallback:在每个测试之前执行
- BeforeTestExecutionCallback:在BeforeEachCallback之后调用
- AfterTestExecutionCallback:在AfterEachCallback之前调用
- TestInstancePreConstructCallback:在构建测试实例之前调用
- TestInstancePreDestroyCallback:在测试中使用测试实例之后和销毁测试实例之前调用
- TestInstanceFactory: 测试实例工厂
- TestInstancePostProcessor:测试实例后处理
- ParameterResolver:参数解析器,用于在运行时动态解析参数
- TestWatcher:测试结果处理
testDisabled:跳过禁用的测试方法后调用testSuccessful:测试方法成功完成后调用testAborted:测试方法中止后调用testFailed:测试方法失败后调用
- TestExecutionExceptionHandler:@Test方法期间抛出的异常处理
- LifecycleMethodExecutionExceptionHandler:生命周期方法期间抛出的异常处理
- InvocationInterceptor:拦截调用
- TestTemplateInvocationContext:为测试模板提供调用上下文
- TestTemplateInvocationContextProvider
22.2、@ExtendWith(声明式注册)
开发人员可以通过注释测试接口、测试类、测试方法或自定义组合注释@ExtendWith(…)并为要注册的扩展提供类引用,以声明方式注册一个或多个扩展。从 JUnit Jupiter 5.8 开始,@ExtendWith还可以在测试类构造函数、测试方法以及@BeforeAll、@AfterAll、 @BeforeEach和@AfterEach生命周期方法中的字段或参数上进行声明。
@Target({ ElementType.FIELD, ElementType.PARAMETER })
@Retention(RetentionPolicy.RUNTIME)
@ExtendWith(RandomNumberExtension.class)
public @interface Random {
}
public class RandomNumberExtension implements BeforeAllCallback, BeforeEachCallback, ParameterResolver {

    private final Random random = new Random(System.nanoTime());

    @Override
    public void beforeAll(ExtensionContext context) throws Exception {
        final Class<?> testClass = context.getRequiredTestClass();
        injectFields(testClass, null, ModifierSupport::isStatic);
    }

    @Override
    public void beforeEach(ExtensionContext context) throws Exception {
        Class<?> testClass = context.getRequiredTestClass();
        Object testInstance = context.getRequiredTestInstance();
        injectFields(testClass, testInstance, ModifierSupport::isNotStatic);
    }

    @Override
    public boolean supportsParameter(ParameterContext parameterContext, ExtensionContext extensionContext) throws ParameterResolutionException {
        return parameterContext.isAnnotated(extension.Random.class) && isInteger(parameterContext.getParameter().getType());
    }

    @Override
    public Object resolveParameter(ParameterContext parameterContext, ExtensionContext extensionContext) throws ParameterResolutionException {
        return this.random.nextInt();
    }


    private void injectFields(Class<?> testClass, Object testInstance, Predicate<Field> predicate) {

        predicate = predicate.and(field -> isInteger(field.getType()));
        AnnotationSupport.findAnnotatedFields(testClass, extension.Random.class, predicate, HierarchyTraversalMode.TOP_DOWN)
                .forEach(field -> {
                    try {
                        field.setAccessible(true);
                        field.set(testInstance, this.random.nextInt());
                    }
                    catch (Exception ex) {
                        throw new RuntimeException(ex);
                    }
                });
    }

    private static boolean isInteger(Class<?> type) {
        return type == Integer.class || type == int.class;
    }

}
public class RandomNumberDemo {

    //在测试类的任何地方使用静态randomNumber0字段,
    //包括@BeforeAll或@AfterEach生命周期方法。
    @Random
    private static Integer randomNumber0;

    //在测试方法和@BeforeEach
    //或@AfterEach生命周期方法中使用randomNumber1字段。
    @Random
    private int randomNumber1;

    RandomNumberDemo(@Random int randomNumber2) {
        System.out.println(randomNumber2);
        System.out.println(randomNumber0);
    }

    @BeforeEach
    void beforeEach(@Random int randomNumber3) {
        System.out.println(randomNumber1);
        System.out.println(randomNumber3);
    }

    @Test
    void test(@Random int randomNumber4) {
        System.out.println(randomNumber4);
    }
}
2018567188
1736345330
-115579494
-373582815
1409388909
22.3、@RegisterExtension(编程式注册)
这个注解也是用来注册扩展的,但是它只能被用到字段上,且相对于@ExtendWith的声明式注册方式,它是编程式的注册方式。被它标注的字段可以是static或non-static,但这个字段不能被private修饰,实际的值也不能为null:
- static:通过这种方式注册的扩展不受任何限制,你可以注册BeforeAllCallback、AfterAllCallback、TestInstanceFactory、TestInstancePostProcessor、TestInstancePreDestroyCallback、BeforeEachCallback等等类型。
- non-static:这种实例类型的注册往往会被延迟,它会在测试类实例化完成并且方法级别的@ExtendWith都注册之后,这回导致一些类级别或实例级别的扩展如:BeforeAllCallback、AfterAllCallback、TestInstanceFactory、TestInstancePostProcessor的注册出现问题。但是,如果你在测试类上标注了@TestInstance(Lifecycle.PER_CLASS),那么它将会被提前到方法级别的@ExtendWith注册之前注册。
- @RegisterExtension标注的字段注册顺序是根据算法确定的,如果你想要明确他们的注册顺序,可以使用org.junit.jupiter.api.Order注解指定。
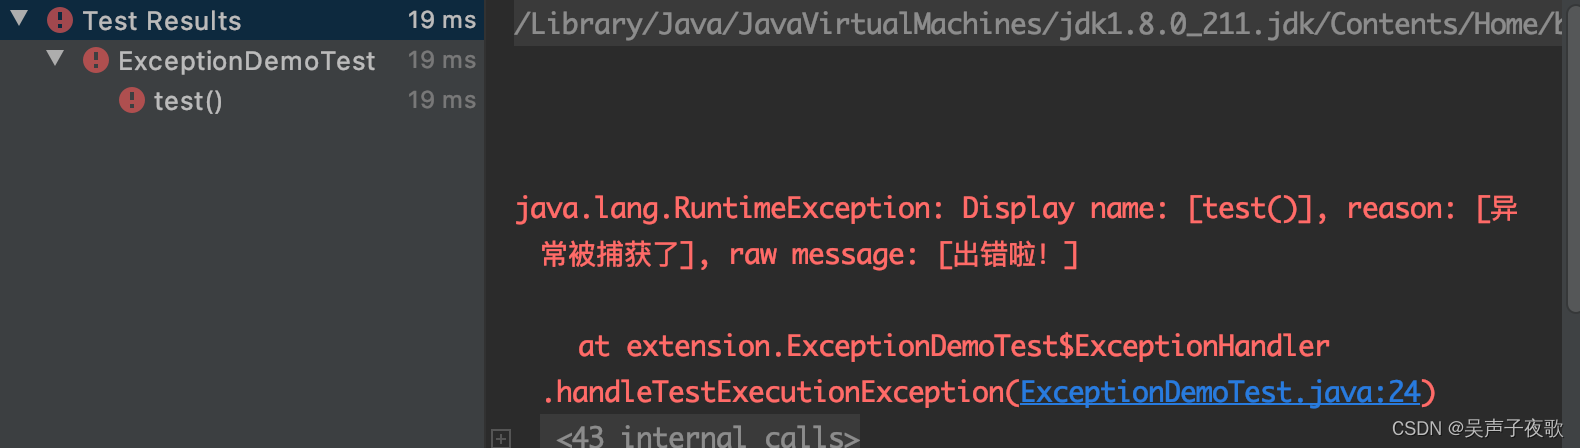
public class ExceptionDemoTest {

    static class ExceptionHandler implements TestExecutionExceptionHandler {
        private String message;

        public ExceptionHandler(String message) {
            this.message = message;
        }

        @Override
        public void handleTestExecutionException(ExtensionContext context, Throwable throwable) throws Throwable {
            throw new RuntimeException(String.format("Display name: [%s], reason: [%s], raw message: [%s]",
                    context.getDisplayName(), this.message, throwable.getMessage()));
        }
    }

    @RegisterExtension
    static ExceptionHandler exceptionHandler = new ExceptionHandler("异常被捕获了");

    @Test
    public void test() {
        throw new RuntimeException("出错啦!");
    }
}
22.4、Java SPI注册
如果你是Maven工程,需要在test目录下的测试资源目录resources(这个目录一般不存在,需要手动创建并右键标记为“Test Resources Root”)中新建一个名为junit-platform.properties的文件(这个文件名不能随意,否则JUnit无法扫描到),并在其中加上配置:
junit.jupiter.extensions.autodetection.enabled=true
而后同样在这个resources下,新建目录WEB-INF/services,之后创建一个名为org.junit.jupiter.api.extension.Extension的文件,这个文件名其实就是Extension接口的全限定类名,而其中的内容就是我们实现的扩展类的全限定类名(如有多个扩展实现,一个限定名占一行):
com.tinysand.fileuploads.ExceptionHandler
最后,如果不想使用配置文件,你可以在VM(Run/Debug Configurations中的VM options)参数添加如下参数而达到同样的效果:-Djunit.jupiter.extensions.autodetection.enabled=true


 被折叠的 条评论
为什么被折叠?
被折叠的 条评论
为什么被折叠?
 到【灌水乐园】发言


