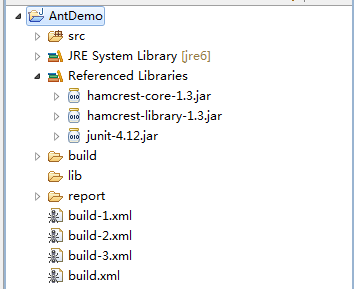
一、ANT任务之Junit:
学习ANT其实主要是学习ANT的task,ANT众多task中有一个Testing Tasks,它下面有两个任务:Junit和JunitReport,主要用来进行单元测试及生成单元测试报告。
下面可以包含其它元素,例如:
1、:运行单个TestCase
2、:运行多个TestCase
3、:定义测试结果输出格式
还有很多,详细可以参考官方文档。
二、项目实例:
由于ant安装比较得简单,网上一搜一大把且现在ecplise基本都带ant,所以本文并未说明如何搭建ant环境。
另外,在eclipse中可以通过:window->show view 来调出Ant视图

2、SimpleCalculation类代码如下:
package com.glen.he;

public class SimpleCalculation {
    public int Add(int a,int b){
        return (a+b);
    }
}
3、测试类SimpleCalculationTest代码如下:
package com.glen.he;

import com.glen.he.SimpleCalculation;

import static org.junit.Assert.*;
import org.junit.Test;

public class SimpleCalculationTest {

    SimpleCalculation sc = new SimpleCalculation();

    @Test
    public void AddTest() {

        int c = sc.Add(3, 5);
        System.out.println("ssss");
        assertEquals(8, c);
    }
}
4、在项目要目录下添加build.xml(执行一个测试)文件,内容如下:
<?xml version="1.0" encoding="UTF-8"?>
<project name="AntDemo" default="junit" basedir=".">
    <!-- =================================================================== -->
    <!-- 变量设置  -->
    <!-- =================================================================== -->

    <!-- 源代码src路径 -->
    <property name="src.path" value="src"/>
    <!-- 编译文件class路径 -->
    <property name="build.path" value="build"/>
    <!-- lib包路径 -->
    <property name="lib.path" value="lib"/>

    <!-- =================================================================== -->
    <!-- 设置classpath -->
    <!-- =================================================================== -->
    <path id="compile.path">
        <fileset dir="${lib.path}">
            <include name="**/*.jar"/>
        </fileset>

        <pathelement path="${build.path}"/>
    </path>

    <!-- =================================================================== -->
    <!-- 清除历史编译class -->
    <!-- =================================================================== -->
    <target name="clean" description="clean">
        <delete dir="${build.path}"/>
    </target>

    <!-- =================================================================== -->
    <!-- 编译测试文件,初始化目录 -->
    <!-- =================================================================== -->
    <target name="compile" description="compile">
        <mkdir dir="${build.path}"/>
        <javac srcdir="${src.path}" destdir="${build.path}"  classpathref="compile.path"/>
    </target>

    <!-- =================================================================== -->
    <!-- 执行测试案例 -->
    <!-- =================================================================== -->
    <target name="junit" depends="">
        <junit printsummary="true">
             <classpath refid="compile.path"/>

             <test name="com.glen.he.EsbCreditTestAll"/>
         </junit>
     </target>

</project>
说明:
<junit printsummary="true">
  <classpath refid="compile.path"/>
  <test name="com.glen.he.SimpleCalculationTest"/>
</junit>


<path id="compile.path">
  <fileset dir="${lib.path}">
    <include name="**/*.jar"/>
  </fileset>
  <pathelement path="${build.path}"/>
</path
我们在junit任务下,使用了编译后的.class文件的目录,还有编译所需的jar包所在的目录。 因为,JUnit任务实际就是为我们运行Test类,而不仅仅是像我们发布Ant文件那样只是javac编译,只需要编译所需的Jar包。(在最后一个build.xml文件里面我会描述,如果我们利用spring框架和mybatis时,我们应该找个把基本数据加到测试目录下面)我们还需要像java任务那样运.class文件,所以必须包括编译后的.class文件。
5、然后把build.xml文件拖到Ant视图中,如下图,双击junit执行即可。
6、执行结果:
junit:
    [junit] Running com.glen.he.EsbCreditTestAll
    [junit] Tests run: 3, Failures: 0, Errors: 0, Time elapsed: 0.021 sec
BUILD SUCCESSFUL
Total time: 338 milliseconds
三、增强版build.xml
通过上面第二步,基本可以达到使用ant和junit来进行单元测试,但还远远不够,比如需要批量运行案例,生成报告等,下面会介绍这些内容
1、使用formatter属性输出junit信息:
修改build.xml文件,增加第16,49,51,57,58,59行代码
修改build.xml文件,修改53行代码,增加了todir属性,指定xml的输出路径。
<?xml version="1.0" encoding="UTF-8"?>
<project name="AntDemo" default="junit" basedir=".">
    <!-- =================================================================== -->
    <!-- 变量设置  -->
    <!-- =================================================================== -->

    <!-- 源代码src路径 -->
    <property name="src.path" value="src/java"/>
    <!-- 编译文件class路径 -->
    <property name="build.path" value="build"/>
    <!-- 单元测试代码路径 -->
    <property name="test.path" value="src/test"/>
    <!-- lib包路径 -->
    <property name="lib.path" value="lib"/>
    <!-- 生成报告junit4.xml路径 -->
    <property name="report.path" value="report"/>

    <!-- =================================================================== -->
    <!-- 设置classpath -->
    <!-- =================================================================== -->
    <path id="compile.path">
        <fileset dir="${lib.path}">
            <include name="**/*.jar"/>
        </fileset>

        <pathelement path="${build.path}"/>
    </path>

    <!-- =================================================================== -->
    <!-- 清除历史编译class -->
    <!-- =================================================================== -->
    <target name="clean" description="clean">
        <delete dir="${build.path}"/>
    </target>

    <!-- =================================================================== -->
    <!-- 编译测试文件,初始化目录 -->
    <!-- =================================================================== -->
    <target name="compile" description="compile">
        <mkdir dir="${build.path}"/>
        <javac srcdir="${src.path}" destdir="${build.path}"  classpathref="compile.path"/>
        <javac srcdir="${test.path}" destdir="${build.path}"  classpathref="compile.path"/>
    </target>

    <!-- =================================================================== -->
    <!-- 执行测试案例 -->
    <!-- =================================================================== -->
    <target name="junit" depends="clean,compile">
        <mkdir dir="${report.path}"/>
        <junit printsummary="true" fork="true">
             <formatter type="xml" usefile="true"/>
             <classpath refid="compile.path"/>
             <test name="com.glen.he.SimpleCalculationTest" todir="${report.path}" fork="true"/>
         </junit>
     </target>

    <target name="delete">
        <delete dir="${report.path}"/>
    </target>

</project>
执行junit的task后,在项目report目录下生成了一个名为TEST-com.glen.he.SimpleCalculationTest.xml的xml文件。
另外:
<formatter type="xml" usefile="true"/>中type属性值还有plain、brief
这时会输出一个文本文件,提供测试失败时的详细内容以及每个测试的运行统计。
2、批量运行单元测试案例:
修改build.xml文件,把步骤7中的第53行代码替换成下面的58~62行代码;
<?xml version="1.0" encoding="UTF-8"?>
<project name="AntDemo" default="junit" basedir=".">
    <!-- =================================================================== -->
    <!-- 变量设置  -->
    <!-- =================================================================== -->

    <!-- 源代码src路径 -->
    <property name="src.path" value="src/java"/>
    <!-- 编译文件class路径 -->
    <property name="build.path" value="build"/>
    <!-- 单元测试代码路径 -->
    <property name="test.path" value="src/test"/>
    <!-- lib包路径 -->
    <property name="lib.path" value="lib"/>
    <!-- 生成报告junit4.xml路径 -->
    <property name="report.path" value="report"/>

    <!-- =================================================================== -->
    <!-- 设置classpath -->
    <!-- =================================================================== -->
    <path id="compile.path">
        <fileset dir="${lib.path}">
            <include name="**/*.jar"/>
        </fileset>

        <pathelement path="${build.path}"/>
    </path>

    <target name="init">
        <mkdir dir="${build.path}"/>
        <mkdir dir="${report.path}"/>
    </target>

    <!-- =================================================================== -->
    <!-- 清除历史编译class -->
    <!-- =================================================================== -->
    <target name="clean" description="clean">
        <delete dir="${build.path}"/>
    </target>

    <!-- =================================================================== -->
    <!-- 编译测试文件,初始化目录 -->
    <!-- =================================================================== -->
    <target name="compile" depends="init" description="compile">
        <javac srcdir="${src.path}" destdir="${build.path}"  classpathref="compile.path"/>
        <javac srcdir="${test.path}" destdir="${build.path}"  classpathref="compile.path"/>
    </target>

    <!-- =================================================================== -->
    <!-- 执行测试案例 -->
    <!-- =================================================================== -->
    <target name="junit" depends="compile">
        <junit printsummary="true" fork="true">
             <formatter type="xml" usefile="true"/>

             <classpath refid="compile.path"/>

            <batchtest fork="on" todir="${report.path}" haltonfailure="no">
                <fileset dir="${build.path}">
                    <include name="**/*Test.class"/>
                </fileset>
            </batchtest>

         </junit>

     </target>

    <!-- 清除Junit生成的报表文档 -->
    <target name="delete">
        <delete dir="${report.path}"/>
    </target>

</project>
3、使用生成测试报告:
在上面我们已经知道,通过formatter(type=“xml”)输出junit信息时会在指定目录下生成一个Test-类路径名.xml的xml文件,但是这个xml文件看起来很不方便。Ant提供了任务使用XSLT将xml文件转换为HTML报告,该任务首先将生成的XML文件整合成单一的XML文件,然后再对他进行转换,这个整合的文件默认情况下被命名为:TESTS-TestSuites.xml.
修改上面的build.xml文件,增加65~71行,如下:
<?xml version="1.0" encoding="UTF-8"?>
<project name="AntDemo" default="junit" basedir=".">
    <!-- =================================================================== -->
    <!-- 变量设置  -->
    <!-- =================================================================== -->

    <!-- 源代码src路径 -->
    <property name="src.path" value="src/java"/>
    <!-- 编译文件class路径 -->
    <property name="build.path" value="build"/>
    <!-- 单元测试代码路径 -->
    <property name="test.path" value="src/test"/>
    <!-- lib包路径 -->
    <property name="lib.path" value="lib"/>
    <!-- 生成报告junit4.xml路径 -->
    <property name="report.path" value="report"/>

    <!-- =================================================================== -->
    <!-- 设置classpath -->
    <!-- =================================================================== -->
    <path id="compile.path">
        <fileset dir="${lib.path}">
            <include name="**/*.jar"/>
        </fileset>

        <pathelement path="${build.path}"/>
    </path>

    <target name="init">
        <mkdir dir="${build.path}"/>
        <mkdir dir="${report.path}"/>
    </target>

    <!-- =================================================================== -->
    <!-- 清除历史编译class -->
    <!-- =================================================================== -->
    <target name="clean" description="clean">
        <delete dir="${build.path}"/>
    </target>

    <!-- =================================================================== -->
    <!-- 编译测试文件,初始化目录 -->
    <!-- =================================================================== -->
    <target name="compile" depends="init" description="compile">
        <javac srcdir="${src.path}" destdir="${build.path}"  classpathref="compile.path"/>
        <javac srcdir="${test.path}" destdir="${build.path}"  classpathref="compile.path"/>
    </target>

    <!-- =================================================================== -->
    <!-- 执行测试案例 -->
    <!-- =================================================================== -->
    <target name="junit" depends="compile">
        <junit printsummary="true" fork="true">
             <formatter type="xml" usefile="true"/>

             <classpath refid="compile.path"/>

            <batchtest fork="on" todir="${report.path}" haltonfailure="no">
                <fileset dir="${build.path}">
                    <include name="**/*Test.class"/>
                </fileset>
            </batchtest>
         </junit>

        <!-- 产生单元测试报表文档 -->
        <junitreport todir="${report.path}">
            <fileset dir="${report.path}">
                <include name="TEST-*.xml" />
            </fileset>
            <report format="frames" todir="${report.path}" />
        </junitreport>

     </target>

    <!-- 清除Junit生成的报表文档 -->
    <target name="delete">
        <delete dir="${report.path}"/>
    </target>

</project>
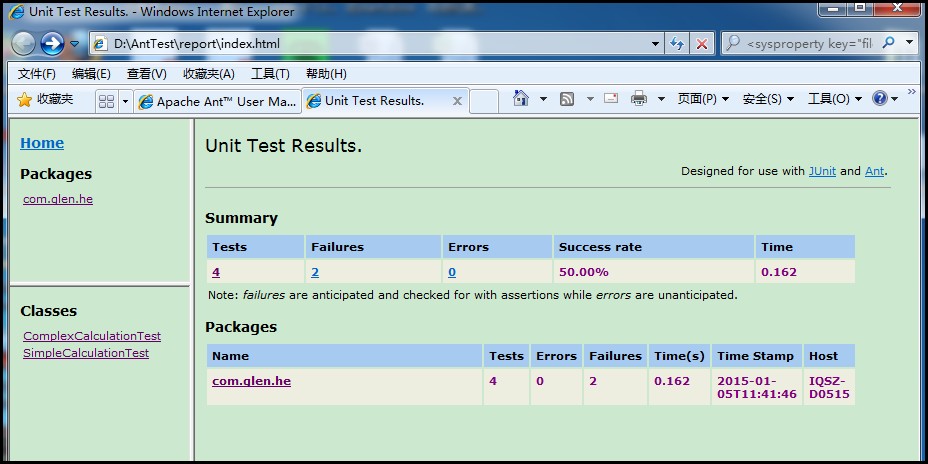
执行后会在指定目录下生成报告文档,打开index.html可以很方便的看到执行的结果。
1、如下图所示(我又补充了3个案例,并且故意让两个案例失败),显示执行的统计结果:

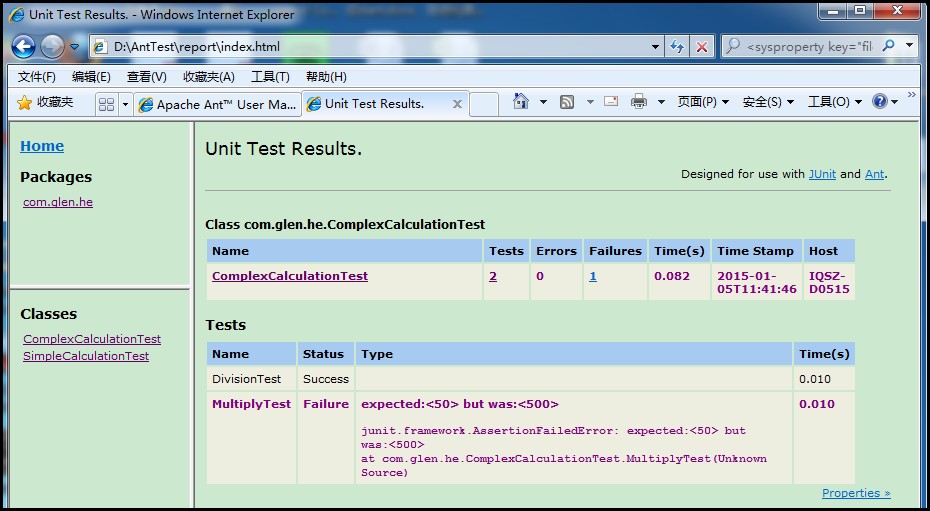
2、点击classes下面的ComplexCalculationTest,可以看到具体某个类里面的单元测试案例执行统计情况以及失败案例的错误信息提示。
我的经验:由于我当前所做的项目是spring+mybatis的,因此利用上面的例子直接去运行的话就会出现一点问题。其实还是我没有理解透彻,因为不管如何测试类运行的时候那么就必须要把所有依赖的文件放到测试编译的目录下面去既然这样子的话,那么我们应该把spring的配置文件和mybatis的配置文件全部要放到编译后的测试文件目录下面才能够运行起来。当然在这里肯定会设计到sping的配置问题和mybatis链接数据库的问题,在这里提醒自己以后不要忘记了。(PS仅作为个人笔记使用,毕竟是用来学习的)
    <target name="junit" depends="compile">
        <delete dir="${report.path}"/>
        <mkdir dir="${report.path}"/>
        <!--就是这么copy把所有的关联文件放到了我的编译测试文件之后的目录下面去了,才能够成功的运行-->
        <copy todir="${build.test.dir}">
            <fileset dir="${src.dir}/config/core/"  />
            <fileset dir="${src.dir}/config/biz/"  />
        </copy>
        <junit printsummary="true" fork="true">
            <formatter type="xml" usefile="true"/>
            <classpath refid="master-classpath"/>
            <batchtest fork="on" todir="${report.path}" haltonfailure="no">
                <fileset dir="${build.test.dir}">
                    <include name="**/*EsbCreditTestAll.class"/>
                </fileset>
            </batchtest>
        </junit>
        <!-- 产生单元测试报表文档 -->
        <junitreport todir="${report.path}">
            <fileset dir="${report.path}">
                <include name="TEST-*.xml" />
            </fileset>
            <report format="frames" todir="${report.path}" />
        </junitreport>
    </target>


 1119
1119


 被折叠的 条评论
为什么被折叠?


