


首先雷大神一路走好,在天堂好好歇息。经常看雷神的博客,还加入了他创办的qq群,没想到就这么走了。哎,雷神走好!
但生活还要继续,通过一个自定义view来看如何测量一个View的尺寸。
在一个view的测量过程中,需要充分考虑父veiw的约束,具体来看,如下:
public class CustomImage extends View {

    public static final String TAG = "CustomImage";

    private Paint mPaint;
    private Bitmap mBitmap;
    private int mRadius;
    private int mBitmapId;
    private Xfermode mXfermode;

    public CustomImage(Context context, AttributeSet attrs) {
        super(context, attrs);
        TypedArray array = context.obtainStyledAttributes(attrs, R.styleable.customImg, 0, 0);
        int count = array.getIndexCount();
        for (int i = 0; i < count; i++) {
            int attr = array.getIndex(i);
            switch (attr) {
                case R.styleable.customImg_imgRadius:
                    mRadius = array.getInt(attr, 0);
                    break;
                case R.styleable.customImg_img:
                    mBitmapId = array.getResourceId(attr, 0);
                    break;
            }
        }
        array.recycle();
        if (mBitmapId != 0) {
            mBitmap = BitmapFactory.decodeResource(getResources(), mBitmapId);
        }
        mXfermode = new PorterDuffXfermode(PorterDuff.Mode.SRC_IN);
        mPaint = new Paint(Paint.ANTI_ALIAS_FLAG);
        mPaint.setStyle(Paint.Style.FILL);
        setLayerType(LAYER_TYPE_SOFTWARE, null);
    }

    @Override
    protected void onDraw(Canvas canvas) {
        super.onDraw(canvas);
        if (mBitmap != null) {
            int bitmapW = mBitmap.getWidth();
            int bitmapH = mBitmap.getHeight();
            Log.i(TAG, "bitmapW = " + bitmapW + " , bitmapH = " + bitmapH);
            RectF rectF = new RectF(0, 0, bitmapW, bitmapH);
            canvas.drawRoundRect(rectF, mRadius, mRadius, mPaint);
            mPaint.setXfermode(mXfermode);
            canvas.drawBitmap(mBitmap, 0, 0, mPaint);
            mPaint.setXfermode(null);
        }
    }

    @Override
    protected void onMeasure(int widthMeasureSpec, int heightMeasureSpec) {
        super.onMeasure(widthMeasureSpec, heightMeasureSpec);
        int widthMode = MeasureSpec.getMode(widthMeasureSpec);
        int widthSize = MeasureSpec.getSize(widthMeasureSpec);
        int heiMode = MeasureSpec.getMode(heightMeasureSpec);
        int heiSize = MeasureSpec.getSize(heightMeasureSpec);
        Log.i(TAG, "widthMode = " + widthMode + " , widthSize = " + widthSize);
        Log.i(TAG, "heiMode = " + heiMode + " , heiSize = " + heiSize);
    }
}一个很简单的自定义view:展示一张图片,在测量的过程中,我们打印了widthMeasureSpec和heightMeasureSpec,通过MeasureSpec类分离除了父View的约束模式和建议尺寸,如果对MeasureSpec不了解可以看看我的上篇博客。(http://blog.csdn.net/cong411/article/details/52089262)
我们看看使用:
<?xml version="1.0" encoding="utf-8"?>
<LinearLayout xmlns:android="http://schemas.android.com/apk/res/android"
xmlns:cc="http://schemas.android.com/apk/res-auto"
xmlns:tools="http://schemas.android.com/tools"
android:layout_width="match_parent"
android:layout_height="match_parent"
tools:context="com.example.cc.cc.CustomImg">
<com.example.cc.cc.custom.CustomImage
android:layout_width="wrap_content"
android:layout_height="wrap_content"
cc:img="@drawable/ddd"
cc:imgRadius="10" />
<Button
android:layout_width="wrap_content"
android:layout_height="wrap_content"
android:background="@android:color/holo_red_dark"
android:text="click me" />
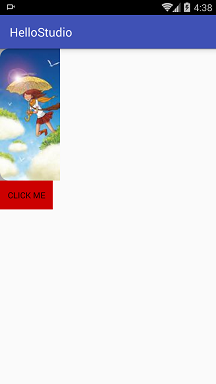
</LinearLayout>然后看一下效果,如果没什么意外,应该是一张图片,左边是一个按钮,结果如下:

意外之处在于按钮不见了,在我给view画上背景色后,才明白,view沾满了整个父控件,view的尺寸打印如下:
I/CustomImage: widthMode = MeasureSpec.AT_MOST , widthSize = 720
I/CustomImage: heiMode = MeasureSpec.AT_MOST , heiSize = 1140
在没有通过setMeasuredDimension(actualWidth, actualHei)方法设置view的尺寸时;该View采用了父View的建议尺寸,于是充满了父空间。
如果换种布局呢?
<?xml version="1.0" encoding="utf-8"?>
<LinearLayout xmlns:android="http://schemas.android.com/apk/res/android"
    xmlns:cc="http://schemas.android.com/apk/res-auto"
    xmlns:tools="http://schemas.android.com/tools"
    android:layout_width="match_parent"
    android:layout_height="match_parent"
    android:orientation="vertical"
    tools:context="com.example.cc.cc.CustomImg">

    <LinearLayout
        android:layout_width="300px"
        android:layout_height="500px">

        <com.example.cc.cc.custom.CustomImage
            android:layout_width="wrap_content"
            android:layout_height="wrap_content"
            cc:img="@drawable/ddd"
            cc:imgRadius="30" />
    </LinearLayout>


    <Button
        android:layout_width="wrap_content"
        android:layout_height="wrap_content"
        android:background="@android:color/holo_red_dark"
        android:text="click me" />

</LinearLayout>
看效果与打印:
I/CustomImage: widthMode = MeasureSpec.AT_MOST, widthSize = 300
I/CustomImage: heiMode = MeasureSpec.AT_MOST, heiSize = 500
其中父View的layout_width=”300px”,view的为android:layout_width=”wrap_content”
打印出来就是layout_width中的数值,并且注意View被切割了,宽被切割了,原因就是父view中限定的宽度小与图片的宽度。
我们在来看最后一种布局
<?xml version="1.0" encoding="utf-8"?>
<LinearLayout xmlns:android="http://schemas.android.com/apk/res/android"
    xmlns:cc="http://schemas.android.com/apk/res-auto"
    xmlns:tools="http://schemas.android.com/tools"
    android:layout_width="match_parent"
    android:layout_height="match_parent"
    android:orientation="vertical"
    tools:context="com.example.cc.cc.CustomImg">

    <LinearLayout
        android:layout_width="400px"
        android:layout_height="700px">

        <com.example.cc.cc.custom.CustomImage
            android:layout_width="300px"
            android:layout_height="500px"
            cc:img="@drawable/ddd"
            cc:imgRadius="30" />
    </LinearLayout>


    <Button
        android:layout_width="wrap_content"
        android:layout_height="wrap_content"
        android:background="@android:color/holo_red_dark"
        android:text="click me" />

</LinearLayout>
图片和上一张一样,
看打印:
I/CustomImage: widthMode = MeasureSpec.EXACTLY, widthSize = 300
I/CustomImage: heiMode = MeasureSpec.EXACTLY, heiSize = 500
发现父view的约束就是我们view中android:layout_width=”300px”的尺寸。
总结下:通过打印的信息,发现如果子View的layout_width为warp_content,父view的约束模式为
AT_MOST,并且view的尺寸为父View的尺寸,如果layout_width为精确值,父view的约束模式为
MeasureSpec.EXACTLY,view的尺寸为自身设置的尺寸。
也就是说view的layout_width中的设置,包含了父View传递过来的约束类型和尺寸,
(1)如果是wrap_content,那么约束的类型是AT_MOST,Size是其父View的尺寸,即是view的尺寸最大到父view的尺寸,即view的尺寸总是要小于等于传递来的Size(子view尺寸总不能大于父view的吧)。
(2)如果是math_parent或者精确值,那么约束的类型是EXACTLY,Size就是设置的精确值,即View的尺寸规定死了,就这么多。
注意以上都是父view传递过来的约束,只是一种良好的建议,最好采纳,当然也可以任性一把,不管他,但是一般都要充分考虑父view传递过来的约束。
上面看到在图片的宽大于view的宽时,图片被切割了,希望可以做到缩小图片而不被切割,这就要充分考虑父View的约束。
代码如下:
package com.example.cc.cc.custom;

import android.content.Context;
import android.content.res.TypedArray;
import android.graphics.Bitmap;
import android.graphics.BitmapFactory;
import android.graphics.Canvas;
import android.graphics.Color;
import android.graphics.Matrix;
import android.graphics.Paint;
import android.graphics.PorterDuff;
import android.graphics.PorterDuffXfermode;
import android.graphics.RectF;
import android.graphics.Xfermode;
import android.util.AttributeSet;
import android.util.Log;
import android.util.TypedValue;
import android.view.View;

import com.example.cc.cc.R;

/**
 * Created by P00028 on 2016/8/1.
 */
public class CustomImage extends View {

    public static final String TAG = "CustomImage";

    private Paint mPaint;
    //原图
    private Bitmap mBitmap;
    //该View对应的Bitmap
    private Bitmap mBaseBitmap;
    //圆角半径
    private int mRadius;
    //原图对应的资源id
    private int mBitmapId;
    //图片回合模式
    private Xfermode mXfermode;
    //原图的宽和高
    private int mImgWidth;
    private int mImgHei;
    private Matrix matrix;

    public CustomImage(Context context, AttributeSet attrs) {
        super(context, attrs);
        TypedArray array = context.obtainStyledAttributes(attrs, R.styleable.customImg, 0, 0);
        int count = array.getIndexCount();
        for (int i = 0; i < count; i++) {
            int attr = array.getIndex(i);
            switch (attr) {
                case R.styleable.customImg_imgRadius:
                    mRadius = array.getInt(attr, 0);
                    break;
                case R.styleable.customImg_img:
                    mBitmapId = array.getResourceId(attr, 0);
                    break;
            }
        }
        array.recycle();
        if (mBitmapId != 0) {
            mBitmap = BitmapFactory.decodeResource(getResources(), mBitmapId);
            mImgWidth = mBitmap.getWidth();
            mImgHei = mBitmap.getHeight();
        }
        mXfermode = new PorterDuffXfermode(PorterDuff.Mode.SRC_IN);
        mPaint = new Paint(Paint.ANTI_ALIAS_FLAG);
        mPaint.setStyle(Paint.Style.FILL);
        mPaint.setTextSize(TypedValue.applyDimension(TypedValue.COMPLEX_UNIT_SP, 12, getResources().getDisplayMetrics()));
        //使用矩阵
        matrix = new Matrix();
        mPaint.setColor(Color.GRAY);
    }

    @Override
    protected void onDraw(Canvas canvas) {
        super.onDraw(canvas);
        //进行绘制
        canvas.drawColor(Color.GRAY);
        //减小绘制的次数,如果mBaseBitmap存在就直接绘制,否则制作mBaseBitmap
        if (mBaseBitmap != null && !mBaseBitmap.isRecycled()) {
            canvas.drawBitmap(mBaseBitmap, 0, 0, mPaint);
            return;
        }
        //取图片的宽度,注意要去除padding
        int imgW = getMeasuredWidth() - getPaddingLeft() - getPaddingRight();
        int imgH = getMeasuredHeight() - getPaddingTop() - getPaddingBottom();
        //计算缩放的比例
        float scaleW = imgW * 1.0f / mImgWidth;
        float scaleH = imgH * 1.0f / mImgHei;
        //使用矩阵对原图压缩,使其和view的宽高一致,matrix对原图的宽高做压缩/拉伸
        matrix.reset();
        matrix.postScale(scaleW, scaleH);
        Bitmap scaleBitmap = Bitmap.createBitmap(mBitmap, 0, 0, mImgWidth, mImgHei, matrix, true);
        int imgWidth = scaleBitmap.getWidth();
        int imgHei = scaleBitmap.getHeight();
        //创建自己画布的bitmap
        mBaseBitmap = Bitmap.createBitmap(getMeasuredWidth(), getMeasuredHeight(), Bitmap.Config.ARGB_8888);
        Canvas myCanvas = new Canvas();
        myCanvas.setBitmap(mBaseBitmap);

        //使用myCanvas将view画在mBaseBitmap上
        RectF rectF = new RectF(getPaddingLeft(), getPaddingTop(), getPaddingLeft()+imgWidth, getPaddingTop()+imgHei);
        myCanvas.drawRoundRect(rectF, mRadius, mRadius, mPaint);
        mPaint.setXfermode(mXfermode);
        myCanvas.drawBitmap(scaleBitmap, getPaddingLeft(), getPaddingTop(), mPaint);
        scaleBitmap.recycle();
        scaleBitmap = null;
        mPaint.setXfermode(null);
        //加上水印
        myCanvas.drawText("cc-Allrights reserved", 5, imgHei / 2, mPaint);
        myCanvas = null;
        //将bitmap展示出来
        canvas.drawBitmap(mBaseBitmap, 0, 0, mPaint);
    }

    @Override
    protected void onMeasure(int widthMeasureSpec, int heightMeasureSpec) {
        super.onMeasure(widthMeasureSpec, heightMeasureSpec);
        Log.i(TAG, "onMeasure");
        int widthMode = MeasureSpec.getMode(widthMeasureSpec);
        int widthSize = MeasureSpec.getSize(widthMeasureSpec);
        int heiMode = MeasureSpec.getMode(heightMeasureSpec);
        int heiSize = MeasureSpec.getSize(heightMeasureSpec);
        Log.i(TAG, "widthMode = " + widthMode + " , widthSize = " + widthSize);
        Log.i(TAG, "heiMode = " + heiMode + " , heiSize = " + heiSize);
        int actualWidth = 0;
        int actualHei = 0;
        //AT_MOST:至多
        switch (widthMode) {
            //这里,父view对子View的约束为:在宽度上,父View最多只有这么多的空间供你使用.所以这里的宽度,只能小于等于父View的限定
            case MeasureSpec.AT_MOST:
                actualWidth = Math.min(widthSize, mImgWidth + getPaddingLeft() + getPaddingRight());
                break;
            //MeasureSpec.EXACTLY:确切的,MeasureSpec.UNSPECIFIED:不做限制
            //父View规定死了子VIew的宽度(EXACTLY)或者对子View不做任何约束(UNSPECIFIED),那么子View的宽度为约束的宽度
            default:
                actualWidth = widthSize;
                break;
        }
        //对于height同样处理
        switch (heiMode) {
            case MeasureSpec.AT_MOST:
                actualHei = Math.min(heiSize, mImgHei + getPaddingTop() + getPaddingBottom());
                break;
            default://MeasureSpec.EXACTLY:确切的,MeasureSpec.UNSPECIFIED:不做限制
                actualHei = widthSize;
                break;
        }
        setMeasuredDimension(actualWidth, actualHei);

    }
}
如下图:

布局如下
<?xml version="1.0" encoding="utf-8"?>
<LinearLayout xmlns:android="http://schemas.android.com/apk/res/android"
    xmlns:cc="http://schemas.android.com/apk/res-auto"
    xmlns:tools="http://schemas.android.com/tools"
    android:layout_width="match_parent"
    android:layout_height="match_parent"
    android:orientation="vertical"
    tools:context="com.example.cc.cc.CustomImg">

    <LinearLayout
        android:layout_width="wrap_content"
        android:layout_height="wrap_content"
        android:background="@android:color/holo_blue_dark"
        android:orientation="horizontal">

        <com.example.cc.cc.custom.CustomImage
            android:layout_width="wrap_content"
            android:layout_height="wrap_content"
            android:paddingLeft="10dp"
            android:paddingTop="10dp"
            cc:img="@drawable/ddd"
            cc:imgRadius="30" />

        <TextView
            android:layout_width="wrap_content"
            android:layout_height="wrap_content"
            android:background="#ff00ff"
            android:text="TEST" />

        <com.example.cc.cc.custom.CustomImage
            android:layout_width="wrap_content"
            android:layout_height="wrap_content"
            cc:img="@drawable/ddd"
            cc:imgRadius="30" />

        <com.example.cc.cc.custom.CustomImage
            android:layout_width="wrap_content"
            android:layout_height="wrap_content"
            android:paddingLeft="10dp"
            cc:img="@drawable/ddd"
            cc:imgRadius="30" />

    </LinearLayout>

    <com.example.cc.cc.custom.CustomImage
        android:layout_width="100dp"
        android:layout_height="100dp"
        android:padding="10dp"
        cc:img="@drawable/ddd"
        cc:imgRadius="30" />


</LinearLayout>
通过该例子,充分理解widthMeasureSpec, heightMeasureSpec中的值对自定义view测量的影响,父view对子view的尺寸约束。以便在以后自定义view时可以游刃有余!


 1万+
1万+

 被折叠的 条评论
为什么被折叠?
被折叠的 条评论
为什么被折叠?
 到【灌水乐园】发言


