最近在现场维护数据库(
Windows Server 2008 R2+Oracle 10.2.0.5)时,发现数据库软件所在分区的空间几乎所剩无几。
将近 100G的空间,除了操作系统和数据库软件,其余什么都没有安装 ,竟然只有6.15G可用, 这是怎么回事呢?

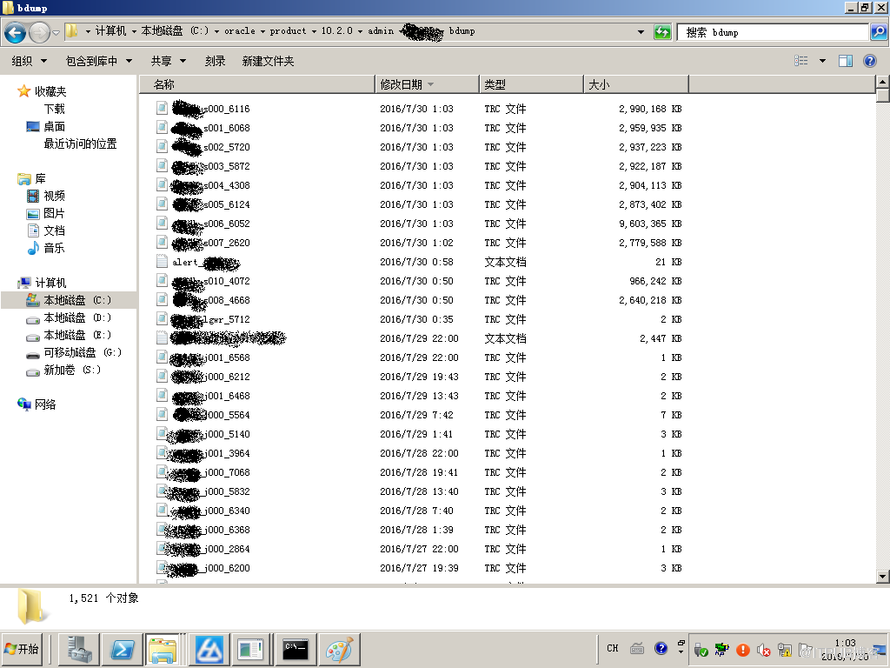
依次排查C盘下的目录,发现问题出在了bdmp目录。
不看不知道,一看吓一跳,超过2G的trace文件有9个,其中有一个将近10G;
其余将近1G的还有不少,怪不得 只有6.15G可用 空间呢。

那么,这些trace文件都记录了什么内容呢?选了几个KB、MB级别的文件打开看了一下,发现内容都一样:
点击( 此处 )折叠或打开
通过查找资料得知,这是WARNING是个Bug,和Oracle的特定版本有关:
点击( 此处 )折叠或打开
那么,如何解决这个bug呢?
貌似 只能升级到上述修复版本或者更高版本。
回想当初,我们由10.2.0.4升级到10.2.0.5,只是为了解决Oracle在Rose HA环境下EM无法正常工作的问题(事实上只是解决了一个其中一个小bug,EM在双机切换时仍然无法正常使用)。
没想到,却引入了这么一个bug。
重要的事情说三遍:
升级需谨慎!
升级需谨慎!
升级需谨慎!
~~~~~~~ the end~~~~~~~~~
hoegh
2016.08.03
将近 100G的空间,除了操作系统和数据库软件,其余什么都没有安装 ,竟然只有6.15G可用, 这是怎么回事呢?

依次排查C盘下的目录,发现问题出在了bdmp目录。
不看不知道,一看吓一跳,超过2G的trace文件有9个,其中有一个将近10G;
其余将近1G的还有不少,怪不得 只有6.15G可用 空间呢。

那么,这些trace文件都记录了什么内容呢?选了几个KB、MB级别的文件打开看了一下,发现内容都一样:
点击( 此处 )折叠或打开
- Dump file c:\oracle\product\10.2.0\admin\HOEGH\bdump\HOEGH_s009_6048.trc
- Sat Jul 30 01:07:40 2016
- ORACLE V10.2.0.5.0 - 64bit Production vsnsta=0
- vsnsql=14 vsnxtr=3
- Oracle Database 10g Enterprise Edition Release 10.2.0.5.0 - 64bit Production
- With the Partitioning, OLAP, Data Mining and Real Application Testing options
- Windows NT Version V6.1 Service Pack 1
- CPU : 40 - type 8664, 20 Physical Cores
- Process Affinity : 0x0000000000000000
- Memory (Avail/Total): Ph:11348M/32757M, Ph+PgF:43306M/65513M
- Instance name: HOEGH
-
- Redo thread mounted by this instance: 1
-
- Oracle process number: 28
-
- Windows thread id: 6048, image: ORACLE.EXE (S009)
-
-
- *** 2016-07-30 01:07:40.094
- *** SESSION ID:(291.400) 2016-07-30 01:07:40.079
- WARNING:Could not lower the asynch I/O limit to 160 for SQL direct I/O. It is set to -1
- *** SESSION ID:(168.4402) 2016-07-30 01:07:41.295
- WARNING:Could not lower the asynch I/O limit to 160 for SQL direct I/O. It is set to -1
- *** 2016-07-30 01:07:53.978
- *** SESSION ID:(205.686) 2016-07-30 01:07:53.978
- WARNING:Could not lower the asynch I/O limit to 160 for SQL direct I/O. It is set to -1
- *** SESSION ID:(224.27814) 2016-07-30 01:07:55.195
- WARNING:Could not lower the asynch I/O limit to 160 for SQL direct I/O. It is set to -1
- *** 2016-07-30 01:09:37.079
- *** SESSION ID:(241.21749) 2016-07-30 01:09:37.079
- WARNING:Could not lower the asynch I/O limit to 160 for SQL direct I/O. It is set to -1
- *** 2016-07-30 01:13:37.179
- *** SESSION ID:(298.53285) 2016-07-30 01:13:37.179
- WARNING:Could not lower the asynch I/O limit to 160 for SQL direct I/O. It is set to -1
- *** 2016-07-30 01:14:07.427
- *** SESSION ID:(219.44573) 2016-07-30 01:14:07.427
- WARNING:Could not lower the asynch I/O limit to 160 for SQL direct I/O. It is set to -1
- *** SESSION ID:(263.59334) 2016-07-30 01:14:08.691
- WARNING:Could not lower the asynch I/O limit to 160 for SQL direct I/O. It is set to -1
- *** 2016-07-30 01:20:09.130
- *** SESSION ID:(160.19644) 2016-07-30 01:20:09.130
- WARNING:Could not lower the asynch I/O limit to 160 for SQL direct I/O. It is set to -1
- *** SESSION ID:(280.35874) 2016-07-30 01:20:10.346
- WARNING:Could not lower the asynch I/O limit to 160 for SQL direct I/O. It is set to -1
- *** 2016-07-30 01:21:52.277
- *** SESSION ID:(224.27814) 2016-07-30 01:21:52.277
- WARNING:Could not lower the asynch I/O limit to 160 for SQL direct I/O. It is set to -1
通过查找资料得知,这是WARNING是个Bug,和Oracle的特定版本有关:
点击( 此处 )折叠或打开
- 'Warning:Could not Lower the Asynch I/O Limit to 224 for SQL direct I/O. It is set to -1' After Upgrading To 10.2.0.5 (Doc ID 1155445.1)
- Bug 9772888 - Needless "WARNING:Could not lower the asynch I/O limit to .. for SQL direct I/O It is set to
该Bug 影响的2个版本:
10.2.0.5
11.2.0.1
在如下版本已经修复:
12.1 (Future Release)
11.2.0.2 (Server Patch Set)
10.2.0.5.2 Patch Set Update
10.2.0.5 Patch 1 on Windows Platforms
那么,如何解决这个bug呢?
貌似 只能升级到上述修复版本或者更高版本。
回想当初,我们由10.2.0.4升级到10.2.0.5,只是为了解决Oracle在Rose HA环境下EM无法正常工作的问题(事实上只是解决了一个其中一个小bug,EM在双机切换时仍然无法正常使用)。
没想到,却引入了这么一个bug。
重要的事情说三遍:
升级需谨慎!
升级需谨慎!
升级需谨慎!
~~~~~~~ the end~~~~~~~~~
hoegh
2016.08.03
来自 “ ITPUB博客 ” ,链接:http://blog.itpub.net/30162081/viewspace-2122886/,如需转载,请注明出处,否则将追究法律责任。
转载于:http://blog.itpub.net/30162081/viewspace-2122886/


 225
225

 被折叠的 条评论
为什么被折叠?


