


以前开发 web 项目时,只需将静态的 "html” 页面后缀名修改为“jsp”,然后在文件中加入jsp页面标识即可做jsp开发。
1. 模板引擎
1、市面上主流的 Java 模板引擎有:JSP、Velocity、Freemarker、Thymeleaf
2、JSP 本质也是模板引擎,Spring Boot 默认是不支持jsp的,官方推荐使用 “Thymeleaf”模板引擎
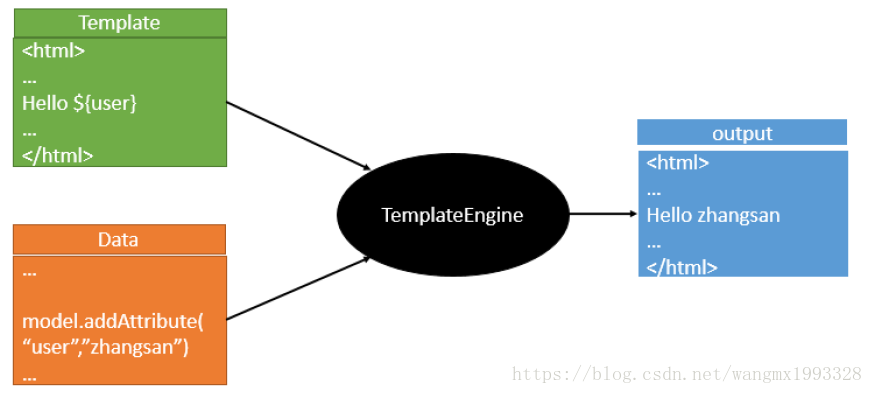
3、模板引擎原理图如下,模板引擎的作用都是将模板(页面)和数据进行整合然后输出显示,区别在于不同的模板使用不同的语法,如 JSP 的JSTL表达式,以及JSP 自己的表达式和语法,同理 Thymeleaf 也有自己的语法
2. Spring Boot 使用 Thymeleaf
1、Thymeleaf 官网:https://www.thymeleaf.org/
2、Thymeleaf 在Github 的主页:https://github.com/thymeleaf/thymeleaf
3. 引入 Thymeleaf
1、使用 Thymeleaf 同样只需要在 pom.xml 引入此模块即可
2、官方文档:“https://docs.spring.io/spring-boot/docs/2.0.3.RELEASE/reference/htmlsingle/#using-boot-starter”
<!-- 引入thymeleaf模板引擎-->
<dependency>
    <groupId>org.springframework.boot</groupId>
    <artifactId>spring-boot-starter-thymeleaf</artifactId>
</dependency>
4. 渲染流程规则
1、使用非常简单,可以找到它的自动配置文件即可查看它的使用规则

2、其中默认规则如下:
- 默认前缀:DEFAULT_PREFIX = “classpath:/templates/”
- 默认后缀:DEFAULT_SUFFIX = “.html”
这完全类似 Spring MVC 的映射规则,如果想修改这些配置只需要在全局配置文件中覆盖修改即可。
3、所以默认只要把 HTML 页面放在 classpath:/templates/ 下,thymeleaf 就能自动渲染, classpath:/templates/ 目录以外的 html 文件是无法使用 Thymeleaf 引擎的。
4、当然自己可以在全局配置文件中覆盖修改这些规则,修改的选项可以从 “ThymeleafProperties” 文件中找到,也可以参 考官方文档配置:
#THYMELEAF (ThymeleafAutoConfiguration)
spring.thymeleaf.prefix=classpath:/templates/ # Prefix that gets prepended to view names when building a URL.
spring.thymeleaf.servlet.content-type=text/html # Content-Type value written to HTTP responses.
spring.thymeleaf.suffix=.html # Suffix that gets appended to view names when building a URL.
5. 后台控制层
/**
 * @RestController :表示本类所有的方法都是直接做内容返回到浏览器
 * @Controller :控制层
 */
@Controller
public class HelloController {

    @RequestMapping("/home")
    public String home(Map<String, Object> paramMap) {
        /** 默认Map的内容会放大请求域中,页面可以直接取值*/
        paramMap.put("name", "James");
        /** 会自动跳转到默认的 classpath:/templates/success.html 页面*/
        return "home";
    }

}
注意不要使用@RestController作为控制层,@RestController默认将方法返回值直接返回给浏览器,不会做视图映射。
在控制层中返回逻辑视图名+数据,逻辑视图名为 home ,意思是需要在 resources/templates 目录下提供一个名为 home.html 的 Thymeleaf 模板文件。
6. 前台页面
<!DOCTYPE html>
<!--作用是让IDEA编辑器有Thymeleaf语法提示,不写不影响运行-->
<html lang="en" xmlns:th="http://www.thymeleaf.org">
<head>
    <meta charset="UTF-8">
    <title>Title</title>
</head>
<body>
	<!--取值语法之一-->
    <p th:text="${name}"></p>
</body>
</html>
浏览器访问:
http://localhost:8080/home
手动渲染Thymeleaf
上面都是自动渲染 Thymeleaf 模板后返回给浏览器,我们也可以手动渲染 Thymeleaf 模板,这个一般在邮件发送时候有用,例如在 resources/templates 目录下新建一个邮件模板,文件名:mail.html,如下:
<!DOCTYPE html>
<html lang="en" xmlns:th="http://www.thymeleaf.org">
<head>
    <meta charset="UTF-8">
    <title>Title</title>
</head>
<body>
<p>hello 欢迎 <span th:text="${username}"></span>加入 XXX 集团,您的入职信息如下:</p>
<table border="1">
    <tr>
        <td>职位</td>
        <td th:text="${position}"></td>
    </tr>
    <tr>
        <td>薪水</td>
        <td th:text="${salary}"></td>
    </tr>
</table>
<img src="http://www.javaboy.org/images/sb/javaboy.jpg" alt="">
</body>
</html>
现在需要将这个 HTML 模板渲染成一个 String 字符串。
@SpringBootTest
@RunWith(SpringRunner.class)
public class DemoTests {

    @Autowired
    TemplateEngine templateEngine;

    @Test
    public void test(){
        Context context = new Context();
        context.setVariable("username", "James");
        context.setVariable("position", "Java工程师");
        context.setVariable("salary", 99999);
        String mail = templateEngine.process("mail", context);
        System.out.println(mail);
    }

}
- 注入一个 TemplateEngine 对象,这个对象就是在 Thymeleaf 的自动化配置类中配置的(即当我们引入 Thymeleaf 的依赖之后,这个实例就有了)。
- 构造一个 Context 对象用来存放变量。
- 调用 process 方法进行渲染,该方法的返回值就是渲染后的 HTML 字符串。
源码解析
Spring Boot 为 Thymeleaf 提供了自动化配置类org.springframework.boot.autoconfigure.thymeleaf.ThymeleafAutoConfiguration 。

自动化配置类中,使用 ThymeleafProperties 作为配置类,然后 @ConditionalOnClass 注解表示当当前系统中存在 TemplateMode 和 SpringTemplateEngine 类时,当前的自动化配置类才会生效,即只要项目中引入了 Thymeleaf 相关的依赖,这个配置就会生效。
查看下 ThymeleafProperties 配置类。
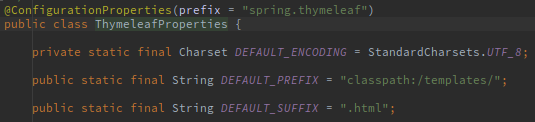
前三个 static 变量定义了默认的编码格式、视图解析器的前缀、后缀等。
可以看出来,Thymeleaf 模板的默认位置在 resources/templates 目录下,默认的后缀是 html 。
默认的配置几乎不需要做任何更改就可以直接使用了。
如果有特殊需求,则可以在 application.properties 中配置以 spring.thymeleaf 开头的属性即可。


 551
551


 被折叠的 条评论
为什么被折叠?
被折叠的 条评论
为什么被折叠?
 到【灌水乐园】发言


