


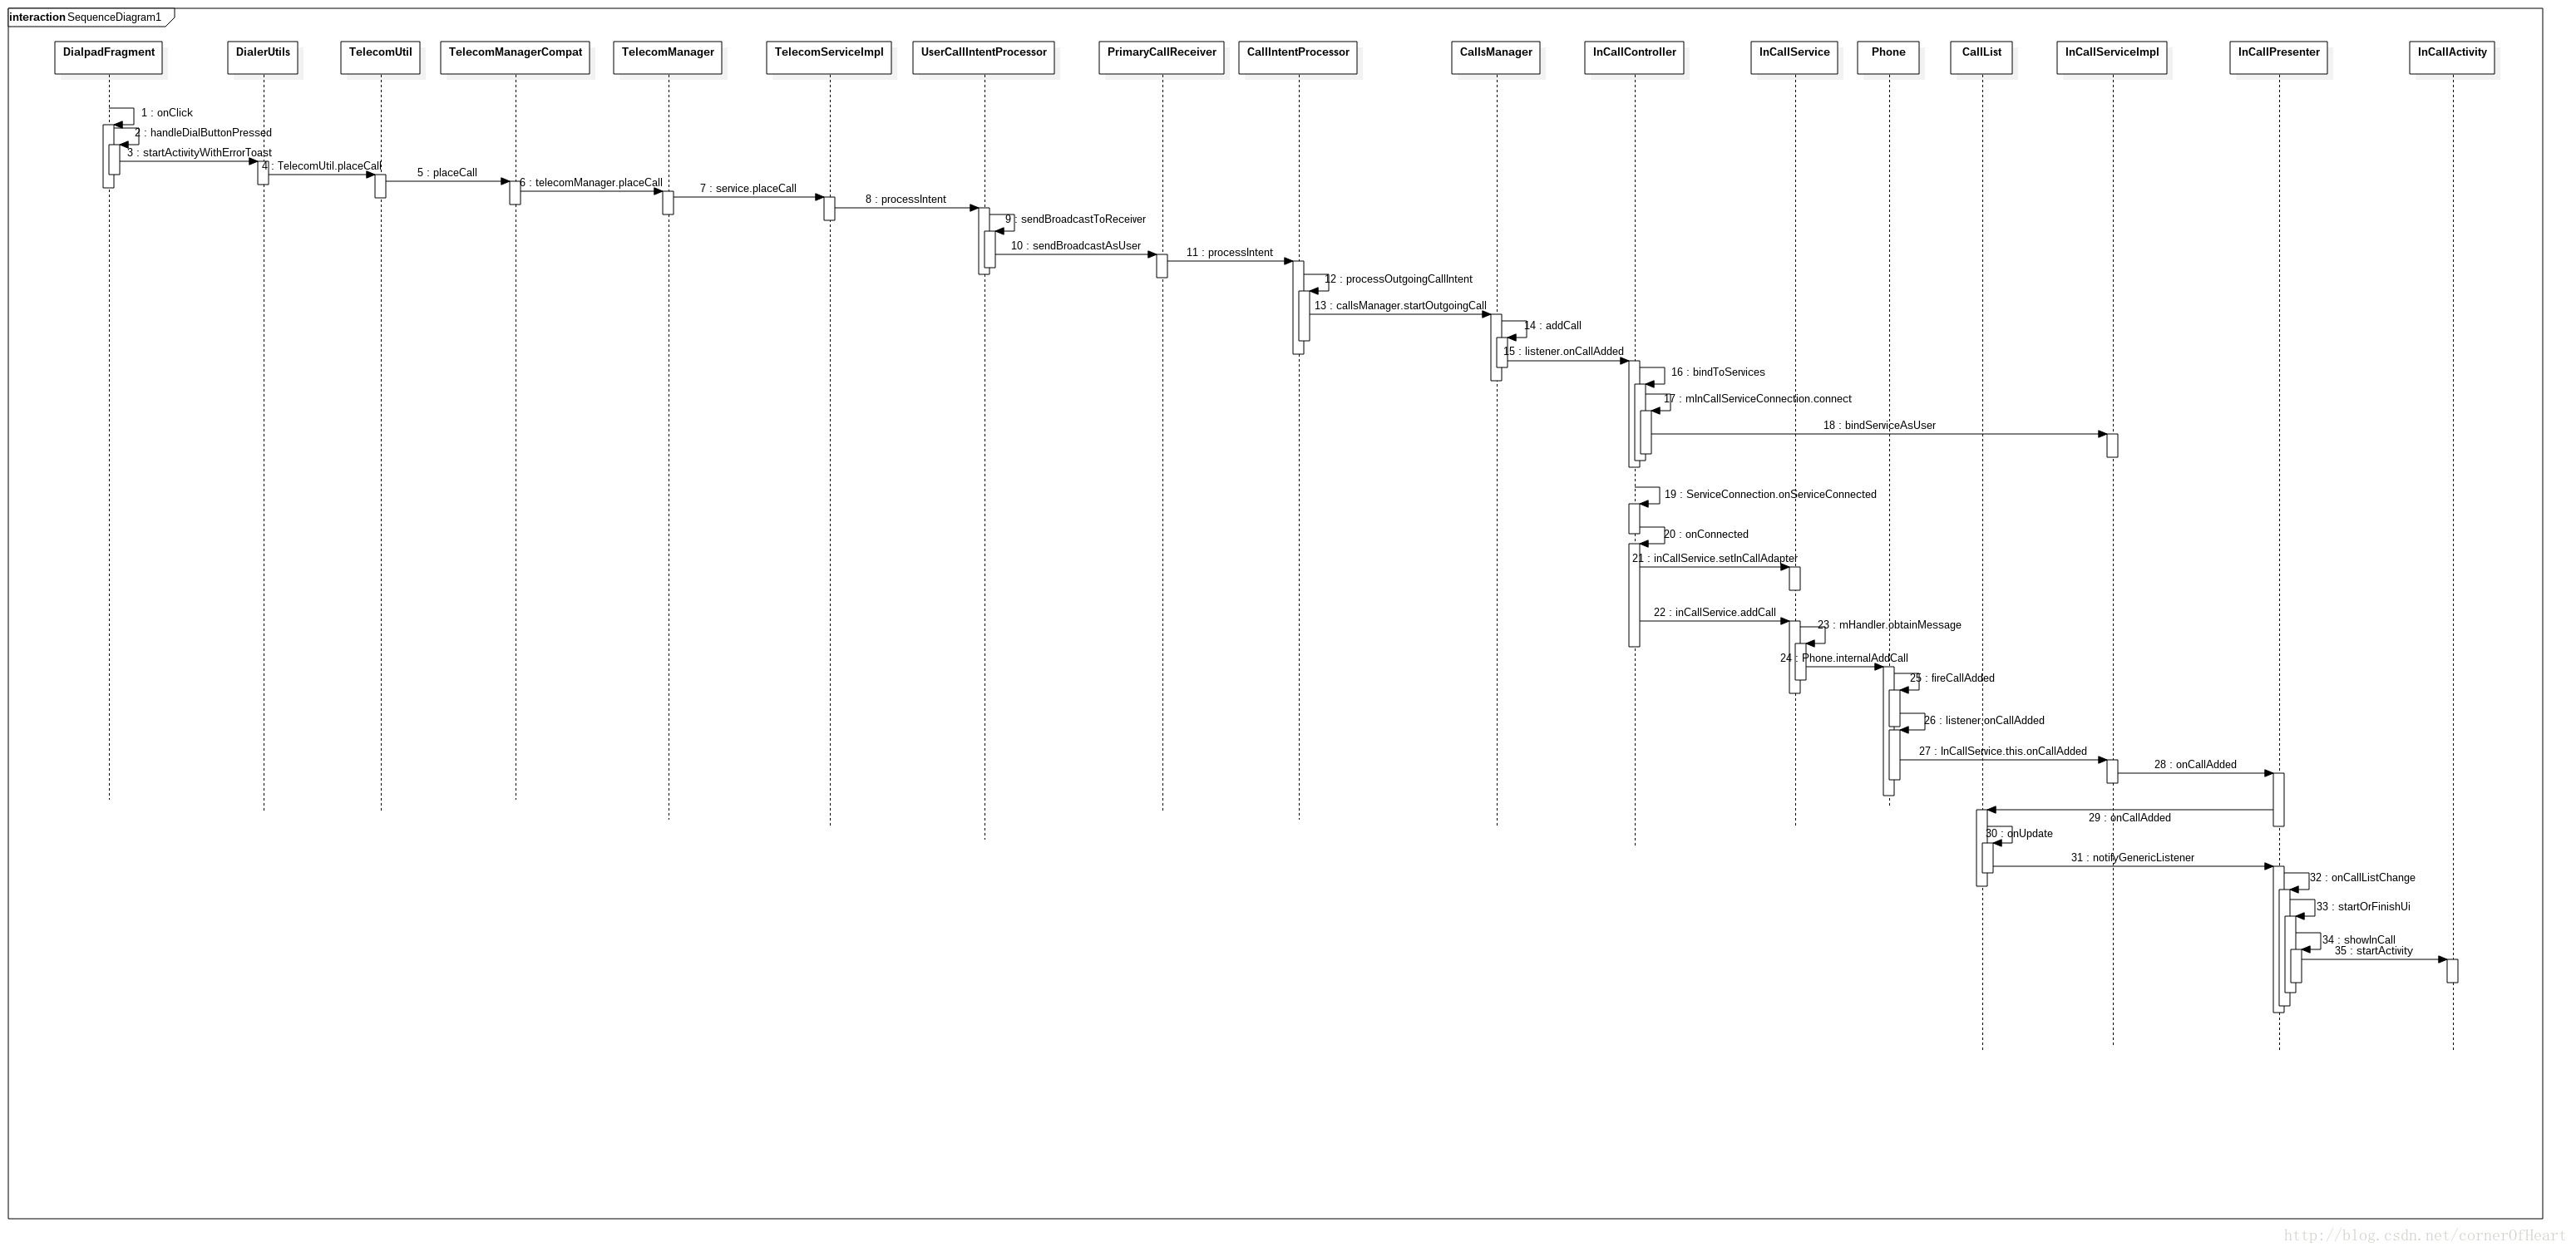
首先明确,MO拨号到启动InCallUI界面会依次经过Dialer–>Telecom service–>InCallUI三部分。
在点击拨号盘拨号按钮后通过onClick()会进入DialUtils.startActivityWithErrorToast():
DialpadFragment.java
    @Override
    public void onClick(View view) {
        int resId = view.getId();
        if (resId == R.id.dialpad_floating_action_button) {
            view.performHapticFeedback(HapticFeedbackConstants.VIRTUAL_KEY);
            handleDialButtonPressed();
        }
	...
    }

    private void handleDialButtonPressed() {
        if (isDigitsEmpty()) { // No number entered.
            handleDialButtonClickWithEmptyDigits();
        } else {
		...
            } else {
                final Intent intent = new CallIntentBuilder(number).
                        setCallInitiationType(LogState.INITIATION_DIALPAD)
                        .build();
                DialerUtils.startActivityWithErrorToast(getActivity(), intent);
                hideAndClearDialpad(false);
            }
        }
    }
DialerUtils.java
    public static void startActivityWithErrorToast(Context context, Intent intent, int msgId) {

            } else {
                context.startActivity(intent);
            }
        }
    }
这里会通过IntentUtil.CALL_ACTION启动Telecom中UserCallActivity,但其实该Activity并不会有一个可是的界面显示,只是作为一个中间转换作用。
 <activity android:name=".components.UserCallActivity"
                ...
            <!-- CALL action intent filters for the various ways of initiating an outgoing call. -->
                        <!-- CALL action intent filters for the various ways of initiating an outgoing call. -->
            <intent-filter>
                <action android:name="android.intent.action.CALL" />
                <category android:name="android.intent.category.DEFAULT" />
                <data android:scheme="tel" />
            </intent-filter>
	</activity>
public class UserCallActivity extends Activity implements TelecomSystem.Component {

    @Override
    protected void onCreate(Bundle bundle) {
        super.onCreate(bundle);
        Log.startSession("UCA.oC");
        try {
            // TODO: Figure out if there is something to restore from bundle.
            // See OutgoingCallBroadcaster in services/Telephony for more.
            Intent intent = getIntent();
            verifyCallAction(intent);
            final UserManager userManager = (UserManager) getSystemService(Context.USER_SERVICE);
            final UserHandle userHandle = new UserHandle(userManager.getUserHandle());
            // Once control flow has passed to this activity, it is no longer guaranteed that we can
            // accurately determine whether the calling package has the CALL_PHONE runtime permission.
            // At this point in time we trust that the ActivityManager has already performed this
            // validation before starting this activity.
            new UserCallIntentProcessor(this, userHandle).processIntent(getIntent(),
                    getCallingPackage(), true /* hasCallAppOp*/);
        } finally {
            Log.endSession();
        }
        finish();
    }
进入UserCallIntentProcessor().processIntent():
 public void processIntent(Intent intent, String callingPackageName,
            boolean canCallNonEmergency) {
        String action = intent.getAction();

        if (Intent.ACTION_CALL.equals(action) ||
                Intent.ACTION_CALL_PRIVILEGED.equals(action) ||
                Intent.ACTION_CALL_EMERGENCY.equals(action)) {
            processOutgoingCallIntent(intent, callingPackageName, canCallNonEmergency);
        }
    }

    private void processOutgoingCallIntent(Intent intent, String callingPackageName,
            boolean canCallNonEmergency) {
        Uri handle = intent.getData();
        String scheme = handle.getScheme();
        String uriString = handle.getSchemeSpecificPart();

	...
        int videoState = intent.getIntExtra(
                TelecomManager.EXTRA_START_CALL_WITH_VIDEO_STATE,
                VideoProfile.STATE_AUDIO_ONLY);
        Log.d(this, "processOutgoingCallIntent videoState = " + videoState);

        intent.putExtra(CallIntentProcessor.KEY_IS_PRIVILEGED_DIALER,
                isDefaultOrSystemDialer(callingPackageName));

        // Save the user handle of current user before forwarding the intent to primary user.
        intent.putExtra(CallIntentProcessor.KEY_INITIATING_USER, mUserHandle);

        sendBroadcastToReceiver(intent);
    }


    private boolean sendBroadcastToReceiver(Intent intent) {
        intent.putExtra(CallIntentProcessor.KEY_IS_INCOMING_CALL, false);
        intent.setFlags(Intent.FLAG_RECEIVER_FOREGROUND);
        intent.setClass(mContext, PrimaryCallReceiver.class);
        Log.d(this, "Sending broadcast as user to CallReceiver");
        mContext.sendBroadcastAsUser(intent, UserHandle.SYSTEM);
        return true;
    }
对intent做一些处理后,以广播方式发出,在 PrimaryCallReceiver接收:
    public void onReceive(Context context, Intent intent) {
        Log.startSession("PCR.oR");
        synchronized (getTelecomSystem().getLock()) {
            getTelecomSystem().getCallIntentProcessor().processIntent(intent);
        }
        Log.endSession();
    }
这就进入CallIntentProcessor().processIntent(),在该方法中取出了intent中携带的各中参数传入CallsManager.startOutgoingCall()用于创建Call对象,
CallsManager.startOutgoingCall()创建Telecom Call对象以此向上构建Telecom Framework Call和InCallUI Call对象,进而去启动InCallUI。
返回后,继续在processOutgoingCallIntent()中调broadcaster.processIntent()…–>CallsManager.placeOutgoingCall()向下进行拨号流程。
此处,我们只分析向上启动InCAllUI的流程。
public void processIntent(Intent intent) {
	...
        Call call = callsManager
                .startOutgoingCall(handle, phoneAccountHandle, clientExtras, initiatingUser);

        if (call != null) {
            // Asynchronous calls should not usually be made inside a BroadcastReceiver because once
            // onReceive is complete, the BroadcastReceiver's process runs the risk of getting
            // killed if memory is scarce. However, this is OK here because the entire Telecom
            // process will be running throughout the duration of the phone call and should never
            // be killed.
            NewOutgoingCallIntentBroadcaster broadcaster = new NewOutgoingCallIntentBroadcaster(
                    context, callsManager, call, intent, callsManager.getPhoneNumberUtilsAdapter(),
                    isPrivilegedDialer);
            final int result = broadcaster.processIntent();
            final boolean success = result == DisconnectCause.NOT_DISCONNECTED;

            if (!success && call != null) {
                disconnectCallAndShowErrorDialog(context, call, result);
            }
        }
    }
CallsManager.startOutgoingCall()
Call startOutgoingCall(Uri handle, PhoneAccountHandle phoneAccountHandle, Bundle extras,
            UserHandle initiatingUser) {
        boolean isReusedCall = true;
        Call call = reuseOutgoingCall(handle);

        // Create a call with original handle. The handle may be changed when the call is attached
        // to a connection service, but in most cases will remain the same.
        if (call == null) {
            call = new Call(getNextCallId(), mContext,
                    this,
                    mLock,
                    mConnectionServiceRepository,
                    mContactsAsyncHelper,
                    mCallerInfoAsyncQueryFactory,
                    mPhoneNumberUtilsAdapter,
                    handle,
                    null /* gatewayInfo */,
                    null /* connectionManagerPhoneAccount */,
                    null /* phoneAccountHandle */,
                    Call.CALL_DIRECTION_OUTGOING /* callDirection */,
                    false /* forceAttachToExistingConnection */,
                    false /* isConference */
            );
            call.initAnalytics();
    ......
   addCall(call);
 }
在addCall()中:
private void addCall(Call call) {
          ....
        for (CallsManagerListener listener : mListeners) {
            if (Log.SYSTRACE_DEBUG) {
                Trace.beginSection(listener.getClass().toString() + " addCall");
            }
            listener.onCallAdded(call);
            if (Log.SYSTRACE_DEBUG) {
                Trace.endSection();
            }
        }
 }
这里通过分发Listener进入InCallController.onCallAdded():
    public void onCallAdded(Call call) {
        if (!isBoundToServices()) {
            bindToServices(call);
        } else {
          	...
                try {
                    inCallService.addCall(parcelableCall);
                } catch (RemoteException ignored) {
                }
            }
            Log.i(this, "Call added to components: %s", componentsUpdated);
        }
    }
总体来说,这里就会去在InCallController中通过跨进程的绑定InCallUI中的InCallServiceImpl来把Call对象给到InCallUI用来启动InCallActivity。
public void bindToServices(Call call) {
        ....
        // [HTC_PHONE] s Zoey if VzwInCallServiceImpl is enable, not show InCallUI
        if (shouldShowInCallUI()) {
            mInCallServiceConnection.connect(call);
        }
        // [HTC_PHONE] e Zoey if VzwInCallServiceImpl is enable, not show InCallUI
        ....
    }
这个方法封装的比较复杂,但最终都会通过mInCallServiceConnection.connect(call)调到InCallServiceBindingConnection.connect(),在此处真正进行对InCallService(实际是InCallUI中的InCallServiceImpl)进行bind:
 @Override
        public boolean connect(Call call) {
            if (mIsConnected) {
                Log.event(call, Log.Events.INFO, "Already connected, ignoring request.");
                return true;
            }

            Intent intent = new Intent(InCallService.SERVICE_INTERFACE);
            intent.setComponent(mInCallServiceInfo.getComponentName());
            if (call != null && !call.isIncoming() && !call.isExternalCall()){
                intent.putExtra(TelecomManager.EXTRA_OUTGOING_CALL_EXTRAS,
                        call.getIntentExtras());
                intent.putExtra(TelecomManager.EXTRA_PHONE_ACCOUNT_HANDLE,
                        call.getTargetPhoneAccount());
            }

            Log.i(this, "Attempting to bind to InCall %s, with %s", mInCallServiceInfo, intent);
            mIsConnected = true;
            if (!mContext.bindServiceAsUser(intent, mServiceConnection,
                        Context.BIND_AUTO_CREATE | Context.BIND_FOREGROUND_SERVICE,
                        UserHandle.CURRENT)) {
                Log.w(this, "Failed to connect.");
                mIsConnected = false;
            }
       ....
        }
这里的Intent intent = new Intent(InCallService.SERVICE_INTERFACE);其中Intent.Action==SERVICE_INTERFACE = “android.telecom.InCallService”;其指向的就是InCallUI中的InCallServiceImpl extends InCallService:
<service android:name="com.android.incallui.InCallServiceImpl"
                 android:permission="android.permission.BIND_INCALL_SERVICE"
                 android:directBootAware="true" >
            <meta-data android:name="android.telecom.IN_CALL_SERVICE_UI" android:value="true" />
            <meta-data android:name="android.telecom.INCLUDE_EXTERNAL_CALLS" android:value="true" />
            <intent-filter>
                <action android:name="android.telecom.InCallService"/>
            </intent-filter>
        </service>
在绑定service以后会返回InCallServiceBinder对象:
    @Override
    public IBinder onBind(Intent intent) {
        return new InCallServiceBinder();
    }
然后进入
private final ServiceConnection mServiceConnection = new ServiceConnection() {
            @Override
            public void onServiceConnected(ComponentName name, IBinder service) {
                Log.startSession("ICSBC.oSC");
                synchronized (mLock) {
                    try {
                        Log.d(this, "onServiceConnected: %s %b %b", name, mIsBound, mIsConnected);
                        mIsBound = true;
                        if (mIsConnected) {
                            // Only proceed if we are supposed to be connected.
                            onConnected(service);
                        }
                    } finally {
                        Log.endSession();
                    }
                }
            }
这onConnected()方法逐步调到InCallController.onConnected():
private boolean onConnected(InCallServiceInfo info, IBinder service) {
        Trace.beginSection("onConnected: " + info.getComponentName());
        Log.i(this, "onConnected to %s", info.getComponentName());

        IInCallService inCallService = IInCallService.Stub.asInterface(service);
        mInCallServices.put(info, inCallService);

        try {
            inCallService.setInCallAdapter(
                    new InCallAdapter(
                            mCallsManager,
                            mCallIdMapper,
                            mLock,
                            info.getComponentName().getPackageName()));
        } catch (RemoteException e) {
            Log.e(this, e, "Failed to set the in-call adapter.");
            Trace.endSection();
            return false;
        }

        // Upon successful connection, send the state of the world to the service.
        List<Call> calls = orderCallsWithChildrenFirst(mCallsManager.getCalls());
        Log.i(this, "Adding %s calls to InCallService after onConnected: %s, including external " +
                "calls", calls.size(), info.getComponentName());
        int numCallsSent = 0;
        for (Call call : calls) {
            try {
                if (call.isExternalCall() && !info.isExternalCallsSupported()) {
                    continue;
                }

                // Track the call if we don't already know about it.
                addCall(call);
                numCallsSent += 1;
                inCallService.addCall(ParcelableCallUtils.toParcelableCall(
                        call,
                        true /* includeVideoProvider */,
                        mCallsManager.getPhoneAccountRegistrar(),
                        info.isExternalCallsSupported()));
            } catch (RemoteException ignored) {
            }
        }
     ....
    }
这里非常关键,通过IInCallService inCallService = IInCallService.Stub.asInterface(service);在InCallController中获得可操作InCallUI中InCallServiceImpl对象的引用inCallService。然后调用了关键的inCallService.setInCallAdapter(),通过这个方法将Telecom service中的InCallAdapter对象设到了Phone的实例中。接着远程调用inCallService.addCall(ParcelableCallUtils.toParcelableCall(call)将Telecom Service call序列化后传给InCallUI用于构建Telecom Framework Call:
 @Override
        public void addCall(ParcelableCall call) {
            mHandler.obtainMessage(MSG_ADD_CALL, call).sendToTarget();
        }

      case MSG_ADD_CALL:
           mPhone.internalAddCall((ParcelableCall) msg.obj);
      break;

    final void internalAddCall(ParcelableCall parcelableCall) {
        Call call = new Call(this, parcelableCall.getId(), mInCallAdapter,
                parcelableCall.getState());
        mCallByTelecomCallId.put(parcelableCall.getId(), call);
        mCalls.add(call);
        checkCallTree(parcelableCall);
        call.internalUpdate(parcelableCall, mCallByTelecomCallId);
        fireCallAdded(call);
     }
注意这里Telecom Framework Call的构造方法有传入InCallAdapter对象,这是后面会用到的用于从上到下进行通话控制的。之后调用了fireCallAdded(call):
 private void fireCallAdded(Call call) {
        for (Listener listener : mListeners) {
            listener.onCallAdded(this, call);
        }
    }
这里的listener是在前面构建Phone对象时传入的mPhoneListener:
 /** ${inheritDoc} */
        @Override
        public void onCallAdded(Phone phone, Call call) {
            InCallService.this.onCallAdded(call);
        }
这里的InCallService.this实际就是InCallServiceImpl实例:
  @Override
    public void onCallAdded(Call call) {
        InCallServiceHelper.preSetup();
        InCallPresenter.getInstance().onCallAdded(call);
    }
进入InCallPresenter.getInstance().onCallAdded():
    public void onCallAdded(final android.telecom.Call call) {
        /*if (shouldAttemptBlocking(call)) {
//            maybeBlockCall(call); // not follow Google design
        } else {*/
            if (call.getDetails()
                    .hasProperty(android.telecom.Call.Details.PROPERTY_IS_EXTERNAL_CALL)) {
                mExternalCallList.onCallAdded(call);
            } else {
                mCallList.onCallAdded(call);
            }
    ....
    }

 public void onCallAdded(final android.telecom.Call telecommCall) {
        Trace.beginSection("onCallAdded");
        final Call call = new Call(telecommCall);
          ....
        if (call.getState() == Call.State.INCOMING ||
                call.getState() == Call.State.CALL_WAITING) {
            onIncoming(call, call.getCannedSmsResponses());
        } else {
            updateMuteStateForSRVCC(call);
            onUpdate(call);
         ....
    }
此处根据Telecom Framework Call创建出对应的InCallUI Call对象,同时设置了监听。之后因为Call.state=DIALING调用onUpdate(call):
   public void onUpdate(Call call) {
        Trace.beginSection("onUpdate");
        onUpdateCall(call);
        notifyGenericListeners();
        Trace.endSection();
    }

    public void notifyGenericListeners() {
        for (Listener listener : mListeners) {
            listener.onCallListChange(this);
        }
    }
进入InCallPresenter:
   @Override
    public void onCallListChange(CallList callList) {
         ....
        InCallState newState = getPotentialStateFromCallList(callList);
        InCallState oldState = mInCallState;
        Log.d(this, "onCallListChange oldState= " + oldState + " newState=" + newState);
        newState = startOrFinishUi(newState);
终于看到曙光了,这里的startOrFinishUi(newState)就是去启动InCallUI通话界面InCallActivity了,传入的newState是InCallState对象,该对象专门用来表征通话界面状态的。
private InCallState startOrFinishUi(InCallState newState) {
        Log.d(this, "startOrFinishUi: " + mInCallState + " -> " + newState);
       ....
     if (showCallUi || showAccountPicker) {
            if(HtcLiteStateController.getInstance().donotShowUIIfLiteConnected() == false) {
                Log.i(this, "Start in call UI");
                showInCall(false /* showDialpad */, !showAccountPicker /* newOutgoingCall */);
            }
        }
     ....

    public void showInCall(final boolean showDialpad, final boolean newOutgoingCall, boolean pendingAnswer) {
        Log.i(this, "Showing InCallActivity");
        Intent intent = getInCallIntent(showDialpad, newOutgoingCall);
        //+[HTC_PHONE]Need to show dialog for user to select video type
        intent.putExtra(EXTRA_SHOW_ANSWER_SELECT_DIALOG, pendingAnswer);
        //+[HTC_PHONE]Need to show dialog for user to select video type
        mContext.startActivity(intent);
    }
OK,InCallActivity终于启动起来了,至于启动起来的界面是什么样的,在之后的关于InCallUI布局一节再来分析。
这里再来说几点零碎的认识:
1,在这个流程,即MO startInCallUI流程中,涉及了Dialer,Telecom Service,Telecom Framework,InCallUI四部分,Dialer不谈,只谈后面三部分。剩下的三个部分从进程角度来讲是运行在两个进程里:1.system_server 2.InCallUI 。其中Telecom Service是运行在system_server中的(android:process=“system”)。而Telecom Framework中的主要java 类是抽象出来放在框架层里,以提供给InCallUI实现或调用的,如InCallService.java,Phone.java,Call.java其并没有运行在一个单独的进程,而是在InCallUI进程中来使用。
2,Telecom service与InCallUI是通过AIDL实现了跨进程的双向互通的。具体实现的类文件是:InCallController.java InCallAdapter.java(Telecom service); InCallService.java InCallAdapter.java(Telecom Framework); InCallServiceImpl.java(InCallUI)。其中Telecom Service通过绑定service–>InCallServiceImpl获得InCallServiceBinder的binder对象用以操作InCallUI。同时调用前面说到的inCallService.setInCallAdapter()传给InCallUI一个在Telecom service中实现了AIDL接口的InCallAdapter extends IInCallAdapter.Stub对象,这就使得InCallUI中持有了操作Telecom service的接口。后面需要分析的HOLD Call, END Call等就需用到这个接口。简单流程如下:
InCallUI Call–>Telecom Framework Call–>Telecom Framwork InCallAdapter–>Telecom Service InCallAdapter


 1311
1311

 被折叠的 条评论
为什么被折叠?
被折叠的 条评论
为什么被折叠?
 到【灌水乐园】发言


