


搭建Spring Boot 项目
详细介绍搭建完整的Spring Boot项目
使用mybatis-plus链接数据库
通过swagger生成接口文档
测试接口
文章目录
一、创建Maven项目
1.点击New Project
2.选择Maven
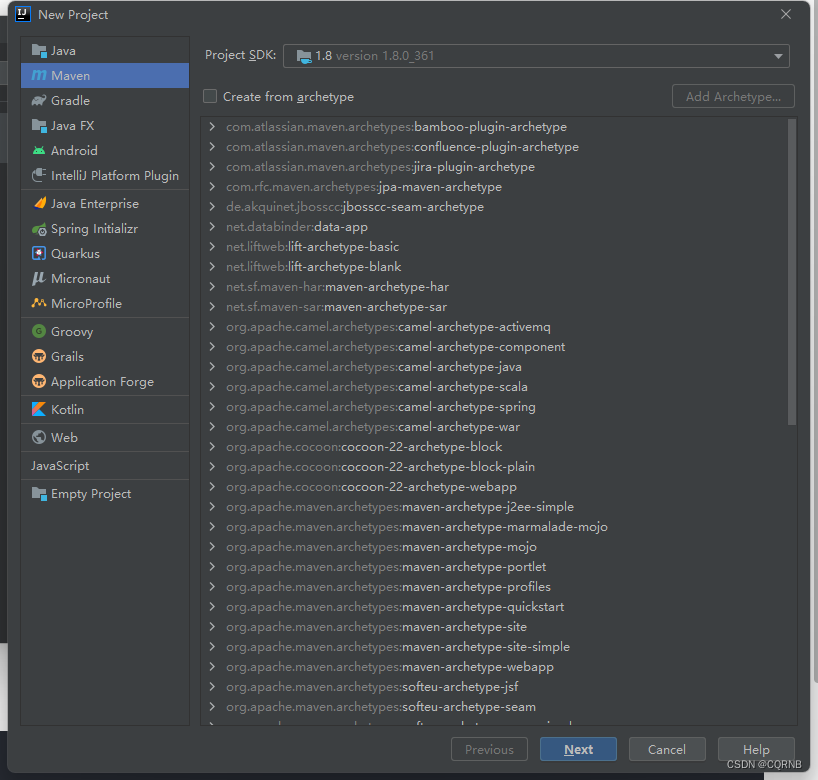
3.点击Next
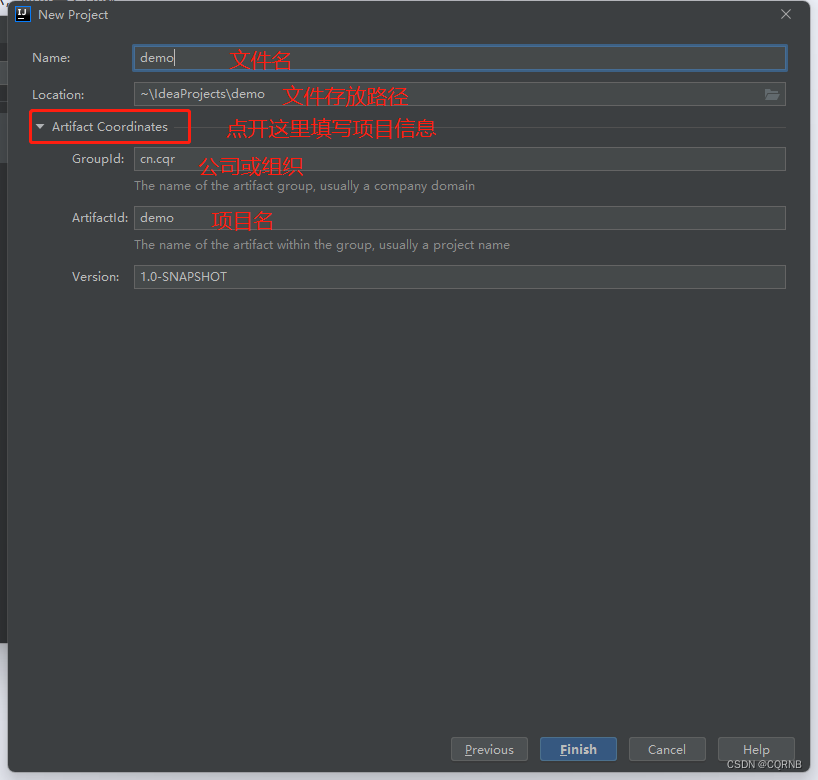
Group一般分为多个段,第一段为域,第二段为公司或组织名称。
4.填好信息后点击Finish
就这样一个空白Maven项目就建好了
二、Maven依赖Spring Boot
1.选择依赖和版本
Spring官网:https://spring.io/
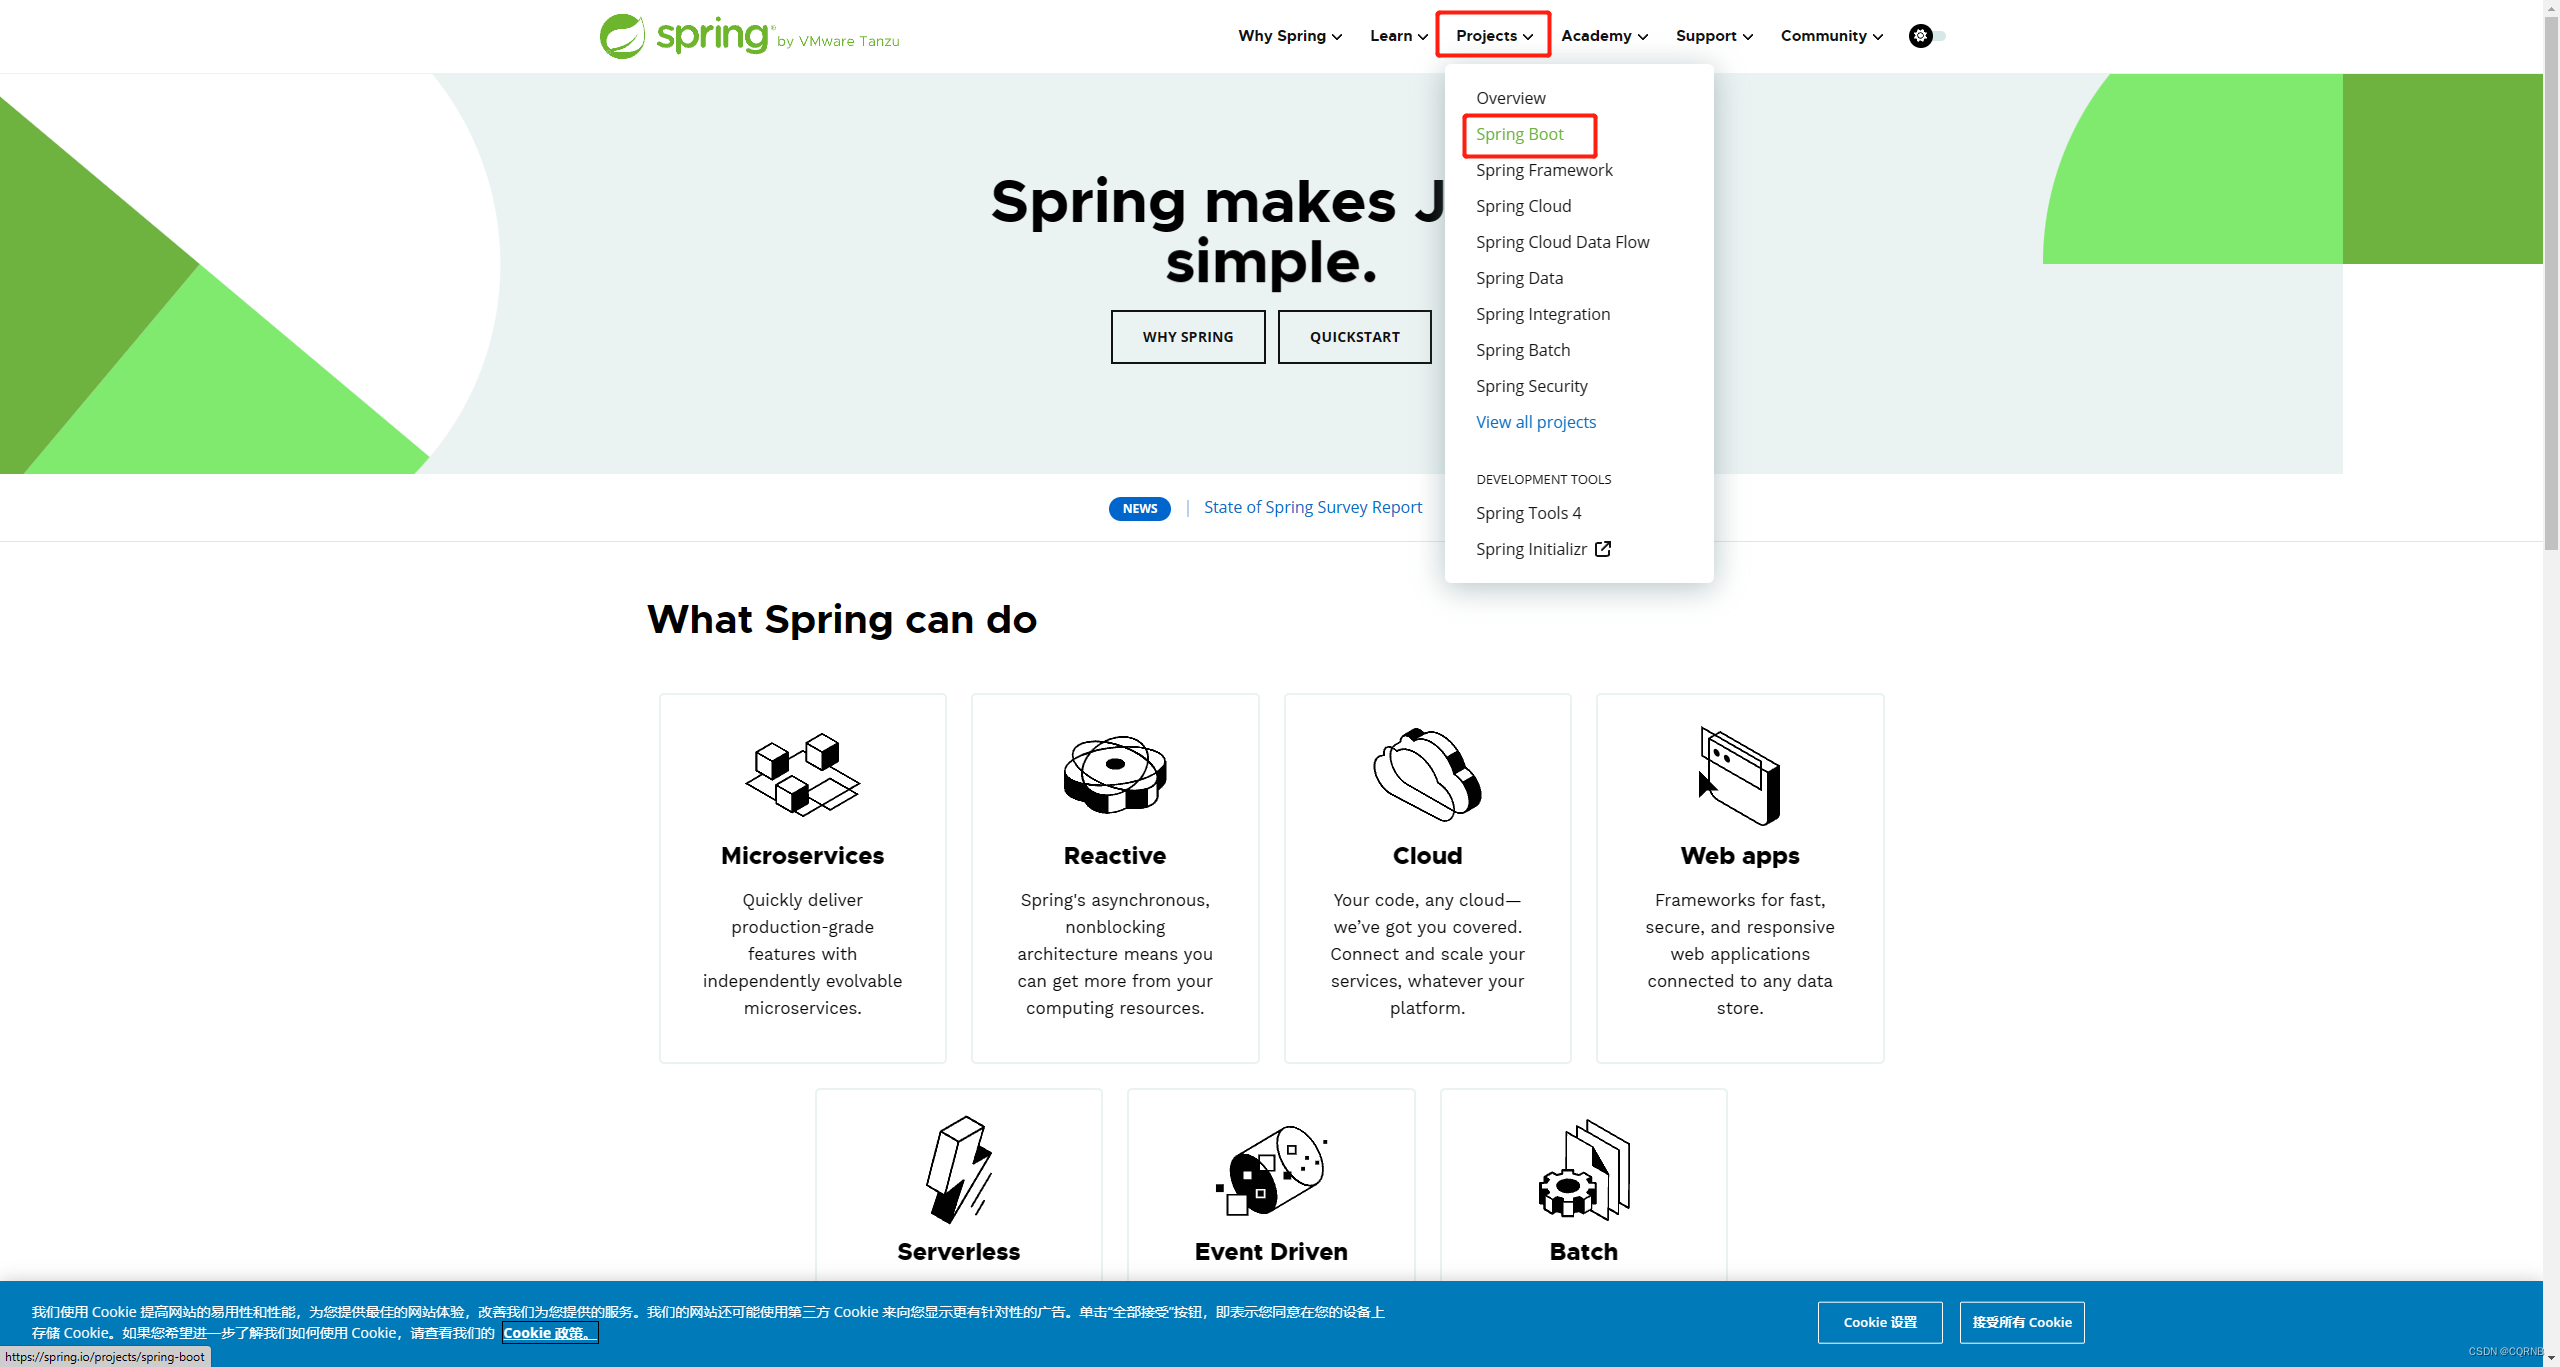
选择spring boot
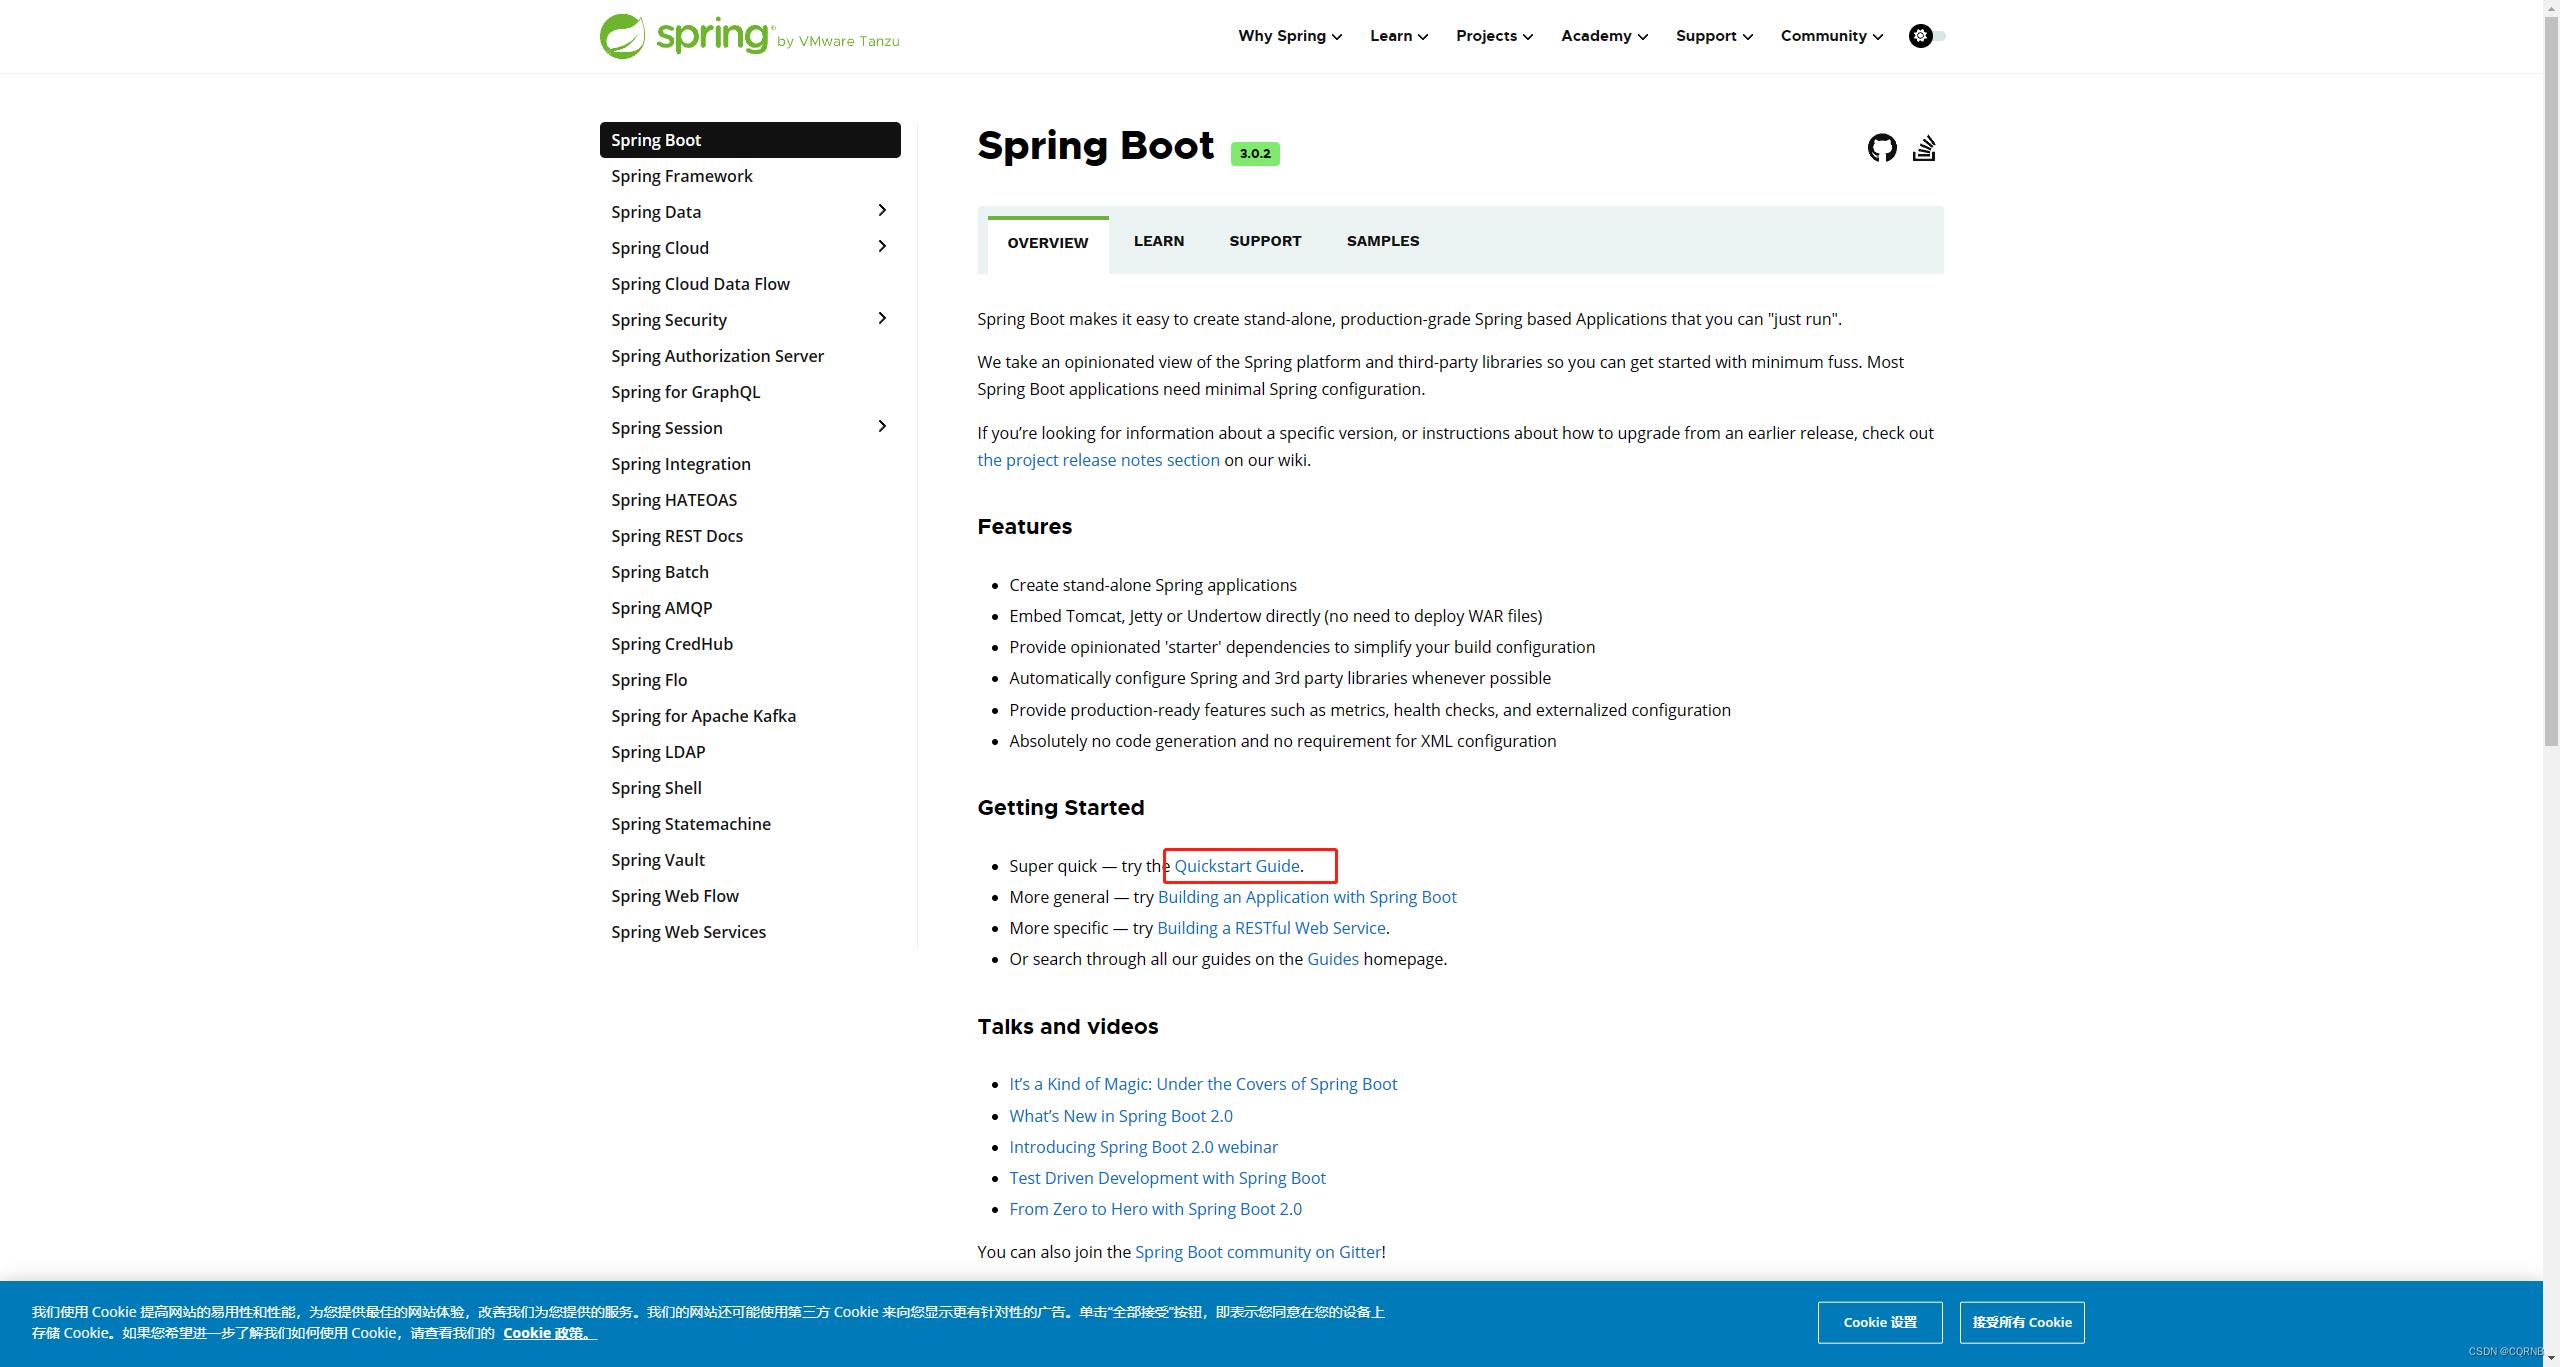
点击入门(Quickstart Guide)
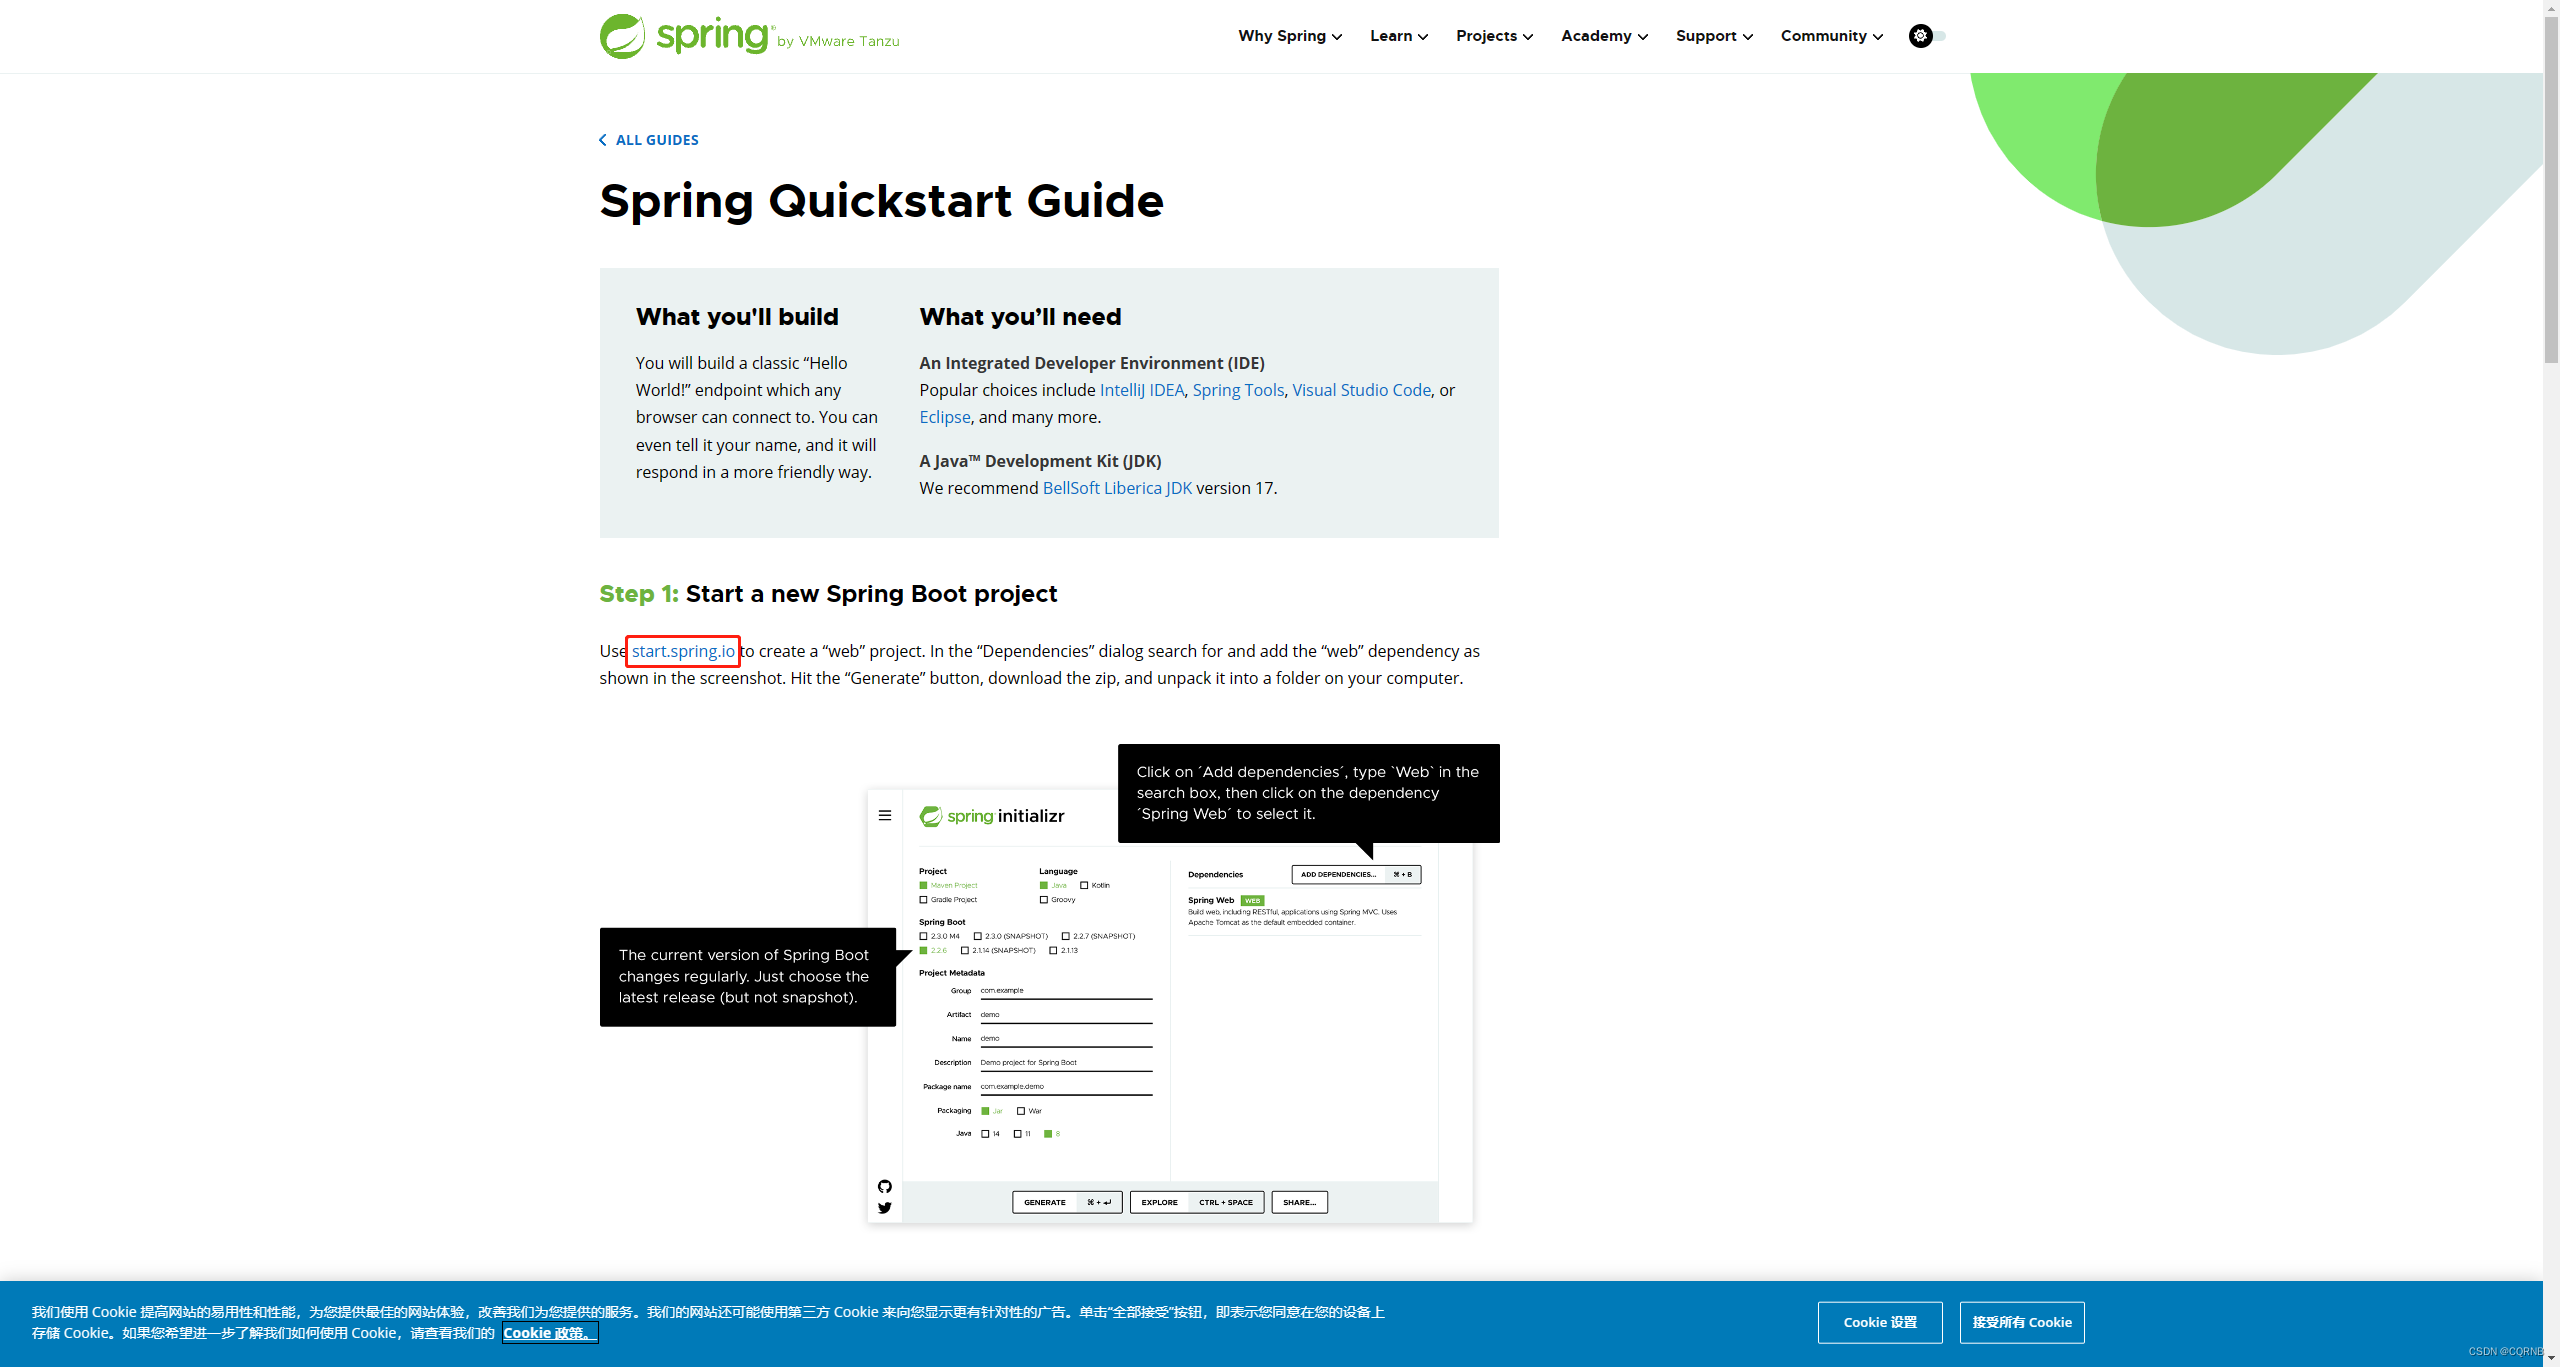
现在spring更新后,把pom依赖整合到这个新地址了:https://start.spring.io/
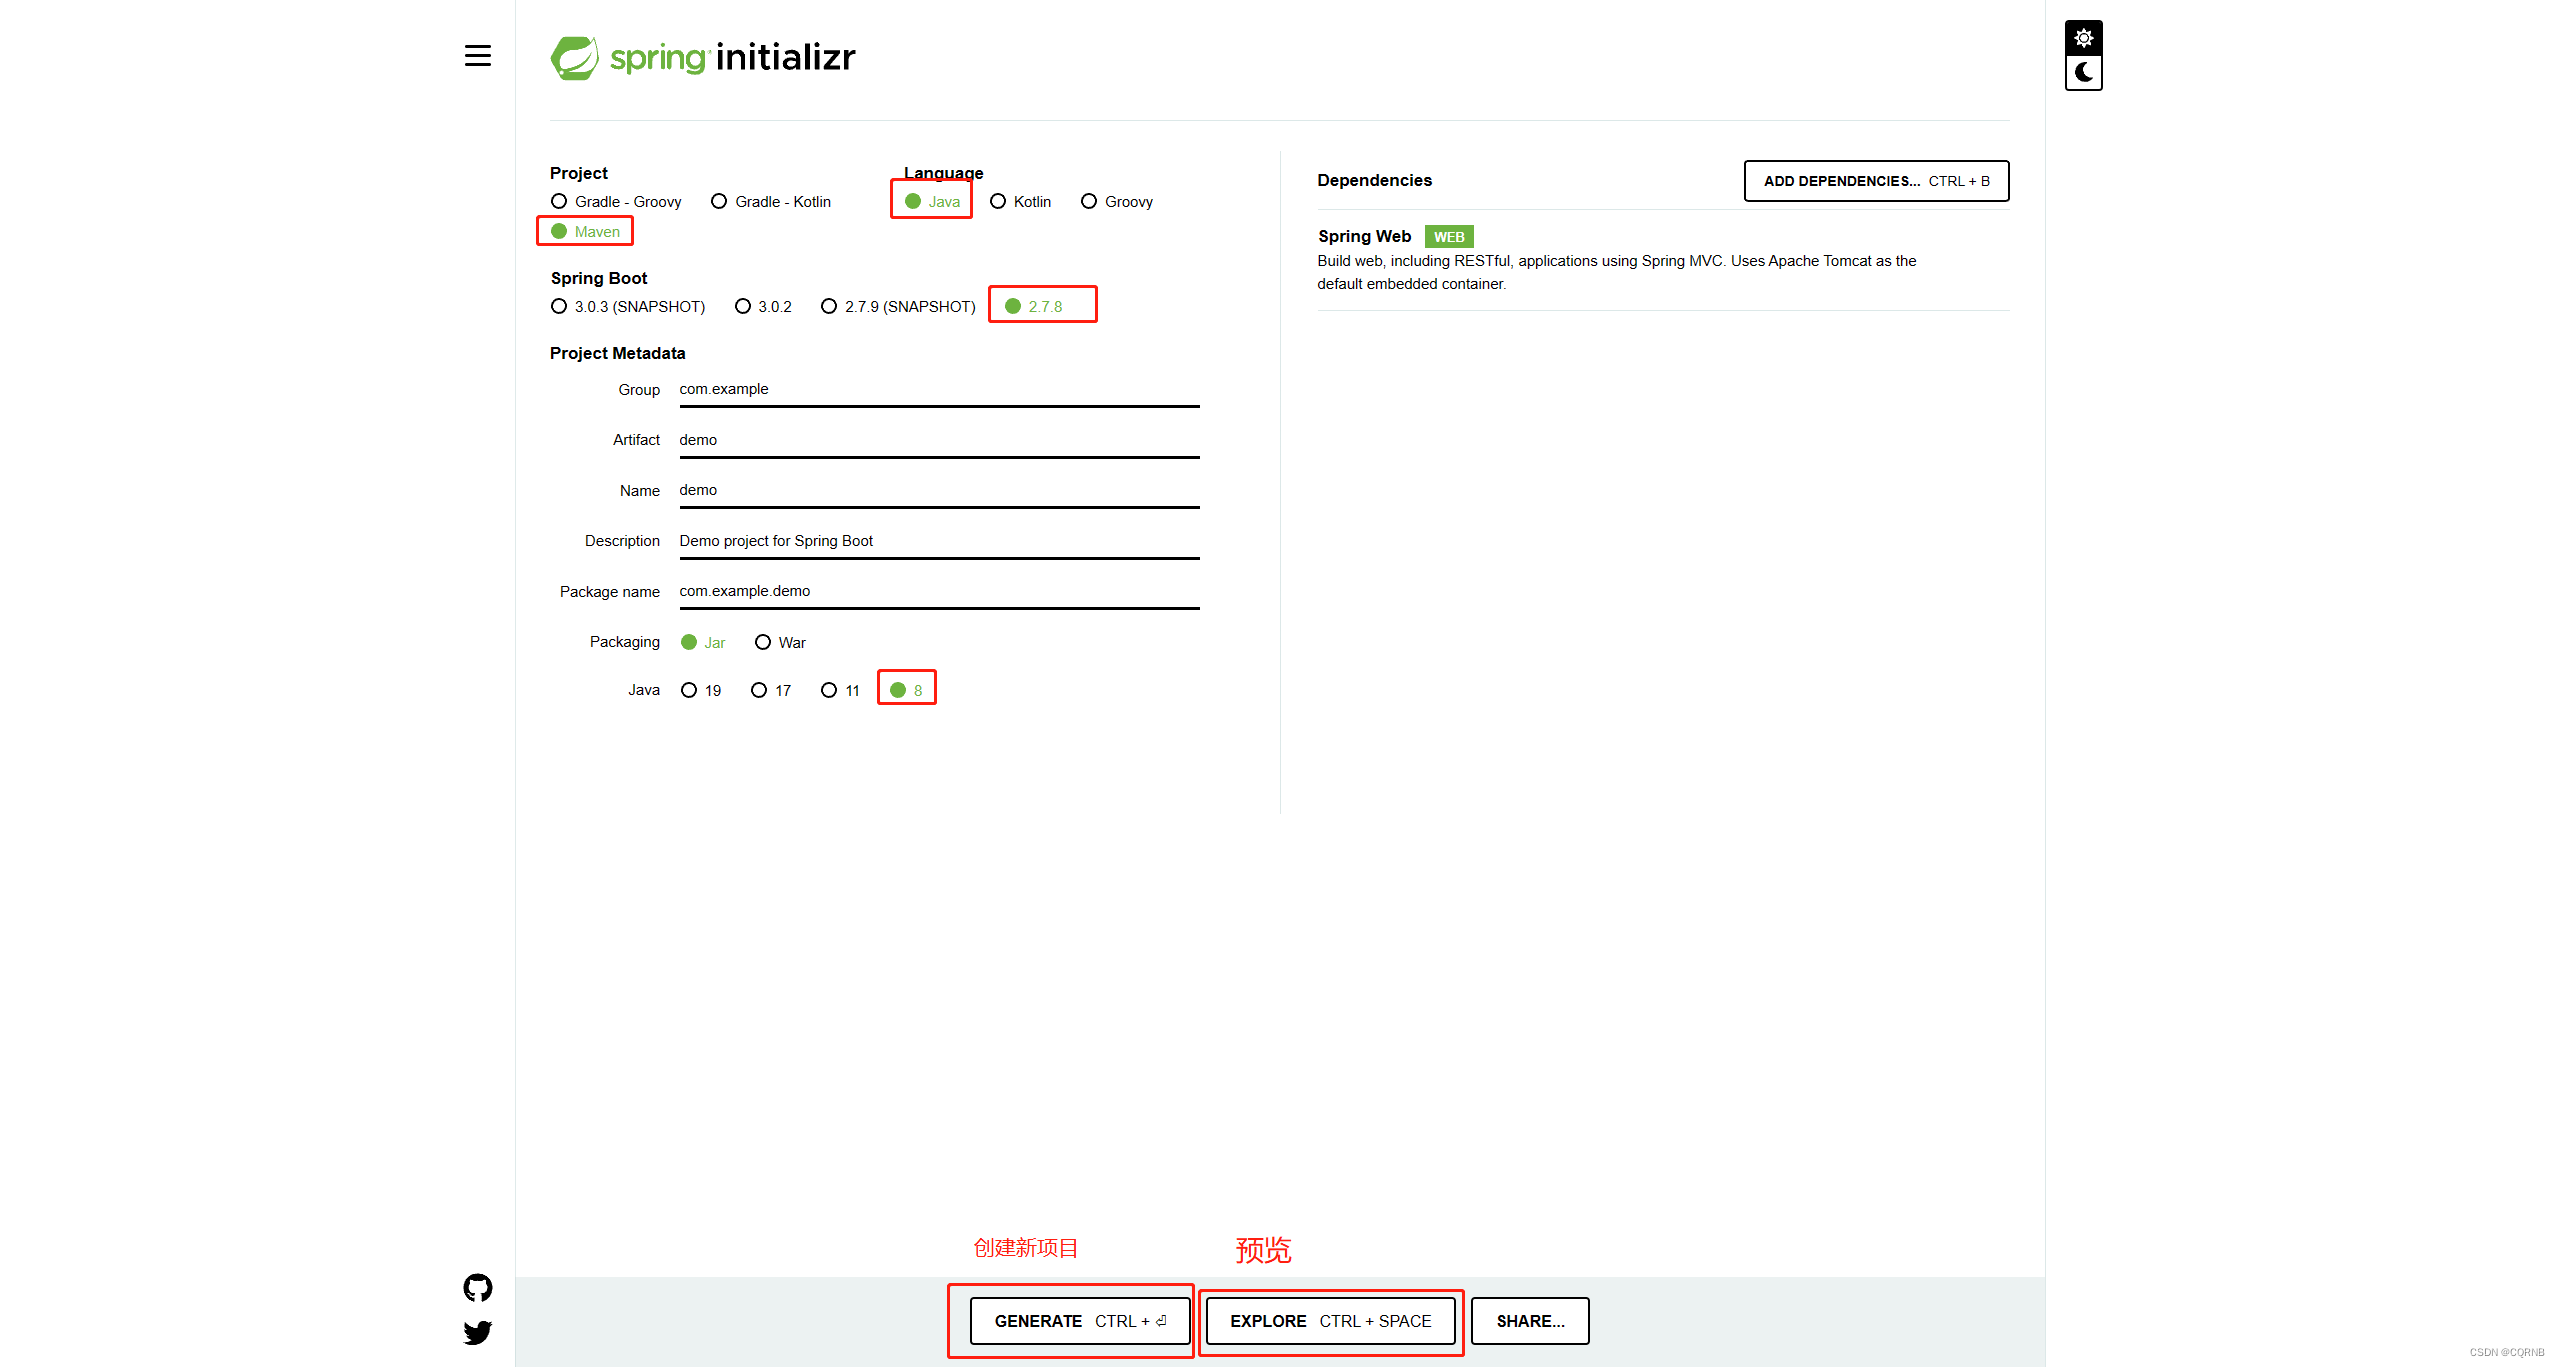
Project是项目类型,我们的是maven项目,所以就选择maven
Language语音,肯定选择java
Spring Boot 这是选择版本号,推荐选择2.7.8,因为如果你不是选择下面的创建项目,而是通过预览查看pom自行依赖的话,有可能会出现“版本 61.0, 应为 52.0”的bug
Project Metadata项目信息,公司或组织,项目名,文件名包名,打包类型和java版本,如果是创建新项目的话,需要仔细填写,自行依赖选择个打包方式和java版本就行了
据说现在推荐使用java17了
点击创建新项目的话,他会生成一个项目,给你下载下来,因为我已经创建好项目了,只需要点击预览就行
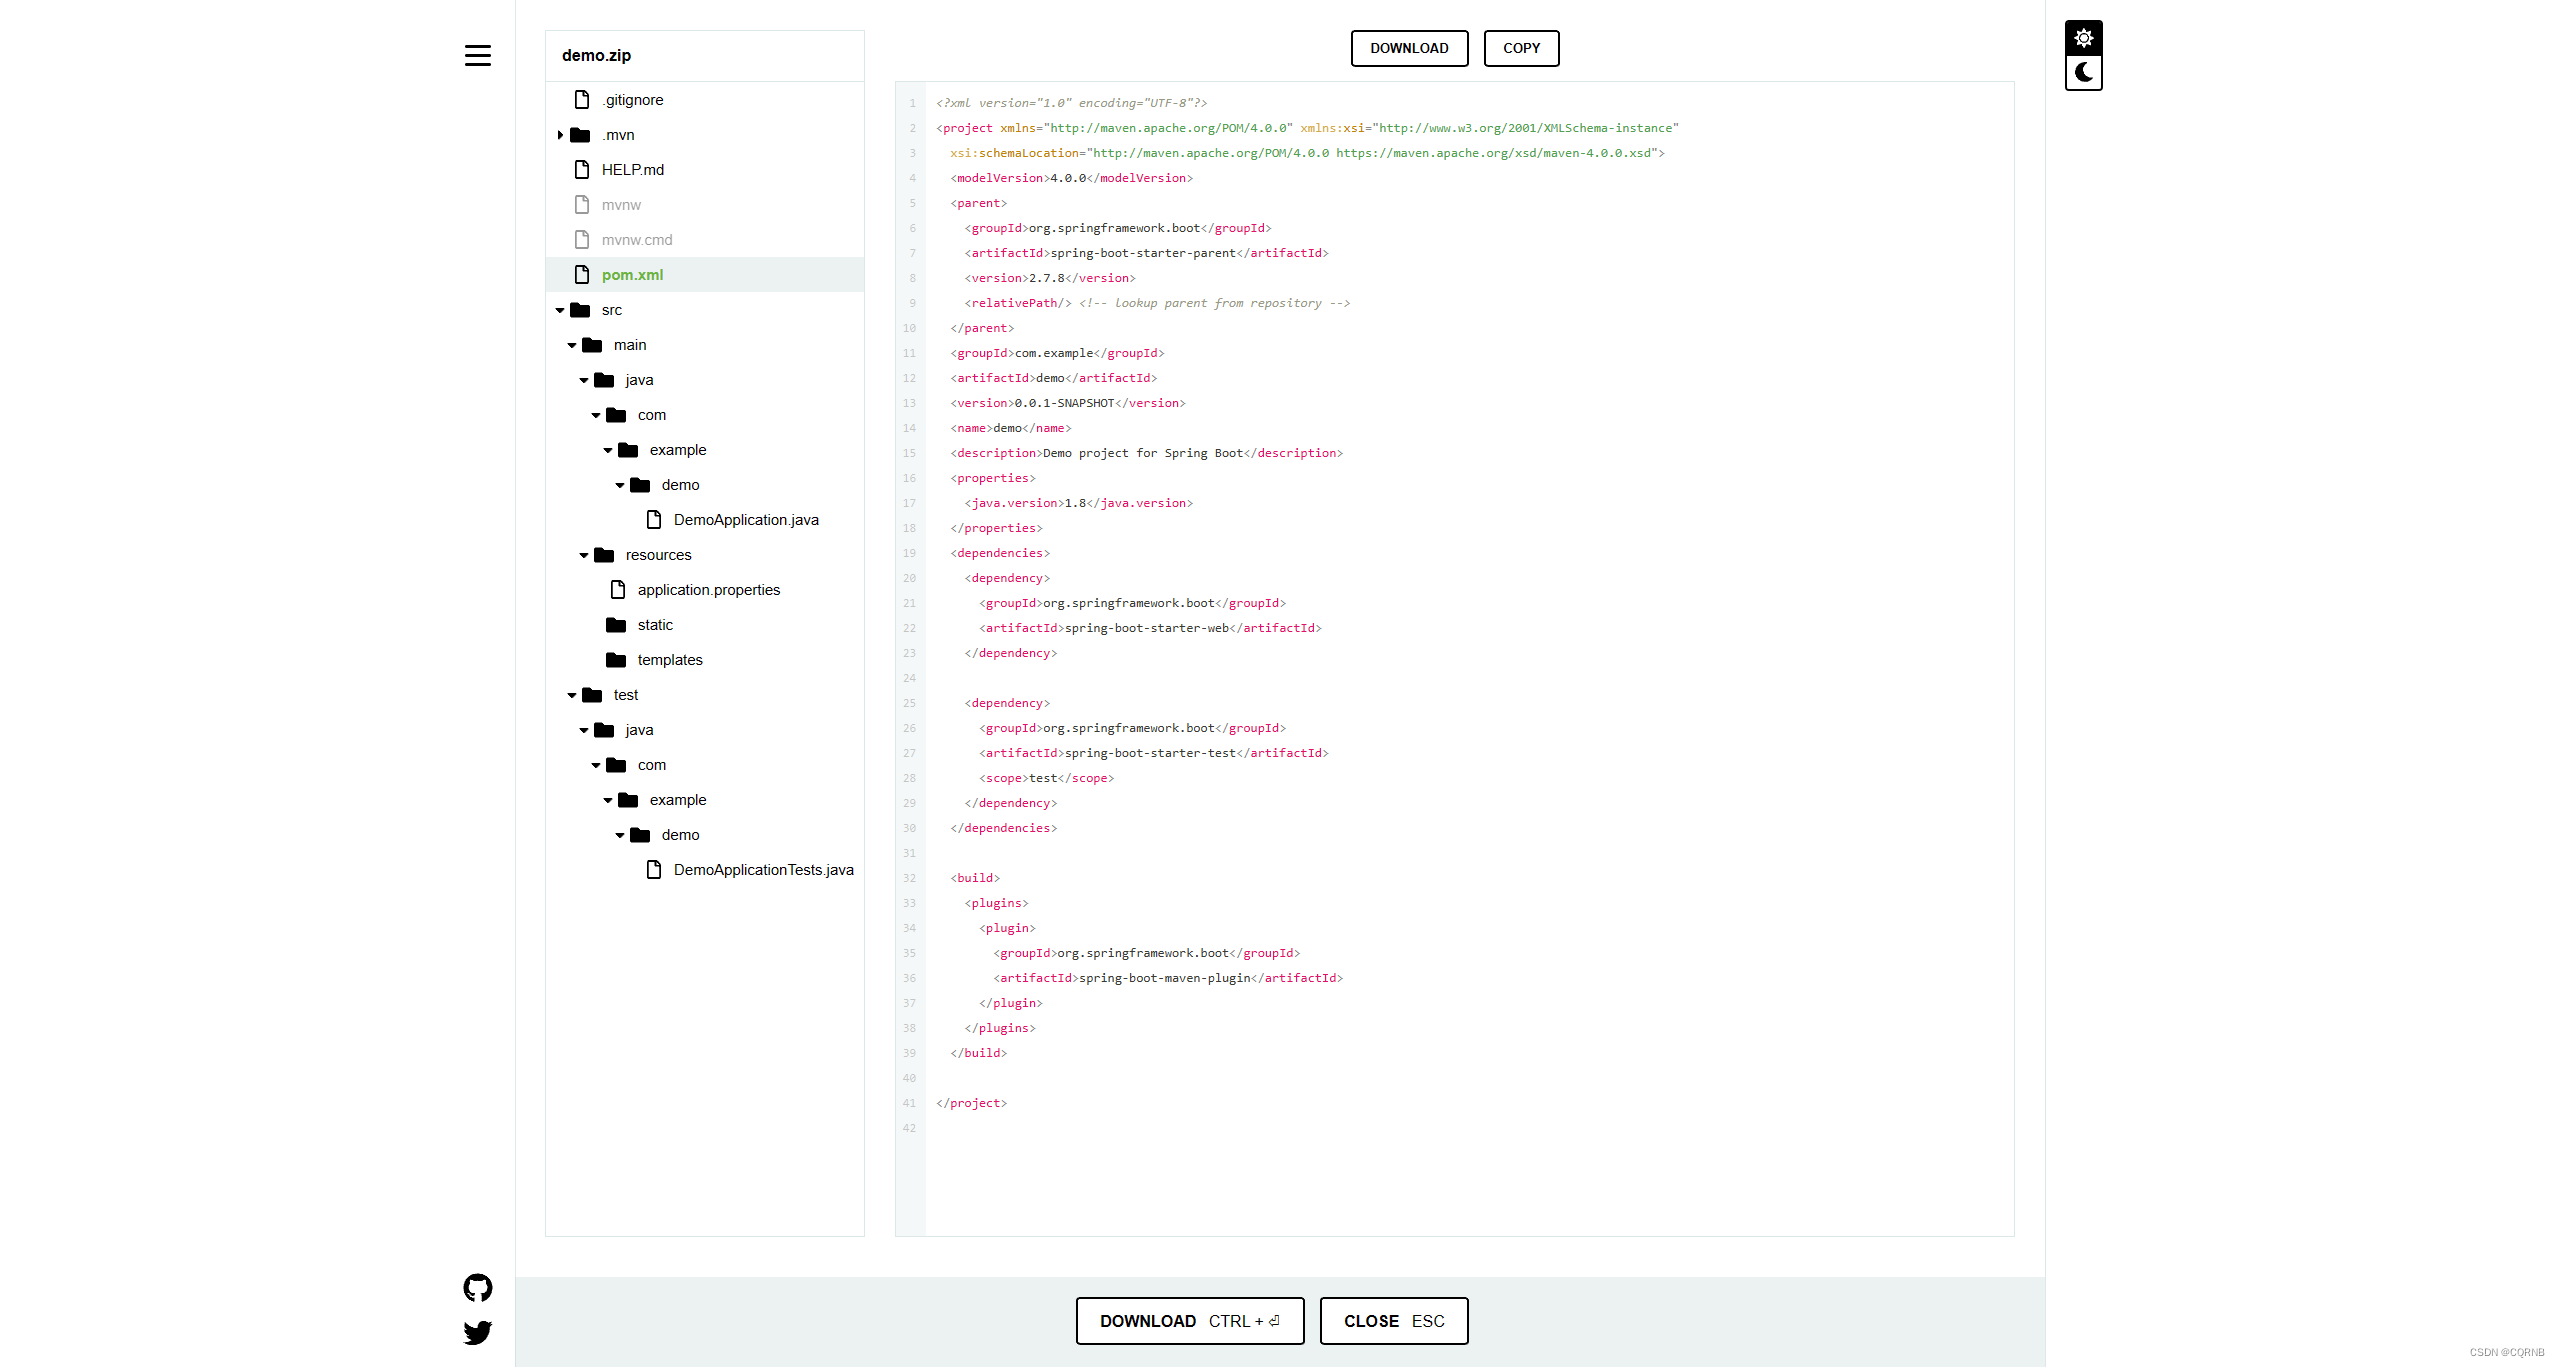
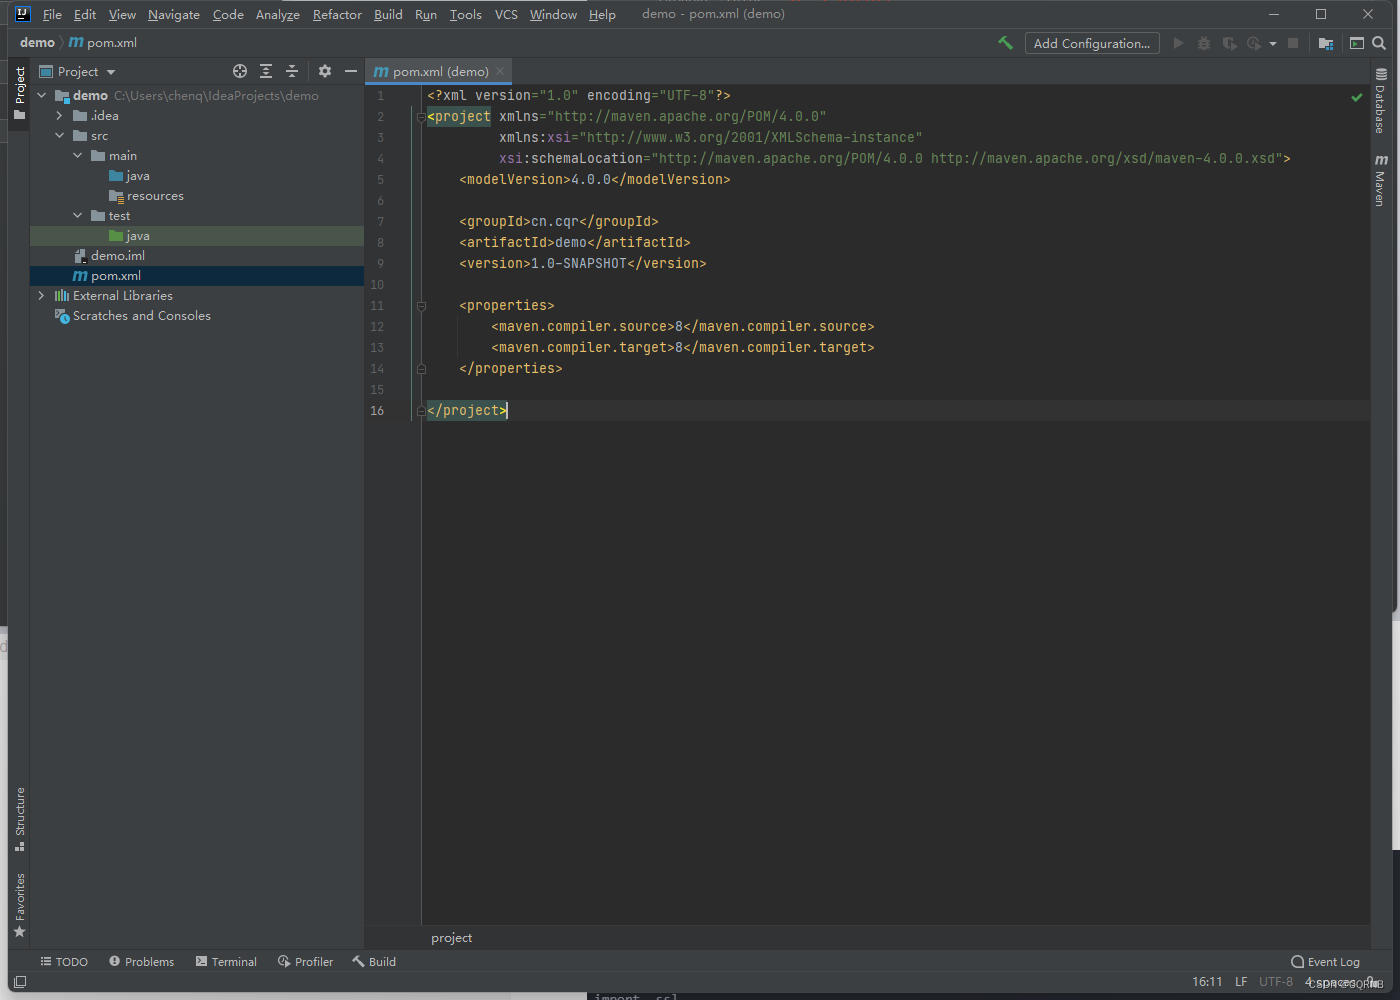
这就是生成的项目,我主要是看pom.xml文件,如果之前仔细填写了Project Metadata项目信息的话,这里可以直接全选复制到自己的pom文件就行了,否则就需要有选择的复制
这是写好的pom文件
<?xml version="1.0" encoding="UTF-8"?>
<project xmlns="http://maven.apache.org/POM/4.0.0"
         xmlns:xsi="http://www.w3.org/2001/XMLSchema-instance"
         xsi:schemaLocation="http://maven.apache.org/POM/4.0.0 https://maven.apache.org/xsd/maven-4.0.0.xsd">
    <modelVersion>4.0.0</modelVersion>

    <groupId><!--todo 这里填写你自己的公司或组织 --></groupId>
    <artifactId><!--todo 这里填写项目名 --></artifactId>
    <version>1.0-SNAPSHOT</version>

    <properties>
        <maven.compiler.source>8</maven.compiler.source>
        <maven.compiler.target>8</maven.compiler.target>
        <java.version>1.8</java.version>
    </properties>

    <parent>
        <groupId>org.springframework.boot</groupId>
        <artifactId>spring-boot-starter-parent</artifactId>
        <version>2.7.8</version>
        <relativePath/> <!-- lookup parent from repository -->
    </parent>

    <dependencies>
        <dependency>
            <groupId>org.springframework.boot</groupId>
            <artifactId>spring-boot-starter-web</artifactId>
        </dependency>

        <dependency>
            <groupId>org.springframework.boot</groupId>
            <artifactId>spring-boot-starter-test</artifactId>
            <scope>test</scope>
        </dependency>
    </dependencies>

    <build>
        <plugins>
            <plugin>
                <groupId>org.springframework.boot</groupId>
                <artifactId>spring-boot-maven-plugin</artifactId>
            </plugin>
        </plugins>
    </build>

</project>
注意,maven配置国内的云仓库,不然依赖拉不下来,可以百度学习怎么配置maven的setting.xml
2.启动测试Hello World!
如果是通过spring生成的项目,里面自带有启动类和测试
我自建的就手动添加启动类
在 点击入门(Quickstart Guide) 点击进去那个页面下方,就有启动类,直接拷贝就行
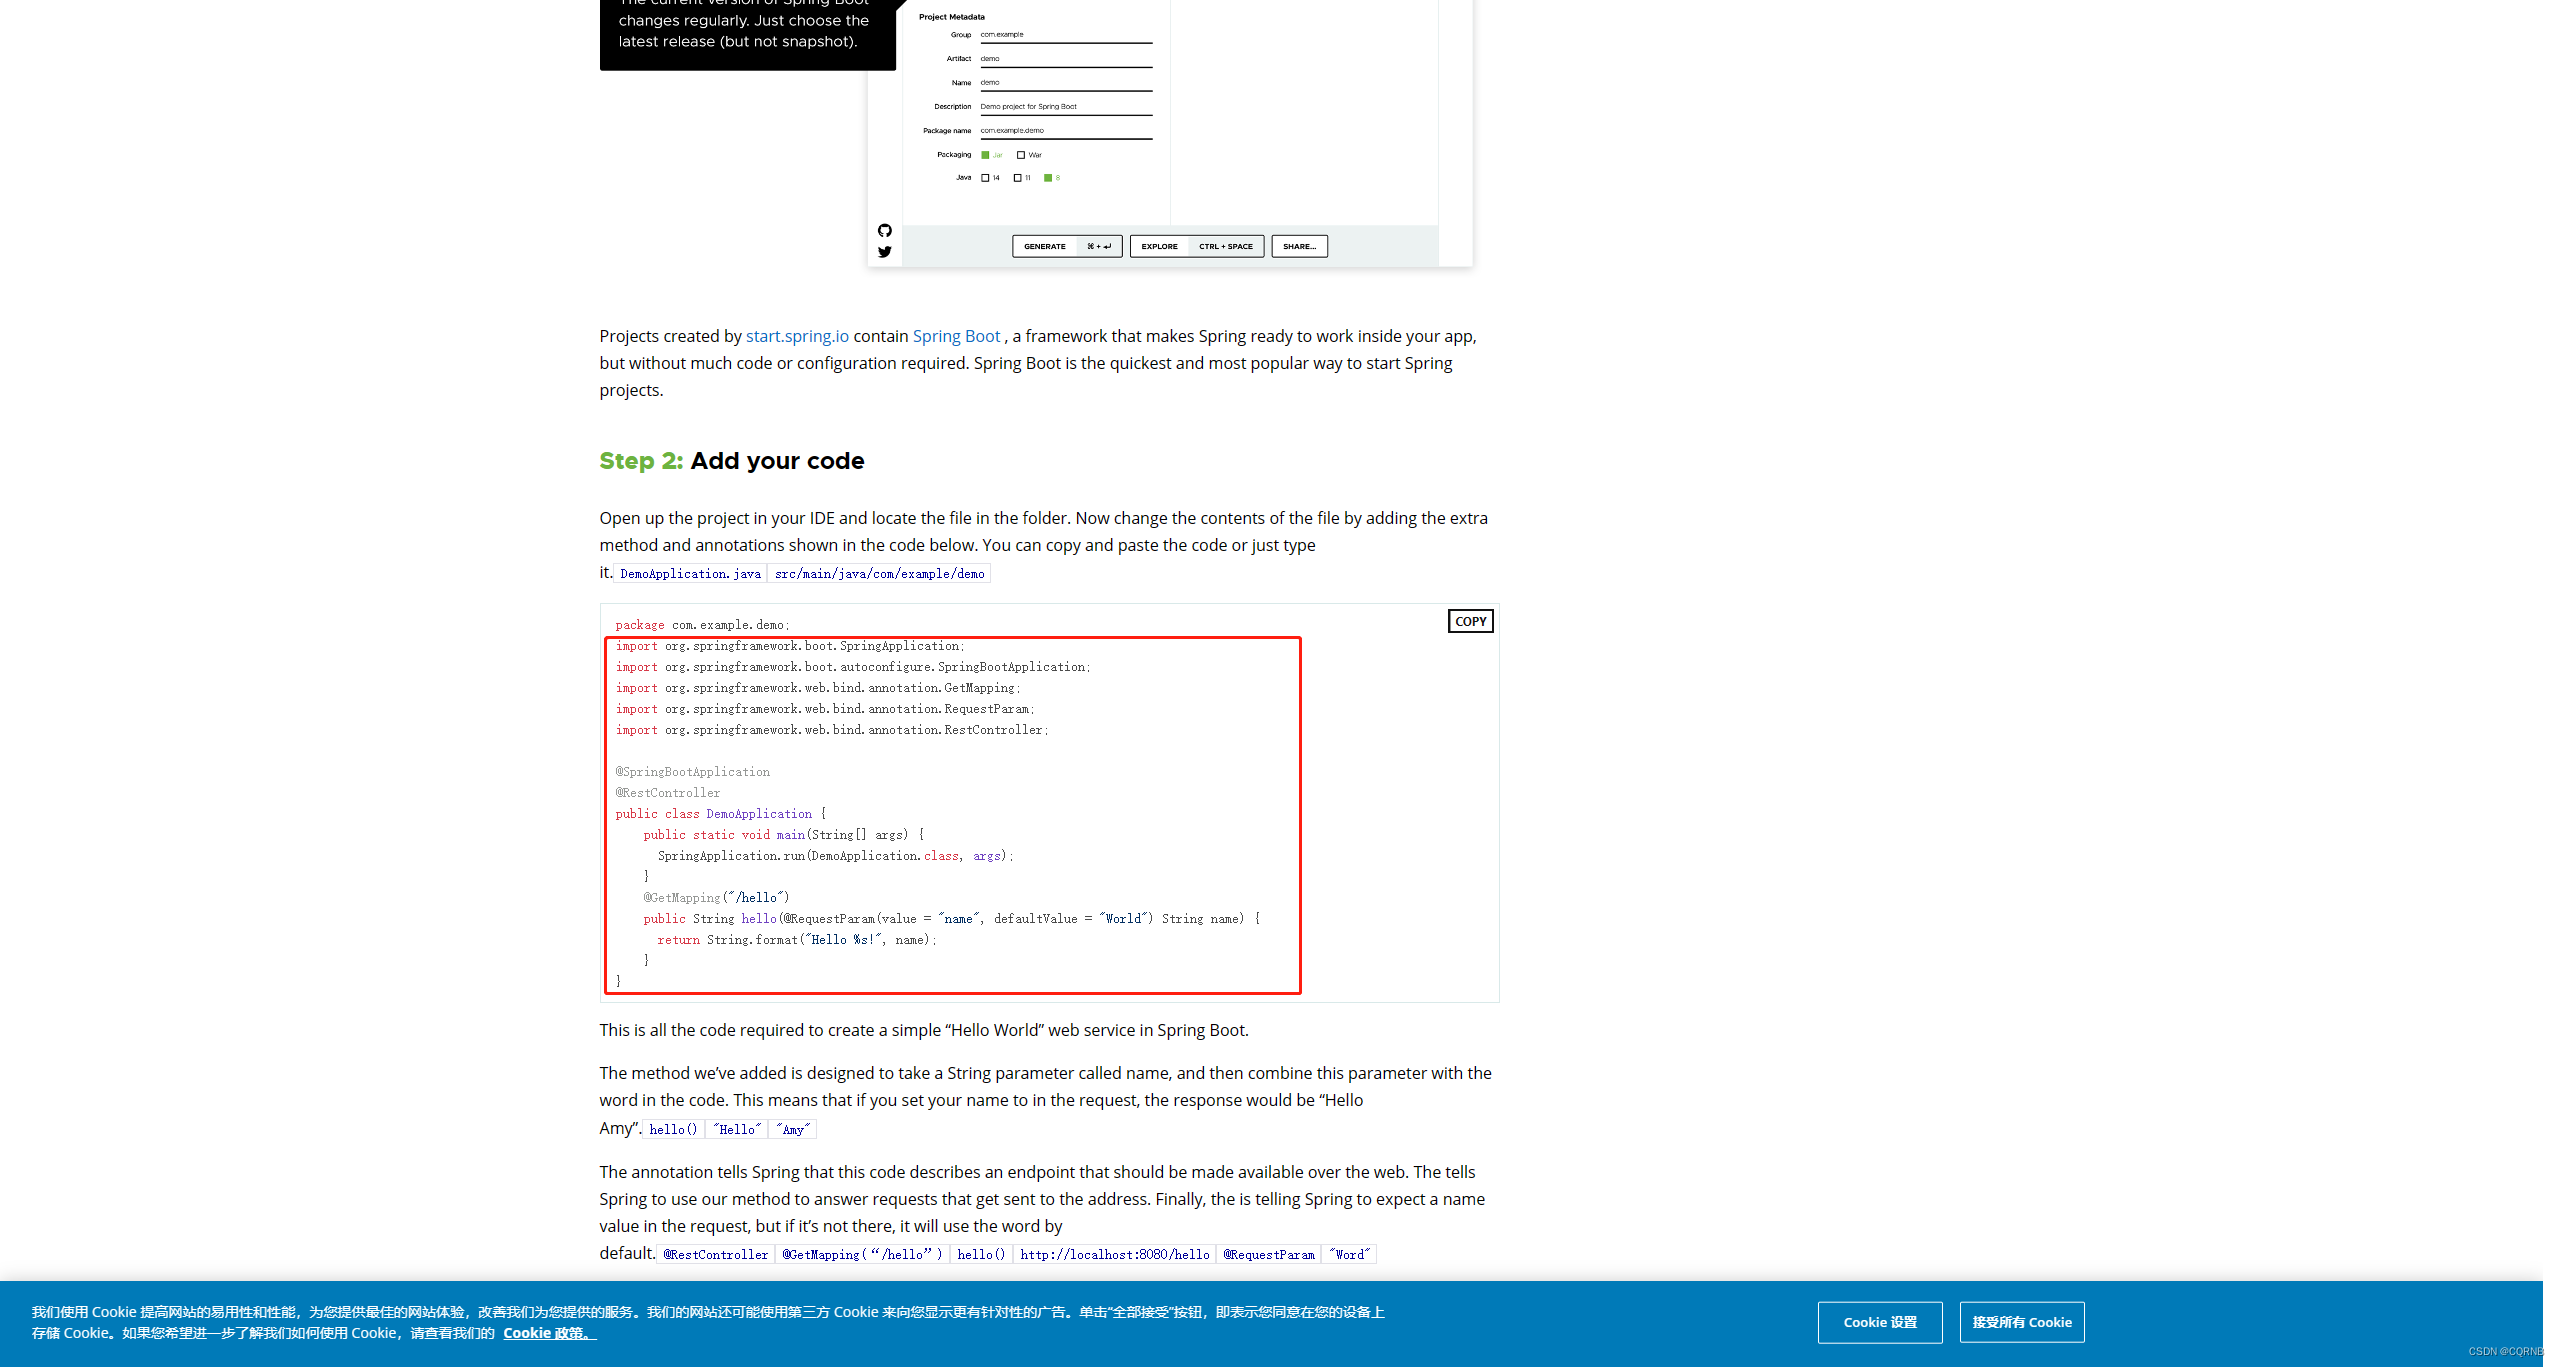
下方还很贴心的有使用说明。
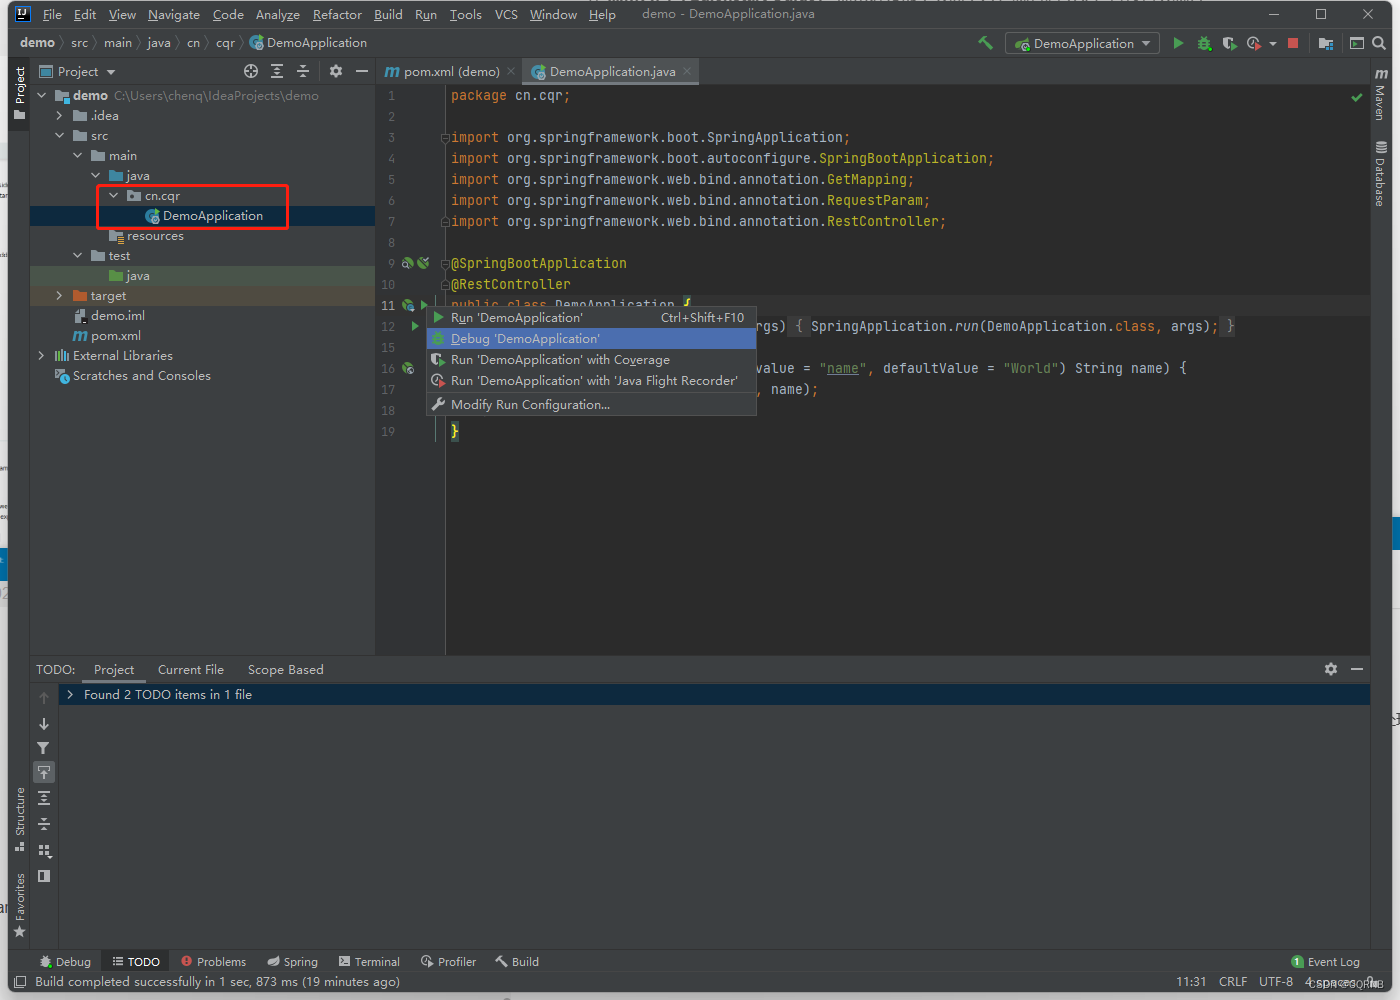
我已经复制好了启动类,然后debug运行
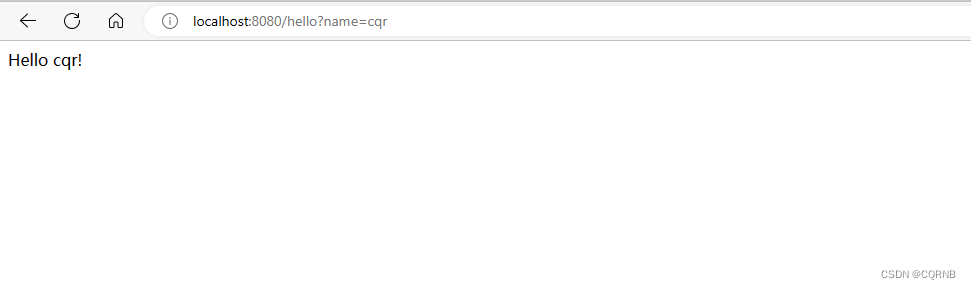
测试成功
三、完善的Spring Boot项目
一个完整的Spring Boot项目都会访问数据库,并且基本都会有用户登陆功能,所以我来简单的完善一下。
1、添加pom依赖
		<dependency>
            <!--引入了它就可以不用引入mybatis了,因为mybatis-plus帮我们引入了mybatis相关依赖,引入了之后也可以正常使用mybatis -->
            <groupId>com.baomidou</groupId>
            <artifactId>mybatis-plus-boot-starter</artifactId>
            <version>3.5.1</version>
        </dependency>

        <dependency>
            <!-- mysql数据库依赖 -->
            <groupId>mysql</groupId>
            <artifactId>mysql-connector-java</artifactId>
            <version>8.0.13</version>
        </dependency>

        <dependency>
            <groupId>org.projectlombok</groupId>
            <artifactId>lombok</artifactId>
            <optional>true</optional>
        </dependency>
        <dependency>
            <!-->swagger依赖<-->
            <groupId>io.springfox</groupId>
            <artifactId>springfox-boot-starter</artifactId>
            <version>3.0.0</version>
        </dependency>
2、在resources创建application.yml配置文件
# 数据库信息
spring:
  datasource:
    driver-class-name: com.mysql.cj.jdbc.Driver
    #一定要加serverTimezone,否则可能链接不上数据库
    #todo 记得改链接、端口和库名
    url: jdbc:mysql://localhost:3306/demo?useUnicode=true&characterEncoding=utf8&useSSL=false&&serverTimezone=UTC
    username: root
    password: 123456

#2.6及以上的SpringBoot整合Swagger3都需要配这一项
  mvc:
    pathmatch:
      matching-strategy: ant_path_matcher
3、修改启动类
import org.springframework.boot.SpringApplication;
import org.springframework.boot.autoconfigure.SpringBootApplication;
import springfox.documentation.oas.annotations.EnableOpenApi;

@EnableOpenApi
@SpringBootApplication
public class DemoApplication {
    public static void main(String[] args) {
      SpringApplication.run(DemoApplication.class, args);
    }
}
4、建库建表 生成model
import com.baomidou.mybatisplus.annotation.*;
import io.swagger.annotations.ApiModel;
import io.swagger.annotations.ApiModelProperty;
import lombok.Data;

import java.util.Date;

@Data
@TableName("admin_user")
@ApiModel("管理员表")
public class AdminUserPO {

    @TableId(value = "id", type = IdType.AUTO)
    private Long id;

    @ApiModelProperty("用户名")
    private String userName;

    @ApiModelProperty("手机号")
    private String phone;

    @ApiModelProperty("密码,密文")
    private String password;

    @ApiModelProperty("注册时间")
    private Date registerTime;

    @ApiModelProperty("是否注销")
    private Boolean isCancellation;

    @Version
    private Long version;

}
import io.swagger.annotations.ApiModel;
import io.swagger.annotations.ApiModelProperty;
import lombok.Data;

@Data
@ApiModel("管理员数据")
public class AdminUserLoginDTO {

//    private Long id;
//    private String userName;
    @ApiModelProperty("手机号")
    private String phone;

    @ApiModelProperty("密码,明文")
    private String password;

}
import io.swagger.annotations.ApiModel;
import io.swagger.annotations.ApiModelProperty;
import lombok.Data;

import java.util.Date;

@Data
@ApiModel("管理员数据")
public class AdminUserLoginVO {

//    @ApiModelProperty("令牌")
//    private String token;
    @ApiModelProperty("id")
    private Long id;
    @ApiModelProperty("用户名")
    private String userName;
    @ApiModelProperty("手机号")
    private String phone;
    @ApiModelProperty("注册时间")
    private Date registerTime;
//    @ApiModelProperty("权限")
//    private List<Permissions> permissions;

}
5、实现controller
import cn.cqr.service.AdminUserService;
import io.swagger.annotations.ApiOperation;
import org.springframework.beans.factory.annotation.Autowired;
import org.springframework.web.bind.annotation.PostMapping;
import org.springframework.web.bind.annotation.RequestBody;
import org.springframework.web.bind.annotation.RequestMapping;
import org.springframework.web.bind.annotation.RestController;
@RestController
@RequestMapping("/admin/user")
public class AdminUserController {
@Autowired
private AdminUserService adminUserService;
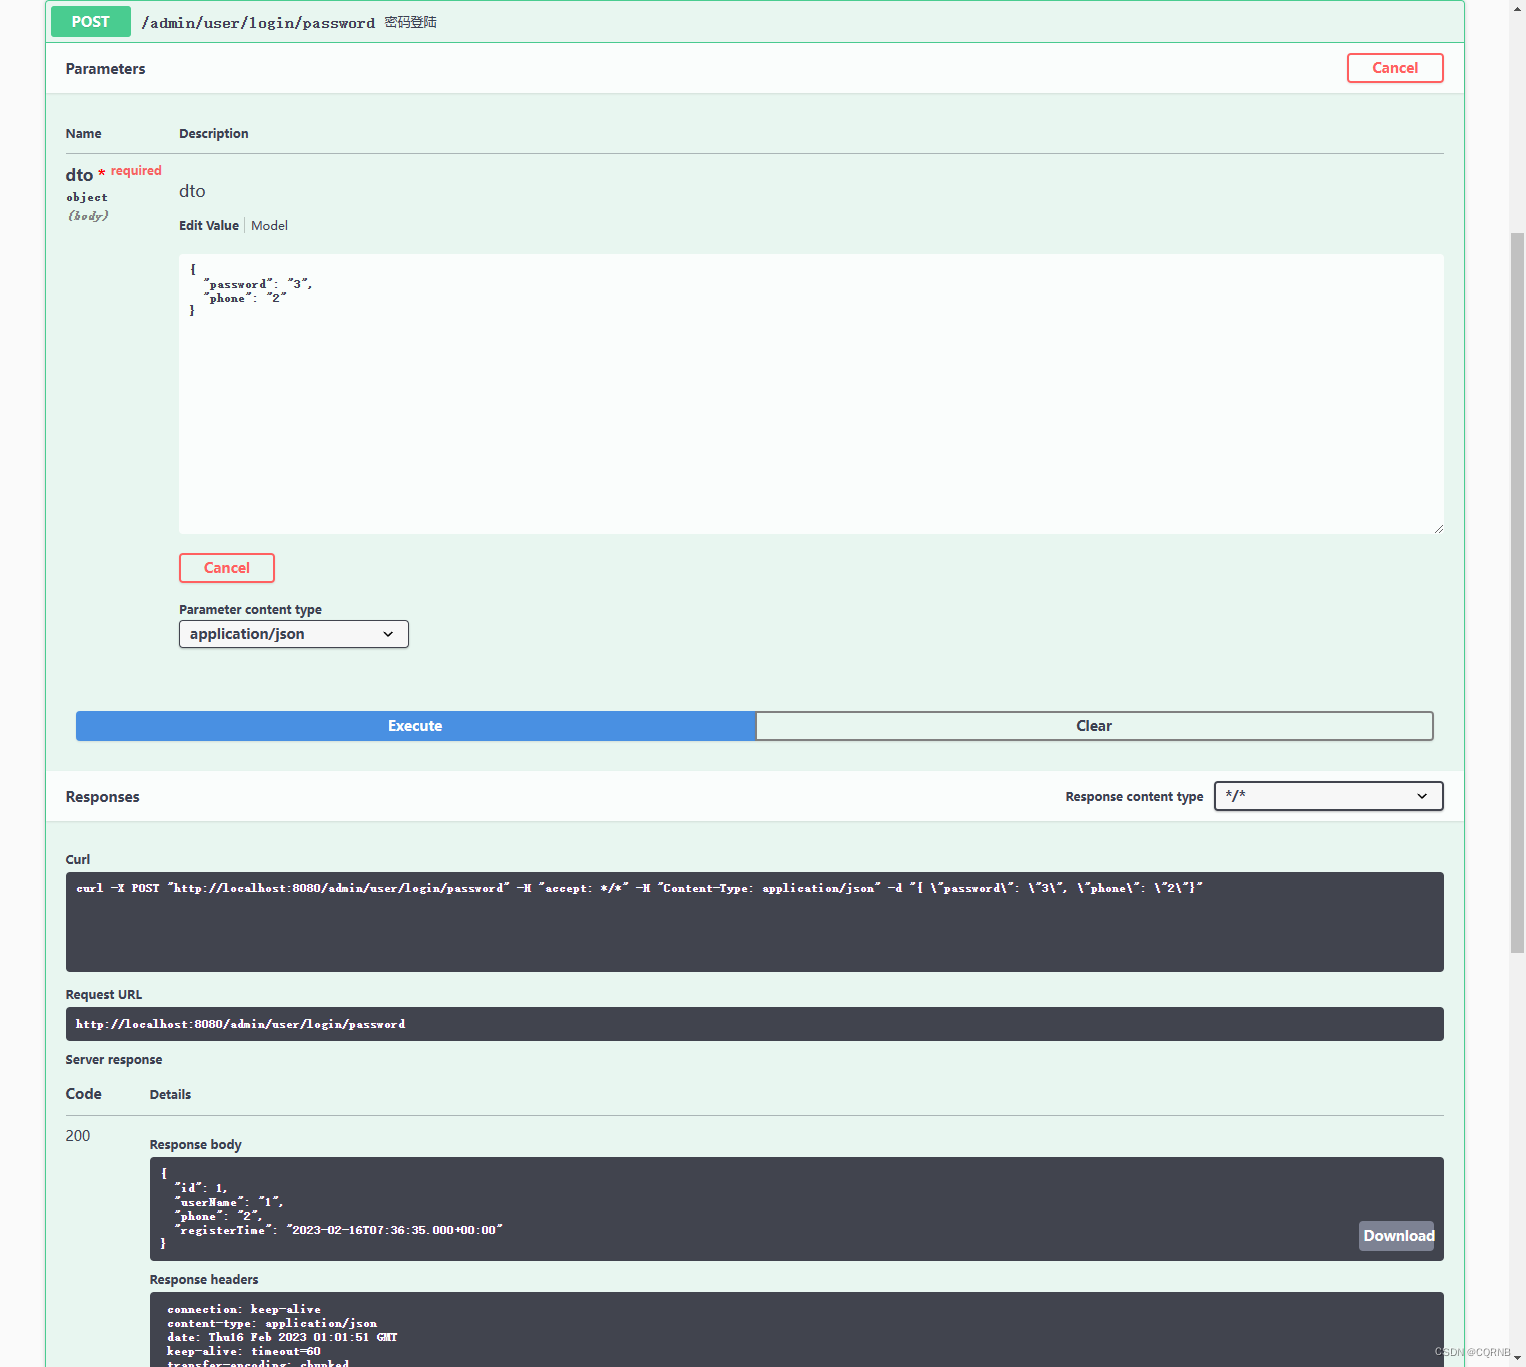
@PostMapping(value = "/login/password")
@ApiOperation("密码登陆")
public AdminUserLoginVO passLogin(@RequestBody() AdminUserLoginDTO dto){
AdminUserLoginVO vo = adminUserService.passLogin(dto);
return vo;
}
}
6、实现service
public interface AdminUserService {

    AdminUserLoginVO passLogin(AdminUserLoginDTO dto);

}
import com.baomidou.mybatisplus.core.conditions.query.LambdaQueryWrapper;
import org.springframework.beans.factory.annotation.Autowired;
import org.springframework.stereotype.Service;

@Service
public class AdminUserServiceImpl implements AdminUserService {

    @Autowired
    private AdminUserMapper adminUserMapper;

    @Override
    public AdminUserLoginVO passLogin(AdminUserLoginDTO dto) {
        //todo 数据效验
        LambdaQueryWrapper<AdminUserPO> wrapper = new LambdaQueryWrapper<>();
        wrapper.eq(AdminUserPO::getPhone, dto.getPhone())
                .eq(AdminUserPO::getIsCancellation,false);
        AdminUserPO po = adminUserMapper.selectOne(wrapper);
        if (po == null) {
            throw new RuntimeException("手机号未注册");
        }
        if (!po.getPassword().equals(dto.getPassword())) {
            throw new RuntimeException("密码错误");
        }
        AdminUserLoginVO vo = new AdminUserLoginVO();
        vo.setId(po.getId());
        vo.setPhone(po.getPhone());
        vo.setUserName(po.getUserName());
        vo.setRegisterTime(po.getRegisterTime());
        return vo;
    }

}
7、实现mapper
import com.baomidou.mybatisplus.core.mapper.BaseMapper;
import org.apache.ibatis.annotations.Mapper;

@Mapper
public interface AdminUserMapper extends BaseMapper<AdminUserPO> {
}
<?xml version="1.0" encoding="UTF-8" ?>
<!DOCTYPE mapper
        PUBLIC "-//mybatis.org//DTD Mapper 3.0//EN"
        "http://mybatis.org/dtd/mybatis-3-mapper.dtd">

<mapper namespace="AdminUserMapper">

<!--    <select id="selectOneByPhone" resultType="AdminUserPO" parameterType="java.lang.String">-->
<!--        select * from admin_user where phone = #{phone} and is_cancellation = 0;-->
<!--    </select>-->

</mapper>
配置config Swagger
import org.springframework.context.annotation.Bean;
import org.springframework.context.annotation.Configuration;
import springfox.documentation.service.ApiInfo;
import springfox.documentation.service.Contact;
import springfox.documentation.spi.DocumentationType;
import springfox.documentation.spring.web.plugins.Docket;
import springfox.documentation.swagger2.annotations.EnableSwagger2;

import java.util.ArrayList;

@Configuration
@EnableSwagger2
public class SwaggerConfiguration {

    private static ApiInfo DEFAULT = null;

    //todo 记得改信息
    @Bean
    public Docket docket() {
        //联系方式
        Contact DEFAULT_CONTACT = new Contact("cqr", "联系url", "邮箱");
        DEFAULT = new ApiInfo(
                "demo",    //项目名
                "Api Documentation",    //描述
                "V-1.0",
                "",    //服务条款网址
                DEFAULT_CONTACT,
                "",    //许可证
                "",
                new ArrayList());
        return new Docket(DocumentationType.SWAGGER_2).apiInfo(DEFAULT);
    }

}


 12万+
12万+


 被折叠的 条评论
为什么被折叠?
被折叠的 条评论
为什么被折叠?
 到【灌水乐园】发言


