


1.定义
frameworks/base/core/res/res/values/attrs.xml
<!-- Boolean internal attribute to adjust view layout based on system windows such as the status bar.If true, adjusts the padding of this view to leave space for the system windows. Will only take effect if this view is in a non-embedded activity.  -->
<attr name="fitsSystemWindows" format="boolean" />
布尔型内部属性,用于根据状态栏(status bar)等系统窗口调整视图布局。如果为true,则调整此视图的padding为系统窗口的大小(比如此View的paddingTop为状态栏的高度)。仅当该视图处于非嵌入式Activity中时才会生效。
2.例子
下面通过一个Demo来展示android:fitsSystemWindows这个属性的作用。
2.1例子代码
2.1.1Activity的代码(FitsSystemWindowActivity.java)
public class FitsSystemWindowActivity extends Activity {
    @Override
    protected void onCreate(@Nullable Bundle savedInstanceState) {
        super.onCreate(savedInstanceState);
        setContentView(R.layout.fitsystem);
        View root = findViewById(R.id.fits_system_windows_view);
        root.setSystemUiVisibility(
                View.SYSTEM_UI_FLAG_LAYOUT_HIDE_NAVIGATION | View.SYSTEM_UI_FLAG_LAYOUT_STABLE);
    }
}
2.1.2layout的代码(fitsystem.xml)
<?xml version="1.0" encoding="utf-8"?>
<FrameLayout
    android:id="@+id/fits_system_windows_view"
    xmlns:android="http://schemas.android.com/apk/res/android"
    android:layout_width="match_parent"
    android:layout_height="match_parent"
    android:background="#FF0000"
    android:fitsSystemWindows="true">

    <TextView
        android:layout_gravity="start|top"
        android:background="#FF00FF"
        android:layout_width="wrap_content"
        android:layout_height="wrap_content"
        android:textSize="20sp"
        android:text="左上角的文本"
        />

    <TextView
        android:layout_gravity="center"
        android:background="#0000FF"
        android:layout_width="wrap_content"
        android:layout_height="wrap_content"
        android:textSize="20sp"
        android:text="本Demo展示fitsSystemWindows的效果"
        />

    <TextView
        android:layout_gravity="start|bottom"
        android:background="#00FF00"
        android:layout_width="wrap_content"
        android:layout_height="wrap_content"
        android:textSize="20sp"
        android:text="左下角的文本"
        />
</FrameLayout>
这里把FrameLayout的背景设置为红色,添加了3个TextView方便我们观察结果。。
2.1.3应用的主题(styles.xml)
<style name="AppTheme.FitsSystemWidows" parent="@android:style/Theme.DeviceDefault.Light.NoActionBar">
    <item name="android:navigationBarColor">@android:color/transparent</item>
    <item name="android:statusBarColor">@android:color/transparent</item>
    <item name="android:windowLightNavigationBar">false</item>
</style>
这里把系统状态栏跟导航栏的背景设置为了透明的。
2.2例子的结果
Demo显示了下面3个效果图
| 效果图1 | 效果图2 | 效果图3 |
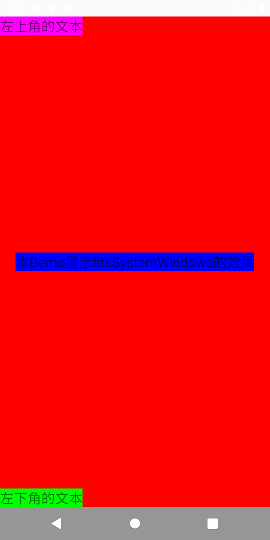 | 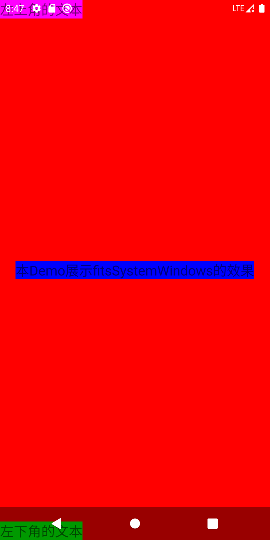 |  |
这3个效果图的代码不同点如下:
| 效果图 | android:fitsSystemWindows | View#setSystemUiVisibility |
| 效果图1 | false | //View root = findViewById(R.id.fits_system_windows_view); //root.setSystemUiVisibility( //View.SYSTEM_UI_FLAG_LAYOUT_HIDE_NAVIGATION | View.SYSTEM_UI_FLAG_LAYOUT_STABLE); |
| 效果图2 | false | View root = findViewById(R.id.fits_system_windows_view); root.setSystemUiVisibility( View.SYSTEM_UI_FLAG_LAYOUT_HIDE_NAVIGATION | View.SYSTEM_UI_FLAG_LAYOUT_STABLE); |
| 效果图3 | true | View root = findViewById(R.id.fits_system_windows_view); root.setSystemUiVisibility( View.SYSTEM_UI_FLAG_LAYOUT_HIDE_NAVIGATION | View.SYSTEM_UI_FLAG_LAYOUT_STABLE); |
- 效果图1红色背景FrameLayout的高度大小如下:
FrameLayout的高度 = 屏幕的高度-状态栏的高度-导航栏的高度
FrameLayout的padding为0
- 效果图2FrameLayout的高度大小如下:
FrameLayout的高度 = 屏幕的高度
FrameLayout的padding为0
- 效果图3FrameLayout的高度大小如下:
FrameLayout的高度 = 屏幕的高度
FrameLayout的paddingTop为状态栏的高度,paddingBottom为导航栏的高度。
- 3个效果图可以看出,其实系统的状态栏与导航栏是覆盖在红色背景FrameLayout之上的。
2.3问题
2.3.1当设置android:fitsSystemWindows="true"时,为什么代码还要调用View#setSystemUiVisibility方法呢?
View root = findViewById(R.id.fits_system_windows_view);
root.setSystemUiVisibility(
     View.SYSTEM_UI_FLAG_LAYOUT_HIDE_NAVIGATION | View.SYSTEM_UI_FLAG_LAYOUT_STABLE);
这个问题的答案在文章末尾会回答。
2.3.2如果给主题添加下面两行配置,ListView,ScrollView等滚动的View可以实现什么效果呢?
  <item name="android:clipChildren">false</item>
  <item name="android:clipToPadding">false</item>
3.源码分析
本文分析的源码是基于Android Q的代码来分析的。
3.1View中的4个标记
| No. | Flag | Comment |
| 1 | static final int OPTIONAL_FITS_SYSTEM_WINDOWS = 0x00000800; | Set for framework elements that use FITS_SYSTEM_WINDOWS, to indicate that they are optional and should be skipped if the window has requested system UI flags that ignore those insets for layout. |
| 2 | static final int PFLAG3_APPLYING_INSETS = 0x20; | Flag indicating that we're in the process of applying window insets |
| 3 | private static final int FITS_SYSTEM_WINDOWS = 0x00000002; | This view will adjust its padding to fit sytem windows (e.g. status bar) |
| 4 | public static final int SYSTEM_UI_LAYOUT_FLAGS = SYSTEM_UI_FLAG_LAYOUT_HIDE_NAVIGATION|SYSTEM_UI_FLAG_LAYOUT_FULLSCREEN; | Flags that can impact the layout in relation to system UI. |
为什么要说这4个标记呢,因为在后面分析事件分发的时候会使用到它们。下面就来分析下这4个标记在什么时候被设置的。
3.1.1OPTIONAL_FITS_SYSTEM_WINDOWS
当通过Activity的setContentView方法设置界面时,会调用到系统PhoneWindow的setContentView方法。
   frameworks/base/core/java/com/android/internal/policy/PhoneWindow.java
    @Override
    public void setContentView(int layoutResID) {
        // Note: FEATURE_CONTENT_TRANSITIONS may be set in the process of installing the window
        // decor, when theme attributes and the like are crystalized. Do not check the feature
        // before this happens.
        if (mContentParent == null) {
            installDecor();
        } else if (!hasFeature(FEATURE_CONTENT_TRANSITIONS)) {
            mContentParent.removeAllViews();
        }
        ......
    }
    private void installDecor() {
        mForceDecorInstall = false;
        if (mDecor == null) {
            mDecor = generateDecor(-1);
            ......
        } else {
            mDecor.setWindow(this);
        }
        if (mContentParent == null) {
            mContentParent = generateLayout(mDecor);

            // Set up decor part of UI to ignore fitsSystemWindows if appropriate.
            mDecor.makeOptionalFitsSystemWindows();

            ......
    }
    protected DecorView generateDecor(int featureId) {
        // System process doesn't have application context and in that case we need to directly use
        // the context we have. Otherwise we want the application context, so we don't cling to the
        // activity.
        Context context;
        if (mUseDecorContext) {
            Context applicationContext = getContext().getApplicationContext();
            if (applicationContext == null) {
                context = getContext();
            } else {
                context = new DecorContext(applicationContext, getContext());
                if (mTheme != -1) {
                    context.setTheme(mTheme);
                }
            }
        } else {
            context = getContext();
        }
        return new DecorView(context, featureId, this, getAttributes());
    }

    protected ViewGroup generateLayout(DecorView decor) {
        ......
        int layoutResource;
        int features = getLocalFeatures();
        // System.out.println("Features: 0x" + Integer.toHexString(features));
        if ((features & (1 << FEATURE_SWIPE_TO_DISMISS)) != 0) {
            layoutResource = R.layout.screen_swipe_dismiss;
            setCloseOnSwipeEnabled(true);
        } else if ((features & ((1 << FEATURE_LEFT_ICON) | (1 << FEATURE_RIGHT_ICON))) != 0) {
            if (mIsFloating) {
                TypedValue res = new TypedValue();
                getContext().getTheme().resolveAttribute(
                        R.attr.dialogTitleIconsDecorLayout, res, true);
                layoutResource = res.resourceId;
            } else {
                layoutResource = R.layout.screen_title_icons;
            }
            // XXX Remove this once action bar supports these features.
            removeFeature(FEATURE_ACTION_BAR);
            // System.out.println("Title Icons!");
        } else if ((features & ((1 << FEATURE_PROGRESS) | (1 << FEATURE_INDETERMINATE_PROGRESS))) != 0
                && (features & (1 << FEATURE_ACTION_BAR)) == 0) {
            // Special case for a window with only a progress bar (and title).
            // XXX Need to have a no-title version of embedded windows.
            layoutResource = R.layout.screen_progress;
            // System.out.println("Progress!");
        } else if ((features & (1 << FEATURE_CUSTOM_TITLE)) != 0) {
            // Special case for a window with a custom title.
            // If the window is floating, we need a dialog layout
            if (mIsFloating) {
                TypedValue res = new TypedValue();
                getContext().getTheme().resolveAttribute(
                        R.attr.dialogCustomTitleDecorLayout, res, true);
                layoutResource = res.resourceId;
            } else {
                layoutResource = R.layout.screen_custom_title;
            }
            // XXX Remove this once action bar supports these features.
            removeFeature(FEATURE_ACTION_BAR);
        } else if ((features & (1 << FEATURE_NO_TITLE)) == 0) {
            // If no other features and not embedded, only need a title.
            // If the window is floating, we need a dialog layout
            if (mIsFloating) {
                TypedValue res = new TypedValue();
                getContext().getTheme().resolveAttribute(
                        R.attr.dialogTitleDecorLayout, res, true);
                layoutResource = res.resourceId;
            } else if ((features & (1 << FEATURE_ACTION_BAR)) != 0) {
                layoutResource = a.getResourceId(
                        R.styleable.Window_windowActionBarFullscreenDecorLayout,
                        R.layout.screen_action_bar);
            } else {
                layoutResource = R.layout.screen_title;
            }
            // System.out.println("Title!");
        } else if ((features & (1 << FEATURE_ACTION_MODE_OVERLAY)) != 0) {
            layoutResource = R.layout.screen_simple_overlay_action_mode;
        } else {
            // Embedded, so no decoration is needed.
            layoutResource = R.layout.screen_simple;
            // System.out.println("Simple!");
        }

        mDecor.startChanging();
        mDecor.onResourcesLoaded(mLayoutInflater, layoutResource);
        ViewGroup contentParent = (ViewGroup)findViewById(ID_ANDROID_CONTENT);
        if (contentParent == null) {
            throw new RuntimeException("Window couldn't find content container view");
        }
        ......
        mDecor.finishChanging();

        return contentParent;
    }

   frameworks/base/core/java/com/android/internal/policy/DecorView.java
    void onResourcesLoaded(LayoutInflater inflater, int layoutResource) {
        if (mBackdropFrameRenderer != null) {
            loadBackgroundDrawablesIfNeeded();
            mBackdropFrameRenderer.onResourcesLoaded(
                    this, mResizingBackgroundDrawable, mCaptionBackgroundDrawable,
                    mUserCaptionBackgroundDrawable, getCurrentColor(mStatusColorViewState),
                    getCurrentColor(mNavigationColorViewState));
        }

        mDecorCaptionView = createDecorCaptionView(inflater);
        final View root = inflater.inflate(layoutResource, null);
        if (mDecorCaptionView != null) {
            if (mDecorCaptionView.getParent() == null) {
                addView(mDecorCaptionView,
                        new ViewGroup.LayoutParams(MATCH_PARENT, MATCH_PARENT));
            }
            mDecorCaptionView.addView(root,
                    new ViewGroup.MarginLayoutParams(MATCH_PARENT, MATCH_PARENT));
        } else {

            // Put it below the color views.
            addView(root, 0, new ViewGroup.LayoutParams(MATCH_PARENT, MATCH_PARENT));
        }
        mContentRoot = (ViewGroup) root;
        initializeElevation();
    }
frameworks/base/core/res/res/layout/screen_simple.xml
<?xml version="1.0" encoding="utf-8"?>
<!--
/* //device/apps/common/assets/res/layout/screen_simple.xml
**
** Copyright 2006, The Android Open Source Project
**
** Licensed under the Apache License, Version 2.0 (the "License");
** you may not use this file except in compliance with the License.
** You may obtain a copy of the License at
**
** http://www.apache.org/licenses/LICENSE-2.0
**
** Unless required by applicable law or agreed to in writing, software
** distributed under the License is distributed on an "AS IS" BASIS,
** WITHOUT WARRANTIES OR CONDITIONS OF ANY KIND, either express or implied.
** See the License for the specific language governing permissions and
** limitations under the License.
*/
This is an optimized layout for a screen, with the minimum set of features
enabled.
-->
<LinearLayout xmlns:android="http://schemas.android.com/apk/res/android"
android:layout_width="match_parent"
android:layout_height="match_parent"
android:fitsSystemWindows="true"
android:orientation="vertical">
<ViewStub android:id="@+id/action_mode_bar_stub"
android:inflatedId="@+id/action_mode_bar"
android:layout="@layout/action_mode_bar"
android:layout_width="match_parent"
android:layout_height="wrap_content"
android:theme="?attr/actionBarTheme" />
<FrameLayout
android:id="@android:id/content"
android:layout_width="match_parent"
android:layout_height="match_parent"
android:foregroundInsidePadding="false"
android:foregroundGravity="fill_horizontal|top"
android:foreground="?android:attr/windowContentOverlay" />
</LinearLayout>- 当第一次调用setContentView时,由于mContentParent为空,会调用installDecor方法。
- installDecor方法首先会判断mDecor是否为空,由于第一次调用所以mDecor为空,调用generateDecor方法会new一个DecorView对象。
- installDecor方法接下来会判断mContentParent是否为空,由于第一次调用所以mContentParent为空。调用generateLayout方法生成mContentParent。
- generateLayout方法会根据一系列条件选定一个layoutResource(这里列举一个简单的布局文件screen_simple.xml),然后调用DecorView#onResourcesLoaded方法把这个layoutResource通过ViewGroup#addView方法添加为DecoreView的子View.之后会找到id为ID_ANDROID_CONTENT(android:id/content)的View然后把值传递给mContentParent。
Ps:screen_simple.xml文件的根View设置了android:fitsSystemWindows="true"
- installDecor方法接下来会调用DecorView#makeOptionalFitsSystemWindows方法来设置OPTIONAL_FITS_SYSTEM_WINDOWS标记。
    android.view.ViewGroup
    /**
     * @hide
     */
    @Override
    @UnsupportedAppUsage
    public void makeOptionalFitsSystemWindows() {
        super.makeOptionalFitsSystemWindows();
        final int count = mChildrenCount;
        final View[] children = mChildren;
        for (int i = 0; i < count; i++) {
            children[i].makeOptionalFitsSystemWindows();
        }
    }
    android.view.View
    /**
     * For use by PhoneWindow to make its own system window fitting optional.
     * @hide
     */
    @UnsupportedAppUsage
    public void makeOptionalFitsSystemWindows() {
        setFlags(OPTIONAL_FITS_SYSTEM_WINDOWS, OPTIONAL_FITS_SYSTEM_WINDOWS);
}- makeOptionalFitsSystemWindows方法被标记为hide,只能够被系统调用。
- DecorView调用makeOptionalFitsSystemWindows之后会给它的子View(仅限于screen_simple.xml布局中的View)设置这个标记。
- 这里可以看出,自己应用布局文件中的View是不会被设置这个标记的。
3.1.2PFLAG3_APPLYING_INSETS
    /**
     * Request to apply the given window insets to this view or another view in its subtree.
     *
     * <p>This method should be called by clients wishing to apply insets corresponding to areas
     * obscured by window decorations or overlays. This can include the status and navigation bars,
     * action bars, input methods and more. New inset categories may be added in the future.
     * The method returns the insets provided minus any that were applied by this view or its
     * children.</p>
     *
     * <p>Clients wishing to provide custom behavior should override the
     * {@link #onApplyWindowInsets(WindowInsets)} method or alternatively provide a
     * {@link OnApplyWindowInsetsListener} via the
     * {@link #setOnApplyWindowInsetsListener(View.OnApplyWindowInsetsListener) setOnApplyWindowInsetsListener}
     * method.</p>
     *
     * <p>This method replaces the older {@link #fitSystemWindows(Rect) fitSystemWindows} method.
     * </p>
     *
     * @param insets Insets to apply
     * @return The provided insets minus the insets that were consumed
     */
    public WindowInsets dispatchApplyWindowInsets(WindowInsets insets) {
        try {
            mPrivateFlags3 |= PFLAG3_APPLYING_INSETS;
            if (mListenerInfo != null && mListenerInfo.mOnApplyWindowInsetsListener != null) {
                return mListenerInfo.mOnApplyWindowInsetsListener.onApplyWindowInsets(this, insets);
            } else {
                return onApplyWindowInsets(insets);
            }
        } finally {
            mPrivateFlags3 &= ~PFLAG3_APPLYING_INSETS;
        }
    }
dispatchApplyWindowInsets方法开始的时候会设置这个标记,方法调用结束后取消设置这个标记。
3.1.3FITS_SYSTEM_WINDOWS
    /**
     * Sets whether or not this view should account for system screen decorations
     * such as the status bar and inset its content; that is, controlling whether
     * the default implementation of {@link #fitSystemWindows(Rect)} will be
     * executed.  See that method for more details.
     *
     * <p>Note that if you are providing your own implementation of
     * {@link #fitSystemWindows(Rect)}, then there is no need to set this
     * flag to true -- your implementation will be overriding the default
     * implementation that checks this flag.
     *
     * @param fitSystemWindows If true, then the default implementation of
     * {@link #fitSystemWindows(Rect)} will be executed.
     *
     * @attr ref android.R.styleable#View_fitsSystemWindows
     * @see #getFitsSystemWindows()
     * @see #fitSystemWindows(Rect)
     * @see #setSystemUiVisibility(int)
     */
    public void setFitsSystemWindows(boolean fitSystemWindows) {
        setFlags(fitSystemWindows ? FITS_SYSTEM_WINDOWS : 0, FITS_SYSTEM_WINDOWS);
    }
可以通过android:fitsSystemWindows这个属性来配置这个标记。
3.1.4SYSTEM_UI_LAYOUT_FLAGS
这个标记会在后面源码分析中了解到。
3.2dispatchApplyWindowInsets方法分析
3.2.1ViewGroup的dispatchApplyWindowInsets方法分析
    @Override
    public WindowInsets dispatchApplyWindowInsets(WindowInsets insets) {
        insets = super.dispatchApplyWindowInsets(insets);
        if (View.sBrokenInsetsDispatch) {
            return brokenDispatchApplyWindowInsets(insets);
        } else {
            return newDispatchApplyWindowInsets(insets);
        }
    }

    private WindowInsets brokenDispatchApplyWindowInsets(WindowInsets insets) {
        if (!insets.isConsumed()) {
            final int count = getChildCount();
            for (int i = 0; i < count; i++) {
                insets = getChildAt(i).dispatchApplyWindowInsets(insets);
                if (insets.isConsumed()) {
                    break;
                }
            }
        }
        return insets;
    }
这个方法从字面意思就是分发事件,跟Touch方法的分发是不是很类似呢?这个方法主要执行下面逻辑:
- 调用父类的dispatchApplyWindowInsets方法,作用就是看自己是否消费这个事件
- 由于View.sBrokenInsetsDispatch的值为true,逻辑走到brokenDispatchApplyWindowInsets方法
- 如果自己消费了事件,就不把事件往下面传递了,直接返回
- 如果自己没有消费事件,循环遍历子View,如果找到了第一个消费的对象,就直接返回。
3.2.2View的dispatchApplyWindowInsets方法分析
    public WindowInsets dispatchApplyWindowInsets(WindowInsets insets) {
        try {
            mPrivateFlags3 |= PFLAG3_APPLYING_INSETS;
            if (mListenerInfo != null && mListenerInfo.mOnApplyWindowInsetsListener != null) {
                return mListenerInfo.mOnApplyWindowInsetsListener.onApplyWindowInsets(this, insets);
            } else {
                return onApplyWindowInsets(insets);
            }
        } finally {
            mPrivateFlags3 &= ~PFLAG3_APPLYING_INSETS;
        }
}- 标记 mPrivateFlags3的值为 PFLAG3_APPLYING_INSETS,还记得前面说的4个标记吗?这里设置了这个标记有什么用呢?后面会用到,先不管。
- 如果设置了Listener,则走listener的回调接口,这里假设没有设置listener,所以这里代码逻辑走else流程。
- 调用 onApplyWindowInsets方法,我们主要分析这个方法。
- 清除掉mPrivateFlags3的值 PFLAG3_APPLYING_INSETS
    public WindowInsets onApplyWindowInsets(WindowInsets insets) {
        if ((mPrivateFlags3 & PFLAG3_FITTING_SYSTEM_WINDOWS) == 0) {
            // We weren't called from within a direct call to fitSystemWindows,
            // call into it as a fallback in case we're in a class that overrides it
            // and has logic to perform.
            if (fitSystemWindows(insets.getSystemWindowInsetsAsRect())) {
                return insets.consumeSystemWindowInsets();
            }
        } else {
            // We were called from within a direct call to fitSystemWindows.
            if (fitSystemWindowsInt(insets.getSystemWindowInsetsAsRect())) {
                return insets.consumeSystemWindowInsets();
            }
        }
        return insets;
}- 检查 mPrivateFlags3这个Flag是否设置了PFLAG3_FITTING_SYSTEM_WINDOWS,这里由于我们没有设置过,所以走if代码流程。
- 后面分析 fitSystemWindows方法。
- fitSystemWindowsInt这个方法要特别注意,因为最后都会进入到这个方法里面,后面在分析这个方法。
- 这里要注意传递给fitSystemWindows方法的参数,是getSystemWindowInsetsAsRect方法的返回值。
- fitSystemWindows或者fitSystemWindowsInt返回了true,则调用WindowInsets的consumeSystemWindowInsets说明此View消费了这个事件。
    @Deprecated
    protected boolean fitSystemWindows(Rect insets) {
        if ((mPrivateFlags3 & PFLAG3_APPLYING_INSETS) == 0) {
            if (insets == null) {
                // Null insets by definition have already been consumed.
                // This call cannot apply insets since there are none to apply,
                // so return false.
                return false;
            }
            // If we're not in the process of dispatching the newer apply insets call,
            // that means we're not in the compatibility path. Dispatch into the newer
            // apply insets path and take things from there.
            try {
                mPrivateFlags3 |= PFLAG3_FITTING_SYSTEM_WINDOWS;
                return dispatchApplyWindowInsets(new WindowInsets(insets)).isConsumed();
            } finally {
                mPrivateFlags3 &= ~PFLAG3_FITTING_SYSTEM_WINDOWS;
            }
        } else {
            // We're being called from the newer apply insets path.
            // Perform the standard fallback behavior.
            return fitSystemWindowsInt(insets);
        }
}- 检查mPrivateFlags3是否设置了PFLAG3_APPLYING_INSETS这个Flag,这里肯定是设置了的,因为在View的dispatchApplyWindowInsets方法开始调用时设置了这个Flag,调用结束时取消了这个Flag。
- 代码走到else流程,会调用 fitSystemWindowsInt方法,还记得前面说的最终都会掉到这个方法吗?
    private boolean fitSystemWindowsInt(Rect insets) {
        if ((mViewFlags & FITS_SYSTEM_WINDOWS) == FITS_SYSTEM_WINDOWS) {
            mUserPaddingStart = UNDEFINED_PADDING;
            mUserPaddingEnd = UNDEFINED_PADDING;
            Rect localInsets = sThreadLocal.get();
            if (localInsets == null) {
                localInsets = new Rect();
                sThreadLocal.set(localInsets);
            }
            boolean res = computeFitSystemWindows(insets, localInsets);
            mUserPaddingLeftInitial = localInsets.left;
            mUserPaddingRightInitial = localInsets.right;
            internalSetPadding(localInsets.left, localInsets.top,
                    localInsets.right, localInsets.bottom);
            return res;
        }
        return false;
}- 检查该View是否设置了FITS_SYSTEM_WINDOWS 这个Flag,也就是是否设置了属性android:fitsSystemWindows="true",还记得前面说的4个Flag中的一个吗?,如果没有设置,说名该View不会消费这个事件,直接返回false。
- computeFitSystemWindows方法计算自己是否消费这次事件
- 调用internalSetPadding 方法设置View自己的padding值
    @Deprecated
    @UnsupportedAppUsage
    protected boolean computeFitSystemWindows(Rect inoutInsets, Rect outLocalInsets) {
        WindowInsets innerInsets = computeSystemWindowInsets(new WindowInsets(inoutInsets),
                outLocalInsets);
        inoutInsets.set(innerInsets.getSystemWindowInsetsAsRect());
        return innerInsets.isSystemWindowInsetsConsumed();
    }

    public WindowInsets computeSystemWindowInsets(WindowInsets in, Rect outLocalInsets) {
        if ((mViewFlags & OPTIONAL_FITS_SYSTEM_WINDOWS) == 0
                || mAttachInfo == null
                || ((mAttachInfo.mSystemUiVisibility & SYSTEM_UI_LAYOUT_FLAGS) == 0
                && !mAttachInfo.mOverscanRequested)) {
            outLocalInsets.set(in.getSystemWindowInsetsAsRect());
            return in.consumeSystemWindowInsets().inset(outLocalInsets);
        } else {
            // The application wants to take care of fitting system window for
            // the content...  however we still need to take care of any overscan here.
            final Rect overscan = mAttachInfo.mOverscanInsets;
            outLocalInsets.set(overscan);
            return in.inset(outLocalInsets);
        }
    }
这里有3个判断条件
- (mViewFlags & OPTIONAL_FITS_SYSTEM_WINDOWS) == 0
- mAttachInfo == null
- ((mAttachInfo.mSystemUiVisibility & SYSTEM_UI_LAYOUT_FLAGS) == 0 && !mAttachInfo.mOverscanRequested))
- 条件1,还记得前面说的 OPTIONAL_FITS_SYSTEM_WINDOWS标记吗?这个标记是DecoreView的直接子View为false,红色的FrameLayout为true。
- 条件2,这个值始终为false。
- 条件3,A:!mAttachInfo.mOverscanRequested始终为true。 B:还记得前面说的 SYSTEM_UI_LAYOUT_FLAGS标记吗?mAttachInfo.mSystemUiVisibility & SYSTEM_UI_LAYOUT_FLAGS这个标记可以调用View的setSystemUiVisibility方法来设置,默认为0.所以如果没有调用setSystemUiVisibility来更改Flag的话,DecoreView的直接子View会消费掉事件,事件就不会往下面传递了。
| 条件1 | 条件2 | 条件3 | 最终结果 | ||||
| DecorView的直接子View | false | false | View#setSystemUiVisibility | 未调用 | true | true | |
| 调用 | false | false | |||||
| 红色背景FrameLayout | true | 不用管 | 不用管 | true | |||
4总结
1.配置android:fitsSystemWindows="true",系统默认行为是给消费了WindowInsets事件的View添加系统状态栏或者导航栏高度的padding。
2.配置android:fitsSystemWindows="true"并不会有任何效果,同时还要调用View#setSystemUiVisibility方法设置下面两个Flag中的任何一个.
SYSTEM_UI_FLAG_LAYOUT_HIDE_NAVIGATION|SYSTEM_UI_FLAG_LAYOUT_FULLSCREEN
public void setSystemUiVisibility(int visibility) {
    if (visibility != mSystemUiVisibility) {
        mSystemUiVisibility = visibility;
        if (mParent != null && mAttachInfo != null && !mAttachInfo.mRecomputeGlobalAttributes) {
                mParent.recomputeViewAttributes(this);
        }
    }
}


 697
697


 被折叠的 条评论
为什么被折叠?
被折叠的 条评论
为什么被折叠?
 到【灌水乐园】发言


