


 本文详细介绍了Tomcat的架构,包括Server、Service、Engine、Host、Connector和Context等核心组件。接着深入剖析了Tomcat的启动过程,从命令行启动到处理命令行参数,再到启动NamingContext和Services。此外,还讲解了请求处理流程,包括接收到HTTP请求后的各个处理阶段,以及权限认证的时序图。最后提到了源码编译的相关信息。
Tomcat架构【官网翻译】–以tomcat9.0.31版本分析
首先,我们看下一个tomcat的server.xml配置【 https://github.com/apache/tomcat/blob/9.0.x/conf/server.xml】
<?xml version="1.0" encoding="UTF-8"?>
<!-- Note: A "Server" is not itself a "Container", so you may not
define subcomponents such as "Valves" at this level.
Documentation at /docs/config/server.html
-->
<Server port="8005" shutdown="SHUTDOWN">
<Listener className="org.apache.catalina.startup.VersionLoggerListener" />
<!-- Security listener. Documentation at /docs/config/listeners.html
<Listener className="org.apache.catalina.security.SecurityListener" />
-->
<!--APR library loader. Documentation at /docs/apr.html -->
<Listener className="org.apache.catalina.core.AprLifecycleListener" SSLEngine="on" />
<!-- Prevent memory leaks due to use of particular java/javax APIs-->
<Listener className="org.apache.catalina.core.JreMemoryLeakPreventionListener" />
<Listener className="org.apache.catalina.mbeans.GlobalResourcesLifecycleListener" />
<Listener className="org.apache.catalina.core.ThreadLocalLeakPreventionListener" />
<!-- Global JNDI resources
Documentation at /docs/jndi-resources-howto.html
-->
<GlobalNamingResources>
<!-- Editable user database that can also be used by
UserDatabaseRealm to authenticate users
-->
<Resource name="UserDatabase" auth="Container"
type="org.apache.catalina.UserDatabase"
description="User database that can be updated and saved"
factory="org.apache.catalina.users.MemoryUserDatabaseFactory"
pathname="conf/tomcat-users.xml" />
</GlobalNamingResources>
<!-- A "Service" is a collection of one or more "Connectors" that share
a single "Container" Note: A "Service" is not itself a "Container",
so you may not define subcomponents such as "Valves" at this level.
Documentation at /docs/config/service.html
-->
<Service name="Catalina">
<!--The connectors can use a shared executor, you can define one or more named thread pools-->
<!--
<Executor name="tomcatThreadPool" namePrefix="catalina-exec-"
maxThreads="150" minSpareThreads="4"/>
-->
<!-- A "Connector" represents an endpoint by which requests are received
and responses are returned. Documentation at :
Java HTTP Connector: /docs/config/http.html
Java AJP Connector: /docs/config/ajp.html
APR (HTTP/AJP) Connector: /docs/apr.html
Define a non-SSL/TLS HTTP/1.1 Connector on port 8080
-->
<Connector port="8080" protocol="HTTP/1.1"
connectionTimeout="20000"
redirectPort="8443" />
<!-- A "Connector" using the shared thread pool-->
<!--
<Connector executor="tomcatThreadPool"
port="8080" protocol="HTTP/1.1"
connectionTimeout="20000"
redirectPort="8443" />
-->
<!-- Define an SSL/TLS HTTP/1.1 Connector on port 8443
This connector uses the NIO implementation. The default
SSLImplementation will depend on the presence of the APR/native
library and the useOpenSSL attribute of the
AprLifecycleListener.
Either JSSE or OpenSSL style configuration may be used regardless of
the SSLImplementation selected. JSSE style configuration is used below.
-->
<!--
<Connector port="8443" protocol="org.apache.coyote.http11.Http11NioProtocol"
maxThreads="150" SSLEnabled="true">
<SSLHostConfig>
<Certificate certificateKeystoreFile="conf/localhost-rsa.jks"
type="RSA" />
</SSLHostConfig>
</Connector>
-->
<!-- Define an SSL/TLS HTTP/1.1 Connector on port 8443 with HTTP/2
This connector uses the APR/native implementation which always uses
OpenSSL for TLS.
Either JSSE or OpenSSL style configuration may be used. OpenSSL style
configuration is used below.
-->
<!--
<Connector port="8443" protocol="org.apache.coyote.http11.Http11AprProtocol"
maxThreads="150" SSLEnabled="true" >
<UpgradeProtocol className="org.apache.coyote.http2.Http2Protocol" />
<SSLHostConfig>
<Certificate certificateKeyFile="conf/localhost-rsa-key.pem"
certificateFile="conf/localhost-rsa-cert.pem"
certificateChainFile="conf/localhost-rsa-chain.pem"
type="RSA" />
</SSLHostConfig>
</Connector>
-->
<!-- Define an AJP 1.3 Connector on port 8009 -->
<!--
<Connector protocol="AJP/1.3"
address="::1"
port="8009"
redirectPort="8443" />
-->
<!-- An Engine represents the entry point (within Catalina) that processes
every request. The Engine implementation for Tomcat stand alone
analyzes the HTTP headers included with the request, and passes them
on to the appropriate Host (virtual host).
Documentation at /docs/config/engine.html -->
<!-- You should set jvmRoute to support load-balancing via AJP ie :
<Engine name="Catalina" defaultHost="localhost" jvmRoute="jvm1">
-->
<Engine name="Catalina" defaultHost="localhost">
<!--For clustering, please take a look at documentation at:
/docs/cluster-howto.html (simple how to)
/docs/config/cluster.html (reference documentation) -->
<!--
<Cluster className="org.apache.catalina.ha.tcp.SimpleTcpCluster"/>
-->
<!-- Use the LockOutRealm to prevent attempts to guess user passwords
via a brute-force attack -->
<Realm className="org.apache.catalina.realm.LockOutRealm">
<!-- This Realm uses the UserDatabase configured in the global JNDI
resources under the key "UserDatabase". Any edits
that are performed against this UserDatabase are immediately
available for use by the Realm. -->
<Realm className="org.apache.catalina.realm.UserDatabaseRealm"
resourceName="UserDatabase"/>
</Realm>
<Host name="localhost" appBase="webapps"
unpackWARs="true" autoDeploy="true">
<!-- SingleSignOn valve, share authentication between web applications
Documentation at: /docs/config/valve.html -->
<!--
<Valve className="org.apache.catalina.authenticator.SingleSignOn" />
-->
<!-- Access log processes all example.
Documentation at: /docs/config/valve.html
Note: The pattern used is equivalent to using pattern="common" -->
<Valve className="org.apache.catalina.valves.AccessLogValve" directory="logs"
prefix="localhost_access_log" suffix=".txt"
pattern="%h %l %u %t "%r" %s %b" />
</Host>
</Engine>
</Service>
</Server>
1.总览
【https://tomcat.apache.org/tomcat-9.0-doc/architecture/overview.html】
术语
- Server
Server代表整个tomcat容器,tomcat自身提供了一个实现,很少用户会去自定义自己的实现
- Service
Service是位于Server下的一个直接组件,它绑定了一个或者多个Connector到一个Engine。这个接口也很少用户会去自定义
- Engine
Engine代表为特定Service提供服务的管道。Service可能会有多个Connector,Engine接收和处理从这些Connector来的所有请求,然后返回Response给Connector,继而再返回给Client
- Host
通过Host,Tomcat Server可以关联上一个域名,比如www.yourcompany.com。一个Engine可能会包含多个Host,Host可以支持二级域名,比如yourcompany.com和abc.yourcompany.com
- Connector
Connector用于处理与客户端的通讯。Tomcat里面提供了一些Connector。例如Http Connector,当tomcat作为一个标准的服务器时,用于处理http请求。另外,AJP Connector,它实现了AJP协议,用于连接Tomcat到一个web服务器,比如Apache HTTPD server
- Context
一个Context代表一个web应用。一个Host里面可能包含多个Context,每个Context有一个唯一的路劲
2.Tomcat启动过程
2.1源码解析
【https://tomcat.apache.org/tomcat-9.0-doc/architecture/startup/serverStartup.txt】
序列1:从命令行启动
类:org.apache.catalina.startup.Bootstrap
a)设置classloaders
        commonLoader (common)-> System Loader
        sharedLoader (shared)-> commonLoader -> System Loader
        catalinaLoader(server) -> commonLoader -> System Loader
源码如下Bootstrap类:
    private void initClassLoaders() {
        try {
            commonLoader = createClassLoader("common", null);
            if (commonLoader == null) {
                // no config file, default to this loader - we might be in a 'single' env.
                commonLoader = this.getClass().getClassLoader();
            }
            catalinaLoader = createClassLoader("server", commonLoader);
            sharedLoader = createClassLoader("shared", commonLoader);
        } catch (Throwable t) {
            handleThrowable(t);
            log.error("Class loader creation threw exception", t);
            System.exit(1);
        }
    }
b)加载启动类(通过反射)
        org.apache.catalina.startup.Catalina
        setParentClassloader -> sharedLoader
        Thread.contextClassloader -> catalinaLoader
源码如下Bootstrap类:
    public void init() throws Exception {

        initClassLoaders();

        Thread.currentThread().setContextClassLoader(catalinaLoader);

        SecurityClassLoad.securityClassLoad(catalinaLoader);

        // Load our startup class and call its process() method
        if (log.isDebugEnabled())
            log.debug("Loading startup class");
        Class<?> startupClass = catalinaLoader.loadClass("org.apache.catalina.startup.Catalina");
        Object startupInstance = startupClass.getConstructor().newInstance();

        // Set the shared extensions class loader
        if (log.isDebugEnabled())
            log.debug("Setting startup class properties");
        String methodName = "setParentClassLoader";
        Class<?> paramTypes[] = new Class[1];
        paramTypes[0] = Class.forName("java.lang.ClassLoader");
        Object paramValues[] = new Object[1];
        paramValues[0] = sharedLoader;
        Method method =
            startupInstance.getClass().getMethod(methodName, paramTypes);
        method.invoke(startupInstance, paramValues);

        catalinaDaemon = startupInstance;
    }
c)Bootstrap.daemon.init()完成
序列2:处理命令行参数
类org.apache.catalina.startup.Bootstrap 这里我们假设命令参数是start
a)Catalina.setAwait(true);
b)Catalina.load()
b1)initDirs()
原文说设置一些属性,如catalina.home,但源码没看到
源码如下Catalina类:
    protected void initDirs() {
        String temp = System.getProperty("java.io.tmpdir");
        if (temp == null || (!(new File(temp)).isDirectory())) {
            log.error(sm.getString("embedded.notmp", temp));
        }
    }
b2)initNaming设置系统属性
b3)createStartDigester()配置digester用于解析server.xml
例如org.apache.catalina.core.StandardServer代表整个tomcat,org.apache.catalina.deploy.NamingResources用于处理JNDI相关,org.apache.catalina.LifecycleListener用于主要组件的start/stop事件监听,org.apache.catalina.core.StandardService,org.apache.catalina.Connector用于处理请求等
源码如下(原方法是在太长,我删减了些)Catalina类:
    protected Digester createStartDigester() {
        long t1=System.currentTimeMillis();
        // Initialize the digester
        Digester digester = new Digester();
        digester.setValidating(false);
        digester.setRulesValidation(true);
        Map<Class<?>, List<String>> fakeAttributes = new HashMap<>();
        // Ignore className on all elements
        List<String> objectAttrs = new ArrayList<>();
        objectAttrs.add("className");
        fakeAttributes.put(Object.class, objectAttrs);
        // Ignore attribute added by Eclipse for its internal tracking
        List<String> contextAttrs = new ArrayList<>();
        contextAttrs.add("source");
        fakeAttributes.put(StandardContext.class, contextAttrs);
        // Ignore Connector attribute used internally but set on Server
        List<String> connectorAttrs = new ArrayList<>();
        connectorAttrs.add("portOffset");
        fakeAttributes.put(Connector.class, connectorAttrs);
        digester.setFakeAttributes(fakeAttributes);
        digester.setUseContextClassLoader(true);

        // Configure the actions we will be using
        digester.addObjectCreate("Server",
                                 "org.apache.catalina.core.StandardServer",
                                 "className");
        digester.addSetProperties("Server");
        digester.addSetNext("Server",
                            "setServer",
                            "org.apache.catalina.Server");

...

        // Add RuleSets for nested elements
        digester.addRuleSet(new NamingRuleSet("Server/GlobalNamingResources/"));
        digester.addRuleSet(new EngineRuleSet("Server/Service/"));
        digester.addRuleSet(new HostRuleSet("Server/Service/Engine/"));
        digester.addRuleSet(new ContextRuleSet("Server/Service/Engine/Host/"));
        addClusterRuleSet(digester, "Server/Service/Engine/Host/Cluster/");
        digester.addRuleSet(new NamingRuleSet("Server/Service/Engine/Host/Context/"));

        // When the 'engine' is found, set the parentClassLoader.
        digester.addRule("Server/Service/Engine",
                         new SetParentClassLoaderRule(parentClassLoader));
        addClusterRuleSet(digester, "Server/Service/Engine/Cluster/");

        long t2=System.currentTimeMillis();
        if (log.isDebugEnabled()) {
            log.debug("Digester for server.xml created " + ( t2-t1 ));
        }
        return digester;

    }
b4)加载server.xml,并通过上方创建的digester解析,生成对象,但实际还没有start
例如Http11NioProtocol的生成,debug截图

源码如下Digester类:
    public Object parse(InputSource input) throws IOException, SAXException {
        configure();
        getXMLReader().parse(input);
        return root;
    }
b5)设置System.out和System.err到SystemLogHandler类
源码如下Catalina类:
    protected void initStreams() {
        // Replace System.out and System.err with a custom PrintStream
        System.setOut(new SystemLogHandler(System.out));
        System.setErr(new SystemLogHandler(System.err));
    }
b6)层层调用所有的组件调用初始化方法
例如StandardServer的init
    public final synchronized void init() throws LifecycleException {
        if (!state.equals(LifecycleState.NEW)) {
            invalidTransition(Lifecycle.BEFORE_INIT_EVENT);
        }

        try {
            setStateInternal(LifecycleState.INITIALIZING, null, false);
            initInternal();
            setStateInternal(LifecycleState.INITIALIZED, null, false);
        } catch (Throwable t) {
            handleSubClassException(t, "lifecycleBase.initFail", toString());
        }
    }

		protected void initInternal() throws LifecycleException {

        super.initInternal();

        // Initialize utility executor
        reconfigureUtilityExecutor(getUtilityThreadsInternal(utilityThreads));
        register(utilityExecutor, "type=UtilityExecutor");

        // Register global String cache
        // Note although the cache is global, if there are multiple Servers
        // present in the JVM (may happen when embedding) then the same cache
        // will be registered under multiple names
        onameStringCache = register(new StringCache(), "type=StringCache");

        // Register the MBeanFactory
        MBeanFactory factory = new MBeanFactory();
        factory.setContainer(this);
        onameMBeanFactory = register(factory, "type=MBeanFactory");

        // Register the naming resources
        globalNamingResources.init();//globalNamingResources的初始化

        // Populate the extension validator with JARs from common and shared
        // class loaders
        if (getCatalina() != null) {
            ClassLoader cl = getCatalina().getParentClassLoader();
            // Walk the class loader hierarchy. Stop at the system class loader.
            // This will add the shared (if present) and common class loaders
            while (cl != null && cl != ClassLoader.getSystemClassLoader()) {
                if (cl instanceof URLClassLoader) {
                    URL[] urls = ((URLClassLoader) cl).getURLs();
                    for (URL url : urls) {
                        if (url.getProtocol().equals("file")) {
                            try {
                                File f = new File (url.toURI());
                                if (f.isFile() &&
                                        f.getName().endsWith(".jar")) {
                                    ExtensionValidator.addSystemResource(f);
                                }
                            } catch (URISyntaxException e) {
                                // Ignore
                            } catch (IOException e) {
                                // Ignore
                            }
                        }
                    }
                }
                cl = cl.getParent();
            }
        }
        // Initialize our defined Services
        for (int i = 0; i < services.length; i++) {
            services[i].init();//services的初始化
        }
    }
c)Catalina.start()
c1)启动NamingContext,并绑定所有JNDI
c2)启动services
StandardService -> starts Engine (ContainerBase -> Realm,Cluster etc)
源码如下StandardServer类:
    protected void startInternal() throws LifecycleException {

        fireLifecycleEvent(CONFIGURE_START_EVENT, null);
        setState(LifecycleState.STARTING);

        globalNamingResources.start();

        // Start our defined Services
        synchronized (servicesLock) {
            for (int i = 0; i < services.length; i++) {
                services[i].start();//Services启动
            }
        }

        if (periodicEventDelay > 0) {
            monitorFuture = getUtilityExecutor().scheduleWithFixedDelay(
                    new Runnable() {
                        @Override
                        public void run() {
                            startPeriodicLifecycleEvent();
                        }
                    }, 0, 60, TimeUnit.SECONDS);
        }
    }
c3)StandardHost的启动
作用:
1.配置一个ErrorReportValve根据HTTP的错误码输出对应HTML
2.开启Valves(例如前面这个ErrorReportValve)
3.配置StandardHostValve,用于绑定WebappClassLoader到线程上下文,为request查找session
4.启动HostConfig组件,这个组件会去部署所有的webapps
源码如下HostConfig类:
    protected void deployApps() {

        File appBase = host.getAppBaseFile();
        File configBase = host.getConfigBaseFile();
        String[] filteredAppPaths = filterAppPaths(appBase.list());
        // Deploy XML descriptors from configBase
        deployDescriptors(configBase, configBase.list());
        // Deploy WARs
        deployWARs(appBase, filteredAppPaths);
        // Deploy expanded folders
        deployDirectories(appBase, filteredAppPaths);

    }
HostConfig之后会创建Digester,Digester会调用ContextConfig.start()用于处理web.xml
c4)在StandardEngine容器的生命周期内,会启动一个后台线程监控context是否有变更。如果context变更了(根据war文件/context.xml文件/web.xml文件的时间戳),热加载将会被触发(stop/remove/deploy/start)
d)Tomcat接收http请求
d1)通过ServerSocket.accept()接收请求,接收是在一个单独的线程中进行的。
其实应该是在Acceptor这个类的run方法中,这个文档可能是很久之前的,还用BIO
源码如下Acceptor类:
@Override
    public void run() {

        int errorDelay = 0;

        // Loop until we receive a shutdown command
        while (endpoint.isRunning()) {

            // Loop if endpoint is paused
            while (endpoint.isPaused() && endpoint.isRunning()) {
                state = AcceptorState.PAUSED;
                try {
                    Thread.sleep(50);
                } catch (InterruptedException e) {
                    // Ignore
                }
            }

            if (!endpoint.isRunning()) {
                break;
            }
            state = AcceptorState.RUNNING;

            try {
                ...
                try {
                    // Accept the next incoming connection from the server
                    // socket
                    socket = endpoint.serverSocketAccept();//接收请求
                } catch (Exception ioe) {
                    ...
                }
                ...
            } catch (Throwable t) {
                ...
            }
        }
        state = AcceptorState.ENDED;
    }
d2)线程池ThreadPoolExecutor指派TaskThread线程处理
源码如下AbstractEndpoint类:
    public boolean processSocket(SocketWrapperBase<S> socketWrapper,
            SocketEvent event, boolean dispatch) {
        try {
            if (socketWrapper == null) {
                return false;
            }
            SocketProcessorBase<S> sc = null;
            if (processorCache != null) {
                sc = processorCache.pop();
            }
            if (sc == null) {
                sc = createSocketProcessor(socketWrapper, event);
            } else {
                sc.reset(socketWrapper, event);
            }
            Executor executor = getExecutor();
            if (dispatch && executor != null) {
                executor.execute(sc);//提交线程池执行处理
            } else {
                sc.run();
            }
        } catch (RejectedExecutionException ree) {
            getLog().warn(sm.getString("endpoint.executor.fail", socketWrapper) , ree);
            return false;
        } catch (Throwable t) {
            ExceptionUtils.handleThrowable(t);
            // This means we got an OOM or similar creating a thread, or that
            // the pool and its queue are full
            getLog().error(sm.getString("endpoint.process.fail"), t);
            return false;
        }
        return true;
    }
d3)Http11Processor调用process处理
d4)这个http会使用Http11InputBuffer来解析。解析请求头、请求行等信息,然后把这些信息存储到一个Coyote request(不是HTTP request)中,这个request包含所有HTTP信息,如主机,端口,scheme等
源码如下(原方法太长了,我删了很多代码)Http11InputBuffer类:
    boolean parseRequestLine(boolean keptAlive, int connectionTimeout, int keepAliveTimeout)
            throws IOException {
    ...
            if ((end - parsingRequestLineStart) > 0) {
                request.protocol().setBytes(byteBuffer.array(), parsingRequestLineStart,
                        end - parsingRequestLineStart);//设置请求的协议,如HTTP/1.1
            } else {
                request.protocol().setString("");
            }
            parsingRequestLine = false;
            parsingRequestLinePhase = 0;
            parsingRequestLineEol = false;
            parsingRequestLineStart = 0;
            return true;
        ...
    }
d5)Processor有一个Adapter的引用,对于http请求来说,它就是CoyoteAdapter。上方的解析完成之后,Adapter.service()会被调用。在这个service方法中,会创建实现了接口HttpServletRequest的Request对象,和实现了HttpServletResponse接口的Response对象,把cookies和context等关联给到request对象
源码如下(删了部分代码)Mapper类:
    private final void internalMap(CharChunk host, CharChunk uri,
            String version, MappingData mappingData) throws IOException {
       ...
        mappingData.context = contextVersion.object;
        mappingData.contextSlashCount = contextVersion.slashCount;

        // Wrapper mapping
        if (!contextVersion.isPaused()) {
            internalMapWrapper(contextVersion, uri, mappingData);
        }

    }
d6)CoyoteAdapter调用容器StandardEngine的invoke(request,response)方法
其实这里一句语句connector.getService().getContainer().getPipeline().getFirst().invoke(request, response);直接调用StandardEngineValve的invoke(Request request, Response response)方法了
源码如下CoyoteAdapter类:
    public void service(org.apache.coyote.Request req, org.apache.coyote.Response res)
            throws Exception {

        Request request = (Request) req.getNote(ADAPTER_NOTES);
        Response response = (Response) res.getNote(ADAPTER_NOTES);

        if (request == null) {
            // Create objects
            request = connector.createRequest();//创建request对象
            request.setCoyoteRequest(req);
            response = connector.createResponse();//创建response对象
            response.setCoyoteResponse(res);

            // Link objects
            request.setResponse(response);
            response.setRequest(request);

            // Set as notes
            req.setNote(ADAPTER_NOTES, request);
            res.setNote(ADAPTER_NOTES, response);

            // Set query string encoding
            req.getParameters().setQueryStringCharset(connector.getURICharset());
        }

        if (connector.getXpoweredBy()) {
            response.addHeader("X-Powered-By", POWERED_BY);
        }

        boolean async = false;
        boolean postParseSuccess = false;

        req.getRequestProcessor().setWorkerThreadName(THREAD_NAME.get());

        try {
            // Parse and set Catalina and configuration specific
            // request parameters
            postParseSuccess = postParseRequest(req, request, res, response);//传递cookie,context等相关信息到request中
            if (postParseSuccess) {
                //check valves if we support async
                request.setAsyncSupported(
                        connector.getService().getContainer().getPipeline().isAsyncSupported());
                // Calling the container
                connector.getService().getContainer().getPipeline().getFirst().invoke(
                        request, response);//调用StandardEngine的invoke方法
            }
            if (request.isAsync()) {
                async = true;
                ReadListener readListener = req.getReadListener();
                if (readListener != null && request.isFinished()) {
                    // Possible the all data may have been read during service()
                    // method so this needs to be checked here
                    ClassLoader oldCL = null;
                    try {
                        oldCL = request.getContext().bind(false, null);
                        if (req.sendAllDataReadEvent()) {
                            req.getReadListener().onAllDataRead();
                        }
                    } finally {
                        request.getContext().unbind(false, oldCL);
                    }
                }

                Throwable throwable =
                        (Throwable) request.getAttribute(RequestDispatcher.ERROR_EXCEPTION);

                // If an async request was started, is not going to end once
                // this container thread finishes and an error occurred, trigger
                // the async error process
                if (!request.isAsyncCompleting() && throwable != null) {
                    request.getAsyncContextInternal().setErrorState(throwable, true);
                }
            } else {
                request.finishRequest();
                response.finishResponse();
            }

        } catch (IOException e) {
            // Ignore
        } finally {
            ...
        }
    }
d7)d8)调用StandardEngineValve的invoke(Request request, Response response)方法
d9)StandardHost默认有两个valves,一个StandardHostValve,另一个ErrorReportValve
其实加上server.xml中配置的org.apache.catalina.valves.AccessLogValve,总计有三个,他们都是通过getNext().invoke(request,response);调用下一个处理
源码如下AbstractAccessLogValve类:
    public void invoke(Request request, Response response) throws IOException,
            ServletException {
        if (tlsAttributeRequired) {
            // The log pattern uses TLS attributes. Ensure these are populated
            // before the request is processed because with NIO2 it is possible
            // for the connection to be closed (and the TLS info lost) before
            // the access log requests the TLS info. Requesting it now causes it
            // to be cached in the request.
            request.getAttribute(Globals.CERTIFICATES_ATTR);
        }
        for (CachedElement element : cachedElements) {
                element.cache(request);
        }
        getNext().invoke(request, response);//调用下一个valve
    }
d10)StandardHostValve关联合适的classloader到当前线程。同时也会检索session关联给到request,如果有session的话,session的acess()方法会被调用来keep alive
d11)StandardHostValve调用pipeline的invoke(request, response)方法
d12)首先是FormAuthenticator的invoke(Request request, Response response)被调用,然后再调用getNext().invoke(request, response);,继而走到StandardContextValve的invoke(Request request, Response response)
源码如下StandardContextValve类:
    public final void invoke(Request request, Response response)
        throws IOException, ServletException {
        ...
        // Select the Wrapper to be used for this Request
        Wrapper wrapper = request.getWrapper();//wrapper会关联一个servlet
        ...
        wrapper.getPipeline().getFirst().invoke(request, response);
    }
d13)StandardWrapperValve的invoke方法中,jsp会被编译成servlet,然后调用真正的servlet
e)servlet被调用
补充:
在d13)调用过程中,其实是构造了一个filterChain,调用filterChain.doFilter(ServletRequest request, ServletResponse response),在这个方法中最终会调用到servlet.service(request, response);,这之后就是根据请求的方法调用doGet/doPost之类的方法了
源码如下ApplicationFilterChain类:
    private void internalDoFilter(ServletRequest request,
                                  ServletResponse response)
        throws IOException, ServletException {
				...
        // We fell off the end of the chain -- call the servlet instance
        try {
            if (ApplicationDispatcher.WRAP_SAME_OBJECT) {
                lastServicedRequest.set(request);
                lastServicedResponse.set(response);
            }

            if (request.isAsyncSupported() && !servletSupportsAsync) {
                request.setAttribute(Globals.ASYNC_SUPPORTED_ATTR,
                        Boolean.FALSE);
            }
            // Use potentially wrapped request from this point
            if ((request instanceof HttpServletRequest) &&
                    (response instanceof HttpServletResponse) &&
                    Globals.IS_SECURITY_ENABLED ) {
                final ServletRequest req = request;
                final ServletResponse res = response;
                Principal principal =
                    ((HttpServletRequest) req).getUserPrincipal();
                Object[] args = new Object[]{req, res};
                SecurityUtil.doAsPrivilege("service",
                                           servlet,
                                           classTypeUsedInService,
                                           args,
                                           principal);
            } else {
                servlet.service(request, response);//调用servlet,如果是jsp,其实是在这个方法才编译的
            }
        } catch (IOException | ServletException | RuntimeException e) {
            throw e;
        } catch (Throwable e) {
            e = ExceptionUtils.unwrapInvocationTargetException(e);
            ExceptionUtils.handleThrowable(e);
            throw new ServletException(sm.getString("filterChain.servlet"), e);
        } finally {
            if (ApplicationDispatcher.WRAP_SAME_OBJECT) {
                lastServicedRequest.set(null);
                lastServicedResponse.set(null);
            }
        }
    }
2.2时序图
可以直接下载官方的
https://tomcat.apache.org/tomcat-9.0-doc/architecture/startup/serverStartup.pdf
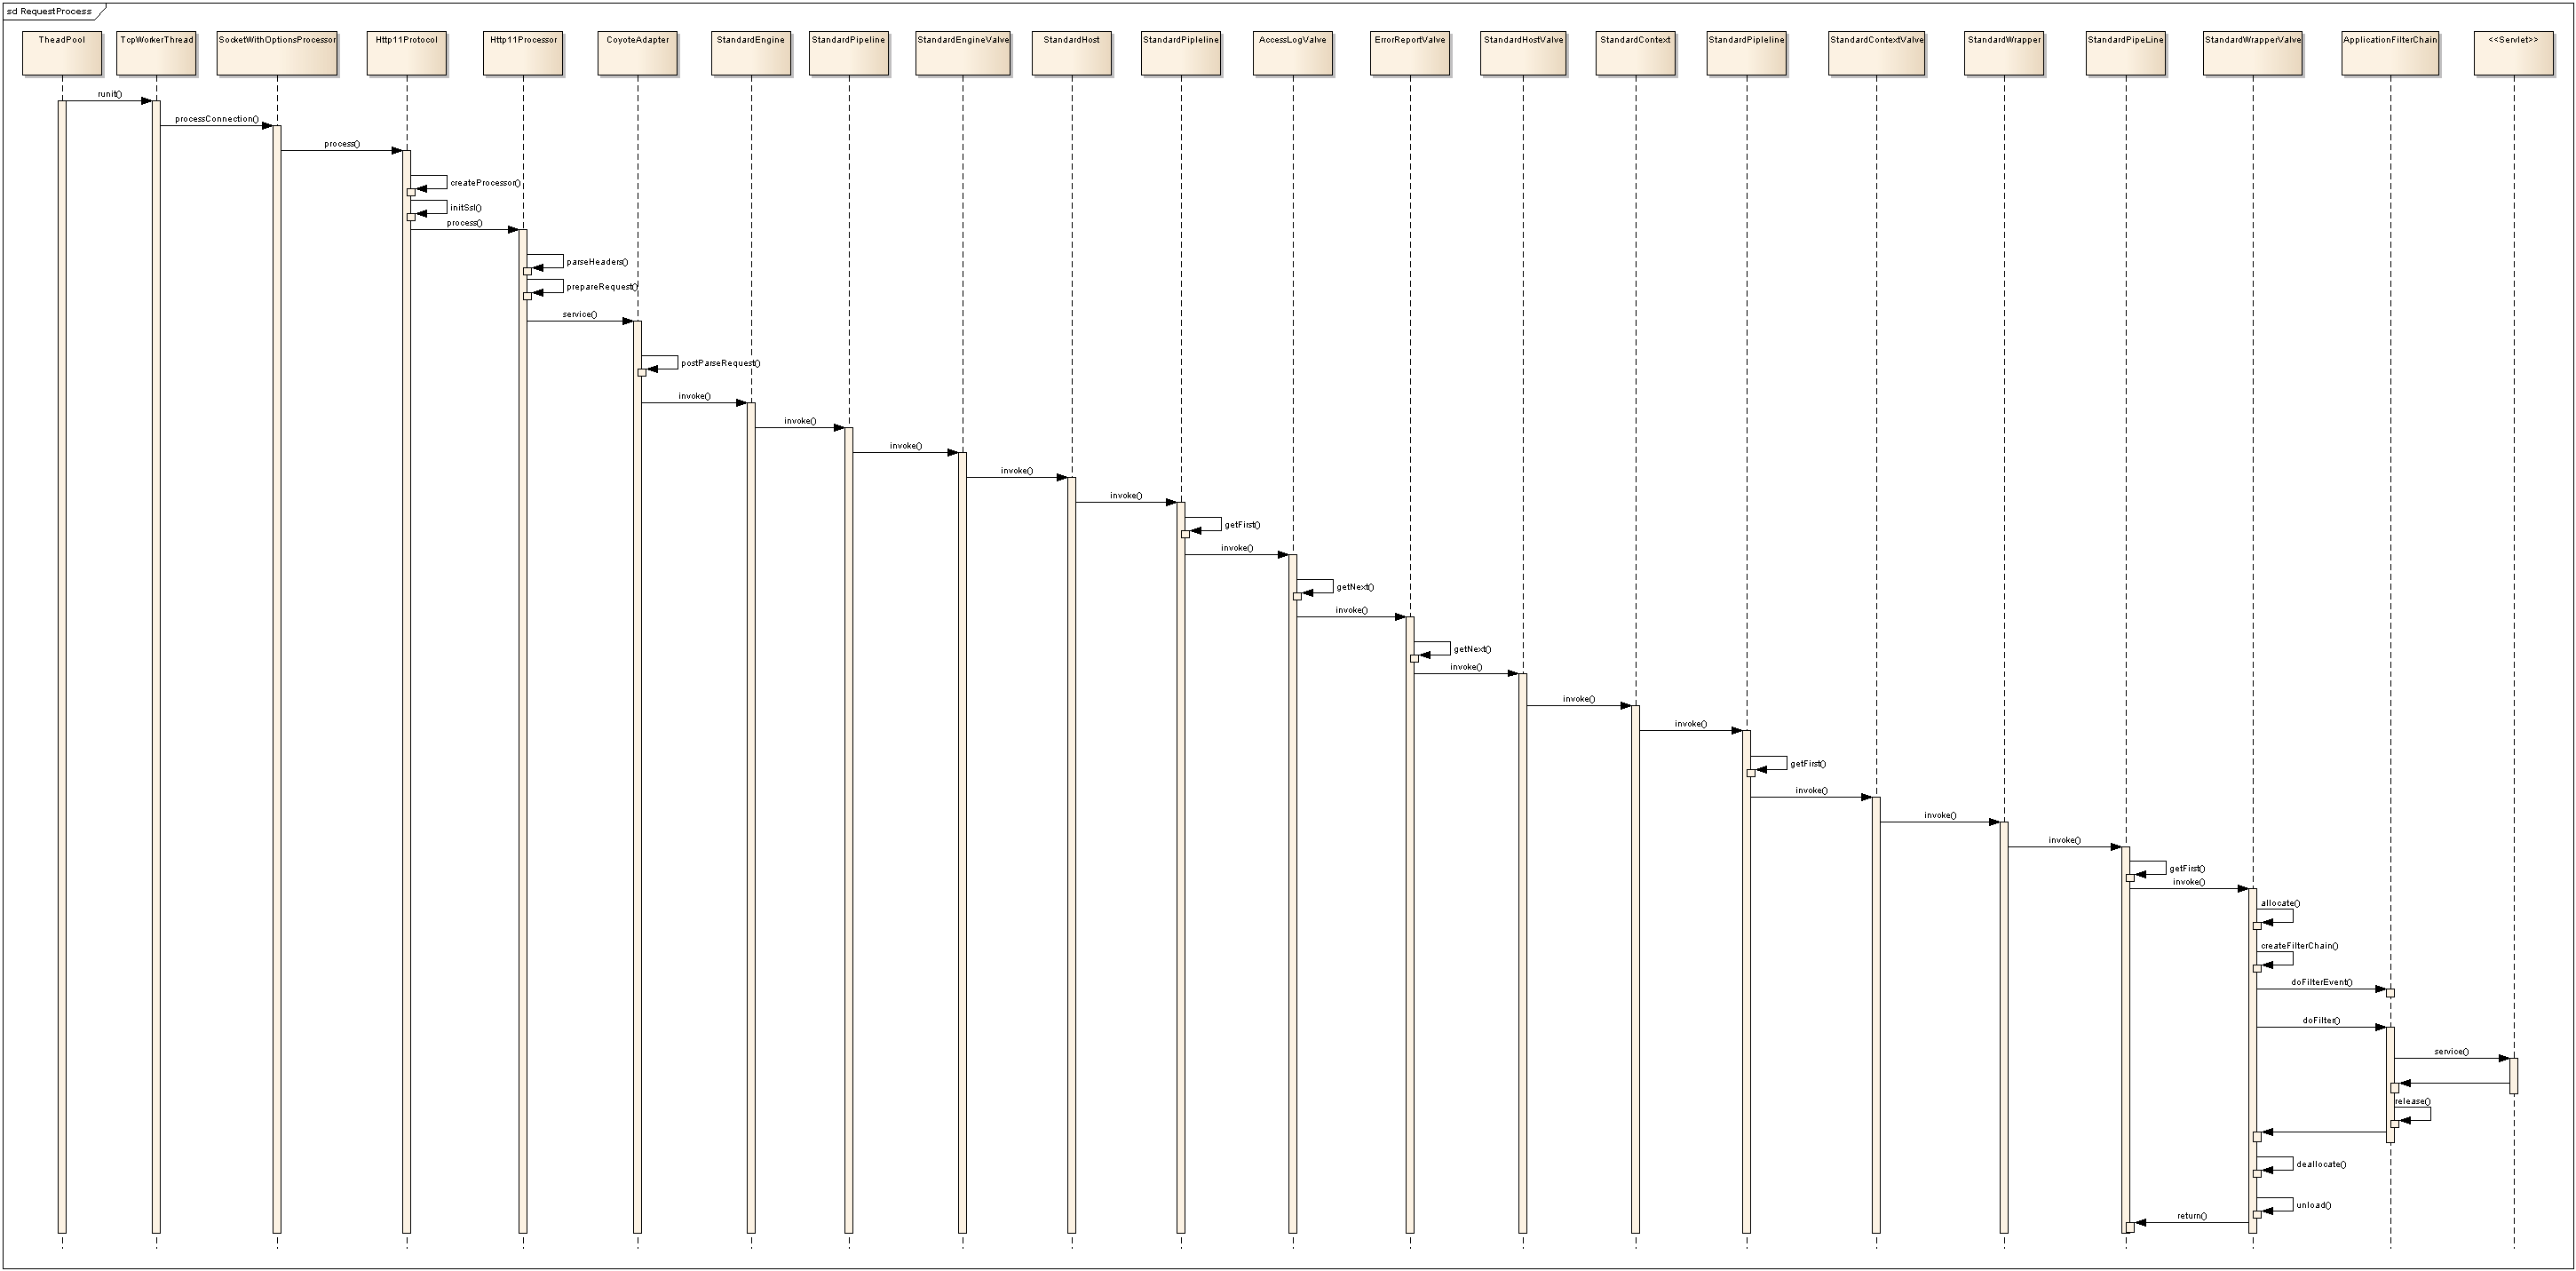
3.请求处理流程
3.1请求处理时序图

https://tomcat.apache.org/tomcat-9.0-doc/architecture/requestProcess/request-process.png
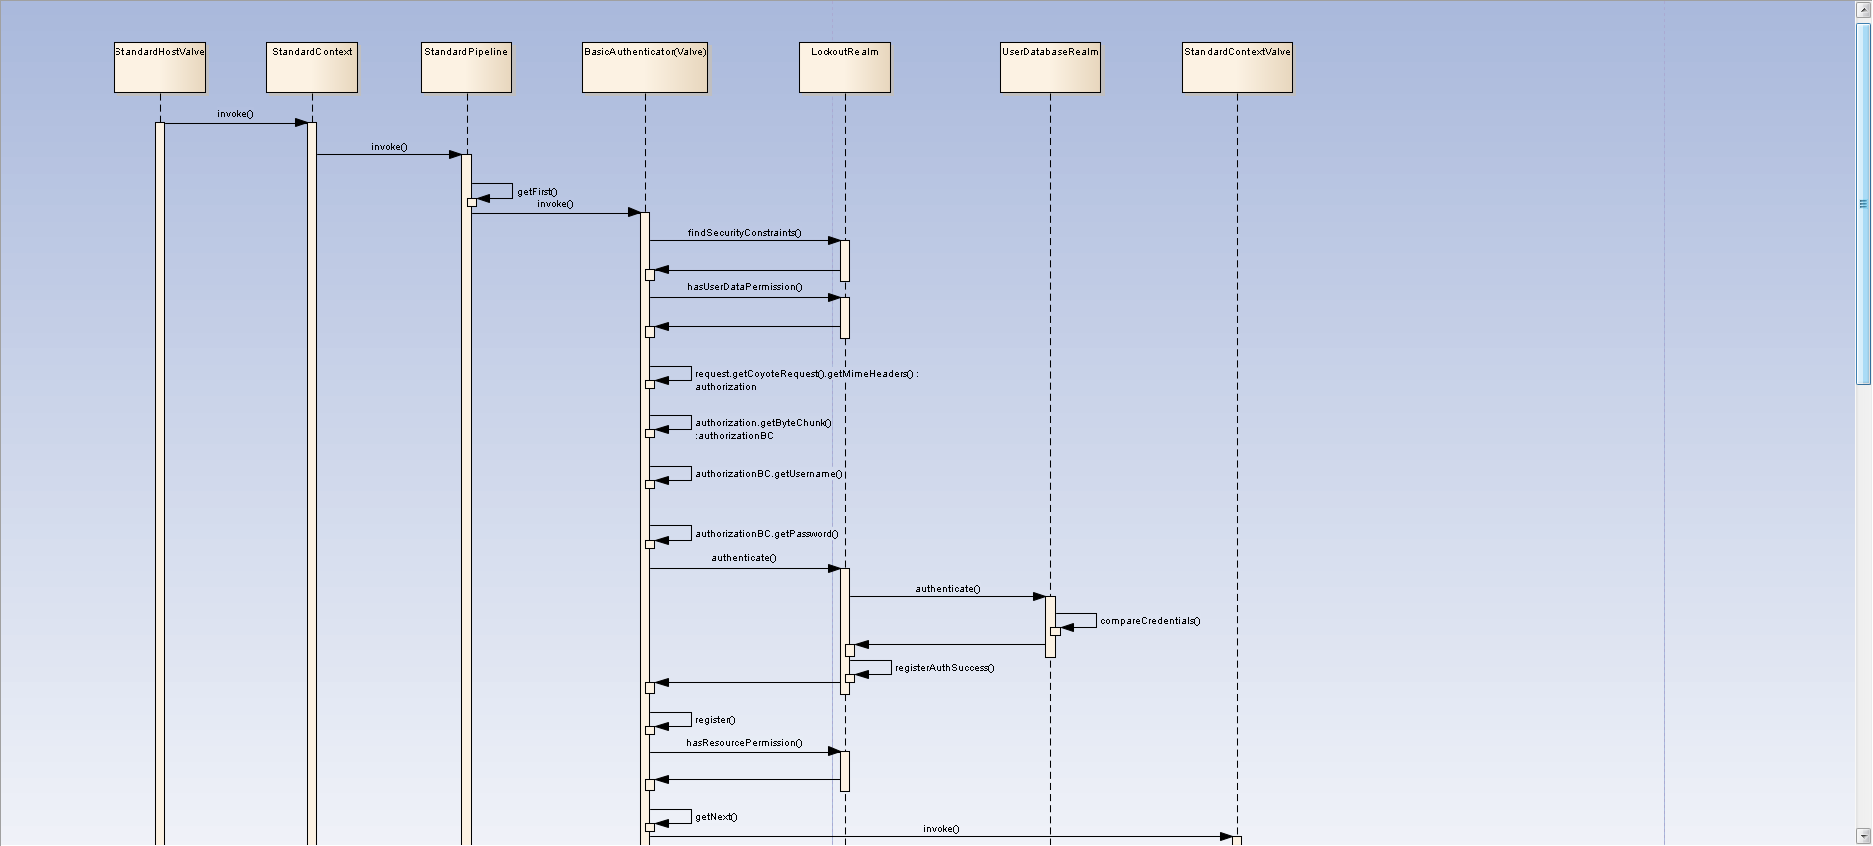
3.2权限认证时序图:

https://tomcat.apache.org/tomcat-9.0-doc/architecture/requestProcess/authentication-process.png
4.源码编译
如果想编译源码,可以查看这篇(https://tomcat.apache.org/tomcat-9.0-doc/building.html)文章,但Tomcat默认是用ant编译的,如果想用maven编译,大家另外再找参考教程吧。我个人是用ant编译的,改了不少地方才编译成功…


 1668
1668

 被折叠的 条评论
为什么被折叠?
被折叠的 条评论
为什么被折叠?
 到【灌水乐园】发言


