


1. 分别将FCKeditor.Net_2.2.zip和FCKeditor_2.5.zip文件解压,图1
FCKeditor_2.5.zip是其最新的Javascript文件和图片什么的;
FCKeditor.Net_2.2.zip是ASP.NET调用的DLL在里面
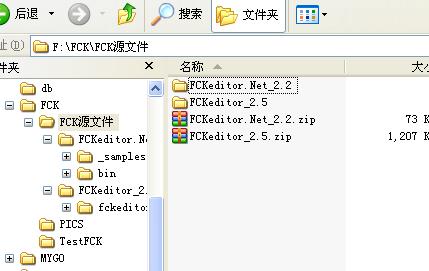
图1
2. 解压后把FCKeditor_2.5.zip里的fckeditor目录整个复制到网站中,图2,注意我的项目名称是“FCK_test”
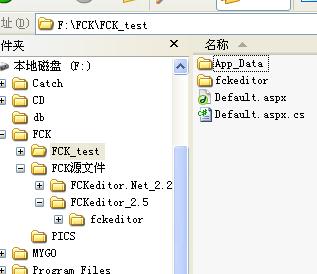
图2
3. 解压FCKeditor.Net_2.2.zip包后在FCKeditor.Net_2.2"bin"Debug目录里找到FredCK.FCKeditorV2.dll,把FredCK.FCKeditorV2.dll复制到网站中,建立一个Bin目录,图3
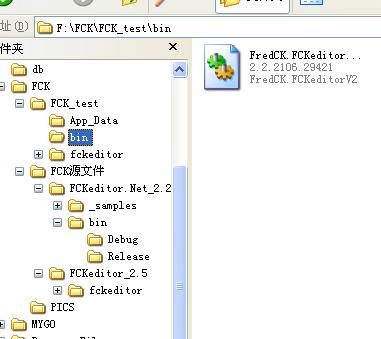
图3
4. 引用FredCK.FCKeditorV2.dll,并将控件拖到页面中,图4,图比较大,点此下载
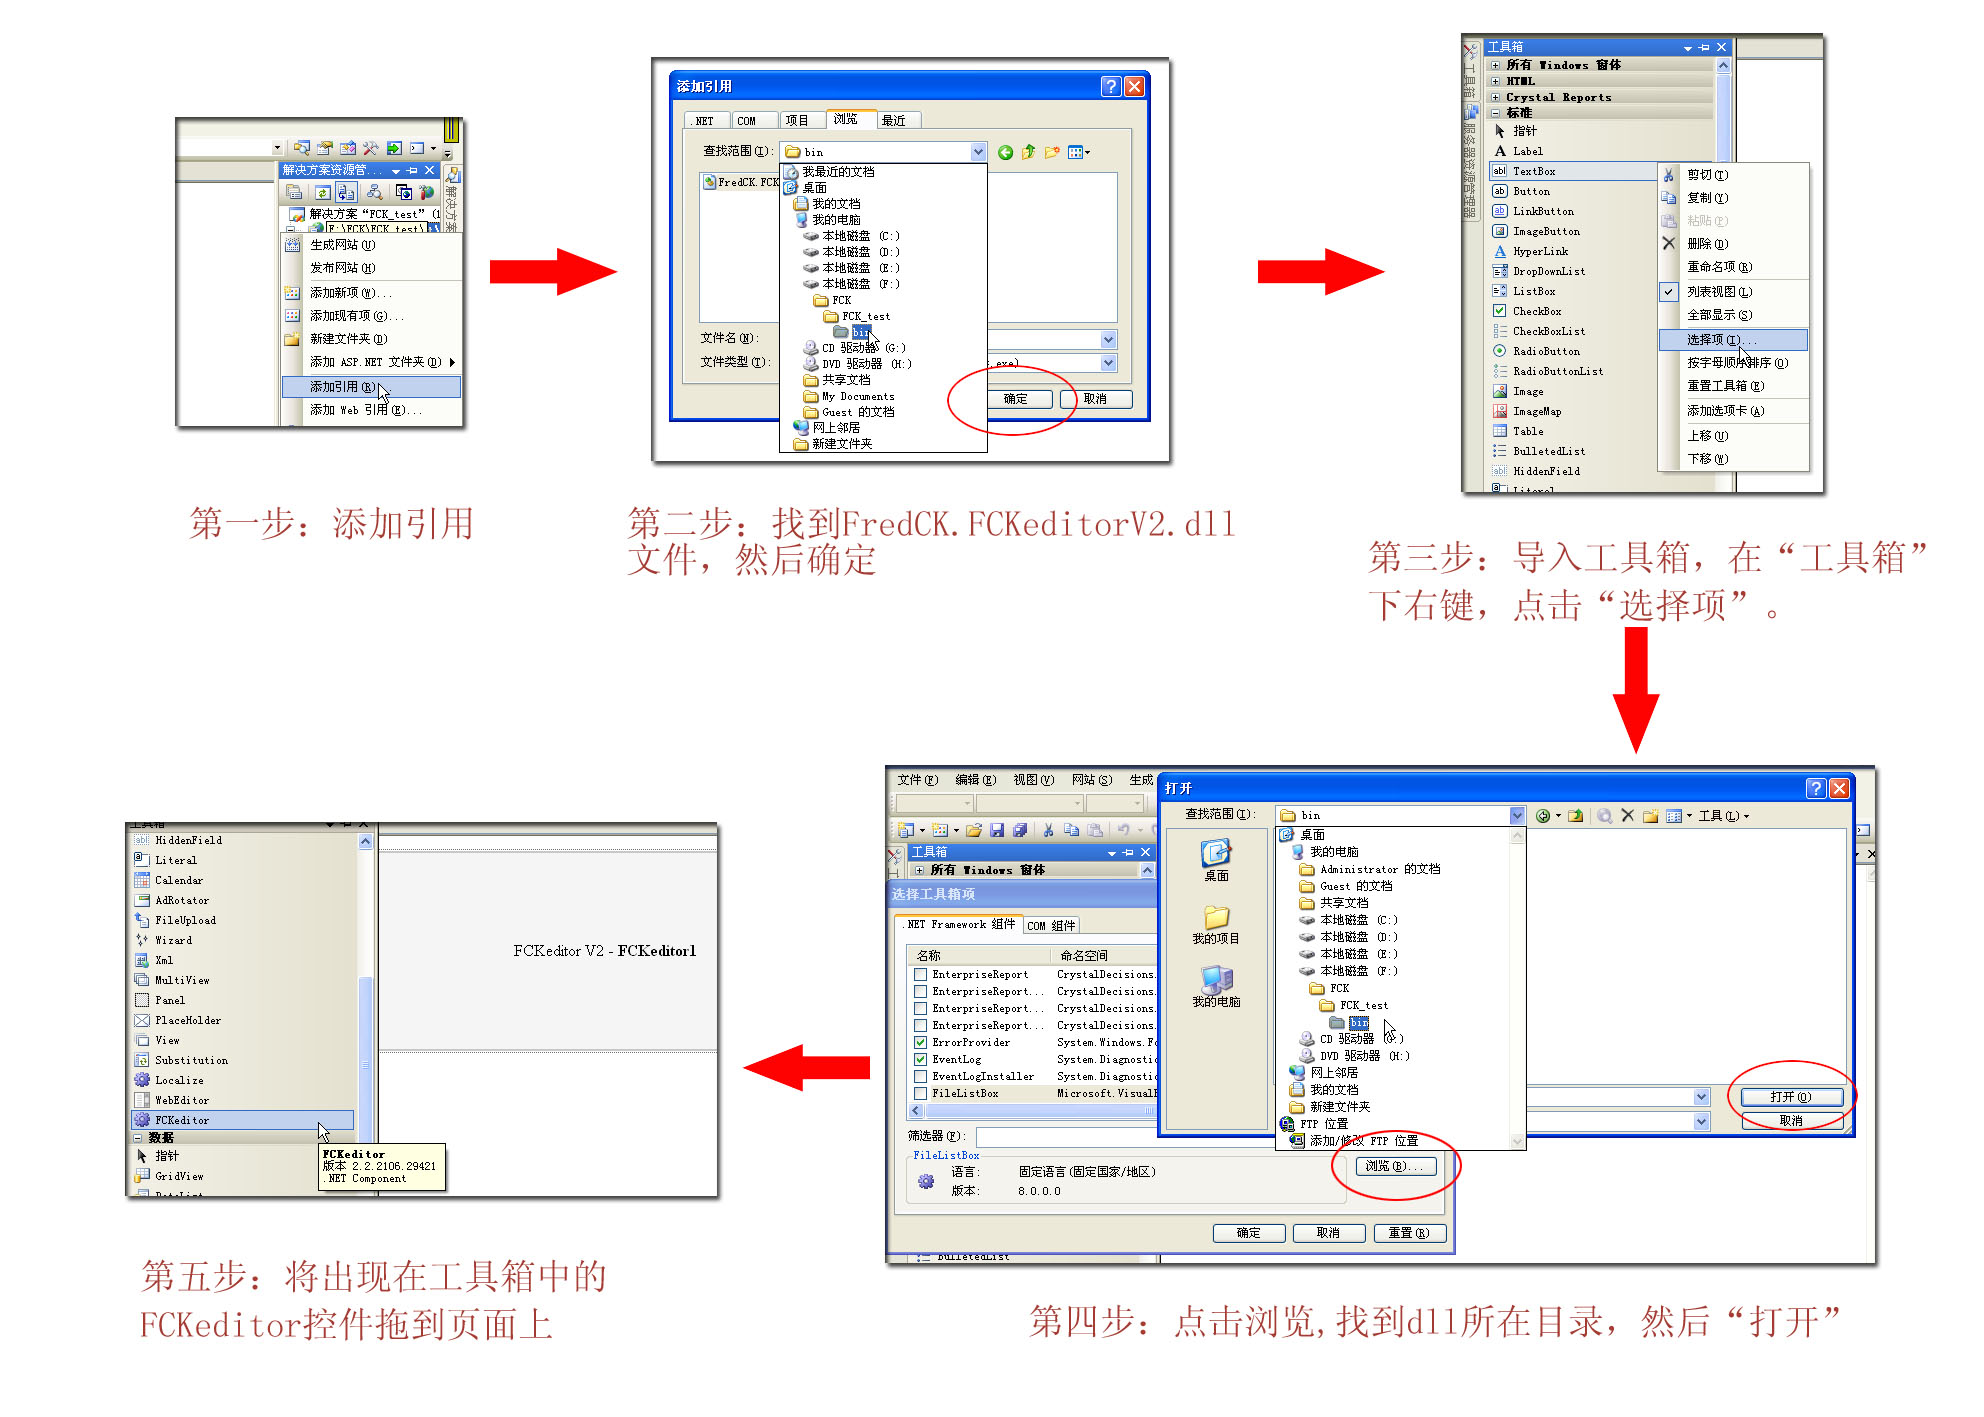
图4
5. 修改fckeditor/fckconfig.js文件
FCKConfig.DefaultLanguage = ''en'' ;改为FCKConfig.DefaultLanguage = ''zh-cn'' ;
var _FileBrowserLanguage = ''php'' ; // asp | aspx | cfm | lasso | perl | php | py
var _QuickUploadLanguage = ''php'' ; // asp | aspx | cfm | lasso | perl | php | py
改为
var _FileBrowserLanguage= ''aspx'' ; // asp | aspx | cfm | lasso | perl | php | py
var _QuickUploadLanguage = ''aspx'' ; // asp | aspx | cfm | lasso | perl | php | py
6. 修改Web.Config文件
<?xmlversion="1.0"?>
<!--
注意: 除了手动编辑此文件以外,您还可以使用
Web 管理工具来配置应用程序的设置。可以使用 Visual Studio 中的
“网站”->“Asp.Net 配置”选项。
设置和注释的完整列表在
machine.config.comments 中,该文件通常位于
"Windows"Microsoft.Net"Framework"v2.x"Config 中
-->
<configuration>
<appSettings>
<addkey="FCKeditor:BasePath"value="~/fckeditor/"/>
<addkey="FCKeditor:UserFilesPath"value="/FCK_test/Files/"/>
</appSettings>
<connectionStrings/>
说明:
<addkey="FCKeditor:BasePath"value="~/fckeditor/"/>
BasePath是fckeditor所在路径,fckeditor由于我们直接放网站目录下这样写就可以,如果您的网站多放几层适当调整即可。
<addkey="FCKeditor:UserFilesPath"value="/FCK_test/Files/"/>
“FCK_test”为当前项目的名称,“Files”表示默认上传的文件夹
如果报错XML request error: Internal Server Error(500)(图片上传时),考虑一下几点:
1. 要上传的文件夹是否存在,<addkey="FCKeditor:UserFilesPath"value="/FCK_test/Files/"/>
2. fckeditor文件夹的相对位置是否正确,<addkey="FCKeditor:BasePath"value="~/fckeditor/"/>
3. fckeditor/fckconfig.js文件是否修改
4.在IIS中建立虚拟目录,打开“写入权限”
FCKeditor出现"this connector is disabled Please check the"editor/filemanager/connectors/aspx/config.aspx"错误的解决办法
解决办法:
打开editor/filemanager/connectors/aspx/config.ascx修改CheckAuthentication()方法,返回true
C# code
private bool CheckAuthentication()
{
// WARNING : DO NOT simply return "true". By doing so, you are allowing
// "anyone" to upload and list the files in your server. You must implement
// some kind of session validation here. Even something very simple as...
//
// return ( Session[ "IsAuthorized" ] != null && (bool)Session[ "IsAuthorized" ] == true );
//
// ... where Session[ "IsAuthorized" ] is set to "true" as soon as the
// user logs in your system.
return true;
}
自定义fckeditor 工具栏上的部分按钮
在默认情况下,fckeditor显示了全部的工具栏。在fckconfig.js中有两个工具栏的配置方案,一个是Default,一个是Basic。我们可以按照他的格式自定义几个选项。
FCKConfig.ToolbarSets["c1"] = [
['Source','DocProps','-','Save','NewPage','Preview','-','Templates'],
['Cut','Copy','Paste','PasteText','PasteWord','-','Print','SpellCheck'],
['Undo','Redo','-','Find','Replace','-','SelectAll','RemoveFormat'],
'/',
['Bold','Italic','Underline','StrikeThrough','-','Subscript','Superscript'],
['JustifyLeft','JustifyCenter','JustifyRight','JustifyFull'],
['Link','Unlink','Anchor'],
'/',
['Style','FontFormat','FontName','FontSize'],
['TextColor','BGColor'],
['FitWindow','ShowBlocks','-','About'] // No comma for the last row.
] ;
在页面中使用fckeditor时可以写成这样
var oFCKeditor = new FCKeditor( 'FCKeditor1' ) ;
oFCKeditor.ToolbarSet="c1";


 1623
1623

 被折叠的 条评论
为什么被折叠?
被折叠的 条评论
为什么被折叠?
 到【灌水乐园】发言


