


Spring整合Struts2、Hibernate原理概述:
从用户角度来看,用户发出HTTP请求,当MVC框架的控制器组件拦截到用户请求时,将调用系统的业务逻辑组件,业务逻辑组件则调用系统的DAO组件,而DAO组件则依赖于SessionFactory和DataSource等底层组件实现数据库访问。
从系统实现角度看,Ioc容器先创建SessionFactory和DataSource等底层组件,然后将这些底层组件注入给DAO组件,提供一个完整的DAO组件,并将此DAO组件注入给业务逻辑组件,从而提供一个完整的业务逻辑组件,而业务逻辑组件又被注入给控制器组件,控制器组件负责拦截用户请求,并将处理结果呈现给用户——这一系列的衔接,都由Spring的IoC容器提供实现。
简单来说,Spring通过IoC容器上管(Struts2)Action的创建并依赖注入给控制器,下管(Hibernate)SessionFactory的创建并依赖注入给DAO组件,是一个巨大的工厂。
dao为什么要继承HibernateDaoSupport?
因为HibernateDaoSupport里面有成员变量HibernateTemplate,它可以持久化对象。
public class CustomerDaoImpl extends HibernateDaoSupport implements CustomerDao {
	@Override
	public void save(Customer customer) {
		System.out.println("持久层:保存客户...");
		this.getHibernateTemplate().save(customer);
	}
}
HibernateTemplate需要用到sessionFactory,所以,在applicationContext.xml中需要配置sessionFactory。给daoImpl注入sessionFactory。
sessionFactory加载hibernate.cfg.xml,这样就获取了与数据库的连接。最后,还要配置事务。配置平台事务管理器HibernateTransactionManager。然后,再开启事务注解,这样,在serviceImpl中就可以使用@Transactional注解了。
applicationContex.xml
<?xml version="1.0" encoding="UTF-8"?>
<beans xmlns="http://www.springframework.org/schema/beans"
	xmlns:xsi="http://www.w3.org/2001/XMLSchema-instance" xmlns:context="http://www.springframework.org/schema/context"
	xmlns:aop="http://www.springframework.org/schema/aop" xmlns:tx="http://www.springframework.org/schema/tx"
	xsi:schemaLocation="http://www.springframework.org/schema/beans
http://www.springframework.org/schema/beans/spring-beans.xsd
http://www.springframework.org/schema/context
http://www.springframework.org/schema/context/spring-context.xsd
http://www.springframework.org/schema/aop
http://www.springframework.org/schema/aop/spring-aop.xsd
http://www.springframework.org/schema/tx
http://www.springframework.org/schema/tx/spring-tx.xsd">

	<context:component-scan base-package="com" />

	<bean id="customerDao" class="com.itheima.dao.CustomerDaoImpl">
		<property name="sessionFactory" ref="sessionFactory" />
	</bean>

	<bean id="sessionFactory"
		class="org.springframework.orm.hibernate5.LocalSessionFactoryBean">
		<property name="configLocation" value="classpath:hibernate.cfg.xml" />
	</bean>

	<bean id="transactionManager"
		class="org.springframework.orm.hibernate5.HibernateTransactionManager">
		<property name="sessionFactory" ref="sessionFactory" />
	</bean>

	<tx:annotation-driven transaction-manager="transactionManager" />
</beans>
hibernate.cfg.xml
<?xml version="1.0" encoding="UTF-8"?>
<!DOCTYPE hibernate-configuration PUBLIC
"-//Hibernate/Hibernate Configuration DTD 3.0//EN"
"http://www.hibernate.org/dtd/hibernate-configuration-3.0.dtd">

<hibernate-configuration>
	<session-factory>
		<!-- 必须配置 -->
		<property name="hibernate.connection.driver_class">com.mysql.jdbc.Driver</property>
		<property name="hibernate.connection.url">jdbc:mysql:///day38_ssh</property>
		<property name="hibernate.connection.username">root</property>
		<property name="hibernate.connection.password">123456</property>
		<property name="hibernate.dialect">org.hibernate.dialect.MySQLDialect</property>

		<!-- 可选配置 -->
		<property name="hibernate.show_sql">true</property>
		<property name="hibernate.format_sql">true</property>
		<property name="hibernate.hbm2ddl.auto">update</property>

		<!-- 配置C3P0的连接池 -->
		<property name="connection.provider_class">org.hibernate.connection.C3P0ConnectionProvider</property>

		<!-- 映射配置文件 -->
		<mapping resource="com/itheima/domain/Customer.hbm.xml" />
	</session-factory>
</hibernate-configuration>
Customer.hbm.xml
<?xml version="1.0" encoding="UTF-8"?>
<!DOCTYPE hibernate-mapping PUBLIC
    "-//Hibernate/Hibernate Mapping DTD 3.0//EN"
    "http://www.hibernate.org/dtd/hibernate-mapping-3.0.dtd">

<hibernate-mapping>
	<class name="com.itheima.domain.Customer" table="cst_customer">
		<id name="cust_id" column="cust_id">
			<generator class="native" />
		</id>

		<property name="cust_name" column="cust_name" />
		<property name="cust_user_id" column="cust_user_id" />
		<property name="cust_create_id" column="cust_create_id" />
		<property name="cust_source" column="cust_source" />
		<property name="cust_industry" column="cust_industry" />
		<property name="cust_level" column="cust_level" />
		<property name="cust_linkman" column="cust_linkman" />
		<property name="cust_phone" column="cust_phone" />
		<property name="cust_mobile" column="cust_mobile" />
	</class>
</hibernate-mapping>
Spring在项目中如何充当粘合剂
1、在项目中利用spring的IOC,明确第定义组件接口(如UserDao),开发者可以独立开发各个组件,然后根据组件间的依赖关系组合(UserController依赖于UserService,UserService依赖于UserDao)运行,很好的把springmvc和hibernate结合起来;2、spring的事务管理把hibernate对数据库的操作进行了事务配置。
Spring 如何整合 Hibernate
整合 Hibernate, 即由 IOC 容器生成 SessionFactory 对象, 并使用Spring 的声明式事务。利用 LocalSessionFactoryBean 工厂 Bean, 声明一个使用 XML 映射文件的 SessionFactory 实例。
利用HibernateTransactionManager 配置 Hibernate 的事务管理器。
描述在系统中如何使用了Spring的事务控制
Spring事务包括编程式事务和声明式事务。在系统中使用了声明式的事务管理是用Spring的AOP来实现的。配置了只读事务和回滚事务(传播行为为required)当出现错误后进行回滚操作。在项目中通过aop切入事务到Service层,这样做能使一次业务逻辑操作如果包括几个数据库操作都控制在一个事务中。
1. PlatformTransactionManager接口
-- 平台事务管理器.(真正管理事务的类)。该接口有具体的实现类,根据不同的持久层框架,需要选择不同的实现类!
2. TransactionDefinition接口
-- 事务定义信息.(事务的隔离级别,传播行为,超时,只读)
采用ISOLATION_DEFAULT(本地数据库默认的隔离级别)
3. TransactionStatus接口
-- 事务的状态。在正常操作事务的过程当中会产生一些状态。
事务的传播行为:
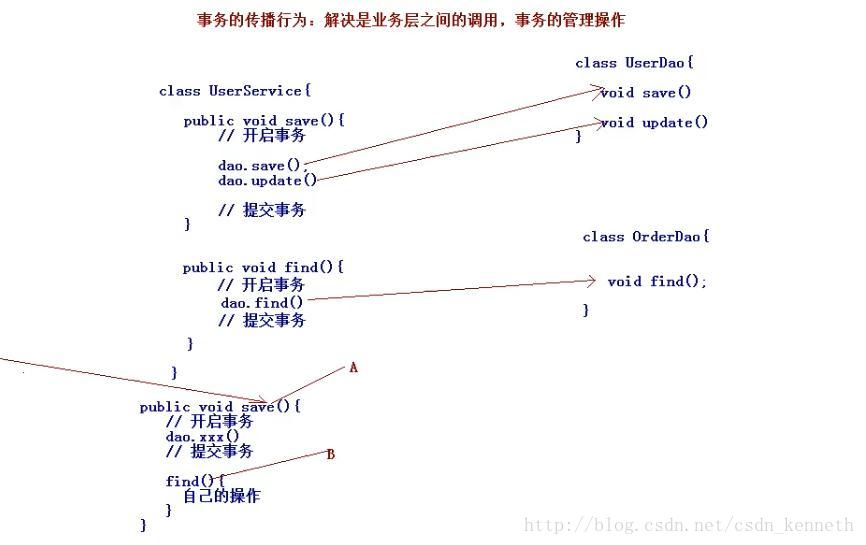
基于AspectJ的注解方式
和简单,就2步:
1.开启注解,<tx:annotation-driven transaction-manager="transactionManager"/>
2.在类或方法上添加@Transactional注解
struts2+spring+hibernate整合-案例与注意事项
参考:http://www.cnblogs.com/zhaoyucong/p/5846972.html
注意1:java build path->default output folder应该是 projectName/WEB-INF/classes


 2699
2699


 被折叠的 条评论
为什么被折叠?
被折叠的 条评论
为什么被折叠?
 到【灌水乐园】发言


