


使用场景
TiDB 是 PingCAP 公司自主设计、研发的开源分布式关系型数据库,是一款同时支持在线事务处理(OLTP)与在线分析处理 (HTAP) 的融合型分布式数据库产品,具备水平扩容或者缩容、金融级高可用、实时 HTAP、云原生的分布式数据库、兼容 MySQL 5.7 协议和 MySQL 生态等重要特性,支持在本地和云上部署。
来源:PingCAP 文档中心 | PingCAP 文档中心
OLTP:在线事务处理
强调支持短时间内大量并发的事务操作(增删改查)能力,每个操作涉及的数据量都很小(比如几十到几百字节)
强调事务的强一致性(例如:银行转账交易,容不得差错) 例:“双十一”期间,可能有几十万用户在同一秒内下订单。后台数据库要能够并发的、以近乎实时的速度处理这些订单请求(如果下了订单,十几秒还没有反应,用户肯定要骂人了)
OLAP:在线分析处理
偏向于复杂的只读查询,读取海量数据进行分析计算,查询时间往往很长
例:“双十一”结束,淘宝的运营人员对订单进行分析挖掘,找出一些市场规律等等。
这种分析可能需要读取所有的历史订单进行计算,耗时几十秒甚至几十分钟都有可能
架构
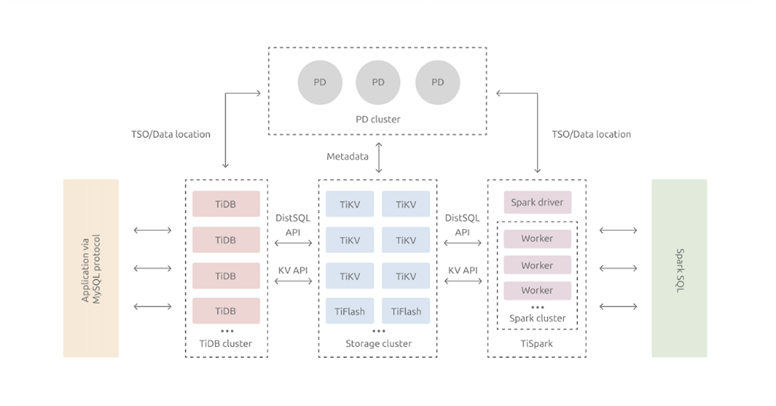
计算节点
TiDB Server:SQL 层,负责接受客户端的连接,执行 SQL 解析和优化,最终生成分布式执行计划。TiDB 层本身是无状态的,实践中可以启动多个 TiDB 实例,通过负载均衡组件(如 LVS、HAProxy 或 F5)对外提供统一的接入地址,客户端的连接可以均匀地分摊在多个 TiDB 实例上以达到负载均衡的效果。
控制节点
PD (Placement Driver) Server:整个 TiDB 集群的元信息管理模块,负责存储每个 TiKV 节点实时的数据分布情况和集群的整体拓扑结构,提供 TiDB Dashboard 管控界面,并为分布式事务分配事务 ID。PD 不仅存储元信息,同时还会根据 TiKV 节点实时上报的数据分布状态,下发数据调度命令给具体的 TiKV 节点,如热点负载均衡、raft副本创建转移等。此外,PD 本身也是由至少 3 个节点构成,拥有高可用的能力。
存储节点
TiDB作为HTAP混合负载数据库,同时具有支持高并发OLTP事务的行存TiKV和支持实时数仓的MPP列存TiFlash。
(1) TiKV Server:负责存储数据,从外部看 TiKV 是一个分布式的提供事务的 Key-Value 存储引擎。存储数据的基本单位是 Region,每个 Region 负责存储一个 Key Range的数据,每个 TiKV 节点会负责多个 Region。另外,TiKV 中的数据都会自动维护多副本(默认为三副本,采用raft协议),天然支持高可用和自动故障转移。
(2) TiFlash:通过raft协议实时的同步数据,数据是以列式的形式进行存储,主要的功能是为分析型的场景加速,提供实时数仓能力。
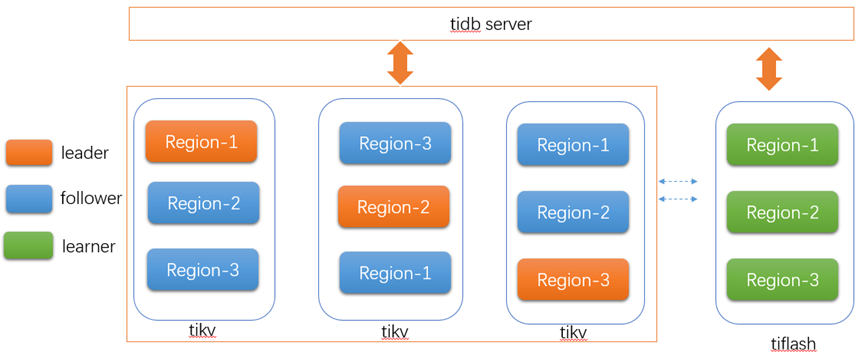
TiDB 作为分布式关系型数据库,由计算节点tidb server提供访问服务,通过负载均衡软件保障对计算节点的均衡访问,用户使用时完全可以看做是一个单节点MySQL数据库,不必关心是否有分库键,还可以在数据库内使用range 、hash、list等分区表。
TiDB采用raft多数派协议,强一致性事务模式,默认为3副本,以region(96M)为单位进行管理,一个region就是一段连续的key空间,tikv内每个region包含leader/follower两种角色,默认情况下由leader提供读写请求,leader按照算法均匀分布到所有的存储节点tikv实例上,系统根据region的负载访问情况可以自动进行region的分裂和leader的转移,使各节点负载尽量均衡。Follower节点作为leader的实时副本,可通过follower read、stale read等功能将非苛刻的实时读分散到其他节点,进而降低leader节点的压力提升整体系统处理能力。
来源
安装
TiDB安装-Local单机版
--我在电脑上装虚拟机Centos 7.9版本
在usr/创建tidb文件夹
--1、下载安装包
wget  http://download.pingcap.org/tidb-latest-linux-amd64.tar.gz
--2、解压文件
tar -zxvf tidb-latest-linux-amd64.tar.gz
cd tidb-latest-linux-amd64
--3、启动
--3.1、启动PD
./bin/pd-server  --data-dir=pd  --log-file=pd.log &
--3.2、启动tikv
./bin/tikv-server  --pd="127.0.0.1:2379"  --data-dir=tikv  --log-file=tikv.log &
--3.3、启动tidb-server
./bin/tidb-server --store=tikv  --path="127.0.0.1:2379"   --log-file=tidb.log &
--4、登录
mysql -h 127.0.0.1 -P 4000 -u root
---------------------------------------
[root@localhost tidb]# tar -zxvf tidb-latest-linux-amd64.tar.gz
tidb-v5.0.1-linux-amd64/
tidb-v5.0.1-linux-amd64/PingCAP Community Software Agreement(English Version).pdf
tidb-v5.0.1-linux-amd64/bin/
tidb-v5.0.1-linux-amd64/bin/pd-ctl
tidb-v5.0.1-linux-amd64/bin/tikv-server
tidb-v5.0.1-linux-amd64/bin/tikv-ctl
tidb-v5.0.1-linux-amd64/bin/reparo
tidb-v5.0.1-linux-amd64/bin/tidb-server
tidb-v5.0.1-linux-amd64/bin/drainer
tidb-v5.0.1-linux-amd64/bin/arbiter
tidb-v5.0.1-linux-amd64/bin/pump
tidb-v5.0.1-linux-amd64/bin/etcdctl
tidb-v5.0.1-linux-amd64/bin/pd-recover
tidb-v5.0.1-linux-amd64/bin/binlogctl
tidb-v5.0.1-linux-amd64/bin/tidb-ctl
tidb-v5.0.1-linux-amd64/bin/pd-server
tidb-v5.0.1-linux-amd64/PingCAP Community Software Agreement(Chinese Version).pdf
[root@localhost tidb]# cd tidb-v5.0.1-linux-amd64/
[root@localhost tidb-v5.0.1-linux-amd64]#
[root@localhost tidb-v5.0.1-linux-amd64]# ./bin/tikv-server  --pd="127.0.0.1:2379"  --data-dir=tikv  --log-file=tikv.log &
[2] 1486
[root@localhost tidb-v5.0.1-linux-amd64]# ./bin/tidb-server --store-tikv  --path="127.0.0.1:2379"   --log-file=tidb.log &
[3] 1504
[root@localhost tidb-v5.0.1-linux-amd64]# ./bin/tidb-server --store=tikv  --path="127.0.0.1:2379"   --log-file=tidb.log &
[2] 1509
------------------------------
虚拟机上没安装mysql客户端,需要安装客户端验证。虚拟机内存需要大些,
否则启动tidb,会自动exit。
由于本机电脑内存不够,服务没起来。
TiDB安装-Docker集群版
在usr/tidb下操作
注意:需要安装docker,和docker-compose并启动docker进行如下操作。
--1、下载tidb-docker-compose
git clone https://github.com/pingcap/tidb-docker-compose.git
--2、创建并启动集群
--获取最新的docker镜像:
cd tidb-docker-compose && docker-compose pull && docker-compose up -d
--3、登录
mysql -h 127.0.0.1 -P 4000 -u root
---------------------------------------
[root@localhost tidb]# ll
total 505140
-rw-r--r--. 1 root root 517255312 Sep 10 04:26 tidb-latest-linux-amd64.tar.gz
drwxr-xr-x. 5 1000 1000      4096 Sep 10 05:35 tidb-v5.0.1-linux-amd64
[root@localhost tidb]# git clone https://github.com/pingcap/tidb-docker-compose.git
Cloning into 'tidb-docker-compose'...
remote: Enumerating objects: 575, done.
remote: Counting objects: 100% (29/29), done.
remote: Compressing objects: 100% (24/24), done.
remote: Total 575 (delta 12), reused 18 (delta 5), pack-reused 546
Receiving objects: 100% (575/575), 302.18 KiB | 0 bytes/s, done.
Resolving deltas: 100% (255/255), done.
[root@localhost tidb]# ll
total 505144
drwxr-xr-x. 14 root root      4096 Sep 10 07:31 tidb-docker-compose
-rw-r--r--.  1 root root 517255312 Sep 10 04:26 tidb-latest-linux-amd64.tar.gz
drwxr-xr-x.  5 1000 1000      4096 Sep 10 05:35 tidb-v5.0.1-linux-amd64
[root@localhost tidb]# cd tidb-docker-compose && docker-compose pull && docker-compose up -d
Pulling pd0            ... done
Pulling pd1            ... done
Pulling pd2            ... done
Pulling tikv0          ... downloading (100.0%)
Pulling tikv1          ... downloading (100.0%)
Pulling tikv2          ... downloading (100.0%)
Pulling tidb           ... done
Pulling tispark-master ... downloading (100.0%)
Pulling tispark-slave0 ... downloading (100.0%)
Pulling tidb-vision    ... done
Pulling pushgateway    ... done
Pulling prometheus     ... done
Pulling grafana        ... download complete

ERROR: for tispark-slave0  write /var/lib/docker/tmp/GetImageBlob992726425: no space left on device
ERROR: for grafana  write /var/lib/docker/tmp/GetImageBlob360950237: no space left on device
ERROR: for tikv2  write /var/lib/docker/tmp/GetImageBlob469180858: no space left on device
ERROR: for tikv1  write /var/lib/docker/tmp/GetImageBlob469180858: no space left on device
ERROR: for tikv0  write /var/lib/docker/tmp/GetImageBlob469180858: no space left on device
ERROR: for tispark-master  write /var/lib/docker/tmp/GetImageBlob289944414: no space left on device
ERROR: write /var/lib/docker/tmp/GetImageBlob289944414: no space left on device
[root@localhost tidb-docker-compose]#
----------------------
由于我虚拟机环境配置不足导致no space,没有空间。
后续没进行完成。
[root@localhost tidb-docker-compose]# free -m
              total        used        free      shared  buff/cache   available
Mem:            990         250         394           1         346         594
Swap: 819 18 801使用TIUP在线搭建TIDB集群
官方建议使用TiUP来搭建管理整个集群环境,下面我们来体验下。
TiUP 是 TiDB 4.0 版本引入的集群运维工具,TiUP cluster 是 TiUP 提供的使用 Golang 编写的集群管理组件,通过 TiUP cluster 组件就可以进行日常的运维工作,包括部署、启动、关闭、销毁、弹性扩缩容、升级 TiDB 集群,以及管理 TiDB 集群参数。
目前 TiUP 可以支持部署 TiDB、TiFlash、TiDB Binlog、TiCDC,以及监控系统。本文将介绍不同集群拓扑的具体部署步骤。
整体架构
| 主机 | 角色 |
| 192.168.40.130 | 中控机,tidb-server,tikv-server,pd-server |
| 192.168.40.158 | tikv-server,pd-server,monitoring_servers,grafana_servers,alertmanager_servers |
| 192.168.40.159 | tikv-server,pd-server |
tidb-server为无状态的服务这里搭建了一个节点作为测试,可通过lvs部署多个节点负载。注意:在生产环境中控机应该单独部署为一台主机中,管理整个集群。
所有节点环境准备
关闭防火墙:
systemctl stop firewalld
永久关闭防火墙,需要重启服务器:
systemctl disable firewalld
临时关闭swap:
swapoff -a
永久关闭swap,需要重启服务器:
sed -ri 's/.*swap.*/#&/' /etc/fstab
安装numactl:
yum -y install numactl.x86_64
安装 TiUP 工具
以下所有操作均在中控机中执行。
1. 下载安装 TiUP 工具
curl --proto '=https' --tlsv1.2 -sSf https://tiup-mirrors.pingcap.com/install.sh | sh
2. 声明全局环境变量
source /root/.bash_profile
3. 安装 TiUP cluster 组件
tiup cluster
4. 如果已经安装 TiUP cluster 组件,可以更新到最新版本
tiup update --self && tiup update cluster
使用 TiUP 工具部署TIDB集群
以下操作均在中控机中进行
1. 生成TIDB的配置模板
tiup cluster template > topology.yaml
2. 修改 topology.yaml 文件
这里主要修改,pd-server,tikv-server,tidb-server,monitoring_servers、grafana_servers、alertmanager_servers的ip,这里不安装tiflash-servers,先注释掉,下面是我的配置文件信息:
# 全局变量应用于所有部署,并用作的默认值
global:
  # 运行tidb集群的用户。
  user: "root"
  # 管理集群中服务器的SSH端口
  ssh_port: 22
  # 集群部署文件、启动脚本和配置文件的存放路径。
  deploy_dir: "/tidb-deploy"
  # TiDB集群数据存储目录
  data_dir: "/tidb-data"
  # 支持值:"amd64", "arm64"(默认值:"amd64")
  arch: "amd64"

# 监控变量应用于所有机器。
monitored:
  # TiDB集群中各节点上报系统信息的通信端口
  node_exporter_port: 9100
  # Blackbox_exporter 通信端口,用于TiDB集群端口监控。
  blackbox_exporter_port: 9115

# 服务器配置用于指定PD Servers的配置
pd_servers:
  - host: 192.168.40.130
  - host: 192.168.40.158
  - host: 192.168.40.159
    # # SSH port of the server.
    # ssh_port: 22
    # # PD Server name
    # name: "pd-1"
    # # communication port for TiDB Servers to connect.
    # client_port: 2379
    # # Communication port among PD Server nodes.
    # peer_port: 2380
    # # PD Server deployment file, startup script, configuration file storage directory.
    # deploy_dir: "/tidb-deploy/pd-2379"
    # # PD Server data storage directory.
    # data_dir: "/tidb-data/pd-2379"
    # # PD Server log file storage directory.
    # log_dir: "/tidb-deploy/pd-2379/log"
    # # numa node bindings.
    # numa_node: "0,1"
    # # The following configs are used to overwrite the `server_configs.pd` values.
    # config:
    #   schedule.max-merge-region-size: 20
    #   schedule.max-merge-region-keys: 200000


# 服务器配置用于指定TiDB服务器的配置。
tidb_servers:
  - host: 192.168.40.130
    # # SSH port of the server.
    # ssh_port: 22
    # # The port for clients to access the TiDB cluster.
    # port: 4000
    # # TiDB Server status API port.
    # status_port: 10080
    # # TiDB Server deployment file, startup script, configuration file storage directory.
    # deploy_dir: "/tidb-deploy/tidb-4000"
    # # TiDB Server log file storage directory.
    # log_dir: "/tidb-deploy/tidb-4000/log"

#  服务器配置用于指定TiKV服务器的配置。
tikv_servers:
  - host: 192.168.40.130
  - host: 192.168.40.158
  - host: 192.168.40.159
    # # SSH port of the server.
    # ssh_port: 22
    # # TiKV Server communication port.
    # port: 20160
    # # TiKV Server status API port.
    # status_port: 20180
    # # TiKV Server deployment file, startup script, configuration file storage directory.
    # deploy_dir: "/tidb-deploy/tikv-20160"
    # # TiKV Server data storage directory.
    # data_dir: "/tidb-data/tikv-20160"
    # # TiKV Server log file storage directory.
    # log_dir: "/tidb-deploy/tikv-20160/log"
    # # The following configs are used to overwrite the `server_configs.tikv` values.
    # config:
    #   log.level: warn

# 服务器配置用于指定Prometheus Server的配置。
monitoring_servers:
  - host: 192.168.40.158
    # # SSH port of the server.
    # ssh_port: 22
    # # Prometheus Service communication port.
    # port: 9090
    # # Prometheus deployment file, startup script, configuration file storage directory.
    # deploy_dir: "/tidb-deploy/prometheus-8249"
    # # Prometheus data storage directory.
    # data_dir: "/tidb-data/prometheus-8249"
    # # Prometheus log file storage directory.
    # log_dir: "/tidb-deploy/prometheus-8249/log"

# 服务器配置用于指定Grafana服务器的配置。
grafana_servers:
  - host: 192.168.40.158
    # # Grafana web port (browser access)
    # port: 3000
    # # Grafana deployment file, startup script, configuration file storage directory.
    # deploy_dir: /tidb-deploy/grafana-3000

# 服务器配置用于指定Alertmanager服务器的配置。
alertmanager_servers:
  # # The ip address of the Alertmanager Server.
  - host: 192.168.40.158
    # # SSH port of the server.
    # ssh_port: 22
    # # Alertmanager web service port.
    # web_port: 9093
    # # Alertmanager communication port.
    # cluster_port: 9094
    # # Alertmanager deployment file, startup script, configuration file storage directory.
    # deploy_dir: "/tidb-deploy/alertmanager-9093"
    # # Alertmanager data storage directory.
    # data_dir: "/tidb-data/alertmanager-9093"
    # # Alertmanager log file storage directory.
    # log_dir: "/tidb-deploy/alertmanager-9093/log"
3. 检查和自动修复集群存在的潜在风险
tiup cluster check ./topology.yaml --apply --user root -p
出现其他错误可以参考下面这篇博客中的内容哦:
https://blog.csdn.net/whiteBearClimb/article/details/116058997
4. 部署 TiDB 集群
注意部署的tidb版本,可以通过 tiup cluster list 来查看现有的版本。tidb-test 表示集群的名称。
tiup cluster deploy tidb-test v5.0.0 ./topology.yaml --user root -p
5. 启动集群
tiup cluster start tidb-test
6. 检查集群情况
tiup cluster display tidb-test

7. 使用navicat 连接TIDB
默认端口为4000,没有密码。
集群监控
8. 查看监控monitoring服务
http://192.168.40.158:9090/

9. 查看grafana服务
http://192.168.40.158:3000
默认用户名和密码都是admin,确定后需要重置新密码,进去后可看到我们部署的tidb-test集群:

点击群可以查看每个组件的详细情况:

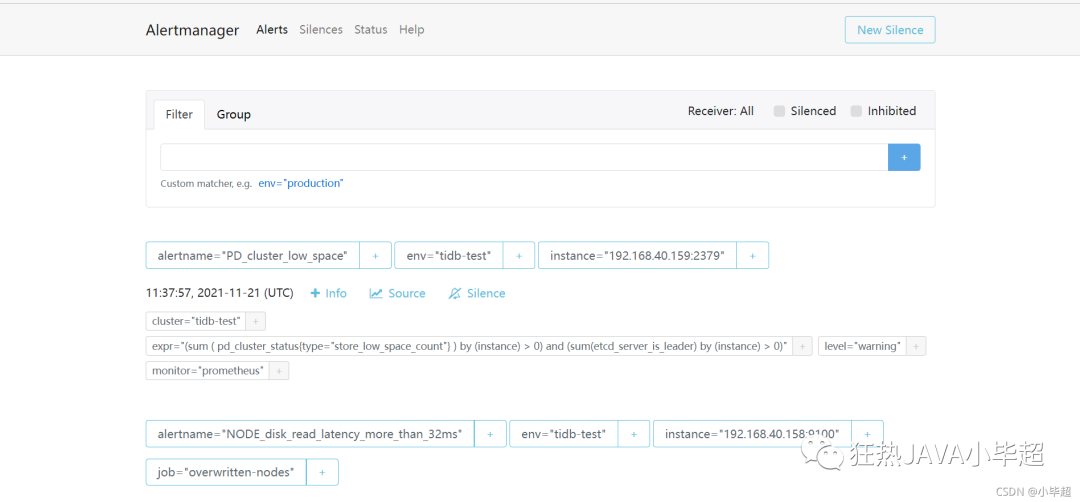
10. 查看告警管理alertmanager服务
http://192.168.40.158:9093
11. 查看dashboard dashboard已在pd中自带了,所以随便一个pd节点的ip就可以打开dashboard页面。
http://http://192.168.40.158:2379/dashboard

默认没有密码,直接登录即可。
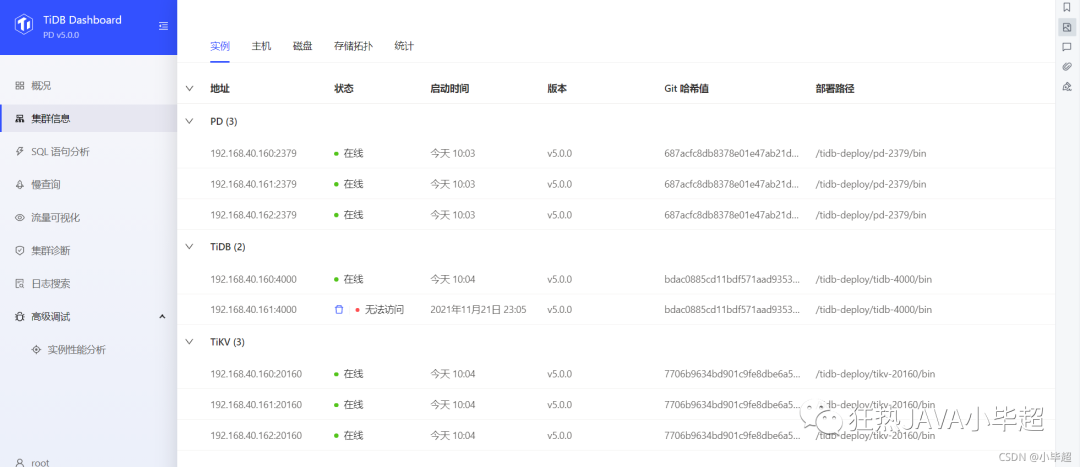
集群信息,SQL监控等等,都可以在这里进行分析。
TiUP工具离线部署TiDB集群
1.联网下载TiUP包管理器
使用可以联网的主机,下载并安装 TiUP 包管理器工具。命令如下:
curl --proto '=https' --tlsv1.2 -sSf https://tiup-mirrors.pingcap.com/install.sh | sh
2.声明全局环境变量
声明全局环境变量,命令如下:
3.通过TiUP工具下载所有工具的离线安装包
使用 tiup list tidb 命令可以看到所有tidb的版本,我们可以在其中选择需要下载的版本。命令如下:
然后通过tiup mirror clone tidb-community-server-${version}-linux-amd64 ${version} --os=linux --arch=amd64
命令进行安装。其中${version}需要替换成对应的TiDB版本,命令如下:
tiup mirror clone tidb-community-server-v5.2.1-linux-amd64 v5.2.1 --os=linux --arch=amd64
我们将前两个命令组合在一起,就得到了下载最新版本安装包的命令,命令如下:
version=`tiup list tidb|sort -r |head -n 2|tail -n 1|awk '{print $1};'` && \
tiup mirror clone tidb-community-server-${version}-linux-amd64 ${version} --os=linux --arch=amd64
4.使用tar命令打包并传输
通过 tar 命令将该组件包打包然后发送到隔离环境的中控机(传输tar包过程可以自行选择方法),命令如下:
tar czvf tidb-community-server-v5.2.1-linux-amd64.tar.gz tidb-community-server-v5.2.1-linux-amd64
5.离线安装TiUP组件
将离线包发送到目标集群的中控机后,执行以下命令离线安装 TiUP 组件:
tar xzvf tidb-community-server-v5.2.1-linux-amd64.tar.gz && \
sh tidb-community-server-v5.2.1-linux-amd64/local_install.sh && \
source /root/.bash_profile
6.编辑集群初始化配置文件
请根据不同的集群拓扑,编辑 TiUP 所需的集群初始化配置文件。首先生成集群初始化配置模版,命令如下:
tiup cluster template > topology.yaml
7.检查和修复集群风险
先使用 check 命令来检查集群存在的潜在风险,命令如下:
tiup cluster check ./topology.yaml --user root -p
8.部署TiDB集群
执行 deploy 命令部署 TiDB 集群,集群名称使用sandata,命令如下:
tiup cluster deploy sandata v5.2.1 ./topology.yaml --user root -p
9.查看集群状态
TiDB集群部署完成后,默认是关闭状态,通过查看集群状态可以进行确认,命令如下:
tiup cluster display sandata
10.启动TiDB集群
最终的目标就是启动TiDB集群,命令如下:
tiup cluster start sandata
11.确认集群已经启动
再次检查部署的 TiDB 集群情况,确认最终的启动状态为Up,命令如下:
tiup cluster display sandata
TIUP使用总结
扩容
查看集群信息
tiup cluster display tidb-test
scale-out-tikv.yaml
编辑扩容文件scale-out-tikv.yaml,写入增加节点的主机相关信息,文件内容如下,注意每行及符号后的空格
tikv配置:
tikv_servers:
 - host: 192.168.59.24
   ssh_port: 22
   port: 20160
   status_port: 20180
   deploy_dir: "/tidb-deploy/tikv-20160"
   data_dir: "/tidb-data/tikv-20160"
   log_dir: "/tidb-deploy/tikv-20160/log"
tidb配置:
tidb_servers:
  - host: 192.168.40.161
   # ssh_port: 22
   # port: 4000
   # status_port: 10080
   # deploy_dir: /data/deploy/install/deploy/tidb-4000
   # log_dir: /data/deploy/install/log/tidb-4000
pd配置:
pd_servers:
  - host: 10.0.1.5
    ssh_port: 22
    name: pd-1
    client_port: 2379
    peer_port: 2380
    deploy_dir: /data/deploy/install/deploy/pd-2379
    data_dir: /data/deploy/install/data/pd-2379
    log_dir: /data/deploy/install/log/pd-2379
启动扩容
tiup cluster scale-out tidb-test scale-out-tikv.yaml -uroot -p
查看集群信息
看看是否增加了对应的tikv节点。
tiup cluster display tidb-test
缩容
相对于扩容,缩容就很简单了,直接指定服务的ip和端口就可以:例如把上面新增的tidb-server去除掉
tiup cluster scale-in tidb-test --node 192.168.40.161:4000
启停节点
查看TiDB集群信息
首先使用 "tiup cluster display <clustername> "命令查看TiDB集群信息,ID列显示的 IP:PORT 可以作为节点名称使用
tiup cluster display sandata
帮助文档
tiup cluster stop -h
停止节点
tiup cluster stop sandata -N 192.168.2.81:2379
启动节点
tiup cluster start sandata -N 192.168.2.81:2379
来源:
使用 TiUP 扩容缩容 TiDB 集群 | PingCAP 文档中心
TIUP详细指令
1. 安装TIUP
下载
curl --proto '=https' --tlsv1.2 -sSf https://tiup-mirrors.pingcap.com/install.sh | sh
声明全局环境变量
source /root/.bash_profile
2. 更新TIUP
tiup update --self
3. 安装组件
例如:安装cluster
tiup cluster
4. 更新组件
tiup update cluster
5. 查看组件的版本
例如:cluster
tiup --binary cluster
6. 生成TIDB部署的模板
tiup cluster template > topology.yaml
7. 检查和自动修复集群存在的潜在风险
tiup cluster check ./topology.yaml --apply --user root -p
8. 部署 TiDB 集群
tiup cluster deploy ${cluster-name} ${cluster-version} ./topology.yaml --user root -p
9. 查看 TiUP 管理的集群
tiup cluster list
10. 检查集群情况
tiup cluster display ${cluster-name}
11. 启动集群
tiup cluster start ${cluster-name}
12. 关闭集群
tiup cluster stop ${cluster-name}
13. 启动部分组件
tiup cluster start ${cluster-name} -R pd
14. 启动指定主机的组件
tiup cluster start ${cluster-name} -N $(ip1):${port1},$(ip2):${port2}
15. 修改集群的名称
tiup cluster rename ${cluster-old-name} ${cluster-new-name}
16. 集群升级
tiup cluster upgrade ${cluster-name} v5.0.0
17. 检查集群状态
tiup cluster check ${cluster-name} --cluster
18. 更新周边工具,比如pd-ctl
tiup install ctl:v5.0.0
来源:


 6757
6757


 被折叠的 条评论
为什么被折叠?
被折叠的 条评论
为什么被折叠?
 到【灌水乐园】发言


