


项目需求:编写主题app,一键切换桌面app图标和系统壁纸。
Android版本:8.1
需求是写一个系统主题app,实现类似于华为手机内置系统主题app的功能,原生android是没有主题app的,网上都是app换肤框架,是给自己单独的app换主题,百般无奈只能自己动手写了。还好我们是在源码基础上开发,可以任性的自定义功能。
步骤一
先找到Launcher加载各种app的地方
Launcher的初始化过程:
    @Override
    protected void onCreate(Bundle savedInstanceState) {
		...
		LauncherAppState app = LauncherAppState.getInstance(this);
		mModel = app.setLauncher(this);
		...
        if (!mModel.startLoader(currentScreen)) {
            mDragLayer.setAlpha(0);
        } else {
            mWorkspace.setCurrentPage(currentScreen);
            setWorkspaceLoading(true);
        }
        ...
	}
进入LauncherModel,发现LauncherModel 居然是BroadcastReceiver
public class LauncherModel extends BroadcastReceiver
去看它的startLoader
public boolean startLoader(int synchronousBindPage) {
        // Enable queue before starting loader. It will get disabled in Launcher#finishBindingItems
        InstallShortcutReceiver.enableInstallQueue(InstallShortcutReceiver.FLAG_LOADER_RUNNING);
        synchronized (mLock) {
            if (mCallbacks != null && mCallbacks.get() != null) {
                final Callbacks oldCallbacks = mCallbacks.get();
                // Clear any pending bind-runnables from the synchronized load process.
                mUiExecutor.execute(new Runnable() {
                            public void run() {
                                oldCallbacks.clearPendingBinds();
                            }
                        });
                stopLoader();
                LoaderResults loaderResults = new LoaderResults(mApp, sBgDataModel,
                        mBgAllAppsList, synchronousBindPage, mCallbacks);
                if (mModelLoaded && !mIsLoaderTaskRunning) {
                    loaderResults.bindWorkspace();
                    loaderResults.bindAllApps();
                    loaderResults.bindDeepShortcuts();
                    loaderResults.bindWidgets();
                    return true;
                } else {
                    startLoaderForResults(loaderResults);
                }
            }
        }
        return false;
    }
第一次初始化mModelLoaded肯定是false无疑,所以进入startLoaderForResults(loaderResults)
    public void startLoaderForResults(LoaderResults results) {
        synchronized (mLock) {
            stopLoader();
            mLoaderTask = new LoaderTask(mApp, mBgAllAppsList, sBgDataModel, results,packName,themeName);
            runOnWorkerThread(mLoaderTask);
        }
    }
LoaderTask是一个Runnable,
    private static void runOnWorkerThread(Runnable r) {
        if (sWorkerThread.getThreadId() == Process.myTid()) {
            r.run();
        } else {
            // If we are not on the worker thread, then post to the worker handler
            sWorker.post(r);
        }
    }
所以应该去看LoaderTask的run方法
public void run() {
        synchronized (this) {
            // Skip fast if we are already stopped.
            if (mStopped) {
                return;
            }
        }

        try (LauncherModel.LoaderTransaction transaction = mApp.getModel().beginLoader(this)) {
            if (DEBUG_LOADERS) Log.d(TAG, "step 1.1: loading workspace");
            loadWorkspace();
            if (DEBUG_LOADERS) Log.d(TAG, "step 1.2: bind workspace workspace");
            mResults.bindWorkspace();

            if (DEBUG_LOADERS) Log.d(TAG, "step 2.1: loading all apps");
            loadAllApps();
            mResults.bindAllApps();

            if (DEBUG_LOADERS) Log.d(TAG, "step 2.3: Update icon cache");
            updateIconCache();

            // third step
            if (DEBUG_LOADERS) Log.d(TAG, "step 3.1: loading deep shortcuts");
            loadDeepShortcuts();
            if (DEBUG_LOADERS) Log.d(TAG, "step 3.2: bind deep shortcuts");
            mResults.bindDeepShortcuts();

            // fourth step
            if (DEBUG_LOADERS) Log.d(TAG, "step 4.1: loading widgets");
            mBgDataModel.widgetsModel.update(mApp, null);
            if (DEBUG_LOADERS) Log.d(TAG, "step 4.2: Binding widgets");
            mResults.bindWidgets();

            transaction.commit();
        } catch (CancellationException e) {
        }
    }
这个方法很大,但是逻辑是顺序的,分别先加载并绑定了 workspace ,然后再加载所有app的view,由于我们想找到的是加载app图标的地方,所以肯定是 loadAllApps 了。
private void loadAllApps() {
        final long loadTime = DEBUG_LOADERS ? SystemClock.uptimeMillis() : 0;
        final List<UserHandle> profiles = mUserManager.getUserProfiles();
        mBgAllAppsList.clear();

        for (UserHandle user : profiles) {
			...//省略
            // Create the ApplicationInfos
            for (int i = 0; i < apps.size(); i++) {
                LauncherActivityInfo app = apps.get(i);
                // This builds the icon bitmaps.
                Log.i(TAG, "loadAllApps--> app=" + app.getName());
                mBgAllAppsList.add(new AppInfo(app, user, quietMode), app);
            }
			...//省略
            ManagedProfileHeuristic.onAllAppsLoaded(mApp.getContext(), apps, user);
        }
		...//省略
    }
其中,for循环用LauncherActivityInfo封装给AppInfo,再添加进list里,
    public void add(AppInfo info, LauncherActivityInfo activityInfo) {
        if (!mAppFilter.shouldShowApp(info.componentName)) {
            return;
        }
        if (findAppInfo(info.componentName, info.user) != null) {
            return;
        }
        mIconCache.getTitleAndIcon(info, activityInfo, true /* useLowResIcon */);

        data.add(info);
        added.add(info);
    }
进入了AllAppsList,使用的是IconCache来管理appinfo的,
    public synchronized void getTitleAndIcon(ItemInfoWithIcon info,
            LauncherActivityInfo activityInfo, boolean useLowResIcon) {
        // If we already have activity info, no need to use package icon
        getTitleAndIcon(info, Provider.of(activityInfo), false, useLowResIcon);
    }
	---
    private synchronized void getTitleAndIcon(
            @NonNull ItemInfoWithIcon infoInOut,
            @NonNull Provider<LauncherActivityInfo> activityInfoProvider,
            boolean usePkgIcon, boolean useLowResIcon) {
        CacheEntry entry = cacheLocked(infoInOut.getTargetComponent(), activityInfoProvider,
                infoInOut.user, usePkgIcon, useLowResIcon);
        applyCacheEntry(entry, infoInOut);
    }
继续封装AppInfo
protected CacheEntry cacheLocked(
            @NonNull ComponentName componentName,
            @NonNull Provider<LauncherActivityInfo> infoProvider,
            UserHandle user, boolean usePackageIcon, boolean useLowResIcon) {
        Preconditions.assertWorkerThread();
        ComponentKey cacheKey = new ComponentKey(componentName, user);
        CacheEntry entry = mCache.get(cacheKey);
        if (entry == null || (entry.isLowResIcon && !useLowResIcon)) {
            entry = new CacheEntry();
            mCache.put(cacheKey, entry);

            // Check the DB first.
            LauncherActivityInfo info = null;
            boolean providerFetchedOnce = false;

            if (!getEntryFromDB(cacheKey, entry, useLowResIcon) || DEBUG_IGNORE_CACHE) {
                info = infoProvider.get();
                providerFetchedOnce = true;

                if (info != null) {
                    Log.i(TAG, "cacheLocked--> 1 create icon ="+info.getName());
                    entry.icon = LauncherIcons.createBadgedIconBitmap(
                            getFullResIcon(info), info.getUser(), mContext,
                            infoProvider.get().getApplicationInfo().targetSdkVersion);
                }
            }
			...//省略
        }
        return entry;
    }
在LauncherIcons的createBadgedIconBitmap里处理appIcon,其中第一个参数来自于getFullResIcon(info)
    public Drawable getFullResIcon(LauncherActivityInfo info) {
        return getFullResIcon(info, true);
    }
    ---
    public Drawable getFullResIcon(LauncherActivityInfo info, boolean flattenDrawable) {
        return mIconProvider.getIcon(info, mIconDpi, flattenDrawable);
    }
    ---
    public Drawable getIcon(LauncherActivityInfo info, int iconDpi, boolean flattenDrawable) {
        return info.getIcon(iconDpi);
    }
获取的Icon资源来自于 LauncherActivityInfo
public Drawable getIcon(int density) {
        // TODO: Go through LauncherAppsService
        final int iconRes = mActivityInfo.getIconResource();
        Drawable icon = null;
        // Get the preferred density icon from the app's resources
        if (density != 0 && iconRes != 0) {
            try {
                final Resources resources
                        = mPm.getResourcesForApplication(mActivityInfo.applicationInfo);
                icon = resources.getDrawableForDensity(iconRes, density);
            } catch (NameNotFoundException | Resources.NotFoundException exc) {
            }
        }
        // Get the default density icon
        if (icon == null) {
            icon = mActivityInfo.loadIcon(mPm);
        }
        return icon;
    }
关键点就是
    final Resources resources
            = mPm.getResourcesForApplication(mActivityInfo.applicationInfo);
    icon = resources.getDrawableForDensity(iconRes, density);
通过各个app的启动Activity(就是每个app都有的主Activity),获取到对应的ApplicationInfo,然后获取到对应包的资源Resources,然后根据那个Resources找到对应Id的drawable.
所以我们找到了Launcher加载app列表,获取app图标的地方了,接下来就是怎么拦截这个操作,使用我们自己主题app的图标了。
步骤二
使Launcher加载我们自己写的包里的资源。
在上面的获取Resources的时候,是通过对应的ApplicationInfo来获取的,也就是每个应用程序都有自己对应的Resources对象来管理当前app的资源,我们怎么去获取到我们自己写的包的Resources呢,如果要先去获取Activityinfo,那就很绕弯了,很巧的是,还有个可用的重载方法。
getResourcesForApplication(ApplicationInfo app)
getResourcesForApplication(String appPackageName)
直接根据包名就可以获取到资源Resources对象,当然这里的报名直接写我们自己的app包名。
所以接下来就是在getFullResIcon那里做拦截,先到我们写的app里找资源,更改如下
    public Drawable getFullResIcon(LauncherActivityInfo info, boolean flattenDrawable) {
        if (!TextUtils.isEmpty(mPackname)) {
            Drawable drawable = getFullResIconLanco(info.getActivityInfo());
            if (drawable != null) {
                return drawable;
            }
        }
        return mIconProvider.getIcon(info, mIconDpi, flattenDrawable);
    }
public Drawable getFullResIconLanco(ActivityInfo info) {
        Drawable drawable = null;
        Resources resourcesX;
        Resources resourcesY;
        try {
            resourcesX= mPackageManager.getResourcesForApplication(
                    info.applicationInfo);
            resourcesY = mPackageManager.getResourcesForApplication(
                    mPackname);
        } catch (PackageManager.NameNotFoundException e) {
            resourcesX = null;
            resourcesY = null;
        }
        if (resourcesX != null && resourcesY != null) {
            int iconId = info.getIconResource();
            if (iconId != 0) {
                drawable = getFullResIcon(resourcesX, resourcesY, iconId);
                if (drawable != null) {
                    return drawable;
                }
            }
        }
        return drawable;
    }
当获取对应Icon的时候,一并得到我们自己app的Resources
    private Drawable getFullResIcon(Resources resourcesReal,Resources resourcesFake, int iconId) {
        Drawable d;
        try {
            String name = resourcesReal.getResourceEntryName(iconId);
            String type = resourcesReal.getResourceTypeName(iconId);
            if (!mThemename.equals("")) {
                name = name + "_" + mThemename;
            }
            int fakeid = resourcesFake.getIdentifier(name,"drawable", mPackname);
            Log.i(TAG, "getFullResIcon--> name = " + name + "--type =" + type+"--iconId="+iconId+"--fakeid="+fakeid);
            d = resourcesFake.getDrawableForDensity(fakeid, mIconDpi);
        } catch (Resources.NotFoundException e) {
            d = null;
        }
        return d ;
    }
根据真实的Resources获取到对应icon的名称,然后根据名称,在我们写的app的Resources里找到同名的id,再找到对应的Drawable。
其中,根据mThemename主题名称的不同,我们加载不同的icon名称,
比如:如果主题名字叫theme,正常的appIcon名称 ic_launcher_main, 对应我们包里的icon就命名成ic_launcher_main_theme, 不同主题加不同的后缀,用于区分不同的id,
关于mThemename和mPackname,主题名和包名的传递,是在我们自己app里直接发送Intent过来的,然后把对应名称设置到IconCache这个类里来就行了,别忘了,前面特别提到LauncherModel是个BroadcastReceiver,发广播的事情不提了。
步骤三
在我们的app里定义不同的主题包
首先要内置第三方app,然后在makefile里区别资源包,我的方法是给出三个目录
LOCAL_RESOURCE_DIR := \
    $(LOCAL_PATH)/res \
    $(LOCAL_PATH)/res_fake\
    $(LOCAL_PATH)/res_xposed \
创建不同的主题资源,其余的就是对应图片命名,然后别忘了引用他们,不然编译不能生成对应R资源。
<resources>
    <drawable name="ic_launcher_browser_fake">@drawable/ic_launcher_browser_fake</drawable>
    <drawable name="ic_launcher_phone_fake">@drawable/ic_launcher_phone_fake</drawable>
    <drawable name="ic_launcher_mms_fake">@drawable/ic_launcher_mms_fake</drawable>
</resources>
然后R文件里就会有我们的ID了,
    public static final int ic_launcher_browser_fake=0x7f08006e;
    public static final int ic_launcher_phone_fake=0x7f080080;
    public static final int ic_launcher_mms_fake=0x7f08007d;
这样,在Launcher找我们包里的图片的时候,找的就是这些我们加进来的图片id.
Tips
Launcher 初始化之后,就不会再加载一次图片,因为那些app列表信息会存储到数据库里,要想每次我们切换主题都有效,就必须强制清空数据,
mIconCache.clear();
这是必须的,以及
    if (clearDb) {
        Log.d(TAG, "loadWorkspace: resetting launcher database");
        LauncherSettings.Settings.call(contentResolver,
                LauncherSettings.Settings.METHOD_CREATE_EMPTY_DB);
    }
这是清除数据库,具体的都在源码里。只有这样才会更新,不然就从缓存里和数据库里找资源了。
步骤四
更改对应壁纸
这里只需要在切换主题的时候更换壁纸,
    try {
        if (mWallPaperid == 0) {
            clearWallpaper();
        }else {
            WallpaperManager.getInstance(this).
            	setBitmap(BitmapFactory.decodeResource(getResources(), mWallPaperid));
        }
    } catch (IOException e) {
        e.printStackTrace();
    }
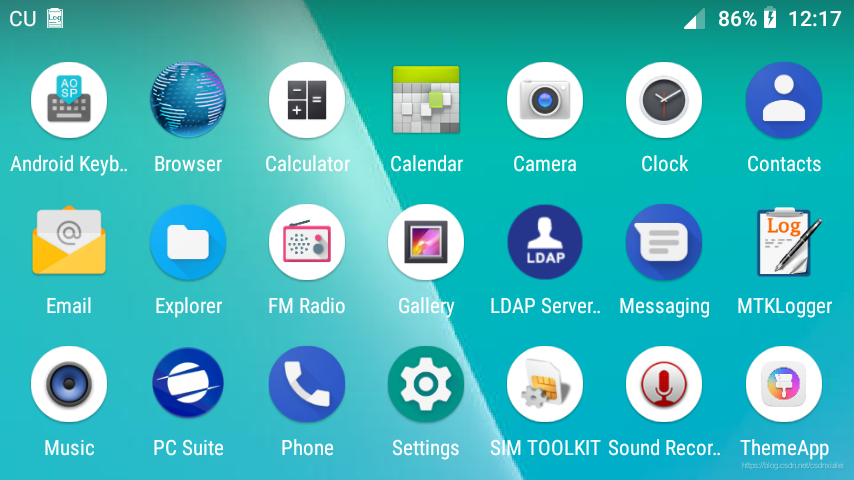
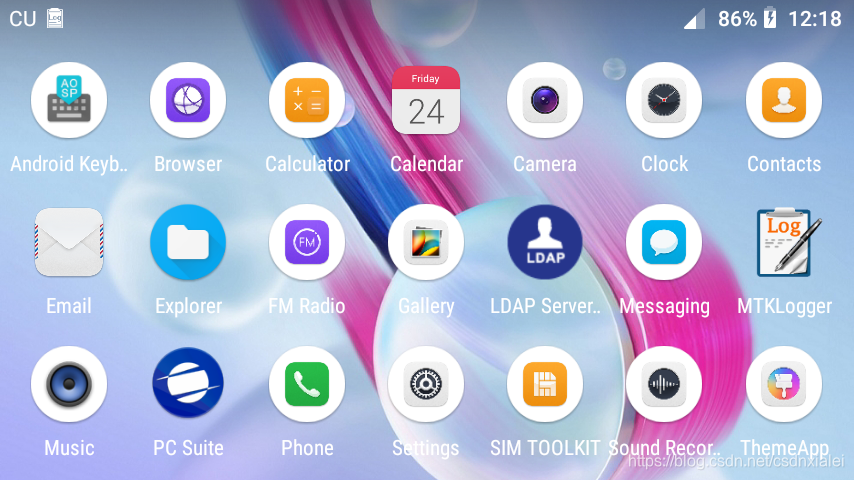
效果图:
总结:
以上过程思路都是我个人摸索的,我不知道像华为和小米那些公司是怎么在处理主题切换的,不过我能想到的是,他们也是改ResID来主题app里找resource,只不过会封装的很多,这也许只有等以后技术厉害了才会知道吧~
关于这个app,我这里只是简单实现了一键切换桌面app图标和壁纸,其他的比如系统其他图标和动态壁纸这些还不清楚怎么实现,还有关于网络下载主题加载资源包的问题,这里也没有给出办法,不过目前需求只是内置几套主题可以,以后升级加载的事再说。


 被折叠的 条评论
为什么被折叠?
被折叠的 条评论
为什么被折叠?
 到【灌水乐园】发言


