


用于更改View的触摸区域,在平常开发中遇到一个问题就是因为图标太小导致老是点击不中,用户体验不太好,TouchDelegate可以改变可点击区域的大小。
Layout如下
<?xml version="1.0" encoding="utf-8"?>
<RelativeLayout xmlns:android="http://schemas.android.com/apk/res/android"
    xmlns:tools="http://schemas.android.com/tools"
    android:layout_width="match_parent"
    android:layout_height="match_parent"
    android:paddingBottom="@dimen/activity_vertical_margin"
    android:paddingLeft="@dimen/activity_horizontal_margin"
    android:paddingRight="@dimen/activity_horizontal_margin"
    android:paddingTop="@dimen/activity_vertical_margin"
    tools:context="demo.cn.com.demo.SecondActivity">

    <LinearLayout
        android:layout_width="match_parent"
        android:layout_height="100dp"
        android:orientation="horizontal"
        android:id="@+id/parent"
        android:weightSum="2">

        <Button
            android:id="@+id/btn1"
            android:layout_width="0dp"
            android:layout_height="50dp"
            android:layout_weight="1"
            android:text="Hello World !" />

        <Button
            android:id="@+id/btn2"
            android:layout_width="0dp"
            android:layout_height="50dp"
            android:layout_weight="1"
            android:text="Hello World !" />

    </LinearLayout>

</RelativeLayout>
java code如下
package demo.cn.com.demo;
import android.graphics.Rect;
import android.support.v7.app.AppCompatActivity;
import android.os.Bundle;
import android.view.TouchDelegate;
import android.view.View;
import android.widget.Button;
import android.widget.LinearLayout;
public class SecondActivity extends AppCompatActivity {
@Override
protected void onCreate(Bundle savedInstanceState) {
super.onCreate(savedInstanceState);
setContentView(R.layout.activity_second2);
final LinearLayout parent = (LinearLayout) findViewById(R.id.parent);
final Button btn1 = (Button) findViewById(R.id.btn1);
Button btn2 = (Button) findViewById(R.id.btn2);
parent.post(new Runnable() {
@Override
public void run() {
Rect rect = new Rect();
btn1.getHitRect(rect);
rect.top -= 100;
rect.left -= 100;
rect.bottom += 100;
rect.right += 100;
TouchDelegate touchDelegate = new TouchDelegate(rect,btn1);
((View)btn1.getParent()).setTouchDelegate(touchDelegate);
}
});
}
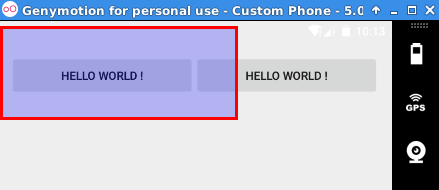
}此时btn1能够点击的区域就是下面的红线框区域
采用此方法需要注意:
1、若View的自定义触摸范围超出Parent的大小,则超出的那部分无效。
2、一个Parent只能设置一个View的TouchDelegate,设置多个时只有最后设置的生效。
3、如果点击区域延伸到了兄弟控件,那么还是兄弟控件响应。


 被折叠的 条评论
为什么被折叠?
被折叠的 条评论
为什么被折叠?
 到【灌水乐园】发言


