


- 🏃♂️ 微信公众号: 朕在debugger
- © 版权: 本文由【朕在debugger】原创、需要转载请联系博主
- 📕 如果文章对您有所帮助,欢迎关注、点赞、转发和订阅专栏!
S(Situation):业务代码与缓存逻辑交织在一起,耦合度太高,后期维护人员无法快速接手。
T(Task):预期实现业务代码与缓存逻辑解耦,使得业务人员可以专注于业务代码编写,在此基础上仍要保障数据一致性。
A(Action):利用 Spring Cache + Redis,接管Spring 的 CacheManager。
R(Result):实现业务代码与缓存逻辑解耦,业务人员仅用注解即可完成对目标对象的缓存实现。
文章目录
Tips:
读者可参考项目代码,构建自己的一个 stater,因文中引入作者私有maven仓库,故此 demo 打包会出现 error,找不到对应依赖,但这不影响读者理解本文思想。
一、业务代码与缓存逻辑紧密相连
先来看一段类似场景的代码
public Product getProductById(int productId) {
        Product product = null;
        // 先尝试从缓存中获取商品信息
        String cachedProduct = getFromCache(productId);
        if (cachedProduct != null) {
            // 如果缓存命中,直接从缓存中获取商品对象
            product = deserializeProduct(cachedProduct);
            System.out.println("Fetched product " + productId + " from cache.");
        } else {
            // 如果缓存中没有,则从数据库中获取商品信息
            product = fetchProductFromDatabase(productId);
            if (product != null) {
                // 将获取到的商品信息存入缓存,有效期设置为1小时
                putInCache(productId, serializeProduct(product));
                System.out.println("Cached product " + productId + " in cache.");
            }
        }
        return product;
    }
怎么样?是不是感觉也没什么大不了的?上面只是一个举例,真实情况业务复杂多了…
如果优化成下面这样子,是不是瞬间心情大好?
@Cacheable(value = "product",key = "#productId")
public Product getProductById(int productId) {
        Product product = fetchProductFromDatabase(productId);
        return product;
    }
二、多级缓存执行逻辑
先看图示一吧,可以很快明白这个逻辑是如何运行的。

▲图一 / L1&L2执行过程
再看看图示二,相比于图示一会更加详细地了解到执行细节。
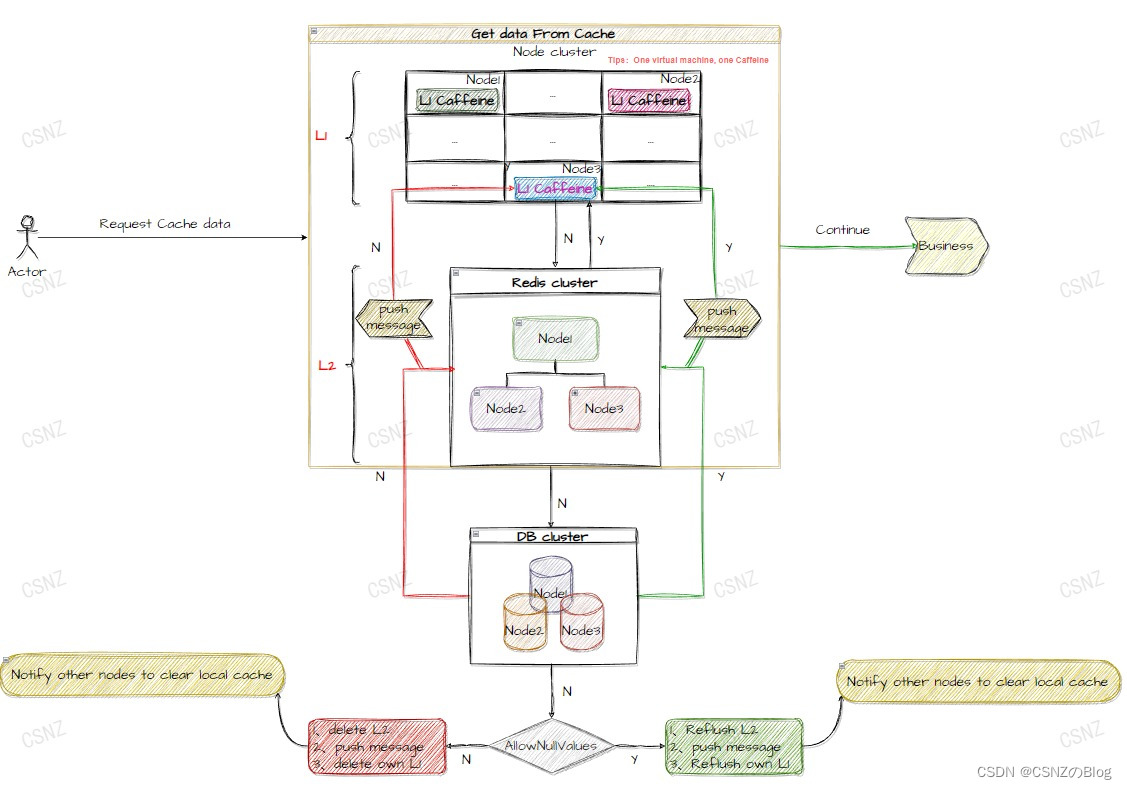
▲图二 / L1&L2细节执行过程
三、如何利用 Spring Cache + Redis,接管 Spring 的 CacheManager
先看图示三吧,大致脉络就是这样子
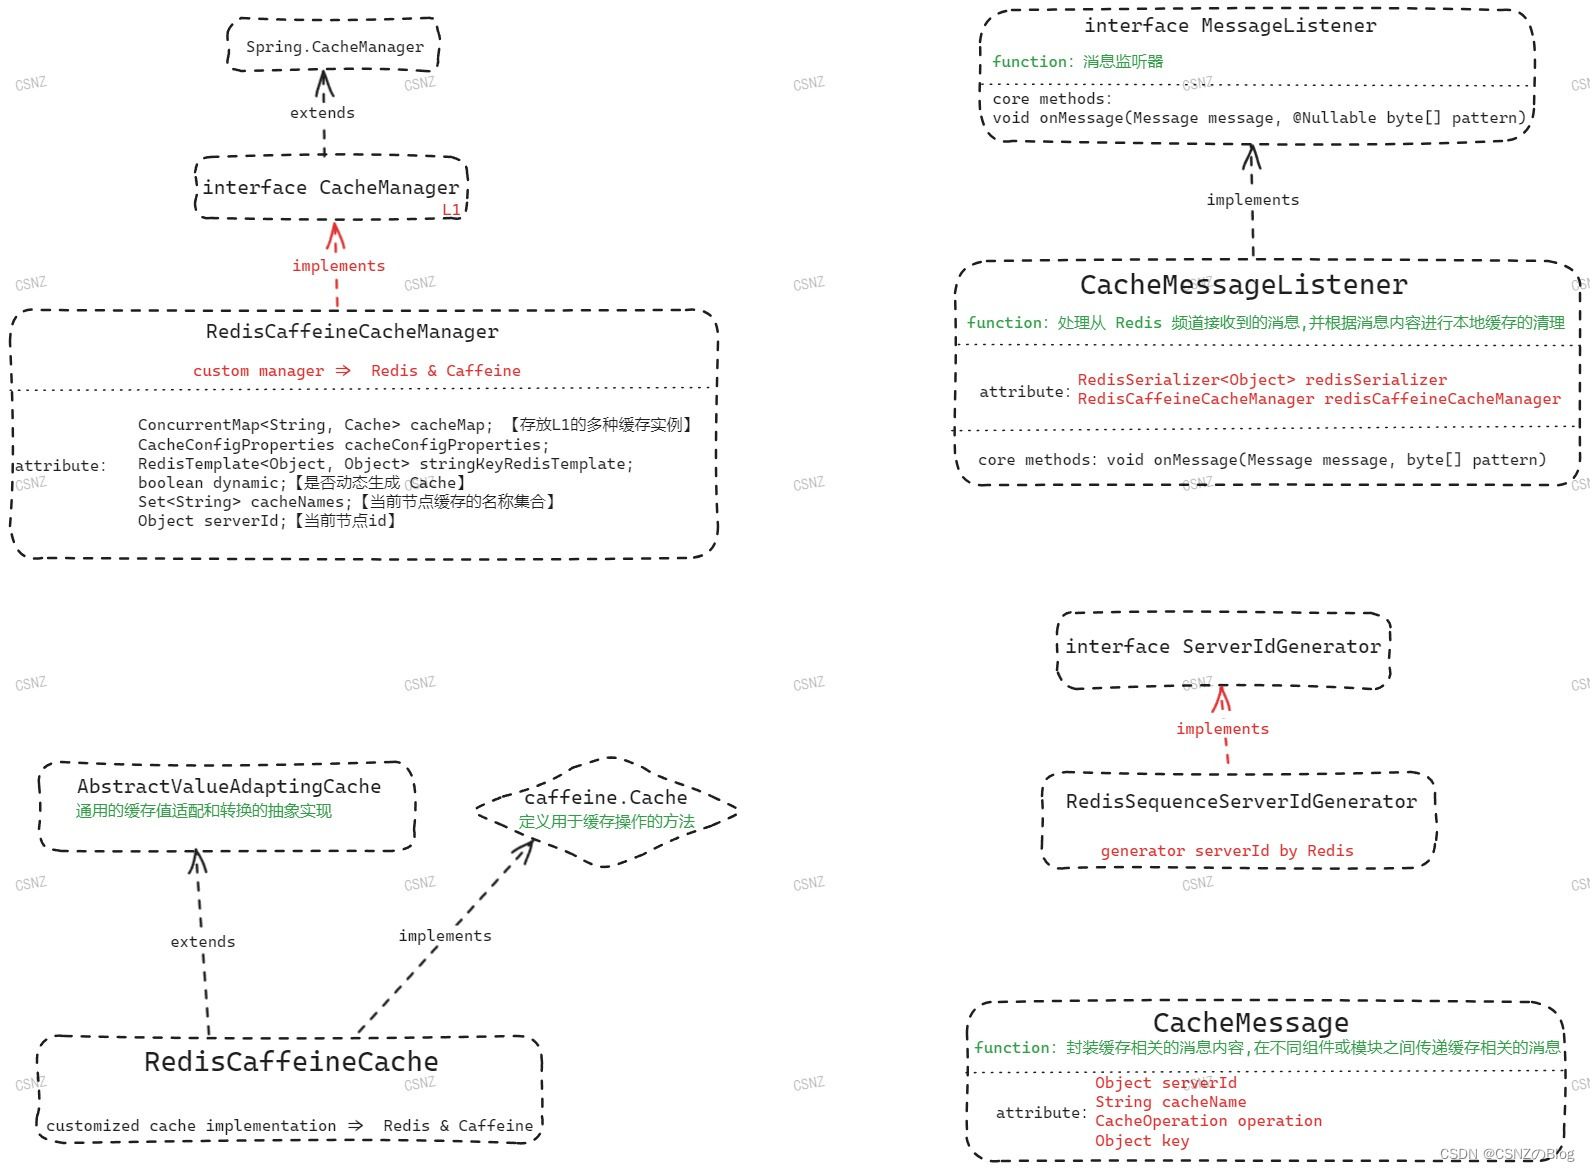
▲图三 / 核心代码关系结构
四、核心代码
源码可参考 https://gitee.com/csnz/cache-spring-boot-starter
自定义 CacheManager 多级缓存实现
public class RedisCaffeineCacheManager implements CacheManager{
    private ConcurrentMap<String, Cache> cacheMap = new ConcurrentHashMap<>();
    private CacheConfigProperties cacheConfigProperties;
    private RedisTemplate<Object, Object> stringKeyRedisTemplate;
    // 是否动态根据cacheName创建Cache的实现
    private boolean dynamic;
    // 当前节点存储的缓存对象集合名称
    private Set<String> cacheNames;
    // 当前节点id
    private Object serverId;
	/*
     * @Description:获取指定名称的缓存对象
     * 如果 cacheMap 中已存在,则直接返回;
     * 如果 cacheMap 中不存在且不允许动态创建缓存,则返回 null;
     * 如果不存在且允许动态创建缓存,则调用 createCache 方法创建缓存并放入 cacheMap 中
     * @Param:[name]
     * @Return org.springframework.cache.Cache
     */
    @Override
    public Cache getCache(String name) {
        Cache cache = cacheMap.get(name);
        if (cache != null) {
            return cache;
        }
        if (!dynamic && !cacheNames.contains(name)) {
            return null;
        }
        cache = createCache(name);
        Cache oldCache = cacheMap.putIfAbsent(name, cache);
        log.debug("create cache instance, the cache name is : {}", name);
        return oldCache == null ? cache : oldCache;
    }
}
多级缓存查询实现
/**
 * @Author:CSNZ
 * @Description:自定义的缓存实现类,结合了 Redis 和 Caffeine 两种缓存机制的优点
 * @Version:1.0
 **/
@Slf4j
@Getter
public class RedisCaffeineCache extends AbstractValueAdaptingCache implements Cache<Object, Object> {
    private final String name; // 缓存名称,例如 externalApiData

    private final Cache<Object, Object> caffeineCache;

    private final RedisTemplate<Object, Object> stringKeyRedisTemplate;

    private final String cachePrefix;

    private final String getKeyPrefix;

    private final Duration defaultExpiration;

    private final Duration defaultNullValuesExpiration;

    private final Map<String, Duration> expires;

    private final String topic;

    private final Object serverId;

    private final Map<String, ReentrantLock> keyLockMap = new ConcurrentHashMap<>();
	 /**
     * 检查L1或L2缓存中是否存在键,不存在则返回 null
     * @param key
     * @return
     */
    @Override
    protected Object lookup(Object key) {
        // 根据前缀拼接 key
        Object cacheKey = getKey(key);
        // 从 L1 中查找此 key
        Object value = getCaffeineValue(key);
        if (Objects.nonNull(value)) {
            log.debug("get cache from caffeine, the key is : {}", cacheKey);
            return value;
        }
        // L1 中查无此key,改从 L2 中查找
        value = getRedisValue(key);
        if (value != null) {
            log.debug("get cache from redis and put in caffeine, the key is : {}", cacheKey);
            setCaffeineValue(key, value);
        }
        return value;
    }
}
五、实战
5-1、项目打包后在测试模块引入其依赖
<dependency>
    <groupId>com.csnz</groupId>
    <artifactId>cache-spring-boot-starter</artifactId>
    <version>0.0.1-SNAPSHOT</version>
</dependency>
5-2、项目启动类加注解 @EnableCaching
@SpringBootApplication
@EnableCaching
public class TestServiceApplication {
    public static void main(String[] args) {
        SpringApplication.run(TestServiceApplication.class, args);
    }
}
5-3、配置 redis 属性
server:
  port: 80
spring:
  data:
    redis:
      database: 0
      host: IP  #Redis服务器地址
      port: 6379            #Redis服务器连接端口
      password: password   #Redis服务器连接密码(默认为空)
      timeout: 8000
5-4、接口使用注解实现缓存与业务逻辑解耦
@RestController
public class HelloController {
    public static final String prefix = "REAL:";

    // 在方法执行前检查缓存是否存在预期的值,如果存在则直接返回缓存中的值,避免重复执行方法
    @Cacheable(value = "user",key = "#name")
    @GetMapping("/getRealName/{name}")
    public String getRealNameFromCache(@PathVariable("name") String name) throws InterruptedException {
        Thread.sleep(3000);
        return prefix+name;
    }
    // 在方法执行后强制将返回值存入缓存,以保证缓存中的值是最新的
    @CachePut(value = "user",key = "#user.id")
    @PostMapping("/updateUser")
    public User updateUser(@RequestBody User user){
        return user.setName("CSNZ");
    }
    // 从缓存中移除指定的缓存条目(剔除此缓存对象)
    @CacheEvict(value = "user",allEntries = true)
    @GetMapping("/clearAndDel")
    public String delUserCache(){
        return "clear all successfully!";
    }
    // 从缓存中移除指定的缓存条目
    @CacheEvict(value = "user",key = "#name")
    @GetMapping("/clearByName/{name}")
    public String clearUserCacheByName(@PathVariable("name") String name){
        return String.format("clear %s cache successfully!",name);
    }
    // @Caching 注解允许在一个方法上同时应用多个 Spring 缓存注解,以提供更细粒度的缓存控制
    @Caching(
            cacheable = {
                @Cacheable(value = "user",key = "#user.id")
            },
            evict = {
                // 清除指定缓存区域("user")中的所有缓存条目,表示会将整个缓存区域清空,即删除缓存中的所有内容,并不仅仅是移除所有条目
                @CacheEvict(value = "employee",allEntries = true)
            }
    )
    @PostMapping("/complex")
    public void complexThing(@RequestBody User user){
        // do something...
    }
}
六、总结
以上案例就是利用 Spring Cache + Redis,接管 Spring 的 CacheManager,实现业务代码与缓存逻辑解耦的一个简要过程,具体细节还需要深入代码理解思想。
如果大家觉得本文写得不错,别忘了给个赞哦!同时,如果您有任何疑问或建议,欢迎在评论区留言,让我们一起交流、探讨!


 496
496

 被折叠的 条评论
为什么被折叠?
被折叠的 条评论
为什么被折叠?
 到【灌水乐园】发言


