


SpringCloud无介绍快使用,sentinel服务熔断功能(二十四)
问题背景
从零开始学springcloud微服务项目
注意事项:
- 约定 > 配置 > 编码
- IDEA版本2021.1
- 这个项目,我分了很多篇章,每篇文章一个操作步骤,目的是显得更简单明了
- controller调service,service调dao
- 默认安装nginx
- 项目源码以及sentinel安装包
sentinel整合ribbon+openFeign+fallback
1 新建两个payment微服务module

2 选择jdk1.8

3 输入服务名:cloudalibaba-provider-payment9003 和 cloudalibaba-provider-payment9004

4 引入pom依赖,cloudalibaba-provider-payment9003 和 cloudalibaba-provider-payment9004两个服务名不同
<?xml version="1.0" encoding="UTF-8"?>
<project xmlns="http://maven.apache.org/POM/4.0.0"
         xmlns:xsi="http://www.w3.org/2001/XMLSchema-instance"
         xsi:schemaLocation="http://maven.apache.org/POM/4.0.0 http://maven.apache.org/xsd/maven-4.0.0.xsd">
    <parent>
        <artifactId>springcloud2022</artifactId>
        <groupId>com.yg</groupId>
        <version>1.0-SNAPSHOT</version>
    </parent>
    <modelVersion>4.0.0</modelVersion>

    <artifactId>cloudalibaba-provider-payment9003</artifactId>

    <dependencies>
        <!--SpringCloud ailibaba nacos -->
        <dependency>
            <groupId>com.alibaba.cloud</groupId>
            <artifactId>spring-cloud-starter-alibaba-nacos-discovery</artifactId>
        </dependency>
        <dependency><!-- 引入自己定义的api通用包,可以使用Payment支付Entity -->
            <groupId>com.yg</groupId>
            <artifactId>cloud-api-commons</artifactId>
            <version>${project.version}</version>
        </dependency>
        <!-- SpringBoot整合Web组件 -->
        <dependency>
            <groupId>org.springframework.boot</groupId>
            <artifactId>spring-boot-starter-web</artifactId>
        </dependency>
        <dependency>
            <groupId>org.springframework.boot</groupId>
            <artifactId>spring-boot-starter-actuator</artifactId>
        </dependency>
        <!--日常通用jar包配置-->
        <dependency>
            <groupId>org.springframework.boot</groupId>
            <artifactId>spring-boot-devtools</artifactId>
            <scope>runtime</scope>
            <optional>true</optional>
        </dependency>
        <dependency>
            <groupId>org.projectlombok</groupId>
            <artifactId>lombok</artifactId>
            <optional>true</optional>
        </dependency>
        <dependency>
            <groupId>org.springframework.boot</groupId>
            <artifactId>spring-boot-starter-test</artifactId>
            <scope>test</scope>
        </dependency>
    </dependencies>

</project>
5 添加application.yml文件,cloudalibaba-provider-payment9003 和 cloudalibaba-provider-payment9004端口不同
server:
  port: 9003

spring:
  application:
    name: nacos-payment-provider
  cloud:
    nacos:
      discovery:
        server-addr: localhost:8848 #配置Nacos地址

management:
  endpoints:
    web:
      exposure:
        include: '*'
6 添加启动类,cloudalibaba-provider-payment9003 和 cloudalibaba-provider-payment9004类名不同
package com.yg.springcloud;

import org.springframework.boot.SpringApplication;
import org.springframework.boot.autoconfigure.SpringBootApplication;
import org.springframework.cloud.client.discovery.EnableDiscoveryClient;

/**
 * @Author suolong
 * @Date 2022/6/22 11:33
 * @Version 2.0
 */
@SpringBootApplication
@EnableDiscoveryClient
public class PaymentMain9003 {

    public static void main(String[] args) {
        SpringApplication.run(PaymentMain9003.class, args);
    }

}
7 添加controller
package com.yg.springcloud.controller;

import com.yg.springcloud.entities.CommonResult;
import com.yg.springcloud.entities.Payment;
import org.springframework.beans.factory.annotation.Value;
import org.springframework.web.bind.annotation.GetMapping;
import org.springframework.web.bind.annotation.PathVariable;
import org.springframework.web.bind.annotation.RestController;

import java.util.HashMap;

/**
 * @Author suolong
 * @Date 2022/6/22 11:35
 * @Version 2.0
 */
@RestController
public class PaymentController {

    @Value("${server.port}")
    private String serverPort;

    public static HashMap<Long, Payment> hashMap = new HashMap<>();

    static {
        hashMap.put(1L, new Payment(1L, "28a8c1e3bc2742d8848569891fb42181"));
        hashMap.put(2L, new Payment(2L, "bba8c1e3bc2742d8848569891ac32182"));
        hashMap.put(3L, new Payment(3L, "6ua8c1e3bc2742d8848569891xt92183"));
    }

    @GetMapping(value = "/paymentSQL/{id}")
    public CommonResult<Payment> paymentSQL(@PathVariable("id") Long id) {
        Payment payment = hashMap.get(id);
        CommonResult<Payment> result = new CommonResult(200, "from mysql,serverPort:  " + serverPort, payment);
        return result;
    }
}
8 创建cloudalibaba-consumer-nacos-order84微服务,pom依赖
<?xml version="1.0" encoding="UTF-8"?>
<project xmlns="http://maven.apache.org/POM/4.0.0"
         xmlns:xsi="http://www.w3.org/2001/XMLSchema-instance"
         xsi:schemaLocation="http://maven.apache.org/POM/4.0.0 http://maven.apache.org/xsd/maven-4.0.0.xsd">
    <parent>
        <artifactId>springcloud2022</artifactId>
        <groupId>com.yg</groupId>
        <version>1.0-SNAPSHOT</version>
    </parent>
    <modelVersion>4.0.0</modelVersion>

    <artifactId>cloudalibaba-consumer-nacos-order84</artifactId>

    <dependencies>
        <!--SpringCloud openfeign -->
        <dependency>
            <groupId>org.springframework.cloud</groupId>
            <artifactId>spring-cloud-starter-openfeign</artifactId>
        </dependency>

        <!--SpringCloud ailibaba nacos -->
        <dependency>
            <groupId>com.alibaba.cloud</groupId>
            <artifactId>spring-cloud-starter-alibaba-nacos-discovery</artifactId>
        </dependency>
        <!--SpringCloud ailibaba sentinel -->
        <dependency>
            <groupId>com.alibaba.cloud</groupId>
            <artifactId>spring-cloud-starter-alibaba-sentinel</artifactId>
        </dependency>
        <!-- 引入自己定义的api通用包,可以使用Payment支付Entity -->
        <dependency>
            <groupId>com.yg</groupId>
            <artifactId>cloud-api-commons</artifactId>
            <version>${project.version}</version>
        </dependency>
        <!-- SpringBoot整合Web组件 -->
        <dependency>
            <groupId>org.springframework.boot</groupId>
            <artifactId>spring-boot-starter-web</artifactId>
        </dependency>
        <dependency>
            <groupId>org.springframework.boot</groupId>
            <artifactId>spring-boot-starter-actuator</artifactId>
        </dependency>
        <!--日常通用jar包配置-->
        <dependency>
            <groupId>org.springframework.boot</groupId>
            <artifactId>spring-boot-devtools</artifactId>
            <scope>runtime</scope>
            <optional>true</optional>
        </dependency>
        <dependency>
            <groupId>org.projectlombok</groupId>
            <artifactId>lombok</artifactId>
            <optional>true</optional>
        </dependency>
        <dependency>
            <groupId>org.springframework.boot</groupId>
            <artifactId>spring-boot-starter-test</artifactId>
            <scope>test</scope>
        </dependency>
    </dependencies>

</project>
9 添加application.yml文件
server:
  port: 84


spring:
  application:
    name: nacos-order-consumer
  cloud:
    nacos:
      discovery:
        server-addr: localhost:8848
    sentinel:
      transport:
        #配置Sentinel dashboard地址
        dashboard: localhost:8080
        #默认8719端口,假如被占用会自动从8719开始依次+1扫描,直至找到未被占用的端口
        port: 8719


#消费者将要去访问的微服务名称(注册成功进nacos的微服务提供者)
service-url:
  nacos-user-service: http://nacos-payment-provider


# 激活Sentinel对Feign的支持
feign:
  sentinel:
    enabled: true
10 添加启动类
package com.yg.springcloud;

import org.springframework.boot.SpringApplication;
import org.springframework.boot.autoconfigure.SpringBootApplication;
import org.springframework.cloud.client.discovery.EnableDiscoveryClient;
import org.springframework.cloud.openfeign.EnableFeignClients;

/**
 * @Author suolong
 * @Date 2022/6/22 11:38
 * @Version 2.0
 */
@SpringBootApplication
@EnableDiscoveryClient
@EnableFeignClients
public class OrderNacosMain84 {

    public static void main(String[] args) {
        SpringApplication.run(OrderNacosMain84.class, args);
    }

}
11 添加payment接口和实现类
package com.yg.springcloud.service;

import com.yg.springcloud.entities.CommonResult;
import com.yg.springcloud.entities.Payment;
import com.yg.springcloud.service.impl.PaymentFallbackService;
import org.springframework.cloud.openfeign.FeignClient;
import org.springframework.web.bind.annotation.GetMapping;
import org.springframework.web.bind.annotation.PathVariable;

/**
 * @Author suolong
 * @Date 2022/6/22 11:45
 * @Version 2.0
 */
@FeignClient(value = "nacos-payment-provider", fallback = PaymentFallbackService.class)//调用中关闭9003服务提供者
public interface PaymentService {

    @GetMapping(value = "/paymentSQL/{id}")
    public CommonResult<Payment> paymentSQL(@PathVariable("id") Long id);

}
package com.yg.springcloud.service.impl;

import com.yg.springcloud.entities.CommonResult;
import com.yg.springcloud.entities.Payment;
import com.yg.springcloud.service.PaymentService;
import org.springframework.stereotype.Component;

/**
 * @Author suolong
 * @Date 2022/6/22 11:45
 * @Version 2.0
 */
@Component
public class PaymentFallbackService implements PaymentService {

    @Override
    public CommonResult<Payment> paymentSQL(Long id)
    {
        return new CommonResult<>(444,"服务降级返回,没有该流水信息",new Payment(id, "errorSerial......"));
    }

}
12 添加配置类
package com.yg.springcloud.config;

import org.springframework.cloud.client.loadbalancer.LoadBalanced;
import org.springframework.context.annotation.Bean;
import org.springframework.context.annotation.Configuration;
import org.springframework.web.client.RestTemplate;

/**
 * @Author suolong
 * @Date 2022/6/22 11:39
 * @Version 2.0
 */

@Configuration
public class ApplicationContextConfig {

    @Bean
    @LoadBalanced
    public RestTemplate getRestTemplate()
    {
        return new RestTemplate();
    }


}
13 添加controller
package com.yg.springcloud.controller;
import com.alibaba.csp.sentinel.annotation.SentinelResource;
import com.yg.springcloud.entities.CommonResult;
import com.yg.springcloud.entities.Payment;
import com.yg.springcloud.service.PaymentService;
import org.springframework.web.bind.annotation.GetMapping;
import org.springframework.web.bind.annotation.PathVariable;
import org.springframework.web.bind.annotation.RequestMapping;
import org.springframework.web.bind.annotation.RestController;
import org.springframework.web.client.RestTemplate;
import javax.annotation.Resource;
/**
* @Author suolong
* @Date 2022/6/22 11:40
* @Version 2.0
*/
@RestController
public class CircleBreakerController {
public static final String SERVICE_URL = "http://nacos-payment-provider";
@Resource
private RestTemplate restTemplate;
@RequestMapping("/consumer/fallback/{id}")
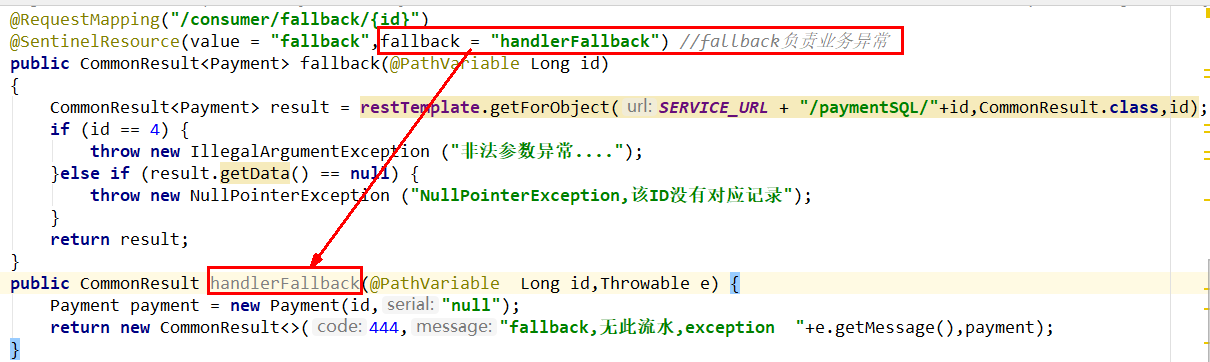
@SentinelResource(value = "fallback", fallback = "handlerFallback") //fallback负责业务异常
public CommonResult<Payment> fallback(@PathVariable Long id) {
CommonResult<Payment> result = restTemplate.getForObject(SERVICE_URL + "/paymentSQL/" + id, CommonResult.class, id);
if (id == 4) {
throw new IllegalArgumentException("IllegalArgumentException,非法参数异常....");
} else if (result.getData() == null) {
throw new NullPointerException("NullPointerException,该ID没有对应记录,空指针异常");
}
return result;
}
public CommonResult handlerFallback(@PathVariable Long id, Throwable e) {
Payment payment = new Payment(id, "null");
return new CommonResult<>(444, "兜底异常handlerFallback,exception内容 " + e.getMessage(), payment);
}
//==================OpenFeign
@Resource
private PaymentService paymentService;
@GetMapping(value = "/consumer/openfeign/{id}")
public CommonResult<Payment> paymentSQL(@PathVariable("id") Long id) {
if (id == 4) {
throw new RuntimeException("没有该id");
}
return paymentService.paymentSQL(id);
}
}
14 只有fallback配置说明


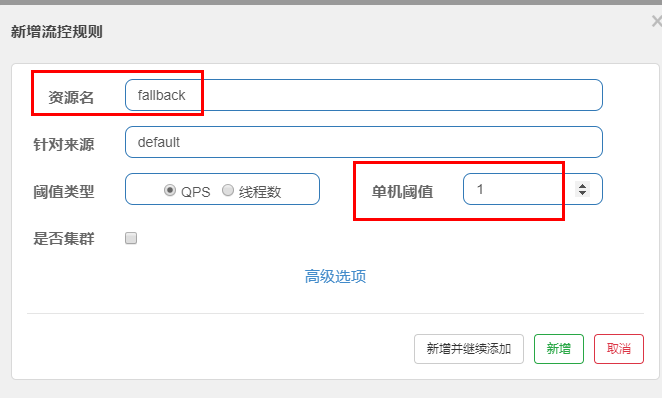
15 只配置blockHandler说明


16 fallback和blockHandler都配置
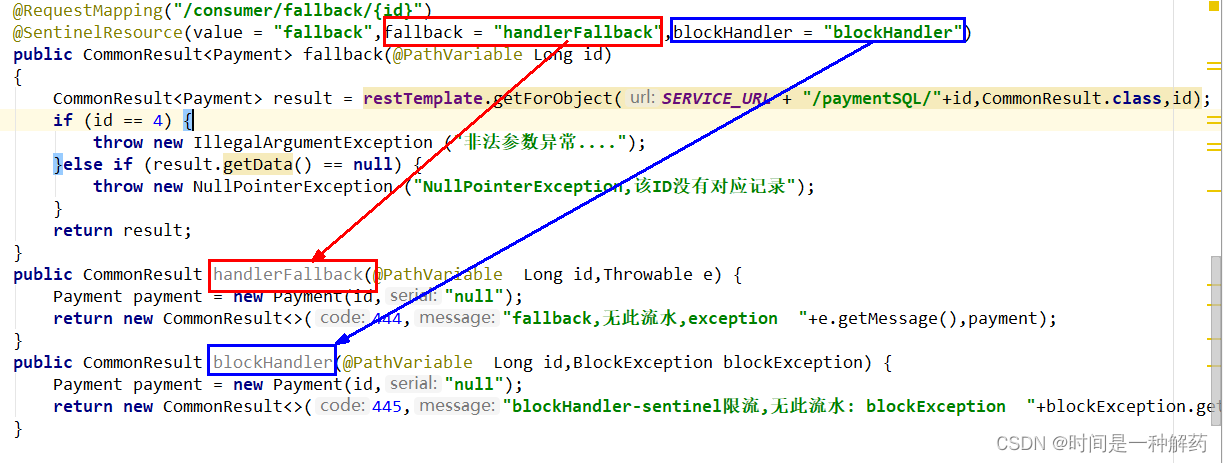

若 blockHandler 和 fallback 都进行了配置,则被限流降级而抛出 BlockException 时只会进入 blockHandler 处理逻辑
17 忽略属性

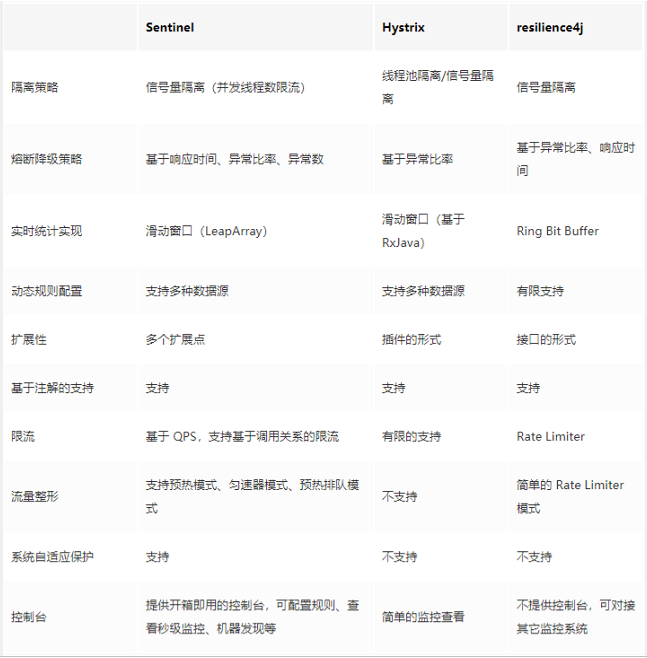
18 熔断框架对比
持久化
1 更改cloudalibaba-sentinel-service8401的pom
<?xml version="1.0" encoding="UTF-8"?>
<project xmlns="http://maven.apache.org/POM/4.0.0"
         xmlns:xsi="http://www.w3.org/2001/XMLSchema-instance"
         xsi:schemaLocation="http://maven.apache.org/POM/4.0.0 http://maven.apache.org/xsd/maven-4.0.0.xsd">
    <parent>
        <artifactId>springcloud2022</artifactId>
        <groupId>com.yg</groupId>
        <version>1.0-SNAPSHOT</version>
    </parent>
    <modelVersion>4.0.0</modelVersion>

    <artifactId>cloudalibaba-sentinel-service8401</artifactId>

    <dependencies>
        <!--SpringCloud ailibaba sentinel-datasource-nacos -->
        <dependency>
            <groupId>com.alibaba.csp</groupId>
            <artifactId>sentinel-datasource-nacos</artifactId>
        </dependency>
        <dependency><!-- 引入自己定义的api通用包,可以使用Payment支付Entity -->
            <groupId>com.yg</groupId>
            <artifactId>cloud-api-commons</artifactId>
            <version>${project.version}</version>
        </dependency>
        <!--SpringCloud ailibaba nacos -->
        <dependency>
            <groupId>com.alibaba.cloud</groupId>
            <artifactId>spring-cloud-starter-alibaba-nacos-discovery</artifactId>
        </dependency>
        <!--SpringCloud ailibaba sentinel-datasource-nacos 后续做持久化用到-->
        <dependency>
            <groupId>com.alibaba.csp</groupId>
            <artifactId>sentinel-datasource-nacos</artifactId>
        </dependency>
        <!--SpringCloud ailibaba sentinel -->
        <dependency>
            <groupId>com.alibaba.cloud</groupId>
            <artifactId>spring-cloud-starter-alibaba-sentinel</artifactId>
        </dependency>
        <!--openfeign-->
        <dependency>
            <groupId>org.springframework.cloud</groupId>
            <artifactId>spring-cloud-starter-openfeign</artifactId>
        </dependency>
        <!-- SpringBoot整合Web组件+actuator -->
        <dependency>
            <groupId>org.springframework.boot</groupId>
            <artifactId>spring-boot-starter-web</artifactId>
        </dependency>
        <dependency>
            <groupId>org.springframework.boot</groupId>
            <artifactId>spring-boot-starter-actuator</artifactId>
        </dependency>
        <!--日常通用jar包配置-->
        <dependency>
            <groupId>org.springframework.boot</groupId>
            <artifactId>spring-boot-devtools</artifactId>
            <scope>runtime</scope>
            <optional>true</optional>
        </dependency>
        <dependency>
            <groupId>cn.hutool</groupId>
            <artifactId>hutool-all</artifactId>
            <version>4.6.3</version>
        </dependency>
        <dependency>
            <groupId>org.projectlombok</groupId>
            <artifactId>lombok</artifactId>
            <optional>true</optional>
        </dependency>
        <dependency>
            <groupId>org.springframework.boot</groupId>
            <artifactId>spring-boot-starter-test</artifactId>
            <scope>test</scope>
        </dependency>
    </dependencies>


</project>
2 更改application
server:
  port: 8401

spring:
  application:
    name: cloudalibaba-sentinel-service
  cloud:
    nacos:
      discovery:
        #Nacos服务注册中心地址
        server-addr: ${REGISTER_HOST:10.10.196.247}:${REGISTER_PORT:8848} #配置Nacos地址
    sentinel:
      transport:
        #配置Sentinel dashboard地址
        dashboard: localhost:8080
        #默认8719端口,假如被占用会自动从8719开始依次+1扫描,直至找到未被占用的端口
        port: 8719
      datasource:
        ds1:
          nacos:
            server-addr: ${REGISTER_HOST:10.10.196.247}:${REGISTER_PORT:8848}
            dataId: cloudalibaba-sentinel-service
            groupId: DEFAULT_GROUP
            data-type: json
            rule-type: flow

management:
  endpoints:
    web:
      exposure:
        include: '*'
3 在nacos上添加配置文件
[
    {
        "resource": "/rateLimit/byUrl",
        "limitApp": "default",
        "grade": 1,
        "count": 1,
        "strategy": 0,
        "controlBehavior": 0,
        "clusterMode": false
    }
]
resource:资源名称;
limitApp:来源应用;
grade:阈值类型,0表示线程数,1表示QPS;
count:单机阈值;
strategy:流控模式,0表示直接,1表示关联,2表示链路;
controlBehavior:流控效果,0表示快速失败,1表示Warm Up,2表示排队等待;
clusterMode:是否集群

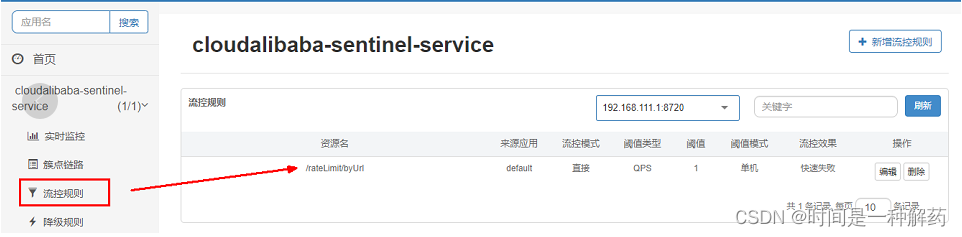
4 启动8401后刷新sentinel发现业务规则有了,注意注意注意:需要调用一次才会显示
SpringCloud无介绍快使用,Seata处理分布式事务(二十五)
SpringCloud无介绍快使用,sentinel服务熔断功能(二十四)
SpringCloud无介绍快使用,sentinel注解@SentinelResource的基本使用(二十三)
SpringCloud无介绍快使用,sentinel热点key限流与系统规则的基本使用(二十二)
SpringCloud无介绍快使用,sentinel熔断降级和限流的基本使用(二十一)
SpringCloud无介绍快使用,Nacos集群和Nginx代理(二十)
SpringCloud无介绍快使用,nacos配置中心的基本使用(十九)
SpringCloud无介绍快使用,nacos注册中心的基本使用(十八)
SpringCloud无介绍快使用,gateway通过微服务名实现动态路由(十七)
SpringCloud无介绍快使用,gateway的基本使用(十六)
SpringCloud无介绍快使用,Ribbon负载均衡工具与OpenFeign的使用(十五)
SpringCloud无介绍快使用,使用Zookeeper替换Eureka服务注册与发现(十四)
SpringCloud无介绍快使用,服务发现Discovery和Eureka自我保护(十三)
SpringCloud无介绍快使用,集群cloud-provider-payment8002搭建(十二)
SpringCloud无介绍快使用,集群Eureka服务注册中心cloud-eureka-server7002搭建(十一)
SpringCloud无介绍快使用,单机Eureka服务注册中心cloud-eureka-server7001搭建(十)
SpringCloud无介绍快使用,新建cloud-api-commons公共模块module(九)
SpringCloud无介绍快使用,新建子module消费者订单模块(八)
SpringCloud无介绍快使用,热部署devtools配置(七)
SpringCloud无介绍快使用,子module提供者支付微服务业务开发(六)
SpringCloud无介绍快使用,新建子module提供者支付微服务yml整合和新建启动类(五)
SpringCloud无介绍快使用,新建子module提供者支付微服务pom整合(四)
SpringCloud无介绍快使用,springcloud父工程pom文件整理(三)
SpringCloud无介绍快使用,IDEA新建springcloud父工程(二)
SpringCloud无介绍快使用,与Spingboot之间的兼容版本选择(一)
作为程序员第 191 篇文章,每次写一句歌词记录一下,看看人生有几首歌的时间,wahahaha … 


 1万+
1万+


 被折叠的 条评论
为什么被折叠?
被折叠的 条评论
为什么被折叠?
 到【灌水乐园】发言


