


一、相关概念
关于这个概念百度一搜一大堆,总而言之就是oracle从10g开始推出的新特性,在管理管理数据文件时,直接跳过操作系统这一层,直接管理数据文件,提高了工作效率,简化了DBA的工作量,同时提供条带化和镜像功能,可以理解为oracle内部的软raid,今天就是为大家介绍如何配置oracle ASM O(∩_∩)O~
-什么是ASMLIB?
asmlib是基于linux module,专门为oracle ASM特性而设计的内核支持库,可以理解为oracle管理磁盘的驱动(个人理解,有可能不准确)。以前配置ASM是可以使用asmlib的,但是。。。
2011年5月,甲骨文发表了一份声明,甲骨文不再提供RHEL6以后任何的asmlib相关更新。。。也就是说,asmlib只能支持到5.9,6以后不能再使用asmlib安装asm了,那么我们怎么办呢?
请看下面的概念解释↓
-什么是udev?
udev是 linux2.6内核里的一个功能,它替代了原有的devfs,成为当前linux默认的设备管理工具。udev以守护进程的形式存在,通过侦听内核发出来的uevent来管理/dev目录下的设备文件。不像之前的设备管理工具,udev在用户空间运行,而不再内核空间运行。
二、试验环境
虚拟机:VMware workstation 12 pro (没有序列号的童鞋可以私聊我)OS: CentOS 6.5
DB: Oracle 11.2.0.4
三、配置udev
为了节省篇幅,创建linux虚机和添加磁盘的过程就不在这里演示了,相信玩过linux的童鞋都知道,不知道的话就百度吧~创建完的磁盘分区之后,在/dev目录下可以看到
[root@asmtest /]# ll /dev/sd*
brw-rw----. 1 root disk 8, 0 Nov 15 02:53 /dev/sda
brw-rw----. 1 root disk 8, 1 Nov 15 02:53 /dev/sda1
brw-rw----. 1 root disk 8, 2 Nov 15 02:53 /dev/sda2
brw-rw----. 1 root disk 8, 3 Nov 15 02:53 /dev/sda3
brw-rw----. 1 root disk 8, 16 Nov 15 02:53 /dev/sdb
brw-rw----. 1 root disk 8, 17 Nov 15 02:53 /dev/sdb1
brw-rw----. 1 root disk 8, 33 Nov 15 02:53 /dev/sdc1
修改虚拟机配置文件
这一步在实际生产环境,物理机或exsi虚拟化是可以省略的,因为workstation的原因,所以增加如下步骤) 
在最后一行添加disk.EnableUUID="TRUE",注意,修改此配置文件时一定要在关机状态修改
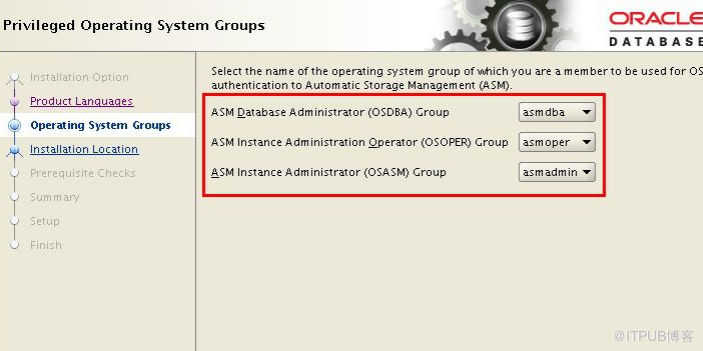
配置用户、组、目录
groupadd oinstall
groupadd dba
groupadd oper
groupadd asmadmin
groupadd asmoper
groupadd asmdba
useradd -g oinstall -G dba,asmdba,oper,asmadmin oracle
useradd -g oinstall -G asmadmin,asmdba,asmoper,dba grid
passwd oracle
passwd grid
--创建目录
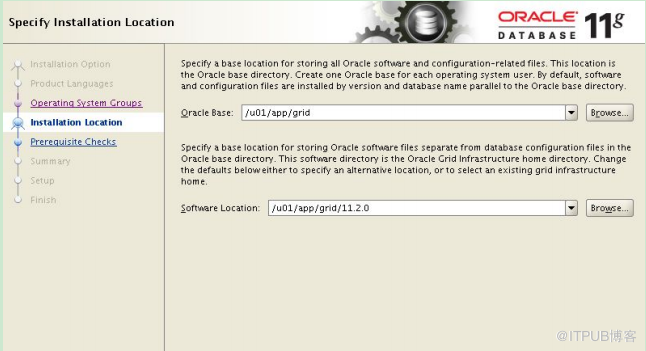
mkdir -p /u01/app/oracle/product/11.2.0/db_1
mkdir -p /u01/app/grid/11.2.0
chown -R oracle.oinstall /u01/app/oracle
chown -R grid.oinstall /u01/app/grid
chmod -R 777 /u01
配置oracle、grid用户环境变量
--修改oracle用户环境变量
ORACLE_SID=tsl
ORACLE_BASE=/u01/app/oracle
ORACLE_HOME=$ORACLE_BASE/product/11.2.0/db_1
LD_LIBRARY_PATH=$ORACLE_HOME/lib:$LD_LIBRARY_PATH
PATH=$ORACLE_HOME/bin:$PATH
DISPLAY=10.10.8.30:0.0
export ORACLE_SID ORACLE_HOME ORACLE_BASE LD_LIBRARY_PATH PATH DISPLAY
stty erase ^h
umask 022
alias sqlplus='rlwrap sqlplus'
alias rman='rlwrap rman'
--修改grid用户环境变量
ORACLE_SID=+ASM
ORACLE_BASE=/u01/app/grid
ORACLE_HOME=/u01/app/grid/11.2.0
LD_LIBRARY_PATH=$ORACLE_HOME/lib:$LD_LIBRARY_PATH
PATH=$ORACLE_HOME/bin:$PATH
DISPLAY=10.10.8.30:0.0
export ORACLE_SID ORACLE_HOME ORACLE_BASE LD_LIBRARY_PATH PATH DISPLAY
stty erase ^h
umask 022
alias sqlplus='rlwrap sqlplus'
alias rman='rlwrap rman'
配置udev
--查询配置信息
[root@asmtest /]# cat /etc/issue
CentOS release 6.5 (Final)
Kernel \r on an \m
[root@asmtest /]# which scsi_id
/sbin/scsi_id
--创建并修改scsi_id.config配置
[root@asmtest /]# vi /etc/scsi_id.config
options=--whitelisted --replace-whitespace
--获取scsi_id
scsi_id --whitelisted --replace-whitespace --device=/dev/sdb
scsi_id --whitelisted --replace-whitespace --device=/dev/sdc
scsi_id --whitelisted --replace-whitespace --device=/dev/sdd
scsi_id --whitelisted --replace-whitespace --device=/dev/sde
--创建修改udev rule规则
[root@asmtest /]# vi /etc/udev/rules.d/99-oracle-asmdevices.rules
KERNEL=="sd*",SUBSYSTEM=="block",PROGRAM=="/sbin/scsi_id --whitelisted --replace-whitespace --device=/dev/$name",RESULT=="36000c2959607dd0d2abb0205c0770feb",NAME="asm-diskb",OWNER="grid",GROUP="asmdba",MODE="0660"
KERNEL=="sd*",SUBSYSTEM=="block",PROGRAM=="/sbin/scsi_id --whitelisted --replace-whitespace --device=/dev/$name",RESULT=="36000c29cf0358cf57bc71c272e7aaafa",NAME="asm-diskc",OWNER="grid",GROUP="asmdba",MODE="0660"
KERNEL=="sd*",SUBSYSTEM=="block",PROGRAM=="/sbin/scsi_id --whitelisted --replace-whitespace --device=/dev/$name",RESULT=="36000c29ab3a775826b86074945f07114",NAME="asm-diskd",OWNER="grid",GROUP="asmdba",MODE="0660"
KERNEL=="sd*",SUBSYSTEM=="block",PROGRAM=="/sbin/scsi_id --whitelisted --replace-whitespace --device=/dev/$name",RESULT=="36000c29b664203120ad96ecedcd1a175",NAME="asm-diske",OWNER="grid",GROUP="asmdba",MODE="0660"
*注意,每个kernel是一行,不能换行
--启动udev
start_udev
[root@asmtest /]# ll /dev/asm*
brw-rw----. 1 grid asmdba 8, 16 Nov 15 08:48 /dev/asm-diskb
brw-rw----. 1 grid asmdba 8, 32 Nov 15 08:48 /dev/asm-diskc
brw-rw----. 1 grid asmdba 8, 48 Nov 15 08:48 /dev/asm-diskd
brw-rw----. 1 grid asmdba 8, 64 Nov 15 08:48 /dev/asm-diske
三、安装grid组件
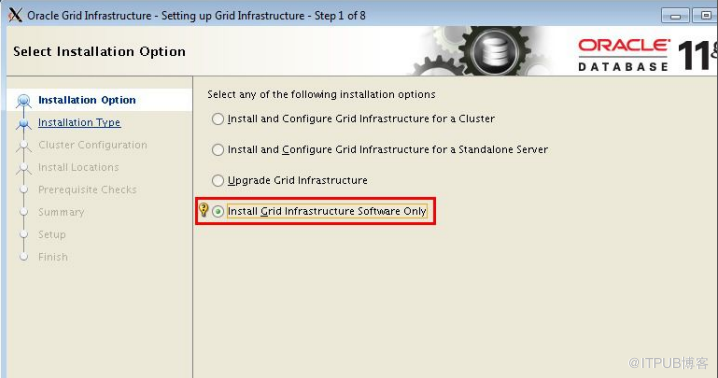

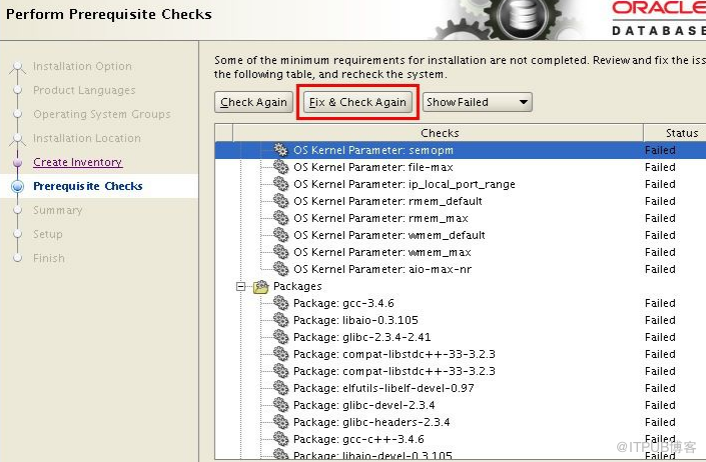
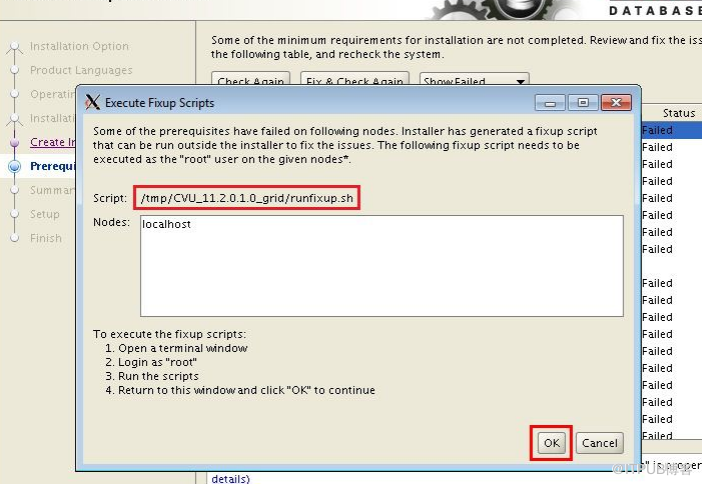

*注:在运行root.sh时会提示单节点要执行命令
To configure Grid Infrastructure for a Stand-Alone Server run the following command as the root user:
/u01/app/grid/11.2.0/perl/bin/perl -I/u01/app/grid/11.2.0/perl/lib -I/u01/app/grid/11.2.0/crs/install /u01/app/grid/11.2.0/crs/install/roothas.pl
这时运行会出现报错:
/u01/app/grid/11.2.0/bin/clscfg.bin: error while loading shared libraries: libcap.so.1: cannot open shared object file: No such file or directory
Failed to create keys in the OLR, rc = 127, Message:
解决报错:
--安装对应包并link文件
yum install -y libcap*.i686
yum install -y libcap*.x86_64
[root@asmtest 11.2.0]# ll /lib64/libcap.so*
lrwxrwxrwx. 1 root root 11 Nov 15 05:11 /lib64/libcap.so -> libcap.so.2
lrwxrwxrwx. 1 root root 14 Nov 15 01:20 /lib64/libcap.so.2 -> libcap.so.2.16
-rwxr-xr-x. 1 root root 19016 Dec 7 2011 /lib64/libcap.so.2.16
[root@asmtest 11.2.0]# ln -s /lib64/libcap.so.2.16 /lib64/libcap.so.1
[root@asmtest 11.2.0]# ln -s /lib64/libcap.so.2 /lib64/libcap.so
ln: creating symbolic link `/lib64/libcap.so': File exists
[root@asmtest 11.2.0]# ll /lib64/libcap.so*
lrwxrwxrwx. 1 root root 11 Nov 15 05:11 /lib64/libcap.so -> libcap.so.2
lrwxrwxrwx. 1 root root 21 Nov 15 05:13 /lib64/libcap.so.1 -> /lib64/libcap.so.2.16
lrwxrwxrwx. 1 root root 14 Nov 15 01:20 /lib64/libcap.so.2 -> libcap.so.2.16
-rwxr-xr-x. 1 root root 19016 Dec 7 2011 /lib64/libcap.so.2.16
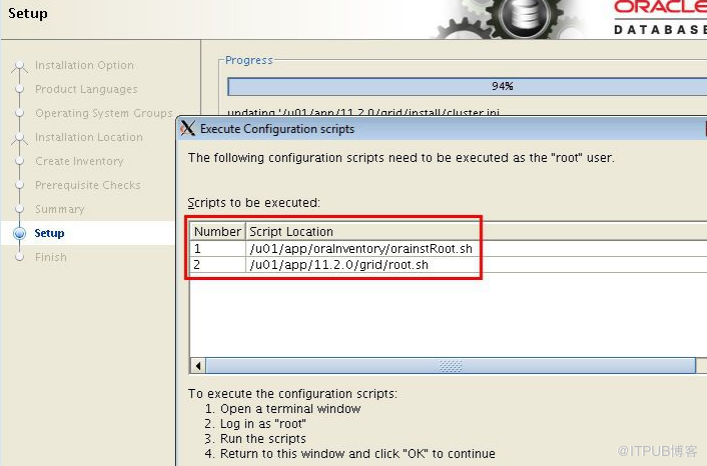
--重新执行root.sh
[root@asmtest 11.2.0]# /u01/app/grid/11.2.0/root.sh
Performing root user operation for Oracle 11g
The following environment variables are set as:
ORACLE_OWNER= grid
ORACLE_HOME= /u01/app/grid/11.2.0
Enter the full pathname of the local bin directory: [/usr/local/bin]:
The contents of "dbhome" have not changed. No need to overwrite.
The contents of "oraenv" have not changed. No need to overwrite.
The contents of "coraenv" have not changed. No need to overwrite.
Entries will be added to the /etc/oratab file as needed by
Database Configuration Assistant when a database is created
Finished running generic part of root script.
Now product-specific root actions will be performed.
To configure Grid Infrastructure for a Stand-Alone Server run the following command as the root user:
/u01/app/grid/11.2.0/perl/bin/perl -I/u01/app/grid/11.2.0/perl/lib -I/u01/app/grid/11.2.0/crs/install /u01/app/grid/11.2.0/crs/install/roothas.pl
To configure Grid Infrastructure for a Cluster execute the following command:
/u01/app/grid/11.2.0/crs/config/config.sh
This command launches the Grid Infrastructure Configuration Wizard. The wizard also supports silent operation, and the parameters can be passed through the response file that is available in the installation media.
[root@asmtest 11.2.0]# /u01/app/grid/11.2.0/perl/bin/perl -I/u01/app/grid/11.2.0/perl/lib -I/u01/app/grid/11.2.0/crs/install /u01/app/grid/11.2.0/crs/install/roothas.pl
Using configuration parameter file: /u01/app/grid/11.2.0/crs/install/crsconfig_params
User ignored Prerequisites during installation
Improper Oracle Grid Infrastructure configuration found on this host
Deconfigure the existing cluster configuration before starting --报错
to configure a new Grid Infrastructure
run '/u01/app/grid/11.2.0/crs/install/roothas.pl -deconfig'
to configure existing failed configuration and then rerun root.sh
--去掉集群配置
[root@asmtest 11.2.0]# /u01/app/grid/11.2.0/crs/install/roothas.pl -verbose -deconfig -force
Using configuration parameter file: /u01/app/grid/11.2.0/crs/install/crsconfig_params
CRS-4639: Could not contact Oracle High Availability Services
CRS-4000: Command Stop failed, or completed with errors.
CRS-4639: Could not contact Oracle High Availability Services
CRS-4000: Command Delete failed, or completed with errors.
CRS-4544: Unable to connect to OHAS
CRS-4000: Command Stop failed, or completed with errors.
Failure in execution (rc=-1, 0, No such file or directory) for command /etc/init.d/ohasd deinstall
Successfully deconfigured Oracle Restart stack
--重新执行root.sh
[root@asmtest 11.2.0]# ./root.sh
Performing root user operation for Oracle 11g
The following environment variables are set as:
ORACLE_OWNER= grid
ORACLE_HOME= /u01/app/grid/11.2.0
Enter the full pathname of the local bin directory: [/usr/local/bin]:
The contents of "dbhome" have not changed. No need to overwrite.
The contents of "oraenv" have not changed. No need to overwrite.
The contents of "coraenv" have not changed. No need to overwrite.
Entries will be added to the /etc/oratab file as needed by
Database Configuration Assistant when a database is created
Finished running generic part of root script.
Now product-specific root actions will be performed.
To configure Grid Infrastructure for a Stand-Alone Server run the following command as the root user:
/u01/app/grid/11.2.0/perl/bin/perl -I/u01/app/grid/11.2.0/perl/lib -I/u01/app/grid/11.2.0/crs/install /u01/app/grid/11.2.0/crs/install/roothas.pl
To configure Grid Infrastructure for a Cluster execute the following command:
/u01/app/grid/11.2.0/crs/config/config.sh
This command launches the Grid Infrastructure Configuration Wizard. The wizard also supports silent operation, and the parameters can be passed through the response file that is available in the installation media.
--重新运行上面黑体脚本
[root@asmtest 11.2.0]# /u01/app/grid/11.2.0/perl/bin/perl -I/u01/app/grid/11.2.0/perl/lib -I/u01/app/grid/11.2.0/crs/install /u01/app/grid/11.2.0/crs/install/roothas.pl
Using configuration parameter file: /u01/app/grid/11.2.0/crs/install/crsconfig_params
User ignored Prerequisites during installation
LOCAL ADD MODE
Creating OCR keys for user 'grid', privgrp 'oinstall'..
Operation successful.
LOCAL ONLY MODE
Successfully accumulated necessary OCR keys.
Creating OCR keys for user 'root', privgrp 'root'..
Operation successful.
CRS-4664: Node asmtest successfully pinned.
Adding Clusterware entries to upstart
asmtest 2016/11/15 05:24:51 /u01/app/grid/11.2.0/cdata/asmtest/backup_20161115_052451.olr
Successfully configured Oracle Grid Infrastructure for a Standalone Server --提示成功配置grid,表示grid安装完成
使用asmca创建磁盘组
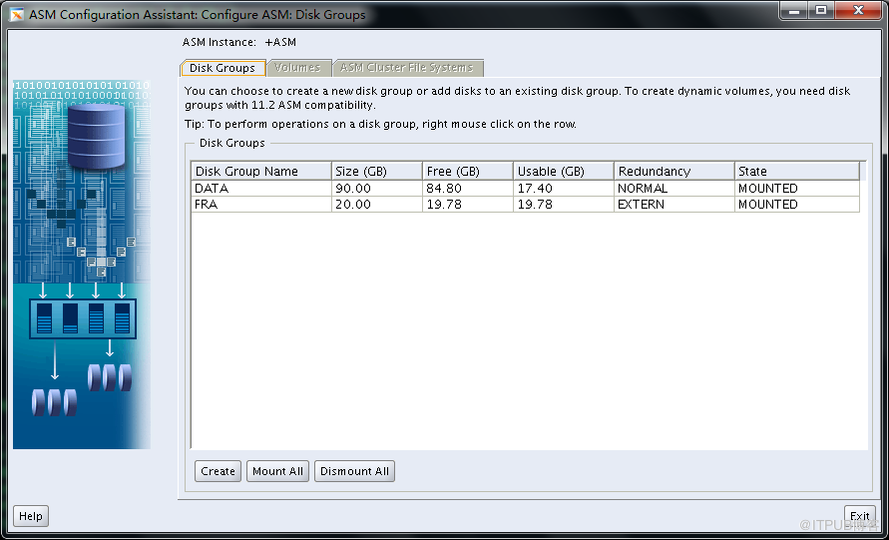

至此,ASM核心组件都已安装完成,接下来可以安装oracle数据库软件了,软件安装部分就是通用的安装方法,有机会我会单独介绍O(∩_∩)O哈哈~
第一次发博客好紧张,大家多多批评指正!
来自 “ ITPUB博客 ” ,链接:http://blog.itpub.net/24862754/viewspace-2129751/,如需转载,请注明出处,否则将追究法律责任。
转载于:http://blog.itpub.net/24862754/viewspace-2129751/


 5244
5244

 被折叠的 条评论
为什么被折叠?
被折叠的 条评论
为什么被折叠?
 到【灌水乐园】发言


