


node.js与前端交互
Note: uBlock Origin blocks the images on this post, because they have the
analyticsword in the path. So make sure you disable it for this page, to see the images 🖼注意:uBlock Origin会阻止此帖子中的图像,因为它们的路径中包含
analytics字。 因此,请确保在此页面上将其禁用,以查看图像🖼
In this post I’m going to show some examples of using the Google Analytics API with Node.js.
在这篇文章中,我将展示一些将Google Analytics(分析)API与Node.js一起使用的示例。
Get the number of today sessions coming from organic sources (Search Engines)
Google offers a great npm package: googleapis. We’re going to use that as the base building block of our API interaction.
Google提供了一个很棒的npm软件包: googleapis 。 我们将使用它作为API交互的基础。
Authentication is a big part of interacting with an API. Check out this post on how to authenticate to the Google APIs. In this article I’m going to assume you read that, and you know how to perform a JWT authentication.
身份验证是与API交互的重要组成部分。 查看有关如何对Google API进行身份验证的文章。 在本文中,我将假定您已阅读该书,并且您知道如何执行JWT身份验证。
环境变量 (Environment variables)
Once you download the JSON Key file from Google, put the client_email and private_key values as environment variables, so that they will be accessible through
从Google下载JSON密钥文件后,请将client_email和private_key值作为环境变量,以便可以通过以下方式访问它们
process.env.CLIENT_EMAILprocess.env.CLIENT_EMAILprocess.env.PRIVATE_KEYprocess.env.PRIVATE_KEY
将用户添加到Google Analytics(分析) (Add the user to Google Analytics)
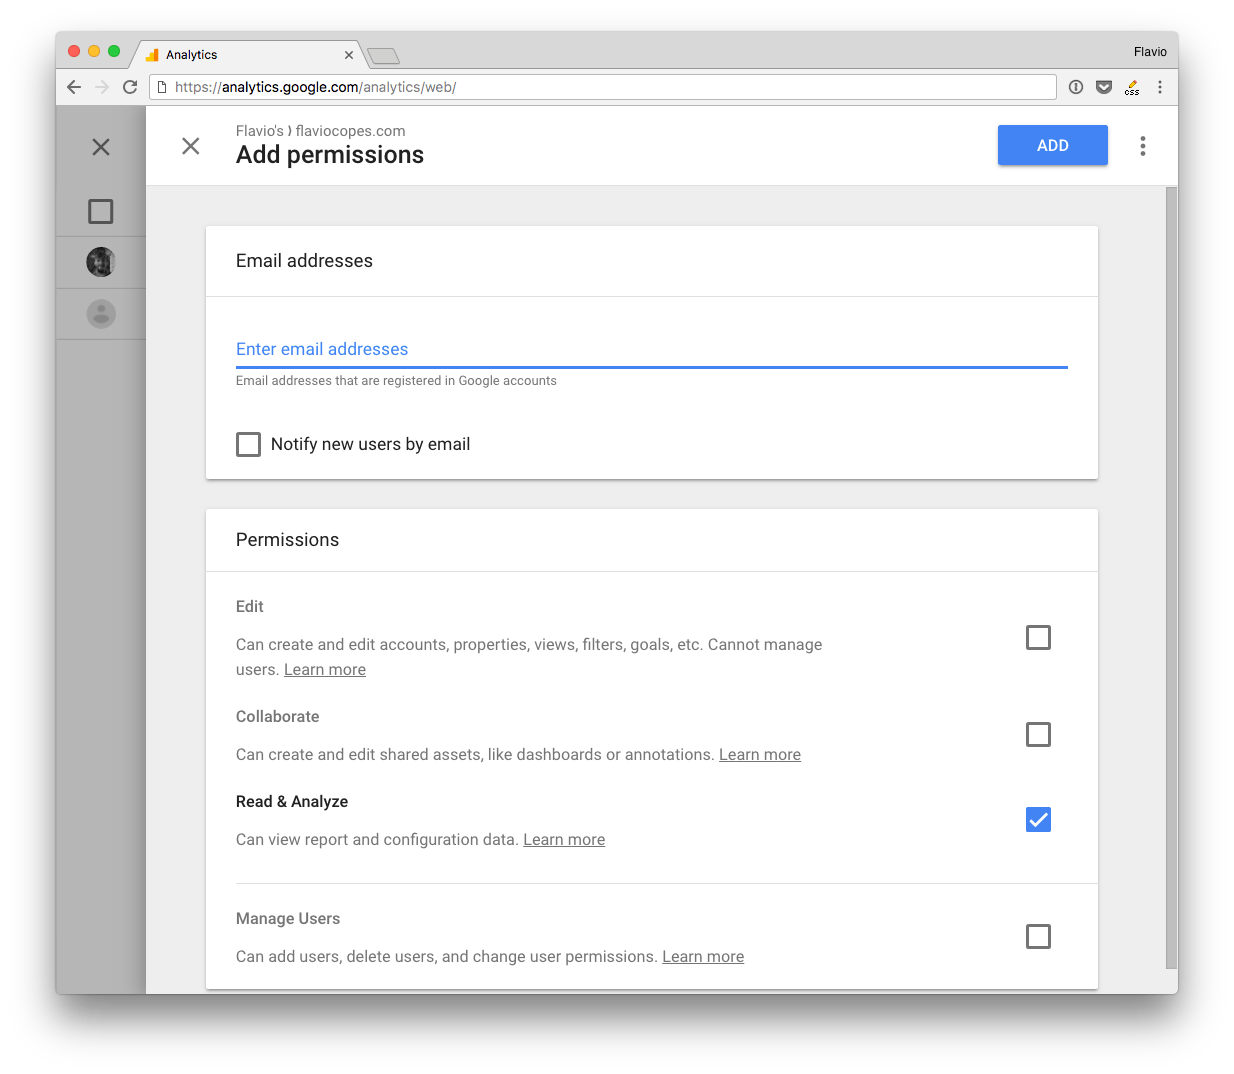
Since we’re using the Service to Service API in these examples, you need to add the client_email value to your Google Analytics profile. Go to the Admin panel and click User Management, either on a property or on a view.
由于在这些示例中使用的是Service to Service API,因此您需要将client_email值添加到您的Google Analytics(分析)配置文件中。 转到管理面板,然后在属性或视图上单击“ 用户管理” 。

And add the email you found in the client_email key in the JSON file:
并在JSON文件的client_email键中添加找到的电子邮件:
导入Google库 (Import the Google library)
const { google } = require('googleapis')Remember the {} around the google object, as we need to destructure it from the googleapis library (otherwise we’d need to call google.google and it’s ugly)
请记住google对象周围的{} ,因为我们需要将其从googleapis库中解构(否则,我们需要调用google.google ,这很丑陋)
定义范围 (Define the scope)
This line sets the scope:
此行设置范围:
const scopes = 'https://www.googleapis.com/auth/analytics.readonly'Google Analytics API defines several scopes:
Google Analytics API定义了几个范围:
https://www.googleapis.com/auth/analytics.readonlyto view the datahttps://www.googleapis.com/auth/analytics.readonly以查看数据https://www.googleapis.com/auth/analyticsto view and manage the datahttps://www.googleapis.com/auth/analytics来查看和管理数据https://www.googleapis.com/auth/analytics.editto edit the management entitieshttps://www.googleapis.com/auth/analytics.edit编辑管理实体https://www.googleapis.com/auth/analytics.manage.usersto manage the account users and permissionshttps://www.googleapis.com/auth/analytics.manage.users以管理帐户用户和权限https://www.googleapis.com/auth/analytics.manage.users.readonlyto view the users and their permissionshttps://www.googleapis.com/auth/analytics.manage.users.readonly以查看用户及其权限https://www.googleapis.com/auth/analytics.provisionto create new Google Analytics accountshttps://www.googleapis.com/auth/analytics.provision以创建新的Google Analytics(分析)帐户
You should always pick the scope that grants the least amount of power.
您应该始终选择能提供最少电量的示波器。
Since we want to only view the reports now, we pick https://www.googleapis.com/auth/analytics.readonly instead of https://www.googleapis.com/auth/analytics.
由于我们现在只想查看报告,因此我们选择https://www.googleapis.com/auth/analytics.readonly而不是https://www.googleapis.com/auth/analytics 。
Google Analytics Reporting API (The Google Analytics Reporting API)
Note: you can also use the Google Analytics Reporting API to access those permissions.
注意:您还可以使用Google Analytics(分析)Reporting API来访问这些权限。
It is a trimmed-down version of the Google Analytics API, offering just the scope https://www.googleapis.com/auth/analytics.readonly and https://www.googleapis.com/auth/analytics.
它是Google Analytics(分析)API的精简版,仅提供范围https://www.googleapis.com/auth/analytics.readonly和https://www.googleapis.com/auth/analytics 。
The API is slightly different than the Analytics API however in how it’s used and in which methods it exposes, so we’ll skip that.
该API与Analytics API稍有不同,但是使用方式和公开的方法不同,因此我们将跳过。
创建JWT (Create the JWT)
const jwt = new google.auth.JWT(process.env.CLIENT_EMAIL, null, process.env.PRIVATE_KEY, scopes)执行请求 (Perform a request)
Check this code:
检查此代码:
const { google } = require('googleapis')
const scopes = 'https://www.googleapis.com/auth/analytics.readonly'
const jwt = new google.auth.JWT(process.env.CLIENT_EMAIL, null, process.env.PRIVATE_KEY, scopes)

const view_id = 'XXXXX'

async function getData() {
  const response = await jwt.authorize()
  const result = await google.analytics('v3').data.ga.get({
    'auth': jwt,
    'ids': 'ga:' + view_id,
    'start-date': '30daysAgo',
    'end-date': 'today',
    'metrics': 'ga:pageviews'
  })

  console.dir(result)
}

getData()
It performs a request to the Google Analytics API to fetch the pageviews number in the last 30 days.
它会向Google Analytics(分析)API发出请求,以获取最近30天的综合浏览量 。
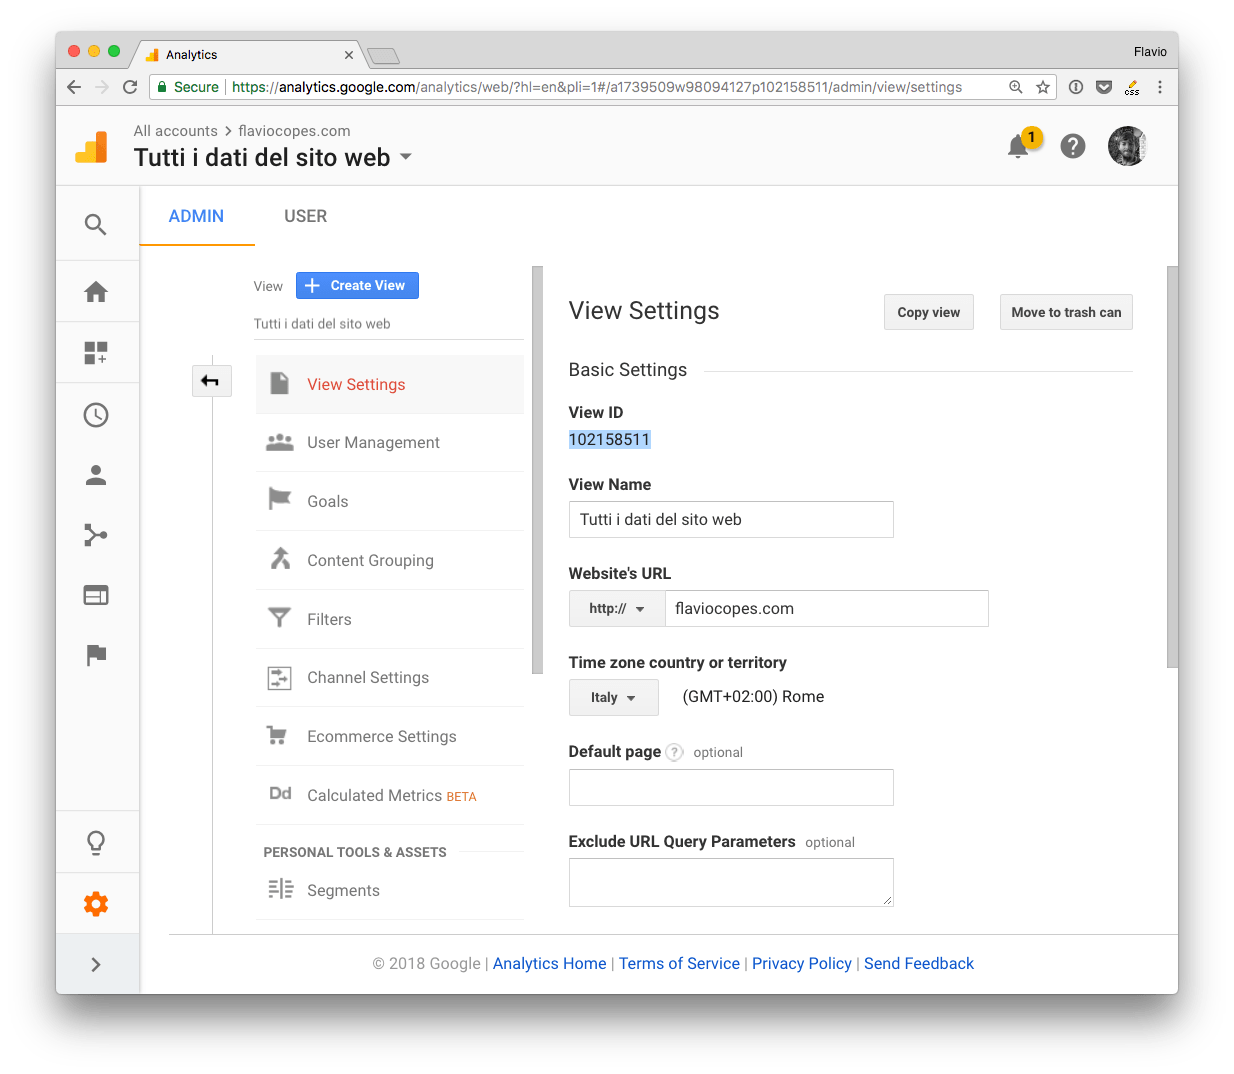
view_id contains the ID of the view. Not your Google Analytics code, but the view ID. You can get that from the admin panel, by clicking View Settings on the view you want to access:
view_id包含视图的ID。 不是您的Google Analytics(分析)代码,而是视图ID。 您可以通过在管理面板上单击要访问的视图上的“视图设置”来获取该视图:
You pass this object to the request:
您将此对象传递给请求:
{
  'auth': jwt,
  'ids': 'ga:' + view_id,
  'start-date': '30daysAgo',
  'end-date': 'today',
  'metrics': 'ga:pageviews'
}
In addition to the jwt object and the view id, we have 3 parameters.
除了jwt对象和视图ID,我们还有3个参数。
metrics: tells the API what we want to getmetrics:告诉API 我们想要得到什么start-date: defines the starting date for the reportstart-date:定义报告的开始日期end-date: defines the end date for the reportend-date:定义报告的结束日期
This request is very simple and returns the number of pageviews occurring in the specified time period.
该请求非常简单,它返回指定时间段内发生的综合浏览量。
The returned result will be something like:
返回的结果将类似于:
{
  status: 200,
  statusText: 'OK',
  headers: {...},
  config: {...},
  request: {...},
  data: {
    kind: 'analytics#gaData',
    id: 'https://www.googleapis.com/analytics/v3/data/ga?ids=ga:XXXXXXXXXXXXXXXXXX&metrics=ga:pageviews&start-date=30daysAgo&end-date=today',
    query:  {
      'start-date': '30daysAgo',
      'end-date': 'today',
      ids: 'ga:XXXXXXXXXXXXXXXXXX',
      metrics: [ 'ga:pageviews' ],
      'start-index': 1,
      'max-results': 1000
    },
    itemsPerPage: 1000,
    totalResults: 1,
    selfLink: 'https://www.googleapis.com/analytics/v3/data/ga?ids=ga:XXXXXXXXXXXXXXXXXX&metrics=ga:pageviews&start-date=30daysAgo&end-date=today',
    profileInfo: {
      profileId: 'XXXXXXXXXXXXXXXXXX',
      accountId: 'XXXXXXXXXXXXXXXXXX',
      webPropertyId: 'UA-XXXXXXXXXXX--XX',
      internalWebPropertyId: 'XXXXXXXXXXXXXXXXXX',
      profileName: 'XXXXXXXXXXXXXXXXXX',
      tableId: 'ga:XXXXXXXXXXXXXXXXXX'
    },
    containsSampledData: false,
    columnHeaders: [
      {
        name: 'ga:pageviews',
        columnType: 'METRIC',
        dataType: 'INTEGER'
      }
    ],
    totalsForAllResults: { 'ga:pageviews': '3000' },
    rows: [ [ '114426' ] ] }
}
With this You can access the pageviews count in response.data.rows[0][0].
有了这个,您可以访问response.data.rows[0][0]的综合浏览量。
指标 (Metrics)
This example was simple. We just asked for this data:
这个例子很简单。 我们只是要求提供以下数据:
{
  'start-date': '30daysAgo',
  'end-date': 'today',
  'metrics': 'ga:pageviews'
}
There is a whole lot of data we can use.
我们可以使用大量数据。
The Dimensions & Metrics Explorer is an awesome tool to discover all the options.
Dimensions&Metrics Explorer是一个很棒的工具,可以发现所有选项。
Those terms are two concepts of Google Analytics.
这些术语是Google Analytics(分析)的两个概念。
Dimensions are attributes, like City, Country or Page, the referral path or the session duration.
维度是属性,例如城市,国家或页面,引荐路径或会话持续时间。
Metrics are quantitative measurements, like the number of users or the number of sessions.
指标是定量指标 ,例如用户数或会话数。
Some examples of metrics:
指标的一些示例:
get the pageviews
ga:pageviews获得综合浏览量
ga:pageviewsget the unique users
ga:users获得唯一用户
ga:usersget the sessions
ga:sessions获取会话
ga:sessionsget the organic searches
ga:organicSearches获得
ga:organicSearches搜索ga:organicSearches
Let’s build some examples with those metrics.
让我们用这些指标构建一些示例。
通用代码 (Common code)
Here is the common code used in the examples below. Put the snippet in the authorize() callback.
这是下面示例中使用的通用代码。 将代码段放入authorize()回调中。
'use strict'

const { google } = require('googleapis')

const scopes = 'https://www.googleapis.com/auth/analytics.readonly'
const jwt = new google.auth.JWT(process.env.CLIENT_EMAIL, null, process.env.PRIVATE_KEY, scopes)

async function getData() {
  const defaults = {
    'auth': jwt,
    'ids': 'ga:' + process.env.VIEW_ID,
  }
  const response = await jwt.authorize()

  /* custom code goes here, using `response` */
}

getData()
The defaults object will be reused in the examples using the spread operator, which is a handy way of handling defaults values in JavaScript.
默认值对象将在示例中使用Spread运算符重用,这是在JavaScript中处理默认值的便捷方法。
获取今天的会议数量 (Get the number of today sessions)
const result = await google.analytics('v3').data.ga.get({
  ...defaults,
  'start-date': 'today',
  'end-date': 'today',
  'metrics': 'ga:sessions'
})

console.dir(result.data.rows[0][0])
获取来自自然资源(搜索引擎)的今日会话数 (Get the number of today sessions coming from organic sources (Search Engines))
Add the filters property:
添加filters属性:
const result = await google.analytics('v3').data.ga.get({
  ...defaults,
  'start-date': 'today',
  'end-date': 'today',
  'metrics': 'ga:sessions',
  'filters': 'ga:medium==organic',
})
获取昨天的会议次数 (Get the number of yesterday sessions)
const result = await google.analytics('v3').data.ga.get({
  ...defaults,
  'start-date': 'yesterday',
  'end-date': 'yesterday',
  'metrics': 'ga:sessions'
})

console.dir(result.data.rows[0][0])
获取最近30天内的会话数 (Get the number of sessions in the last 30 days)
const result = await google.analytics('v3').data.ga.get({
  ...defaults,
  'start-date': '30daysAgo',
  'end-date': 'today',
  'metrics': 'ga:sessions'
})

console.dir(result.data.rows[0][0])
获取最近30天内使用的浏览器 (Get the browsers used in the last 30 days)
const result = await google.analytics('v3').data.ga.get({
  ...defaults,
  'start-date': '30daysAgo',
  'end-date': 'today',
  'dimensions': 'ga:browser',
  'metrics': 'ga:sessions'
})

console.dir(result.data.rows.sort((a, b) => b[1] - a[1]))
[
[ 'Chrome', '994' ],
[ 'Safari', '548' ],
[ 'Firefox', '442' ],
[ 'Android Webview', '113' ],
[ 'Opera', '56' ],
[ 'Safari (in-app)', '41' ],
[ 'Edge', '36' ],
[ 'Internet Explorer', '4' ]
]获取使用Chrome浏览器的访客数量 (Get the number of visitors using Chrome)
const result = await google.analytics('v3').data.ga.get({
  ...defaults,
  'start-date': '30daysAgo',
  'end-date': 'today',
  'dimensions': 'ga:browser',
  'metrics': 'ga:sessions',
  'filters': 'ga:browser==Chrome',
})

console.dir(result.data.rows[0][1])
按流量来源获取会话 (Get the sessions by traffic source)
const result = await google.analytics('v3').data.ga.get({
  ...defaults,
  'start-date': '30daysAgo',
  'end-date': 'today',
  'dimensions': 'ga:source',
  'metrics': 'ga:sessions'
})

console.dir(result.data.rows.sort((a, b) => b[1] - a[1]))
[
[ 'google', '1343' ],
[ '(direct)', '731' ],
[ 'medium.com', '624' ],
[ 't.co', '987' ],
[ 'reddit.com', '65' ]
]Google Analytics Real Time API (The Google Analytics Real Time API)
The Google Analytics Real Time API is [May 2018] in private beta, and it’s not publicly accessible. Check this page.
Google Analytics(分析)实时API于[测试版]于2018年5月发布,并且无法公开访问。 检查此页面 。
node.js与前端交互


 被折叠的 条评论
为什么被折叠?
被折叠的 条评论
为什么被折叠?
 到【灌水乐园】发言


