


git可视化工具使用
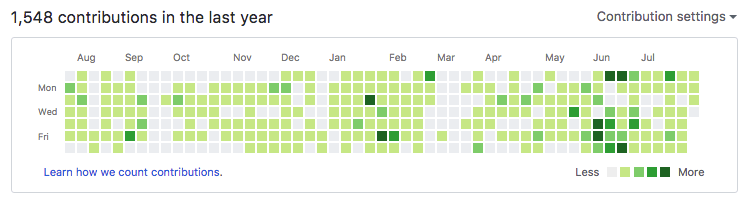
A few years ago I built an Electron + Meteor.js + gitlog desktop app that scanned my local Git repositories and provided me a nice contributions graph, like the one shown on GitHub.com:
几年前,我构建了一个Electron + Meteor.js + gitlog桌面应用程序,该应用程序扫描了我的本地Git存储库,并为我提供了一个不错的贡献图,例如GitHub.com上显示的图:
That was before every single app used Electron, and I really disliked this approach due to the generated app size, 50x bigger if compared to the WebKit-based MacGap. Anyway, it looked like this, with a GitHubbish UI:
那是在每个应用程序都使用Electron之前,我真的不喜欢这种方法,因为生成的应用程序大小比基于WebKit的MacGap大50倍。 无论如何,它看起来像这样,并带有GitHubbish UI:

I found it useful because not all my projects were (are) on GitHub, some are on BitBucket or GitLab, but all the code I work on is on my laptop, so that’s the “single source of truth” when it comes to contributions.
我发现它很有用,因为不是我的所有项目都在GitHub上,有些不在BitBucket或GitLab上,但是我从事的所有代码都在笔记本电脑上,所以这是贡献的“唯一真相”。
The app still runs, but it’s unreleased to the general public.
该应用程序仍在运行,但尚未向公众发布。
Today I decided to port this as a Go console command, since I still find the concept nice.
今天,我决定将其移植为Go控制台命令 ,因为我仍然觉得这个概念不错。
我将在本文中构建的内容🎉 (What I’m going to build in this article 🎉)
A CLI command that generates a graph similar to
生成类似于以下内容的图形的CLI命令

在哪里可以找到此代码 (Where to find this code)
The code is on this Gist: https://gist.github.com/flaviocopes/bf2f982ee8f2ae3f455b06c7b2b03695
代码在此要点上: https : //gist.github.com/flaviocopes/bf2f982ee8f2ae3f455b06c7b2b03695
第一步 (First steps)
I divided the task in 2 parts:
我将任务分为两部分:
- Acquire a list of folders to scan 获取要扫描的文件夹列表
- Generate the stats 生成统计
I’ll make a single command do both, using Go command line flags parsing. When passing the -add flag, the command will add a folder to the list. Using the command without flags will generate the graph. I’ll limit the dataset timeframe to the last 6 months, to avoid dumping too much data all at once to the user.
我将使用Go命令行标志解析来使单个命令同时执行这两个操作。 传递-add标志时,该命令会将文件夹添加到列表中。 使用不带标志的命令将生成图形。 我将数据集的时间范围限制为最近6个月,以避免将太多数据一次全部转储给用户。
Let’s write a simple skeleton for this separation of concerns:
让我们为关注点分离写一个简单的框架:
package main

import (
    "flag"
)

// scan given a path crawls it and its subfolders
// searching for Git repositories
func scan(path string) {
    print("scan")
}

// stats generates a nice graph of your Git contributions
func stats(email string) {
    print("stats")
}

func main() {
    var folder string
    var email string
    flag.StringVar(&folder, "add", "", "add a new folder to scan for Git repositories")
    flag.StringVar(&email, "email", "your@email.com", "the email to scan")
    flag.Parse()

    if folder != "" {
        scan(folder)
        return
    }

    stats(email)
}
第1部分:获取要扫描的文件夹列表 (Part 1: Acquire a list of folders to scan)
The algorithm I’ll follow for this first part is pretty simple:
我将在第一部分中遵循的算法非常简单:
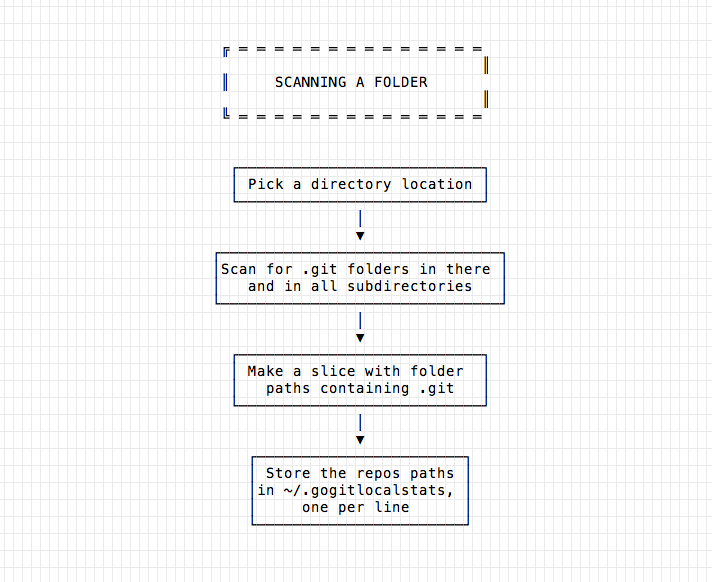
This part of the program is divided in 2 subparts. In the first, I’ll scan the folder passed as argument recursively in search for repositories. I’ll store a list of repositories folders in a file stored in the home directory, called .gogitlocalstats.
程序的这一部分分为2个子部分。 首先,我将以递归方式扫描作为参数传递的文件夹,以搜索存储库。 我将存储库文件夹列表存储在主目录(称为.gogitlocalstats中的文件中。
Let’s see how scan() can be filled. It’s basically 3 lines of code, beside some output generation:
让我们看看如何填充scan()。 除了一些输出生成外,基本上是三行代码:
// scan scans a new folder for Git repositories
func scan(folder string) {
    fmt.Printf("Found folders:\n\n")
    repositories := recursiveScanFolder(folder)
    filePath := getDotFilePath()
    addNewSliceElementsToFile(filePath, repositories)
    fmt.Printf("\n\nSuccessfully added\n\n")
}
This is the workflow:
这是工作流程:
we get a slice of strings from
recursiveScanFolder()我们从
recursiveScanFolder()获得了一部分字符串- we get the path of the dot file we’re going to write to. 我们得到将要写入的点文件的路径。
- we write the slice contents to the file 我们将切片内容写入文件
Let’s start by examining 1), scanning the folder. I wrote a detailed tutorial on how to scan a folder with Go if you want to learn more about the various options available. I’m not going to use filepath.Walk because it would go into every single folder. With ioutil.Readdir we have more control. I’ll skip vendor and node_modules folders, which can contain a huge amount of folders which I’m not interested in, and I’ll also skip .git folders, but when I find one, I add it to my slice:
首先检查1),扫描文件夹。 如果您想了解更多有关各种可用选项的信息,我写了一篇详细的教程,介绍如何使用Go扫描文件夹 。 我不会使用filepath.Walk因为它将进入每个文件夹。 有了ioutil.Readdir我们有了更多的控制权。 我将跳过vendor和node_modules文件夹,其中可能包含大量我不感兴趣的文件夹,我还将跳过.git文件夹,但是当我找到一个时,将其添加到我的片中:
// scanGitFolders returns a list of subfolders of `folder` ending with `.git`.
// Returns the base folder of the repo, the .git folder parent.
// Recursively searches in the subfolders by passing an existing `folders` slice.
func scanGitFolders(folders []string, folder string) []string {
    // trim the last `/`
    folder = strings.TrimSuffix(folder, "/")

    f, err := os.Open(folder)
    if err != nil {
        log.Fatal(err)
    }
    files, err := f.Readdir(-1)
    f.Close()
    if err != nil {
        log.Fatal(err)
    }

    var path string

    for _, file := range files {
        if file.IsDir() {
            path = folder + "/" + file.Name()
            if file.Name() == ".git" {
                path = strings.TrimSuffix(path, "/.git")
                fmt.Println(path)
                folders = append(folders, path)
                continue
            }
            if file.Name() == "vendor" || file.Name() == "node_modules" {
                continue
            }
            folders = scanGitFolders(folders, path)
        }
    }

    return folders
}
It explicitly avoids going into folders called vendor or node_modules since those folders can be huge and usually you don’t put your Git repositories in there, we can safely ignore them.
它明确地避免进入名为vendor或node_modules的文件夹,因为这些文件夹可能很大,并且通常您不将Git存储库放在其中,我们可以放心地忽略它们。
As you can see this is a recursive function, and it’s started by this other function, which passes it an empty slice of strings, to start with:
如您所见,这是一个递归函数,它是由另一个函数启动的,该函数向其传递一个空字符串片,以以下内容开头:
// recursiveScanFolder starts the recursive search of git repositories
// living in the `folder` subtree
func recursiveScanFolder(folder string) []string {
    return scanGitFolders(make([]string, 0), folder)
}
Part 2) of the workflow is getting the path of the dotfile containing our database of repos paths:
工作流的第2部分)获取包含我们的回购路径数据库的点文件路径:
// getDotFilePath returns the dot file for the repos list.
// Creates it and the enclosing folder if it does not exist.
func getDotFilePath() string {
    usr, err := user.Current()
    if err != nil {
        log.Fatal(err)
    }

    dotFile := usr.HomeDir + "/.gogitlocalstats"

    return dotFile
}
This function uses the os/user package’s Current function to get the current user, which is a struct defined as
此函数使用os/user软件包的Current函数获取当前用户,该用户结构定义为
// User represents a user account.
type User struct {
    // Uid is the user ID.
    // On POSIX systems, this is a decimal number representing the uid.
    // On Windows, this is a security identifier (SID) in a string format.
    // On Plan 9, this is the contents of /dev/user.
    Uid string
    // Gid is the primary group ID.
    // On POSIX systems, this is a decimal number representing the gid.
    // On Windows, this is a SID in a string format.
    // On Plan 9, this is the contents of /dev/user.
    Gid string
    // Username is the login name.
    Username string
    // Name is the user's real or display name.
    // It might be blank.
    // On POSIX systems, this is the first (or only) entry in the GECOS field
    // list.
    // On Windows, this is the user's display name.
    // On Plan 9, this is the contents of /dev/user.
    Name string
    // HomeDir is the path to the user's home directory (if they have one).
    HomeDir string
}
We’re interested in the HomeDir property to get the full path to our dotfile:
我们对HomeDir属性感兴趣,以获取我们的点文件的完整路径:
dotFile := usr.HomeDir + "/.gogitlocalstats"So, now we have a list of repos, a file to write them to, and the next step for scan() is to store them, without adding duplicate lines.
因此,现在我们有了一个存储库列表,一个将它们写入的文件,而scan()的下一步是存储它们,而不添加重复的行。
The process is
这个过程是
- parse the existing repos stored in the file to a slice 将文件中存储的现有存储库解析为切片
- add the new items to the slice, without adding duplicates 将新项目添加到切片中,而不添加重复项
- store the slice to the file, overwriting the existing content 将切片存储到文件中,覆盖现有内容
This is the job of addNewSliceElementsToFile():
这是addNewSliceElementsToFile()的工作:
// addNewSliceElementsToFile given a slice of strings representing paths, stores them
// to the filesystem
// addNewSliceElementsToFile given a slice of strings representing paths, stores them
// to the filesystem
func addNewSliceElementsToFile(filePath string, newRepos []string) {
    existingRepos := parseFileLinesToSlice(filePath)
    repos := joinSlices(newRepos, existingRepos)
    dumpStringsSliceToFile(repos, filePath)
}
First thing this does is calling parseFileLinesToSlice(), which takes a file path string, and returns a slice of string with the contents of the file. Nothing too much specific:
这样做的第一件事是调用parseFileLinesToSlice() ,该方法接受文件路径字符串,并返回包含文件内容的字符串切片。 没什么太具体的:
// parseFileLinesToSlice given a file path string, gets the content
// of each line and parses it to a slice of strings.
func parseFileLinesToSlice(filePath string) []string {
    f := openFile(filePath)
    defer f.Close()

    var lines []string
    scanner := bufio.NewScanner(f)
    for scanner.Scan() {
        lines = append(lines, scanner.Text())
    }
    if err := scanner.Err(); err != nil {
        if err != io.EOF {
            panic(err)
        }
    }

    return lines
}
This calls openFile(), which given a file path string opens the file and returns it.
这将调用openFile() ,它给定一个文件路径字符串,将打开文件并返回它。
// openFile opens the file located at `filePath`. Creates it if not existing.
func openFile(filePath string) *os.File {
    f, err := os.OpenFile(filePath, os.O_APPEND|os.O_WRONLY, 0755)
    if err != nil {
        if os.IsNotExist(err) {
            // file does not exist
            _, err = os.Create(filePath)
            if err != nil {
                panic(err)
            }
        } else {
            // other error
            panic(err)
        }
    }

    return f
}
In this case it tries to open our dotfile. If there’s an error, and the error tells us that the file does not exist (using os.IsNotExist()), we create the file using os.Create(), so we can start filling it with the repositories scanned. It returns the open file descriptor.
在这种情况下,它将尝试打开我们的点文件。 如果出现错误,并且错误告诉我们该文件不存在(使用os.IsNotExist() ),我们将使用os.Create()创建文件,因此可以开始使用扫描的存储库填充该文件。 它返回打开的文件描述符。
addNewSliceElementsToFile() after getting the file descriptor immediately defers f.Close() to close the file after the function is done. It then calls parseFileLinesToSlice(), an utility function that parses each line of a file to a strings slice.
addNewSliceElementsToFile()后, addNewSliceElementsToFile()立即使f.Close()延迟以完成函数后关闭文件。 然后,它调用parseFileLinesToSlice() ,该实用程序函数将文件的每一行解析为字符串切片。
joinSlices() then given 2 slices, adds the content of the first to the second, only if the content did not exist yet. This prevents duplicate lines.
然后, joinSlices()给定2个切片,仅在第一个切片的内容不存在的情况下才将其添加到第二个切片。 这样可以防止重复的行。
Put:
放:
// joinSlices adds the element of the `new` slice
// into the `existing` slice, only if not already there
func joinSlices(new []string, existing []string) []string {
    for _, i := range new {
        if !sliceContains(existing, i) {
            existing = append(existing, i)
        }
    }
    return existing
}

// sliceContains returns true if `slice` contains `value`
func sliceContains(slice []string, value string) bool {
    for _, v := range slice {
        if v == value {
            return true
        }
    }
    return false
}
Last thing is the call to dumpStringsSliceToFile(), which given a slice of strings, and a file path, writes that slice to the file with each string on a new line:
最后一件事是对dumpStringsSliceToFile()的调用,该调用给出了一个字符串切片和一个文件路径,并将该切片与每个字符串的新行写入文件:
// dumpStringsSliceToFile writes content to the file in path `filePath` (overwriting existing content)
func dumpStringsSliceToFile(repos []string, filePath string) {
    content := strings.Join(repos, "\n")
    ioutil.WriteFile(filePath, []byte(content), 0755)
}
Here’s the fully working whole content of this first part:
这是第一部分的全部内容:
I put this in a separate file, for clarity, called scan.go (in the same folder as main.go)
我把这个单独的文件中,为了清楚,叫scan.go (在同一文件夹中main.go )
第2部分:生成统计信息 (Part 2: Generate the stats)
Second part now: generate the stats!
现在第二部分:生成统计信息!

I work on a separate file as well, called stats.go.
我也使用一个单独的文件stats.go 。
In this file I’m going to use a dependency called go-git which is available on GitHub at https://github.com/src-d/go-git. It abstracts the details of dealing with the Git internal representation of commits, exposes a nice API, and it’s self-contained (doesn’t need external libs like the libgit2 bindings do), which for my program is a good compromise.
在此文件中,我将使用名为go-git的依赖项,该依赖项可在GitHub上的https://github.com/src-d/go-git上找到。 它抽象了处理提交的Git内部表示的细节,公开了一个不错的API,并且它是独立的(不需要像libgit2绑定那样的外部库),这对我的程序来说是一个很好的折衷方案。
Let’s implement stats() with 2 function calls:
让我们通过2个函数调用来实现stats() :
// stats calculates and prints the stats.
func stats(email string) {
    commits := processRepositories(email)
    printCommitsStats(commits)
}- get the list of commits 获取提交列表
- given the commits, generate the graph 给定提交,生成图形
Looks simple enough.
看起来很简单。
// processRepositories given a user email, returns the
// commits made in the last 6 months
func processRepositories(email string) map[int]int {
    filePath := getDotFilePath()
    repos := parseFileLinesToSlice(filePath)
    daysInMap := daysInLastSixMonths

    commits := make(map[int]int, daysInMap)
    for i := daysInMap; i > 0; i-- {
        commits[i] = 0
    }

    for _, path := range repos {
        commits = fillCommits(email, path, commits)
    }

    return commits
}
Very easy:
好简单:
- get the dot file path 获取点文件路径
- parse the lines of the file to a list (slice) of repositories 将文件行解析为存储库列表(切片)
fills a
commitsmapwith 0 integer values用0的整数值填充
commitsmapiterates over the repositories and fills the
commitsmap遍历存储库并填充
commitsmap
I reuse getDotFilePath() and parseFileLinesToSlice() from the scan.go file. Since the package is the same, I don’t have to do anything, they are available for use.
我重用了scan.go文件中的getDotFilePath()和parseFileLinesToSlice() 。 由于程序包是相同的,因此我无需执行任何操作,因此可以使用它们。
Here is the fillCommits() implementation:
这是fillCommits()实现:
// fillCommits given a repository found in `path`, gets the commits and
// puts them in the `commits` map, returning it when completed
func fillCommits(email string, path string, commits map[int]int) map[int]int {
    // instantiate a git repo object from path
    repo, err := git.PlainOpen(path)
    if err != nil {
        panic(err)
    }
    // get the HEAD reference
    ref, err := repo.Head()
    if err != nil {
        panic(err)
    }
    // get the commits history starting from HEAD
    iterator, err := repo.Log(&git.LogOptions{From: ref.Hash()})
    if err != nil {
        panic(err)
    }
    // iterate the commits
    offset := calcOffset()
    err = iterator.ForEach(func(c *object.Commit) error {
        daysAgo := countDaysSinceDate(c.Author.When) + offset

        if c.Author.Email != email {
            return nil
        }

        if daysAgo != outOfRange {
            commits[daysAgo]++
        }

        return nil
    })
    if err != nil {
        panic(err)
    }

    return commits
}
daysInLastSixMonths is a constant defined as const daysInLastSixMonths = 183.
daysInLastSixMonths是一个常量,定义为const daysInLastSixMonths = 183 。
outOfRange is a constant as well, defined as const outOfRange = 99999 which contrary to daysInLastSixMonths has no real meaning. It’s set as the return value of countDaysSinceDate() when the commit is older than 6 months, our data analysis interval.
outOfRange也是一个常量,定义为const outOfRange = 99999 ,与daysInLastSixMonths相反,它没有实际含义。 当提交时间超过6个月(我们的数据分析间隔countDaysSinceDate()时,将其设置为countDaysSinceDate()的返回值。
object is provided by the go-git package, by importing gopkg.in/src-d/go-git.v4/plumbing/object.
object是通过提供go-git包,通过导入gopkg.in/src-d/go-git.v4/plumbing/object 。
I add an offset to the “daysAgo” calculation because of the way the GitHub-like graph works: each row represents a day name (starting from sunday), and each row represents a week. I fill the current week with “fake data”.
由于类似GitHub的图表的工作方式,我向“ daysAgo”计算中添加了一个偏移量:每行代表一天的名称(从星期日开始),每行代表一周。 我用“假数据”填充了当前一周。
countDaysSinceDate() returns how many days ago the commit was made. I reset the current date to the exact start of the day (00:00:00) to avoid hours being part of the equation. The timezone is inferred from the system.
countDaysSinceDate()返回进行提交的天数。 我将当前日期重置为当天的确切开始时间(00:00:00),以避免小时成为方程式的一部分。 从系统推断时区。
// getBeginningOfDay given a time.Time calculates the start time of that day
func getBeginningOfDay(t time.Time) time.Time {
    year, month, day := t.Date()
    startOfDay := time.Date(year, month, day, 0, 0, 0, 0, t.Location())
    return startOfDay
}

// countDaysSinceDate counts how many days passed since the passed `date`
func countDaysSinceDate(date time.Time) int {
    days := 0
    now := getBeginningOfDay(time.Now())
    for date.Before(now) {
        date = date.Add(time.Hour * 24)
        days++
        if days > daysInLastSixMonths {
            return outOfRange
        }
    }
    return days
}
calcOffset() is used to determine the correct place of a commit in our commits map, to be easily shown in the console render.
calcOffset()用于确定提交在我们的提交映射中的正确位置,以便在控制台渲染中轻松显示。
// calcOffset determines and returns the amount of days missing to fill
// the last row of the stats graph
func calcOffset() int {
    var offset int
    weekday := time.Now().Weekday()

    switch weekday {
    case time.Sunday:
        offset = 7
    case time.Monday:
        offset = 6
    case time.Tuesday:
        offset = 5
    case time.Wednesday:
        offset = 4
    case time.Thursday:
        offset = 3
    case time.Friday:
        offset = 2
    case time.Saturday:
        offset = 1
    }

    return offset
}
We’re now done with processing the commits. We now have a map of commits, we can print it. Here’s the operation center:
现在我们已经完成了处理提交。 现在我们有了提交的地图,我们可以打印它。 这是运营中心:
// printCommitsStats prints the commits stats
func printCommitsStats(commits map[int]int) {
    keys := sortMapIntoSlice(commits)
    cols := buildCols(keys, commits)
    printCells(cols)
}- sort the map 排序地图
- generate the columns 生成列
- print each column 打印每一列
排序地图 (Sort the map)
// sortMapIntoSlice returns a slice of indexes of a map, ordered
func sortMapIntoSlice(m map[int]int) []int {
    // order map
    // To store the keys in slice in sorted order
    var keys []int
    for k := range m {
        keys = append(keys, k)
    }
    sort.Ints(keys)

    return keys
}
sortMapIntoSlice() takes a map and returns a slice with the map keys ordered by their integer value. This is used to print the map properly sorted.
sortMapIntoSlice()获取一个地图,并返回一个带有按其整数值排序的地图键的切片。 这用于打印正确排序的地图。
生成列 (Generate the columns)
// buildCols generates a map with rows and columns ready to be printed to screen
func buildCols(keys []int, commits map[int]int) map[int]column {
    cols := make(map[int]column)
    col := column{}

    for _, k := range keys {
        week := int(k / 7) //26,25...1
        dayinweek := k % 7 // 0,1,2,3,4,5,6

        if dayinweek == 0 { //reset
            col = column{}
        }

        col = append(col, commits[k])

        if dayinweek == 6 {
            cols[week] = col
        }
    }

    return cols
}
buildCols() takes the keys slice we generated in sortMapIntoSlice() and the map. It creates a new map, instead of using the days as keys, it uses weeks. The column type is defined as a slice of integers: type column []int.
buildCols()获取我们在sortMapIntoSlice()和地图中生成的键切片。 它创建一个新的地图,而不是使用日期作为关键字,而是使用几周。 column类型定义为整数切片: type column []int 。
The week is determined by dividing the day index by 7, and which day of the week is it, is easy to get with a module operation k % 7. When the day of the week is sunday, we create a new column and we fill it, and when it’s saturday, we add the week to the columns map.
通过将天指数除以7来确定星期,并且使用模块运算k % 7可以很容易地获得星期几。 当星期几是星期天时,我们创建一个新列并填充它,而当它是星期六时,我们将星期添加到列图中。
打印单元格 (Print the cells)
// printCells prints the cells of the graph
func printCells(cols map[int]column) {
	printMonths()
	for j := 6; j >= 0; j-- {
		for i := weeksInLastSixMonths + 1; i >= 0; i-- {
			if i == weeksInLastSixMonths+1 {
				printDayCol(j)
			}
			if col, ok := cols[i]; ok {
				//special case today
				if i == 0 && j == calcOffset()-1 {
					printCell(col[j], true)
					continue
				} else {
					if len(col) > j {
						printCell(col[j], false)
						continue
					}
				}
			}
			printCell(0, false)
		}
		fmt.Printf("\n")
	}
}printCells(), first calls printMonths() to print the months names line. Then for each different subsequent line (day of the week) it processes each week and calls printCell(), passing the value and if it’s today or not. If it’s the first column, it calls printDayCol() to print the day name.
printCells() ,首先调用printMonths()来打印月份名称行。 然后,对于每个不同的后续行(一周中的某天),它每周处理一次并调用printCell() ,并传递值以及是否为今天。 如果是第一列,它将调用printDayCol()来打印日期名称。
// printMonths prints the month names in the first line, determining when the month
// changed between switching weeks
func printMonths() {
	week := getBeginningOfDay(time.Now()).Add(-(daysInLastSixMonths * time.Hour * 24))
	month := week.Month()
	fmt.Printf("         ")
	for {
		if week.Month() != month {
			fmt.Printf("%s ", week.Month().String()[:3])
			month = week.Month()
		} else {
			fmt.Printf("    ")
		}

		week = week.Add(7 * time.Hour * 24)
		if week.After(time.Now()) {
			break
		}
	}
	fmt.Printf("\n")
}
Here’s printMonths(). It goes to the beginning of the history we’re analyzing, and increments week-by-week. If the month changes when going to the next week, it prints it. Breaks when I get over the current date.
这是printMonths() 。 它一直到我们正在分析的历史的开始,并且每周一次递增。 如果当下个月转到下周时,它会打印出来。 当我超过当前日期时休息。
printDayCol() is very simple, given a day row index, it prints the day name:
printDayCol()非常简单,给定日期行索引,它会打印日期名称:
// printDayCol given the day number (0 is Sunday) prints the day name,
// alternating the rows (prints just 2,4,6)
func printDayCol(day int) {
	out := "     "
	switch day {
	case 1:
		out = " Mon "
	case 3:
		out = " Wed "
	case 5:
		out = " Fri "
	}

	fmt.Printf(out)
}printCell(), listed below, calculates the correct escape sequence depending on the amount of commits in a cell, and also standardizes the cell width, depending on the number of digits of the number printed. And at the end, it prints the cell to io.Stdout:
下面列出的printCell()根据单元格中的提交数量来计算正确的转义序列,并根据打印数字的位数来标准化单元格宽度。 最后,它将单元格打印到io.Stdout :
// printCell given a cell value prints it with a different format
// based on the value amount, and on the `today` flag.
func printCell(val int, today bool) {
    escape := "\033[0;37;30m"
    switch {
    case val > 0 && val < 5:
        escape = "\033[1;30;47m"
    case val >= 5 && val < 10:
        escape = "\033[1;30;43m"
    case val >= 10:
        escape = "\033[1;30;42m"
    }

    if today {
        escape = "\033[1;37;45m"
    }

    if val == 0 {
        fmt.Printf(escape + "  - " + "\033[0m")
        return
    }

    str := "  %d "
    switch {
    case val >= 10:
        str = " %d "
    case val >= 100:
        str = "%d "
    }

    fmt.Printf(escape+str+"\033[0m", val)
}
Here is the complete code for stats.go, with the contents of this second part of the program:
这是stats.go的完整代码,以及程序第二部分的内容:
Here is what you’ll get when running it:
这是运行它会得到的:
git可视化工具使用


 91
91

 被折叠的 条评论
为什么被折叠?
被折叠的 条评论
为什么被折叠?
 到【灌水乐园】发言


