


Install
foremanto allow executing the app from command line
When I first used Electron in 2015 it was not yet clear that it would be so pervasive in modern apps, and I was kind of shocked by the resulting app size.
当我在2015年首次使用Electron时 ,尚不清楚它在现代应用程序中是否如此普遍,并且由此产生的应用程序大小令我有些震惊。
But, Electron is clearly here to stay and it’s not mandatory that your app should feel slow and consume tons of memory, like VS Code demonstrates every day to me (on a not blazing fast machine).
但是,Electron显然会留下来,并且您的应用程序应该变慢并消耗大量内存不是强制性的,就像VS Code每天向我演示(在一台速度不快的机器上)。
So, here’s a quick start for a React app with create-react-app, ready to roll with ESlint integration.
因此,这是一个具有create-react-app的React应用的快速入门 ,可以通过ESlint集成进行发布。
如果尚未安装npm (Install npm if you haven’t already)
On OSX:
在OSX上:
brew install npm移至您的开发文件夹 (Move to your development folder)
cd ~/dev创建React应用 (Create react app)
npx create-react-app app
cd app
加电子 (Add electron)
npm install electron
npm install --save-dev electron-builder 安装foreman以允许从命令行执行应用 (Install foreman to allow executing the app from command line)
npm install foreman -g安装create-react-app依赖项 (Install the create-react-app dependencies)
npm install配置eslint(您的里程可能会有所不同) (Configure eslint (your mileage might vary))
.eslintrc.json
.eslintrc.json
{
  "env": {
    "browser": true,
    "commonjs": true,
    "es6": true,
    "jest": true
  },
  "parserOptions": {
    "ecmaFeatures": {
      "jsx": true
    },
    "sourceType": "module"
  },
  "rules": {
    "no-const-assign": "warn",
    "no-this-before-super": "warn",
    "no-undef": "warn",
    "no-continue": "off",
    "no-unreachable": "warn",
    "no-unused-vars": "warn",
    "constructor-super": "warn",
    "valid-typeof": "warn",
    "quotes": [
      2,
      "single"
    ],
    "semi": [
      "error",
      "never"
    ]
  },
  "parser": "babel-eslint",
  "extends": "airbnb",
  "plugins": [
    "react",
    "jsx-a11y",
    "import"
  ]
}
Now add ESLint and some of its helpers
现在添加ESLint及其一些助手
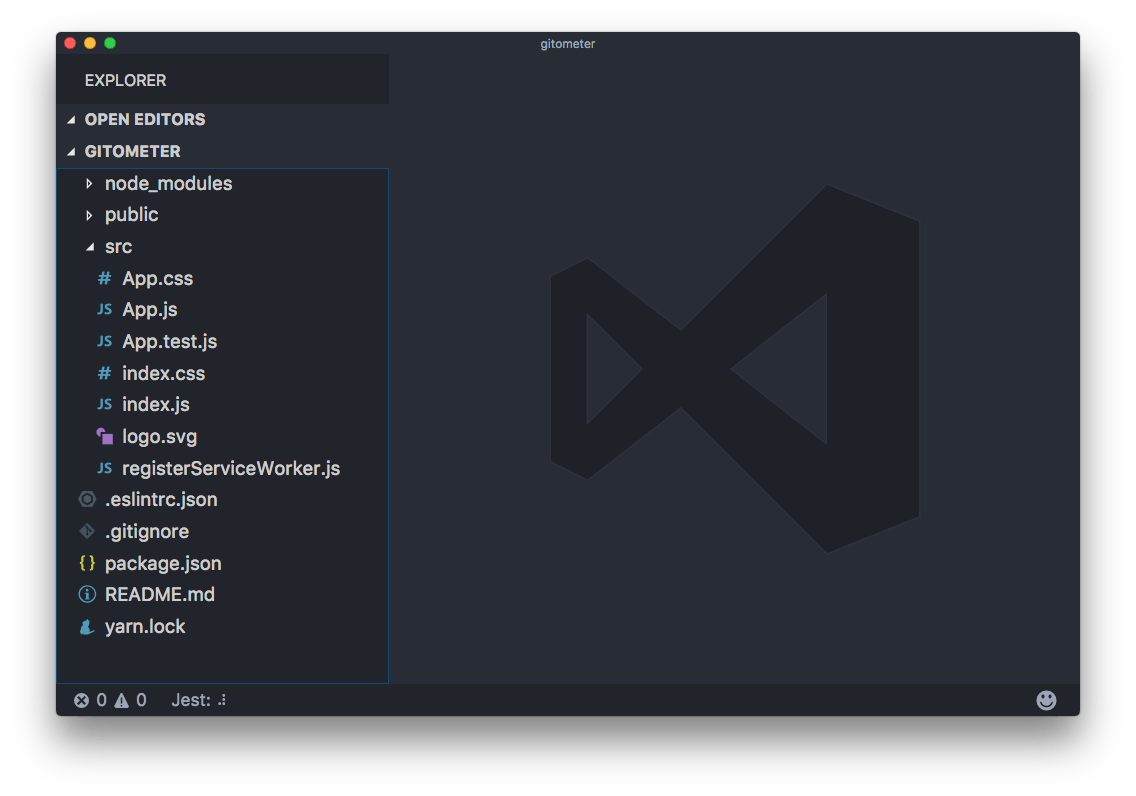
npm install eslint eslint-config-airbnb eslint-plugin-jsx-a11y eslint-plugin-import eslint-plugin-react eslint-plugin-importThis is what you should have right now:
这是您现在应该拥有的:
Now tweak the package.json file to add some electron helpers.
现在调整package.json文件以添加一些电子助手。
Right now its content is something like
现在它的内容就像
{
  "name": "gitometer",
  "version": "0.1.0",
  "private": true,
  "dependencies": {
    "electron": "^1.7.5",
    "eslint": "^4.5.0",
    "eslint-config-airbnb": "^15.1.0",
    "eslint-plugin-import": "^2.7.0",
    "eslint-plugin-jsx-a11y": "^6.0.2",
    "eslint-plugin-react": "^7.3.0",
    "react": "^15.6.1",
    "react-dom": "^15.6.1",
    "react-scripts": "1.0.11"
  },
  "scripts": {
    "start": "react-scripts start",
    "build": "react-scripts build",
    "test": "react-scripts test --env=jsdom",
    "eject": "react-scripts eject"
  },
  "devDependencies": {
    "electron-builder": "^19.24.1"
  }
}
(don’t mind versions, outdated as soon as I publish this)
(不要介意版本,在我发布此版本时已过时)
Remove the scripts property and change it with
删除scripts属性并使用
"scripts": {
  "start": "nf start -p 3000",
  "build": "react-scripts build",
  "test": "react-scripts test --env=jsdom",
  "eject": "react-scripts eject",
  "electron": "electron .",
  "electron-start": "node src/start-react",
  "react-start": "BROWSER=none react-scripts start",
  "pack": "build --dir",
  "dist": "npm run build && build",
  "postinstall": "install-app-deps"
},
On Windows you might need to have a
.envfile withBROWSER=nonein it as environemnt variables do not work like in Linux/macOS在Windows上,您可能需要
.env包含BROWSER=none的.env文件,因为环境变量无法像在Linux / macOS中那样工作
As you can see, start was moved to react-start, but the rest is unchanged, and some electron utils were added.
如您所见, start已移至react-start ,但其余部分保持不变,并添加了一些电子工具。
BROWSER=noneinreact-starttells React not to load in a browser tab, so we only get the app in the Electron window.
BROWSER=noneinreact-start告诉React不要在浏览器选项卡中加载,因此我们仅在Electron窗口中获取该应用。
Also add
还添加
"homepage": "./",
"main": "src/start.js",
and
和
"build": {
  "appId": "com.electron.electron-with-create-react-app",
  "win": {
    "iconUrl": "https://cdn2.iconfinder.com/data/icons/designer-skills/128/react-256.png"
  },
  "directories": {
    "buildResources": "public"
  }
}
The end result should be:
最终结果应为:
{
  "name": "gitometer",
  "version": "0.1.0",
  "private": true,
  "dependencies": {
    "electron": "^1.7.5",
    "eslint": "^4.5.0",
    "eslint-config-airbnb": "^15.1.0",
    "eslint-plugin-import": "^2.7.0",
    "eslint-plugin-jsx-a11y": "^6.0.2",
    "eslint-plugin-react": "^7.3.0",
    "react": "^15.6.1",
    "react-dom": "^15.6.1",
    "react-scripts": "1.0.11"
  },
  "devDependencies": {
    "electron-builder": "^19.24.1"
  },
  "homepage": "./",
  "main": "src/start.js",
  "scripts": {
    "start": "nf start -p 3000",
    "build": "react-scripts build",
    "test": "react-scripts test --env=jsdom",
    "eject": "react-scripts eject",
    "electron": "electron .",
    "electron-start": "node src/start-react",
    "react-start": "BROWSER=none react-scripts start",
    "pack": "build --dir",
    "dist": "npm run build && build",
    "postinstall": "install-app-deps"
  },
  "build": {
    "appId": "com.electron.electron-with-create-react-app",
    "win": {
      "iconUrl": "https://cdn2.iconfinder.com/data/icons/designer-skills/128/react-256.png"
    },
    "directories": {
      "buildResources": "public"
    }
  }
}
Now create a file named Procfile in the project root folder, with this content:
现在,在项目根文件夹中创建一个名为Procfile的文件,内容如下:
react: npm run react-start
electron: npm run electron-start
设置足够了! (Enough with the setup!)
Let’s now start writing some code.
现在开始编写一些代码。
src/start.js
src / start.js
const { app, BrowserWindow } = require('electron')

const path = require('path')
const url = require('url')

let mainWindow

function createWindow() {
  mainWindow = new BrowserWindow({
    width: 800,
    height: 600,
    webPreferences: {
      nodeIntegration: true
    }
  })

  mainWindow.loadURL(
    process.env.ELECTRON_START_URL ||
      url.format({
        pathname: path.join(__dirname, '/../public/index.html'),
        protocol: 'file:',
        slashes: true
      })
  )

  mainWindow.on('closed', () => {
    mainWindow = null
  })
}

app.on('ready', createWindow)

app.on('window-all-closed', () => {
  if (process.platform !== 'darwin') {
    app.quit()
  }
})

app.on('activate', () => {
  if (mainWindow === null) {
    createWindow()
  }
})
src/start-react.js
src / start-react.js
const net = require('net')
const childProcess = require('child_process')

const port = process.env.PORT ? process.env.PORT - 100 : 3000

process.env.ELECTRON_START_URL = `http://localhost:${port}`

const client = new net.Socket()

let startedElectron = false
const tryConnection = () => {
  client.connect({ port }, () => {
    client.end()
    if (!startedElectron) {
      console.log('starting electron')
      startedElectron = true
      const exec = childProcess.exec
      exec('npm run electron')
    }
  })
}

tryConnection()

client.on('error', () => {
  setTimeout(tryConnection, 1000)
})
启动 (Start up)
That’s it!
而已!
Run
跑
npm startand you should see the React sample app coming up in a native app:
并且您应该看到本机应用程序中出现了React示例应用程序:

谢谢 (Thanks to)
This post was heavily inspired by https://gist.github.com/matthewjberger/6f42452cb1a2253667942d333ff53404
这篇文章受到https://gist.github.com/matthewjberger/6f42452cb1a2253667947942d333ff53404的启发


 被折叠的 条评论
为什么被折叠?
被折叠的 条评论
为什么被折叠?
 到【灌水乐园】发言


