three.js 动画
Animation in 3D space – one of the integral and exciting processes. Animation gives life to your static scene. I think you have already thought about the animation of objects when working with three.js. Yes, animate objects is possible with functions of three.js, we can change the position, size, rotation, and other properties of objects (and their children) in real-time. However, this becomes problematic if we want to change the properties of tens or even hundreds of related objects at once, especially when it comes to three-dimensional animation of the (rigged) characters. In this case, much easier to animate the 3d model in a special editor, and then export the model into a suitable format for loading into three.js. In this lesson we will look at a variety of three-dimensional editors, and we learn how to download our animated models in three.js scene.
3D空间中的动画–不可或缺的令人兴奋的过程之一。 动画使您的静态场景栩栩如生。 我认为您在使用three.js时已经考虑过对象的动画。 是的,可以使用three.js函数为对象设置动画,我们可以实时更改对象(及其子对象)的位置,大小,旋转和其他属性。 但是,如果我们想一次更改数十个甚至数百个相关对象的属性,这将成为问题,尤其是涉及到(已绑定)角色的三维动画时。 在这种情况下,更容易在特殊的编辑器中对3d模型进行动画处理,然后将模型导出为合适的格式以加载到three.js中。 在本课程中,我们将研究各种三维编辑器,并学习如何在three.js场景中下载动画模型。
During my research and experience, I found that only two file formats could contain the animation (to be used in three.js): Json and Dae.
在我的研究和经验中,我发现只有两种文件格式可以包含动画(将在three.js中使用):Json和Dae。
现场演示1
现场演示2
现场演示3
Before we start our discussion, you may test our demos. In the first demo, we load Json model, last two demos – Dae models.
在我们开始讨论之前,您可以测试我们的演示。 在第一个演示中,我们加载Json模型,最后两个演示– Dae模型。
3D编辑和经验 (3D editors and experience)
The following 3D programs are installed on my computer:
我的计算机上安装了以下3D程序:
- 3ds Max Design 2014 (additionally, a special plugin to export models into Json was installed for the 3DS Max) 3ds Max Design 2014(此外,还为3DS Max安装了一个特殊的插件,用于将模型导出到Json中)
- Poser Pro 2014 Poser Pro 2014
- Unity 统一
- Blender (additionally, a special plugin to export models into Json was installed for the Blender) Blender(此外,为Blender安装了一个特殊的插件,用于将模型导出到Json中)
Well, first of all, I downloaded a bunch (more than 20) of various models in different formats. There were different models: static and animated. I was going to use these models to import in the installed 3D editors.
好吧,首先,我下载了一堆(超过20种)各种格式不同的模型。 有不同的模型:静态和动画。 我将使用这些模型导入已安装的3D编辑器。
Poser Pro 2014 (Poser Pro 2014)
This program, seemed me like a very friendly program to work with 3D characters. There are many ready models in ‘Library’, and you can handle with the model easily, using your mouse. After, you can export your result to Collada (dae). First window offers to select ‘Export Range’. Then – Export Options. I tried various options, but unfortunately, all my attempts to load the exported dae file into three.js failed. It always gave me the following error: Uncaught TypeError: Cannot read property ‘add’ of undefined (three.min.71.js:365)
这个程序似乎对我来说是一个非常友好的程序,可以处理3D角色。 “库”中有许多现成的模型,您可以使用鼠标轻松处理该模型。 之后,您可以将结果导出到Collada(dae)。 第一个窗口提供选择“导出范围”的信息。 然后–导出选项。 我尝试了各种选项,但不幸的是,所有将导出的dae文件加载到three.js的尝试都失败了。 它总是给我以下错误:未捕获的TypeError:无法读取未定义的属性“ add”(three.min.71.js:365)
But, when I tried to import this file in Blender, the animation was here. I tried to re-export it into dae again (in Blender), but it didn’t work. I also tried to export that model into Json and load into scene – this worked, however the animation was corrupted. Thus I decided to put away this program. It didn’t want to work properly by some reason.
但是,当我尝试在Blender中导入此文件时,动画就在这里。 我试图再次将其重新导出到dae中(在Blender中),但是没有用。 我还尝试将模型导出到Json并加载到场景中–可行,但是动画已损坏。 因此,我决定放弃该程序。 由于某些原因,它不想正常工作。


统一 (Unity)
This is a bit difficult-to-use program. It allows you to import models (as assets), make some changes with the model, and export to dae (Collada Export). I tried with several models, however after I exported the models into dae, the models failed to load in three.js. It gave the following error: Uncaught TypeError: Cannot read property ‘elements’ of null (three.min.71.js:44). Thus I decided to put this program away, too.
这是一个有点难用的程序。 它允许您导入模型(作为资产),对模型进行一些更改并导出到dae(Collada导出)。 我尝试了几种模型,但是将模型导出到dae后,模型无法加载到three.js中。 它给出了以下错误:Uncaught TypeError:无法读取null的属性“ elements”(three.min.71.js:44)。 因此,我决定也放弃该程序。


3ds Max Design 2014 (3ds Max Design 2014)
The program has a pretty friendly interface, but it could be complex, because of many functions and properties. 3ds Max supports many 3D formats, so you can export/import most of models. However, nearly always, when I tried to load the result models (in DAE format), I received the following error:
该程序具有一个非常友好的界面,但是由于许多功能和属性,它可能很复杂。 3ds Max支持许多3D格式,因此您可以导出/导入大多数模型。 但是,几乎总是在尝试加载结果模型(DAE格式)时收到以下错误:
Uncaught TypeError: Cannot read property ‘initialized’ of undefined (three.min.71.js:696)
未捕获的TypeError:无法读取未定义的属性“已初始化”(three.min.71.js:696)
I also tried to use the installed plugin (ThreeJsExporter), but it also didn’t give me the desired result.
我也尝试使用已安装的插件(ThreeJsExporter),但它也没有给我想要的结果。
搅拌机 (Blender)
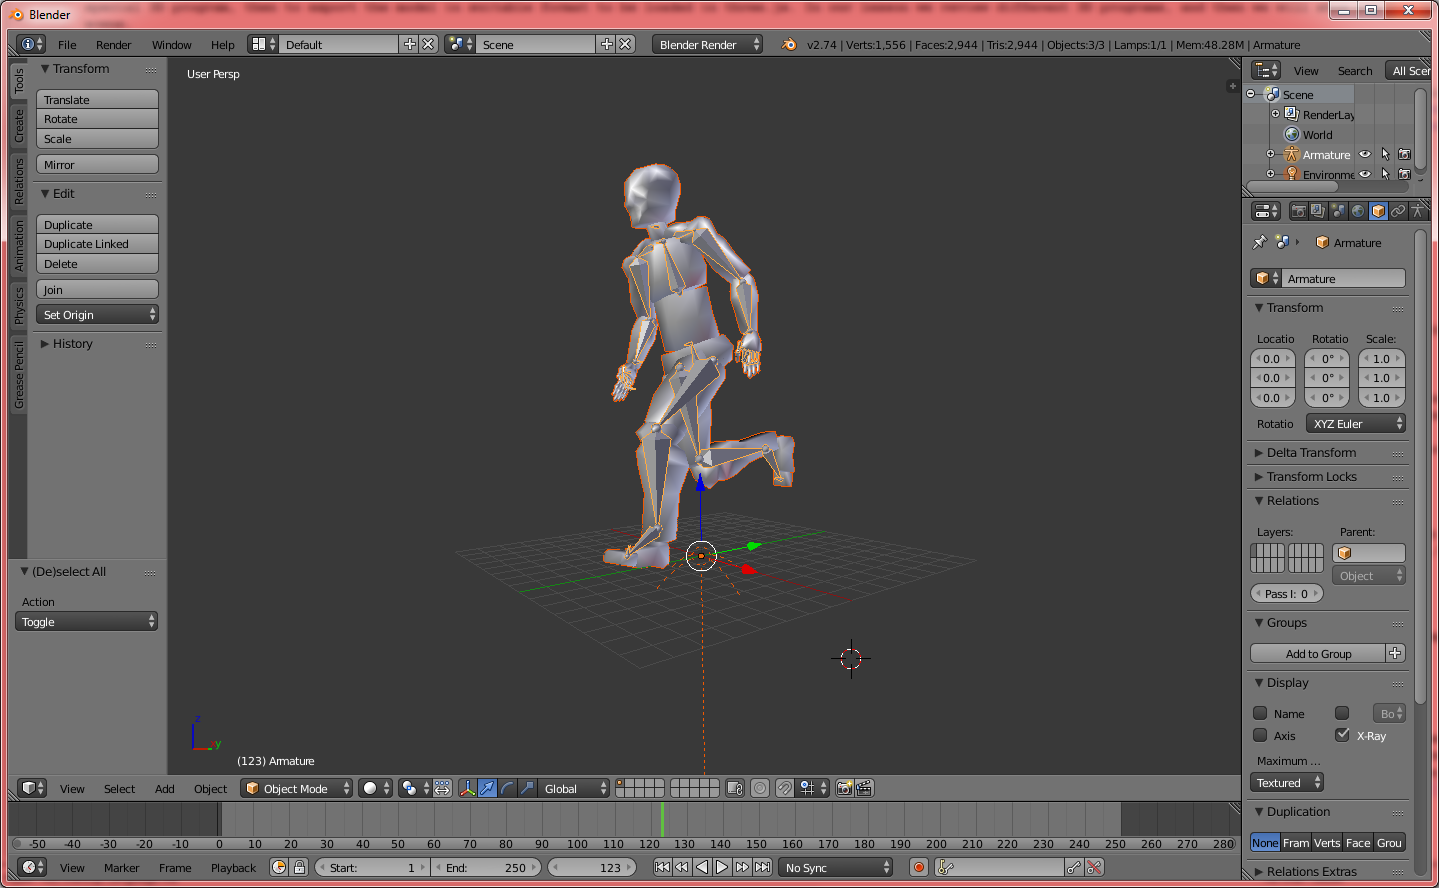
From the first view it looks like this program is the most low level editor. Like 3DS Max, it has a lot of functions, but this is much lighter and free (other programs that we used require a paid license). But, for a beginner, it could be difficult to learn this program. Especially after all the programs we tried before – all of them have friendly graphic interface, but there is no the toolbar with buttons in the Blender. Sometimes it is really difficult to find something here. However, this program finally does what we need. It also supports various 3d file formats, like dae/fbx (that support the animation).
从第一个角度看,该程序是最底层的编辑器。 像3DS Max一样,它具有许多功能,但是更轻巧,更免费(我们使用的其他程序需要付费许可证)。 但是,对于初学者来说,学习该程序可能很困难。 特别是在我们尝试过的所有程序之后-它们都有友好的图形界面,但是Blender中没有带有按钮的工具栏。 有时候在这里很难找到一些东西。 但是,该程序最终可以满足我们的需求。 它还支持各种3D文件格式,例如dae / fbx(支持动画)。


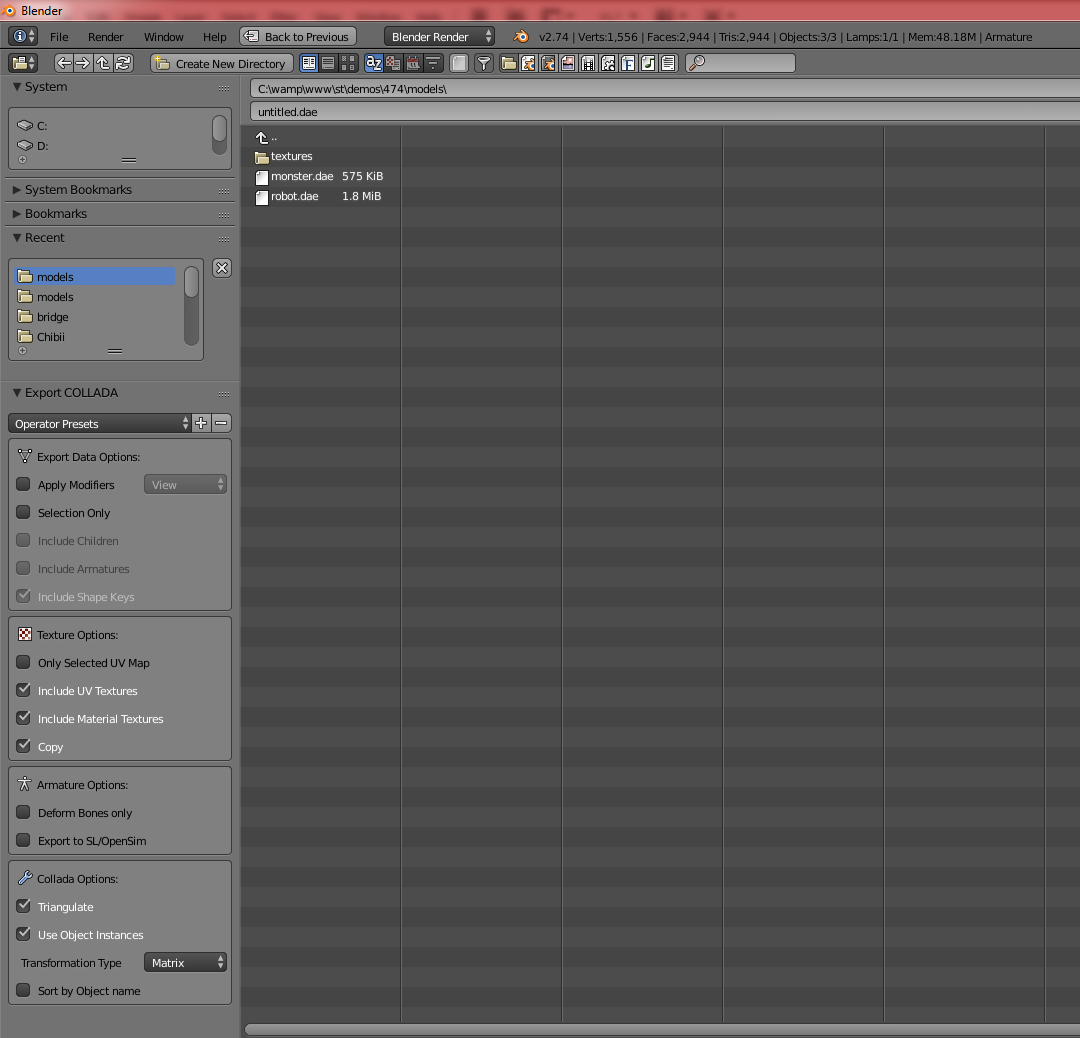
If you export to Collada/dae, I recommend to use the following properties:
如果导出到Collada / dae,我建议使用以下属性:


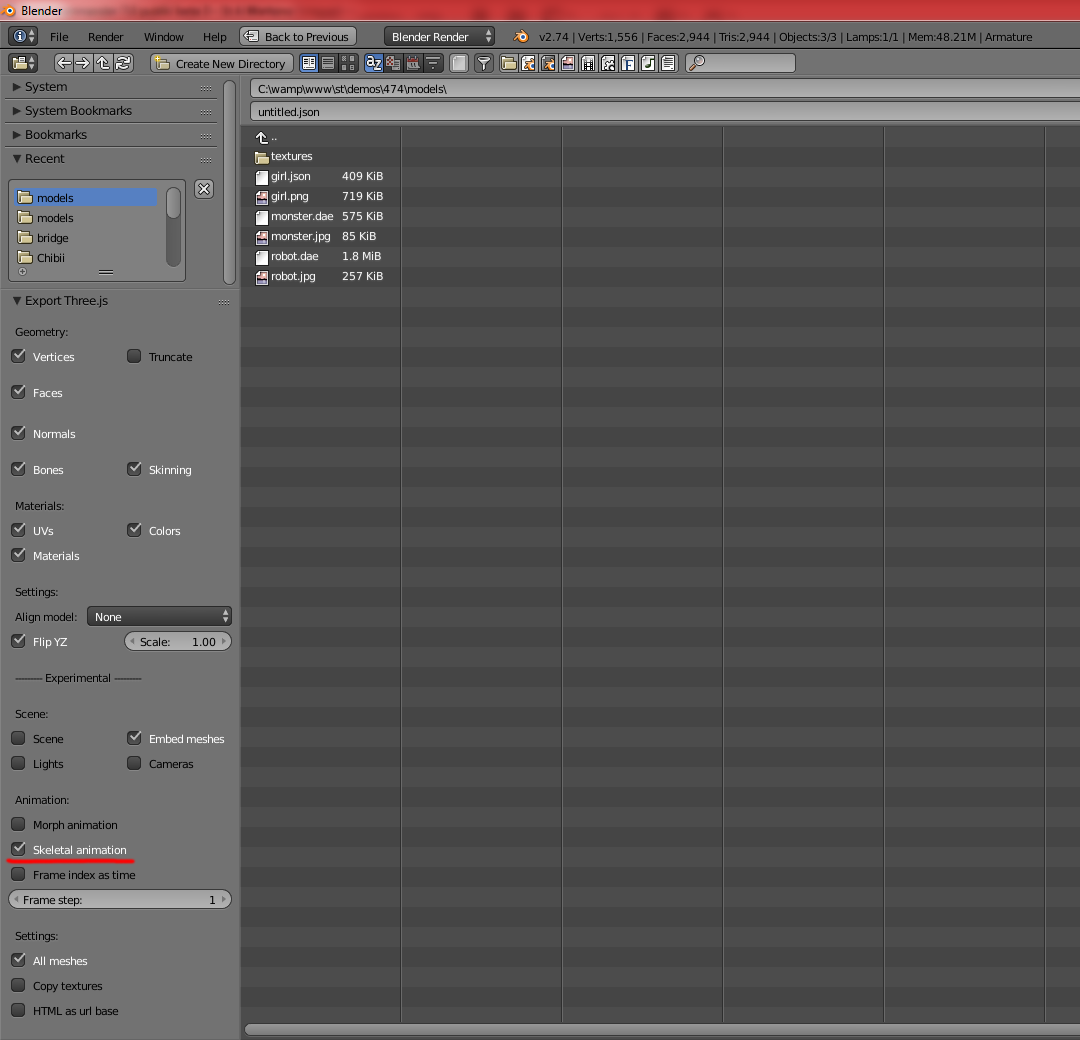
If you export to Json, use the following properties:
如果导出到Json,请使用以下属性:


Of course, not any models could be easily exported without any problem, but most of them. The initial model should be properly rigged with bones.
当然,不是任何模型都可以轻松导出而不会出现任何问题,但是大多数模型都可以导出。 初始模型应正确地用骨头固定。
Besides that, if you notice, that your model looks like that (after exporting):
除此之外,如果您注意到,您的模型看起来就是这样(导出后):


So, the model is currupted. To solve this situation, I recommend the following steps:
因此,该模型已损坏。 要解决这种情况,我建议执行以下步骤:
1) Click right mouse button on a nearest bone (so you will select it), then press twice ‘A’ button (to select all bones), switch to Pose Mode.
1)在最接近的骨骼上单击鼠标右键(因此将其选中),然后按两次“ A”按钮(选择所有骨骼),切换到“姿势模式”。
2) Goto ‘Pose’ -> ‘Clear Transform’ -> ‘All’.
2)转到“姿势”->“清除变换”->“全部”。


3) Then switch to ‘Object Mode’, select your model in any place, then press twice ‘A’ button again (to select the whole model), then: CTRL-A -> Location, CTRL-A -> Position, CTRL-A -> Scale
3)然后切换到“对象模式”,在任何位置选择模型,然后再次按两次“ A”按钮(以选择整个模型),然后:CTRL-A->位置,CTRL-A->位置,CTRL -A->比例
After, try to export to DAE (or Json) again. After these actions, the model usually works fine in three.js. If not – try another initial model (dae / fbx). This method worked for me with several animated models, but not with all downloaded models. Now, let’s start with coding. First of all, create a new html file and put the following code:
之后,尝试再次导出到DAE(或Json)。 完成这些操作后,该模型通常可以在three.js中正常工作。 如果不是,请尝试使用其他初始模型(dae / fbx)。 这种方法对我来说适用于多个动画模型,但不适用于所有下载的模型。 现在,让我们从编码开始。 首先,创建一个新的html文件并放入以下代码:
index.html (index.html)
<!DOCTYPE html>
<html lang="en" >
  <head>
    <meta charset="utf-8" />
    <meta name="author" content="Script Tutorials" />
    <title>WebGL With Three.js - Lesson 11 - Animated Objects | Script Tutorials</title>
    <meta name="viewport" content="width=device-width, initial-scale=1.0, maximum-scale=1.0, user-scalable=no">
    <link href="css/main.css" rel="stylesheet" type="text/css" />
  </head>
  <body>
    <script src="js/three.min.71.js"></script>
    <script src="js/THREEx.WindowResize.js"></script>
    <script src="js/OrbitControls.js"></script>
    <script src="js/stats.min.js"></script>
    <script src="js/ColladaLoader.js"></script>
    <script src="js/script.js"></script>
  </body>
</html>
This simple code loads all the necessary libraries.
这个简单的代码加载了所有必要的库。
场景的骨架 (Skeleton of the scene)
Now, create ‘js’ directory, and empty ‘script.js’ in the directory. Put the following code into this file:
现在,创建“ js”目录,并在目录中清空“ script.js”。 将以下代码放入此文件:
js / script.js (js/script.js)
var lesson11 = {
  scene: null, camera: null, renderer: null,
  container: null, controls: null,
  clock: null, stats: null,
  init: function() {
    // Create main scene
    this.scene = new THREE.Scene();
    this.scene.fog = new THREE.FogExp2(0xc8e0ff, 0.0003);
    var SCREEN_WIDTH = window.innerWidth, SCREEN_HEIGHT = window.innerHeight;
    // Prepare perspective camera
    var VIEW_ANGLE = 45, ASPECT = SCREEN_WIDTH / SCREEN_HEIGHT, NEAR = 1, FAR = 1000;
    this.camera = new THREE.PerspectiveCamera(VIEW_ANGLE, ASPECT, NEAR, FAR);
    this.scene.add(this.camera);
    this.camera.position.set(100, 0, 0);
    this.camera.lookAt(new THREE.Vector3(0,0,0));
    // Prepare webgl renderer
    this.renderer = new THREE.WebGLRenderer({ antialias:true });
    this.renderer.setSize(SCREEN_WIDTH, SCREEN_HEIGHT);
    this.renderer.setClearColor(this.scene.fog.color);
    // Prepare container
    this.container = document.createElement('div');
    document.body.appendChild(this.container);
    this.container.appendChild(this.renderer.domElement);
    // Events
    THREEx.WindowResize(this.renderer, this.camera);
    // Prepare Orbit controls
    this.controls = new THREE.OrbitControls(this.camera);
    this.controls.target = new THREE.Vector3(0, 0, 0);
    this.controls.maxDistance = 150;
    // Prepare clock
    this.clock = new THREE.Clock();
    // Prepare stats
    this.stats = new Stats();
    this.stats.domElement.style.position = 'absolute';
    this.stats.domElement.style.left = '50px';
    this.stats.domElement.style.bottom = '50px';
    this.stats.domElement.style.zIndex = 1;
    this.container.appendChild( this.stats.domElement );
    // Add lights
    this.scene.add( new THREE.AmbientLight(0xFFFFFF));
    // Load Json model
    this.loadJsonModel();
    // Load Dae model
    // this.loadDaeModel();
  },
  loadJsonModel: function() {
  },
  loadDaeModel: function() {
  }
};
// Animate the scene
function animate() {
  requestAnimationFrame(animate);
  render();
  update();
}
// Update controls and stats
function update() {
  var delta = lesson11.clock.getDelta();
  lesson11.controls.update(delta);
  lesson11.stats.update();
  THREE.AnimationHandler.update(delta);
}
// Render the scene
function render() {
  if (lesson11.renderer) {
    lesson11.renderer.render(lesson11.scene, lesson11.camera);
  }
}
// Initialize lesson on page load
function initializeLesson() {
  lesson11.init();
  animate();
}
if (window.addEventListener)
  window.addEventListener('load', initializeLesson, false);
else if (window.attachEvent)
  window.attachEvent('onload', initializeLesson);
else window.onload = initializeLesson;
This is basic code to run the scene.
这是运行场景的基本代码。
loadJsonModel (loadJsonModel)
The following code is used to load Json models:
以下代码用于加载Json模型:
  loadJsonModel: function() {
    // Prepare JSONLoader
    var jsonLoader = new THREE.JSONLoader();
    jsonLoader.load('models/girl.json', function(geometry, materials) {
      materials.forEach(function(mat) {
        mat.skinning = true;
      });
      // Prepare SkinnedMesh with MeshFaceMaterial (using original texture)
      var modelMesh = new THREE.SkinnedMesh(
        geometry, new THREE.MeshFaceMaterial(materials)
      );
      // Set position and scale
      var scale = 40;
      modelMesh.position.set(0, -20, 0);
      modelMesh.scale.set(scale, scale, scale);
      // Prepare animation
      var animation = new THREE.Animation(
        modelMesh, geometry.animations[0],
        THREE.AnimationHandler.CATMULLROM
      );
      // Add the mesh and play the animation
      lesson11.scene.add(modelMesh);
      animation.play();
    });
  }
After the model file is loaded, we set ‘skinning’ to ‘true’ for all children materials. Then we create THREE.SkinnedMesh with THREE.MeshFaceMaterial (to support original materials), then we scale and set position the model, prepare the animation, and finally – add the model into our scene and play the animation.
加载模型文件后,我们将所有子材质的“外观”设置为“ true”。 然后,使用THREE.MeshFaceMaterial创建THREE.SkinnedMesh(以支持原始材质),然后缩放并设置模型的位置,准备动画,最后–将模型添加到场景中并播放动画。
The following code is used to load Dae models:
以下代码用于加载Dae模型:
  loadDaeModel: function() {
    // Prepare ColladaLoader
    var daeLoader = new THREE.ColladaLoader();
    daeLoader.options.convertUpAxis = true;
    daeLoader.load('models/robot.dae', function(collada) {
      var modelMesh = collada.scene;
      // Prepare and play animation
      modelMesh.traverse( function (child) {
        if (child instanceof THREE.SkinnedMesh) {
          var animation = new THREE.Animation(child, child.geometry.animation);
          animation.play();
        }
      } );
      // Set position and scale
      var scale = 2.5;
      modelMesh.position.set(0, -20, 0);
      modelMesh.scale.set(scale, scale, scale);
      // Add the mesh into scene
      lesson11.scene.add(modelMesh);
    });
  }
As you see, the code is a bit different then ‘loadJsonModel’. After we load the model, we traverse all it’s children and start playing the animation. Then we set the position and scale, and add the model mesh to the scene.
如您所见,代码与“ loadJsonModel”有些不同。 加载模型后,我们遍历所有子项并开始播放动画。 然后我们设置位置和比例,然后将模型网格添加到场景中。
The lesson is finished. See you in the next tutorial.
课程结束。 在下一个教程中见。
现场演示1
现场演示2
现场演示3
[sociallocker]
[社交储物柜]
打包下载
[/sociallocker]
[/ sociallocker]
翻译自: https://www.script-tutorials.com/webgl-with-three-js-lesson-11/
three.js 动画


 747
747

 被折叠的 条评论
为什么被折叠?


