


Atom describes itself as a “hackable text editor for the 21st century“. It has become the go-to text editor for thousands of developers all over the world and is very easy to extend and customize. Developers share new features with the Atom community by publishing packages and themes. After reading this article, you can publish your own Atom syntax theme – a great first step in hacking Atom!
Atom将自己描述为“ 21世纪可入侵的文本编辑器 ”。 它已成为全球成千上万开发人员的首选文本编辑器,并且非常易于扩展和定制。 开发人员通过发布软件包和主题与Atom社区共享新功能。 阅读本文之后,您可以发布自己的Atom语法主题–入侵Atom的第一步!
什么是语法主题? (What is a Syntax Theme?)
A syntax theme lets you style the text/code area in the editor. An interface theme, on the other hand, allows you to style all other aspects of the Atom text editor (like the sidebar, status bar, tabs and so on). We’ll restrict ourselves to writing a syntax theme. This article only assumes a working knowledge of CSS.
语法主题使您可以在编辑器中设置文本/代码区域的样式。 另一方面, 界面主题使您可以为Atom文本编辑器的所有其他方面设置样式(如侧边栏,状态栏,选项卡等)。 我们将限制自己编写语法主题。 本文仅假设您对CSS有一定的了解。
入门 (Getting Started)
So what do you need to get started? You just need to download the Atom text editor, and you’re good to go! Atom uses Less, which is a superset of CSS with some nifty features like variables which we’ll learn as we go along.
那么,您需要什么入门呢? 您只需要下载Atom文本编辑器 ,就可以了! Atom使用Less,它是CSS的超集,具有一些漂亮的功能,例如变量,我们将不断学习。
生成Atom语法主题包 (Generate an Atom syntax theme package)
There was a time when writing a syntax theme meant a lot of work. Today, there’s an excellent auto-generate feature built right into Atom.
曾经有一段时间编写语法主题意味着很多工作。 如今,Atom内置了出色的自动生成功能。
Open Atom and hit
Cmd + Shift + P(for Windows useCtrl + Shift + P)打开Atom并点击
Cmd + Shift + P(对于Windows使用Ctrl + Shift + P)Type
generate类型
generateChoose the Package Generator: Generate syntax theme option
选择“ 包生成器:生成语法主题”选项
Atom will prompt you for a location to save the package. You can save it anywhere you like.
Atom会提示您输入保存软件包的位置。 您可以将其保存在任意位置。
为您的包裹命名 (Name your package)
Atom will open up the generated package as a project that you can start editing. Atom recommends that the package name ends with -syntax, and it’s best practice to use a lower case hyphen separated name. I’m going to name my package blue-everywhere-syntax and well, turn up the blue.
Atom将打开生成的程序包作为您可以开始编辑的项目。 Atom建议软件包名称以-syntax ,并且最佳实践是使用小写字母连字符分隔的名称。 我将我的程序包命名为blue-everywhere-syntax ,好吧,把它改成蓝色。
包装结构 (Package structure)
The auto-generated package has been laid out carefully so that it is very easy to edit.
自动生成的程序包已经仔细布置,因此非常易于编辑。
The main stylesheet resides in
index.less.主样式表位于
index.less。The base styles reside in
styles/base.less, and the colors reside instyles/colors.less. We’ll dig deeper into these files soon.基本样式位于
styles/base.less,而颜色则位于styles/colors.less。 我们将尽快深入研究这些文件。If you’ve used Node.js and NPM then
package.jsonwill be familiar. It gives the package a name and description and lets you provide some useful metadata.如果您使用过Node.js和NPM,那么
package.json将会很熟悉。 它为软件包提供了名称和描述,并允许您提供一些有用的元数据。The
README.mdfile allows you to describe your theme using markdown. If you publish your theme, this README will be visible to users who visit your download page.README.md文件使您可以使用markdown描述主题。 如果您发布主题,则访问您下载页面的用户可以看到此自述文件。
给我看代码 (Show Me The Code)
So let’s dive right in. Without getting into the details, it’s useful to know that Atom’s rendering engine is basically Chrome under the hood (check out Electron if you want to understand how it all works). That’s why we can style it using good old CSS. But since the folks who built Atom wanted to make use of some convenient features like variables and nested imports, they chose to use Less. Not to worry, because we only need a couple of Less features and I’ve laid them out for you in the article!
因此,让我们直接深入研究。无需深入了解,了解Atom的渲染引擎基本上就是底层的Chrome是很有用的(如果您想了解所有工作原理,请查看Electron )。 这就是为什么我们可以使用良好的旧CSS对其进行样式设置的原因。 但是由于构建Atom的人们想利用一些方便的功能,例如变量和嵌套导入,所以他们选择使用Less 。 不用担心,因为我们只需要几个Less功能,并且我已在本文中为您介绍了这些功能!
Since Atom uses Chromium, all you need to do to see your changes reflect in your editor is, you guessed it, reload! You can reload Atom using Cmd + Alt + Ctrl + L or View > Developer > Reload. Let’s go to Atom Settings (Cmd + ,) > Themes and set our editor’s syntax theme to the new theme that we just created.
由于Atom使用Chromium,因此您要想看到所做的更改就可以重新加载! 您可以使用Cmd + Alt + Ctrl + L或View > Developer > Reload来重新加载Atom。 让我们转到Atom设置( Cmd + , )>主题,然后将编辑器的语法主题设置为刚创建的新主题。
让我们变蓝 (Let’s turn things blue)
Open the colors.less file (style > colors.less). You can see a variable called @very-dark-gray, whose value is set to #1d1f21.
打开colors.less文件( style > colors.less )。 您会看到一个名为@very-dark-gray的变量,其值设置为#1d1f21 。
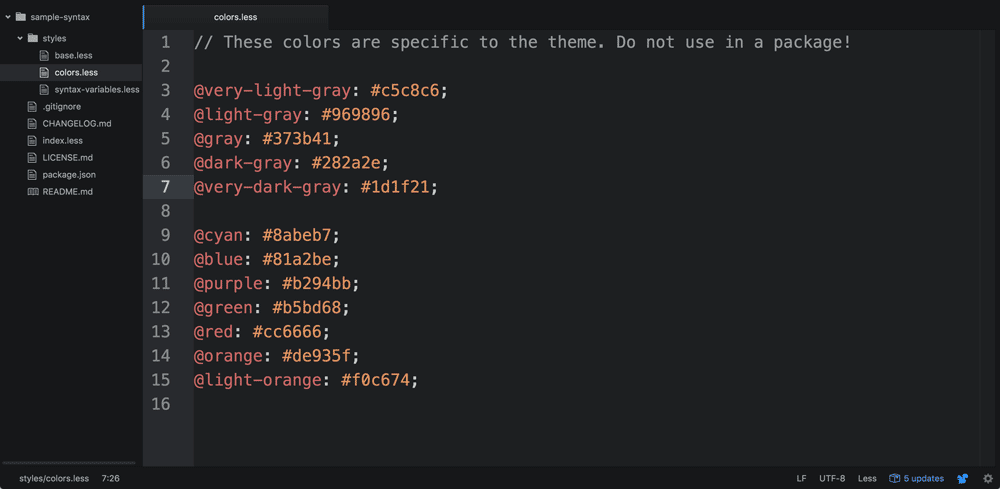
Our initial theme colors.less file
我们最初的主题colors.less文件
Let’s change this to a dark blue instead #1d1f33. Now reload atom (Cmd + Alt + Ctrl + L or View > Developer > Reload). Boom! The background of the text area should have changed.
让我们将其更改为深蓝色,而不是#1d1f33 。 现在重新加载原子( Cmd + Alt + Ctrl + L或View > Developer > Reload )。 繁荣! 文本区域的背景应该已更改。
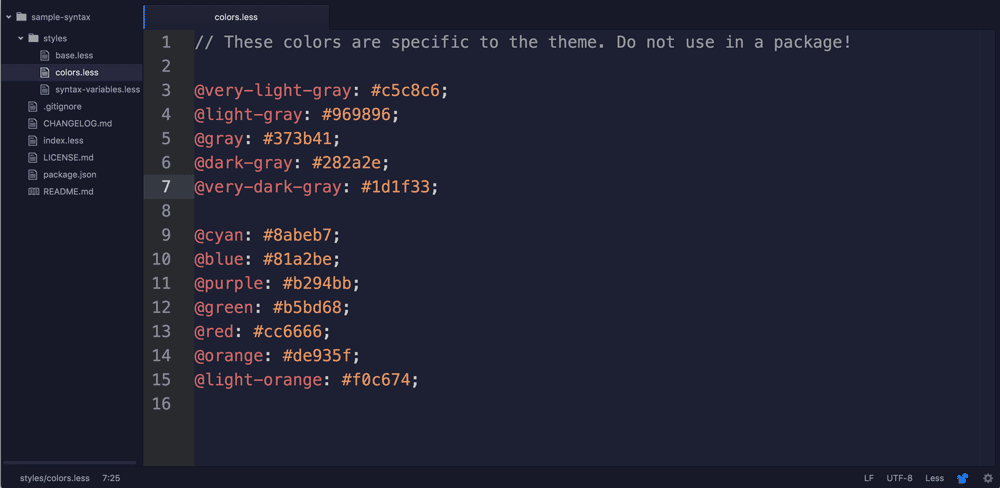
Our theme colors.less file after the change
更改后我们的主题colors.less文件
刚才发生了什么? (What just happened?)
Let’s take a deeper look at these less files. index.less imports base.less. If we open up base.less, we see that it’s quite similar to CSS. We can see that the theme is using some Less features like variables. Variables are easy to spot, since they begin with an @ symbol.
让我们更深入地研究这些更少的文件。 index.less进口base.less 。 如果打开base.less ,我们会发现它与CSS非常相似。 我们可以看到主题正在使用一些Less功能,例如变量。 变量很容易发现,因为它们以@符号开头。
For now, let’s focus on the editor’s background color. The color is defined in the first few lines.
现在,让我们集中讨论编辑器的背景色。 颜色在前几行中定义。
@import "syntax-variables";

atom-text-editor, :host {
  background-color: @syntax-background-color;
We can see that the editor’s background-color is set to the variable @syntax-background-color. But where is @syntax-background-color defined?
我们可以看到编辑器的background-color设置为变量@syntax-background-color 。 但是@syntax-background-color在哪里定义?
We can see that a file called syntax-variables has been imported in the first line. Let’s look inside syntax-variables.less for @syntax-background-color‘s definition.
我们可以看到在第一行中已经导入了一个名为syntax-variables的文件。 我们来看一下@syntax-background-color的定义的syntax-variables.less内部。
@import "colors";

// This defines all syntax variables that syntax themes must implement when they
// include a syntax-variables.less file.

// General colors
@syntax-text-color: @very-light-gray;
@syntax-cursor-color: white;
@syntax-selection-color: lighten(@dark-gray, 10%);
@syntax-background-color: @very-dark-gray;
We find that @syntax-background-color is set to @very-dark-gray. As you might’ve guessed, @very-dark-gray is defined in colors.less. This is why we opened up colors.less and changed @very-dark-gray to change the editor’s background color.
我们发现@syntax-background-color设置为@very-dark-gray 。 您可能已经猜到, @very-dark-gray是在colors.less定义的。 这就是为什么我们打开colors.less并更改@very-dark-gray来更改编辑器的背景色的原因。
样式表的组织 (Organization of stylesheets)
How you organize variables between stylesheets is a matter of taste. Atom is suggesting through it’s auto-generated template that you group together items which ought to have the same colors using syntax variables in base.less and then assign a color to each of these variables in syntax-variables.less. But you can see that this is more for our convenience, and in many cases, colors are also directly defined in base.less. Armed with this information, it should be fairly easy to change up the colors in your new theme! Experiment with an entirely new palette and view the results by reloading your Atom window.
如何在样式表之间组织变量是一个问题。 Atom建议通过它的自动生成的模板,将应该使用相同颜色的项目组合在一起,这些内容应该使用base.less语法变量,然后为这些变量中的每个变量分配一个颜色, syntax-variables.less 。 但是您可以看到,这更多是为了我们的方便,而且在许多情况下,颜色也是直接在base.less定义的。 有了这些信息,就可以很容易地更改新主题的颜色! 试用全新的调色板,并通过重新加载Atom窗口查看结果。
高级样式 (Advanced Styling)
But what if we want to change the styling for very specific cases? Apart from variables and imports, there are a couple of other Less features that we will find useful in reading and modifying our stylesheets. You can skip the next two subsections if you’re already comfortable with using Less.
但是,如果我们要针对非常特殊的情况更改样式,该怎么办? 除了变量和导入之外,还有一些其他的Less功能,在阅读和修改样式表时会有用。 如果您已经习惯使用Less,则可以跳过接下来的两个小节。
- Nested styles 嵌套样式
The
&operator&运算子
嵌套样式 (Nested styles)
Less supports nested styles. How do they work?
Less支持嵌套样式。 它们如何工作?
<div class="container">
  <a href="http://some-url.com">Click here!</a>
  <div class="red-block">
    <a href="http://some-url.com">Click here!</a>
    <a href="http://some-url.com">Click here!</a>
  </div>
  <a href="http://some-url.com">Click here!</a>
  <a href="http://some-url.com">Click here!</a>
</div>
Let’s say we wanted all the <a> tags inside .red-block to be red, but not the ones outside. We would write the Less stylesheet this way:
假设我们希望.red-block所有<a>标记为红色,而不是外部的。 我们将以这种方式编写Less样式表:
.container {
  .red-block {
    a {
      color: red;
    }
  }
}
This is the same as:
这与以下内容相同:
a.container.red-block {
  color: red;
}
The auto-generated stylesheets use nested styles extensively, since this ensures that related styles appear together.
自动生成的样式表广泛使用嵌套样式,因为这样可以确保相关样式一起出现。
&运算子 (The & operator)
The & operator is best explained with an example.
最好用示例说明&运算符。
.box {
  color: black;
  &-red {
    color: red;
  }
  &-blue {
    color: blue;
  }
  &:hover {
    color: gray;
  }
}
This is the same as:
这与以下内容相同:
.box {
  color: black;
}
.box-red {
  color: red;
}
.box-blue {
  color: blue;
}
.box:hover {
  color: gray;
}
As you can see, & is shorthand for the parent selector. It’s used quite frequently in base.less and now we know how it works.
如您所见, &是父选择器的简写。 它在base.less经常使用,现在我们知道它是如何工作的。
蓝色变量名称 (Blue variable names)
Now let’s try some advanced color changes. Let’s turn all variable names dark blue. Let’s also underline the variable name when we hover on it.
现在,让我们尝试一些高级的颜色更改。 让我们将所有变量名都变成深蓝色。 当我们在变量名称上悬停时,还要在其下划线。
Atom automatically adds the .variable class to all variables in the code editor. So, we need to modify styling for the .variable class.
Atom自动将.variable类添加到代码编辑器中的所有变量。 因此,我们需要为.variable类修改样式。
.variable {
  color: #336699;
  &:hover {
    text-decoration: underline;
  }
  ...
Reload the page and all the variable names (which start with an @), should now be blue. And hovering on one should result in an underline!
重新加载页面,所有变量名(以@开头)现在应为蓝色。 并且将鼠标悬停在其上将导致出现下划线!
当前行号 (Current line number)
Now let us also turn the current line number blue so that it catches our eye. If you read through base.less, you’ll find a section called .gutter, inside which we can style .line-number.
现在让我们也将当前行号设为蓝色,以便引起我们的注意。 如果通读base.less ,您会发现一个名为.gutter的部分,在其中可以设置.line-number样式。
In colors.less we add @deep-sky-blue: #009ACD;.
在colors.less我们添加@deep-sky-blue: #009ACD; 。
We then use this color in base.less. You might’ve noticed that there are two cursor-line classes in the stylesheet – .cursor-line-no-selection and .cursor-line. Now if some text is selected in a line, we can make the line number stand out even more by making it lighter. Less has a nifty lighten function which enables us to do this easily.
然后,我们在base.less使用此颜色。 您可能已经注意到,样式表中有两个cursor-line类– .cursor-line-no-selection和.cursor-line 。 现在,如果在一行中选择了一些文本,我们可以通过使其更亮来使行号更加突出。 Less拥有漂亮的lighten功能,使我们能够轻松地做到这一点。
.gutter {
  background-color: @syntax-gutter-background-color;
  color: @syntax-gutter-text-color;

  .line-number {
    &.cursor-line {
      background-color: @syntax-gutter-background-color-selected;
      color: lighten(@deep-sky-blue, 10%);
    }

    &.cursor-line-no-selection {
      color: @deep-sky-blue;
    }
That change, if done correctly, looks like so:
如果正确完成,则更改如下所示:
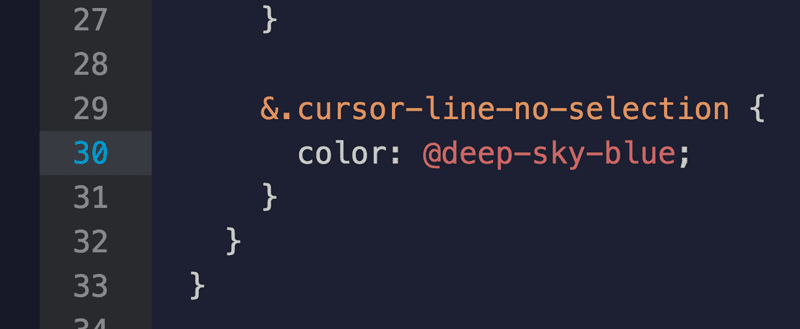
Our new theme for the current line number!
当前行号的新主题!
结论 (Conclusion)
Through a series of simple examples and a working knowledge of CSS, we’ve created a brand new syntax theme for Atom. You can keep improving your Atom theme, and if you like what you’ve built, you can share it with the world using the Atom Package Manager (APM). Happy hacking! Please share the themes that you create in the comments.
通过一系列简单的示例和CSS的使用知识,我们为Atom创建了全新的语法主题。 您可以不断改进Atom主题,并且如果您喜欢自己构建的主题,则可以使用Atom软件包管理器(APM)与世界分享。 骇客骇客! 请分享您在评论中创建的主题。
资源资源 (Resources)
Here’s a list of resources that you can use to dig deeper into some of the ideas introduced in this tutorial -:
这是一份资源列表,您可以用来深入研究本教程中介绍的一些想法-:
Color operation functions in Less: Less has a number of cool color functions like “lighten” and “darken”.
Less中的颜色操作功能 :Less具有许多很酷的颜色功能,例如“变亮”和“变暗”。
Publishing your Atom theme: Instructions on how you can publish an Atom package.
发布您的Atom主题 :有关如何发布Atom程序包的说明。
Atom flight manual: The “Getting Started” manual for all things Atom.
Atom飞行手册 :有关Atom的所有内容的“入门”手册。
翻译自: https://www.sitepoint.com/build-your-own-atom-theme-with-css/


 164
164


 被折叠的 条评论
为什么被折叠?
被折叠的 条评论
为什么被折叠?
 到【灌水乐园】发言


