


cms web
The “Headless CMS” is a relatively new type of tool, but what is it? What makes it different? And, how do you get started with one?
“无头CMS”是一种相对较新的工具,它是什么? 是什么使它与众不同? 而且,您如何入门?
Traditional CMSs typically have two major components: a back end where you create and manage your content, and a front end which displays the content. The front end is almost always a website which is often built using outdated techniques, tools, and libraries.
传统的CMS通常具有两个主要组件:一个用于创建和管理内容的后端,以及一个用于显示内容的前端。 前端几乎总是一个网站,通常使用过时的技术,工具和库来构建。
Headless CMSs take a different approach, only having a back end where you create and manage your content. They typically deliver your content via a robust API which allows you to easily retrieve your content in a developer-friendly way. This separation of concerns means the CMS does only one thing: manage your content. Headless CMSs don’t dictate how or where you display your content. You can deliver your content to any device or platform, using practically any programming language, framework or library.
无头CMS采用不同的方法,只有在后端创建和管理内容。 他们通常通过健壮的API提供您的内容,该API允许您以对开发人员友好的方式轻松检索内容。 关注点的分离意味着CMS只做一件事:管理您的内容。 无头CMS并不指示您如何显示内容或在何处显示内容。 您几乎可以使用任何编程语言,框架或库将内容交付到任何设备或平台。
Looking for more CMS topics? Check out these great links:
寻找更多CMS主题? 查看以下重要链接:
CMS Content Organization Structures: Trees vs Facets vs Tags
And check out SitePoint Premium for more books, courses and free screencasts.
并查看SitePoint Premium,获取更多书籍,课程和免费截屏视频。
使用Elemeno构建简单的投资组合网站 (Building a Simple Portfolio Site with Elemeno)
Let’s take a look at how we would build a simple portfolio site using Elemeno, a popular Headless CMS cofounded by yours truly. We’ll use a typical Node.js development stack, but the same principles could be applied to any language or framework.
让我们看一下如何使用Elemeno构建一个简单的投资组合站点, Elemeno是由您的人真正创立的一种流行的Headless CMS。 我们将使用典型的Node.js开发堆栈,但是相同的原理可以应用于任何语言或框架。
The tools we’ll be using include:
我们将使用的工具包括:
Node.js, a server-side JavaScript runtime environment
服务器端JavaScript运行时环境Node.js
Express, a web framework
Express ,一个Web框架
Pug, a templating library (formerly known as Jade)
Pug ,一个模板库(以前称为Jade)
Elemeno, a headless CMS
Elemeno ,无头CMS
We’ll get started first by setting up our project on Elemeno. Elemeno is a hosted product, so there’s nothing to install and no databases to set up. Simply create an account, if you don’t already have one, then create a new project. You can get started 100% free by choosing the development plan, which will fit our needs perfectly for this demo.
首先,我们在Elemeno上建立我们的项目。 Elemeno是托管产品,因此无需安装任何内容,也无需设置数据库。 只需创建一个帐户 (如果您还没有一个),然后创建一个新项目。 通过选择开发计划,您可以100%免费地上手,这完全符合我们对该演示的需求。
定义内容模型 (Defining content models)
The next step is to define our content models. You can think of a content model as the template of inputs that will be displayed when creating content. Elemeno has two different types of content models: Singles and Collections. Collections allow you to create many items from the same content model. This is perfect for things like collections of products, articles, or projects. Singles allow you to create a single item from a content model. This is ideal for things like contact info, or about us pages.
下一步是定义我们的内容模型。 您可以将内容模型视为创建内容时将显示的输入模板。 Elemeno具有两种不同类型的内容模型: Singles和Collections 。 集合使您可以从同一内容模型创建许多项目。 这非常适合诸如产品,文章或项目的集合之类的事情。 Singles使您可以从内容模型创建单个项目。 对于联系信息或关于我们页面的事情,这是理想的选择。
For our simple portfolio site, we’ll create a Collection to store information about our projects. We’ll need to determine what information we want to display for each project, and what type of input is best suited to capture that information. For our portfolio, each project will have:
对于我们的简单投资组合网站,我们将创建一个Collection来存储有关我们项目的信息。 我们需要确定要为每个项目显示的信息,以及最适合捕获该信息的输入类型。 对于我们的投资组合,每个项目将具有:
- Title (Plain Text) 标题(纯文字)
- Description (Markdown) 说明(降价)
- Date (Date and Time) 日期(日期和时间)
- Screenshot / Photo (Image Picker) 截图/照片(图像选择器)
- URL (Plain Text) 网址(纯文本)
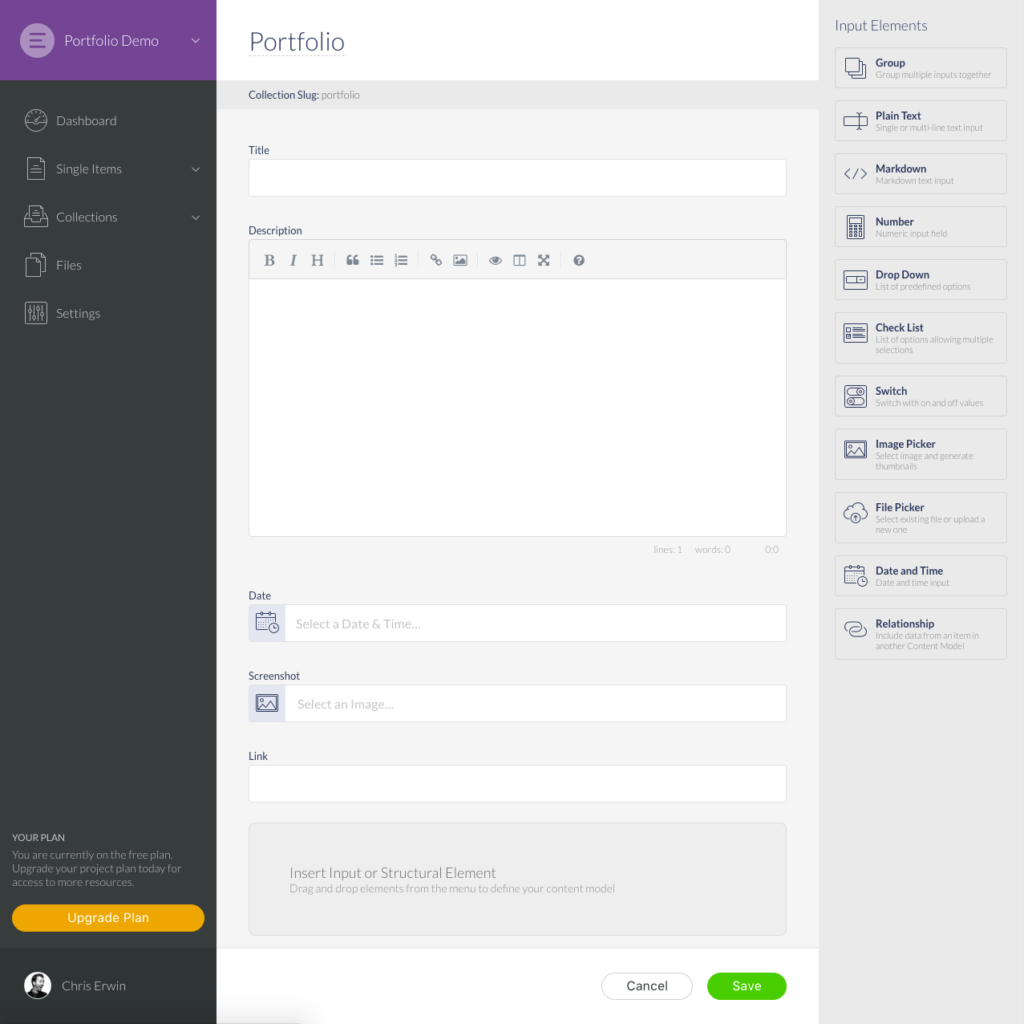
When creating a collection on Elemeno, you start by giving your collection a name at the very top of the screen. We’ll call our collection “Portfolio”. You’ll see that our collection starts with a single “title” input on the left side of the screen, and a list of input elements on the right. To define our content model we simply drag and drop input elements from the list onto our blank slate on the left. These inputs are exactly what you’ll see when creating the content items for your portfolio.
在Elemeno上创建收藏集时,首先需要在屏幕顶部为收藏集命名。 我们将其集合称为“投资组合”。 您会看到我们的集合以屏幕左侧的单个“ title”输入开头,右侧为输入元素列表。 要定义内容模型,我们只需将列表中的输入元素拖放到左侧的空白板上即可。 这些输入正是您为投资组合创建内容项时所看到的。
After placing each input element, click on the input to change its settings. We’ll set the “label” for each input and leave the other options to their default setting for now.
放置每个输入元素后,单击输入以更改其设置。 我们将为每个输入设置“标签”,并暂时将其他选项保留为其默认设置。
Our Portfolio collection should now look something like this:
现在,我们的投资组合集合应如下所示:
Once we’re happy with what we have, we can click the “Save” button to create the collection.
对我们拥有的东西满意后,我们可以单击“保存”按钮来创建集合。
创建项目 (Creating Items)
Now that we have our Portfolio collection defined, we can start creating items. Simply click the “Create the first item” button to get started. Fill out each of the inputs and click the “Save and Publish Now” button to create our Portfolio item. Next, create a few more items to fill up our Portfolio Collection a little bit.
现在我们已经定义了Portfolio集合,我们可以开始创建项目了。 只需单击“创建第一项”按钮即可开始。 填写每个输入,然后单击“立即保存并发布”按钮以创建我们的投资组合项。 接下来,创建更多项目以填充我们的投资组合集。
Now we’re ready to jump into the code and start building our site. First we’ll need to ensure we have Node.js and NPM installed for our development environment. You can do a simple check by opening Terminal and entering the following command:
现在,我们准备跳入代码并开始构建我们的网站。 首先,我们需要确保为开发环境安装了Node.js和NPM。 您可以通过打开终端并输入以下命令来进行简单检查:
node -vYou should see your installed version show up, or command not found: node if Node isn’t installed. If you need to install Node, simply download the installer from the Node.js website.
您应该看到已安装的版本显示出来,或者command not found: node如果未安装Node)。 如果需要安装Node,只需从Node.js网站下载安装程序 。
First create a new directory to store our project files, and then navigate to that folder in a Terminal window. We need a couple of node packages for our project, so we’ll use NPM to install them by entering the following command:
首先创建一个新目录来存储我们的项目文件,然后在“终端”窗口中导航到该文件夹。 我们的项目需要几个节点程序包,因此我们将使用NPM通过输入以下命令来安装它们:
npm install elemeno express pugWe’ll create a new file called server.js, and we’ll get started by including the packages we just downloaded:
我们将创建一个名为server.js的新文件,并开始包含刚刚下载的软件包:
var Elemeno = require('elemeno'),
    express = require('express'),
    pug = require('pug');
We’ll create a new Express application by simply calling Express:
我们将通过简单地调用Express来创建一个新的Express应用程序:
var app = express();Now we need to create a new directory called views to hold all of our Pug template files. Then we’ll configure Express to tell it where our templates live, and which templating engine we’re using. Note: you can use any other supported templating engine based on personal preference.
现在,我们需要创建一个名为views的新目录,以保存我们所有的Pug模板文件。 然后,我们将配置Express来告诉它我们的模板在哪里,以及我们在使用哪个模板引擎。 注意:您可以根据个人喜好使用任何其他受支持的模板引擎。
app.set('views', './views');
app.set('view engine', 'pug');
We can now create the route for our landing page. We’ll keep things nice and simple by defining all of our routes right inside server.js. To define our first route, we’ll use:
现在,我们可以为目标网页创建路线。 通过在server.js内定义所有路由,我们将使事情变得轻松简单。 要定义我们的第一个路线,我们将使用:
app.get('/', function(req, res) {
    res.render('index.pug');
});
This simply tells Express when someone makes a GET request to our root / we want to render our index.pug template.
这只是告诉Express,何时有人向我们的root发出GET请求/我们想呈现我们的index.pug模板。
The next step is to create the index.pug template inside of our views directory. Create a new file, save it as index.pug and for now we’ll just fill it with something simple like:
下一步是在我们的views目录中创建index.pug模板。 创建一个新文件,将其另存为index.pug ,现在,我们将用以下简单内容填充它:
h1 Hello World!Now back in server.js we just need to tell Express which server port it should listen on:
现在回到server.js我们只需要告诉Express它应该侦听哪个服务器端口即可:
app.listen(3000, function () {
    console.log('Portfolio listening on port 3000');
});
From a Terminal window you can now type node server and hit enter to get our website up and running.
现在,您可以在“终端”窗口中键入node server然后按Enter键以启动并运行我们的网站。
Voila! We have a super basic node website. In your web browser go to localhost:3000 and you should see our super awesome “Hello World!” message.
瞧! 我们有一个超级基本节点网站。 在您的Web浏览器中,转到localhost:3000 ,您应该会看到我们的超棒“ Hello World!”。 信息。
包括内容 (Including content)
Now let’s include the content from Elemeno in our website. We’ll start by creating an API Key which will allow us to access the content from our portfolio website. Go to the Settings screen on Elemeno, find the API Keys section and click the “Create API Key” button. We’ll give our key a name of “Website” and we’ll leave the other settings to their defaults. We’ll see our new API Key listed, click on it to view the details and copy the “Access Token” value.
现在,让我们将Elemeno中的内容包含在我们的网站中。 我们将从创建一个API密钥开始,该API密钥将允许我们从投资组合网站访问内容。 转到Elemeno上的“设置”屏幕,找到“ API密钥”部分,然后单击“创建API密钥”按钮。 我们将密钥命名为“网站”,并将其他设置保留为默认设置。 我们将看到列出的新API密钥,单击它以查看详细信息并复制“访问令牌”值。
Back in our server.js file, we’ll create a new instance of the Elemeno client near the top of our file:
回到我们的server.js文件中,我们将在文件顶部附近创建一个Elemeno客户端的新实例:
var Elemeno = require('elemeno'),
    express = require('express'),
    pug = require('pug');

var app = express();
var elemeno = new Elemeno('PASTE-ACCESS-TOKEN-HERE');
Paste in the Access Token we copied from Elemeno. Now inside our index route we’ll fetch a list of projects from our Portfolio collection
粘贴在我们从Elemeno复制的访问令牌中。 现在,在索引路径内,我们将从投资组合集合中获取项目列表
app.get('/', function(req, res) {
    elemeno.getCollectionItems('portfolio', function(err, response) {
        res.render('index.pug', {projects: response.data});
    });
});
We pass the slug for our Portfolio collection, portfolio, to the getCollectionItems function. This function will return an array of objects representing the items in our collection. We then render our Pug template and pass along the data that was returned.
我们将Portfolio集合的portfolio getCollectionItems传递给getCollectionItems函数。 此函数将返回一个对象数组,这些对象代表我们集合中的项目。 然后,我们渲染我们的Pug模板并传递返回的数据。
在模板中实现数据 (Implementing the data in the template)
Our next step is to implement that data in our Pug template. Open the index.pug template and create a simple for in loop to display a list of our projects.
下一步是在我们的Pug模板中实现该数据。 打开index.pug模板并创建一个简单的for in循环以显示我们的项目列表。
for project in projects
    h1= project.title
    div!= project.content.description.html
    img(src= project.content.screenshot.imageUrl)
    p: a(href= project.content.link) Visit Site
If you’re not familiar with Pug templates, this will look a little strange, but essentially each line defines which tag we want to output, and the content for that tag. We use dot notation to access the nested structure of each portfolio object returned from Elemeno. For reference, an item from our portfolio will have a structure similar to:
如果您不熟悉Pug模板,这看起来会有些奇怪,但实际上每一行都定义了我们要输出的标签以及该标签的内容。 我们使用点表示法来访问从Elemeno返回的每个投资组合对象的嵌套结构。 作为参考,我们投资组合中的某个项目的结构类似于:
{
  "id": "123e4567-e89b-12d3-a456-426655440000",
  "slug": "google",
  "title": "Google",
  "dateCreated": "2017-07-11T14:28:49.772Z",
  "dateUpdated": "2017-07-11T14:28:49.772Z",
  "datePublished": "2017-07-11T14:28:49.772Z",
  "published": true,
  "content": {
    "description": {
      "markdown": "The best little search engine that ever existed",
      "html": "<p>The best little search engine that ever existed</p>"
    },
    "date": "2005-07-11T04:00:00+00:00",
    "link": "http://google.com",
    "screenshot": {
      "dateCreated": "2017-07-11T14:25:04.950Z",
      "dateUpdated": "2017-07-11T14:25:04.950Z",
      "title": "google.png",
      "fileSize": "65941",
      "mimeType": "image/png",
      "metaData": {
        "width": 580,
        "colors": {
          "palette": null,
          "dominant": {
            "rgb": {
              "b": 232,
              "g": 233,
              "r": 233
            },
            "hex": "E9E9E8",
            "isLight": true
          }
        },
        "height": 407,
        "alternativeText": null,
        "copyrightInformation": null
      },
      "tags": [],
      "imageUrl": "https://d1o9o9r2qlybfc.cloudfront.net/full/08c3f6dd-b6da-4241-bdd0-288799b1e1a4.png",
      "thumbnails": {}
    }
  }
}
We can restart our server by going back to our Terminal window where our Node server is running and hitting Control + C on our keyboard. This will stop our node server. We can start the server again by typing node server and hitting enter.
我们可以重新启动服务器,方法是返回运行节点服务器的终端窗口,然后按键盘上的Control + C 。 这将停止我们的节点服务器。 我们可以通过键入node server并按Enter来再次启动服务器。
We’ll create a project details page next so that we don’t display all of our content directly on the home page. Create a new template in the views directory called details.pug. In this file, we create something like:
接下来,我们将创建一个项目详细信息页面,这样我们就不会直接在主页上显示所有内容。 在views目录中创建一个名为details.pug的新模板。 在此文件中,我们创建如下内容:
h1= project.title
div!= project.content.description.html
img(src= project.content.screenshot.imageUrl)
p: a(href= project.content.link) Visit Site
And we’ll update our index template to only list the project name with a link to the details view:
并且我们将更新索引模板,以仅列出项目名称以及指向详细信息视图的链接:
for project in projects
    ul
        li: a(href='/view/' + project.slug) #{project.title}
Note how we’re including the project.slug in the URL for the details page. This will allow us to determine which portfolio item to fetch on the details page.
请注意,我们如何在详细信息页面的URL中包含project.slug 。 这将使我们能够确定要在详细信息页面上提取哪个投资组合项目。
Now we need to define a new route for our details view in our server.js file
现在我们需要在server.js文件中为详细信息视图定义一条新路线
app.get('/view/:slug', function(req, res) {
    var slug = req.params.slug;

    elemeno.getCollectionItem('portfolio', slug, function(err, response) {
        res.render('details.pug', {project: response.data});
    });
});
Here you can see that we define our route path with a dynamic parameter :slug. This means that if we make a GET requests to /views/ANYTHING it will get handled by this route. We extract the slug param from the URL and set to a new variable slug which we then pass to our getCollectionItem function. Note this function is fetching a singular item from the collection, so we need to pass both the collection slug and the item slug. This function returns a single object representing the item that we requested. We render our details.pug template and pass along the data for our portfolio item.
在这里,您可以看到我们使用动态参数:slug定义了路由路径。 这意味着,如果我们向/views/ANYTHING发出GET请求,它将通过此路由进行处理。 我们从URL中提取slug参数,并将其设置为新变量slug ,然后将其传递给我们的getCollectionItem函数。 请注意,此函数从集合中获取单个项目,因此我们需要同时传递集合条和项目条。 此函数返回一个代表我们请求的项目的对象。 我们呈现我们的details.pug模板,并传递我们投资组合项目的数据。
We can now restart our server again, and we’ll have a home page that links to our details page and all of the content will be pulled from Elemeno. If we create a new portfolio item on Elemeno, and then refresh our portfolio’s home page, we’ll see the new project listed there as well.
现在,我们可以再次重新启动服务器,我们将有一个主页,该链接链接到我们的详细信息页面,所有内容将从Elemeno提取。 如果我们在Elemeno上创建一个新的项目组合项目,然后刷新我们的项目组合的主页,我们还将在其中看到新项目。
One last step will help handle any cases where we try to access a project that doesn’t exist in our portfolio collection. We’ll build a simple error handler in the details route that will display an error message, instead of crashing our server:
最后一步将帮助您处理任何尝试访问项目集集合中不存在的项目的情况。 我们将在详细信息路由中构建一个简单的错误处理程序,该处理程序将显示错误消息,而不是使我们的服务器崩溃:
app.get('/view/:slug', function(req, res) {
    var slug = req.params.slug;

    elemeno.getCollectionItem('portfolio', slug, function(err, response) {
        if (err) {
            return res.render('404.pug');
        }

        res.render('details.pug', {project: response.data});
    });
});
Then we just create a simple 404.pug template in our views directory with our error message:
然后,我们只404.pug在我们的views目录中创建一个简单的404.pug模板,并显示错误消息:
h1 Oops! that project does not existWe can restart our server again, and if we try access a non-existent project we should get our new 404 page.
我们可以再次重新启动服务器,如果尝试访问一个不存在的项目,我们应该获得新的404页面。
结语 (Wrapping Up)
That’s it! We have a simple website pulling content from a Headless CMS. Our website is incredibly crude, and leaves much to be desired in terms of design and user experience. However, you can see how easy it is to access content from a Headless CMS like Elemeno and use virtually any programming language, templating engine, or framework. We could have easily used a different templating engine like EJS, Dust, or Handlebars. Instead of Express we could have used a different framework like Koa, Hapi, or Sails. Instead of Node we could have used a different programming language altogether like Ruby, PHP, or Python. Instead of a website we could have built a Mobile App, Watch App, or some sort of Arduino prototype.
而已! 我们有一个简单的网站,可从无头CMS提取内容。 我们的网站简直令人毛骨悚然,在设计和用户体验方面还有很多不足之处。 但是,您可以看到从Elemeno之类的Headless CMS访问内容并实际上使用任何编程语言,模板引擎或框架是多么容易。 我们可以轻松使用其他模板引擎,例如EJS,Dust或Handlebars。 代替Express,我们可以使用Koa,Hapi或Sails等其他框架。 可以不使用Node而是使用其他编程语言,例如Ruby,PHP或Python。 代替网站,我们可以构建移动应用程序,Watch App或某种Arduino原型。
A Headless CMS allows you to easily manage your content while allowing you to build projects on multiple devices using your favorite tools and techniques. Your CMS should not dictate where or how you build your projects.
无头CMS使您可以轻松管理内容,同时可以使用自己喜欢的工具和技术在多个设备上构建项目。 您的CMS不应指示您在何处或如何构建项目。
I’ve shared a fully baked version of this simple portfolio site on GitHub: Elemeno Portfolio Demo. Feel free to fork it and make it your own!
我已经在GitHub上共享了此简单投资组合网站的完整版本: Elemeno Portfolio Demo 。 随意分叉,使其成为自己的!
翻译自: https://www.sitepoint.com/build-web-apps-with-a-headless-cms/
cms web


 616
616

 被折叠的 条评论
为什么被折叠?
被折叠的 条评论
为什么被折叠?
 到【灌水乐园】发言


