


linux初学者入门
It is a general tendency of human beings to resist change. Unless Git was around when you started with version control systems, chances are that you are comfortable with Subversion. Often, people say that Git is too complex for beginners. Yet, I beg to differ!
人类抵抗变化是普遍的趋势。 除非在开始使用版本控制系统时Git就在身边,否则您很可能对Subversion感到满意。 人们常常说,Git对于初学者来说太复杂了。 但是,我希望有所不同!
In this tutorial, I will explain how to use Git for your personal projects. We will assume you are creating a project from scratch and want to manage it with Git. After going through the basic commands, we will have a look at how you could put your code in the cloud using GitHub.
在本教程中,我将解释如何在个人项目中使用Git。 我们将假定您正在从头开始创建项目,并希望使用Git进行管理。 完成基本命令后,我们将看看如何使用GitHub将代码放入云中。
We will talk about the basics of Git here — how to initialize your projects, how to manage new and existing files, and how to store your code in the cloud. We will avoid relatively complex parts of Git like branching, as this tutorial is intended for beginners.
我们将在这里讨论Git的基础知识-如何初始化项目,如何管理新文件和现有文件以及如何将代码存储在云中。 我们将避免像分支一样的Git相对复杂的部分,因为本教程是针对初学者的。
安装Git (Installing Git)
The official website of Git has detailed information about installing on Linux, Mac, or Windows. In this case, we would be using Ubuntu 13.04 for demonstration purposes, where you install Git using apt-get.
Git的官方网站提供了有关在Linux,Mac或Windows上安装的详细信息 。 在这种情况下,我们将使用Ubuntu 13.04进行演示,在此使用apt-get安装Git。
sudo apt-get install git初始配置 (Initial Configuration)
Let’s create a directory inside which we will be working. Alternately, you could use Git to manage one of your existing projects, in which case you would not create the demo directory as below.
让我们创建一个我们将在其中工作的目录。 或者,您可以使用Git来管理现有项目之一,在这种情况下,您将不会创建演示目录,如下所示。
mkdir my_git_project
cd my_git_project
The first step is to initialize Git in a directory. This is done using the command init, which creates a .git directory that contains all the Git-related information for your project.
第一步是在目录中初始化Git。 这可以使用命令init完成,该命令将创建一个.git目录,其中包含项目的所有与Git相关的信息。

git initNext, we need to configure our name and email. You can do it as follows, replacing the values with your own name and email.
接下来,我们需要配置我们的名称和电子邮件。 您可以按照以下步骤进行操作,用您自己的名称和电子邮件替换这些值。
git config --global user.name 'Shaumik'
git config --global user.email 'sd@gmail.com'
git config --global color.ui 'auto'
It is important to note that if you do not set your name and email, certain default values will be used. In our case, the username ‘donny’ and email ‘donny@ubuntu’ would be the default values.
重要的是要注意,如果不设置名称和电子邮件,将使用某些默认值。 在我们的例子中,用户名“ donny”和电子邮件“ donny @ ubuntu”将是默认值。
Also, we set the UI color to auto so that the output of Git commands in the terminal are color coded. The reason we prefix --global to the command is to avoid typing these config commands the next time we start a Git project on our system.
另外,我们将UI颜色设置为auto以便终端中Git命令的输出采用颜色编码。 我们在命令前--global的原因是避免下次我们在系统上启动Git项目时键入这些配置命令。
暂存文件以提交 (Staging Files for Commit)
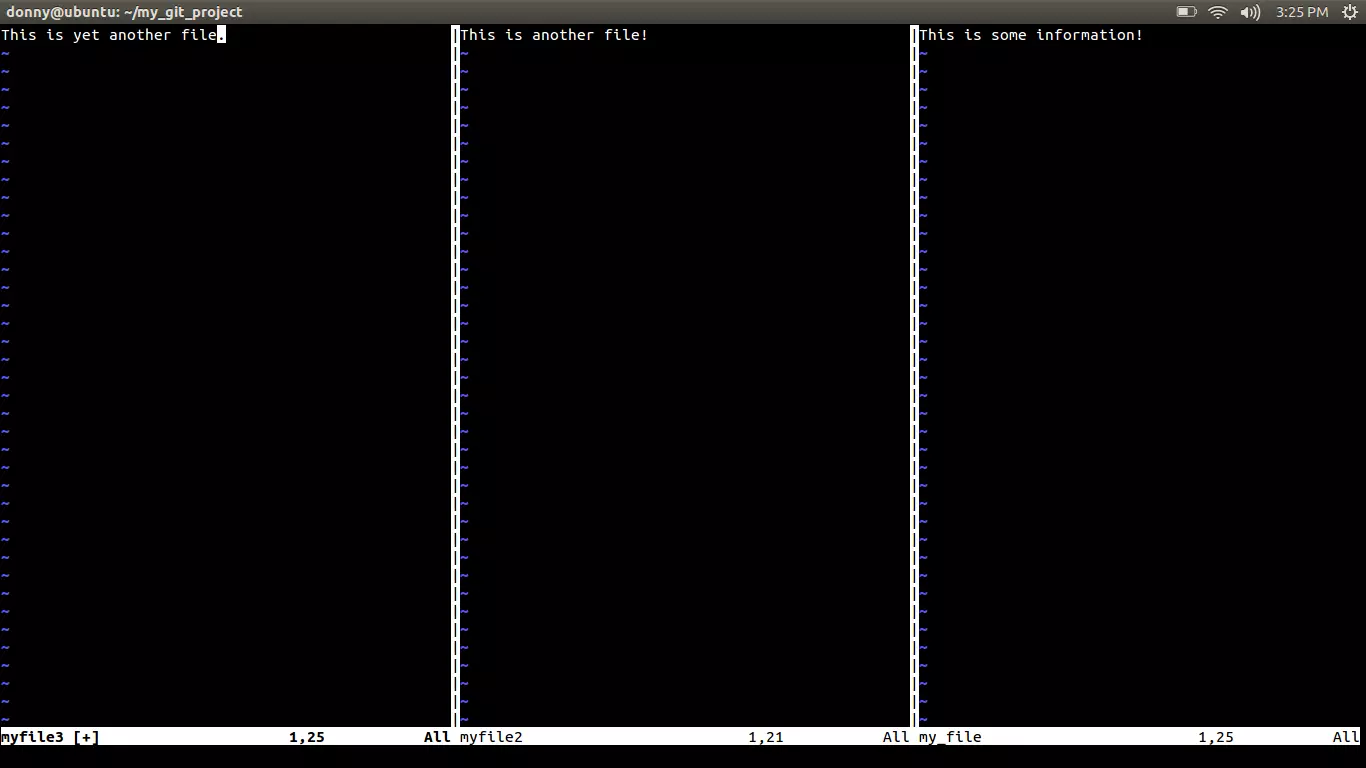
The next step is to create some files in the directory. You could use a text editor like Vim. Note that if you are going to add Git to an already existing directory, you do not need to perform this step.
下一步是在目录中创建一些文件。 您可以使用像Vim这样的文本编辑器。 请注意,如果要将Git添加到现有目录中,则无需执行此步骤。
检查您的存储库状态 (Check the Status of Your Repository)
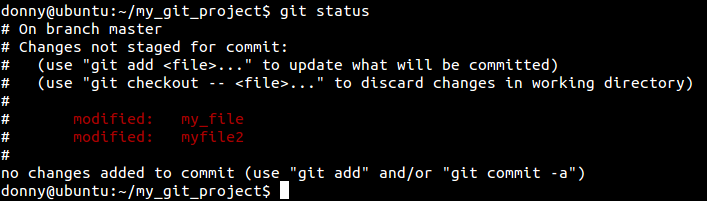
Now that we have some files in our repository, let us see how Git treats them. To check the current status of your repository, we use the git status command.
现在我们的存储库中有一些文件,让我们看看Git如何对待它们。 要检查您存储库的当前状态,我们使用git status命令。
git status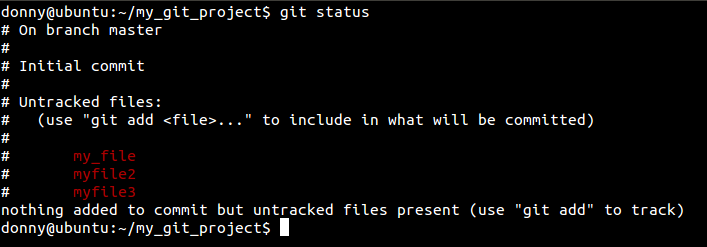
添加要跟踪的Git文件 (Adding Files for Git to Track)
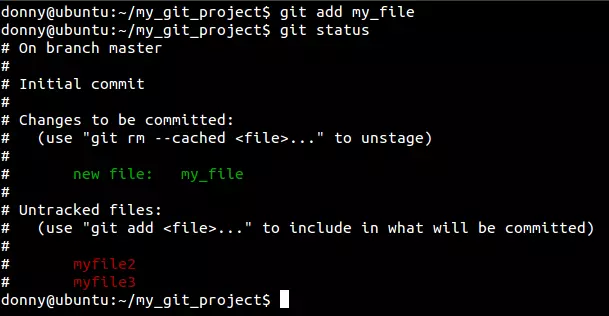
At this point, we do not have any files for Git to track. We need to add files specifically to Git order to tell Git to track them. We add files using add.
目前,我们没有任何文件可供Git跟踪。 我们需要专门向Git添加文件,以告知Git对其进行跟踪。 我们使用add添加文件。
git add my_fileChecking the status of the repository again shows us that one file has been added.
再次检查存储库的状态将向我们显示已添加一个文件。
To add multiple files, we use the following (note that we have added another file for demonstration purposes.)
要添加多个文件,我们使用以下内容(请注意,出于演示目的,我们添加了另一个文件。)
git add myfile2 myfile3You could use git add recursively, but be careful with that command. There are certain files (like compiled files) that are usually kept out of the Git repository. If you use add recursively, it would add all such files, if they are present in your repository.
您可以递归使用git add ,但请谨慎使用该命令。 有些文件(例如编译文件)通常不包含在Git存储库中。 如果您递归使用add ,它将添加所有此类文件(如果它们存在于存储库中)。
删除文件 (Removing Files)
Let’s say you have added files to Git that you do not want it to track. In such a situation, you tell Git to stop tracking them. Yet, running a simple git rm will not only remove it from Git, but will also remove it from your local file system as well! To tell Git to stop tracking a file, but still keep it on your local system, run the following command:
假设您已向Git添加了不希望其跟踪的文件。 在这种情况下,您告诉Git停止跟踪它们。 但是,运行一个简单的git rm不仅可以将它从Git中删除, 还可以将其从本地文件系统中删除 ! 要告诉Git停止跟踪文件,但仍将其保留在本地系统上,请运行以下命令:
git rm --cached [file_name]进行变更 (Committing Changes)
Once you have staged your files, you can commit them into Git. Imagine a commit as a snapshot in time where you can return back to access your repository at that stage. You associate a commit message with every commit, which you can provide with the -m prefix.
暂存文件后,可以commit它们commit到Git中。 想象一下一次提交作为快照,您可以在该阶段返回以访问存储库。 您可以将提交消息与每个提交相关联,您可以使用-m前缀提供该消息。
git commit -m "My first commit"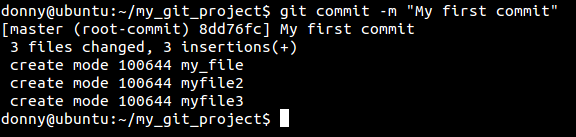
Provide a useful commit message because it helps you in identifying what you changed in that commit. Avoid overly general messages like “Fixed bugs”. If you have an issue tracker, you could provide messages like “Fixed bug #234”. It’s good practice to prefix your branch name or feature name to your commit message. For instance, “Asset management – Added feature to generate PDFs of assets” is a meaningful message.
提供有用的提交消息,因为它可以帮助您识别在该提交中所做的更改。 避免使用过于笼统的信息,例如“已修复的错误”。 如果您有问题跟踪器,则可以提供诸如“已修复的错误#234”之类的消息。 优良作法是在您的提交消息之前添加分支名称或功能名称。 例如,“资产管理–生成资产PDF的新增功能”是一条有意义的消息。
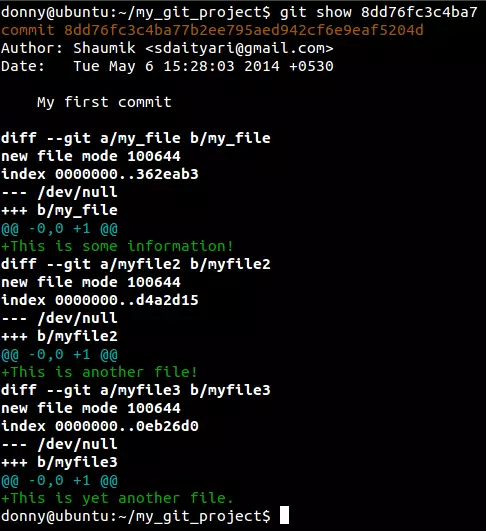
Git identifies commits by attaching a long hexadecimal number to every commit. Usually, you do not need to copy the whole string, and the first 5-6 characters are enough to identify your commit. In the screenshot, notice that 8dd76fc identifies our first commit.
Git通过在每个提交上附加一个十六进制数字来标识提交。 通常,您不需要复制整个字符串,并且前5-6个字符足以标识您的提交。 在屏幕截图中,请注意8dd76fc标识了我们的第一次提交。
进一步承诺 (Further Commits)
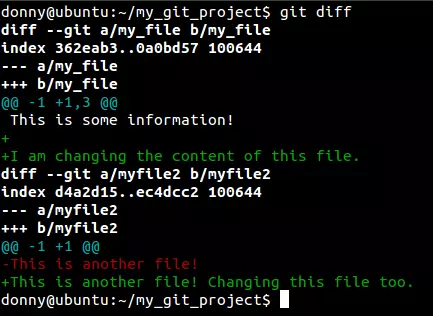
Let’s now change a few files after our first commit. After changing them, we notice through git status that Git notices the change in the files that it is tracking.
现在让我们在第一次提交后更改一些文件。 更改它们之后,我们通过git status注意到Git注意到了它正在跟踪的文件中的更改。
You can check the changes to the tracked files from the last commit by running git diff. If you want to have a look at the changes to a particular file, you can run git diff <file>.
您可以通过运行git diff检查上次提交后对跟踪文件的更改。 如果要查看对特定文件的更改,可以运行git diff <file> 。
You need to add these files again to stage the changes in tracked files for the next commit. You can add all the tracked files by running:
您需要再次添加这些文件,以便在下一次提交时跟踪文件中的更改。 您可以通过运行以下命令添加所有跟踪的文件:
git add -uYou could avoid this command by prefixing -a to git commit, which adds all changes to tracked files for a commit. This process, however, is very dangerous as it can be damaging. For instance, let’s say you opened a file and changed it by mistake. If you selectively stage them, you would notice changes in each file. But if you add -a to your commit, all files would be committed and you would fail to notice possible errors.
您可以通过在git commit前面加上-a来避免此命令,这会将所有更改添加到跟踪的文件中以进行提交。 但是,此过程非常危险,因为它可能会损坏。 例如,假设您打开了一个文件并错误地对其进行了更改。 如果有选择地暂存它们,则会注意到每个文件中的更改。 但是,如果在提交中添加-a ,则所有文件都将被提交,并且您不会注意到可能的错误。
Once you have staged your files, you can proceed to a commit. Im mentioned that a message can be associated with every commit, which we entered by using -m. However, it is possible for you to provide multi-line messages by using the command git commit, which opens up an interactive format for you to write!
暂存文件后,即可继续提交。 我提到了消息可以与每次提交相关联,我们使用-m输入了该消息。 但是,您可以使用git commit命令提供多行消息,这会打开一种交互式格式供您编写!
git commit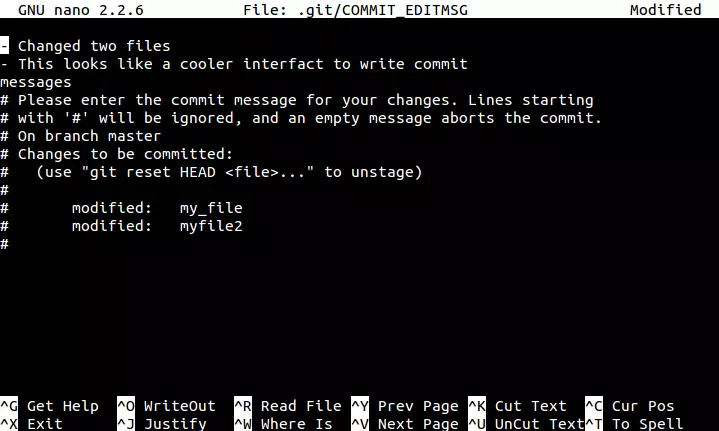
项目管理 (Managing of Your Project)
To check the history of your project, you can run the following command.
要检查项目的历史记录,可以运行以下命令。
git log
This shows you the entire history of the project — which is a list of all the commits and their information. The information about a commit contains the commit hash, author, time and commit message. There are many variations of git log, which you could explore once you understand the concept of a branch in Git. To view the details of a particular commit and the files that were changed, run the following command:
这向您显示了项目的整个历史-这是所有提交及其信息的列表。 有关提交的信息包含提交哈希,作者,时间和提交消息。 git log有多种变体,一旦您了解了Git中branch的概念,就可以进行探索。 要查看特定提交的详细信息以及已更改的文件,请运行以下命令:
git show <hash>Where <hash> is the hex number associated with the commit. As this tutorial is for beginners, we will not cover how to get back to the state of a particular commit in time or how to manage branches.
其中<hash>是与提交关联的十六进制数字。 由于本教程是针对初学者的,因此我们将不介绍如何及时返回特定提交的状态或如何管理分支。
将您的代码放在云端 (Putting Your Code in the Cloud)
Once you have learned how to manage your code on your system, the next step is to put it in the cloud. Since Git doesn’t have a central server like Subversion, you need to add each source to collaborate with others. That is where the concept of remotes comes in. A remote refers to a remote version of your repository.
学习了如何在系统上管理代码后,下一步就是将其放入云中。 由于Git没有像Subversion这样的中央服务器,因此您需要添加每个源以与其他源进行协作。 这就是引入remote概念的地方。 remote是指存储库的远程版本。
If you wish to put your code in the cloud, you could create a project on GitHub, GitLab, or BitBucket and push your existing code to the repository. In this case, the remote repository in the cloud would act as a remote to your repository. Conveniently, a remote to which you have write access is called the origin.
如果希望将代码放在云中,则可以在GitHub , GitLab或BitBucket上创建一个项目,然后将现有代码推送到存储库中。 在这种情况下,云中的远程存储库将充当您的存储库的远程。 方便地,您具有写访问权限的远程称为origin 。
After you create a remote repository, you have the ability to add a remote origin and then push the code to the origin.
创建远程存储库后,可以添加远程origin ,然后将代码推送到源。
git remote add origin https://github.com/sdaityari/my_git_project.git
git push -u origin master
结论 (Conclusion)
Git is full of features and we have covered just the basics here. I hope that this post helped you get started with Git. If you have any issues or questions about getting started, let us know in the comments below.
Git充满了功能,我们在这里仅介绍了基础知识。 我希望这篇文章可以帮助您开始使用Git。 如果您有任何关于入门的问题或疑问,请在下面的评论中告诉我们。
linux初学者入门


 232
232

 被折叠的 条评论
为什么被折叠?
被折叠的 条评论
为什么被折叠?
 到【灌水乐园】发言


