


coldfusion
For web developers who are just starting out, the idea of learning ColdFusion can be daunting, especially given that hosting a commercial site on Adobe ColdFusion server has the potential to be quite costly. While Adobe does provide a free, fully functional developer version of its ColdFusion server, it only allows for a browser from the local machine, plus two IP addresses, to connect at a time. This can place restrictions on the development process. For example, if one was seeking help and wanted to share a work-in-progress with others, Adobe’s development server would prevent this.
对于刚刚起步的Web开发人员而言,学习ColdFusion的想法可能令人望而生畏,尤其是考虑到在Adobe ColdFusion服务器上托管商业站点可能会造成很高的成本。 尽管Adobe确实提供了其ColdFusion服务器的免费的,功能齐全的开发人员版本,但它仅允许来自本地计算机的浏览器以及两个IP地址同时连接。 这可能会限制开发过程。 例如,如果有人寻求帮助并希望与他人共享正在进行的工作,则Adobe的开发服务器将阻止这种情况。
介绍BlueDragon (Introducing BlueDragon)
Enter the dragon! The BlueDragon Server, that is. BlueDragon is a CFML (ColdFusion Markup Language) web server (much like Adobe’s ColdFusion Server), created by a company called New Atlanta. Like the Adobe server, the BlueDragon development server is free. But unlike Adobe’s developer version, it doesn’t restrict IP addresses, although the free version doesn’t support SSL and cannot be used in commercial applications. If your application doesn’t need SSL and is not commercial, then BlueDragon is a terrific alternative to Adobe’s server. Another advantage is that you can actually deploy your application on your own server (as long as it’s non-commercial).
进入龙族! 即是BlueDragon服务器。 BlueDragon是一种CFML(ColdFusion标记语言)Web服务器(类似于Adobe的ColdFusion服务器),由一家名为New Atlanta的公司创建。 像Adobe服务器一样,BlueDragon开发服务器是免费的。 但是与Adobe的开发人员版本不同,它没有限制IP地址,尽管免费版本不支持SSL,也不能在商业应用中使用。 如果您的应用程序不需要SSL且非商业用途,那么BlueDragon是Adobe服务器的绝佳替代品。 另一个优点是,您实际上可以将应用程序部署在自己的服务器上(只要它是非商业性的即可)。
In this article, I’ll show you how to install and configure the BlueDragon web server and write a very simple ColdFusion application. These instructions are very much targeted toward developers who are experimenting with ColdFusion-style development for the first time.
在本文中,我将向您展示如何安装和配置BlueDragon Web服务器以及编写一个非常简单的ColdFusion应用程序。 这些说明非常针对首次尝试ColdFusion风格开发的开发人员。
First up, let’s talk about the differences in the CFML (Cold Fusion Markup Language) support provided for BlueDragon and for the official Adobe server. Some tags are unsupported (although often this is with good reason, as they’re either deprecated or obsolete), some are supported with minor differences (often in the form of options that can be passed to the tag), and some include enhancements to Adobe’s implementation. For the most up-to-date compatibility information, visit New Atlanta’s documentation page for the BlueDragon Server.
首先,让我们谈谈为BlueDragon和官方Adobe服务器提供的CFML(ColdFusion标记语言)支持的区别。 有些标签不受支持(尽管通常有充分的理由,因为它们已被弃用或已作废),有些标签则有细微差别(通常以可以传递给标签的选项形式),有些包含对Adobe的实现。 有关最新兼容性信息,请访问New Atlanta的BlueDragon服务器文档页面 。
One other important point to note is that BlueDragon doesn’t currently support CFMX8. So if you’re working through a ColdFusion-based tutorial using BlueDragon, be sure to keep this point — and the tag compatibility differences mentioned above — in mind.
需要注意的另一重要点是,BlueDragon当前不支持CFMX8。 因此,如果您正在使用BlueDragon完成基于ColdFusion的教程,请务必牢记这一点以及上面提到的标签兼容性。
安装BlueDragon (Installing BlueDragon)
Now that you’re aware of the differences between BlueDragon and Adobe’s implementation of CFML, we can install the BlueDragon server and start experimenting. Visit New Atlanta’s download page for BlueDragon to download the installer. The free version that I’ll assume you’re running throughout this article is located at the very bottom of the page. While this article only covers the installation of the Windows version, installers are available for Mac and Linux as well. Installation instructions for other platforms are available on the documentation page.
现在您已经知道BlueDragon和Adobe的CFML实现之间的区别,我们可以安装BlueDragon服务器并开始实验。 访问New Atlanta的BlueDragon下载页面以下载安装程序。 我认为您在本文中一直在运行的免费版本位于页面的底部。 虽然本文仅介绍Windows版本的安装,但Mac和Linux也可以使用安装程序。 文档页面上提供了其他平台的安装说明。
The install process is straightforward — you’ll be asked to agree to the software license and decide where you want the server to be installed. One screen will ask you for the port number that you wish to run the web server on. The default port is 8080, but you can choose another port if necessary (other development environments, like Ruby On Rails, also use this port for their internal web servers). You also have the option to integrate your BlueDragon server with another web server, as shown in Figure 1.
安装过程非常简单-系统将要求您同意软件许可并决定要在哪里安装服务器。 一个屏幕将询问您要在其上运行Web服务器的端口号。 默认端口是8080,但是您可以根据需要选择其他端口(其他开发环境,例如Ruby On Rails,也将该端口用于其内部Web服务器)。 您还可以选择将BlueDragon服务器与另一个Web服务器集成,如图1所示。
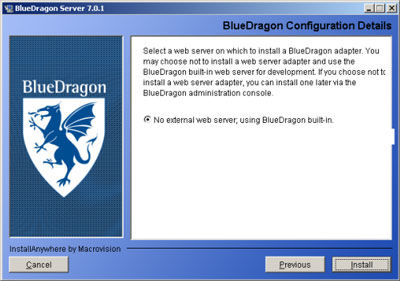
If you’re just getting started with ColdFusion-style development, it’s a good idea to stick with the built-in BlueDragon server, rather than using Apache or IIS, in case you hit any compatibility hurdles.
如果您只是开始使用ColdFusion风格的开发,则最好使用内置的BlueDragon服务器,而不是使用Apache或IIS,以防遇到任何兼容性障碍。
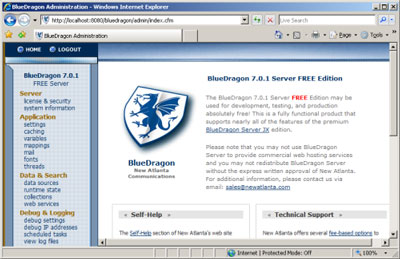
Another installation step will ask you for your password; since the free BlueDragon Server doesn’t support SSL, it’s a good idea to choose a password that you haven’t used on other systems (consider using a site like https://www.goodpassword.com to create a random string). Once the installation is complete, the BlueDragon admin console will launch in your web browser. You should see a login form, shown in Figure 2, at which point you can enter the admin password that you specified during the installation process.
另一个安装步骤将要求您输入密码。 由于免费的BlueDragon服务器不支持SSL,因此,最好选择一个未在其他系统上使用过的密码(考虑使用https://www.goodpassword.com这样的网站来创建随机字符串)。 安装完成后,BlueDragon管理控制台将在您的Web浏览器中启动。 您应该看到一个登录表单,如图2所示,此时您可以输入在安装过程中指定的管理员密码。

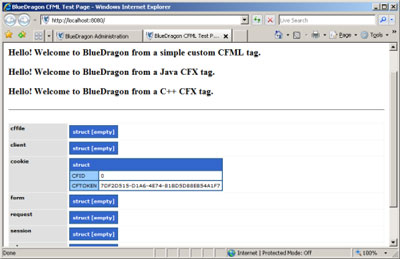
Once you’ve logged in, you’ll see the main console page, shown in Figure 3. The ins and outs of this console are beyond the scope of this article, but suffice it to say that this is where all of the main settings for the BlueDragon web server are contained.
登录后,您将看到主控制台页面,如图3所示。此控制台的来龙去脉不在本文讨论范围之内,但足以说明这是所有主要设置的地方用于BlueDragon Web服务器。
Now that our server is set up, it’s time to write some code to see how well it operates.
现在我们的服务器已经设置好了,是时候编写一些代码来查看其运行情况了。
检查Web服务器 (Checking the Web Server)
To verify that pages other than the admin console are being rendered correctly, open a new tab in your web browser and type the following URL into your address bar: http://localhost:8080/. If you changed the default port from 8080, use your custom port number instead. The list of variables shown in Figure 4 should display.
要验证是否正确显示了管理控制台以外的页面,请在Web浏览器中打开一个新标签,然后在地址栏中输入以下URL: http://localhost:8080/ 。 如果您将默认端口从8080更改为,请改用您的自定义端口号。 应该显示如图4所示的变量列表。
If you have some experience with web servers, you’re probably wondering where the index file that’s responsible for this page is stored. The document root of the BlueDragon server can be found in the directory in which BlueDragon was installed, under the folder wwwroot. For a default installation on Windows, the document root is the folder C:BlueDragon_Server_70wwwroot. In this directory you’ll find a file called index.cfm. This is the file that was parsed by the BlueDragon server in order to produce the page in Figure 4.
如果您对Web服务器有一定的经验,您可能想知道负责此页面的索引文件存储在哪里。 BlueDragon服务器的文档根目录可以在BlueDragon的安装目录下的目录wwwroot 。 对于Windows上的默认安装,文档根目录为文件夹C:BlueDragon_Server_70wwwroot 。 在此目录中,您将找到一个名为index.cfm的文件。 这是BlueDragon服务器解析的文件,以产生图4中的页面。
If you open this file in a text editor, you’ll see a bunch of HTML as well as a number of tags beginning with cf. This is CFML — the core language of ColdFusion. If you haven’t dealt with ColdFusion development before, this code may not make much sense to you, but fear not — we’ll walk through it now.
如果您在文本编辑器中打开此文件,则会看到一堆HTML以及许多以cf开头的标签。 这就是CFML — ColdFusion的核心语言。 如果您以前从未处理过ColdFusion开发,则此代码对您可能没有多大意义,但请不要担心-我们现在将逐步进行介绍。
Before we analyze this code, or write any code of our own, let’s get set up with a decent code editing tool.
在分析这段代码或编写自己的任何代码之前,让我们使用一个不错的代码编辑工具进行设置。
CFEclipse开发ColdFusion (ColdFusion Development with CFEclipse)
Another potential cost when developing with ColdFusion is that of an IDE (Integrated Development Environment). Of course, Adobe sells the Dreamweaver MX product for development, and HomeSite+ also can be used for ColdFusion development. But these products cost money, and we’re trying to avoid that! Fortunately, we can use a free add-on to the Eclipse IDE (Integrated Development Environment) called CFEclipse.
使用ColdFusion开发时的另一个潜在成本是IDE(集成开发环境)的成本。 当然,Adobe出售Dreamweaver MX产品用于开发,并且HomeSite +也可以用于ColdFusion开发。 但是这些产品要花钱,我们正在努力避免这种情况! 幸运的是,我们可以使用名为CFEclipse的Eclipse IDE(集成开发环境)的免费附件。
This add-on is installed through the Eclipse update manager, so first you’ll need to install Eclipse.
该插件是通过Eclipse更新管理器安装的,因此首先您需要安装Eclipse 。
Once you’ve done so, fire it up, and select Help > Software Updates > Find and Install. When you’re prompted, click on the Select new features to install option, which will bring up a list of locations to choose from. The CFEclipse plugin isn’t listed, so we’ll need to add it — click on New Remote Site…, and enter "CFEclipse" in the name field, and http://www.cfeclipse.org/update as the URL. Once you’ve done that, make sure that only the CFEclipse option is checked, then click Continue. Continue through with the rest of the installation process, restarting Eclipse when you’re done.
完成后,启动它,然后选择“ 帮助” >“ 软件更新” >“ 查找并安装” 。 出现提示时,单击“ 选择要安装的新功能”选项,这将弹出一个位置列表供您选择。 CFEclipse插件未列出,因此我们需要添加它-单击“ 新建远程站点…” ,然后在名称字段中输入"CFEclipse" ,并以http://www.cfeclipse.org/update作为URL。 完成此操作后,请确保仅选中CFEclipse选项,然后单击“ 继续” 。 继续进行其余的安装过程,完成后重新启动Eclipse。
What if Eclipse doesn’t behave?If Eclipse doesn’t start after you’ve installed the plugin, try running it from the command line as eclipse -clean.
如果Eclipse不起作用怎么办? 如果在安装插件后Eclipse无法启动,请尝试以eclipse -clean的方式从命令行运行它。
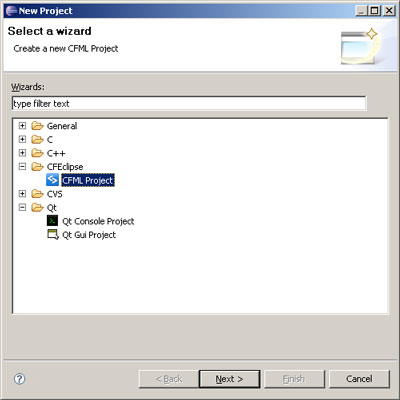
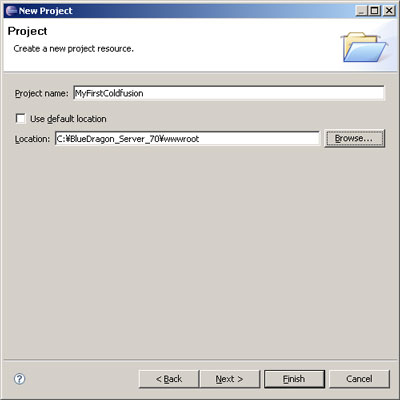
Now that CFEclipse is installed, it’s time to create a new CFML project. Select File > New Project to bring up the new project wizard. As I’ve done in Figure 5 below, select CFML Project from the CFEclipse category.
现在已经安装了CFEclipse,是时候创建一个新的CFML项目了。 选择“ File >“ New Project以打开新项目向导。 正如我在下面的图5中所做的那样,从CFEclipse类别中选择CFML Project 。
The next screen will prompt you for a project name — we’ll call our first project MyFirstColdfusion. Deselect Use default location from the Directory option and browse for the wwwroot directory that we created during the BlueDragon installation.
下一个屏幕将提示您输入项目名称-我们将第一个项目称为MyFirstColdfusion。 从目录选项中取消选择使用默认位置 ,然后浏览我们在BlueDragon安装期间创建的wwwroot目录。
The project creation wizard will prompt you for "referenced projects," a setting you can safely ignore for now. You may also be prompted to switch perspectives. A perspective is a version of the Eclipse user interface that can be modified, depending on which programming language you’re coding in, and what stage of the development process you’re at. Go ahead and allow Eclipse to change your current perspective.
项目创建向导将提示您输入“引用的项目”,您现在可以放心忽略此设置。 可能还会提示您切换透视图。 透视图是Eclipse用户界面的一个版本,可以根据您所使用的编程语言以及所处开发阶段的不同而对其进行修改。 继续并允许Eclipse更改您当前的观点。
When you’ve successfully created your project, look for the MyFirstColdfusion folder under the Project Navigator, click the + next to the folder to expand the view, and locate the index.cfm file. Double-click the filename to edit it in Eclipse.
成功创建项目后,在“项目导航器”下查找MyFirstColdfusion文件夹,单击该文件夹旁边的+以展开视图,然后找到index.cfm文件。 双击文件名以在Eclipse中对其进行编辑。
“你好,世界!” ColdFusion风格 ("Hello World!" ColdFusion-style)
By default, our index.cfm file contains a number of confusing tags; let’s delete the entire contents of this file and replace it with the following code:
默认情况下,我们的index.cfm文件包含许多令人困惑的标记。 让我们删除该文件的全部内容,并将其替换为以下代码:
<html>
<head>
<title>BlueDragon CFML Test Page</title>
</head>
<body bgcolor=#FFFFFF>
<h1>BlueDragon CFML Test Page</H1>
<!-- Our code will go here -->
</body>
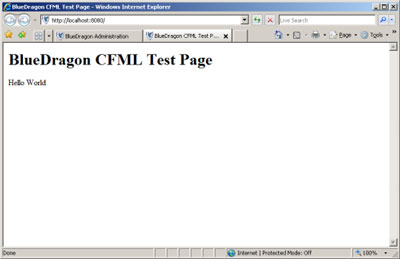
</html>Note that I’ve left a comment in the body of our HTML file that indicates where we’ll add our ColdFusion code later. Most introductions to programming languages begin with a simple "Hello world!" example, however, because we could easily achieve this goal using a simple HTML tag, we’ll instead create an example that’s a little more dynamic and CFML-specific. Here’s our sample code:
请注意,我在HTML文件的主体中留下了注释,该注释指示我们稍后将在何处添加ColdFusion代码。 大部分编程语言介绍都是从一个简单的“ Hello world!”开始的。 但是,由于我们可以使用简单HTML标记轻松实现此目标,因此我们将创建一个更具动态性和特定于CFML的示例。 这是我们的示例代码:
<cfset hello_world = "Hello World!">

<cfoutput>#hello_world#</cfoutput>
Point your web browser at http://localhost:8080/, and you should see a page that displays "BlueDragon CFML Test Page" in its title, and the words "Hello World!" in its body.
将您的Web浏览器指向http://localhost:8080/ ,您应该看到一个标题为“ BlueDragon CFML测试页”的页面,以及“ Hello World!”字样。 在其体内。
Congratulations — you’ve just written your first CFML program! Now, you may be wondering, "What did I just do?" Let’s examine that first line of code:
恭喜,您已经编写了第一个CFML程序! 现在,您可能想知道,“我刚刚做了什么?” 让我们检查一下第一行代码:
<cfset hello_world = "Hello World!">The cfset tag is used to set variables. In this case, we’re creating a string that contains the value "Hello World," and can be identified by the name hello_world. In its most basic form, cfset syntax looks something like this:
cfset标记用于设置变量。 在这种情况下,我们将创建一个包含值“ Hello World”的字符串,并可以使用名称hello_world进行标识。 以最基本的形式, cfset语法如下所示:
<cfset variable_name = value>While we’ve used a string in the above example, we could just as well have assigned a different data type, such as a number, an array or a list.
虽然在上面的示例中使用了字符串,但我们同样可以分配其他数据类型,例如数字,数组或列表。
Let’s take another look at that second line of code:
让我们再来看一下第二行代码:
<cfoutput>#hello_world#</cfoutput>The cfoutput tag accomplishes the same goal as functions such as print and echo in other languages — it writes output to the browser (which is why it’s called, erm, cfoutput). The # signs inside the tag let cfoutput know that the contents it contains are dynamic. You can place either a variable or the result of a function inside the # signs, and it will be evaluated and replaced with the dynamic content. You can also mix regular text with dynamic content, like this:
cfoutput标记实现了与其他语言中的print和echo等功能相同的目标-将输出写入浏览器(这就是为什么将其称为erm, cfoutput )。 标签内的#号使cfoutput知道它包含的内容是动态的。 您可以将变量或函数的结果放在#号中,并将对其进行评估并替换为动态内容。 您还可以将常规文本与动态内容混合,如下所示:
<cfoutput>The variable hello_world = #hello_world#</cfoutput>This would produce the following output:
这将产生以下输出:
The variable hello_world = Hello World!结论 (Conclusion)
In this article, I introduced you to the free BlueDragon CFML server and the CFEclipse plugin. We walked through the installation process for both of these tools, and then you used them to write and execute your first CFML script. If the fear of cost and remote IP restrictions was preventing you from diving into ColdFusion development, you now have no more excuses. You can get started with these free tools today!
在本文中,我向您介绍了免费的BlueDragon CFML服务器和CFEclipse插件。 我们逐步完成了这两个工具的安装过程,然后使用它们来编写和执行第一个CFML脚本。 如果担心成本和远程IP限制使您无法进入ColdFusion开发,那么您现在没有更多借口了。 您今天就可以开始使用这些免费工具!
翻译自: https://www.sitepoint.com/develop-coldfusion-apps-free/
coldfusion


 260
260

 被折叠的 条评论
为什么被折叠?
被折叠的 条评论
为什么被折叠?
 到【灌水乐园】发言


