


In a previous article, you’ve been introduced to CouchDB. This time, you’re going to create a full-fledged app where you can apply the things you learned. You’re also going to learn how to secure your database at the end of the tutorial.
在上一篇文章中,已经向您介绍了CouchDB 。 这次,您将创建一个成熟的应用程序,您可以在其中应用所学到的东西。 您还将在本教程的最后学习如何保护数据库。
项目概况 (Overview of the Project)
You’re going to build a Pokemon spawn locations recorder.
您将要构建一个Pokemon产卵位置记录器。
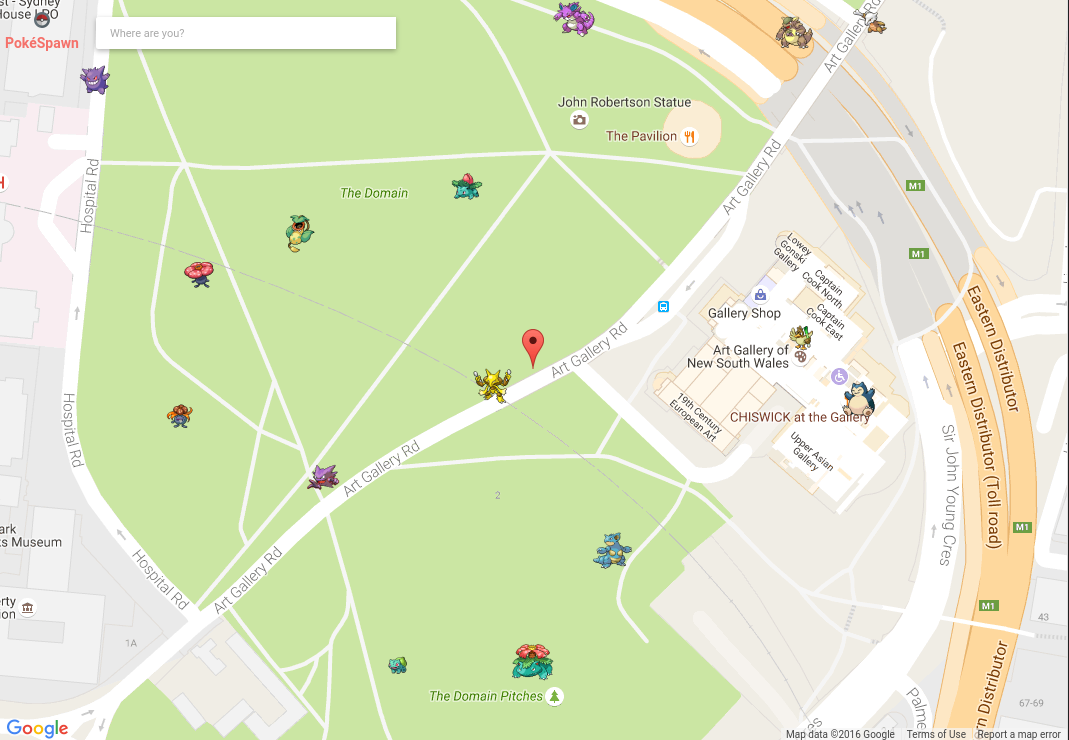
This will allow users to save the locations of the monsters they encounter on Pokemon Go. Google Maps will be used to search for locations and a marker placed to pinpoint the exact location. Once the user is satisfied with the location, the marker can be interacted with, when it will show a modal box which allows the user to enter the name of the Pokemon and save the location. When the next user comes along and searches the same location, the values added by previous users will be plotted in the map as markers. Here’s what the app will look like:
这将允许用户保存他们在Pokemon Go上遇到的怪物的位置。 Google地图将用于搜索位置,并放置一个标记来精确定位位置。 一旦用户对位置满意,就可以与标记进行交互,当标记将显示一个模式框时,允许用户输入神奇宝贝的名称并保存位置。 当下一个用户出现并搜索相同的位置时,前一个用户添加的值将在地图中绘制为标记。 该应用程序的外观如下所示:
The full source code for the project is available on Github.
Github上提供了该项目的完整源代码。
搭建开发环境 (Setting Up the Development Environment)
If you don’t have a good, isolated dev environment set up, it’s recommended you use Homestead Improved.
如果没有良好的隔离开发环境,建议您使用Homestead Improvement 。
The box doesn’t come with CouchDB installed, so you’ll need to do that manually; but not just plain CouchDB. The app needs to work with geo data (latitudes and longitudes): you’ll supply CouchDB with the bounding box information from Google Maps. The bounding box represents the area currently being shown in the map, and all the previous coordinates users have added to that area would be shown on the map as well. CouchDB cannot do that by default, which is why you need to install a plugin called GeoCouch in order to give CouchDB some spatial superpowers.
该包装盒没有安装CouchDB,因此您需要手动进行操作。 但不仅仅是普通的CouchDB。 该应用程序需要使用地理数据(纬度和经度):您将向CouchDB提供Google Maps的边界框信息。 边界框表示当前在地图上显示的区域,并且用户已添加到该区域的所有先前坐标也将显示在地图上。 默认情况下,CouchDB无法做到这一点,这就是为什么您需要安装一个名为GeoCouch的插件以便赋予CouchDB一些空间超级能力的原因。
The simplest way to do that is by means of the GeoCouch docker container. You can also try to install GeoCouch manually but it requires you to install CouchDB from source and configure it all by hand. I don’t really recommend this method unless you have a unix beard.
最简单的方法是通过GeoCouch docker容器 。 您也可以尝试手动安装GeoCouch,但它需要您从源代码安装CouchDB并手动进行配置。 除非您有unix胡须,否则我不建议您使用此方法。
Go ahead and install Docker into the VM you’re using, and come back here once you’re done.
继续, 将Docker安装到您正在使用的VM中 ,完成后再回到这里。
安装GeoCouch (Installing GeoCouch)
First, clone the repo and navigate inside the created directory.
首先,克隆存储库并在创建的目录中导航。
git clone git@github.com:elecnix/docker-geocouch.git
cd docker-geocouch
Next, open the Dockerfile and replace the script for getting CouchDB with the following:
接下来,打开Dockerfile并使用以下内容替换用于获取CouchDB的脚本:
# Get the CouchDB source
RUN cd /opt; wget http://www-eu.apache.org/dist/couchdb/source/${COUCH_VERSION}/a$
    tar xzf /opt/apache-couchdb-${COUCH_VERSION}.tar.gz
You need to do this because the download URL that’s currently being used is already failing.
您需要这样做,因为当前正在使用的下载URL 已经失败 。
Build the docker image:
构建docker映像:
docker build -t elecnix/docker-geocouch:1.6.1 .This will take a while depending on your internet connection so go grab a snack. Once it’s done, create the container and start it:
这将需要一些时间,具体取决于您的互联网连接,因此请品尝小吃。 完成后,创建容器并启动它:
docker create -ti -p 5984:5984 elecnix/docker-geocouch:1.6.1
docker start <container id>
Once it has started, you can test to see if it’s running by executing the following command:
一旦启动,您可以通过执行以下命令来测试它是否正在运行:
curl localhost:5984Outside the VM, if you forwarded ports properly, that’ll be:
在VM外部,如果正确转发了端口,则将是:
curl 192.168.33.10:5984It should return the following:
它应该返回以下内容:
{"couchdb":"Welcome","uuid":"2f0b5e00e9ce08996ace6e66ffc1dfa3","version":"1.6.1","vendor":{"version":"1.6.1","name":"The Apache Software Foundation"}}Note that I’ll constantly refer to 192.168.33.10 throughout the article. This is the IP assigned to Scotchbox, which is the Vagrant box I used. If you’re using Homestead Improved, the IP is 192.168.10.10. You can use this IP to access the app. If you’re using something else entirely, adapt as needed.
请注意,在整篇文章中,我将不断引用192.168.33.10 。 这是分配给Scotchbox的IP,这是我使用的Vagrant框。 如果您使用的是Homestead Improvement ,则IP为192.168.10.10 。 您可以使用此IP访问该应用。 如果您正在使用其他东西,请根据需要进行调整。
设置项目 (Setting Up the Project)
You’re going to use the Slim framework to speed up the development of the app. Create a new project using Composer:
您将使用Slim框架来加速应用程序的开发。 使用Composer创建一个新项目:
php composer create-project slim/slim-skeleton pokespawnpokespawn is the name of the project, so go ahead and navigate to that directory once Composer is done installing. Then, install the following extra packages:
pokespawn是项目的名称,因此在Composer完成安装后继续并导航至该目录。 然后,安装以下额外的软件包:
composer require danrovito/pokephp guzzlehttp/guzzle gregwar/image vlucas/phpdotenvHere’s a brief overview on each one:
以下是每个方面的简要概述:
danrovito/pokephp– for easily talking to the Pokemon API.danrovito/pokephp–用于轻松与Pokemon API对话。guzzlehttp/guzzle– for making requests to the CouchDB server.guzzlehttp/guzzle–用于向CouchDB服务器发出请求。gregwar/image– for resizing the Pokemon sprites returned by the Pokemon API.gregwar/image–用于调整Pokemon API返回的Pokemon小精灵的大小。vlucas/phpdotenv– for storing configuration values.vlucas/phpdotenv–用于存储配置值。
设置数据库 (Setting Up the Database)
Access Futon from the browser and create a new database called pokespawn. Once created, go inside the database and create a new view. You can do that by clicking on the view dropdown and selecting temporary view. Add the following inside the textarea for the Map Function:
从浏览器访问Futon并创建一个名为pokespawn的新数据库。 创建完成后,进入数据库并创建一个新视图。 您可以通过单击视图下拉菜单并选择临时视图来实现 。 在textarea内为Map Function添加以下内容:
function(doc){
  if(doc.doc_type == 'pokemon'){
    emit(doc.name, null);
  }
}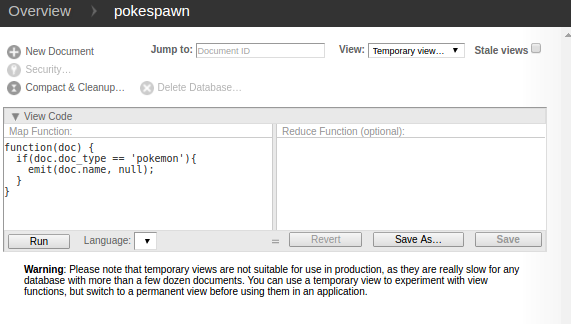
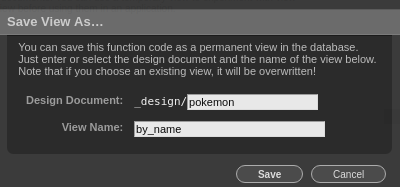
Once that’s done, click on the save as button, add pokemon as the name of the design document, and by_name as the view name. Press on save to save the view. Later on, you’ll be using this view to suggest Pokemon names based on what the user has entered.
完成后,单击“ 另存为”按钮,将pokemon添加为设计文档的名称,并将by_name为视图名称。 按保存以保存视图。 稍后,您将使用此视图根据用户输入的内容来建议Pokemon名称。
Next, create a design document for responding to spatial searches. You can do that by selecting Design documents in the view dropdown then click on new document. Once in the page for creating a design document, click on the add field button and add spatial as the field name, and the following as the value:
接下来,创建一个设计文档以响应空间搜索。 您可以通过在视图下拉菜单中选择“ 设计文档” ,然后单击“ 新文档”来实现 。 进入用于创建设计文档的页面后,单击添加字段按钮,并添加spatial作为字段名称,并添加以下内容作为值:
{
   "points": "function(doc) {\n    if (doc.loc) {\n        emit([{\n            type: \"Point\",\n            coordinates: [doc.loc[0], doc.loc[1]]\n        }], [doc.name, doc.sprite]);\n    }};"
}
This design document utilizes the spatial functions provided by GeoCouch. The first thing it does is check whether the document has a loc field in it. The loc field is an array containing the coordinates of a specific location, with the first item containing the latitude and the second item containing the longitude. If the document meets this criteria, it uses the emit() function just like a normal view. The key is a GeoJSON geometry and the value is an array containing the name of the Pokemon and the sprite.
本设计文件利用了GeoCouch提供的空间功能。 它要做的第一件事是检查文档中是否有loc字段。 loc字段是一个包含特定位置的坐标的数组,其中第一项包含纬度,第二项包含经度。 如果文档符合此条件,则它将像正常视图一样使用emit()函数。 key是GeoJSON几何图形,值是一个包含Pokemon和精灵名称的数组。
When you make a request to the design document, you need to specify the start_range and the end_range which has the format of a JSON array. Each item can either be a number or a null. null is used if you want an open range. Here’s an example request:
向设计文档提出请求时,需要指定具有JSON数组格式的start_range和end_range 。 每个项目可以是数字,也可以是null 。 如果要打开范围,则使用null 。 这是一个示例请求:
curl -X GET --globoff 'http://192.168.33.10:5984/pokespawn/_design/location/_spatial/points?start_range=[-33.87049924568689,151.2149563379288]&end_range=[33.86709181198735,151.22298150730137]'And its output:
及其输出:
{
  "update_seq": 289,
  "rows":[{
     "id":"c8cc500c68f679a6949a7ff981005729",
     "key":[
        [
           -33.869107336588,
           -33.869107336588
        ],
        [
           151.21772705984,
           151.21772705984
        ]
     ],
     "bbox":[
        -33.869107336588,
        151.21772705984,
        -33.869107336588,
        151.21772705984
     ],
     "geometry":{
        "type":"Point",
        "coordinates":[
           -33.869107336588,
           151.21772705984
        ]
     },
     "value":[
        "snorlax",
        "143.png"
     ]
  }]
}
If you want to learn more about what specific operations you can do with GeoCouch, be sure to read the documentation or the Wiki.
如果您想了解更多有关使用GeoCouch可以执行的特定操作的信息,请务必阅读文档或Wiki 。
创建项目 (Creating the Project)
Now you’re ready to write some code. First you’re going to take a look at the code for the back-end then move on to the front-end code.
现在您可以编写一些代码了。 首先,您将看一下后端的代码,然后转到前端代码。
oke进口商 (Poke Importer)
The app requires some Pokemon data to be already in the database before it can be used, thus the need for a script that’s only executed locally. Create a poke-importer.php file at the root of your project directory and add the following:
该应用程序需要先将一些Pokemon数据存储在数据库中,然后才能使用,因此需要仅在本地执行的脚本。 在项目目录的根目录下创建一个poke-importer.php文件,并添加以下内容:
<?php
require 'vendor/autoload.php';

set_time_limit(0);

use PokePHP\PokeApi;
use Gregwar\Image\Image;

$api = new PokeApi;

$client = new GuzzleHttp\Client(['base_uri' => 'http://192.168.33.10:5984']); //create a client for talking to CouchDB

$pokemons = $api->pokedex(2); //make a request to the API
$pokemon_data = json_decode($pokemons); //convert the json response to array

foreach ($pokemon_data->pokemon_entries as $row) {
    $pokemon = [
        'id' => $row->entry_number,
        'name' => $row->pokemon_species->name,
        'sprite' => "{$row->entry_number}.png",
        'doc_type' => "pokemon"
    ];
    //get image from source, save it then resize.
    Image::open("https://raw.githubusercontent.com/PokeAPI/sprites/master/sprites/pokemon/{$row->entry_number}.png")
         ->resize(50, 50)
         ->save('public/img/' . $row->entry_number . '.png');
    //save the pokemon data to the database
    $client->request('POST', "/pokespawn", [
        'headers' => [
                'Content-Type' => 'application/json'
        ],
        'body' => json_encode($pokemon)
    ]);

    echo $row->pokemon_species->name . "\n";
}
echo "done!";
This script makes a request to the Pokedex endpoint of the Pokemon API. This endpoint requires the ID of the Pokedex version that you want it to return. Since Pokemon Go only currently allows players to catch Pokemon from the first generation, supply 2 as the ID. This returns all the Pokemon from the Kanto region of the original Pokemon game. Then loop through the data, extract all the necessary information, save the sprite, and make a new document using the extracted data.
该脚本向Pokemon API的Pokedex端点发出请求。 该端点需要您要返回的Pokedex版本的ID。 由于《 Pokemon Go》目前仅允许玩家抓取第一代Pokemon,因此请提供2作为ID。 这将返回原始口袋妖怪游戏中关东地区的所有口袋妖怪。 然后遍历数据,提取所有必要的信息,保存子画面,并使用提取的数据制作新文档。
路线 (Routes)
Open the src/routes.php file and add the following routes:
打开src/routes.php文件并添加以下路由:
<?php
$app->get('/', 'HomeController:index');
$app->get('/search', 'HomeController:search');
$app->post('/save-location', 'HomeController:saveLocation');
$app->post('/fetch', 'HomeController:fetch');
Each of the routes will respond to the actions that can be performed throughout the app. The root route returns the home page, the search route returns the Pokemon name suggestions, the save-location route saves the location and the fetch route returns the Pokemon in a specific location.
每条路线都会响应可在整个应用中执行的操作。 根路径返回主页, search路径返回口袋妖怪名称建议, save-location路径保存位置, fetch路径返回口袋妖怪在特定位置。
家庭控制器 (Home Controller)
Under the src directory, create an app/Controllers folder and inside create a HomeController.php file. This will perform all the actions needed for each of the routes. Here is the code:
在src目录下,创建一个app/Controllers文件夹,并在内部创建一个HomeController.php文件。 这将执行每条路线所需的所有动作。 这是代码:
<?php
namespace App\Controllers;

class HomeController
{
  protected $renderer;

  public function __construct($renderer)
  {
    $this->renderer = $renderer; //the twig renderer
    $this->db = new \App\Utils\DB; //custom class for talking to couchdb
  }

  public function index($request, $response, $args)
  {
    //render the home page
    return $this->renderer->render($response, 'index.html', $args);
  }

  public function search()
  {
    $name = $_GET['name']; //name of the pokemon being searched
    return $this->db->searchPokemon($name); //returns an array of suggestions based on the user input
  }

  public function saveLocation()
  {
    $id = $_POST['pokemon_id']; //the ID assigned by CouchDB to the Pokemon
    return $this->db->savePokemonLocation($id, $_POST['pokemon_lat'], $_POST['pokemon_lng']); //saves the pokemon location to CouchDB and returns the data needed to plot the pokemon in the map
  }

  public function fetch()
  {
    return json_encode($this->db->fetchPokemons($_POST['north_east'], $_POST['south_west'])); //returns the pokemon's within the bounding box of Google map.
  }
}
The Home Controller uses the $renderer which is passed in via the constructor to render the home page of the app. It also uses the DB class which you’ll be creating shortly.
家用控制器使用$renderer ,它通过构造函数传入以呈现应用程序的主页。 它还使用您将要创建的DB类。
与CouchDB交谈 (Talking to CouchDB)
Create a Utils/DB.php file under the app directory. Open the file and create a class:
在app目录下创建一个Utils/DB.php文件。 打开文件并创建一个类:
<?php
namespace App\Utils;

class DB
{

}
Inside the class, create a new Guzzle client. You’re using Guzzle instead of some of the PHP clients for CouchDB because you can do anything you want with it.
在课程内部,创建一个新的Guzzle客户端。 您正在使用Guzzle而不是CouchDB的某些PHP客户端,因为您可以使用它进行任何操作。
private $client;

public function __construct()
{
    $this->client = new \GuzzleHttp\Client([
        'base_uri' => getenv('BASE_URI')
    ]);
}
The config is from the .env file at the root of the project. This contains the base URL of CouchDB.
该配置来自项目根目录下的.env文件。 它包含CouchDB的基本URL。
BASE_URI="http://192.168.33.10:5984"searchPokemon is responsible for returning the data used by the auto-suggest functionality. Since CouchDB doesn’t actually support the LIKE condition that you’re used to in SQL, you’re using a little hack to mimic it. The trick here is using start_key and end_key instead of just key which only returns exact matches. fff0 is one of the special unicode characters allocated at the very end of the basic multilingual plane. This makes it a good candidate for appending at the end of the actual string being searched, which makes the rest of the characters become optional because of its high value. Note that this hack only works for short words so it’s more than enough for searching for Pokemon names.
searchPokemon负责返回自动建议功能使用的数据。 由于CouchDB实际上并不支持您在SQL中所习惯的LIKE条件,因此您在使用一些技巧来模仿它。 这里的技巧是使用start_key和end_key而不是仅返回完全匹配key 。 fff0是在基本多语言平面的最末端分配的特殊unicode字符之一。 这使其成为附加在要搜索的实际字符串末尾的很好的候选者,这使得其余字符由于其较高的值而成为可选字符。 请注意,此技巧仅适用于简短的单词,因此对于搜索神奇宝贝的名字来说绰绰有余。
public function searchPokemon($name)
{
  $unicode_char = '\ufff0';
  $data = [
    'include_docs' => 'true',
    'start_key' => '"' . $name . '"',
    'end_key' => '"' . $name . json_decode('"' . $unicode_char .'"') . '"'
  ];
  //make a request to the view you created earlier
  $doc = $this->makeGetRequest('/pokespawn/_design/pokemon/_view/by_name', $data);
  if (count($doc->rows) > 0) {
    $data = [];
    foreach ($doc->rows as $row) {
      $data[] = [
        $row->key,
        $row->id
      ];
    }
    return json_encode($data);
  }
  $result = ['no_result' => true];
  return json_encode($result);
}
makeGetRequest is used for performing the read requests to CouchDB and makePostRequest for write.
makeGetRequest用于执行对CouchDB的读取请求和makePostRequest的写入请求。
public function makeGetRequest($endpoint, $data = [])
{
  if (!empty($data)) {
    //make a GET request to the endpoint specified, with the $data passed in as a query parameter
    $response = $this->client->request('GET', $endpoint, [
      'query' => $data
    ]);
  } else {
    $response = $this->client->request('GET', $endpoint);
  }
  return $this->handleResponse($response);
}

private function makePostRequest($endpoint, $data)
{
  //make a POST request to the endpoint specified, passing in the $data for the request body
  $response = $this->client->request('POST', $endpoint, [
    'headers' => [
        'Content-Type' => 'application/json'
    ],
    'body' => json_encode($data)
  ]);
  return $this->handleResponse($response);
}
savePokemonLocation saves the coordinates to which the Google map marker is currently pointing, along with the name and the sprite. A doc_type field is also added for easy retrieval of all the documents related to locations.
savePokemonLocation保存Google地图标记当前指向的坐标,以及name和sprite 。 还添加了doc_type字段,以方便检索与位置有关的所有文档。
public function savePokemonLocation($id, $lat, $lng)
{
  $pokemon = $this->makeGetRequest("/pokespawn/{$id}"); //get pokemon details based on ID

  //check if supplied data are valid
  if (!empty($pokemon->name) && $this->isValidCoordinates($lat, $lng)) {
    $lat = (double) $lat;
    $lng = (double) $lng;
    //construct the data to be saved to the database
    $data = [
      'name' => $pokemon->name,
      'sprite' => $pokemon->sprite,
      'loc' => [$lat, $lng],
      'doc_type' => 'pokemon_location'
    ];

    $this->makePostRequest('/pokespawn', $data); //save the location data
    $pokemon_data = [
      'type' => 'ok',
      'lat' => $lat,
      'lng' => $lng,
      'name' => $pokemon->name,
      'sprite' => $pokemon->sprite
    ];
    return json_encode($pokemon_data); //return the data needed by the pokemon marker
  }
  return json_encode(['type' => 'fail']); //invalid data
}
isValidCoordinates checks if the latitude and longitude values have a valid format.
isValidCoordinates检查纬度和经度值是否具有有效格式。
private function isValidCoordinates($lat = '', $lng = '')
{
  $coords_pattern = '/^[+\-]?[0-9]{1,3}\.[0-9]{3,}\z/';
  if (preg_match($coords_pattern, $lat) && preg_match($coords_pattern, $lng)) {
    return true;
  }
  return false;
}
fetchPokemons is the function that makes the request to the design document for spatial search that you created earlier. Here, you specify the southwest coordinates as the value for the start_range and the northeast coordinates as the value for the end_range. The response is also limited to the first 100 rows to prevent requesting too much data. Earlier, you’ve also seen that there are some data returned by CouchDB that aren’t really needed. It would be useful to extract and then return only the data needed on the front-end. I chose to leave that as an optimization for another day.
fetchPokemons是用于向您先前创建的用于空间搜索的设计文档发出请求的函数。 在这里,您将西南坐标指定为start_range的值,将东北坐标指定为end_range的值。 响应也仅限于前100行,以防止请求太多数据。 之前,您还看到了CouchDB返回的一些真正不需要的数据。 提取然后仅返回前端所需的数据将很有用。 我选择将其作为优化的另一天。
public function fetchPokemons($north_east, $south_west)
{
  $north_east = array_map('doubleval', $north_east); //convert all array items to double
  $south_west = array_map('doubleval', $south_west);
  $data = [
    'start_range' => json_encode($south_west),
    'end_range' => json_encode($north_east),
    'limit' => 100
  ];
  $pokemons = $this->makeGetRequest('/pokespawn/_design/location/_spatial/points', $data); //fetch all pokemon's that are in the current area
  return $pokemons;
}
handleResponse converts the JSON string returned by CouchDB into an array.
handleResponse将CouchDB返回的JSON字符串转换为数组。
private function handleResponse($response)
{
  $doc = json_decode($response->getBody()->getContents());
  return $doc;
}
Open composer.json at the root directory and add the following right below the require property, then execute composer dump-autoload. This allows you to autoload all the files inside the src/app directory and make it available inside the App namespace:
在根目录中打开composer.json ,并在require属性下添加以下内容,然后执行composer dump-autoload 。 这使您可以自动加载src/app目录中的所有文件,并使其在App名称空间中可用:
"autoload": {
    "psr-4": {
        "App\\": "src/app"
    }
}
Lastly, inject the Home Controller into the container. You can do that by opening the src/dependencies.php file and add the following to the bottom:
最后,将家庭控制器注入到容器中。 您可以通过打开src/dependencies.php文件并在底部添加以下内容来做到这一点:
$container['HomeController'] = function ($c) {
    return new App\Controllers\HomeController($c->renderer);
};
This allows you to pass the Twig renderer to the Home Controller and makes HomeController accessible from the router.
这使您可以将Twig渲染器传递到Home Controller,并使HomeController可从路由器访问。
主页模板 (Home Page Template)
Now you’re ready to proceed with the front-end. First, create a templates/index.html file at the root of the project directory and add the following:
现在,您可以继续进行前端了。 首先,在项目目录的根目录下创建一个templates/index.html文件,并添加以下内容:
<!DOCTYPE html>
<html lang="en">
<head>
    <meta charset="UTF-8">
    <meta name="viewport" content="width=device-width, initial-scale=1">
    <title>PokéSpawn</title>
    <link rel="stylesheet" href="lib/picnic/picnic.min.css">
    <link rel="stylesheet" href="lib/remodal/dist/remodal.css">
    <link rel="stylesheet" href="lib/remodal/dist/remodal-default-theme.css">
    <link rel="stylesheet" href="lib/javascript-auto-complete/auto-complete.css">
    <link rel="stylesheet" href="css/style.css">
    <link rel="icon" href="favicon.ico"><!-- by Maicol Torti https://www.iconfinder.com/Maicol-Torti -->
</head>
<body>
  <div id="header">
    <div id="title">
      <img src="img/logo.png" alt="logo" class="header-item" />
      <h1 class="header-item">PokéSpawn</h1>
    </div>
    <input type="text" id="place" class="controls" placeholder="Where are you?"><!-- text field for typing the location -->
  </div>


  <div id="map"></div>
  <!-- modal for saving pokemon location -->
  <div id="add-pokemon" class="remodal" data-remodal-id="modal">
    <h3>Plot Pokémon Location</h3>
    <form method="POST" id="add-pokemon-form">
      <div>
        <input type="hidden" name="pokemon_id" id="pokemon_id"><!-- id of the pokemon in CouchDB-->
        <input type="hidden" name="pokemon_lat" id="pokemon_lat"><!--latitude of the red marker -->
        <input type="hidden" name="pokemon_lng" id="pokemon_lng"><!--longitude of the red marker -->
        <input type="text" name="pokemon_name" id="pokemon_name" placeholder="Pokémon name"><!--name of the pokemon whose location is being added -->
      </div>
      <div>
        <button type="button" id="save-location">Save Location</button><!-- trigger the submission of location to CouchDB -->
      </div>
    </form>
  </div>

  <script src="lib/zepto.js/dist/zepto.min.js"></script><!-- event listening, ajax -->
  <script src="lib/remodal/dist/remodal.min.js"></script><!-- for modal box -->
  <script src="lib/javascript-auto-complete/auto-complete.min.js"></script><!-- for autocomplete text field -->
  <script src="js/main.js"></script>

  <script src="https://maps.googleapis.com/maps/api/js?key=YOUR_GOOGLEMAP_APIKEY&callback=initMap&libraries=places" defer></script><!-- for showing a map-->
</body>
</html>
In the <head> are the styles from the various libraries that the app uses, as well as the styles for the app. In the <body> are the text field for searching locations, the map container, and the modal for saving a new location. Below those are the scripts used in the app. Don’t forget to replace YOUR_GOOGLEMAP_APIKEY in the Google Maps script with your own API key.
在<head>是应用程序使用的各种库中的样式以及应用程序的样式。 在<body>是用于搜索位置的文本字段,地图容器以及用于保存新位置的模式。 在这些下方是应用程序中使用的脚本。 不要忘记用自己的API密钥替换Google Maps脚本中的YOUR_GOOGLEMAP_APIKEY 。
JavaScript (JavaScript)
For the main JavaScript file (public/js/main.js), first create variables for storing values that you will be needing throughout the whole file.
对于主JavaScript文件( public/js/main.js ),首先创建变量以存储整个文件中需要的值。
var modal = $('#add-pokemon').remodal(); //initialize modal
var map; //the google map

var markers = []; //an array for storing all the pokemon markers currently plotted in the map
Next, create the function for initializing the map. A min_zoomlevel is specified to prevent users from zooming out until they can see the entirety of the world map. You’ve already added a limit to the results that can be returned by CouchDB, but this is also a nice addition to prevent the users from expecting that they can select data from the whole world.
接下来,创建用于初始化地图的函数。 指定了min_zoomlevel可以防止用户缩小,直到他们可以看到整个世界地图。 您已经为CouchDB可以返回的结果添加了一个限制,但这也是防止用户期望他们可以从整个世界选择数据的一个很好的补充。
function initMap() {
  var min_zoomlevel = 18;
  map = new google.maps.Map(document.getElementById('map'), {
    center: {lat: -33.8688, lng: 151.2195}, //set
    disableDefaultUI: true, //hide default UI controls
    zoom: min_zoomlevel, //set default zoom level
    mapTypeId: 'roadmap' //set type of map
  });

  //continue here...
}
Create the marker for pin-pointing locations that users want to add. Then, add an event listener for opening the modal for adding locations when the marker is pressed:
创建标记以精确指出用户要添加的位置。 然后,添加事件监听器,以在按下标记时打开用于添加位置的模式:
marker = new google.maps.Marker({
  map: map,
  position: map.getCenter(),
  draggable: true
});

marker.addListener('click', function(){
  var position = marker.getPosition();
  $('#pokemon_lat').val(position.lat());
  $('#pokemon_lng').val(position.lng());
  modal.open();
});
Initialize the search box:
初始化搜索框:
var header = document.getElementById('header');
var input = document.getElementById('place');
var searchBox = new google.maps.places.SearchBox(input); //create a google map search box
map.controls[google.maps.ControlPosition.TOP_LEFT].push(header); //position the header at the top left side of the screen
Add various map listeners:
添加各种地图侦听器:
map.addListener('bounds_changed', function() { //executes when user drags the map
  searchBox.setBounds(map.getBounds()); //make places inside the current area a priority when searching
});

map.addListener('zoom_changed', function() { //executes when user zooms in or out of the map
  //immediately set the zoom to the minimum zoom level if the current zoom goes over the minimum
  if (map.getZoom() < min_zoomlevel) map.setZoom(min_zoomlevel);
});

map.addListener('dragend', function() { //executes the moment after the map has been dragged
  //loop through all the pokemon markers and remove them from the map
  markers.forEach(function(marker) {
    marker.setMap(null);
  });
  markers = [];

  marker.setPosition(map.getCenter()); //always place the marker at the center of the map
  fetchPokemon(); //fetch some pokemon in the current viewable area
});
Add an event listener for when the place in the search box changes.
添加事件侦听器,以了解搜索框中的位置何时发生变化。
searchBox.addListener('places_changed', function() { //executes when the place in the searchbox changes
  var places = searchBox.getPlaces();

  if (places.length == 0) {
    return;
  }

  var bounds = new google.maps.LatLngBounds();
  var place = places[0]; //only get the first place
  if (!place.geometry) {
    return;
  }

  marker.setPosition(place.geometry.location); //put the marker at the location being searched
  if (place.geometry.viewport) {
    // only geocodes have viewport
    bounds.union(place.geometry.viewport);
  } else {
    bounds.extend(place.geometry.location);
  }

  map.fitBounds(bounds); //adjust the current map bounds to that of the place being searched
  fetchPokemon(); //fetch some Pokemon in the current viewable area

});
The fetchPokemon function is responsible for fetching the Pokemon that were previously plotted in the currently viewable area of the map.
fetchPokemon函数负责获取先前在地图的当前可视区域绘制的Pokemon。
function fetchPokemon(){

  //get the northeast and southwest coordinates of the viewable area of the map
  var bounds = map.getBounds();
  var north_east = [bounds.getNorthEast().lat(), bounds.getNorthEast().lng()];
  var south_west = [bounds.getSouthWest().lat(), bounds.getSouthWest().lng()];

  $.post(
    '/fetch',
    {
      north_east: north_east,
      south_west: south_west
    },
    function(response){
      var response = JSON.parse(response);
      response.rows.forEach(function(row){ //loop through all the results returned
        var position = new google.maps.LatLng(row.geometry.coordinates[0], row.geometry.coordinates[1]); //create a new google map position
        //create a new marker using the position created above
        var poke_marker = new google.maps.Marker({
          map: map,
          title: row.value[0], //name of the pokemon
          position: position,
          icon: 'img/' + row.value[1] //pokemon image that was saved locally
        });

        //create an infowindow for the marker
        var infowindow = new google.maps.InfoWindow({
          content: "<strong>" + row.value[0] + "</strong>"
        });
        //when clicked it will show the name of the pokemon
        poke_marker.addListener('click', function() {
          infowindow.open(map, poke_marker);
        });
        markers.push(poke_marker);
      });
    }
  );
}
This is the code for adding the auto-suggest functionality of the text field for entering the name of a Pokemon. A renderItem function is specified to customize the HTML used for rendering each suggestion. This allows you to add the ID of the Pokemon as a data attribute which you then use to set the value of the pokemon_id field once a suggestion is selected.
这是用于添加文本字段的自动建议功能的代码,用于输入神奇宝贝的名称。 指定了renderItem函数以自定义用于呈现每个建议HTML。 这使您可以将Pokemon的ID添加为数据属性,一旦选择了建议,就可以使用它来设置pokemon_id字段的值。
new autoComplete({
  selector: '#pokemon_name', //the text field to add the auto-complete
  source: function(term, response){
    //use the results returned by the search route as a data source
    $.getJSON('/search?name=' + term, function(data){
      response(data);
    });
  },
  renderItem: function (item, search){ //the code for rendering each suggestions.
      search = search.replace(/[-\/\\^$*+?.()|[\]{}]/g, '\\$&');
      var re = new RegExp("(" + search.split(' ').join('|') + ")", "gi");
      return '<div class="autocomplete-suggestion" data-id="' + item[1] + '" data-val="' + item[0] + '">' + item[0].replace(re, "<b>$1</b>")+'</div>';
  },
  onSelect: function(e, term, item){ //executed when a suggestion is selected
    $('#pokemon_id').val(item.getAttribute('data-id'));
  }
});
When the Save Location button is pressed, a request is made to the server to add the Pokemon location to CouchDB.
当按下“ 保存位置”按钮时,将向服务器发出将Pokemon位置添加到CouchDB的请求。
$('#save-location').click(function(e){
  $.post('/save-location', $('#add-pokemon-form').serialize(), function(response){
    var data = JSON.parse(response);
    if(data.type == 'ok'){
      var position = new google.maps.LatLng(data.lat, data.lng); //create a location
      //create a new marker and use the location
      var poke_marker = new google.maps.Marker({
        map: map,
        title: data.name, //name of the pokemon
        position: position,
        icon: 'img/' + data.sprite //pokemon image
      });
      //create an infowindow for showing the name of the pokemon
      var infowindow = new google.maps.InfoWindow({
        content: "<strong>" + data.name + "</strong>"
      });
      //show name of pokemon when marker is clicked
      poke_marker.addListener('click', function() {
        infowindow.open(map, poke_marker);
      });

      markers.push(poke_marker);
    }
    modal.close();
    $('#pokemon_id, #pokemon_lat, #pokemon_lng, #pokemon_name').val(''); //reset the form
  });

});

$('#add-pokemon-form').submit(function(e){
  e.preventDefault(); //prevent the form from being submited on enter
})
款式 (Styles)
Create a public/css/styles.css file and add the following styles:
创建一个public/css/styles.css文件并添加以下样式:
html, body {
    height: 100%;
    margin: 0;
    padding: 0;
}

#header {
    text-align: center;
}

#title {
    float: left;
    padding: 5px;
    color: #f5716a;
}

.header-item {
    padding-top: 10px;
}

h1.header-item {
    font-size: 14px;
    margin: 0;
    padding: 0;
}

#map {
    height: 100%;
}

.controls {
    margin-top: 10px;
    border: 1px solid transparent;
    border-radius: 2px 0 0 2px;
    box-sizing: border-box;
    -moz-box-sizing: border-box;
    height: 32px;
    outline: none;
    box-shadow: 0 2px 6px rgba(0, 0, 0, 0.3);
}

#place {
    background-color: #fff;
    margin-left: 12px;
    padding: 0 11px 0 13px;
    text-overflow: ellipsis;
    width: 300px;
    margin-top: 20px;
}

#place:focus {
    border-color: #4d90fe;
}

#type-selector {
    color: #fff;
    background-color: #4d90fe;
    padding: 5px 11px 0px 11px;
}

#type-selector label {
    font-family: Roboto;
    font-size: 13px;
    font-weight: 300;
}

#target {
    width: 345px;
}

.remodal-wrapper {
    z-index: 100;
}

.remodal-overlay {
    z-index: 100;
}
保护CouchDB (Securing CouchDB)
By default CouchDB is open to all. This means that once you expose it to the internet, anyone can wreak havoc in your database. Anyone can do any database operation by simply using Curl, Postman or any other tool for making HTTP requests. In fact, this temporary state even has a name: the “admin party”. You’ve seen this in action in the previous tutorial and even when you created a new database, a view and a design document earlier. All of these actions can only be performed by the server admin but you’ve gone ahead and done it without logging in or anything. Still not convinced? Try executing this on your local machine:
默认情况下,CouchDB对所有人开放。 这意味着,一旦将其公开给互联网,任何人都可以对数据库造成破坏。 任何人都可以简单地使用Curl , Postman或任何其他发出HTTP请求的工具来执行任何数据库操作。 实际上,该临时状态甚至有一个名称:“管理方”。 您已经在上一教程中看到了这一点,甚至在您之前创建新数据库,视图和设计文档时也已看到。 所有这些操作只能由服务器管理员执行,但是您无需登录或执行任何操作即可完成操作。 还是不服气? 尝试在本地计算机上执行此操作:
curl -X PUT http://192.168.33.10:5984/my_newdatabaseYou’ll get the following as a response if you don’t already have a server admin on your CouchDB installation:
如果您在CouchDB安装中还没有服务器管理员,则会得到以下答复:
{"ok":true}Yikes, right? The good news is there’s an easy fix. All you have to do is create a server admin. You can do so with the following command:
kes,对不对? 好消息是,有一个简单的解决方法。 您所要做的就是创建服务器管理员。 您可以使用以下命令进行操作:
curl -X PUT http://192.168.33.10:5984/_config/admins/kami -d '"mysupersecurepassword"'The command above creates a new server admin named “kami” with the password “mysupersecurepassword”.
上面的命令使用密码“ mysupersecurepassword”创建一个名为“ kami”的新服务器管理员。
By default, CouchDB doesn’t have any server admin so once you create one, the admin party is over. Note that server admins have god-like powers so you’re probably better off creating only one or two. Then create a handful of database admins who can only perform CRUD operations. You can do so by executing the following command:
默认情况下,CouchDB没有任何服务器管理员,因此一旦创建一个服务器,管理员就结束了。 请注意,服务器管理员具有类似上帝的权力,因此最好只创建一个或两个。 然后创建一些只能执行CRUD操作的数据库管理员。 您可以通过执行以下命令来这样做:
curl -HContent-Type:application/json -vXPUT http://kami:mysupersecurepassword@192.168.33.10:5984/_users/org.couchdb.user:plebian --data-binary '{"_id": "org.couchdb.user:plebian","name": "plebian","roles": [],"type": "user","password": "mypass"}'If successful, it will return a response similar to the following:
如果成功,它将返回类似于以下内容的响应:
*   Trying 192.168.33.10...
* Connected to 192.168.33.10 (192.168.33.10) port 5984 (#0)
* Server auth using Basic with user 'root'
> PUT /_users/org.couchdb.user:plebian HTTP/1.1
> Host: 192.168.33.10:5984
> Authorization: Basic cm9vdDpteXN1cGVyc2VjdXJlcGFzc3dvcmQ=
> User-Agent: curl/7.47.0
> Accept: */*
> Content-Type:application/json
> Content-Length: 101
>
* upload completely sent off: 101 out of 101 bytes
< HTTP/1.1 201 Created
< Server: CouchDB/1.6.1 (Erlang OTP/R16B03)
< Location: http://192.168.33.10:5984/_users/org.couchdb.user:plebian
< ETag: "1-9c4abdc905ecdc9f0f56921d7de915b9"
< Date: Thu, 18 Aug 2016 07:57:20 GMT
< Content-Type: text/plain; charset=utf-8
< Content-Length: 87
< Cache-Control: must-revalidate
<
{"ok":true,"id":"org.couchdb.user:plebian","rev":"1-9c4abdc905ecdc9f0f56921d7de915b9"}
* Connection #0 to host 192.168.33.10 left intact
Now you can try the same command from earlier with a different database name:
现在,您可以使用其他数据库名称尝试使用更早的相同命令:
curl -X PUT http://192.168.33.10:5984/my_awesomedatabaseAnd CouchDB will shout at you:
CouchDB会对您大喊:
{"error":"unauthorized","reason":"You are not a server admin."}For this to work, you now have to supply your username and password in the URL like so:
为此,您现在必须在URL中提供用户名和密码,如下所示:
curl -X PUT http://{your_username}:{your_password}@192.168.33.10:5984/my_awesomedatabaseOk, so that’s it? Well, not really because the only thing you’ve done is limit database operations that can only be done by server admins. This includes things like creating a new database, deleting a database, managing users, full-admin access to all databases (including system tables), CRUD operations to all documents. This leaves you with unauthenticated users still having the power to do CRUD stuff on any database. You can give this a try by logging out of Futon, pick any database you want to mess around with and do CRUD stuff in it. CouchDB will still happily perform those operations for you.
好的,就是这样吗? 好吧,不是真的,因为您要做的只是限制只能由服务器管理员执行的数据库操作。 这包括诸如创建新数据库,删除数据库,管理用户,对所有数据库(包括系统表)的完全管理员访问,对所有文档的CRUD操作等操作。 这样,未经身份验证的用户仍然可以在任何数据库上执行CRUD任务。 您可以通过注销Futon进行尝试,选择要使用的任何数据库并在其中进行CRUD。 CouchDB仍将很高兴为您执行这些操作。
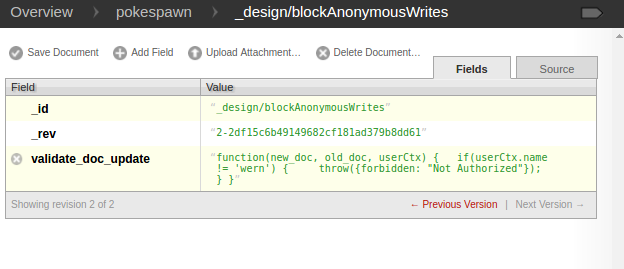
So, how do you patch up the remaining holes? You can do that by creating a design document that will check if the username of the user who is trying to perform a write operation (insert or update) is the same as the name of the user that’s allowed to do it. In Futon, log in using a server admin or database admin account, select the database you want to work with, and create a new design document. Set the ID as _design/blockAnonymousWrites, add a field named validate_doc_update, and set the value to the following:
那么,如何修补剩余的Kong? 您可以通过创建一个设计文档来做到这一点,该文档将检查尝试执行写操作(插入或更新)的用户名是否与允许执行该操作的用户名相同。 在Futon中,使用服务器管理员或数据库管理员帐户登录,选择要使用的数据库,然后创建一个新的设计文档。 将ID设置为_design/blockAnonymousWrites ,添加一个名为validate_doc_update的字段,并将值设置为以下内容:
function(new_doc, old_doc, userCtx){
  if(userCtx.name != 'kami'){
    throw({forbidden: "Not Authorized"});
  }
}
The new version of the document, the existing document, and the user context are passed in as an argument to this function. The only thing you need to check is the userCtx which contains the name of the database, the name of the user who’s doing the operation, and an array of roles assigned to the user.
文档的新版本,现有文档和用户上下文作为该函数的参数传递。 唯一需要检查的是userCtx ,其中包含数据库名称,执行操作的用户名称以及分配给该用户的角色数组。
A secObj is also passed as the fourth argument, but you don’t really need to work on it; that’s why it’s omitted. Basically, the secObj describes what admin privileges have been set on the database.
secObj也作为第四个参数传递,但是您实际上并不需要对其进行处理。 这就是为什么省略它的原因。 基本上, secObj描述了在数据库上设置了哪些管理员特权。
Once you’ve added the value, save the design document, log out, and try to create a new document or update an existing one and watch CouchDB complain at you.
添加值后,保存设计文档,注销,然后尝试创建新文档或更新现有文档,并观察CouchDB向您抱怨。
Since you’re only checking for the username, you might be thinking that attackers can simply guess the username and supply any value to the password and it would work. Well, not really, because CouchDB first checks if the username and password are correct before the design document even gets executed.
由于您仅检查用户名,因此您可能会认为攻击者可以简单地猜测用户名并为密码提供任何值,这样就可以了。 好吧,不是真的,因为CouchDB首先在设计文档执行之前检查用户名和密码是否正确。
Alternatively, if you have many users in a single database, you can also check for the role. The function below will throw an error at any user who doesn’t have the role of “pokemon_master”.
另外,如果一个数据库中有许多用户,则还可以检查角色。 下面的函数将对没有“ pokemon_master”角色的任何用户抛出错误。
function(new_doc, old_doc, userCtx) {
  if(userCtx.roles.indexOf('pokemon_master') == -1){
    throw({forbidden: "Not Authorized"});
  }
}
If you want to learn more about how to secure CouchDB, be sure to check out the following resources:
如果您想了解有关如何保护CouchDB的更多信息,请确保检查以下资源:
保护应用程序 (Securing the App)
Let’s wrap up by updating the app to use the security measures that you’ve applied to the database. First update the .env file: change the BASE_URI with just the IP address and the port, and then add the username and password of the CouchDB user that you’ve created.
最后,通过更新应用程序以使用已应用到数据库的安全措施来结束本文。 首先更新.env文件:仅使用IP地址和端口更改BASE_URI ,然后添加您创建的CouchDB用户的用户名和密码。
BASE_URI="192.168.33.10:5984"
COUCH_USER="plebian"
COUCH_PASS="mypass"
Then, update the constructor of the DB class to use the new details:
然后,更新DB类的构造函数以使用新的详细信息:
public function __construct()
{
  $this->client = new \GuzzleHttp\Client([
    'base_uri' => 'http://' . getenv('COUCH_USER') . ':' . getenv('COUCH_PASS') . '@' . getenv('BASE_URI')
    ]);
}
结论 (Conclusion)
That’s it! In this tutorial, you learned how to create a Pokemon spawn locations recorder app with CouchDB. With the help of the GeoCouch plugin, you were able to perform spatial queries, and you learned how to secure your CouchDB database.
而已! 在本教程中,您学习了如何使用CouchDB创建Pokemon产卵位置记录器应用程序。 借助GeoCouch插件,您可以执行空间查询,并且学习了如何保护CouchDB数据库。
Do you use CouchDB in your projects? What for? Any suggestions / features to add into this little project of ours? Let us know in the comments!
您在项目中使用CouchDB吗? 做什么的? 有什么建议/功能可以添加到我们的这个小项目中吗? 让我们在评论中知道!
翻译自: https://www.sitepoint.com/how-to-create-a-pokemon-spawn-locations-recorder-with-couchdb/


 497
497

 被折叠的 条评论
为什么被折叠?
被折叠的 条评论
为什么被折叠?
 到【灌水乐园】发言


