


SitePoint recently released a new WordPress base theme. It’s very easy to customize and you can quickly and easily build advanced WordPress themes to suit your needs.
SitePoint最近发布了一个新的WordPress基本主题 。 自定义非常容易,您可以快速轻松地构建高级WordPress主题以满足您的需求。
The SitePoint Base Theme gives you full permission to edit and modify the base theme. After downloading this theme, I customized it to build a theme for my WordPress blog. If you’d like to learn more about custom theme development, check out SitePoint’s course Build a Custom WordPress Theme!
SitePoint基本主题为您提供编辑和修改基本主题的完全权限。 下载此主题后,我对其进行了自定义,以为我的WordPress博客构建主题。 如果您想了解有关自定义主题开发的更多信息,请查看SitePoint的课程“ 构建自定义WordPress主题” !
There are two different ways to customize this theme:
自定义此主题有两种方法:
Create a child theme.
创建一个子主题 。
- Use SitePoint Base Theme to kick off your own awesome theme. 使用SitePoint基本主题启动您自己的超赞主题。
In this tutorial, I am going to explain, how to create a child theme and modify the SitePoint Base theme.
在本教程中,我将解释如何创建子主题和修改SitePoint Base主题。
入门 (Getting Started)
I prefer to use a local WordPress installation to create and test new WordPress themes. A local development environment can make your development workflow much faster and simpler.
我更喜欢使用本地WordPress安装来创建和测试新的WordPress主题。 本地开发环境可以使您的开发工作流程更快,更简单。
I’m using WAMP Server for Windows. You can use any tool of your choice to set up local WordPress development environment. MAMP for MAC, WAMP for Windows, XAMPP and Bitnami are cross platform tools to install WordPress locally.
我正在使用Windows的WAMP Server。 您可以使用任何选择的工具来设置本地WordPress开发环境。 适用于MAC的MAMP ,适用于Windows的WAMP , XAMPP和Bitnami是跨平台工具,可在本地安装WordPress。
Download Sitepoint Base Theme
Download a code editor. I prefer SublimeText.
下载代码编辑器。 我更喜欢SublimeText 。
After setting up a local WordPress installation, run your local WordPress site, install and activate SitePoint base theme.
设置本地WordPress安装后,运行本地WordPress网站,安装并激活SitePoint基本主题。
Open your themes folder and create a new folder name it sitepoint-base-child or anything you like. Create two files in this new child folder.
打开您的主题文件夹,然后创建一个新文件夹,名称为sitepoint-base-child或您喜欢的任何名称。 在此新的子文件夹中创建两个文件。
- style.css style.css
- functions.php functions.php
If you do decide to use a child theme with the SitePoint Base Theme, there’s no need to use CSS @import or even enqueue the parent stylesheet. SitePoint Base Theme will automatically enqueue the parent stylesheet for you.
如果您确实决定将子主题与SitePoint基本主题一起使用,则无需使用CSS @import甚至无需排队父样式表。 SitePoint基本主题将自动为您加入父样式表。
Open style.css file and include the following information:
打开style.css文件,并包含以下信息:
/*
 Theme Name:   SitePoint Base Child
 Theme URI:    http://www.yoursite.com/
 Description:  A sitepoint-base child theme by Tahir Taous
 Author:       Your Name
 Author URI:   http://www.yoursite.com
 Template:     sitepoint-base
 Text Domain:  sitepoint-base-child
 Version:      1.0.0
*/
Save your changes.
保存您的更改。
Login to your local WordPress site, go to Appearance > Themes. You should see SitePoint Base Theme there without any screenshot. Activate SitePoint Base Child theme.
登录到您本地的WordPress网站,转到Appearance > Themes 。 您应该在那里看到SitePoint基本主题,而没有任何屏幕截图。 激活SitePoint基本子主题。
Your child theme is ready. Now we can add our own custom styles to suit our own preferences.
您的孩子主题已准备就绪。 现在,我们可以添加自己的自定义样式以适合我们自己的喜好。
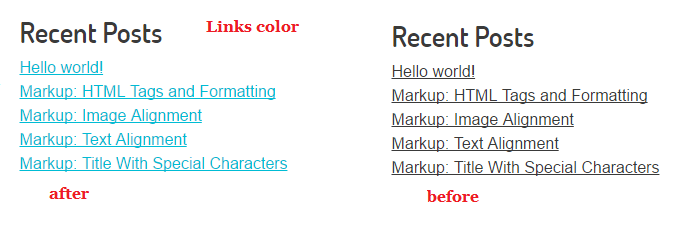
For me, I’d like to change the default color for the links. The default color for the links is #3a3a3a.
对我来说,我想更改链接的默认颜色。 链接的默认颜色是#3a3a3a 。
Open style.css file and add the following styles to change the default color for links. I also want underline all visited links.
打开style.css文件,并添加以下样式以更改链接的默认颜色。 我还想在所有访问过的链接下划线。
a {color: #00BCD4;}
a:visited {text-decoration: underline;}
You can see the base color for the link in the screenshot below.
您可以在下面的屏幕截图中看到链接的基础颜色。
网站名称和说明 (Site Title and Description)
By default, SitePoint Base Theme does not display your tagline and site title size is quite large. Let’s change the styles for the site title and add support for site description. Copy header.php file from SitePoint Base Theme folder and paste it in your child theme.
默认情况下,SitePoint基本主题不会显示您的标语,并且网站标题的大小很大。 让我们更改网站标题的样式,并添加对网站描述的支持。 从SitePoint基本主题文件夹中复制header.php文件,并将其粘贴到您的子主题中。
Around line 45, you can find following code, which displays our site title and logo. If you upload your custom logo, the site title text will be hidden.
在第45行附近,您可以找到以下代码,其中显示了我们的网站标题和徽标。 如果您上传自定义徽标 ,则站点标题文本将被隐藏。
<div class="grid-40 tablet-grid-40 site-title">
  <?php sitepointbase_the_custom_logo() ?>
</div> <!-- /.grid-40.site-title -->
We are now going to replace above code the following new code.
现在,我们将用以下新代码替换上面的代码。
<div class="grid-40 tablet-grid-40">
  <div class="site-title">
    <?php sitepointbase_the_custom_logo() ?>
  </div>
  <p class="site-description">
    <?php bloginfo('description') ?>
  </p>
</div> <!-- /.grid-40.site-title -->
Go to Appearance > Customize > Site Identity and add your site tagline.
转到外观>自定义>网站标识,然后添加网站标语。
Now, if you upload your custom logo, only site title will be hidden not the tagline text.
现在,如果您上传自定义徽标,则只会隐藏网站标题,而不是标语文本。
I’d also like to change the font-size of site-title (64px = 4rem). You can use Chrome Developer Tools to inspect and find all related styles for any element. In your SitePoint Base Theme’s style.css, you can find following styles.
我还想更改site-title的字体大小(64px = 4rem)。 您可以使用Chrome开发者工具来检查和查找任何元素的所有相关样式。 在SitePoint基本主题的style.css ,您可以找到以下样式。
.site-title a {
    color: #3a3a3a;
    font-size: 64px;
    font-size: 4rem;
    text-decoration: none;
}
The size for the site title link is also a little big, so you can reduce the size. Just declare your new styles in child theme’s style.css file. You can also change the color for site title.
网站标题链接的大小也有点大,因此可以减小大小。 只需在子主题的style.css文件中声明您的新样式即可。 您还可以更改网站标题的颜色。
.site-title a {
    color: #00BCD4;
    font-size: 32px;
    font-size: 2rem;
}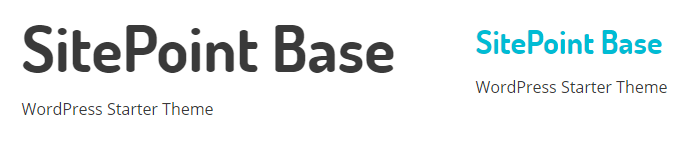
In the screenshot above, you can see new color and the smaller font size for site title.
在上面的屏幕截图中,您可以看到网站标题的新颜色和较小的字体。
新的Google字体 (New Google Font)
I am using a heavily customized SitePoint base theme at my personal and WordPress blog. SitePoint Base is a great starting point but there are a few customisations I want to make such as fonts, color for links and the margin between list items.
我在个人和WordPress博客中使用了高度定制的SitePoint基本主题。 SitePoint Base是一个很好的起点,但是我要进行一些自定义,例如字体,链接的颜色以及列表项之间的边距。
I’d like to use new Google Fonts for my child theme. You can select and use any Google Font. I am going to use Patua One and Titillium Web. For the titles, SitePoint Base uses ‘Dosis’ font, I have selected ‘Patua One’ for the titles.
我想为孩子主题使用新的Google字体 。 您可以选择并使用任何Google字体。 我将使用Patua One和Titillium Web 。 对于标题,SitePoint Base使用“ Dosis”字体,我为标题选择了“ Patua One”。
For body and other content, SitePoint Base theme is using ‘Open Sans’ Google font but I am going to use ‘Titillium Web’.
对于正文和其他内容,SitePoint Base主题使用的是“ Open Sans” Google字体,但我将使用“ Titillium Web”。
Open functions.php file in your child theme and add the following code to register our new Google web fonts (Titillium Web and Patua One).
在您的子主题中打开functions.php文件,并添加以下代码来注册我们的新Google网络字体(Titillium Web和Patua One)。
function sitepoint_base_child_fonts_url() {
$fonts_url = '';

/* Translators: If there are characters in your language that are not
* supported by titillium_web, translate this to 'off'. Do not translate
* into your own language.
*/
$titillium_web = _x( 'on', 'titillium_web font: on or off', 'sitepoint-base-child' );

/* Translators: If there are characters in your language that are not
* supported by Patua One, translate this to 'off'. Do not translate
* into your own language.
*/
$patua_one = _x( 'on', 'Patua One font: on or off', 'sitepoint-base-child' );

if ( 'off' !== $titillium_web || 'off' !== $patua_one ) {
$font_families = array();

if ( 'off' !== $titillium_web ) {
$font_families[] = 'Titillium Web:400,400i,600,900';
}

if ( 'off' !== $patua_one ) {
$font_families[] = 'Patua One:400';
}

$query_args = array(
'family' => urlencode( implode( '|', $font_families ) ),
'subset' => urlencode( 'latin,latin-ext' ),
);

$fonts_url = add_query_arg( $query_args, 'https://fonts.googleapis.com/css' );
}

return esc_url_raw( $fonts_url );
}


// Enqueuing on the front end
function sitepoint_base_child_scripts_styles() {
wp_enqueue_style( 'sitepoint-base-child-fonts', sitepoint_base_child_fonts_url(), array(), null );
}
add_action( 'wp_enqueue_scripts', 'sitepoint_base_child_scripts_styles' );
Next, we need to add the new Google Fonts in the child theme style.css file. Open style.css fine in your child theme and paste the following code.
接下来,我们需要在子主题style.css文件中添加新的Google字体。 在您的子主题中正常打开style.css并粘贴以下代码。
body, dt, b, strong, strong em, b em, em,
.wp-caption .wp-caption-text,
.gallery-caption,
.entry-caption,
blockquote p, blockquote cite,
.menu-toggle, button, input,
.archive-title,
.page-title,
.entry-content th,
.comment-content th,
.comments-link,
.entry-header address,
.comment-content address,
.entry-header time,
.entry-header address,
.entry-content dt,
.comment-content dt,
.archive-meta,
.comments-area article header time,
form label.error,
#wp-calendar caption,
.nav-menu
{
  font-family: 'Titillium Web', sans-serif;
}

h1, h2, h3, h4, h5, h6,
article.sticky .featured-post,
h1.page-title{
font-family: 'Patua One', cursive;
}
Now save your changes and load the front page of your website. You should see your new Google Fonts in action.
现在,保存您的更改并加载网站的首页。 您应该会看到新的Google字体正在运行。
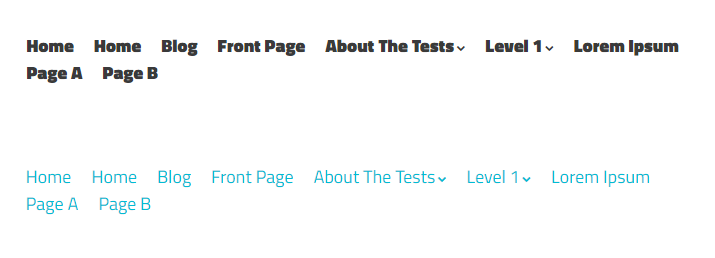
Although, our new Google Fonts are working, we need to modify some styles. The default font-weight is 700 for .nav-menu. See around line 1748 in parent theme’s style.css file. We need to change the default font-weight.
尽管我们的新Google字体正在运行,但是我们需要修改一些样式。 .nav-menu的默认font-weight是700。 请参见父主题的style.css文件中的1748行。 我们需要更改默认的font-weight 。
Open child theme’s style.css file and add the following code.
打开子主题的style.css文件,并添加以下代码。
.nav-menu { font-weight: normal;}
.main-small-navigation a, .main-navigation a{color: #00bcd4;}
The default link color main navigation is #3a3a3a but I have changed it to #00bcd4. You can see the changes in the screenshot below.
默认链接颜色主导航为#3a3a3a但我将其更改为#00bcd4 。 您可以在下面的屏幕截图中看到更改。
其他一些变化 (Some Other Changes)
So far, we have changed the default color for links and the main navigation menu link and added two new Google Fonts. Add following styles in your child theme’s style.css file to add padding between drop-down menu items, increase the margin between list items in widget areas and align site tagline center on small screen devices.
到目前为止,我们已经更改了链接和主导航菜单链接的默认颜色,并添加了两个新的Google字体。 在子主题的style.css文件中添加以下样式,以在下拉菜单项之间添加填充,增加小部件区域中的列表项之间的边距,并在小屏幕设备上对齐网站标语中心。
.main-navigation ul ul a {padding: .5rem;}

.widget li {margin: .5rem 0;}

@media only screen and (max-width: 519px) {
.site-description{text-align: center;}
}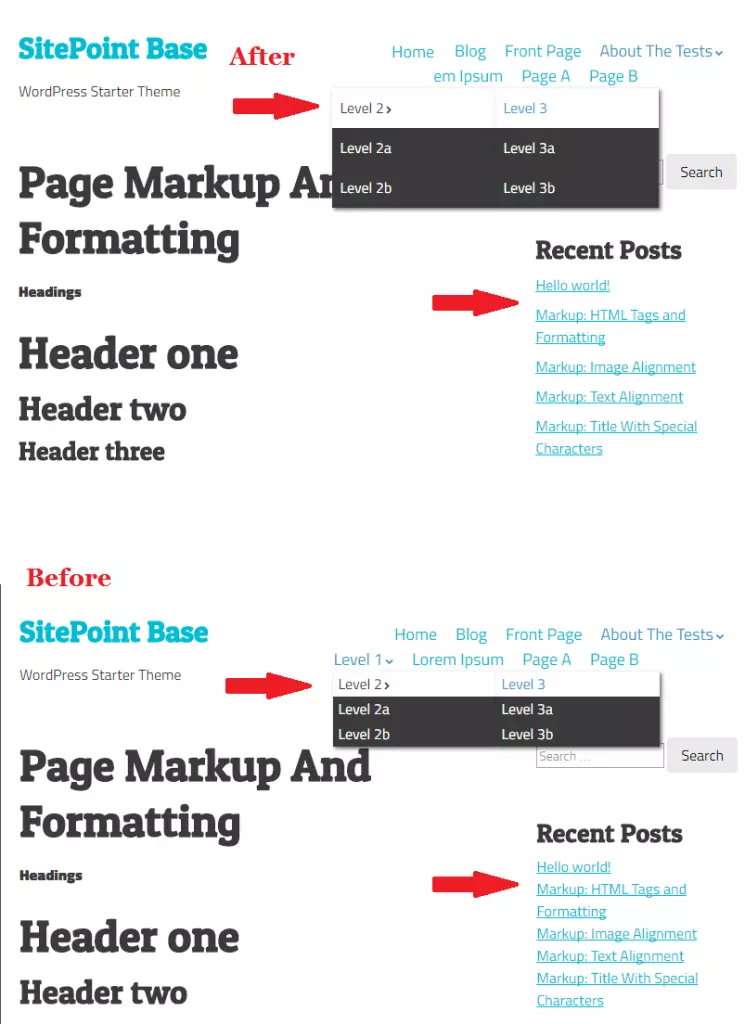
You can see these changes in the above screenshot.
您可以在上面的屏幕截图中看到这些更改。
下一步是什么? (What’s Next?)
In this tutorial, I have explained how you can use a child theme to modify default styles of SitePoint Base Theme, this is just a basic tutorial.
在本教程中,我已经解释了如何使用子主题来修改SitePoint基本主题的默认样式,这只是一个基础教程。
You can even add new navigation menus, custom landing pages, new widget areas, display post excerpt on home-page instead of full post content and more to your child theme. You can even customize default theme to build your own powerful theme.
您甚至可以添加新的导航菜单,自定义登录页面,新的小部件区域,在首页上显示帖子摘录,而不是完整的帖子内容,以及更多子主题。 您甚至可以自定义默认主题以构建自己的强大主题。
Additionally, you can also learn to create a new simple template File for a WordPress theme in SitePoint’s Build Your First WordPress Theme mini course, which you can preview below:
此外,您还可以在SitePoint的“ 构建您的第一个WordPress主题”迷你课程中学习为WordPress主题创建新的简单模板文件,您可以在下面进行预览:
If you enjoyed this tutorial, add your comments below and let us know what you’d like to learn more about so you can learn to customize the SitePoint Base theme like a pro.
如果您喜欢本教程,请在下面添加您的评论,并告诉我们您想了解的更多信息,以便像专业人士一样自定义SitePoint Base主题。
翻译自: https://www.sitepoint.com/customize-sitepoint-wordpress-base-theme/


 2893
2893

 被折叠的 条评论
为什么被折叠?
被折叠的 条评论
为什么被折叠?
 到【灌水乐园】发言


