


 本文深入探讨HTML中的coords属性,解释其在图像映射中的作用,包括如何与a元素结合使用,以及与传统的area元素和map元素的区别。通过实例对比,展示不同方法的应用场景。
描述 (Description)
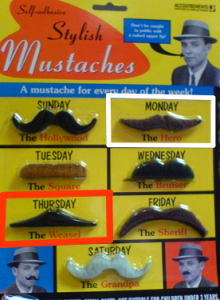
The coords attribute is applied to a link (a element) when the link is contained inside an object element. It’s used to position the link over the top of an image. If you think this sounds like an image map, you’re right. You can use the coords and shape attributes with an a element to create the same effect you’d achieve using a series of area elements in conjunction with a map. Although they do much the same thing, it’s useful to compare the two methods. First, let’s see the image, which is shown below. If we used the client-side image map method to achieve this result, the markup would be as follows:
所述coords属性应用于一个链路( a当链接被包含的内部元件) object元件。 它用于将链接放置在图像上方。 如果您认为这听起来像一张图片地图,那是对的。 您可以将coords和shape属性与元素一起使用,以创建与将一系列area元素与地图结合使用所获得的效果。 尽管它们做的事情大致相同,但是比较这两种方法很有用。 首先,让我们看一下图像,如下所示。 如果我们使用客户端图像映射方法来实现此结果,则标记将如下所示:
<img src="mustaches.png" alt="Mustaches" width="276"
    height="375" border="0" usemap="#Map"/>
<map name="Map" id="Map">
  <area shape="rect" coords="132,117,270,185" href="the-hero.html"
      alt="Monday's mustache - 'The Hero'"/>
  <area shape="poly" coords="136,238,137,301,3,306,3,242"
      href="the-weasel.html" alt="Thursday's mustache -
      'The Weasel'"/>
</map>
This example code consists of area elements to which alt, coords, and shape attributes are applied. All of these attributes apply to the map element.
此示例代码由应用了alt,coords和shape属性的area元素组成。 所有这些属性都适用于map元素。
Now, let’s look at the alternative code, in which the coords and shape attributes are applied to a elements instead:
现在,让我们看一下替代代码,其中将coords和shape属性应用于元素:
<object data="mustaches.png" alt="Mustaches" type="image/png"
    width="276" height="375" border="0" usemap="#Map2">
  <map name="Map2" id="Map2">
    <ul>
      <li><a href="the-hero.html" shape="rect"
          coords="132,117,270,185">Monday's mustache -
          'The Hero'</a></li>
      <li><a href="the-weasel.html" shape="poly"
          coords="136,238,137,301,3,306,3,242">Thursday's
          mustache - 'The Weasel'</a></li>
    </ul>
  </map>
</object>
In the second example, the links have been placed inside a ul, and instead of the alt attributes we used for the area in the first example, the text is contained within the link. The idea is that the user will be presented with a list of links in browsers that don’t support the object element properly.
在第二个示例中,链接已放置在ul ,而不是在第一个示例中用于区域的alt属性,而是在链接中包含了文本。 这样做的想法是,在浏览器中向用户显示不正确支持object元素的链接列表。
例 (Example)
This coords attribute defines the top-left and bottom-right coordinates for a rectangular shape:
此coords属性定义矩形的左上和右下坐标:
<a href="the-hero.html" shape="rect" coords="132,117,270,185">
    Monday's mustache - 'The Hero'</a>
值 (Value)
The values that can be entered into the coords attribute are as follows:
可以输入到coords属性的值如下:
For rectangular shapes (
"rect"), thecoordsattribute will take four values: x1, y1, x2, and y2. These values define the top-left corner of the rectangle (how many pixels along and down from the image’s top-left corner the boundary will appear), and the bottom-right corner (how many pixels along and down from the image’s top-left corner the boundary will appear).对于矩形形状(
"rect"),coords属性将采用四个值: x 1, y 1, x 2和y2 。这些值定义矩形的左上角(沿矩形上下方向有多少像素)图像的左上角将显示边界)和右下角(将在图像的左上角沿上下方向显示多少像素)。For circular shapes (
"circ"), three values are required: x, y, and r. The x and y coordinates tell the browser where the circle’s center point is, while the r value specifies the radius of the circle.对于圆形(
"circ"),需要三个值: x , y和r 。 x和y坐标告诉浏览器圆的中心点在哪里,而r值指定圆的半径。Polygonal shapes (
"poly"), which are almost always created using a WYSIWYG HTML editor such as Dreamweaver, are defined by a series of x, y coordinates, each of which relates to a point on the polygon’s outline.多边形形状(
"poly")几乎总是使用WYSIWYG HTML编辑器(例如Dreamweaver)创建的,由一系列x , y坐标定义,每个坐标与多边形轮廓上的一个点有关。


 1994
1994

 被折叠的 条评论
为什么被折叠?
被折叠的 条评论
为什么被折叠?
 到【灌水乐园】发言


