


atom github
Atom is a fantastic editor and comes by default with all you need to develop your project … except maybe for one thing – that one detail that you’d love to see in Atom. That one thing could be anything: a keyboard shortcut to write faster; an important feature; or even syntax highlighting for a language you use but that isn’t supported by default.
Atom是一个出色的编辑器,默认情况下,它包含开发项目所需的所有内容……也许除了一件事之外-您希望在Atom中看到的那一个细节。 那可能是任何事情:键盘快捷键可以更快地编写; 一个重要特征 甚至是您使用的语言的语法高亮显示,但默认情况下不支持。
The good news is that Atom is ready to welcome a lot of packages. You can extend its default features with these packages, written by the community. But what if you don’t find the package you’re searching for?
好消息是Atom准备好欢迎许多软件包。 您可以使用社区编写的这些软件包扩展其默认功能。 但是,如果找不到要搜索的软件包怎么办?
Writing your own package is not so complicated, so why not? In this tutorial we’ll see how to create our own package for Atom, by taking the example of a syntax highlighting package.
编写自己的程序包并不那么复杂,那为什么不呢? 在本教程中,我们将以语法突出显示包为例,了解如何为Atom创建自己的包。
我们将建立什么 (What We’ll Build)
Recently I wanted to develop some programs in the Scilab language. As it’s a language used in maths, it’s not really the type of language we find by default in Atom, and there was no package for its syntax. That’s why I decided to write my own package: language-scilab.
最近,我想用Scilab语言开发一些程序。 由于它是数学中使用的一种语言,因此它并不是我们默认在Atom中找到的那种语言,并且没有语法包。 这就是为什么我决定编写自己的程序包: language-scilab的原因 。
Here we’ll write a similar package, for the language you want. We’ll see first how to initialize a brand new package with a valid package.json file. Then we’ll write some rules to highlight our language. Finally, we’ll see how to publish our package – so that any user of Atom will be able to use it.
在这里,我们将为您想要的语言编写一个类似的程序包。 我们首先将看到如何使用有效的package.json文件初始化全新的程序package.json 。 然后,我们将编写一些规则来突出我们的语言。 最后,我们将看到如何发布我们的程序包-以便Atom的任何用户都可以使用它。
初始化新的Atom程序包 (Initializing a New Atom Package)
Atom uses a configuration folder to store all your personal options, but also the packages you installed. This folder is named .atom, and is located in your personal folder (/home/user/.atom for instance).
Atom使用配置文件夹存储您的所有个人选项以及已安装的软件包。 该文件夹名为.atom ,位于您的个人文件夹(例如/home/user/.atom )中。
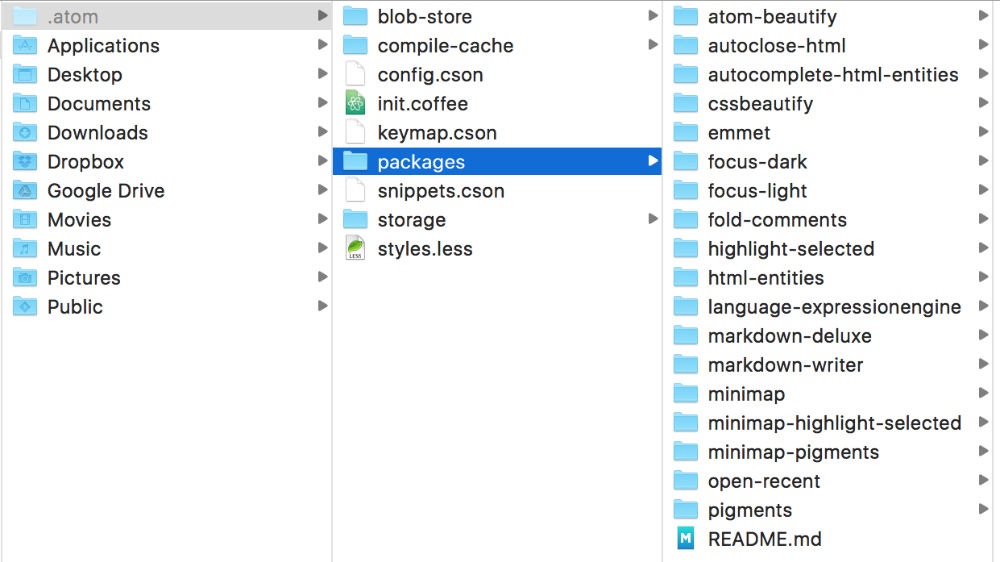
The packages you install are all located in the packages subfolder of this folder. Every package has its own folder. So the first step to create your package is to create the your folder, named after your package. In our example, I create the folder language-mylanguage: it’s a sort of naming convention when we want to add the support for a language.
您安装的软件包都位于此文件夹的packages子文件夹中。 每个程序包都有自己的文件夹。 因此,创建程序包的第一步是创建以程序包命名的文件夹。 在我们的示例中,我创建了文件夹language-mylanguage :当我们要添加对语言的支持时,这是一种命名约定。
For now, your package is invalid. To be recognized by Atom, it needs a package.json file at the root of the folder you just created.
目前,您的包裹无效。 要被Atom识别,它需要在刚创建的文件夹的根目录下有一个package.json文件。
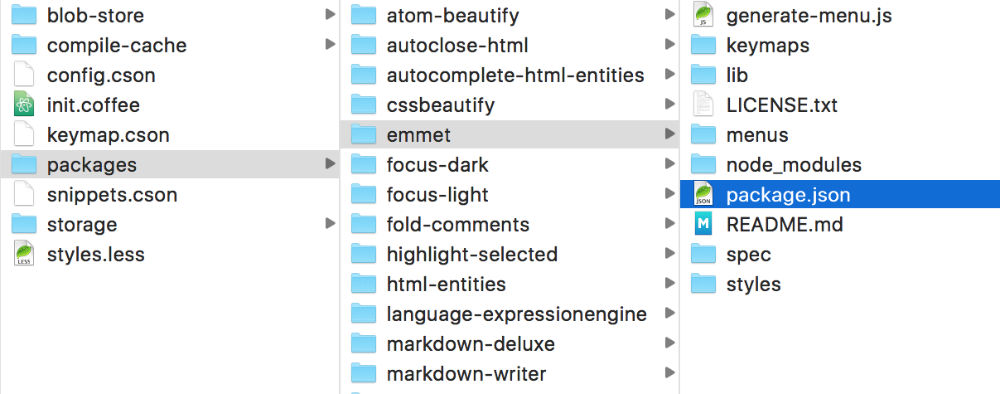
This file contains some information, like the name of your package or the repository where we can find it. Below is the package.json file of our language-mylanguage package (explanations follow):
该文件包含一些信息,例如包的名称或我们可以在其中找到它的存储库。 以下是我们的language-mylanguage软件包的package.json文件(说明如下):
{
  "name": "language-mylanguage",
  "version": "0.0.0",
  "description": "Mylanguage language support in Atom",
  "engines": {
    "atom": "*"
  },
  "dependencies": {},
  "repository": {
    "type": "git",
    "url": "https://github.com/JeremyHeleine/language-mylanguage.git"
  },
  "bugs": {
    "url": "https://github.com/JeremyHeleine/language-mylanguage/issues"
  },
  "license": "MIT"
}
We find several entries in this file. First, the name one: as you can guess, it contains the name of your package. You can (and you should) add a description with the description entry, basically to let the other users know about what your package does.
我们在此文件中找到几个条目。 首先, name一个:您可以猜到,它包含您的包裹的名称。 您可以(并且应该)在description条目中添加描述,基本上是让其他用户知道您的软件包的用途。
The version entry is filled with a version number, which must respect the following convention: major.minor.bug. Here we indicate 0.0.0. Even if you know that you’re developing the version 1.0.0 or 0.1.0 or your package, indicate 0.0.0. We’ll see why when we publish our package.
version条目中填充了一个版本号,必须遵守以下约定: major.minor.bug 。 在这里,我们指出0.0.0 。 即使您知道正在开发1.0.0或0.1.0版本或您的软件包,也请指定0.0.0 。 我们将看到发布包时的原因。
The engines entry can be used to indicate the minimal required version of Atom for your package to work. In the same vein, we find the dependencies entry to indicate other packages needed by your package. It must be used if you create a plugin for another package.
engines条目可用于指示您的软件包正常工作所需的最低版本。 同样,我们找到dependencies项条目来指示您的软件包所需的其他软件包。 如果您为另一个软件包创建插件,则必须使用它。
Then we find the repository entry. It’s the URL indicating where the public repository of your package is located. If you want to publish your package, you need this entry. You can leave it empty for now if you don’t want to create your public repository right now, but think about filling it before publishing.
然后,我们找到repository条目。 该URL指示软件包的公共存储库所在的位置。 如果要发布软件包,则需要此条目。 如果您不想立即创建公共存储库,可以暂时将其保留为空,但可以考虑在发布之前填充它。
The bugs entry is the URL where we can report issues affecting your package. Here we use the default page GitHub offers for every repository. Finally, a license name can be indicated with the license entry.
bugs条目是URL,我们可以在其中报告影响您的软件包的问题。 在这里,我们使用GitHub为每个存储库提供的默认页面。 最后,可以在license条目中指示许可证名称。
Other entries can be filled if you need them. They’re not mandatory. All available entries can be found on Atom documentation.
如果需要,可以填写其他条目。 它们不是强制性的。 所有可用的条目都可以在Atom文档中找到。
Now that your package has a valid package.json file, Atom can recognize it and load it. However, it’s totally useless right now, so it’s time to make it useful by giving it some features.
现在,您的软件包有了有效的package.json文件,Atom可以识别并加载它。 但是,它现在完全没有用,因此是时候通过提供一些功能来使其变得有用。
Note that Atom won’t load your package now: it loads all the installed packages at start. You can, however, force Atom to reload the packages with View/Reload. It’s useful for seeing the changes you just did on your package.
请注意,Atom现在不会加载您的软件包:它将在启动时加载所有已安装的软件包。 但是,您可以强制Atom使用View/Reload加载软件包。 这对于查看您刚刚对程序包所做的更改很有用。
创建语法突出显示包 (Creating a Syntax Highlighting Package)
To add new syntax highlighting rules, you need to create a subfolder named grammars. In this folder, create a new CSON file named after the language you want to support (e.g. mylanguage.cson). This file will contain all your syntax highlighting rules.
要添加新的语法突出显示规则,您需要创建一个名为grammars的子文件夹。 在此文件夹中,创建一个新的CSON文件,该文件以您要支持的语言(例如mylanguage.cson )命名。 该文件将包含所有语法突出显示规则。
基本信息 (Basic Information)
Before identifying the syntax of our language, we need to tell Atom how to identify this language. This can be achieved thanks to three entries in your newly created CSON file:
在确定我们语言的语法之前,我们需要告诉Atom如何识别该语言。 这可以通过新创建的CSON文件中的三个条目来实现:
'scopeName': 'source.mylanguage'
'name': 'Mylanguage'
'fileTypes': ['ext1', 'ext2']
The scopeName entry is a way to identify your language for themes, other packages or even configuration files. Generally we follow the convention used above.
scopeName条目是一种识别主题,其他软件包甚至配置文件的语言的方法。 通常,我们遵循上面使用的约定。
The name entry contains the name of the language that will be displayed at the bottom right corner of Atom, when you are editing a file using your language.
name条目包含使用语言编辑文件时将在Atom右下角显示的语言名称。
Finally, the fileTypes entry contains an array listing all the file extensions used by your language. Each time you open a file using one of these extensions, Atom will automatically choose your syntax highlighting.
最后, fileTypes条目包含一个数组,该数组列出了您的语言使用的所有文件扩展名。 每次使用这些扩展名之一打开文件时,Atom都会自动选择语法突出显示。
语法规则 (Syntax Rules)
All the rules for your language must be declared in a fourth entry: patterns. We’ll see here two types of rules we can add. However, any added rule must be declared between {} in the patterns array:
您所用语言的所有规则都必须在第四项中声明: patterns 。 我们将在此处看到可以添加的两种规则。 但是,必须在patterns数组的{}之间声明任何添加的规则:
'scopeName': 'source.mylanguage'
'name': 'Mylanguage'
'fileTypes': ['ext1', 'ext2']

'patterns': [
    {
        # First rule
    },
    {
        # Second rule
    },
    # …
    {
        # Last rule
    }
]
匹配语法元素 (Matching a Syntax Element)
Let’s build our first rule with match, the first type we’ll see. This rule will detect any number like 4, 7.2 or even .568, for instance:
让我们用match构造第一个规则,我们将看到的第一个类型。 此规则将检测像任何数量的4 , 7.2甚至.568 ,例如:
{
    'match': '\\b(([0-9]+\\.?[0-9]*)|(\\.[0-9]+))\\b'
    'name': 'constant.numeric.mylanguage'
}
The match entry must be filled with a valid regex. Then, each time Atom sees text matching this regex, it will encapsulate it in a span element with the class names indicated in name. You can add several class names, each one separated by a dot.
match项必须使用有效的正则表达式填充。 然后,每次Atom看到与该正则表达式匹配的文本,它将把它封装在一个span元素中,其名称以name表示。 您可以添加几个类名,每个类名之间用一个点分隔。
You should notice that the regex contains more backslashes than usual. In fact, we can use every special character like \b to detect a word break. However, as your regex is nothing but a string, if you just type \b, the b will be escaped and nothing will happen. We want the \b string in our final regex, after the string being parsed. That’s why we need to escape the backslash. In practice, that means you need to double each backslash you type and \b becomes \\b.
您应注意,正则表达式包含的反斜杠比平时更多。 实际上,我们可以使用\b类的每个特殊字符来检测单词中断。 但是,由于您的正则表达式只不过是一个字符串,因此,如果您只键入\b ,则b将被转义并且什么也不会发生。 解析完字符串后,我们需要在最终的正则表达式中使用\b字符串。 这就是为什么我们需要逃避反斜杠。 实际上,这意味着您需要将键入的每个反斜杠加倍,并且\b变为\\b 。
You can add whatever class names you want in the name entry. However, there are some conventions to follow. Generally, indicate the type of element you want to highlight and finish with the name of the language. There are a lot of different types that are all shared by different editors. TextMate lists them in its documentation on naming conventions.
您可以在name条目中添加所需的任何类名称。 但是,需要遵循一些约定。 通常,请指定要突出显示的元素类型并以语言名称结尾。 有许多不同的类型,它们都由不同的编辑者共享。 TextMate在其有关命名约定的文档中列出了它们。
If you use these conventions, other developers can better understand what you’re doing. But there’s another reason why it’s a good idea to respect these conventions: themes.
如果使用这些约定,则其他开发人员可以更好地了解您在做什么。 但是,尊重这些约定是一个好主意的另一个原因:主题。
In Atom, it’s the theme that decides which style will be displayed for element you want to highlight. These themes try to be compatible with the more languages possible, so they use these conventions.
在Atom中,主题是决定要突出显示的元素将显示哪种样式的主题。 这些主题试图与更多的语言兼容,因此它们使用这些约定。
That way, in the example above, we don’t have to add any CSS to stylize our numbers. As we use the convention, our theme automatically detects it. Better: as it’s the same convention used for every language, numbers in our language will be displayed the same way numbers are displayed in other languages.
这样,在上面的示例中,我们不必添加任何CSS即可样式化我们的数字。 使用约定时,主题会自动检测到约定。 更好:因为每种语言都使用相同的约定,所以我们的语言中的数字将以与其他语言中的数字相同的方式显示。
在同一规则中匹配多个元素 (Matching Several Elements in the Same Rule)
The name entry should always be present. It’s here to highlight the entire text verifying the regex. But what if you want to highlight several elements in the same rule?
name条目应始终存在。 在这里突出显示验证正则表达式的整个文本。 但是,如果您想突出显示同一规则中的几个元素,该怎么办?
Let’s take an example with a function declaration like the following:
让我们以函数声明为例,如下所示:
function nameOfTheFunction() {
}
We want to highlight the word function as a keyword, along with the name of the function. If we can match the function keyword to highlight it without any problem, the name of the function can’t be retrieved without this keyword. That’s why we need to highlight these two elements in the same rule. This can be achieved with the following rule:
我们要突出显示单词function作为关键字以及函数的名称。 如果我们可以匹配function关键字以突出显示它而没有任何问题,那么没有此关键字就无法检索函数的名称。 这就是为什么我们需要在同一规则中突出显示这两个元素。 这可以通过以下规则来实现:
{
    'match': '\\b(function)\\s+(\\w+)\\s*\\(.*\\)'
    'captures':
        '1':
            'name': 'keyword.control.mylanguage'
        '2':
            'name': 'entity.name.function.mylanguage'
    'name': 'meta.function.mylanguage'
}
The name entry still contains the class names that will encapsulate the whole text. However, we now find the captures entry, which needs some explanation.
name条目仍然包含将封装整个文本的类名称。 但是,我们现在找到captures条目,这需要一些解释。
Our regex contains capturing parentheses around function and the name of the function. As in other languages, these captures can be retrieved thanks to the captures entry. The 1 then refers to the first capture (the function keyword) and the 2 refers to the second (the name of the function). We apply the right class names to them with name.
我们的正则表达式包含捕获function周围的括号和function名称的信息。 与其他语言一样,这些捕获可以通过captures条目来检索。 然后1指向第一个捕获( function关键字), 2指向第二个捕获( function名称)。 我们使用name将正确的类名应用于它们。
With the function declaration above we obtain the following in Atom:
通过上面的函数声明,我们在Atom中获得以下内容:
<span class="meta function mylanguage">
    <span class="keyword control mylanguage">function</span>
    <span class="entity name function mylanguage">nameOfTheFunction</span>
    …
</span>
匹配规则的开始和结束 (Matching the Beginning and the End of a Rule)
Sometimes it’s easier to detect the beginning and the end of an element than the element itself. It’s true for strings, for instance:
有时,检测元素的开始和结束比元素本身更容易。 例如,对于字符串是正确的:
{
    'begin': '\''
    'end': '\''
    'name': 'string.quoted.single.mylanguage'
}
With this rule, Atom will search for a first quote to begin the string. Then, the next quote it finds will be the end of the string, as expected (the search is ungreedy). You can indicate the regexes you want as begin and end delimiters. As always, the name entry must be filled with the class names you want for the whole retrieved element.
使用此规则,Atom将搜索第一个引号以开始字符串。 然后,找到的下一个引号将是字符串的结尾,这与预期的一样(搜索不满意)。 您可以将所需的正则表达式指定为begin和end定界符。 与往常一样, name条目必须用您想要的整个检索元素的类名称填充。
For example, with this:
例如,与此:
var best_site = 'SitePoint';… you get this:
…您得到此:
var best_site = <span class="string quoted single mylanguage">'SitePoint'</span>;Capturing elements is also possible. Highlighting the quotes is, for example, a common task. To achieve this, you can use beginCaptures and endCaptures. The way they work is exactly the same as captures works for the match rule. The only difference is that with beginCaptures you can capture parentheses in the begin regex and, with endCaptures, you can capture elements in the end regex:
捕获元素也是可能的。 例如,突出显示引号是一项常见任务。 为此,可以使用beginCaptures和endCaptures 。 它们的工作方式与match规则的captures工作完全相同。 唯一的区别是,使用beginCaptures可以在begin regex中捕获括号,而使用endCaptures可以在end regex中捕获元素:
{
    'begin': '\''
    'beginCaptures':
        '0':
            'name': 'punctuation.definition.string.begin.mylanguage'
    'end': '\''
    'endCaptures':
        '0':
            'name': 'punctuation.definition.string.end.mylanguage'
    'name': 'string.quoted.single.mylanguage'
}
With the same JavaScript line as above, you’ll now get this:
使用与上述相同JavaScript行,您现在将获得:
var best_site =
    <span class="string quoted single mylanguage">
        <span class="punctuation definition string begin mylanguage">'</span>
        SitePoint
        <span class="punctuation definition string end mylanguage">'</span>
    </span>;
Finally, you can also capture elements placed between your delimiters. As match is not used, you can’t use captures, but you can use patterns instead.
最后,您还可以捕获放置在定界符之间的元素。 由于未使用match ,因此无法使用captures ,而可以使用patterns 。
This new entry is an array listing the elements you want to highlight inside the current highlight. It’s a regex to execute only between your delimiters. In the example below, we escape \' to highlight the fact that it’s a special character in our string:
此新条目是一个数组,列出了要在当前突出显示内突出显示的元素。 这是仅在定界符之间执行的正则表达式。 在下面的示例中,我们转义\'以突出显示它是字符串中的特殊字符这一事实:
{
    'begin': '\''
    'beginCaptures':
        '0':
            'name': 'punctuation.definition.string.begin.mylanguage'
    'end': '\''
    'endCaptures':
        '0':
            'name': 'punctuation.definition.string.end.mylanguage'
    'name': 'string.quoted.single.mylanguage'
    'patterns': [
        {
            'match': '\\''
            'name': 'constant.character.escape.mylanguage'
        }
    ]
}
You can add as many patterns as you want. With the rule above, if we want to highlight the following JavaScript code:
您可以根据需要添加任意数量的模式。 使用上述规则,如果我们要突出显示以下JavaScript代码:
var best_site = 'It\'s SitePoint';… we’ll get this:
……我们将得到:
var best_site =
    <span class="string quoted single mylanguage">
        <span class="punctuation definition string begin mylanguage">'</span>
        It<span class="constant character escape mylanguage">\'</span>s SitePoint
        <span class="punctuation definition string end mylanguage">'</span>
    </span>;
发布原子包 (Publishing an Atom Package)
So now our package works great … for us. If you needed your package, chances are that other developers also need it. In this case, why not share your work, so that everyone can enjoy it?
因此,现在我们的包装对我们来说很棒。 如果您需要您的软件包,则其他开发人员也有可能需要它。 在这种情况下,为什么不共享您的作品,让每个人都可以享受呢?
The very first thing to do before publishing your package is to check if a package with the same name as yours already exists. To do that, you can search for this name in Atom itself (in the options, where you can install packages). You can also check the URL https://atom.io/packages/name-of-your-package: if you get an error, the package doesn’t exist yet, and you can publish yours.
发布软件包之前,要做的第一件事就是检查是否存在与您的软件包同名的软件包。 为此,您可以在Atom本身中搜索该名称(在可安装软件包的选项中)。 您还可以检查URL https://atom.io/packages/name-of-your-package :如果出现错误,则说明该软件包尚不存在,可以发布它。
To publish your package, you’ll need a public repository, like the ones you can create on GitHub. Refer to the tips above on how to indicate your repository’s URL in the package.json file of your package.
要发布软件包,您需要一个公共存储库,例如可以在GitHub上创建的存储库。 请参阅上面的提示,以了解如何在package.json文件中指示存储库的URL。
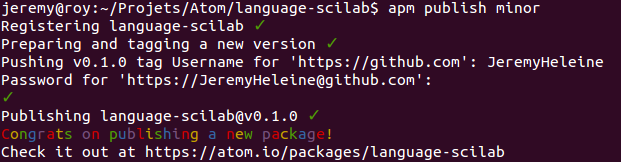
Now you’re ready to publish your package. In a terminal, go to your package’s folder and type apm publish minor to publish your first minor version. You can also publish a major or very minor version by replacing minor with major or patch.
现在您可以发布软件包了。 在终端中,转到软件包的文件夹,然后键入apm publish minor来发布第一个次要版本。 您还可以通过将major或patch替换minor来发布主要版本或非常次要版本。
This command will do several things. If it’s the first time you’ve used it, it will begin by registering your package’s name. Then, it will retrieve the current version number and increase it. That’s why we indicated 0.0.0 as a version number for our package: by using apm-publish, it will automatically become 0.1.0 (with minor). Then, the command creates the corresponding Git tag and pushes these changes. For this step, your credentials will be required.
该命令将执行几项操作。 如果这是您第一次使用它,它将首先注册您的包裹名称。 然后,它将检索当前版本号并增加它。 这就是为什么我们将0.0.0表示为软件包的版本号:通过使用apm-publish ,它将自动变为0.1.0 (带有minor )。 然后,该命令创建相应的Git标记并推送这些更改。 对于此步骤,将需要您的凭据。
Finally, your package is published, without you having to have anything else.
最后,您的程序包将发布,而您无需其他任何操作。
You can unpublish one of your packages with apm unpublish name-of-the-package. Be careful if you also want to delete your GitHub repository: you have to unpublish your package before deleting your repository. If you delete your repository first, you won’t be able to unpublish your package.
您可以使用apm unpublish name-of-the-package来取消发布其中一个程序apm unpublish name-of-the-package 。 如果您还想删除GitHub存储库,请小心:删除存储库之前,必须先取消发布软件包。 如果先删除存储库,则将无法取消发布程序包。
结束语 (Closing Words)
Atom is a very powerful editor. With packages, you can enhance it and add the features you need. Now you know how to create yours and how to publish them.
Atom是一个非常强大的编辑器。 使用软件包,您可以对其进行增强并添加所需的功能。 现在,您知道了如何创建自己的以及如何发布它们。
As Atom is very flexible, you can do a lot of different things with packages. That also means that we can’t describe in one article how to write any type of package. That’s why we only saw here how to create a syntax highlighting package. However, initializing and publishing your package will always be done in the same way.
由于Atom非常灵活,因此您可以使用软件包执行许多不同的操作。 这也意味着我们无法在一篇文章中描述如何编写任何类型的包。 这就是为什么我们在这里仅看到如何创建语法突出显示包的原因。 但是,初始化和发布程序包将始终以相同的方式进行。
If you’ve got any questions or comments, please reply below. Have you created a package of your own? Tell us about it!
如果您有任何疑问或意见,请在下面答复。 您是否创建了自己的包裹? 告诉我们吧!
翻译自: https://www.sitepoint.com/how-to-write-a-syntax-highlighting-package-for-atom/
atom github


 3813
3813

 被折叠的 条评论
为什么被折叠?
被折叠的 条评论
为什么被折叠?
 到【灌水乐园】发言


