


 本文详细介绍了如何使用Gulp自动化工具配合Git和Heroku,实现Node.js项目的高效部署。文中深入探讨了Heroku术语,所需文件,如Procfile的创建,以及正确配置依赖关系的方法。同时,文章提供了部署到Heroku的具体步骤,包括Heroku工具带的安装,Git命令的使用,以及自定义域名的设置。
gulp 创建git 提交
Whether you’ve used it or not you’ve probably heard about Heroku at some point wandering around the Web. Heroku lets you deploy, run, and manage projects written in Ruby, Node.js, Java, Python, Clojure, Scala, and PHP. This platform brings joy to so many developers because of its amazing build packs that create a robust deployment workflow.
无论您是否使用过它,您都可能在网上徘徊的某个时候听说过Heroku 。 Heroku使您可以部署,运行和管理以Ruby,Node.js,Java,Python,Clojure,Scala和PHP编写的项目。 该平台具有令人惊叹的构建包 ,可创建强大的部署工作流程,因此为许多开发人员带来了欢乐。

Let’s examine the required files needed to deploy a project to Heroku using Gulp, Git, and Node.
让我们检查使用Gulp,Git和Node将项目部署到Heroku所需的必需文件。
Heroku术语 (Heroku Terminology)
Before we begin, we’ll make sure a few bits of terminology are defined.
在开始之前,我们将确保定义一些术语。
-
Dyno
戴诺
- here. 在此处阅读有关Dyno类型的更多信息。 Buildpacks 构建包
- These lie behind the slug compilation process. They’re open source, enabling you to extend Heroku to other languages and frameworks. Buildpacks take your application, its dependencies, and the language runtime, and produce slugs.
- 这些隐藏在编译过程的后面。 它们是开源的,使您能够将Heroku扩展到其他语言和框架。 Buildpacks接收您的应用程序,其依赖项和语言运行时,并生成代码。 Slug ug
- A bundle of your source, fetched dependencies, the language runtime, and compiled/generated output of the build system – ready for execution.
- 捆绑了您的源,获取的依赖项,语言运行时以及构建系统的编译/生成的输出-准备执行。
档案要求 (File Requirements)
In order to run a Node-based project on Heroku, we need a few things to get started. The first thing we need is a project. For our purposes, we’ll use the Transformicons Open Source project as the example for this tutorial. You can also use the Transformicons repo with your own free Heroku account to practice outside this article!
为了在Heroku上运行基于Node的项目,我们需要一些入门知识。 我们需要的第一件事是一个项目。 为了我们的目的,我们将使用Transformicons开源项目作为本教程的示例。 您也可以将Transformicons仓库与您自己的免费Heroku帐户一起使用,以在本文之外进行练习!
制作Procfile (Make a Procfile)
Begin by making a blank file named Procfile and placing it within the root of your project. Procfile is short for “Process File” and used to explicitly declare what command should be executed to start your app. By default, a Procfile is not required, but it’s good form for Node-based projects to create one.
首先制作一个名为Procfile的空白文件,并将其放在项目的根目录下。 Procfile是“进程文件”的缩写,用于显式声明应执行什么命令来启动您的应用程序。 默认情况下, Procfile ,但这是基于Node的项目创建一个的好形式。
If a Procfile isn’t defined, then one will be created automatically using npm start as the web process type. Here’s the Procfile process command for Transformicons:
如果Procfile ,则将使用npm start作为Web进程类型自动创建一个Procfile 。 这是用于Transformicons的Procfile处理命令:
web: node node_modules/gulp/bin/gulp buildThe line above lets us use the locally installed version of Gulp provided by Node’s Package Manager (NPM) instead of having to use a globally installed version. The gulp build portion of that command in this case will fire up a server, compile Sass, concatenate / uglify JavaScript, replace asset calls, cache bust file names, compile templates with Assemble, and finally minify our compiled HTML documents! This is the part where we dance our pants off
上面的行使我们可以使用Node的Package Manager(NPM)提供的本地安装的Gulp版本,而不必使用全局安装的版本。 在这种情况下,该命令的gulp build部分将启动服务器,编译Sass,连接/ uglify JavaScript,替换资产调用,缓存无效文件名,使用Assemble编译模板,最后最小化我们已编译HTML文档! 这是我们脱掉裤子的部分
创建生产服务器 (Create a Production Server)
For those using Gulp to serve assets, you can use the following task in your gulpfile.js to fire up a static server for Heroku in order to view the deployed project in a browser.
对于那些使用Gulp提供资产的用户,可以在gulpfile.js使用以下任务为Heroku gulpfile.js静态服务器,以便在浏览器中查看已部署的项目。
gulp.task('serveprod', function() {
  connect.server({
    root: [your_project_path],
    port: process.env.PORT || 5000, // localhost:5000
    livereload: false
  });
});
Developers also have the option of using something like a Node-based server if desired, but for this discussion we’ll use Gulp to handle that for us.
如果需要的话,开发人员还可以选择使用基于节点的服务器之类的东西,但是在本次讨论中,我们将使用Gulp为我们处理这些事情。
定义正确的依赖关系 (Define the Correct Dependencies)
Gulp requires the presence of a package.json file within the root of your project’s directory. Inside this file you must note whether the dependencies defined are installed or not. By default, Heroku config is set to production and will install dependencies from the dependencies object.
Gulp要求在项目目录的根目录中存在package.json文件。 在此文件中,您必须注意是否已安装定义的依赖项。 默认情况下,Heroku配置设置为生产,并将安装dependencies对象中的dependencies 。
devDependencies for tasks such as gulp clean, like in the case below, will not install on the production environment. Using the example below, notice I require many items under dependencies that are necessary for deployment, like minification, concatenation, and anything that generally helps to build the project files themselves.
devDependencies的任务,如gulp clean ,喜欢在下面的情况下,不会对生产环境中安装。 使用下面的示例,请注意,我在部署所需的dependencies项下需要许多项,例如缩小,串联以及通常有助于自己构建项目文件的所有项。
{
  "dependencies": {
    "gulp": "^3.8.10",
    "gulp-autoprefixer": "^1.0.1",
    "gulp-concat": "^2.4.1",
    "gulp-connect": "^2.0.6",
    "gulp-extname": "^0.2.0",
    "gulp-load-plugins": "^0.7.0",
    "gulp-minify-html": "^0.1.8",
    "gulp-rev": "^2.0.1",
    "gulp-sass": "^1.2.2",
    "gulp-template": "^1.1.1",
    "gulp-uglify": "^1.0.1",
    "gulp-usemin": "^0.3.8",
    "gulp-util": "^3.0.1",
    "assemble": "git://github.com/assemble/assemble#v0.6.0",
    "lodash": "^2.4.1",
    "marked": "^0.3.2"
  },
  "devDependencies": {
    "gulp-clean": "^0.3.1"
  }
}
部署到Heroku (Deploy to Heroku)
Now that your project has the required files in place for deployment to Heroku, download the Heroku toolbelt and install it on your machine. The Heroku command-line client will install to /usr/local/heroku and /usr/local/heroku/bin will be added to your PATH. Assuming you already have a username and password with Heroku, begin by logging in to your Heroku account from the shell.
现在,您的项目已具有部署到Heroku所需的文件,请下载Heroku工具带并将其安装在您的计算机上。 Heroku命令行客户端将安装到/usr/local/heroku并且/usr/local/heroku/bin将添加到您的PATH 。 假设您已经拥有Heroku的用户名和密码,首先从shell登录到您的Heroku帐户。
heroku loginOnce logged in, run the following commands in the order that follows (assuming your project has a git repo initialized).
登录后,按以下顺序运行以下命令(假设您的项目已初始化git repo)。
cd [mysitedir]
heroku create
git push heroku master
heroku open
The heroku create command creates a new application on Heroku – along with a Git remote that must be used to receive your application’s source. Make sure your code (especially any changes that are not present on your remote repository) is pushed to GitHub (or Bitbucket if you choose) before you deploy to Heroku, otherwise changes will remain undetected when git push heroku master is executed.
heroku create命令在Heroku上创建一个新应用程序-以及必须用于接收应用程序源的Git远程程序。 在部署到Heroku之前,请确保将您的代码(特别是远程存储库中不存在的任何更改)推送到GitHub(如果选择的话,则推送到Bitbucket),否则在执行git push heroku master时不会检测到更改。
If you need to check production code, you can always use foreman start from the shell to test instructions and functionality for deployment on your local machine. If you’re curious what the deployment logs look like for Heroku, feel free to check out this CodeShare.
如果需要检查生产代码,则始终可以使用从外壳程序foreman start的foreman start来测试在本地计算机上部署的说明和功能。 如果您想知道Heroku的部署日志是什么样子,请随时查看此CodeShare 。

Note for GitHub users: Heroku is limited to a rolling window of 75 Git requests per hour, per user, per app. Once this limit is reached, in order to protect the Git service, Git requests are denied for a few minutes until request levels drop below the limit.
给GitHub用户的注意事项 :Heroku的滚动窗口仅限于每个应用程序每个用户每小时75个Git请求。 一旦达到此限制,为了保护Git服务,将在几分钟之内拒绝Git请求,直到请求级别降至该限制以下。
回头看 (Looking Back)
Lets take a look at what’s happened up until this point and why Heroku is so cool for deployment. Most importantly, we’ve prevented production code from entering our GitHub repo, ultimately avoiding future merge conflicts that can and will occur often with compiled code.
让我们看看到目前为止发生了什么,以及为什么Heroku在部署方面如此出色。 最重要的是,我们已经阻止了生产代码进入我们的GitHub存储库,最终避免了以后的合并冲突,这种合并冲突经常会在编译后的代码中发生。
We’ve also managed to concatenate, minify, and cache bust file references purely for deployment purposes. This approach prevents us from manually writing our replacement references within each individual document. All these tasks are completed automagically by machines! Now let’s get rid of that myproject.herokuapp.com domain name.
我们还设法纯粹为了部署目的而连接,缩小和缓存胸围文件引用。 这种方法使我们无法在每个文档中手动编写替换参考。 所有这些任务都是由机器自动完成的! 现在,让我们摆脱myproject.herokuapp.com域名。
自定义域 (Custom Domain)
For those that desire a custom domain name you should be aware that it’s not possible at the time of this writing to remove the www, so it’s good form to forward calls from non www references to the www reference if you desire that behaviour.
对于那些希望有一个自定义域名,你应该知道,这是不可能的,在写这篇文章的时候去除www ,所以这是很好的形式转发来自非呼叫www引用到www如果你希望这种行为的参考。
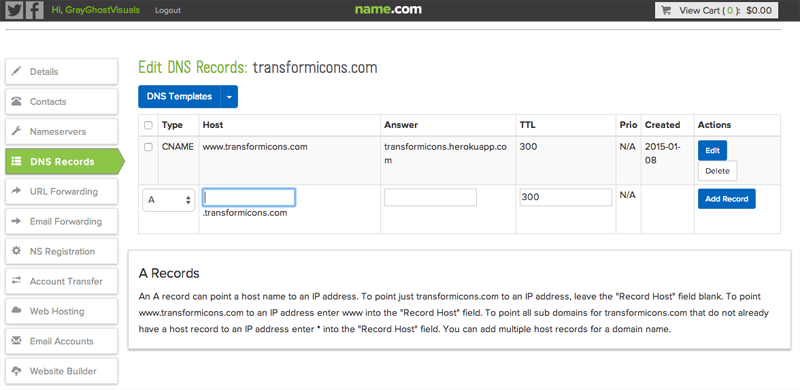
To create a custom CNAME, simply add the myproject.herokuapp.com domain to your CNAME record followed by name forwarding, should you choose to do so.
要创建自定义CNAME,只需将myproject.herokuapp.com域添加到CNAME记录中,然后再进行名称转发即可(如果您选择这样做)。
补充笔记 (Additional Notes)
Heroku users should take the time to understand the buildpack-api caching explanation that also clarifies a bit on how the flow works with Heroku projects. If at any time you need some “heroic” help via the command-line, you can always type heroku help to get a list of options available.
Heroku用户应该花些时间来理解buildpack-api缓存说明,该说明还澄清了该流程如何与Heroku项目一起使用。 如果您随时需要通过命令行获得一些“英雄”帮助,则可以随时键入heroku help以获得可用选项列表。
With regards to Gulp, there may be times when you require to be all “Bill Murray” and control Gulp’s streams as you deploy, ensuring one process has completed before another begins. In order to ensure one task completes before another begins, give your src line a var named stream and return the stream once your task pipes are completed.
关于Gulp,有时候您可能需要所有“ Bill Murray”并在部署时控制Gulp的流,以确保一个过程在另一个过程开始之前已经完成。 为了保证一个任务完成的另一个开始之前,给你的src线路var命名stream ,一旦你的任务管道完成返回流。
This ensures that one task knows when another completes, avoiding simultaneously running in parallel. Here’s an example of what that looks like:
这样可以确保一项任务知道另一项任务何时完成,从而避免同时并行运行。 这是一个看起来像的例子:
gulp.task('sass', function() {
  var stream = gulp.src(paths.sitesass + '/**/*.scss')
    .pipe($.sass())
    .pipe($.autoprefixer({
      browsers: ['last 2 versions'],
      cascade: false
    }))
    .pipe(gulp.dest(paths.sitecss))
    .pipe($.connect.reload());

  return stream; // return stream to notify us of completion
});

gulp.task('cssmin', ['sass'], function() {
  var stream = gulp.src(paths.sitecss + '/*.css')
    .pipe(minifyCSS({keepBreaks:true}))
    .pipe(gulp.dest(paths.sitecss));

  return stream; // return stream to notify us of completion
});
结论 (Conclusion)
A productive workflow and the tools that help make deployment a breeze are essential to any developer’s arsenal. Whatever the tool is, make it the best it can be and don’t be afraid to break habits in order to venture into the unknown. Get started right now and empower your workflow and deployment methods.
高效的工作流程和有助于轻松部署的工具对于任何开发人员来说都是必不可少的。 无论使用哪种工具,都应尽其所能,不要害怕为了习惯未知而打破习惯。 立即开始,并授权您的工作流程和部署方法。
进一步阅读 (Further Reading)
翻译自: https://www.sitepoint.com/deploying-heroku-using-gulp-node-git/
gulp 创建git 提交


 752
752

 被折叠的 条评论
为什么被折叠?
被折叠的 条评论
为什么被折叠?
 到【灌水乐园】发言


