PhpMyAdmin is one of the most used tools when it comes to managing your databases. By default, PhpMyAdmin does a great job. However, it comes with a lot of handy extra extensions which can be easily activated. In this article, we will activate these extensions and see what they can do for us.
在管理数据库时, PhpMyAdmin是最常用的工具之一。 默认情况下,PhpMyAdmin做得很好。 但是,它附带了许多方便的额外扩展,可以轻松激活它们。 在本文中,我们将激活这些扩展并查看它们可以为我们做什么。
建立 (Setup)
Before you can continue, please make sure PhpMyAdmin is up and running. After logging in, you will probably notice this message at the bottom of the main panel:
在继续之前,请确保PhpMyAdmin已启动并正在运行。 登录后,您可能会在主面板底部看到以下消息:
The phpMyAdmin configuration storage is not completely configured, some extended features have been deactivated. To find out why click here.Clicking on here will lead you to a page indicating that you didn’t activate all extensions yet. You can activate them by changing the config.inc.php file and adding the following lines.
单击here将带您到一个页面,表明您尚未激活所有扩展。 您可以通过更改config.inc.php文件并添加以下行来激活它们。
$cfg['Servers'][$i]['controluser'] = 'pma';
$cfg['Servers'][$i]['controlpass'] = 'pmapass';
$cfg['Servers'][$i]['pmadb'] = 'phpmyadmin';
$cfg['Servers'][$i]['bookmarktable'] = 'pma__bookmark';
$cfg['Servers'][$i]['relation'] = 'pma__relation';
$cfg['Servers'][$i]['table_info'] = 'pma__table_info';
$cfg['Servers'][$i]['pdf_pages'] = 'pma__pdf_pages';
$cfg['Servers'][$i]['table_coords'] = 'pma__table_coords';
$cfg['Servers'][$i]['column_info'] = 'pma__column_info';
$cfg['Servers'][$i]['history'] = 'pma__history';
$cfg['Servers'][$i]['recent'] = 'pma__recent';
$cfg['Servers'][$i]['table_uiprefs'] = 'pma__table_uiprefs';
$cfg['Servers'][$i]['users'] = 'pma__users';
$cfg['Servers'][$i]['usergroups'] = 'pma__usergroups';
$cfg['Servers'][$i]['navigationhiding'] = 'pma__navigationhiding';
$cfg['Servers'][$i]['tracking'] = 'pma__tracking';
$cfg['Servers'][$i]['userconfig'] = 'pma__userconfig';
$cfg['Servers'][$i]['designer_coords'] = 'pma__designer_coords';
$cfg['Servers'][$i]['favorite'] = ‘pma__favorite’;
$cfg['Servers'][$i]['savedsearches'] = 'pma__savedsearches';
Change the username, password and database name to your own liking. All the other config values are table names. By leaving these blank, you will deactivate these extensions. However, if you want to activate any, I would suggest to keep the same name as I provided above. Depending on your PhpMyAdmin version, not all config values will be available by default. In this case, I used the 4.2.x version of PhpMyAdmin.
根据自己的喜好更改用户名,密码和数据库名称。 所有其他配置值都是表名。 将这些留空,您将停用这些扩展名。 但是,如果您想激活任何一个,我建议保持与上面提供的名称相同。 根据您的PhpMyAdmin版本,默认情况下并非所有配置值都可用。 在这种情况下,我使用的是PhpMyAdmin的4.2.x版本。
When done, it’s time to create the database. Create a database with the name you defined in the config file. Next, you can search for a file named create_tables.sql on your machine, probably in PhpMyAdmin’s root folder or the scripts subfolder. In the case of a Linux machine, you can probably find it in /usr/share/phpMyAdmin/examples/ or /usr/share/doc/phpmyadmin/scripts/. Run this SQL file against your newly created database. If you changed any table name in the config above, make sure you change the name of the table here too.
完成后,就该创建数据库了。 使用您在配置文件中定义的名称创建一个数据库。 接下来,您可以在计算机上的PhpMyAdmin的根文件夹或scripts子文件夹中搜索名为create_tables.sql的文件。 对于Linux机器,您可能可以在/usr/share/phpMyAdmin/examples/或/usr/share/doc/phpmyadmin/scripts/ 。 针对您新创建的数据库运行此SQL文件。 如果您在上面的配置中更改了任何表名,请确保在此处也更改表名。
Next, we need to create the user with the password we configured. Run the queries below, with the username and password you defined.
接下来,我们需要使用我们配置的密码创建用户。 使用您定义的用户名和密码运行以下查询。
GRANT USAGE ON mysql.* TO 'pma'@'localhost' IDENTIFIED BY 'pmapass';
GRANT SELECT (
    Host, User, Select_priv, Insert_priv, Update_priv, Delete_priv,
    Create_priv, Drop_priv, Reload_priv, Shutdown_priv, Process_priv,
    File_priv, Grant_priv, References_priv, Index_priv, Alter_priv,
    Show_db_priv, Super_priv, Create_tmp_table_priv, Lock_tables_priv,
    Execute_priv, Repl_slave_priv, Repl_client_priv
    ) ON mysql.user TO 'pma'@'localhost';
GRANT SELECT ON mysql.db TO 'pma'@'localhost';
GRANT SELECT ON mysql.host TO 'pma'@'localhost';
GRANT SELECT (Host, Db, User, Table_name, Table_priv, Column_priv)
    ON mysql.tables_priv TO 'pma'@'localhost';
GRANT SELECT, INSERT, UPDATE, DELETE ON phpmyadmin.* TO 'pma'@'localhost';When logging in and out of PhpMyAdmin, the message we saw earlier should disappear. If it’s still there, click the link to see what is missing.
登录和注销PhpMyAdmin时,我们之前看到的消息应该消失。 如果仍然存在,请单击链接以查看缺少的内容。
Let’s dive into all these extensions.
让我们深入研究所有这些扩展。
收藏 (Bookmarking)
By enabling bookmark, you are given the ability to bookmark your queries. When you create a query, you can tick a box to bookmark it. Also, when the query has already run, you can bookmark it by scrolling down to the bottom of the page and filling in the bookmark box.
通过启用bookmark ,您可以对查询添加书签。 创建查询时,可以在方框中打勾以将其添加为书签。 另外,当查询已经运行时,您可以通过向下滚动到页面底部并填写书签框来为其添加书签。

Whenever you go to the SQL tab, you will see at the bottom that you can choose between several bookmarked queries. Pick the one you want to use and define if you want to submit, view or delete the query.
每当您转到“ SQL”选项卡时,都将在底部看到您可以在几个加标签的查询之间进行选择的地方。 选择您要使用的查询,并定义是否要提交,查看或删除查询。

关系 (Relation)
The option relation is probably one of the best features I have used in this whole list. If you are using foreign keys, those keys will become clickable. By clicking the foreign key, you will be redirected to the other table, showing the record with that particular key.
选项relation可能是我在整个列表中使用的最佳功能之一。 如果您使用的是外键,则这些键将变为可单击状态。 通过单击外键,您将被重定向到另一个表,显示具有该特定键的记录。
Also, while adding or editing a record with a foreign key, instead of a text field, you will get a select list with all the possible options.
另外,在使用外键(而不是文本字段)添加或编辑记录时,您将获得带有所有可能选项的选择列表。

表信息 (Table info)
Seeing a dropdown with all possible values in case of a foreign key is nice. Yet, it would be even better if it would show a certain column instead of the ID. To achieve this, make sure to activate table_info. Go to the master table, click on structure and click the relation view link. If you scroll all the way down to the bottom of the page, you can define which column to display.
在有外键的情况下,看到带有所有可能值的下拉列表很不错。 但是,如果它显示某个列而不是ID,那就更好了。 为此,请确保激活table_info 。 转到主表,单击结构,然后单击关系视图链接。 如果一直滚动到页面底部,则可以定义要显示的列。

Whenever I am creating a new record with a foreign key now, the value from the column I picked is now displayed next to the primary key. No longer do you need to remember a key.
现在,无论何时使用外键创建新记录,我选择的列中的值现在都会显示在主键旁边。 您不再需要记住钥匙。

PDF页面 (PDF Pages)
It is possible to export your relations to PDF. To be able to do this, you need to activate the pdf_pages, table_coords and relation in your config. Next, open the database you want to export to PDF. Click on the operations tab. Next, click the Edit or export relational schema link and continue. Fill in all fields and click submit. If you completed the form, a PDF will roll out, showing all the data you requested.
可以将您的关系导出为PDF。 为此,您需要在配置中激活pdf_pages , table_coords和relation 。 接下来,打开要导出为PDF的数据库。 单击operations选项卡。 接下来,单击“ Edit or export relational schema链接,然后继续。 填写所有字段,然后单击提交。 如果您填写了表格,将会展开一个PDF,显示您请求的所有数据。
列信息 (Column info)
With column info, you can add comments to column names. This can come in handy when you want to make clear to other people what you are expecting in this column or what it contains. You can do so, by changing the column data. You will notice that a new comment field has been added. If you fill in a comment, the comment will then appear just below the column title.
使用column info ,您可以在列名称中添加注释。 当您想让其他人清楚您在本专栏中的期望或它所包含的内容时,这可能会派上用场。 您可以通过更改列数据来实现。 您会注意到已添加了新的注释字段。 如果您填写评论,则该评论将出现在列标题的正下方。

Next to this, you can also apply transformations to columns, the same way you add a comment. With a transformation, you can convert a file name into a clickable link, which will open up the actual file.
除此之外,您还可以将转换应用于列,就像添加注释一样。 通过转换,您可以将文件名转换为可单击的链接,这将打开实际文件。
历史 (History)
If you enable history, all queries you run through PhpMyAdmin are saved in your history, until you log out or close your browser. You can view your query history by opening up the query pop-up window and clicking SQL History.
如果启用了history ,则通过PhpMyAdmin运行的所有查询都将保存在历史记录中,直到注销或关闭浏览器为止。 您可以通过打开查询弹出窗口并单击SQL History来查看查询历史SQL History 。
最近 (Recent)
In the navigation panel, you will notice there is a recent button which contains a drop down with all tables you recently viewed. By default, this list of recent tables is already displayed. However, if you want to keep it persistent between sessions, you can activate recent in your config file, making sure your recent activity is saved.
在导航面板中,您会注意到有一个最近按钮,其中包含一个下拉列表,其中包含您最近查看的所有表。 默认情况下,此最近表列表已经显示。 但是,如果要在会话之间保持持久性,则可以在配置文件中激活“ recent ,以确保保存了最近的活动。
表UI首选项 (Table UI Preferences)
When viewing a table, you can reorder columns by dragging them to a different place. These changes are only visible changes for you. The order is still the same for the actual table. Next to that, you can also sort columns ascending and descending. During your session, the visual changes you are doing will be saved. However, after logging out, these settings will be set back to default. By enabling table_uiprefs, the settings will be persistent, making sure you always have the same view as you configured.
查看表时,可以通过将列拖动到其他位置来对列进行重新排序。 这些更改对您来说只是可见的更改。 实际表的顺序仍然相同。 除此之外,您还可以按升序和降序对列进行排序。 在会话期间,您所做的视觉更改将被保存。 但是,注销后,这些设置将恢复为默认值。 通过启用table_uiprefs ,设置将保持table_uiprefs ,确保您始终拥有与配置相同的视图。
用户和用户组 (Users and User groups)
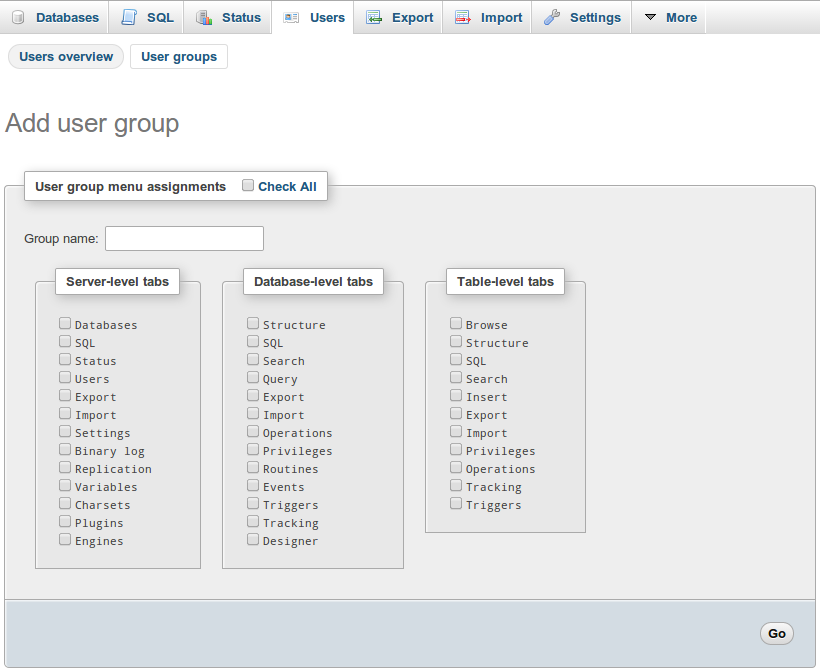
You might not want to show all options to all your users. In that case, you can add user groups to PhpMyAdmin by going to the user tab. Create a new group and define what they can see. Next, you can assign users to this group, making sure they only see the menu items you marked when creating the group. This way, you can show different views to different types of users and make sure you don’t see any options you are not using.
您可能不希望向所有用户显示所有选项。 在这种情况下,可以通过转到用户选项卡将用户组添加到PhpMyAdmin。 创建一个新组并定义他们可以看到的内容。 接下来,您可以将用户分配给该组,确保他们仅在创建组时看到您标记的菜单项。 这样,您可以向不同类型的用户显示不同的视图,并确保您没有看到未使用的任何选项。

导航隐藏 (Navigation Hiding)
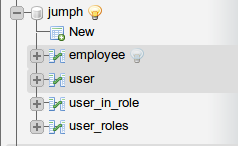
With navigationhiding, you can hide certain tables from your overview in the navigation panel. By clicking the light bulb next to a table, it will disappear. You can make it reappear again, by clicking the light bulb next to the table name. This way, you can make your view a lot cleaner, hiding tables you are not using actively.
使用navigationhiding隐藏,您可以在导航面板的总览中隐藏某些表。 通过单击桌子旁边的灯泡,它会消失。 通过单击表名旁边的灯泡,可以使其再次出现。 这样,您可以使视图更加整洁,隐藏不使用的表。

追踪 (Tracking)
With tracking, you can track any changes performed through PhpMyAdmin on a particular table. By going to the table and then opening up the tab named tracking, you can create a version of the current table. Any changes to this table which are performed through PhpMyAdmin are now saved. This way, you can easily track what has changed in this table since that version was created.
通过跟踪,您可以跟踪通过PhpMyAdmin对特定表执行的所有更改。 通过转到表,然后打开名为tracking的选项卡,可以创建当前表的版本。 现在可以保存通过PhpMyAdmin执行的对该表的所有更改。 这样,您可以轻松跟踪自创建该版本以来此表中发生的更改。
用户配置 (User config)
Any user configuration is saved by default in your browser. This means that whenever you use a different browser or you clean your browser cache, all your settings will be lost. By activating userconfig, the configuration will be saved in the database, allowing you to keep the same settings.
默认情况下,所有用户配置都保存在浏览器中。 这意味着,每当您使用其他浏览器或清理浏览器缓存时,所有设置都会丢失。 通过激活userconfig ,配置将保存在数据库中,使您可以保留相同的设置。
设计师座标 (Designer Coordinates)
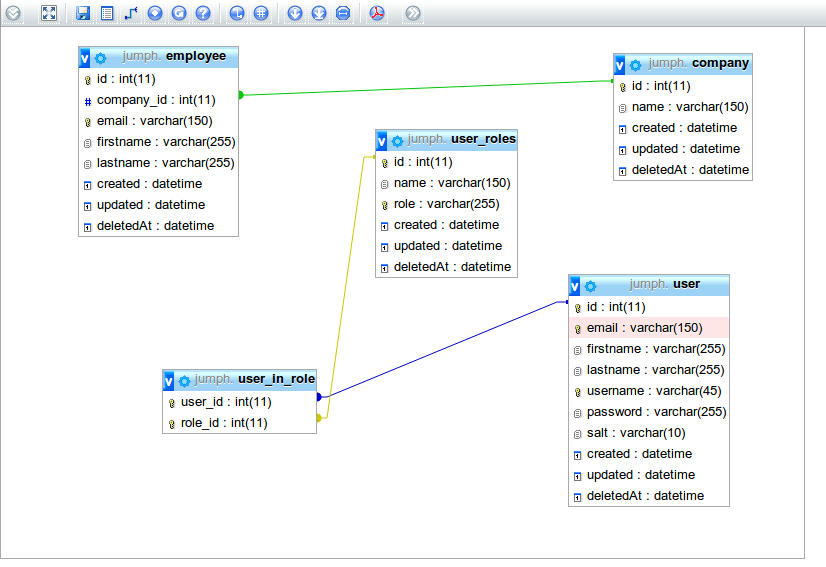
By enabling designer_coords, you can view the relationships between your tables in the designer mode. If you go to a database and click on designer, you will see a similar view like below, indicating all relations. Next to that, you can visually manage these relationships through this window.
通过启用designer_coords ,您可以在设计器模式下查看表之间的关系。 如果转到数据库并单击设计器,您将看到类似下面的视图,指示所有关系。 紧接着,您可以通过此窗口直观地管理这些关系。

收藏夹 (Favorites)
When viewing a database, you will notice that stars appear next to table names when you activate favorite. By clicking on a star, you add that table to your favorites. In the navigation panel, you will see a favorite drop down. Any tables you added to your favorites, will appear in this drop down.
查看数据库时,您会发现在激活favorite时,表名旁边会出现星号。 通过单击星号,可以将该表添加到收藏夹中。 在导航面板中,您将看到一个喜欢的下拉列表。 您添加到收藏夹的所有表格都会显示在此下拉列表中。

保存的搜索 (Saved searches)
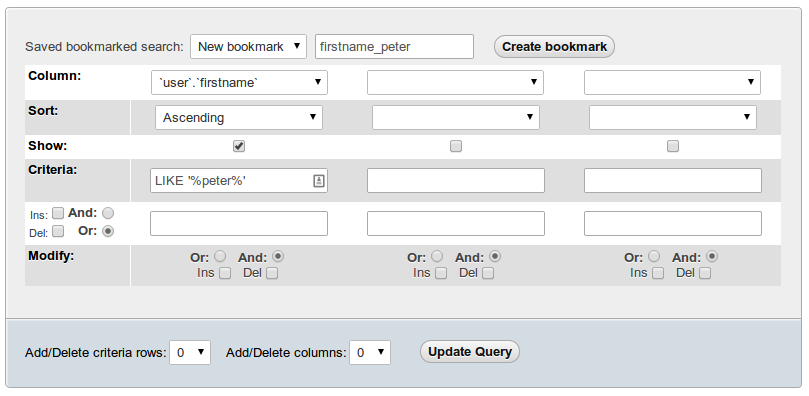
When you open up a database and you are going to the query tab, you can configure an extensive search here. You can save this search by bookmarking it. Note that this is a different bookmark than the SQL bookmarks we have seen earlier. However, this way you can save your searches and perform them later.
打开数据库并转到“查询”选项卡时,您可以在此处配置广泛的搜索。 您可以通过将其添加书签来保存该搜索。 请注意,这是与我们之前看到SQL书签不同的书签。 但是,通过这种方式,您可以保存搜索并在以后执行。

结论 (Conclusion)
Activating these extensions is easy and can really improve the usability of PhpMyAdmin. I especially like the fact that I can click on foreign keys so I can see to which record it is connected. Are you going to activate these extensions in your PhpMyAdmin and if so, which are you going to activate? Have you been using them? I would love to hear from you in the comments below.
激活这些扩展很容易,并且可以真正提高PhpMyAdmin的可用性。 我特别喜欢这样的事实,我可以单击外键,以便查看连接到哪个记录。 您是否要在PhpMyAdmin中激活这些扩展名,如果要激活,您将激活哪些扩展名? 您一直在使用它们吗? 我希望在下面的评论中听到您的意见。
翻译自: https://www.sitepoint.com/enable-phpmyadmins-extra-features/


 1364
1364

 被折叠的 条评论
为什么被折叠?


