打包phar
Deployment of web applications can be difficult and cumbersome if you don’t have the right tools. If you’ve ever deployed a Java application before, I’m sure you’ve heard of JAR files (which stands for “Java ARchive”). Everything executable/accessible that makes up the application can be bundled in a single JAR file, which is a blessing when it comes time to deploy.
如果没有正确的工具,则Web应用程序的部署可能会很困难且繁琐。 如果您以前曾经部署过Java应用程序,那么我确定您已经听说过JAR文件(其代表“ Java ARchive”)。 组成应用程序的所有可执行文件/可访问文件都可以捆绑在一个JAR文件中,这对于部署时是个福音。
PHAR (“Php ARchive”) is analogous to the JAR file concept but for PHP. If you have PHP 5.3 or greater, the Phar extension is built-in and enabled; you can start using it without any additional requirements.
PHAR(“ Php ARchive”)类似于JAR文件的概念,但适用于PHP。 如果您具有PHP 5.3或更高版本,则Phar扩展是内置的并且已启用; 您可以开始使用它,而无需任何其他要求。
This article is intended to shed some light on this important feature for those who haven’t used it before. Hopefully you’ll find it a very helpful tool and have a better and faster deployment experience.
本文旨在为那些以前从未使用过的重要功能提供一些启示。 希望您会发现它是一个非常有用的工具,并拥有更好,更快的部署体验。
PHAR files are treated as read-only by default, and you can use any PHAR file without any special configuration. This is great for deployment. But as you’ll be creating your own PHARs you’ll need to allow write-access which is done through the php.ini file.
默认情况下,PHAR文件被视为只读文件,您可以使用任何PHAR文件而无需任何特殊配置。 这非常适合部署。 但是,当您创建自己的PHAR时,您需要允许通过php.ini文件进行写访问。
Open php.ini, find the phar.readonly directive, and modify it accordingly:
打开php.ini ,找到phar.readonly指令,并进行相应的修改:
phar.readonly = 0
Now you’re ready to package your libraries and applications as PHARs.
现在,您可以将库和应用程序打包为PHAR。
您的第一个PHAR (Your First PHAR)
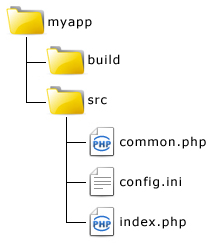
Begin by creating the application’s directory structure; somewhere on your system, create the following:
首先创建应用程序的目录结构; 在系统上的某处,创建以下内容:

The build directory will hold the PHAR package when it’s created to avoid polluting the source tree with generated artifacts. The src directory holds the source files that make up the application.
build目录将在创建时包含PHAR包,以避免使用生成的工件污染源树。 src目录包含构成应用程序的源文件。
index.php will serve as the application’s entry point, common.php will be a pseudo-library of common classes used by the application, and config.ini will be the configuration file for the application.
index.php将用作应用程序的入口点, common.php将是应用程序使用的公共类的伪库,而config.ini将是应用程序的配置文件。
The contents of index.php looks like:
index.php的内容如下:
<?php
require_once "phar://myapp.phar/common.php";
$config = parse_ini_file("config.ini");
AppManager::run($config);
The contents of common.php looks like:
common.php的内容如下所示:
<?php
class AppManager
{
    public static function run($config) {
         echo "Application is now running with the following configuration... ";
         var_dump($config);
     }
}
And the contents of config.ini looks like:
config.ini的内容如下所示:
[database]
host=localhost
db=dbname
user=myuser
pass=dbpass
创建PHAR (Creating the PHAR)
Besides the application structure, you also need a script to generate the PHAR archive. Create a new PHP file named create-phar.php in your myapp root with the following code:
除了应用程序结构,您还需要一个脚本来生成PHAR存档。 使用以下代码在myapp根目录中创建一个名为create-phar.php的新PHP文件:
<?php
$srcRoot = "~/myapp/src";
$buildRoot = "~/myapp/build";

$phar = new Phar($buildRoot . "/myapp.phar",
	FilesystemIterator::CURRENT_AS_FILEINFO |     	FilesystemIterator::KEY_AS_FILENAME, "myapp.phar");
$phar["index.php"] = file_get_contents($srcRoot . "/index.php");
$phar["common.php"] = file_get_contents($srcRoot . "/common.php");
$phar->setStub($phar->createDefaultStub("index.php"));

copy($srcRoot . "/config.ini", $buildRoot . "/config.ini");
Then open a terminal window, navigate to the myapp directory and run it:
然后打开一个终端窗口,导航到myapp目录并运行它:
aabouzekry@platinum:~/myapp$ php create-phar.php
After running the script, you should find the myapp.phar archive in the build directory along with a copy of config.ini file. Copy these two files to your web server’s document root directory (e.g. htdocs).
运行脚本后,您应该在build目录中找到myapp.phar存档以及config.ini文件的副本。 将这两个文件复制到Web服务器的文档根目录(例如htdocs )。
To access the Phar packaged application you could call the archive directly, but this is not recommended and may require additional configuration of your web server to forward PHAR files to the correct PHP handler. Another approach is to create a run script which includes the archive.
要访问Phar打包的应用程序,您可以直接调用归档文件,但是不建议这样做,并且可能需要对Web服务器进行其他配置才能将PHAR文件转发到正确PHP处理程序。 另一种方法是创建一个包含存档的运行脚本。
Create a run script called run.php in your web server’s document root with the following:
使用以下run.php在Web服务器的文档根目录中创建一个名为run.php的运行脚本:
<?php
require "myapp.phar";
The code does nothing but bypass the hassle of reconfiguring your server to handle PHAR files directly. If you’re hosting your application in a shared hosting environment and don’t have access to your server’s configuration, then this is a perfect solution as well!
该代码什么也没有做,只是避免了将服务器重新配置为直接处理PHAR文件的麻烦。 如果您将应用程序托管在共享托管环境中,但无权访问服务器的配置,那么这也是一个完美的解决方案!
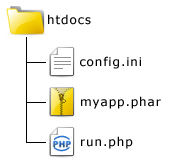
After creating the runner, your web root should look like this:
创建运行器后,您的Web根目录应如下所示:

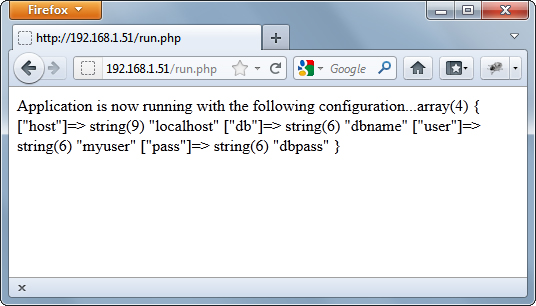
Point your browser to the run.php script and you should see the following output:
将浏览器指向run.php脚本,您应该看到以下输出:

幕后 (Behind the Curtains)
Let’s take a closer look at the create-phar.php code to see what it all means. Jave a look at the following line from it:
让我们仔细看看create-phar.php代码,以了解所有含义。 看看其中的以下行:
<?php
$phar = new Phar($buildRoot . "/myapp.phar",
        FilesystemIterator::CURRENT_AS_FILEINFO |
        FilesystemIterator::KEY_AS_FILENAME, "myapp.phar");
A new Phar object is created which typically takes three arguments. The first argument is the path of the archive file to manipulate. Not only can you create new archives, but you can also manipulate existing ones.
创建一个新的Phar对象,该对象通常带有三个参数。 第一个参数是要处理的存档文件的路径。 您不仅可以创建新档案,还可以操纵现有档案。
The second argument is a flag to set how the object will handle files. The Phar object subclasses the PHP RecursiveDirectoryIterator class and this argument is simply passed to the parent class. The argument I provided is the default for RecursiveDirectoryIterator anyway, which is fine for now.
第二个参数是用于设置对象如何处理文件的标志。 Phar对象是PHP RecursiveDirectoryIterator类的子类,并且此参数只是传递给父类。 无论如何,我提供的参数仍然是RecursiveDirectoryIterator的默认值,目前还可以。
The third argument is the alias for the archive which will be used internally when referring to itself using the phar stream wrapper. In other words, all files inside the archive which require including other files from the archive should refer to it explicitly using the stream wrapper and the alias. For example, the code from index.php earlier references common.php file in this manner.
第三个参数是存档的别名,当使用phar流包装器引用自身时,将在内部使用该phar 。 换句话说,档案中所有需要包括档案中其他文件的文件都应使用流包装器和别名明确引用它。 例如, index.php之前的代码以这种方式引用common.php文件。
<?php
require_once "phar://myapp.phar/common.php";
After the object is created, index.php and common.php are added to the archive. The code treats the Phar object now as an associative array to specify the contents of the files keyed by their filenames, and file_get_contents() is used to read the file from disk. You can add as many files as you like similarly, but if you need to add a lot of files or an entire directory then you may want to consider using the more convenient buildFromDirectory() method.
创建对象之后,将index.php和common.php添加到存档中。 该代码现在将Phar对象视为一个关联数组,以指定以文件名作为文件名的文件的内容,并且使用file_get_contents()从磁盘读取文件。 您可以类似地添加任意多个文件,但是如果需要添加许多文件或整个目录,则可能需要考虑使用更方便的buildFromDirectory()方法。
<?php
$phar->buildFromDirectory("/path/to/dir",'/.php$/');
The first argument to buildFromDirectory() is the path to the desired directory and the second is an optional regular expression specifying which files to include. To include all of the files within the directory, just skip the second argument.
buildFromDirectory()的第一个参数是所需目录的路径,第二个参数是可选的正则表达式,用于指定要包括的文件。 要包括目录中的所有文件,只需跳过第二个参数。
The setStub() method is called to create the stub file. A stub file tells the archive what to do when its loaded by the compiler.
setStub()方法创建存根文件。 存根文件告诉归档文件在由编译器加载时该怎么做。
Finally, the config.ini is copied from the src directory to the build directory alongside the archive.
最后,将config.ini从src目录复制到归档文件旁边的build目录。
存根文件 (The Stub File)
When you run a PHAR archive, the stub inside is treated as a meta file to initialize the archive and tell it what to do when its called without referring to a particular file. In the example, I left the creation of the stub file up to the Phar object with the createDefaultStub() method which created a default stub containing the following code:
当您运行PHAR归档文件时,内部的存根将被视为元文件以初始化归档文件,并在调用归档文件时告诉归档文件做什么,而无需引用特定文件。 在示例中,我使用createDefaultStub()方法将存根文件的创建工作留给了Phar对象,该方法创建了一个包含以下代码的默认存根:
<?php
Phar::mapPhar();
include "phar://myapp.phar/index.php";
__HALT_COMPILER();
The default stub generated with createDefaultStub() illustrates little more than the minimum requirements. Phar::mapPhar() populates the meta-data of the archive and initializes it, and your stub file should end with a call to __HALT_COMPILER() with no trailing white space. This function halts further execution by the PHP interpreter at this point, allowing the possibility of including data after it without the risk of it being executed. This is a requirement by the Phar wrapper, without which the archive won’t work at all.
用createDefaultStub()生成的默认存根仅说明了最低要求。 Phar::mapPhar()填充档案的元数据并对其进行初始化,并且您的存根文件应以对__HALT_COMPILER()的调用结尾, __HALT_COMPILER()空格。 此功能此刻将停止PHP解释器的进一步执行,从而允许在数据之后包含数据而没有执行数据的风险。 这是Phar包装器的要求,否则,归档将根本无法工作。
Alternatively, you can create your own stub file to perform custom initializations of your PHAR archive and read it in like so:
另外,您可以创建自己的存根文件以对PHAR归档文件执行自定义初始化,并按如下方式读取它:
<?php
$phar->setStub(file_get_contents("stub.php"));
认真对待Phar (Taking Phar Seriously)
If you’re developing a class library or other includable code, putting it in a PHAR archive is a neat and tidy solution to distribute it to multiple projects. The Phar extension has been highly optimized to give the same performance if not better than normal file access, so it’s likely you will not compromise the performance of your own application by using it.
如果要开发类库或其他包含的代码,则将其放在PHAR归档中是一个整洁的解决方案,可以将其分发到多个项目中。 Phar扩展已经过高度优化,即使不比普通文件访问性能更好,也能提供相同的性能,因此您很可能不会通过使用它来损害自己应用程序的性能。
To use Phar effectively though you should be aware it does have some limitations. Here are a few tips to help you better understand Phar and get the most out of it:
要有效地使用Phar,尽管您应该知道它确实有一些限制。 以下是一些技巧,可帮助您更好地了解Phar并从中获得最大收益:
- You can package a whole application in a PHAR, but it is not an auto-deploy solution. It’s a single-file access method for the application. 您可以将整个应用程序打包在PHAR中,但这不是自动部署的解决方案。 这是应用程序的单文件访问方法。
- You can perform auto-deployment functionality manually inside the archive allowing for more robust deployments, like creating cache and upload directories on the sever, generating common configuration files, etc. 您可以在档案内部手动执行自动部署功能,以实现更强大的部署,例如在服务器上创建缓存和上载目录,生成通用配置文件等。
- You should avoid back-writing to Phars in a real-world deployment. Instead, put all writeable files outside the archive. Writing to the PHAR is disabled in a standard PHP installation because it’s insecure for your application to do so. 您应该避免在实际部署中回写到Phars。 而是将所有可写文件放在存档之外。 在标准PHP安装中,禁止写入PHAR,因为这样做对您的应用程序是不安全的。
摘要 (Summary)
Phar can save you a lot of hassle in packaging and deploying your applications and I recommend you consider using it. This article was intended to introduce you to the main concepts of Phar. You saw how to create the archive and include files, learned a bit about the importance of the stub file, and how PHP can access files within the archive. Unfortunately the resources for working with Phar in the PHP manual are incomplete and the limited amount of resources elsewhere on the Internet aren’t helpful enough. Hopefully in future articles I’ll be able to show you more about leveraging Phar.
Phar可以为您打包和部署应用程序时省去很多麻烦,我建议您考虑使用它。 本文旨在向您介绍Phar的主要概念。 您了解了如何创建档案文件和包含文件,了解了存根文件的重要性以及PHP如何访问档案文件中的文件。 不幸的是,PHP手册中使用Phar的资源不完整,并且Internet上其他地方的资源数量有限,不足以提供帮助。 希望在以后的文章中,我能够向您展示更多有关利用Phar的信息。
Image via Pavel Ignatov / Shutterstock
图片来自Pavel Ignatov / Shutterstock
翻译自: https://www.sitepoint.com/packaging-your-apps-with-phar/
打包phar


 306
306

 被折叠的 条评论
为什么被折叠?


