


商品类别批量添加的前端开发
In this tutorial, you will begin to learn plugin development for WordPress. The example plugin will have an admin page with a basic form element and a submit button, and will perform the simple task of creating bulk categories in one go.
在本教程中,您将开始学习WordPress的插件开发。 该示例插件将具有一个带有基本表单元素和提交按钮的管理页面,并将执行一次创建批量类别的简单任务。
A lot of times, when developing a website or blog on WordPress, you would need to create a lot of categories. In these instances, it can become a pain to create categories one by one. So, in this tutorial you will learn to build a plugin which allows a list of comma separated categories to be copy pasted into a text area. And on clicking a button, all the categories are loaded into the WordPress categories section in a single go. So, this will prevent the need to sit and click on the Add New Category button for every category that has to be created.
很多时候,在WordPress上开发网站或博客时,您需要创建很多类别。 在这些情况下,一一创建类别可能会很麻烦。 因此,在本教程中,您将学习构建一个插件,该插件允许将逗号分隔的类别列表复制粘贴到文本区域中。 然后单击一个按钮,一次即可将所有类别加载到WordPress类别部分。 因此,这将避免需要坐下来为每个必须创建的类别单击“添加新类别”按钮。
Requirements:
要求:
- You will need a local installation of WordPress (or a development server of some kind) 您将需要本地安装WordPress(或某种开发服务器)
- You will need to know basic HTML and PHP 您将需要了解基本HTML和PHP
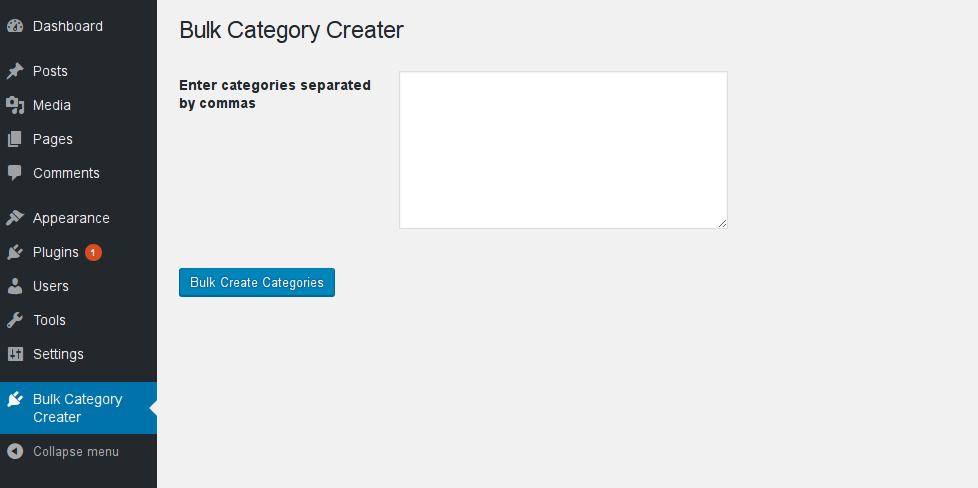
What are you going to build (Preview of the final stage of what you are going to create)
您将要构建什么(要创建的最后阶段的预览)
关于WordPress插件的简要说明 (A Brief Note About WordPress Plugins )
Plugins in WordPress are basically PHP scripts which allow you to change or add new features to your existing WordPress installation. It could be something really simple, like the “Hello Dolly” plugin, or something really advanced like the Jetpack or Google Analytics plugins.
WordPress中的插件基本上是PHP脚本,可让您更改或向现有WordPress安装中添加新功能。 它可能非常简单,例如“ Hello Dolly”插件,或者真正先进的诸如Jetpack或Google Analytics(分析)插件。
So, why should you build a plugin?
那么,为什么要构建一个插件?
Most WordPress developers are aware that they should not hack WordPress core files to suit their needs. It creates updating issues, and could be insecure. But if altering WordPress core code is not a good option, how else will you add new features to your WordPress website? The answer, of course, is via plugins. An added benefit to learning how to create plugins is that you get to learn more about WordPress itself, and how it works. That in turn will make you a better WordPress Developer.
大多数WordPress开发人员都知道,他们不应该黑客WordPress核心文件来满足他们的需求。 它会导致更新问题,并且可能不安全。 但是,如果更改WordPress核心代码不是一个好的选择,那么您将如何向WordPress网站添加新功能呢? 答案当然是通过插件。 学习如何创建插件的另一个好处是,您可以了解有关WordPress本身及其工作方式的更多信息。 反过来,这将使您成为更好的WordPress开发人员。
学习插件开发 (Learning Plugin Development)
In order to create a plugin, you have to create a particular folder structure for your plugin. Every plugin has a directory name and one or more PHP files inside it.
为了创建插件,您必须为插件创建一个特定的文件夹结构。 每个插件都有一个目录名和一个或多个PHP文件。
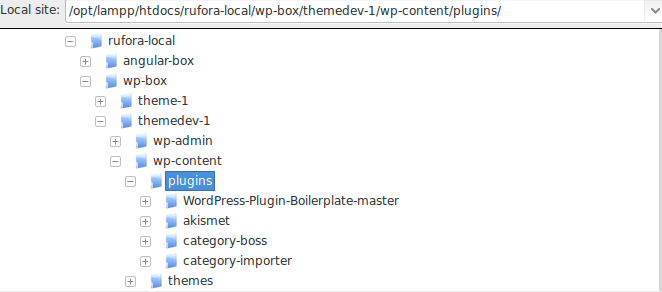
Inside your WordPress directory structure, you will find a directory called wp-content. Inside the wp-content will be a directory called plugins.
在WordPress目录结构中,您会找到一个名为wp-content的目录。 在wp-content内部将有一个名为plugins的目录。
Your folder structure would look similar to this:
您的文件夹结构看起来类似于:
第一步–创建文件 (First Steps – Creating Your Files)
The very first step in creating a plugin is to navigate to the wp-content directory of your WordPress installation and inside the directory navigate to the plugins directory. Inside the plugins directory create a new directory called bulk-category-creator.
创建插件的第一步是导航到WordPress安装的wp-content目录,并在目录内部导航到plugins目录。 在plugins目录内,创建一个名为bulk-category-creator的新目录。
Once, you have created the directory, create a file named bulk-category-creator.php. Make sure that the directory name and the PHP file name are the same.
创建目录之后,请创建一个名为bulk-category-creator.php的文件。 确保目录名和PHP文件名相同。
Now, open your text editor and copy paste the following code into it
现在,打开您的文本编辑器,然后将以下代码复制粘贴到其中
<?php
   /*
   Plugin Name: Bulk Category Creator
   Plugin URI: http://www.ruforaweb.com
   Description: A plugin to bulk-create categories in one go
   Version: 1.0
   Author: Vishnu Ajit
   Author URI: http://twitter.com/vishnuajith310
   License: GPL2
   */
Every plugin has a section of code comments at the top containing a description, version information, author name and licensing information. This is usually found in the header of the plugin’s main file. In our case, it is found in bulk-category-creator.php. This section is the metadata of the plugin. Let us dissect the example metadata line by line.
每个插件的顶部都有一段代码注释,其中包含描述,版本信息,作者姓名和许可信息。 通常可以在插件主文件的头中找到该文件。 在我们的例子中,可以在bulk-category-creator.php找到它。 本节是插件的元数据。 让我们逐行剖析示例元数据。
Plugin Name: Here is the name given to the plugin, in our case we call it the Bulk Category Creator
插件名称:这是为插件指定的名称,在我们的情况下,我们称其为批量类别创建者
Plugin URI: This is a link to where the plugin can be found on the internet for download purposes. It can be found in the WordPress.org archives or in another location.
插件URI:这是指向链接的链接,可以在Internet上找到该插件以进行下载。 可以在WordPress.org归档文件中或其他位置找到它。
Description: This is the section where you can describe what actions the plugin performs.
说明:此部分可描述插件执行的操作。
Version: Specifies the version of the plugin
版本:指定插件的版本
Author: Name of the author or developer who created this plugin
作者:创建此插件的作者或开发人员的姓名
Author URI: Link to the author’s address on the internet
作者URI:链接到互联网上的作者地址
License: The license under which this plugin is released
许可证:发布该插件所依据的许可证
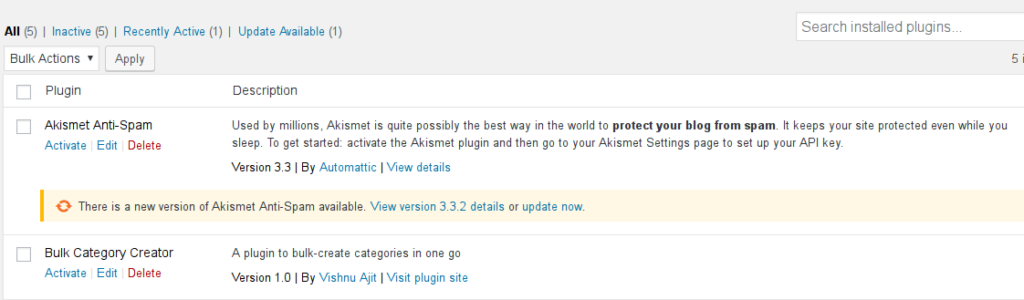
Navigate to your Admin Dashboard > Plugins > Installed Plugins and you should see your plugin in the list.
导航到“管理控制台”>“插件”>“已安装的插件”,您将在列表中看到您的插件。
代码布局–批量类别创建者插件 (Code Layout – Bulk Category Creator Plugin)
Before jumping into coding our plugin, let us understand some basic WordPress hooks. Basically, in WordPress there are two main types of hooks: Actions and Filters. Since, this is a basic plugin development tutorial, we shall not go into too much detail, but basically this is how they differ.
在开始对插件进行编码之前,让我们了解一些基本的WordPress挂钩。 基本上,在WordPress中,钩子主要有两种类型:Actions和Filters。 由于这是基本的插件开发教程,因此我们不会赘述太多,但是基本上这就是它们的不同之处。
Actions: Actions are used when you add something when an event has occurred. Example: an action to tweet an article when a new post has been published.
动作 :在事件发生时添加某些内容时,将使用动作。 示例:发布新帖子时发推文的操作。
Filters: Filters are used when you have to change some data or process it.
过滤器 :当您必须更改某些数据或对其进行处理时,将使用过滤器。
Now that you are familiar with the basics, let us start coding our plugin.
既然您已经熟悉了基础知识,那么让我们开始编写插件代码。
add_action('admin_menu', 'rfr_CategoryCreatorMenu');This line of code hooks the admin_menu to the function rfr_CategoryCreatorMenu
这行代码将admin_menu到函数rfr_CategoryCreatorMenu
The admin_menu function is used to add submenu or menu options to our WordPress Admin Dashboard. Once that has been done, write down the next snippet of code.
admin_menu函数用于将子菜单或菜单选项添加到我们的WordPress Admin Dashboard。 完成之后,记下下一个代码片段。
<?php
   /*
   Plugin Name: Bulk Category Creator
   Plugin URI: http://www.ruforaweb.com
   Description: A plugin to bulk-create categories in one go
   Version: 1.0
   Author: Vishnu Ajit
   Author URI: http://twitter.com/vishnuajith310
   License: GPL2
   */

add_action('admin_menu', 'rfr_CategoryCreatorMenu');

function rfr_CategoryCreatorMenu()
{

    add_menu_page('Bulk Category Creator Plugin','Bulk Category Creator','administrator', __FILE__, 'rfr_CategorySettingsPage' , 'dashicons-admin-plugins');

    add_action('admin_init', 'rfr_RegisterPluginSettings');

}
If you observe the above snippet carefully, you shall see that we have added a function rfr_CategoryCreatorMenu to our code. Let us dissect the lines of code one by one.
如果您仔细观察上述片段,您将看到我们在代码中添加了一个函数rfr_CategoryCreatorMenu 。 让我们一一剖析代码行。
We have used the name rfr_CategoryCreatorMenu in our code. You may notice the prefix rfr_ that I have used. Always, when creating custom plugins for WordPress, make sure your functions have unique names. Along with making the code cleaner, this resolves conflicts which may arise due to different plugins using the same name. So, always ensure that your functions are prefixed by a unique name. In this case I have used rfr_ as my prefix; you can use whatever you want. You can use the first three letters of your name or your company name, for example.
我们在代码中使用了名称rfr_CategoryCreatorMenu 。 您可能会注意到我使用的前缀rfr_ 。 通常,在为WordPress创建自定义插件时,请确保您的函数具有唯一的名称。 除了使代码更简洁外,这还解决了由于使用相同名称的不同插件而引起的冲突。 因此,请始终确保您的函数以唯一名称为前缀。 在这种情况下,我使用rfr_作为前缀。 您可以使用任何您想要的。 例如,您可以使用姓名或公司名称的前三个字母。
Okay, now inside the rfr_CategoryCreatorMenu function we have added a add_menu_page function.
好的,现在在rfr_CategoryCreatorMenu函数中,我们添加了add_menu_page函数。
The add_menu_page function adds a top level menu page. This function has a number of parameters passed into it.
add_menu_page函数添加顶层菜单页面。 此函数具有传递给它的许多参数。
- First parameter: This is the content of the title of the plugin page. 第一个参数:这是插件页面标题的内容。
- Second Parameter: This is the name of the Plugin as it appears in the Admin Dashboard. In our case, it shows Bulk Category Creator 第二个参数:这是显示在管理控制台中的插件的名称。 在我们的案例中,它显示了大宗类别创建者
- Third parameter: This is the permission restriction for the plugin. In our case only administrators can access or use our plugin. 第三个参数:这是插件的权限限制。 在我们的情况下,只有管理员可以访问或使用我们的插件。
- Fourth parameter: This is the slug used to refer to this menu 第四个参数:这是用于引用此菜单的子弹
- Fifth parameter: This is the function which should be invoked in order to display the contents of the page. 第五个参数:这是为了显示页面内容而应调用的函数。
- Sixth parameter: This is the URL to the icon to be displayed besides our menu in the Admin Dashboard. In our case we have added ‘dashicons-admin-plugin’ which is part of an icon-set that comes along with WordPress. Refer https://developer.wordpress.org/resource/dashicons for more icons that come along with the default WordPress bundle. 第六个参数:这是要显示在管理控制台中菜单旁边的图标的URL。 在我们的案例中,我们添加了“ dashicons-admin-plugin”,它是WordPress随附的图标集的一部分。 请参阅https://developer.wordpress.org/resource/dashicons,以获取默认WordPress捆绑包随附的更多图标。
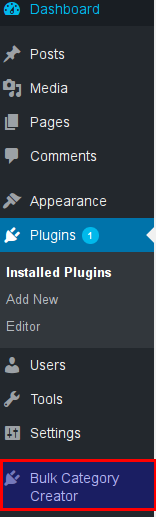
Now, if you observe your Admin Dashboard, you can see that a new Menu called the Bulk Category Creator has been created.
现在,如果您观察管理控制台,则可以看到已经创建了一个名为“大宗商品分类创建器”的新菜单。
Next, We have to add another hook to our admin_init action.
接下来,我们必须向我们的admin_init操作添加另一个钩子。
add_action(‘admin_init’, ‘rfr_RegisterPluginSettings’);We shall come back to it in a moment.
我们待会儿再谈。
Now the next part is to design the frontend of the admin dashboard. You might have noticed that, in the add_menu_page function we have pointed to a function rfr_CategorySettingsPage.
现在,下一部分是设计管理仪表盘的前端。 您可能已经注意到,在add_menu_page函数中,我们已指向函数rfr_CategorySettingsPage 。
Let us define this function
让我们定义这个功能
function rfr_CategorySettingsPage() {
?>
<div class="wrap">
<h1>Bulk Category Creator</h1>

<form method='post'><input type='hidden' name='form-name' value='form 1' />
    <?php settings_fields( 'rfr-bulk-category-creator-group' ); ?>
    <?php do_settings_sections( 'rfr-bulk-category-creator-group' ); ?>
    <table class="form-table">
        <tr valign="top">
        <th scope="row">Enter categories separated by commas</th>
        <td>
        <textarea cols="50" rows="8" name="options_textarea"></textarea>
        </td>
        </tr>
    </table>

    <?php submit_button('Bulk Create Categories'); ?>

</form>

<?php } ?><
This is where we define the frontend for the plugin’s admin page.
这是我们定义插件管理页面前端的地方。
Basically, it consists of a form with a textarea. It is into this textarea that we are going to paste our categories in a comma separated list.
基本上,它由带有文本区域的表单组成。 我们将在此文本区域中将类别粘贴到逗号分隔的列表中。
This section is just basic HTML where a form is defined, and inside a table layout, a textarea has been specified. Just ensure that you do not forget to write the settings_fields and do_settings_sections just below the form declaration.
本部分只是定义表单的基本HTML,并在表布局中指定了textarea。 只要确保您不要忘记在表单声明的下方编写settings_fields和do_settings_sections即可。
Now, if you try navigating to our newly created menu “Bulk Category Creator” you can see the following:
现在,如果您尝试导航到我们新创建的菜单“批量类别创建者”,则可以看到以下内容:
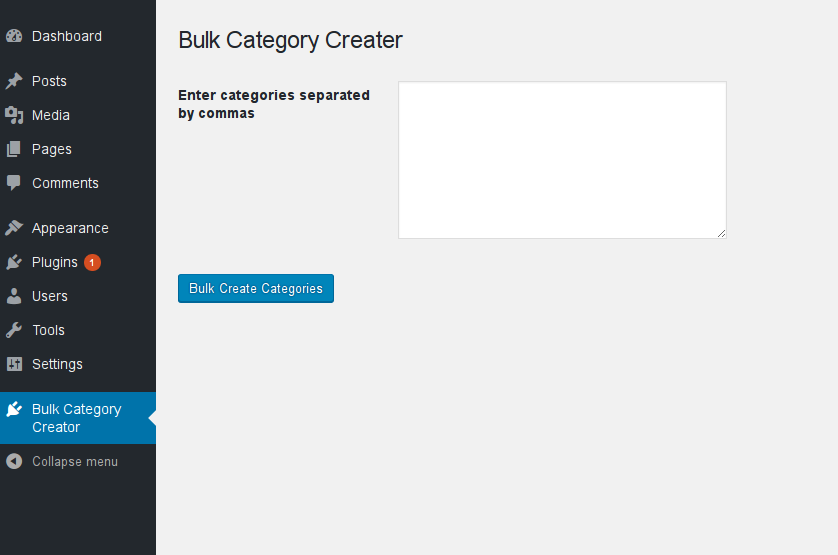
Tada! We have successfully created the frontend of our plugin. We have added an HTML form element to our plugin’s dashboard.
多田 我们已经成功创建了插件的前端。 我们在插件的仪表板上添加了HTML表单元素。
Now, the only thing left to do is to code the necessary programming which allows us to import bulk categories on a single attempt.
现在,剩下要做的就是编写必要的编程代码,这使我们可以在一次尝试中导入批量类别。
function rfr_RegisterPluginSettings() {
    //register our settings

    register_setting( 'rfr-bulk-category-creator-group', 'options_textarea' );

    rfr_CreateCategories();

}

function rfr_CreateCategories()
{

    $returnedStr = esc_attr($_POST['options_textarea'] );

    $trimmed = trim($returnedStr);

    $categories_array = explode(',',$trimmed);

    foreach ($categories_array as $key => $value)
    {

        $catString = $value.'';

        $term = term_exists($value,'category');
        if($term==0 || $term==null)
        {
            create_category($value);

        }

    }

}

function create_category($value)
{
    $trimmedValue = trim($value);
    $hyphenatedValue = str_replace(" ", "-", $trimmedValue);

    wp_insert_term(
        $trimmedValue,
        'category',
        array(
            'description' => $trimmedValue,
            'slug'=> $hyphenatedValue
            )
        );
}
The above content is basic PHP, but let us look into it in detail:
以上内容是基本PHP,但让我们对其进行详细研究:
$returnedStr = esc_attr($_POST['options_textarea'] );

$trimmed = trim($returnedStr);

$categories_array = explode(',',$trimmed);
$returnedStr receives the value submitted from the textarea inside the form element.
$returnedStr接收form元素内从textarea提交的值。
$trimmed trims off the empty spaces on the left and right sides of the string.
$trimmed修剪掉字符串左侧和右侧的空白区域。
The PHP explode function is used to convert the comma separated values into the $categories_array variable.
PHP explode函数用于将逗号分隔的值转换为$categories_array变量。
Next, we use a foreach loop to browse the contents of the $categories_array variable.
接下来,我们使用一个foreach循环浏览$categories_array变量的内容。
foreach ($categories_array as $key => $value)
{
    $catString = $value.'';

    $term = term_exists($value,'category');
    if($term==0 || $term==null)
    {
        create_category($value);

    }
}
Here, we loop inside each variable that is present inside the $categories_array
在这里,我们循环遍历$categories_array内部存在的每个变量
$catString gets the value of $value. The suffix .' ' is added to make sure the value is a string.
$catString获取$value 。 后缀.' ' 添加.' '以确保该值是一个字符串。
In the next line $term = term_exists($value, ‘category’);
在下一行中, $term = term_exists($value, 'category');
We have used a WordPress hook term_exists to make sure that existing category names are not re-added to the category list. So, for instance if a category called “tall” is already present, if we try adding “tall” into the bulk category creator textarea, it wont be re-added to the list of categories.
我们使用了WordPress钩子term_exists来确保现有的类别名称不会重新添加到类别列表中。 因此,例如,如果已经存在一个名为“高”的类别,则如果我们尝试将“高”添加到批量类别创建者文本区域中,则不会将其重新添加到类别列表中。
In the next line, we have used conditional checking to make sure already existing categories are not re-added to our list of categories
在下一行中,我们使用了条件检查来确保不会将现有的类别重新添加到我们的类别列表中
The line if($term ==0 || $term == null) ensures that.
if($term ==0 || $term == null)确保了这一点。
Next, we pass the value to our create_category function:
接下来,我们将该值传递给我们的create_category函数:
function create_category($value)
{
    $trimmedValue = trim($value);
    $hyphenatedValue = str_replace(" ", "-", $trimmedValue);

    wp_insert_term(
        $trimmedValue,
        'category',
        array(
            'description' => $trimmedValue,
            'slug'=> $hyphenatedValue
            )
        );

}
Inside this function we do the following:
在此函数内,我们执行以下操作:
$trimmedValue = trim($value);
$trimmedValue = trim($value);
We pass the $value to our PHP trim function to trim whitespaces off our value.
我们将$value传递给我们PHP trim函数,以减少空白值。
We also create a hyphenated value for use in our slug by writing:
我们还通过编写以下代码来创建一个用于我们的段中的连字符值:
$hyphenatedValue = str_replace(" ", "-", $trimmedValue);
$hyphenatedValue = str_replace(" ", "-", $trimmedValue);
Here, we use the PHP function str_replace to replace the spaces in between our words with hyphens. For example, if the category we added is “Must Watch” we get the $hyphenatedValue as “Must-Watch”.
在这里,我们使用PHP函数str_replace用连字符替换单词之间的空格。 例如,如果我们添加的类别为“必须监视”,则我们将$hyphenatedValue作为“必须监视”。
Next, we use another WordPress hook the wp_insert_term to add our trimmed value, the taxonomy, and an array consisting of the description and our hyphenated slug.
接下来,我们使用另一个WordPress钩子wp_insert_term来添加我们的修剪后的值,分类法以及一个由描述和连字符组成的数组。
The function wp_insert_term function has 3 parameters.
函数wp_insert_term函数具有3个参数。
- First parameter : the value to be inserted 第一个参数:要插入的值
- Second parameter: The taxonomy required. In our case ‘category’ 第二个参数:所需的分类法。 在我们的案例中,“类别”
- Third parameter: An array consisting of the description and our slug 第三个参数:由描述和我们的子弹组成的数组
The complete code is listed below
完整的代码在下面列出
< ?php
   /*
   Plugin Name: Bulk Category Creator
   Plugin URI: http://www.ruforaweb.com
   Description: A plugin to bulk-create categories in one go
   Version: 1.0
   Author: Vishnu Ajit
   Author URI: http://twitter.com/vishnuajith310
   License: GPL2
   */

add_action('admin_menu', 'rfr_CategoryCreatorMenu');

function rfr_CategoryCreatorMenu()
{

    add_menu_page('Bulk Category Creator Plugin','Bulk Category Creator','administrator', __FILE__, 'rfr_CategorySettingsPage' , 'dashicons-admin-plugins');

    add_action('admin_init', 'rfr_RegisterPluginSettings');

}

function rfr_RegisterPluginSettings() {
    //register our settings

    register_setting( 'rfr-bulk-category-creator-group', 'options_textarea' );

    rfr_CreateCategories();

}

function rfr_CreateCategories()
{

        $returnedStr = esc_attr($_POST['options_textarea'] );

        $trimmed = trim($returnedStr);

        $categories_array = explode(',',$trimmed);

    foreach ($categories_array as $key => $value)
    {

        $catString = $value.'';

        $term = term_exists($value,'category');
        if($term==0 || $term==null)
        {
            create_category($value);

        }

    }

}

function create_category($value)
{
    $trimmedValue = trim($value);
    $hyphenatedValue = str_replace(" ", "-", $trimmedValue);

    wp_insert_term(
        $trimmedValue,
        'category',
        array(
            'description' => $trimmedValue,
            'slug'=> $hyphenatedValue
            )
        );

}

function rfr_CategorySettingsPage() {
?>
<div class="wrap">
<h1>Bulk Category Creator</h1>

<form method='post'><input type='hidden' name='form-name' value='form 2' />
    < ?php settings_fields( 'rfr-bulk-category-creator-group' ); ?>
    < ?php do_settings_sections( 'rfr-bulk-category-creator-group' ); ?>
    <table class="form-table">

        <tr valign="top">
        <th scope="row">Enter categories separated by commas</th>
        <td>
        <textarea cols="50" rows="8" name="options_textarea"></textarea>
        </td>
        </tr>
    </table>

    < ?php submit_button('Bulk Create Categories'); ?>

</form>
</div>
< ?php } ?>
Now, navigate to Admin Dashboard > Bulk Categories Creator and enter a list of categories.
现在,导航至“管理仪表板”>“大分类类别创建器”并输入类别列表。
In this example, I’m adding Tall, Medium, Short, and Ultra Short into the textarea.
在此示例中,我将“高”,“中”,“短”和“超短”添加到文本区域。
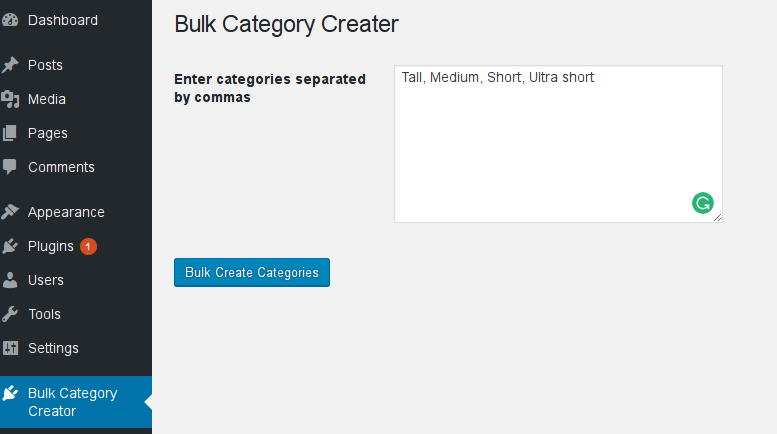
Now, click on Bulk Create Categories
现在,点击批量创建类别
Then, navigate to Admin Dashboard > Posts > Categories and you can see that our categories have been added to the list of Categories.
然后,导航至“管理控制台”>“帖子”>“类别”,您可以看到我们的类别已添加到“类别”列表中。
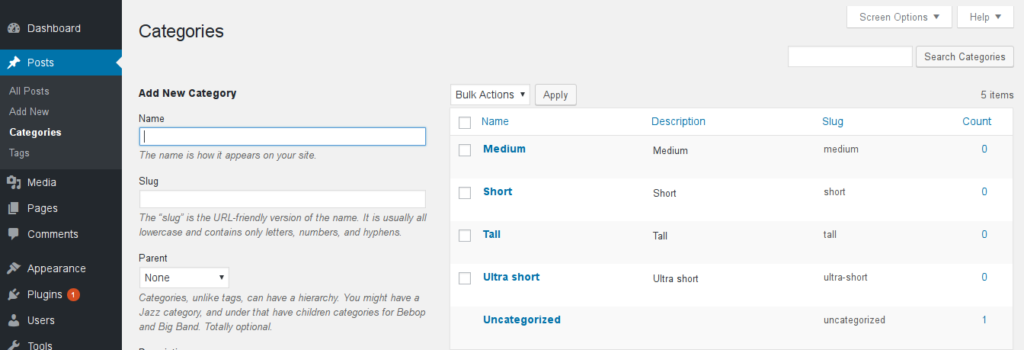
Success! Our list of categories have now been created in one go. Note that under the slug section our category ‘ultra short’ has been hyphenated into ‘ultra-short’.
成功! 现在可以一次性创建我们的类别列表。 请注意,在“子弹”部分下,我们的“超短”类别已被连字符为“超短”。
So, in our tutorial, you have successfully created your first WordPress Plugin, the Bulk Category Creator Plugin. If you have followed through this tutorial, you should now have a working WordPress plugin!
因此,在我们的教程中,您已经成功创建了第一个WordPress插件,即Bulk Category Creator插件。 如果您已按照本教程进行操作,那么您现在应该已经可以使用WordPress插件了!
If you want to distribute this plugin to your friends, just compress the plugin directory to a .zip file and you are done.
如果您想将此插件分发给您的朋友,只需将插件目录压缩为.zip文件即可。
Thank you for following this tutorial! If you have questions or comments, leave them in the comments section below!
感谢您关注本教程! 如果您有任何问题或意见,请将其留在下面的评论部分!
翻译自: https://www.sitepoint.com/learn-plugin-development-bulk-category-creator/
商品类别批量添加的前端开发


 174
174


 被折叠的 条评论
为什么被折叠?
被折叠的 条评论
为什么被折叠?
 到【灌水乐园】发言


