


旅行者 问题
This article was peer reviewed by Wern Ancheta. Thanks to all of SitePoint’s peer reviewers for making SitePoint content the best it can be!
本文由Wern Ancheta进行同行评审。 感谢所有SitePoint的同行评审人员使SitePoint内容达到最佳状态!
Today, we are talking about Voyager!
今天,我们谈论的是旅行者 !

Voyager is a Laravel package that provides a full administration system for the framework in its “skeleton app” form. Voyager has 4 main features:
Voyager是Laravel软件包,以“骨架应用程序”形式为框架提供了完整的管理系统。 旅行者有4个主要功能:
Media Manager – Built on top of Intervention Image, it provides a fully functional media manager that allow us to view, edit, and delete images from storage. This way, we can have all of our media in a single place, making it easy to access and manipulate.
媒体管理器 –建立在Intervention Image之上,它提供了功能齐全的媒体管理器,使我们可以查看,编辑和删除存储中的图像。 这样,我们可以将所有媒体都放在一个位置,从而易于访问和操作。
Menu Builder – The Menu Builder allows us to add, edit, and delete menu items. It also gives us the ability to create new menus and manage them.
菜单生成器 –菜单生成器使我们可以添加,编辑和删除菜单项。 它还使我们能够创建和管理新菜单。
Database Manager – Allows us to access and manipulate our database directly from the admin panel. Instead of having to use Laravel’s
Schema, Voyager provides us with a mechanism to add, delete, and edit entries in the database. It will also (upon specification) create our models when adding tables to the database.数据库管理器 –允许我们直接从管理面板访问和操作数据库。 Voyager不必使用Laravel的
Schema,而是为我们提供了一种在数据库中添加,删除和编辑条目的机制。 当将表添加到数据库时,它将(根据规范)创建我们的模型。Bread/CRUD builder – BREAD is simply CRUD for the database. Voyager provides a mechanism to Browse, Read, Edit, Add, and Delete entries and views of any table in our database.
面包/ CRUD构建器 – BREAD只是数据库的CRUD。 Voyager提供了一种机制来浏览,读取,编辑,添加和删除我们数据库中任何表的条目和视图。
Let’s take a closer look at it.
让我们仔细看看。
安装旅行者 (Installing Voyager)
First, let’s start with a fresh Laravel installation. Of course, we can start with an existing project, but for the purpose of this article we will start with a fresh one.
首先,让我们从全新的Laravel安装开始。 当然,我们可以从现有项目开始,但是出于本文的目的,我们将从一个新项目开始。
While it’s outside the scope of this article, the recommended way to start a new Laravel project is by using Composer:
虽然不在本文讨论范围之内,但是建议使用Composer来启动一个新的Laravel项目:
composer create-project laravel/laravel voyagerThis will create a new Laravel project called voyager inside the /voyager folder. To serve this new Laravel project, using PHP’s built in server:
这将创建一个新的Laravel项目称为voyager内部/voyager文件夹。 要使用PHP的内置服务器为这个新的Laravel项目提供服务:
php artisan serveOn Homestead Improved, the serving is taken care of for you with Nginx.
在Homestead Improvementd上 ,Nginx可以为您提供服务。
With a fresh Laravel installation up and running, we can now focus on installing the Voyager Admin package.
通过全新的Laravel安装并运行,我们现在可以集中精力安装Voyager Admin软件包。
composer require tcg/voyagerAs we can see during the installation process, Voyager is pulling components from some very well known PHP packages like Doctrine ORM for the database manager, or Guzzle and Intervention Image for PHP image handling and manipulation. This shows us that Voyager is built on top of reliable and proven components.
正如我们在安装过程中看到的那样,Voyager正在从一些非常著名PHP软件包中提取组件,例如用于数据库管理器的Doctrine ORM或用于PHP图像处理和操纵的Guzzle and Intervention Image。 这表明我们Voyager建立在可靠且可靠的组件之上。
Next, let’s fire up our favorite code editor. We will need to edit some files in order to have Voyager up and running.
接下来,让我们启动我们最喜欢的代码编辑器。 我们需要编辑一些文件才能启动Voyager。
First, we open the .env file and add our database credentials so that Voyager can connect to it.
首先,我们打开.env文件并添加数据库凭据,以便Voyager可以连接到该文件。
DB_HOST=localhost
DB_DATABASE=database
DB_USERNAME=username
DB_PASSWORD=password
After that, let’s add the Voyager and Image Intervention service providers to our providers array. This array can be found in the config/app.php file, and all we need to do is append the following elements to it:
之后,让我们将Voyager和Image Intervention服务提供者添加到我们的提供者阵列中。 可以在config/app.php文件中找到此数组,而我们需要做的只是向其添加以下元素:
TCG\Voyager\VoyagerServiceProvider::class,
Intervention\Image\ImageServiceProvider::class,
To finish the installation:
要完成安装:
php artisan voyager:installWe should now see the "Successfully installed Voyager! Enjoy :)" message.
现在,我们应该看到"Successfully installed Voyager! Enjoy :)"消息。
There is only one thing left to do: seeding the database.
剩下要做的只有一件事:为数据库设置种子。
php artisan db:seedThis will seed our database with test data using the seed classes. If we serve our Laravel installation again, we should now see login and register options in the top right corner.
这将使用种子类为我们的数据库添加测试数据。 如果我们再次提供Laravel安装服务,现在应该在右上角看到login和register选项。
The newly created admin area in /admin should look like this:
/admin新创建的admin区域应如下所示:
Quite gorgeous! The TCG team made quite an effort. To log in and explore, let’s use the following credentials:
相当华丽! TCG团队付出了很大的努力。 要登录并浏览,请使用以下凭据:
email: admin@admin.com
password: password
From this admin panel, we have access to all our main features. The media manager, menu builder, database manager and CRUD/BREAD builder, all can be accessed from the admin panel’s main menu.
在此管理面板中,我们可以访问所有主要功能。 媒体管理器,菜单构建器,数据库管理器和CRUD / BREAD构建器都可以从管理面板的主菜单访问。
We also have access to a dashboard, via which we can add Google Analytics by going to Settings, and adding our Google Analytics Client ID into the designated field.
我们还可以访问仪表板,通过该仪表板,我们可以通过转到Settings并将Google Analytics Client ID添加到指定字段中来添加Google Analytics Client ID 。
If we check Tools -> Database we can see that the menu items are the ones that have the BREAD option activated (and a proper menu created, but we will get to that later). We are looking at three of our main features: the database manager, BREAD builder, and menu builder. Let’s look at them in action.
如果我们选择Tools -> Database我们可以看到菜单项是激活了BREAD选项的菜单项(并创建了一个正确的菜单,但是稍后我们将介绍)。 我们正在研究我们的三个主要功能:数据库管理器,BREAD构建器和菜单构建器。 让我们看看它们的作用。
数据库管理员 (Database Manager)
To create a new database column in Laravel, we normaly need to use migrations and the Laravel schema facade. While both are relatively simple to use, if we compare them to using Voyager, we can easily see which method is faster.
要在Laravel中创建新的数据库列,我们通常需要使用migrations和Laravel schema外观。 尽管两者都相对易于使用,但是如果将它们与使用Voyager进行比较,我们可以轻松地看到哪种方法更快。
Let’s imagine we want to create a new table and add some columns the Laravel way (using migrations as our database “version control” and then using Schema to build our database schema).
假设我们要创建一个新表并以Laravel方式添加一些列(使用迁移作为数据库的“版本控制”,然后使用Schema构建我们的数据库模式)。
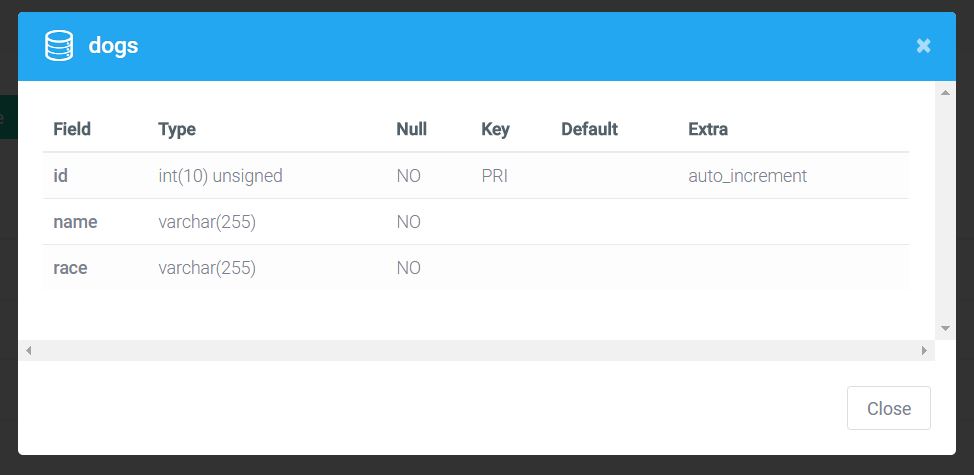
Let’s focus on creating a Dogs table with some columns to identify our beloved pets. First, let’s start with the table. To begin, our table will hold an auto-increment field called id.
让我们集中精力创建一个包含一些列的Dogs表,以识别我们心爱的宠物。 首先,让我们从表格开始。 首先,我们的表将包含一个名为id的自动递增字段。
Schema::create('dogs', function (Blueprint $table) {
    $table->increments('id');
});
Then, let’s add name and breed columns to our table.
然后,让我们在表中添加name和breed列。
Schema::table('dogs', function ($table) {
    $table->string('name');
    $table->string('breed');
});
Our full migration file will look like this:
我们完整的迁移文件如下所示:
<?php

use Illuminate\Support\Facades\Schema;
use Illuminate\Database\Schema\Blueprint;
use Illuminate\Database\Migrations\Migration;

class CreateDogsTable extends Migration
{
    /**
     * Run the migrations.
     *
     * @return void
     */
    public function up()
    {
        Schema::create('dogs', function (Blueprint $table) {
            $table->increments('id');
        });

        Schema::table('dogs', function ($table) {
            $table->string('name');
            $table->string('breed');
        });
    }

    /**
     * Reverse the migrations.
     *
     * @return void
     */
    public function down()
    {
        Schema::drop('dogs');
    }
}
While migrations are useful, using Voyager makes things easier and more visual, making it so that even a non-programmer can easily do it.
尽管迁移非常有用,但使用Voyager可使事情变得更轻松,更直观,从而使即使是非程序员也可以轻松地做到这一点。
Let’s look at the same example using Voyager’s database manager.
让我们看看使用Voyager的数据库管理器的相同示例。
In our Voyager admin area let’s click the Tools -> Database -> Create New Table button
在我们的Voyager管理区域中,单击Tools -> Database -> Create New Table按钮
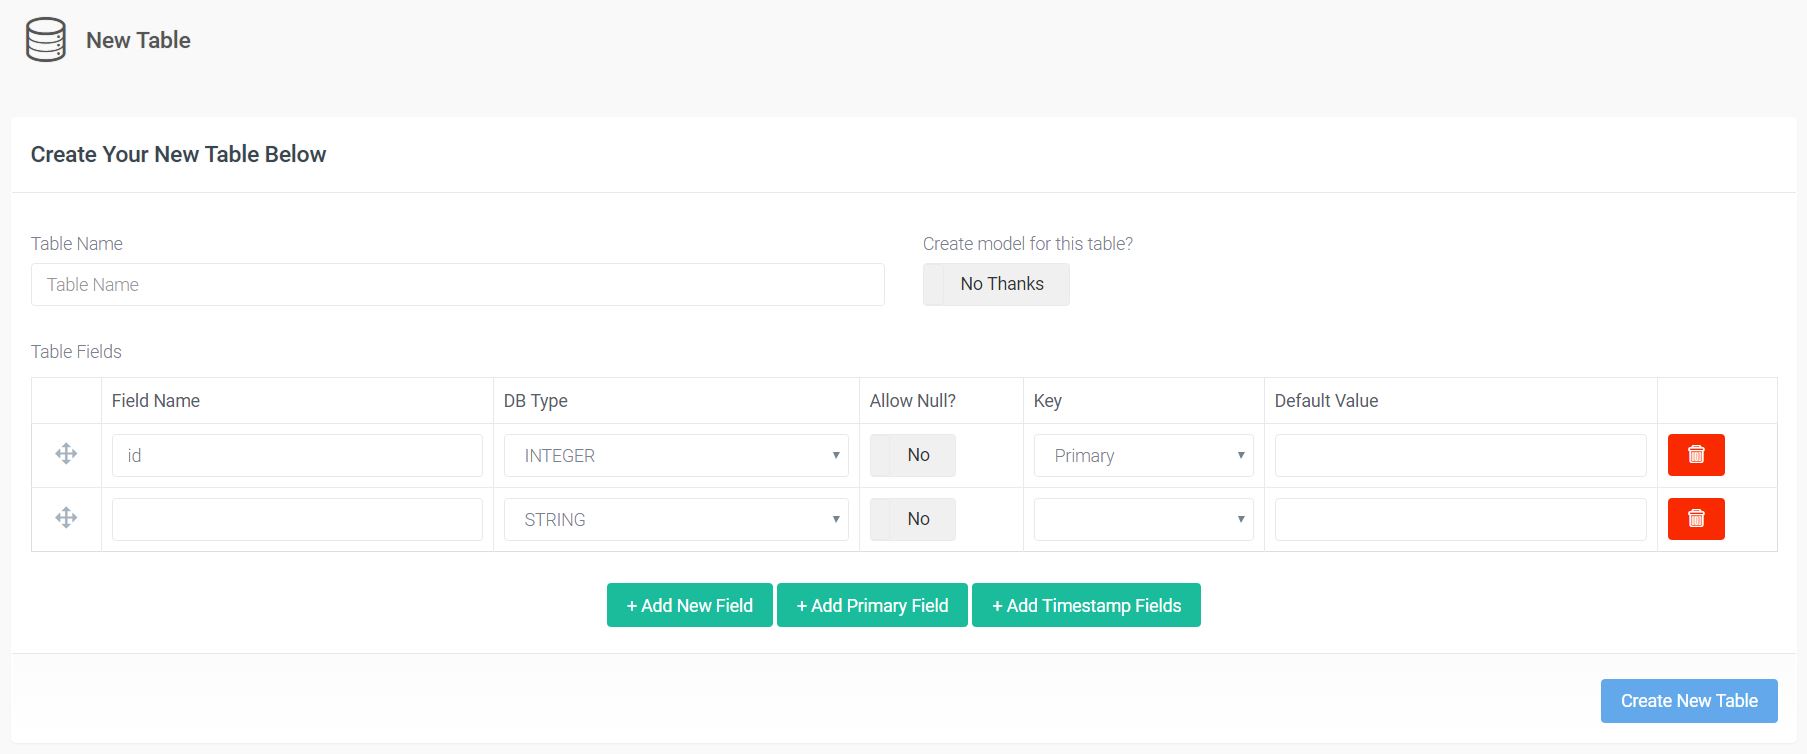
It’s pretty self explanatory, and should look familiar if you’ve ever used a tool like PhpMyAdmin. Let’s fill the fields accordingly and click the Create New Table button. Be sure to add the timestamp fields by choosing the Add Timestamp Fields option, as this will be important in the future. After that, let’s check the tables listing. We can see our dogs table there, with the option to View, Edit, Delete, and Add BREAD to this table. If we click View, we can see that we just created the same table as above, without using any code, and twice as fast.
这是很容易解释的,如果您曾经使用过PhpMyAdmin之类的工具,则应该看起来很熟悉。 让我们相应地填写字段,然后单击“ Create New Table按钮。 确保选择“ Add Timestamp Fields选项来Add Timestamp Fields ,因为这在将来很重要。 之后,让我们检查表列表。 我们可以在此处看到我们的dogs表,其中包括View , Edit , Delete和Add BREAD to this table 。 如果单击View ,可以看到我们只是创建了与上述相同的表,而无需使用任何代码,并且速度是以前的两倍。
面包制作器 (BREAD Builder)
Earlier we talked about the BREAD feature. BREAD is nothing more than the ability to Browse, Read, Edit, Add and Delete views and functionality from any table in our database. Adding this functionality is as easy as clicking the Add BREAD to this table on any table in our table listing. Let’s do it to our Dogs table.
之前我们讨论了BREAD功能。 BREAD无非就是能够从我们数据库的任何表中浏览,读取,编辑,添加和删除视图和功能。 添加此功能就像在我们的表列表中的任何表上单击Add BREAD to this table一样简单。 让我们在Dogs表中进行操作。
As we can see by clicking the button, we now have this big form builder. Here, we can find all the options for our BREAD, from display name to visibility. We can also see that Voyager allows us to set our Input type not only as text fields and different box types, but also as images and files. This way, we can easily add image and file fields to our database.
正如我们通过单击按钮所看到的,我们现在有了这个大的表单生成器。 在这里,我们可以找到BREAD的所有选项,从显示名称到可见性。 我们还可以看到Voyager允许我们不仅将输入类型设置为文本字段和不同的框类型,还可以将图像和文件设置为输入类型。 这样,我们可以轻松地将图像和文件字段添加到我们的数据库中。
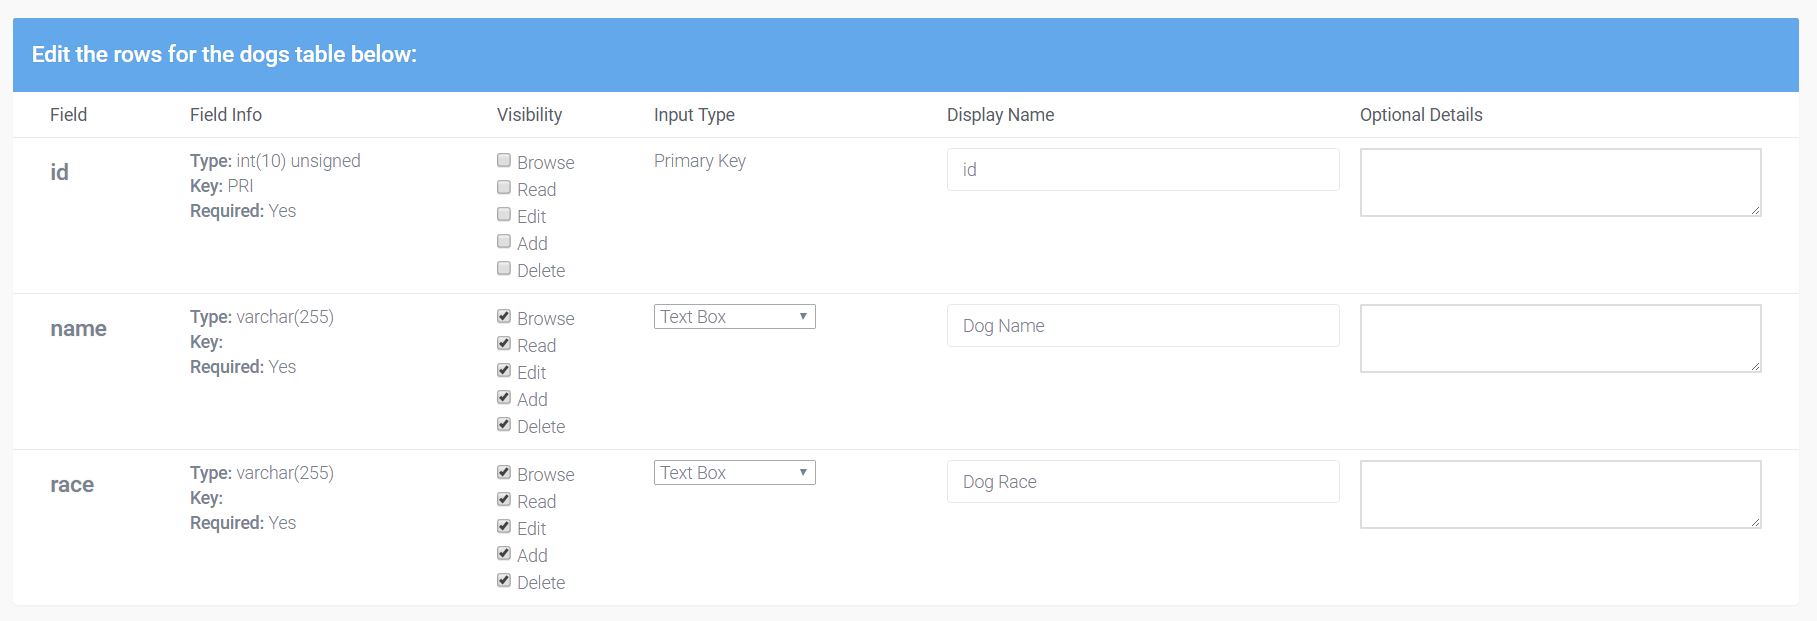
There are also some fields for information like the Slug, the Icon (it has the option of using Voyager’s font class for icons), Display name, and Model name.
还有一些信息字段,例如“子弹”,“图标”(可以选择使用Voyager的字体类作为图标的选项),“显示名称”和“模型名称”。
After filling out the form and creating our BREAD, if we check our menu, we can see that we don’t have our Dogs option yet. That’s where the Menu Builder comes in.
填写表单并创建BREAD之后,如果我们查看菜单,就会发现我们还没有Dogs选项。 这就是菜单生成器的用武之地。
菜单生成器 (Menu Builder)
In Tools -> Menu Builder, we have the option to create a new menu, edit the admin menu, or the main menu. Right now, we want to create a new menu item in our admin panel so we can use the BREAD options created for our Dogs table. Next to the admin, let’s click the Builder option.
在Tools -> Menu Builder ,我们可以选择创建一个新菜单,编辑admin菜单或main菜单。 现在,我们想在管理面板中创建一个新的菜单项,以便可以使用为Dogs表创建的BREAD选项。 在管理员旁边,让我们单击“ Builder选项。
A drag and drop menu lets us organize our admin panel menu now. At the top of the page, there’s the New menu item option.
拖放菜单使我们现在可以组织管理面板菜单。 在页面顶部,有“ New menu item选项。
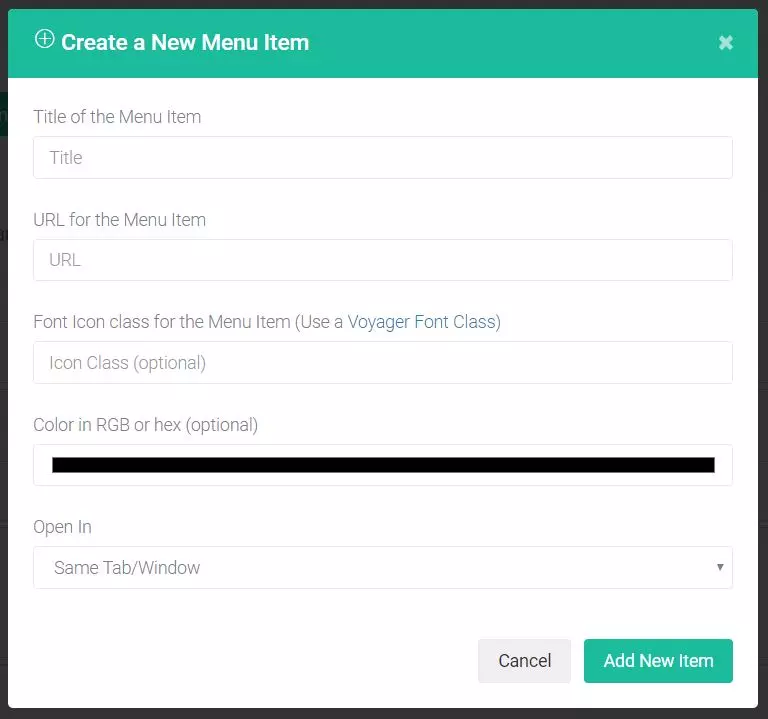
Be careful when filling this form. The URL should follow the following structure: /admin/slug, where the slug should be the URL slug used when creating BREAD for the table. If they’re not identical, we will end up with routing problems that are fairly hard to debug. After selecting the icon for the menu, we are good to go! Our Dogs menu is created!
填写此表格时要小心。 该URL应该遵循以下结构: /admin/slug ,其中该slug应该是为表创建BREAD时使用的URL slug。 如果它们不相同,我们将面临难以调试的路由问题。 选择菜单图标后,我们就可以开始了! 我们的Dogs菜单已创建!
We can now navigate to our Dogs menu to view, add, edit, or delete entries. We currently have none, so have fun creating some.
现在,我们可以导航到“ Dogs菜单以查看,添加,编辑或删除条目。 我们目前还没有,所以创建一些有趣。
Note: One of the things I found out while playing around with Voyager is that it would try to insert a created_at and updated_at value when trying to insert values to a newly created database table. This would happen even when those fields were not created in the database. I had to go back and add those fields manually to the database table. This is the reason why we had to add those fields earlier.
注意:我在玩Voyager时发现的一件事是,当尝试向新创建的数据库表中插入值时,它将尝试插入created_at和updated_at值。 即使没有在数据库中创建这些字段,也会发生这种情况。 我不得不返回并将这些字段手动添加到数据库表中。 这就是为什么我们必须更早添加这些字段的原因。
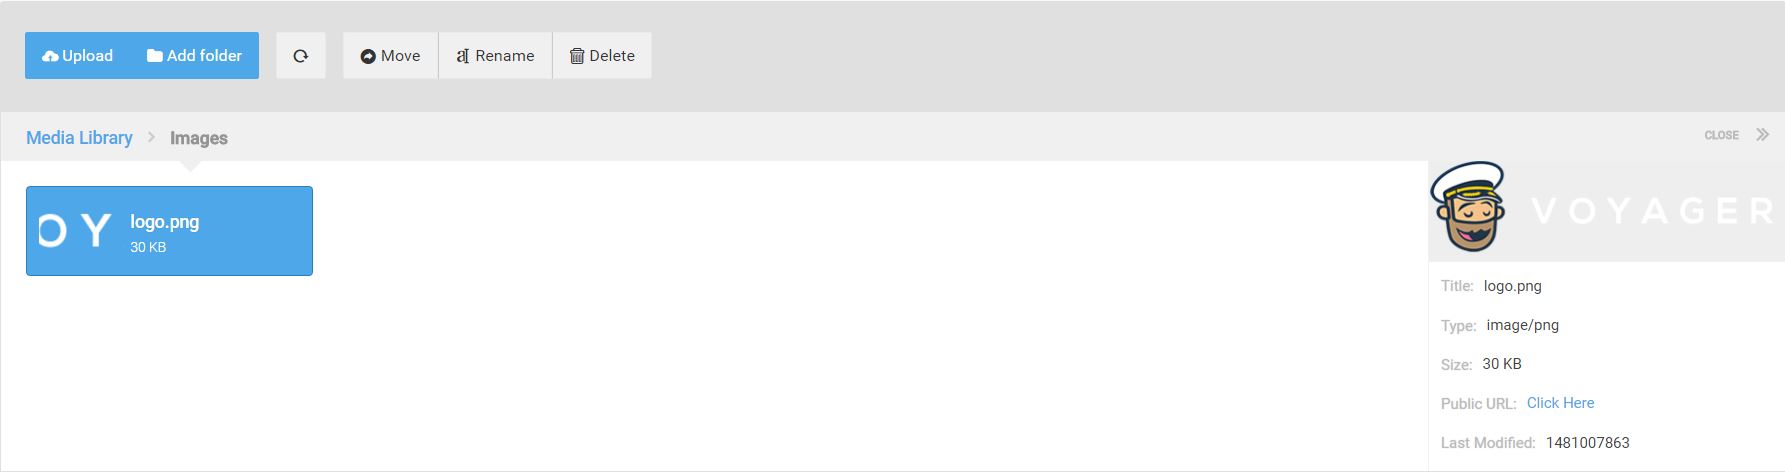
媒体经理 (Media Manager)
If we check our menu, we can see that we have a Media option.
如果我们检查菜单,可以看到我们有一个Media选项。
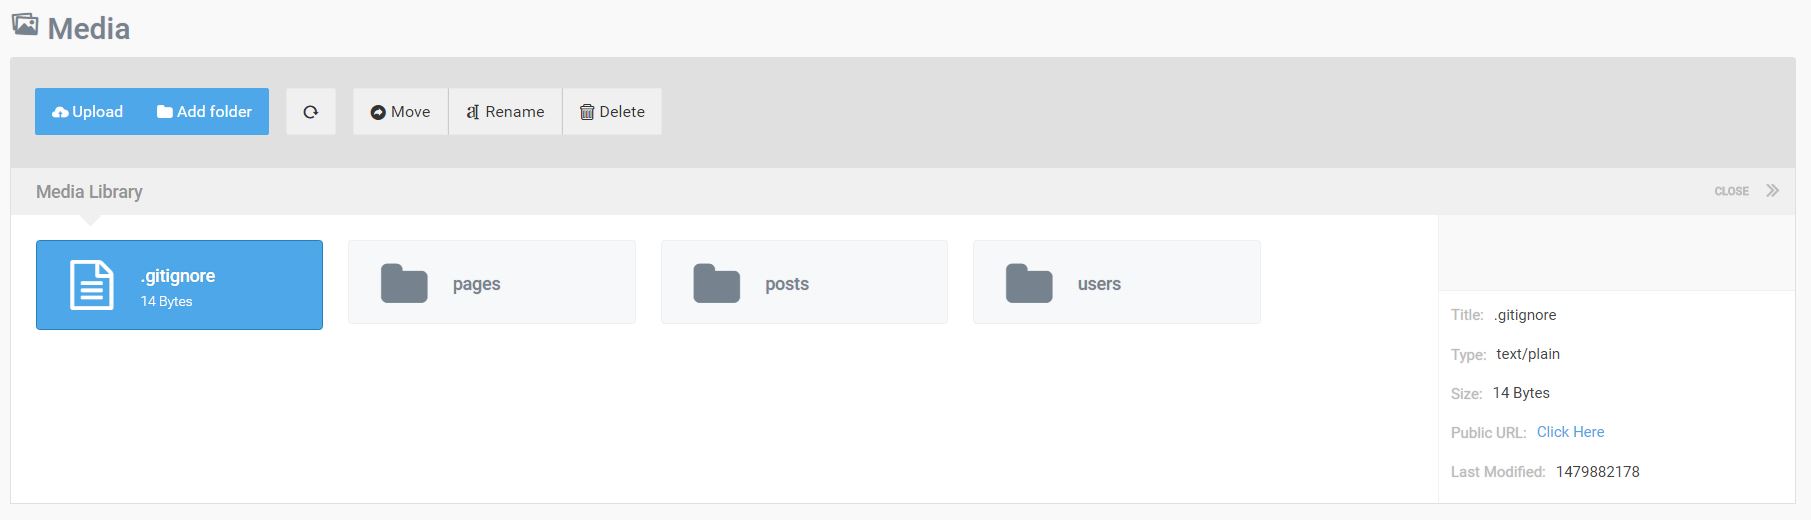
The media manager is straight forward. It gives us a centralized place to access all static files in our application, with the option to upload files, create folders to further organize our media, move files around, rename, and delete them. As we can see in the screenshot below, we also get some information on the uploaded file, including a thumbnail and a public url for easier access.
媒体经理很直接。 它为我们提供了一个集中的位置,可以访问应用程序中的所有静态文件,并可以选择上传文件,创建文件夹以进一步组织我们的媒体,四处移动文件,重命名和删除它们。 正如我们在下面的屏幕快照中所见,我们还获得了有关上传文件的一些信息,包括缩略图和公共URL,以便于访问。
Everything will be conveniently stored in the the storage/app/public folder.
一切都将方便地存储在storage/app/public文件夹中。
结论 (Conclusion)
Voyager is a great admin package for Laravel. It is very easy to use, and extremely practical. Voyager is also open source, being improved every day. Why not take a look at its repo and help out with writing better docs or fixing some of the bugs? This incredibly practical Laravel package is sure to benefit many Laravel users, and deserves all the help we can give it.
Voyager是Laravel的出色管理包。 它非常易于使用,并且非常实用。 Voyager也是开源的,每天都在改进。 为什么不看看它的仓库,并帮助编写更好的文档或修复一些错误呢? 这个非常实用的Laravel软件包肯定会让许多Laravel用户受益,并且值得我们提供所有帮助。
Have you given it a go? What are your complaints? What are your praises? Let us know in the comments.
你试过了吗? 你有什么抱怨? 您的好评是什么? 让我们在评论中知道。
翻译自: https://www.sitepoint.com/voyager-can-an-admin-interface-make-laravel-even-more-approachable/
旅行者 问题


 380
380

 被折叠的 条评论
为什么被折叠?
被折叠的 条评论
为什么被折叠?
 到【灌水乐园】发言


