


This article was created in partnership with Alibaba Cloud. Thank you for supporting the partners who make SitePoint possible.
本文是与阿里云合作创建的。 感谢您支持使SitePoint成为可能的合作伙伴。
Alibaba Cloud is a provider that is gaining significant visibility as of late. One of the main products it offers is ECS (Elastic Compute Service) or, to put it into simpler terms, a flexible, cloud-based VPS. Those acquainted with the market of cloud computing products will notice similarities with Amazon’s Elastic Cloud – and they’d be right. Upon testing the Alibaba Cloud’s ECS, we can say it is a strong competitor to Amazon, and other vendors in the cloud computing space.
阿里云是最近才获得重要关注的提供商。 它提供的主要产品之一是ECS(弹性计算服务),或者更简单地说,是基于云的灵活VPS。 那些了解云计算产品市场的人会注意到与Amazon的Elastic Cloud的相似之处-并且他们是对的。 经过对阿里云ECS的测试,我们可以说它是亚马逊以及云计算领域其他供应商的有力竞争者。
In fact, if we judge by the diversity of products Alibaba Cloud has in its offering, we could perhaps say they are already there.
实际上,如果我们根据阿里云产品的多样性来判断,我们也许可以说它们已经存在。
For this article, we took the practical task of moving a fully-fledged, production eCommerce website to an Alibaba ECS instance (we used an actual live website running on another domain, and moved it to a test domain).
对于本文,我们承担了将成熟的生产型电子商务网站移至阿里巴巴ECS实例的实际任务(我们使用了在另一个域上运行的实际在线网站,并将其移至测试域)。
The installation we used was a WooCommerce website with hundreds of products, users, and significant disk space usage.
我们使用的安装是一个拥有数百个产品,用户和大量磁盘空间使用量的WooCommerce网站。
弹性计算服务 (Elastic Compute Service)
Once we register with Alibaba Cloud, we are offered US$300 worth of credit to try out its products (once we confirm our payment methods, such as a credit card, or PayPal account). These funds can go toward deploying and testing an ECS instance.
在阿里云上注册后 ,我们将获得价值300美元的信贷以试用其产品(一旦我们确认了付款方式,例如信用卡或PayPal帐户)。 这些资金可用于部署和测试ECS实例。
After logging in, we navigate to our management console, select Elastic Compute Service in the menu on the left, and then Instances. Once we click this link, we are presented with a button on the right to Create Instance.
登录后,我们导航到管理控制台,在左侧菜单中选择Elastic Compute Service ,然后选择Instances 。 单击此链接后,将在创建实例的右侧显示一个按钮。
We are then presented with options we can choose for the instance – Billing Method, Region – meaning the location of our server – and Instance Type. We can select from several architectures (we went with x86 Architecture) and categories such as General Purpose, Compute Optimized, Memory Optimized, High Clock Speed and other types.
然后,我们将看到可以为实例选择的选项- 计费方式 , 区域 -表示服务器的位置-以及实例类型 。 我们可以从几种架构(我们使用x86架构)和类别中进行选择,例如通用 , 计算优化 , 内存优化 , 高时钟速度和其他类型。
We can then select one of the offered server sizes – by memory size, virtual core count, clock speed, and so on.
然后,我们可以选择一种提供的服务器大小–通过内存大小,虚拟内核数,时钟速度等。
Below this, we can select one of the offered images – there are a number of operating systems we can choose, including Alibaba’s own Aliyun Linux, CentOS, Ubuntu, Windows Server, and others. Among Marketplace Images, there is a large selection of preconfigured application images we can select.
在此之下,我们可以选择提供的映像之一–我们可以选择许多操作系统,包括阿里巴巴自己的Aliyun Linux,CentOS,Ubuntu,Windows Server等。 在市场映像中,我们可以选择很多预配置的应用程序映像。
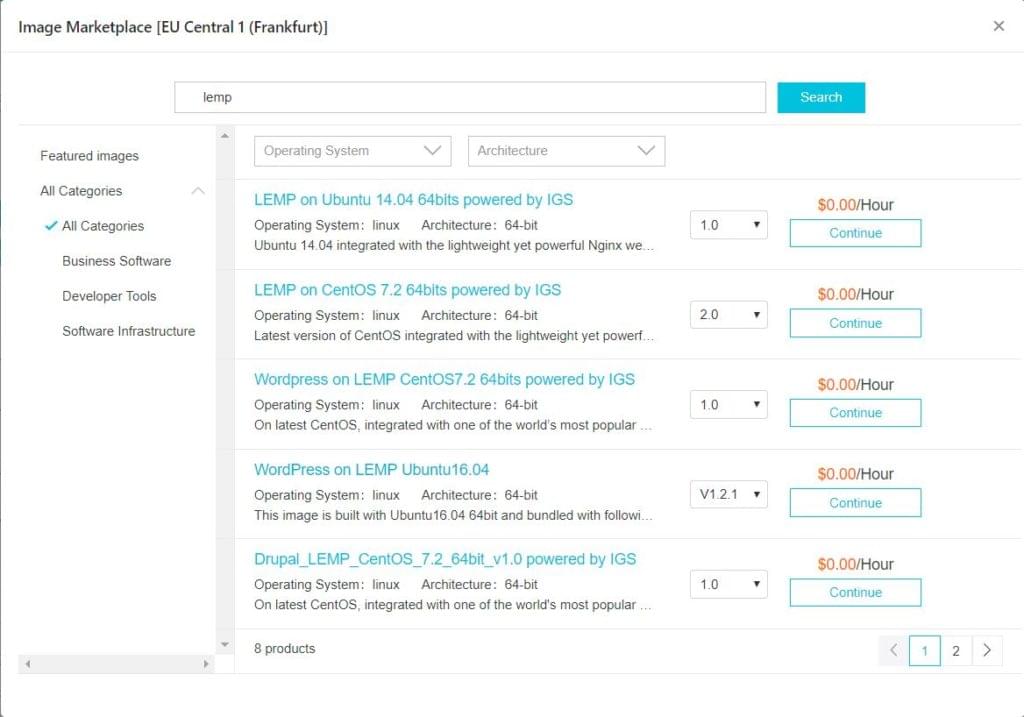
Here we are selecting the Plesk free image, since it offers us a number of convenient ways to manage our server – domain management, database management, and WordPress application management – all in one web interface.
在这里,我们选择了免费的Plesk映像,因为它为我们提供了许多方便的方法来管理服务器-域管理,数据库管理和WordPress应用程序管理-全部集中在一个Web界面中。

If we have a Plesk license obtained separately, or we want to pay more, we can get premium version of Plesk with even more features that make professional server management a lot simpler.
如果我们有单独获得的Plesk许可证,或者我们想支付更多费用,我们可以获得具有更多功能的Plesk的高级版本,这些功能使专业服务器管理更加简单。
Another convenience of Plesk instances is that they have been hardened and secured with configured firewall rules. It also comes with phpMyAdmin preinstalled. This is great because, considering that we are using a LEMP server stack, installing and configuring phpMyAdmin can take some work.
Plesk实例的另一个便利之处是它们已使用配置的防火墙规则进行了强化和保护。 它还预装了phpMyAdmin。 这很不错,因为考虑到我们使用的是LEMP服务器堆栈,安装和配置phpMyAdmin可能会花费一些工作。
We then select storage – SSD disk is the recommended option, with up to 500GB in size.
然后,我们选择存储-建议使用SSD磁盘,最大容量为500GB。
We can then select networking options – here we will probably be okay if we go with the default preselected options. We can also configure security groups – a useful thing if we have more than one server instance.
然后,我们可以选择联网选项-如果我们使用默认的预选选项,在这里我们可能会没事的。 我们还可以配置安全组-如果我们有多个服务器实例,这将非常有用。
Now we come to SSH access configuration. Here we can configure our SSH keys for passwordless access, which is generally recommended. However, since we are doing a migration, we will configure password access, so we don’t have to copy public SSH keys from the server we are migrating from.
现在我们来谈谈SSH访问配置。 在这里,我们可以配置SSH密钥以进行无密码访问,通常建议这样做。 但是,由于正在进行迁移,因此我们将配置密码访问权限,因此我们不必从要迁移的服务器上复制公共SSH密钥。
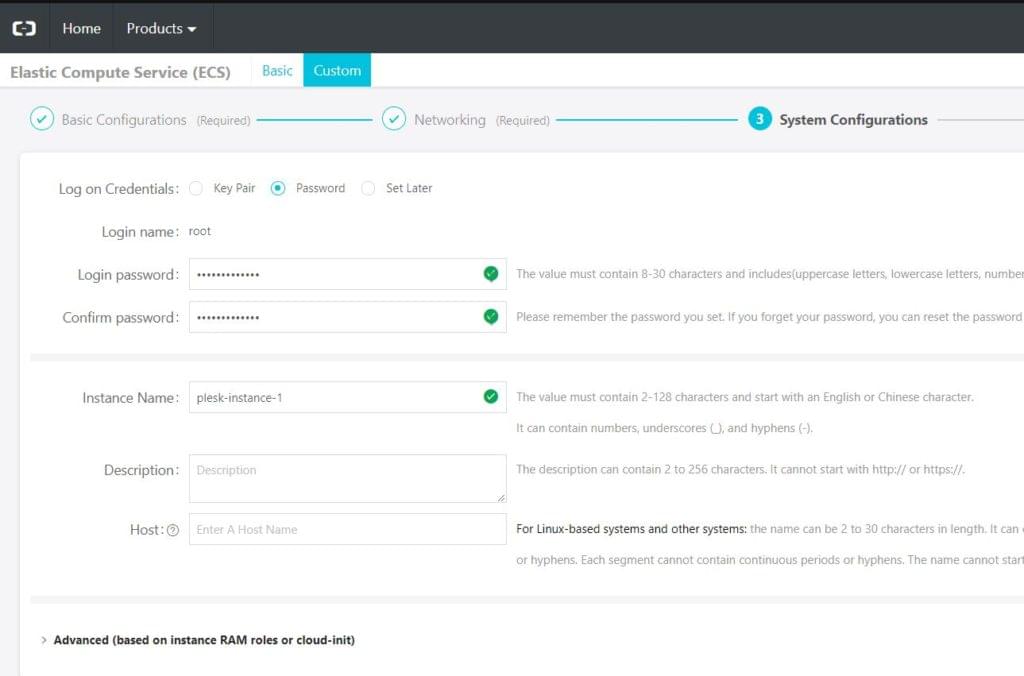
We should take a note of the password we created here. If we forget the password, we can reset it in the ECS console.
我们应该记下我们在此处创建的密码。 如果忘记了密码,可以在ECS控制台中将其重置。
After we complete our order, we can go back to the web console and wait for a minute or two till our instance is created. Once the instance is running, we can connect to the system shell through a VNC session in our browser. Once we do this, our instance spits out further instructions in the shell:
完成订单后,我们可以返回Web控制台并等待一两分钟,直到创建实例为止。 实例运行后,我们可以通过浏览器中的VNC会话连接到系统外壳。 完成此操作后,我们的实例会在shell中吐出更多指令:
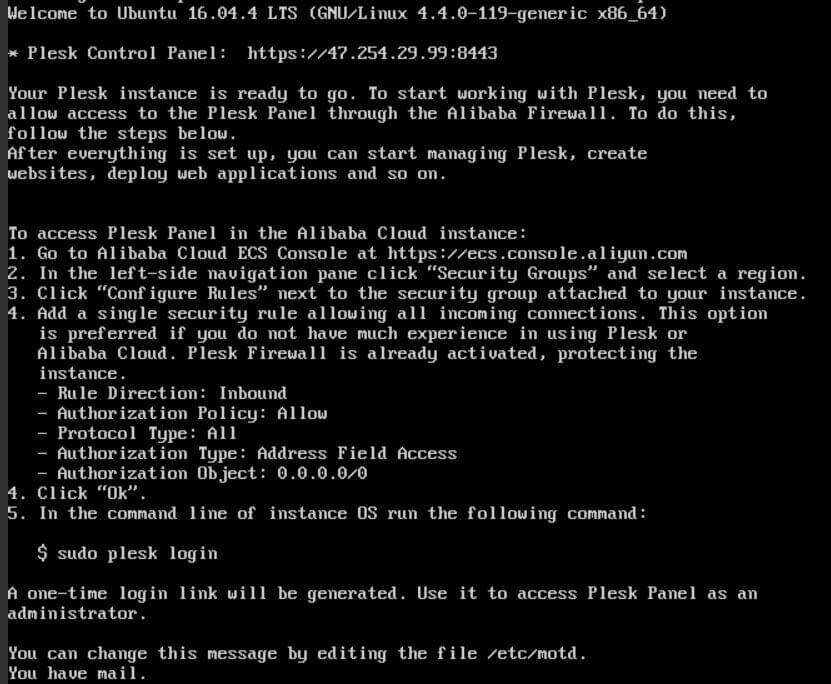
We need to create a security rule which will open the ports we need, and enable us to access our instance. Once we have done this, we can connect to our instance via SSH shell (or continue our VNC session), and generate our Plesk admin account:
我们需要创建一个安全规则,该规则将打开所需的端口,并使我们能够访问我们的实例。 完成此操作后,我们可以通过SSH Shell连接到我们的实例(或继续我们的VNC会话),并生成我们的Plesk管理员帐户:
We will copy the second URL which will allow us web access to the Plesk admin.
我们将复制第二个URL,这将使我们可以通过Web访问Plesk管理员。
Once we visit this URL in our browser, we will create our account:
在浏览器中访问该URL后,我们将创建我们的帐户:
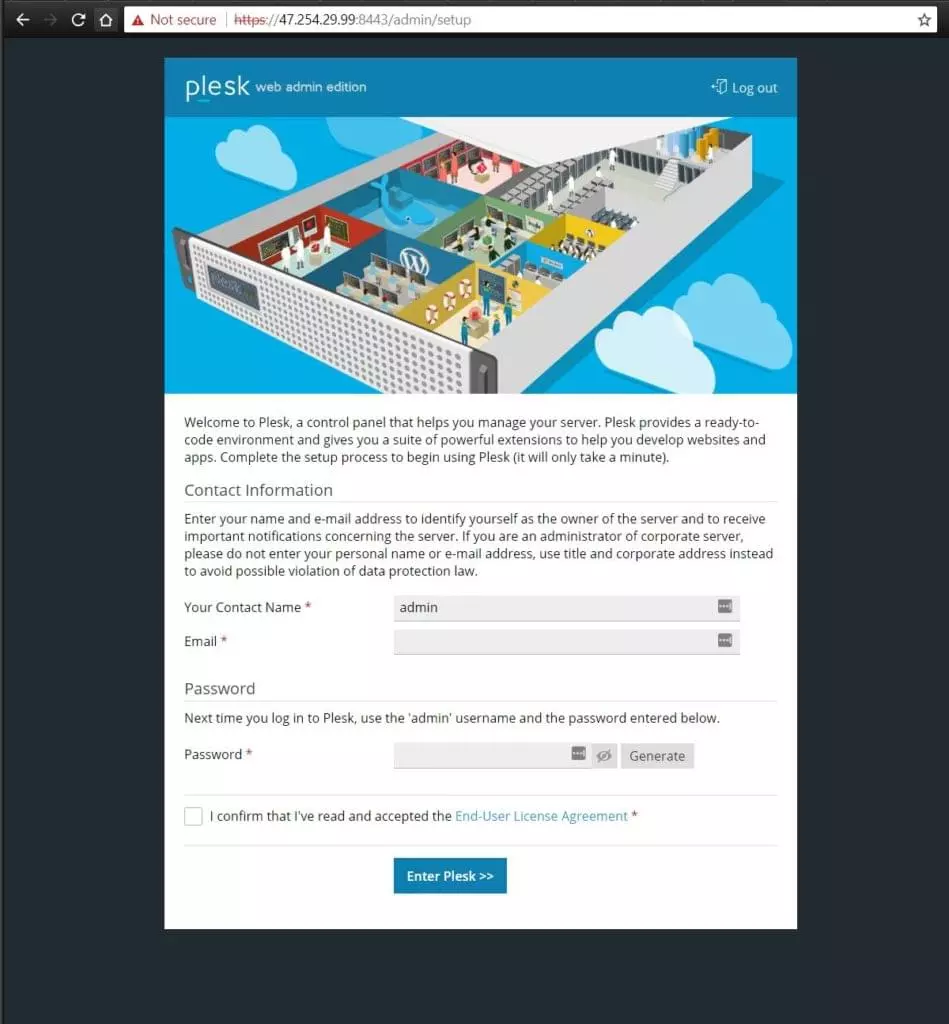
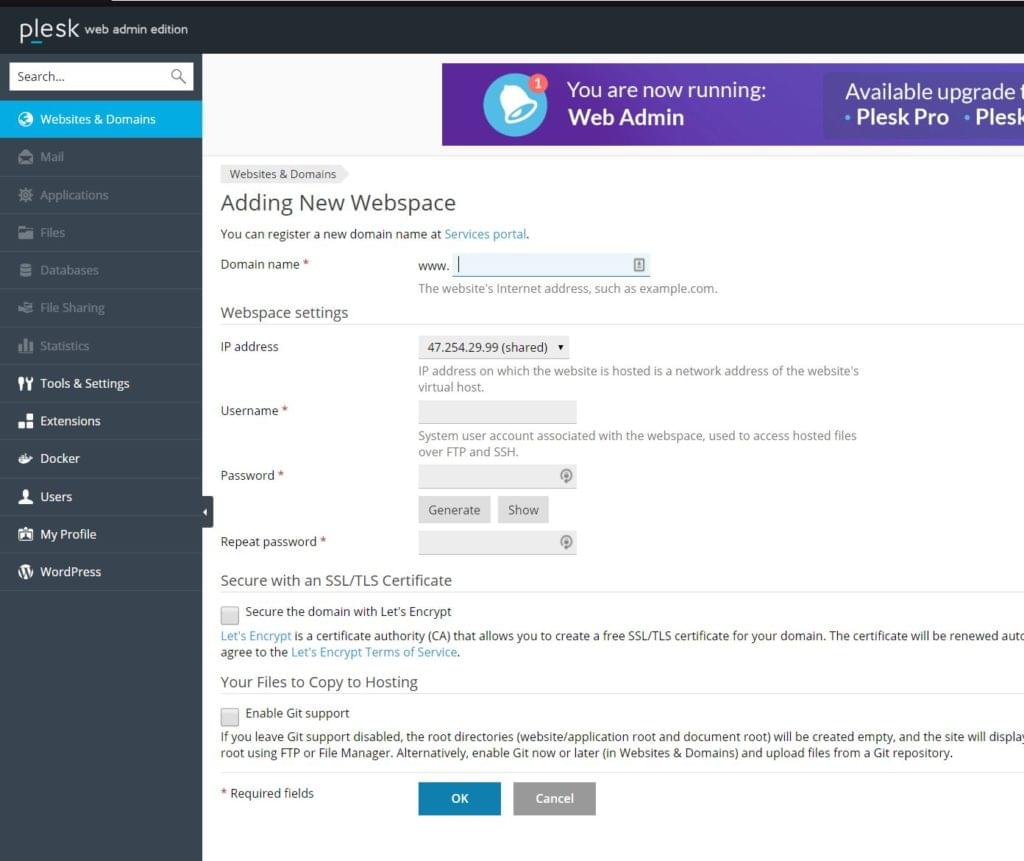
We presume here that we have a domain, and we have pointed our domain – or subdomain – to our instance’s public IP address. If not, we are shown our IP once we are logged into Plesk admin console. Once we have pointed our domain to this IP, we can create a Webspace – basically a virtual host for our website. We would otherwise need to manually configure nginx for this, but with Plesk, we have the convenience of doing this the easy way.
我们在这里假设我们有一个域,并且已经将域(或子域)指向了实例的公共IP地址。 如果没有,登录到Plesk管理控制台后,将显示IP。 一旦将域指向该IP,就可以创建一个Webspace –基本上是我们网站的虚拟主机。 否则,我们需要为此手动配置nginx,但是使用Plesk,我们可以通过简单的方法方便地进行配置。
We can also secure the domain with a Let’s Encrypt certificate. Again, we would otherwise do this manually, installing certbot and creating a certificate for our virtual host / website. Here, it is just a checkbox we need to check.
我们还可以使用“让我们加密”证书来保护域。 同样,否则,我们将手动执行此操作,安装certbot并为我们的虚拟主机/网站创建证书。 在这里,这只是我们需要检查的复选框。
Plesk的便捷性 (The Convenience and Simplicity of Plesk)
In this guide we needed to preserve the integrity of our existing WordPress and WooCommerce installation, and to avoid conflicts, we cloned an entire WordPress directory to our created website / domain root. But for the purposes of new installations, Plesk offers one click deployment of WordPress – along with dozens of other applications, such as OpenCart, Magento, Prestashop, Drupal, Typo3 and others.
在本指南中,我们需要保持现有WordPress和WooCommerce安装的完整性,并避免冲突,我们将整个WordPress目录克隆到我们创建的网站/域根目录中。 但是,出于新安装的目的,Plesk提供了WordPress的一键式部署–以及数十种其他应用程序,例如OpenCart,Magento,Prestashop,Drupal,Typo3等。
The convenience of using the Plesk interface is that we will be able to manage our entire stack from a unified web interface, from managing our server configuration, editing our php.ini file, to installing and updating our WordPress and plugins.
使用Plesk界面的便利之处在于,我们将能够从统一的Web界面管理整个堆栈,从管理服务器配置,编辑php.ini文件到安装和更新WordPress和插件。
If we migrated our website through SSH / rsync like we did, we will need to click the scan button for Plesk to detect our website.
如果像我们一样通过SSH / rsync迁移网站,则需要单击“ scan按钮让Plesk检测到我们的网站。
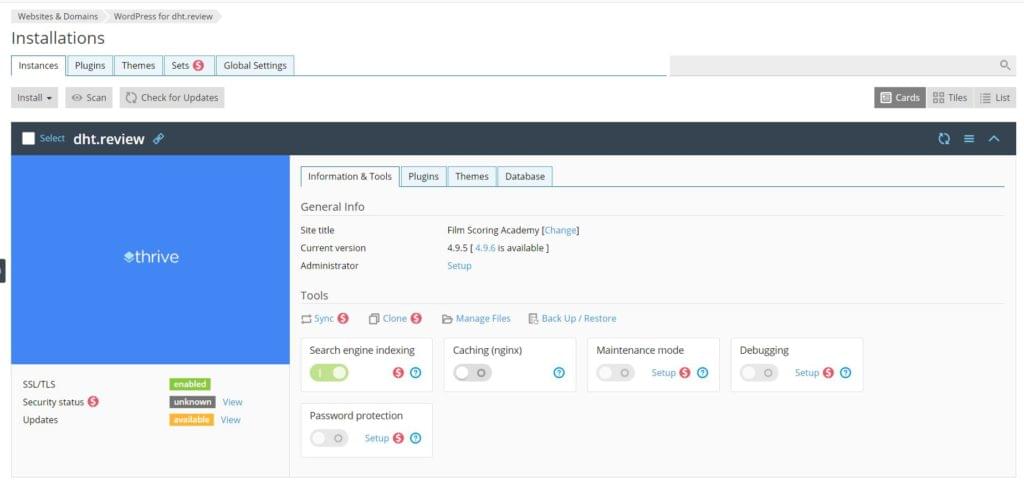
From the Plesk interface, we can also turn on nginx caching, and back up and restore our website. There are more options available for paying users of Plesk (we can easily upgrade our license), and it will make website management a lot easier.
从Plesk界面,我们还可以打开nginx缓存,并备份和还原我们的网站。 Plesk的付费用户可以使用更多选项(我们可以轻松升级许可证),这将使网站管理更加容易。
But to reach this stage, we will first clone our website to the new instance.
但是要达到这个阶段,我们将首先将网站克隆到新实例。
移民 (Migration)
To migrate our existing eCommerce store, we will log in to our existing server, through SSH, and create a database dump:
要迁移现有的电子商务商店,我们将通过SSH登录到现有服务器,并创建数据库转储:
mysqldump -u ourusername -p ourdatabasename > ourdatabase.file.sqlThe query above (with, obviously, our own specific database name and desired file name) will leave us with our website database file, which we will transfer to our new server instance with scp:
上面的查询(显然带有我们自己的特定数据库名称和所需的文件名)将使我们留下我们的网站数据库文件,我们将使用scp将其转移到我们的新服务器实例中:
scp ./ourdatabase.file.sql root@ourdomainname:/var/wwwHere, with our domain or new server IP in place of ourdomainname, we will enter our new server password and transfer the database.
在这里,用我们的域或新服务器IP代替ourdomainname ,我们将输入新服务器密码并传输数据库。
We will transfer our entire website folder (presumably under /var/www/ on our old server – or in one of the subfolders) to our new server:
我们会将整个网站文件夹(大概在旧服务器上的/var/www/下或子文件夹之一中)转移到新服务器上:
rsync -avzh /var/www/our-website-folder/ root@ourdomainname:/var/www/vhosts/ourdomainname/httpdocsWe will interchange ourdomainname above with the domain name that we assigned to our website in Plesk interface. The path /var/www/our-website-folder/ presumes that our website folder with some name is under /var/www, on our old server, and Plesk will, typically, place our new website root into /var/www/vhosts/ourdomainname/httpdocs.
我们将互换ourdomainname以上的域名,我们分配给我们的Plesk界面中的网站。 路径/var/www/our-website-folder/假定我们的旧服务器上的某些名称的网站文件夹位于/ var / www下,并且Plesk通常会将我们的新网站根目录放置到/var/www/vhosts/ourdomainname/httpdocs 。
One thing to pay attention to using rsync is the slash after our source folder path – here /var/www/our-website-folder/. If we omit the slash, rsync will copy the entire folder into our new folder. If we use the slash at the end, it will copy our source folder contents. So that is one thing to keep note of.
使用rsync时要注意的一件事是源文件夹路径后的斜杠– /var/www/our-website-folder/ 。 如果我们省略斜杠,rsync会将整个文件夹复制到我们的新文件夹中。 如果我们在末尾使用斜杠,它将复制源文件夹的内容 。 因此,这是一件事要注意。
Provided that this copying went okay, we now have our file system in place. We need to create our database, and import the contents from the database dump file we transferred to /var/www.
只要复制顺利,我们现在就可以使用文件系统了。 我们需要创建数据库,并从我们转移到/var/www的数据库转储文件中导入内容。
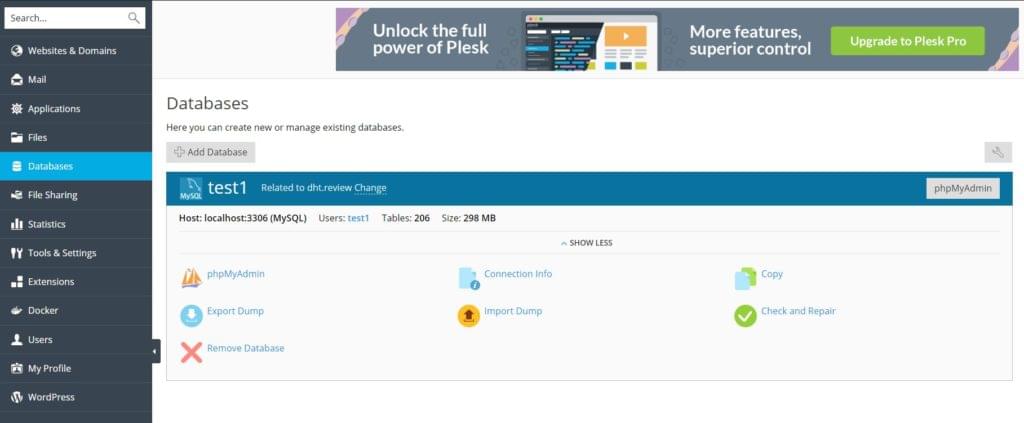
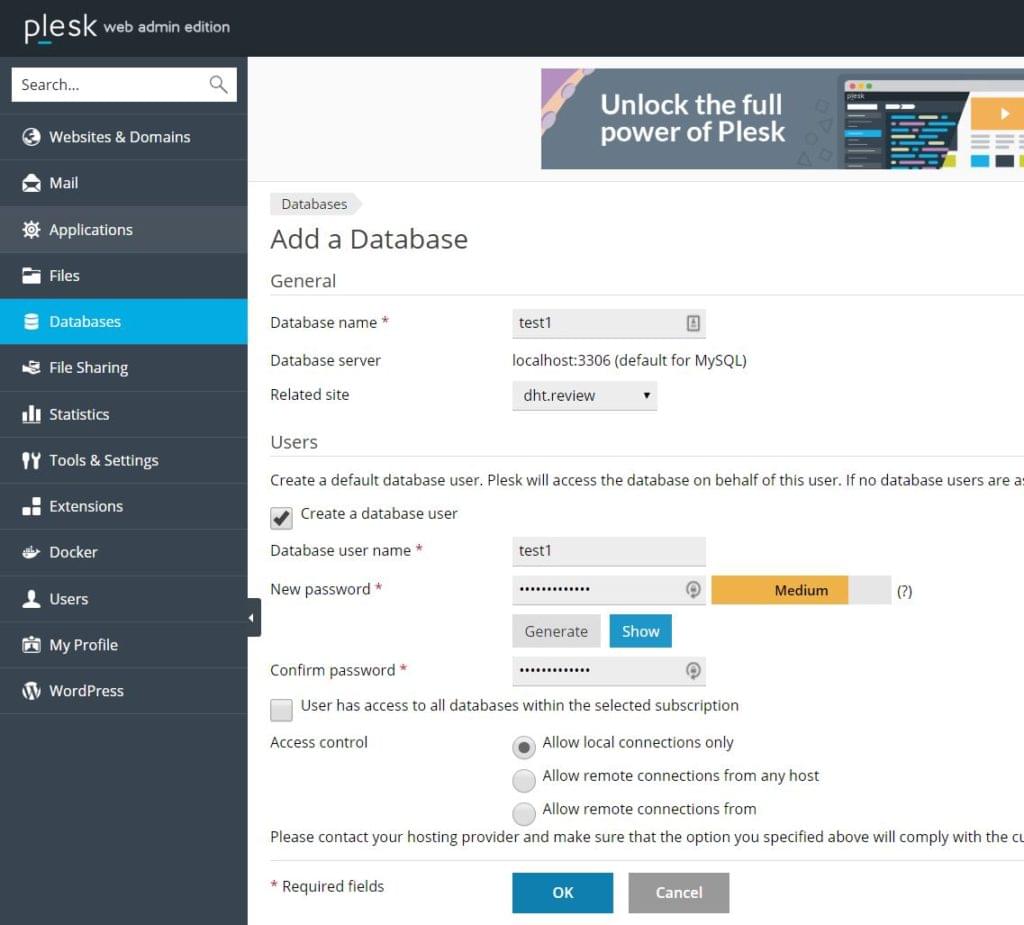
In our database section, we can easily add databases, and export and import them. In our migration case, we will import our dump through the shell, because our production website has a database as large as couple of hundreds of megabytes. For smaller databases, we can import them easily through the web interface.
在我们的数据库部分,我们可以轻松地添加数据库,以及导出和导入它们。 在迁移的情况下,我们将通过外壳导入转储,因为我们的生产网站拥有一个高达数百兆字节的数据库。 对于较小的数据库,我们可以通过Web界面轻松导入它们。
Once this is done, we will import our file through the shell:
完成此操作后,我们将通过外壳导入文件:
mysql -u test1 -p test1 < /var/www/ourdatabase.file.sqlNow mysql will prompt us for the password we created, and upon entering it, it will import our database file to our new database.
现在,mysql将提示我们输入创建的密码,并在输入密码后将数据库文件导入到新数据库中。
配置迁移的网站 (Configuring the Migrated Website)
We now have our website root folder migrated, our virtual host and domain are fully configured, our SSL certificate is set up and active, and we have created a database and imported our database dump file into it. Now we need to configure our new website to use the new database.
现在,我们已迁移了网站根文件夹,已对虚拟主机和域进行了完整配置,我们的SSL证书已设置并处于活动状态,并且我们已创建数据库并将数据库转储文件导入其中。 现在,我们需要配置新网站以使用新数据库。
We presume that our new website is in /var/www/vhosts/ourdomainname/httpdocs – Plesk’s default setup. We will switch to that folder and edit the wp-config.php file to enter the database details:
我们假设我们的新网站位于/var/www/vhosts/ourdomainname/httpdocs – Plesk的默认设置。 我们将切换到该文件夹并编辑wp-config.php文件以输入数据库详细信息:
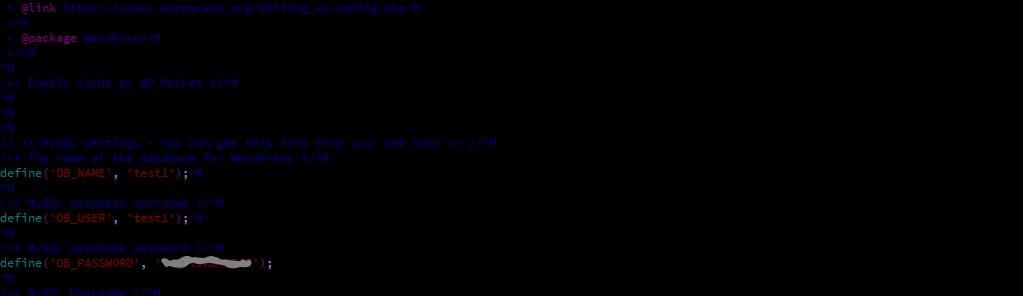
This is all we need to do. Our website should be available under our domain that we directed to our new instance.
这就是我们要做的。 我们的网站应该在我们指向新实例的域下可用。
In the case that we migrated our website to another domain than the one it had on the old server, or to a subdomain – which is a standard practice until we make sure that our migrated website is functioning properly – we will need to conduct a search-replace procedure to replace our old URLs in the database for our new URLs / domains.
如果我们将网站迁移到旧服务器以外的其他域或子域,这是一种标准做法,直到我们确保所迁移的网站正常运行,我们将需要进行搜索-replace过程,将数据库中的旧URL替换为新的URL /域。
For the website to function properly, the URLs in the database need to be consistent with the website URLs.
为了使网站正常运行,数据库中的URL必须与网站URL一致。
Now, we can’t conduct this directly on the database file like it was any other textual file, because URLs in a WordPress database are saved in serialized format, and if conducted directly, our database will be broken.
现在,我们不能像在任何其他文本文件上一样直接在数据库文件上执行此操作,因为WordPress数据库中的URL是以序列化格式保存的,如果直接执行,则我们的数据库将被破坏。
So we need a tool. The fastest tool here is WP-CLI – installing it is a bit out of scope of this article, but the instructions here are rather simple and straightforward, so you shouldn’t experience problems with this.
因此,我们需要一个工具。 这里最快的工具是WP-CLI-安装它有点超出本文的范围,但是这里的说明非常简单明了,因此您不会遇到任何问题。
Once WP-CLI is installed, we can simply use wp search-replace //olddomain //newdomain --allow-root, and WP CLI will change all instances of the given URL (in our case, it was tens of thousands).
一旦安装了WP-CLI,我们就可以简单地使用wp search-replace //olddomain //newdomain --allow-root ,并且WP CLI会更改给定URL的所有实例(在我们的例子中,它是成千上万个)。
If we experience any issues with our new installation, we will also want to flush the cache using wp cache flush --allow-root. We’ll also need to delete transients or flush the rewrite rules.
如果我们在新安装中遇到任何问题,我们还希望使用wp cache flush --allow-root 。 我们还需要删除瞬态或刷新重写规则 。
All these commands presume we are in our website root directory with our shell (/var/www/vhosts/ourdomainname/httpdoc). In case WP-CLI complains about memory, we will want to change the memory_limit value in php.ini – WP-CLI uses the cli php.ini file, found in this case in /etc/php/7.0/cli.
所有这些命令都假定我们位于带有外壳程序( /var/www/vhosts/ourdomainname/httpdoc )的网站根目录中。 万一WP-CLI抱怨内存,我们将要更改php.ini的memory_limit值– WP-CLI使用cli php.ini文件,在这种情况下位于/etc/php/7.0/cli 。
结论 (Conclusion)
If you’re starting a website from scratch, Alibaba Cloud’s Plesk image will make things really simple – we will be able to pull multiple online websites, and perform advanced configurations in only a couple of clicks. One interface lends itself to a fast and simple workflow. Premium licenses are here to give us features suitable for web hosts, with client accounts.
如果您是从头开始创建网站,则阿里云的Plesk映像将使事情变得非常简单–我们将能够拉多个在线网站,并且只需单击几下即可执行高级配置。 一个界面适合快速,简单的工作流程。 此处提供了高级许可,可为我们提供适用于具有客户帐户的Web主机的功能。
This, together with the flexibility of Alibaba ECS instances, allows us to scale our stack up or down as needed, making it a solid choice for web professionals.
这加上阿里云ECS实例的灵活性,使我们能够根据需要扩大或缩小堆栈,使其成为Web专业人士的可靠选择。
翻译自: https://www.sitepoint.com/how-to-migrate-woocommerce-to-alibaba-cloud-ecs-with-lets-encrypt/


 339
339

 被折叠的 条评论
为什么被折叠?
被折叠的 条评论
为什么被折叠?
 到【灌水乐园】发言


