


log4jphp
Any social application you encounter nowadays features a timeline, showing statuses of your friends or followers generally in a descending order of time. Implementing such a feature has never been easy with common SQL or NoSQL databases.
如今您遇到的任何社交应用程序都具有时间轴,通常按时间降序显示您的朋友或关注者的状态。 对于常见SQL或NoSQL数据库,实现这种功能从未如此简单。
Complexity of queries, performance impacts increasing with the number of friends/followers and difficulties to evolve your social model are points that graph databases are eliminating.
查询的复杂性,性能的影响随着朋友/追随者数量的增加而增加,以及发展社交模型的困难,这些都是图形数据库所消除的点。
In this tutorial, we’re going to extend the demo application used by the two introduction articles about Neo4j and PHP, respectively:
在本教程中,我们将扩展有关Neo4j和PHP的两篇介绍文章所使用的演示应用程序:
The application is built on Silex and has users following other users. The goal throughout this article will be to model the feature of feeds efficiently in order to retrieve the last two posts of the people you follow and order them by time.
该应用程序基于Silex构建,并且用户跟随其他用户。 贯穿本文的目标是有效地对提要的特征进行建模,以便检索您关注的人的最后两个帖子并按时间对其进行排序。
You’ll discover a particular modeling technique called Linked list and some advanced queries with Cypher.
您将发现一种称为链接列表的特殊建模技术,以及使用Cypher进行的一些高级查询。
The source code for this article can be found in its own Github repository.
可以在其自己的Github存储库中找到本文的源代码。
在图形数据库中建模时间线 (Modeling a timeline in a graph database)
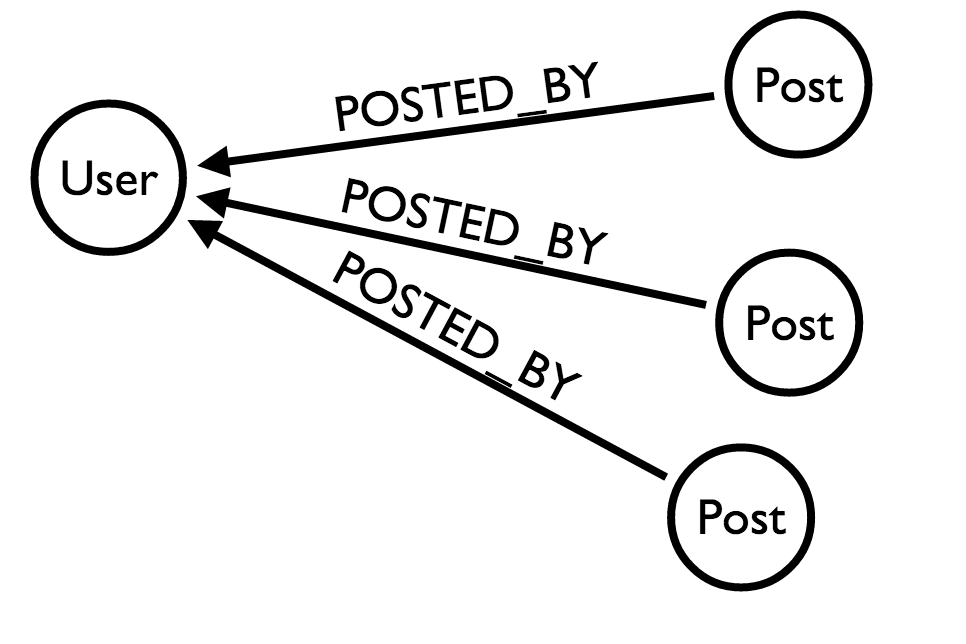
People who are used to other database modeling techniques tend to relate each post to the user. A post would have a timestamp property and the order of the posts will be done against this property.
习惯于其他数据库建模技术的人们倾向于将每个帖子与用户相关联。 帖子将具有timestamp属性,并且帖子的顺序将针对此属性。
Here is a simple representation:
这是一个简单的表示形式:
Leverage the power of a graph database
利用图数据库的力量
A node in a graph database holds a reference to the connections he has, providing fast performance for graph traversals.
图数据库中的节点拥有对其拥有的连接的引用,从而为图遍历提供了快速的性能。
A common modeling technique for user feeds is called Linked list. In our application, the user node will have a relationship named LAST_POST to the last post created by the user. This post will have a PREVIOUS_POST relationship to the previous one which also has a PREVIOUS_POST to the second previous post etc, etc…
用户提要的一种常见建模技术称为“ 链接列表” 。 在我们的应用程序中,用户节点将与用户创建的最后一个帖子具有名为LAST_POST的关系。 这篇文章将前一个其中也有一个PREVIOUS_POST到第二以前的帖子等,等一个PREVIOUS_POST关系...

With this model, you have immediate access to the latest post of a user. In fact, you don’t even need to have a timestamp at all to retrieve its timeline (we will keep it though, in order to sort the posts across different users).
使用此模型,您可以立即访问用户的最新帖子。 实际上,您甚至根本不需要时间戳来检索其时间轴(不过我们会保留它,以便对不同用户的帖子进行排序)。
More importantly, what the user is doing in time is modeled in a natural way in a graph database. Being able to store the data in a manner that corresponds to how this data is living outside the database is a real benefit for analysis, lookups and understanding your data.
更重要的是,在图形数据库中以自然的方式对用户及时执行的操作进行了建模。 能够以与该数据如何在数据库外部存储相对应的方式存储数据,对于分析,查找和理解您的数据确实有好处。
最初设定 (Initial setup)
I suggest you download the repository used for the introduction articles and rename it to social-timeline for example:
我建议您下载用于介绍文章的存储库,例如将其重命名为社交时间轴 :
git clone git@github.com:sitepoint-editors/social-network
mv social-network social-timeline

cd social-timeline
rm -rf .git
composer install
bower install
As in the previous articles, we’re going to load the database with a generated dummy dataset with the help of Graphgen.
与之前的文章一样,我们将在Graphgen的帮助下使用生成的虚拟数据集加载数据库。
You’ll need to have a running database (local or remote), go to this link, click on Generate and then on “Populate your database”.
您需要有一个正在运行的数据库(本地或远程),请转到此链接 ,单击“生成”,然后单击“填充数据库”。
If you use Neo4j 2.2, you’ll need to provide the neo4j username and your password in the graphgen populator box:
如果使用Neo4j 2.2,则需要在graphgen填充器框中提供neo4j用户名和密码:

This will import 50 users with a login, first name and last name. Each user will have two blog posts, one with a LAST_POST relationship to the user and one with a PREVIOUS_POST relationship to the other feed.
这将导入50个具有登录名,名字和姓氏的用户。 每个用户都有两个博客帖子,一个与该用户具有LAST_POST关系,另一个与另一个供稿具有PREVIOUS_POST关系。
If you now open the Neo4j browser, you can see how the users and posts are modeled:
如果现在打开Neo4j浏览器,则可以查看用户和帖子的建模方式:

显示用户供稿 (Displaying the user feeds)
The application already has a set of controllers and templates. You can pick one user by clicking on them and it will display their followers and some suggestions of people to follow.
该应用程序已经具有一组控制器和模板。 您可以通过单击选择一个用户,它将显示其关注者和一些关注对象的建议。
用户喂食路线 (The user feeds route)
First, we will add a route for displaying the feeds of a specific user. Add this portion of code to the end of the web/index.php file
首先,我们将添加一条路线以显示特定用户的供稿。 将这部分代码添加到web/index.php文件的末尾
$app->get('/users/{user_login}/posts', 'Ikwattro\\SocialNetwork\\Controller\\WebController::showUserPosts')
    ->bind('user_post');
用户提供控制器和Cypher查询 (The user feeds controller and the Cypher query)
We will map the route to an action in the src/Controller/WebController.php file.
我们将路由映射到src/Controller/WebController.php文件中的一个动作。
In this action, we will fetch the feeds of the given user from the Neo4j database and pass them to the template along with the user node.
在此操作中,我们将从Neo4j数据库中获取给定用户的提要,并将它们与用户节点一起传递到模板。
public function showUserPosts(Application $application, Request $request)
    {
        $login = $request->get('user_login');
        $neo = $application['neo'];
        $query = 'MATCH (user:User) WHERE user.login = {login}
        MATCH (user)-[:LAST_POST]->(latest_post)-[PREVIOUS_POST*0..2]->(post)
        RETURN user, collect(post) as posts';
        $params = ['login' => $login];
        $result = $neo->sendCypherQuery($query, $params)->getResult();

        if (null === $result->get('user')) {
            $application->abort(404, 'The user $login was not found');
        }

        $posts = $result->get('posts');

        return $application['twig']->render('show_user_posts.html.twig', array(
            'user' => $result->getSingle('user'),
            'posts' => $posts,
        ));
    }
Some explanations:
一些解释:
We first
MATCHa user by his login name.我们首先通过用户的登录名来
MATCH用户。We then
MATCHthe last feed of the user and expand to the PREVIOUS_FEED (The use of the*0..2relationship depth will have effect to embed the latest_post node inside the post nodes collection) and we limit the maximum depth to 2.然后,我们
MATCH用户的最后一个提要,并扩展到PREVIOUS_FEED(使用*0..2关系深度将有效地将lastest_post节点嵌入post节点集合中),并将最大深度限制为2。- We return the found feeds in a collection. 我们将找到的提要返回到一个集合中。
在模板中显示提要 (Displaying the feeds in the template)
We will first add a link in the user profile to access their feeds, by just adding this line after at the end of the user information block:
我们将首先在用户个人资料中添加一个链接以访问其供稿,只需在用户信息块末尾添加以下行即可:
<p><a href="{{ path('user_post', {user_login: user.property('login') }) }}">Show posts</a></p>We will now create our template showing the user timeline (posts). We set a heading and a loop iterating our feeds collection for displaying them in a dedicated html div:
现在,我们将创建显示用户时间轴(帖子)的模板。 我们设置了一个标题和一个循环来循环我们的提要集合,以便在专用的html div中显示它们:
{% extends "layout.html.twig" %}

{% block content %}
    <h1>Posts for {{ user.property('login') }}</h1>

    {% for post in posts %}
        <div class="row">
        <h4>{{ post.properties.title }}</h4>
        <div>{{ post.properties.body }}</div>
        </div>
        <hr/>
    {% endfor %}

{% endblock %}
If you now choose a user and click on the show user posts link, you can see that our posts are well displayed and ordered by descending time without specifying a date property.
如果现在选择一个用户,然后单击“ 显示用户帖子”链接,则可以看到我们的帖子很好地显示并按时间降序排列,而没有指定date属性。

显示时间线 (Displaying the timeline)
If you’ve imported the sample dataset with Graphgen, each of your users will follow approximately 40 other users.
如果您已使用Graphgen导入了示例数据集,则每个用户将关注大约40个其他用户。
To display a user timeline, you need to fetch all the users he follows and expand the query to the LAST_POST relationship from each user.
要显示用户时间轴,您需要获取他关注的所有用户,并将每个用户的查询扩展为LAST_POST关系。
When you get all these posts, you need to filter them by time to order them between users.
收到所有这些帖子后,您需要按时间过滤它们以在用户之间进行排序。
用户时间轴路线 (The user timeline route)
The process is the same as the previous one – we add the route to the index.php, we create our controller action, we add a link to the timeline in the user profile template and we create our user timeline template.
该过程与上一个过程相同–我们将路由添加到index.php ,创建控制器动作,在用户配置文件模板中添加到时间线的链接,然后创建用户时间线模板。
Add the route to the web/index.php file
将路由添加到web/index.php文件
$app->get('/user_timeline/{user_login}', 'Ikwattro\\SocialNetwork\\Controller\\WebController::showUserTimeline')
    ->bind('user_timeline');
The controller action:
控制器动作:
public function showUserTimeline(Application $application, Request $request)
    {
        $login = $request->get('user_login');
        $neo = $application['neo'];
        $query = 'MATCH (user:User) WHERE user.login = {user_login}
        MATCH (user)-[:FOLLOWS]->(friend)-[:LAST_POST]->(latest_post)-[:PREVIOUS_POST*0..2]->(post)
        WITH user, friend, post
        ORDER BY post.timestamp DESC
        SKIP 0
        LIMIT 20
        RETURN user, collect({friend: friend, post: post}) as timeline';
        $params = ['user_login' => $login];
        $result = $neo->sendCypherQuery($query, $params)->getResult();

        if (null === $result->get('user')) {
            $application->abort(404, 'The user $login was not found');
        }

        $user = $result->getSingle('user');
        $timeline = $result->get('timeline');

        return $application['twig']->render('show_timeline.html.twig', array(
            'user' => $result->get('user'),
            'timeline' => $timeline,
        ));
    }
Explanations about the query:
有关查询的说明:
- First we match our user. 首先,我们匹配用户。
- Then we match the path between this user, the other users he is following and their last feed (see here how Cypher is really expressive about what you want to retrieve). 然后,我们匹配该用户,其关注的其他用户与他们的最后一个提要之间的路径(请参见此处,Cypher如何真正表达您想要检索的内容)。
- We order the feeds by their timestamp. 我们按提要的时间戳来订购提要。
- We return the feeds in collections containing the author and the feed. 我们在包含作者和提要的集合中返回提要。
- We limit the result to 20 feeds. 我们将结果限制为20个提要。
Add a link to the user profile template, just after the user feeds link:
在用户提供链接之后,立即将链接添加到用户个人资料模板:
<p><a href="{{ path('user_timeline', {user_login: user.property('login') }) }}">Show timeline</a></p>And create the timeline template:
并创建时间线模板:
% extends "layout.html.twig" %}

{% block content %}
    <h1>Timeline for {{ user.property('login') }}</h1>

    {% for friendFeed in timeline %}
        <div class="row">
        <h4>{{ friendFeed.post.title }}</h4>
        <div>{{ friendFeed.post.body }}</div>
        <p>Written by: {{ friendFeed.friend.login }} on {{ friendFeed.post.timestamp | date('Y-m-d H:i:s') }}</p>
        </div>
        <hr/>
    {% endfor %}

{% endblock %}
We now have a pretty cool timeline showing the last 20 feeds of the people you follow that is efficient for the database.
现在,我们有一个很酷的时间表来显示您关注的人的最后20个提要,这对于数据库是有效的。

在时间轴上添加帖子 (Adding a post to the timeline)
In order to add posts to linked lists, the Cypher query is a bit more tricky. You need to create the post node, remove the LAST_POST relationship from the user to the old latest_post, create the new relationship between the very last post node and the user and finally create the PREVIOUS_POST relationship between the new and old last post nodes.
为了将帖子添加到链接列表中,Cypher查询更加棘手 。 您需要创建发布节点,从用户到旧的last_post删除LAST_POST关系,在最后一个发布节点和用户之间创建新关系,最后在新旧发布节点之间创建PREVIOUS_POST关系。
Simple, isn’t? Let’s go!
很简单,不是吗? 我们走吧!
As usual, we’ll create the POST route for the form pointing to the WebController action:
和往常一样,我们将为表单创建POST路由,以指向WebController动作:
$app->post('/new_post', 'Ikwattro\\SocialNetwork\\Controller\\WebController::newPost')
    ->bind('new_post');
Next, we will add a basic HTML form for inserting the post title and text in the user template:
接下来,我们将添加一个基本HTML表单,用于在用户模板中插入帖子标题和文本:
#show_user.html.twig
<div class="row">
        <div class="col-sm-6">
            <h5>Add a user status</h5>
            <form id="new_post" method="POST" action="{{ path('new_post') }}">
            <div class="form-group">
                <label for="form_post_title">Post title:</label>
                <input type="text" minLength="3" name="post_title" id="form_post_title" class="form-control"/>
            </div>
            <div class="form-group">
                <label for="form_post_body">Post text:</label>
                <textarea name="post_body" class="form-control"></textarea>
            </div>
            <input type="hidden" name="user_login" value="{{ user.property('login') }}"/>
            <button type="submit" class="btn btn-success">Submit</button>
            </form>
        </div>
    </div>
And finally, we create our newPost action:
最后,我们创建我们的newPost动作:
public function newPost(Application $application, Request $request)
    {
        $title = $request->get('post_title');
        $body = $request->get('post_body');
        $login = $request->get('user_login');
        $query = 'MATCH (user:User) WHERE user.login = {user_login}
        OPTIONAL MATCH (user)-[r:LAST_POST]->(oldPost)
        DELETE r
        CREATE (p:Post)
        SET p.title = {post_title}, p.body = {post_body}
        CREATE (user)-[:LAST_POST]->(p)
        WITH p, collect(oldPost) as oldLatestPosts
        FOREACH (x in oldLatestPosts|CREATE (p)-[:PREVIOUS_POST]->(x))
        RETURN p';
        $params = [
            'user_login' => $login,
            'post_title' => $title,
            'post_body' => $body
            ];
        $result = $application['neo']->sendCypherQuery($query, $params)->getResult();
        if (null !== $result->getSingle('p')) {
            $redirectRoute = $application['url_generator']->generate('user_post', array('user_login' => $login));

            return $application->redirect($redirectRoute);

        }

        $application->abort(500, sprintf('There was a problem inserting a new post for user "%s"', $login));

    }
Some explanations:
一些解释:
We first MATCH the user, then we optionally match his LAST_POST node.
我们首先匹配用户,然后可选地匹配他的LAST_POST节点。
- We delete the relationship between the user and his most recent last post. 我们删除了用户与其最近的最新帖子之间的关系。
- We create our new post (which in fact is his last post in his real life timeline). 我们创建了新帖子(实际上是他在他的现实生活中的最后一个帖子)。
- We create the relationship between the user and his “new” last post. 我们在用户和他的“新”最新帖子之间创建关系。
- We break the query and pass the user, the last post and a collection of his old latest_posts. 我们中断查询,并传递用户,最后一个帖子以及他旧的last_posts的集合。
We then iterate over the collection and create a PREVIOUS_POST relationship between the new last post and the next one.
然后,我们遍历集合,并在新的上一个帖子和下一个帖子之间创建PREVIOUS_POST关系。
The tricky part here, is that the oldLatestPosts collection will always contain 0 or 1 elements, which is ideal for our query.
这里最棘手的部分是oldLatestPosts集合将始终包含0或1个元素,这对于我们的查询是理想的。

结论 (Conclusion)
In this article, we discovered a modeling technique called Linked list, learned how to implement this in a social application and how to retrieve nodes and relationships in an efficient way. We also learned some new Cypher clauses like SKIP and LIMIT, useful for pagination.
在本文中,我们发现了一种称为链接列表的建模技术,了解了如何在社交应用程序中实现此功能以及如何以有效的方式检索节点和关系。 我们还学习了一些新的Cypher子句,例如SKIP和LIMIT,可用于分页。
While real world timelines are quite a bit more complex than what we’ve seen here, I hope it’s obvious how graph databases like Neo4j really are the best choice for this type of application.
尽管现实世界的时间线比我们在这里看到的要复杂得多,但我希望很明显,像Neo4j这样的图形数据库确实是此类应用程序的最佳选择。
翻译自: https://www.sitepoint.com/efficient-user-timelines-php-application-neo4j/
log4jphp


 被折叠的 条评论
为什么被折叠?
被折叠的 条评论
为什么被折叠?
 到【灌水乐园】发言


