sphinx 文档
I recently had the need to write proper prose-like source-code documentation for the Diffbot PHP client. Having looked at several documentation generators, and even having suggested a @prose tag for importing of related MD/reST documents into method and class descriptions, I realized there simply is no perfect solution we can all agree on (yet). So until I extend Sage with a @prose token and reST parsing, I opted for ReadTheDocs and Sphinx.
最近,我需要为Diffbot PHP客户端编写适当的类似散文的源代码文档。 看了几个文档生成器后,甚至建议使用@prose标签将相关的MD / reST文档导入方法和类描述中,我意识到根本没有一个完美的解决方案,我们都尚未达成共识。 因此,在我使用@prose令牌扩展Sage并进行reST解析之前,我选择了ReadTheDocs和Sphinx。

RTD is widely used in the industry. It hosts powerful docs such as Guzzle’s, PhpSpec’s and many more. It supports reST alongside MD (or, to be more accurate, MD alongside reST), which is a huge plus as RST files are more suitable for highly technical documents. It can be run locally and generate offline-friendly HTML files, but it can also compile from documentation source available online and and be automatically hosted as a subdomain of readthedocs.org.
RTD在行业中被广泛使用。 它包含功能强大的文档,例如Guzzle的 , PhpSpec的等等。 它与MD一起支持reST(或更准确地说,与REST一起支持MD),这是一个巨大的优势,因为RST文件更适合于技术含量较高的文档。 它可以在本地运行并生成脱机友好HTML文件,但也可以从在线提供的文档源进行编译,并自动托管为readthedocs.org的子域。
That said, setting it up for a PHP project has some caveats, so we’ll go through a basic guide in this tutorial.
就是说,为PHP项目进行设置需要注意一些事项,因此我们将在本教程中通读基本指南。
TL; DR (TL;DR)
If you’re just looking for the list of commands to get up and running quickly:
如果您只是在寻找快速启动和运行的命令列表:
sudo pip install sphinx sphinx-autobuild sphinx_rtd_theme sphinxcontrib-phpdomain
mkdir docs
cd docs
sphinx-quickstart
wget https://gist.githubusercontent.com/Swader/b16b18d50b8224f83d74/raw/b3c1d6912aefc390da905c8b2bb3660f513af713/requirements.txt
After the quickstart setup, to activate the theme and PHP syntax highlights run:
快速入门设置后,要激活主题和PHP语法突出显示,请运行:
sed -i '/extensions = \[\]/ c\extensions = \["sphinxcontrib.phpdomain"\]' source/conf.py
echo '

import sphinx_rtd_theme
html_theme = "sphinx_rtd_theme"
html_theme_path = [sphinx_rtd_theme.get_html_theme_path()]

# Set up PHP syntax highlights
from sphinx.highlighting import lexers
from pygments.lexers.web import PhpLexer
lexers["php"] = PhpLexer(startinline=True, linenos=1)
lexers["php-annotations"] = PhpLexer(startinline=True, linenos=1)
primary_domain = "php"

' >> source/conf.py
To build HTML:
建立HTML:
make htmlor
要么
sphinx-build -b html source buildThe latter command supports several options you can add into the mix.
后一个命令支持您可以添加到混合中的几个选项 。
Sphinx安装 (Sphinx Installation)
ReadTheDocs uses Sphinx behind the scenes, and as such is a through-and-through Python implementation. To make use of it, we need to install several prerequisites. We’ll use our trusty Homestead Improved to set up a brand new environment for us to play in.
ReadTheDocs在后台使用Sphinx ,因此是Python的一个完整实现。 要使用它,我们需要安装几个先决条件。 我们将使用值得信赖的Homestead改良版为我们提供一个全新的游戏环境。
After the VM is set up, SSH into it with vagrant ssh and execute:
设置虚拟机后,使用vagrant ssh SSH进入虚拟机并执行:
sudo pip install sphinx sphinx-autobuildIf you don’t have the command pip, follow the official instructions to get it installed, or just execute the following if on Ubuntu:
如果您没有命令pip ,请按照官方说明进行安装,或者在Ubuntu上仅执行以下命令:
sudo apt-get install python-sphinx python-setuptools
sudo easy_install pip
These tools have now made the command sphinx-quickstart available.
这些工具现在使命令sphinx-quickstart可用。
推荐的文件夹布局 (Recommended Folder Layout)
Generally, you’ll either have:
通常,您将拥有:
- the documentation in the same folder as the project you’re documenting, or… 文档与要记录的项目位于同一文件夹中,或者…
- the documentation in its own repository. 文档在其自己的存储库中。
Unless the documentation spans several projects or contexts, it is recommended it be in the same folder as the project. If you’re worried about bloating the size of your project when Composer is downloading it for use, the docs can be easily kept out of the distribution by being placed into the .gitattributes file (see here).
除非文档涉及多个项目或上下文,否则建议将其与项目放在同一文件夹中。 如果您担心在Composer下载要使用的项目时过大的项目规模,可以将这些文档放入.gitattributes文件中(请参阅此处 ),从而轻松地将其排除在发行版.gitattributes 。
When we run the command sphinx-quickstart, it’ll ask us for the root folder of our docs. This is the folder into which all other subfolders regarding the docs will go. Note that this is not the project’s root folder. If your project is at my-php-project, the root of the docs will likely be in something like my-php-project/docs.
当我们运行命令sphinx-quickstart ,它将要求我们提供文档的根文件夹。 这是与文档有关的所有其他子文件夹将进入的文件夹。 请注意,这不是项目的根文件夹。 如果您的项目位于my-php-project ,则文档的根目录可能位于my-php-project/docs 。
Next, Sphinx offers to either make a separate _build folder for the compiled version of the docs (e.g. HTML), while the sources will be in the root (defined in the previous step), or to make two folders under root: source and build, keeping the root clean. Feel free to choose whichever option you prefer (we went with the latter, for cleanliness and structure).
接下来,Sphinx提供为文档的编译版本(例如HTML)创建一个单独的_build文件夹,而源位于根目录(在上一步中定义),或者在根目录下创建两个文件夹: source和build ,保持根部清洁。 随意选择您喜欢的任何一个选项(为了简洁和结构,我们选择了后者)。
Follow the rest of the instructions to set some meta data, select .rst as the file extension, and finally answer “no” to all questions about additional plugins – those refer to Python projects and are outside our jurisdiction. Likewise, when asked to create make files, accept.
按照其余说明设置一些元数据,选择.rst作为文件扩展名,最后对所有有关其他插件的问题回答“否”,这些问题涉及Python项目,不在我们的管辖范围之内。 同样,当要求创建make文件时,请接受。
自订主题 (Custom Theme)
Building the documents with the command make html produces the HTML documents in the build folder. Opening the documents in the browser reveals a screen not unlike the following:
使用命令make html生成文档会在build文件夹中生成HTML文档。 在浏览器中打开文档会显示一个与以下内容相似的屏幕:
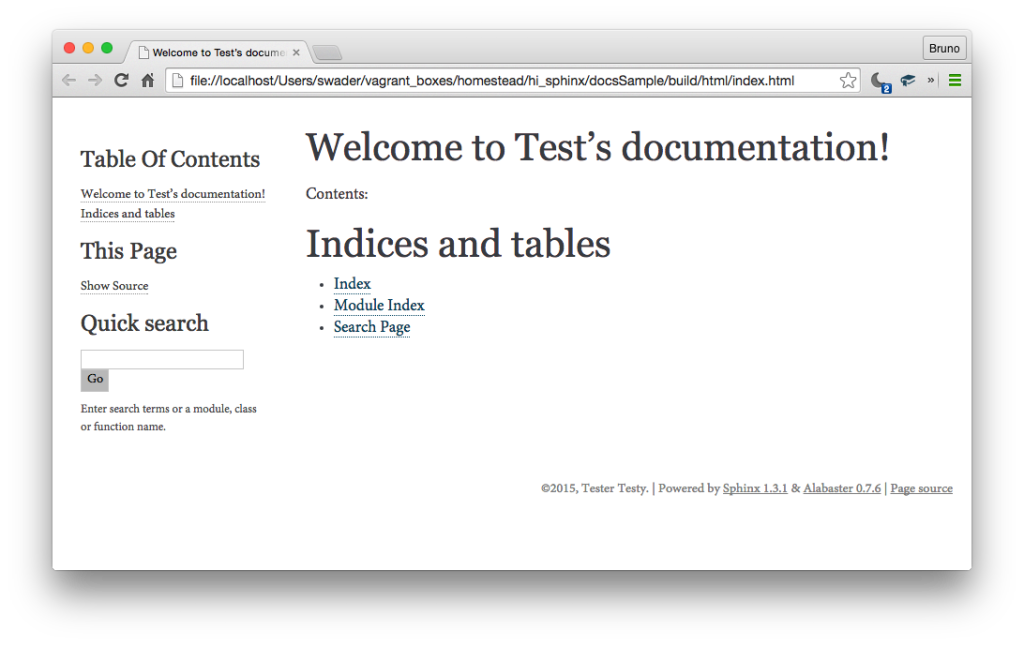
That’s not very appealing. This theme is much more stylish and modern. Let’s install it.
那不是很吸引人。 这个主题更加时尚和现代。 让我们安装它。
pip install sphinx_rtd_themeThen, in the source folder of the docs root, find the file conf.py and add the following line to the top, among the other import statements:
然后,在docs根目录的source文件夹中 ,找到文件conf.py并将以下行添加到顶部,以及其他import语句:
import sphinx_rtd_themeIn the same file, change the name of the HTML theme:
在同一文件中,更改HTML主题的名称:
html_theme = "sphinx_rtd_theme"Finally, tell Sphinx where the theme is by asking the imported module:
最后,通过询问导入的模块,告诉Sphinx主题在哪里:
html_theme_path = [sphinx_rtd_theme.get_html_theme_path()]Building the docs with make html should now produce some significantly prettier HTML:
现在,使用make html构建文档应该会产生一些更漂亮HTML:
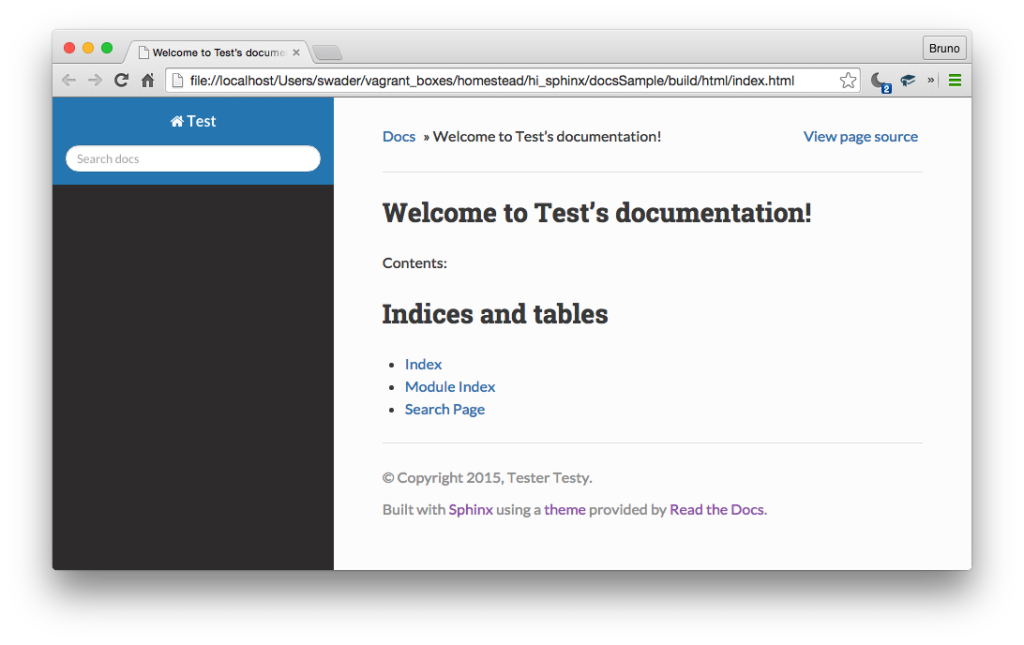
Most themes follow the same installation procedure. Here is a short list. Hopefully, it’ll expand in the future.
大多数主题遵循相同的安装过程。 这是一个简短的清单。 希望它将来会扩展。
目录 (Table of Contents)
During the quickstart, a user is asked for the name of the master file (typically index). The master file usually contains little to no content – rather, it only holds directives.
在quickstart期间,系统会要求用户提供主文件的名称(通常为index )。 主文件通常几乎不包含任何内容,而是仅包含指令。
A reST directive is like a function – a powerful construct of the reST syntax which accepts arguments, options, and a body. The toctree directive is one of them. It requires an option of maxdepth, indicating the maximum number of levels in a single menu item (e.g. depth of 2 is Mainmenu -> Submenu1 but not -> Submenu2).
reST指令就像一个函数一样,是reST语法的强大构造,可以接受参数,选项和主体。 toctree指令是其中之一。 它需要一个maxdepth选项,指示单个菜单项中的最大级别数(例如,2的深度是Mainmenu -> Submenu1而不是-> Submenu2 )。
After the option goes a blank line, and then a one-per-line list of include files, without extensions. Folders are supported (subfolder/filetoinclude).
该选项之后为空行,然后是包含文件的单行列表,不带扩展名。 支持subfolder/filetoinclude夹( subfolder/filetoinclude )。
.. Test documentation master file, created by
   sphinx-quickstart on Sat Aug  8 20:15:44 2015.
   You can adapt this file completely to your liking, but it should at least
   contain the root `toctree` directive.

Welcome to Test's documentation!
================================

Contents:

.. toctree::
   :maxdepth: 2

   overview
   quickstart
In the example above, Sphinx prints out Contents:, followed by an expanded version of the table of contents, i.e. a bulleted list of all headings found in the included documents. Additionally, many authors include extra information at the top of the master file to give a birds-eye overview of the library right then and there. See Guzzle’s.
在上面的示例中,Sphinx打印出Contents: :,然后输出Contents:的扩展版本,即在包含的文档中找到的所有标题的项目符号列表。 此外,许多作者在母版文件的顶部都包含了额外的信息,以便从那时起那里就可以一览整个图书馆。 参见Guzzle的 。
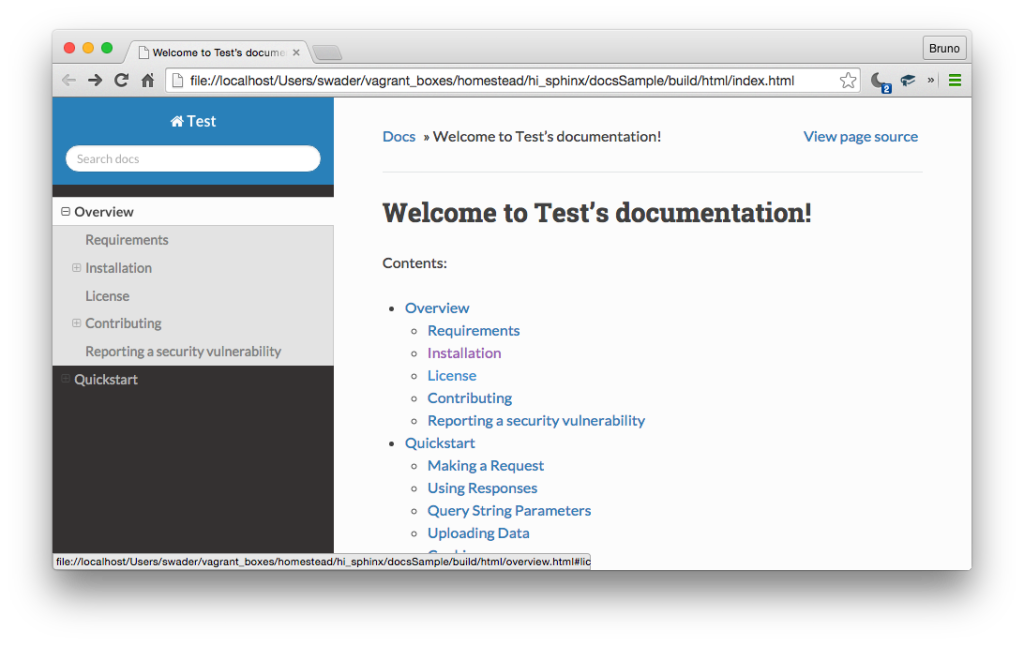
The toctree definition in the master file will be automatically mirrored in the left ToC navigation bar.
主文件中的toctree定义将自动镜像到左侧的ToC导航栏中。
Let’s grab the overview and quickstart files from Guzzle so that we don’t have to write our own. Put them into the root of the docs, and rebuild with make html.
让我们从Guzzle中获取overview和quickstart文件,这样我们就不必编写自己的文件了。 将它们放入文档的根目录,然后使用make html重建。
The documentation should now appear, and the left ToC should be expandable with the little plus icons:
现在将出现文档,左ToC应该使用小加号图标扩展:
For more information about the toctree directive and everything it can do to give you truly customized output, see here.
有关toctree指令及其可以为您提供真正定制输出的所有信息的更多信息,请参见此处 。
PHP语法 (PHP Syntax)
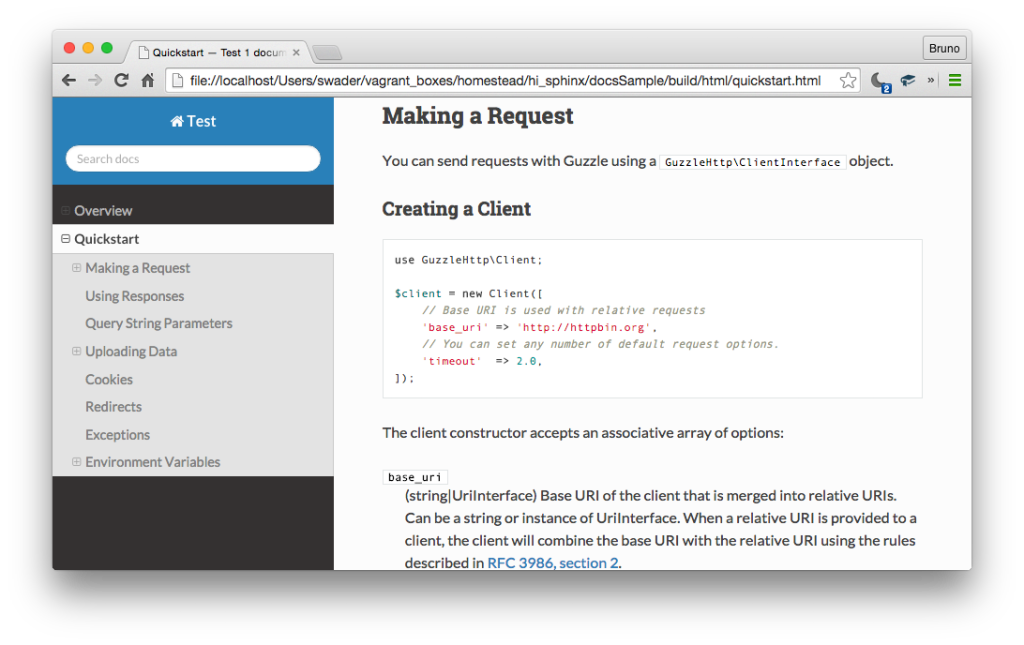
If we look at the quickstart document, we’ll notice that the PHP samples aren’t syntax highlighted. Not surprising, considering Sphinx defaults to Python. Let’s fix this.
如果我们查看quickstart文档,则会注意到PHP示例未突出显示语法。 考虑到Sphinx默认为Python,这并不奇怪。 让我们解决这个问题。
In the source/conf.py file, add the following:
在source/conf.py文件中,添加以下内容:
from sphinx.highlighting import lexers
from pygments.lexers.web import PhpLexer
lexers['php'] = PhpLexer(startinline=True, linenos=1)
lexers['php-annotations'] = PhpLexer(startinline=True, linenos=1)
primary_domain = 'php'
This imports the PHP lexer and defines certain code block language-hints as specifically parseable by the module. It also sets the default mode of the documentation to PHP, so that if you omit a language declaration on a code block, Sphinx will just assume it’s PHP. E.g., instead of:
这将导入PHP词法分析器,并定义模块专门可解析的某些代码块语言提示。 它还将文档的默认模式设置为PHP,因此,如果在代码块上省略语言声明,Sphinx只会假定它是PHP。 例如,代替:
.. code-block:: php

    use myNamespace/MyClass;
    ...
one can type:
一个可以输入:
.. code-block::

    use myNamespace/MyClass;
    ...
After adding the above into the configuration file, a rebuild is necessary.
将以上内容添加到配置文件后,需要重新构建。
make htmlThis should produce syntax highlighted PHP sections:
这将产生突出显示语法PHP部分:
PHP域 (PHP Domain)
Additionally, we can install the PHP domain.
另外,我们可以安装PHP域 。
Domains are sets of reST roles and directives specific to a programming language, making Sphinx that much more adept at recognizing common concepts and correctly highlighting and interlinking them. The PHP domain, originally developed by Mark Story, can be installed via:
域是特定于编程语言的一组reST角色和指令,使Sphinx更加善于识别常见概念并正确突出并互连它们。 最初由Mark Story开发PHP域可以通过以下方式安装:
sudo pip install sphinxcontrib-phpdomainThe extension needs to be activated by changing the extensions line to:
需要通过将extensions行更改为以下内容来激活extensions :
extensions = ["sphinxcontrib.phpdomain"]Let’s try and make another reST file now, with a described PHP class so we can see how well the PHP domain does its magic. We’ll create source/class.rst, and add class to the index.rst file under all the others. Then, we’ll put the following into class.rst:
现在,让我们尝试使用描述PHP类制作另一个reST文件,以便我们了解PHP域如何发挥其魔力。 我们将创建source/class.rst ,并将class添加到其他所有目录下的index.rst文件中。 然后,将以下内容放入class.rst :
DateTime Class
==============

.. php:class:: DateTime

  Datetime class

  .. php:method:: setDate($year, $month, $day)

      Set the date.

      :param int $year: The year.
      :param int $month: The month.
      :param int $day: The day.
      :returns: Either false on failure, or the datetime object for method chaining.


  .. php:method:: setTime($hour, $minute[, $second])

      Set the time.

      :param int $hour: The hour
      :param int $minute: The minute
      :param int $second: The second
      :returns: Either false on failure, or the datetime object for method chaining.

  .. php:const:: ATOM

      Y-m-d\TH:i:sP
If we rebuild, we get something like this:
如果我们进行重建,则会得到以下内容:
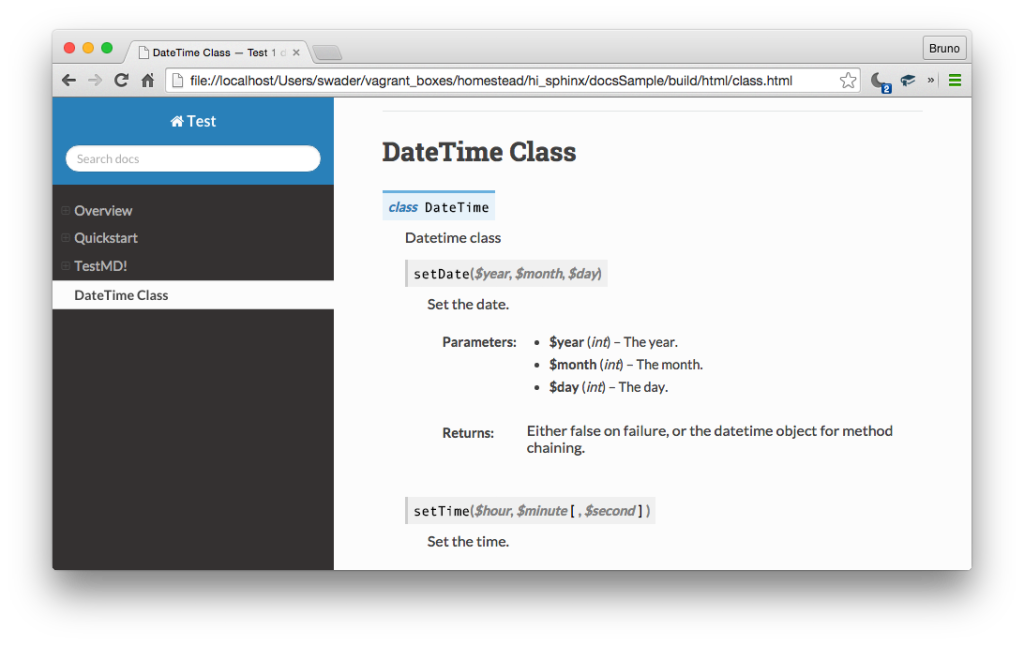
Note that without the PHP Domain installed, this screen would be empty.
请注意,如果未安装PHP域,则此屏幕为空。
This doesn’t look too bad, but it could be better. We’ll leave the styling for another day, though.
看起来还不错,但是可能会更好。 不过,我们将样式保留另一天。
查看资料 (View Source)
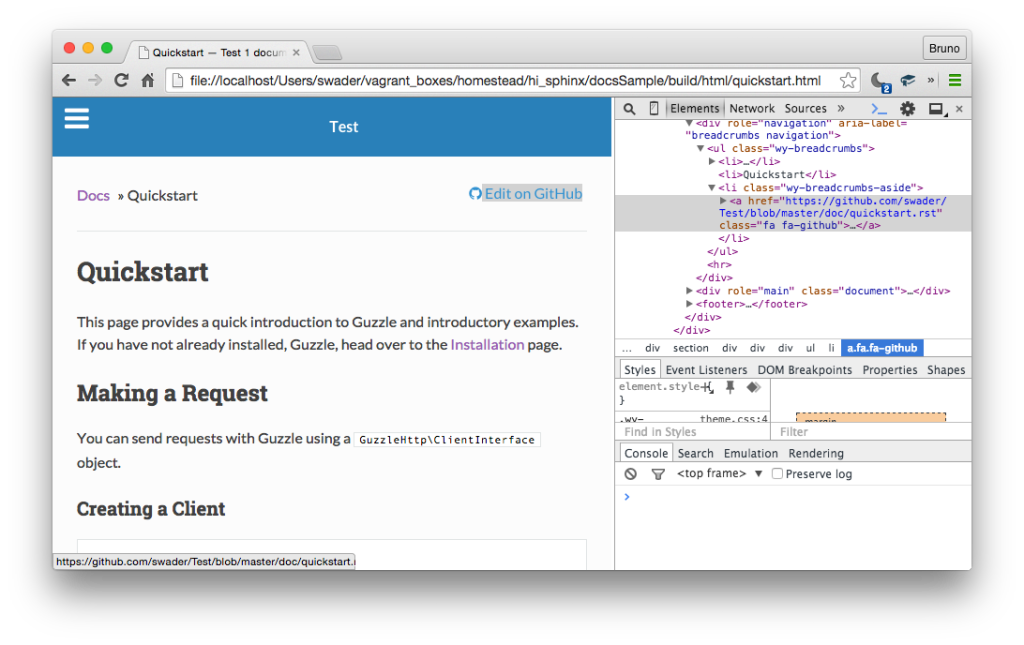
It is common for docs to include a link to their source files at the top, so that users can suggest changes, raise issues and send pull requests for improvements if they spot something being out of place.
文档通常在顶部包含指向其源文件的链接,以便用户发现更改不当时可以提出更改建议,提出问题并发送拉取请求以进行改进。
In the configuration options, there is a flag to show/hide these source links. By default, they’ll lead to _sources/file where file is the currently viewed file, and _sources is a directory inside the build directory – i.e., all source files are copied to build/_sources during the build procedure.
在配置选项中 ,有一个标记来显示/隐藏这些源链接。 默认情况下,它们将指向_sources/file ,其中file是当前查看的文件,而_sources是build目录中的目录–即,在构建过程中,所有源文件都将复制到build/_sources中。
We don’t want this, though. We’ll be hosting the docs on Github, and we want sources to lead there, no matter where they are hosted. We can do this by adding HTML context variables into the conf.py file:
但是,我们不希望这样。 我们将在Github上托管文档,并且无论这些文档托管在什么地方,我们都希望这些资源能够在此托管。 我们可以通过将HTML上下文变量添加到conf.py文件中来做到这一点:
html_context = {
  "display_github": True,
  "github_user": "user",
  "github_repo": project,
  "github_version": "master",
  "conf_py_path": "/doc/",
  "source_suffix": source_suffix,
}
Be careful to add this block after the project definition, else you’ll get an error about the project variable not being defined. Putting this at the bottom of conf.py is generally a safe bet.
请小心在project定义之后添加此块,否则您将收到有关未定义project变量的错误。 通常将其放在conf.py的底部是安全的选择。
ReST与MD (ReST vs MD)
For a quick and dirty intro to reST, see this, but also look into the custom markup added by the Sphinx team – these additional features help you get the best out of your documentation.
有关reST的快速而又肮脏的介绍,请参见this ,还可以查看Sphinx团队添加的自定义标记- 这些附加功能可帮助您充分利用文档。
ReST has many more features than MD does, so for parity’s sake and an easier transition, here’s a great conversion guide and a one-for-one comparison of features neatly laid out in tabular format.
ReST具有比MD更多的功能,因此,为了实现奇偶校验和更轻松的转换,这里有一个很好的转换指南,以及以表格格式整齐地排列的功能的一对一比较 。
添加MD (Adding MD)
Sometimes, you may not be willing or able to convert existing MD documentation into reST. That’s okay, Sphinx can dual-wield MD/reST support.
有时,您可能不愿意或无法将现有的MD文档转换为reST。 没关系,Sphinx可以双重使用MD / reST支持。
First, we need to install the MD processing module:
首先,我们需要安装MD处理模块:
sudo pip install recommonmarkWe also need to import the parser into source/conf.py:
我们还需要将解析器导入到source/conf.py :
from recommonmark.parser import CommonMarkParserFinally, we need to tell Sphinx to send .md files to the parser by replacing the previously defined source_suffix line with:
最后,我们需要通过以下命令替换先前定义的source_suffix行,以告知Sphinx将.md文件发送到解析器:
source_suffix = ['.rst', '.md']
source_parsers = {
    '.md': CommonMarkParser,
}
If we try it out by adding a file testmd.md into source with the contents:
如果我们通过将文件testmd.md添加到包含以下内容的source来进行尝试:
# TestMD!

We are testing md!

## Second heading!

Testing MD files.

---

    echo "Here is some PHP code!"
Rebuilding should now show the MD content as fully rendered – with one caveat. The syntax won’t be highlighted (not even if we put the code into a PHP code fence). If someone has an idea about why this happens and how to avoid it, please let us know in the comments.
现在,重建应该将MD内容显示为完全渲染-带有一个警告。 语法不会突出显示(即使我们将代码放入PHP代码围栏也不会)。 如果有人对为什么会发生这种现象以及如何避免这种想法有所了解,请在评论中告知我们。
在ReadTheDocs上托管 (Hosting on ReadTheDocs)
Now that our documentation is ready, we can host it online. For the purpose of this demo, we create a repo of sample content at http://github.com/sitepoint-editors/samplesphinx-php.
现在我们的文档已准备就绪,我们可以在线托管它。 出于本演示的目的,我们在http://github.com/sitepoint-editors/samplesphinx-php上创建了示例内容的存储库。
To host the docs online, we first add a new project…
要在线托管文档,我们首先添加一个新项目…
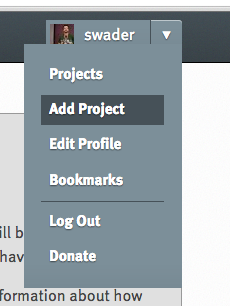
The next screen asks for a connection with Github. After importing repositories, we click Create on the one we want to create an RTD project from and confirm some additional values which can all be left at default.
下一个屏幕要求与Github建立连接。 导入存储库后,我们单击要从其创建RTD项目的存储库上的“创建”,并确认一些其他值(默认情况下都可以保留)。
After a build successfully finishes, our docs should be live:
构建成功完成后,我们的文档应该已发布:
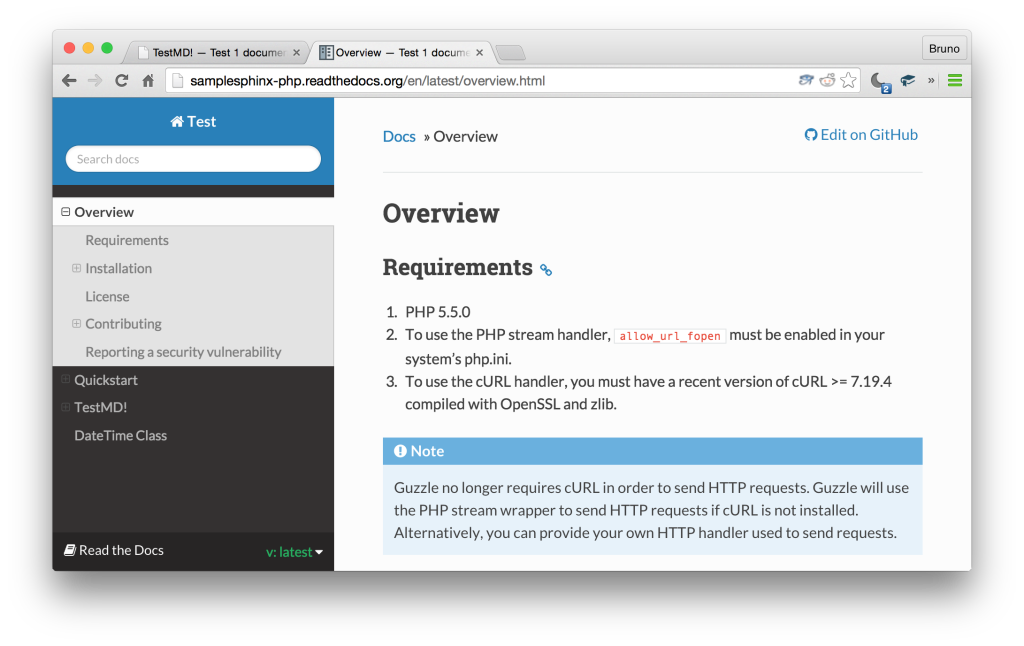
Note: this check used to be required, but RTD seems to have fixed the issue and you can now use the same theme declaration both in the local version, and the live one.
注意:以前需要进行此检查 ,但RTD似乎已解决了该问题,您现在可以在本地版本和实时版本中使用相同的主题声明。
RTD扩展 (Extensions on RTD)
Earlier in this tutorial, we installed the PHP Domain for easier directive-powered PHP class descriptions. This extension is not available on ReadTheDocs, though.
在本教程的前面,我们安装了PHP域,以简化由指令驱动PHP类描述。 但是,该扩展名在ReadTheDocs上不可用。
Luckily, ReadTheDocs utilizes virtualenv and can install almost any module you desire. To install custom modules, we need the following:
幸运的是,ReadTheDocs利用virtualenv并可以安装几乎您想要的任何模块。 要安装自定义模块,我们需要以下内容:
a
requirements.txtfile in the repo somewhere存储库中的某个
requirements.txt文件the path to this file in the
Advanced Settingssection of our project on ReadTheDocsReadTheDocs上我们项目的“
Advanced Settings部分中此文件的路径
To get a requirements file, we can just save the output of the command pip freeze into a file:
要获取需求文件,我们可以将命令pip freeze的输出保存到文件中:
pip freeze > requirements.txtThe freeze command will generate a long list of modules, and some of them might not be installable on ReadTheDocs (Ubuntu specific ones, for example). You’ll have to follow the errors in the build phases and remove them from the file, one by one, until a working requirements file is reached, or until RTD improve their build report to flag errors more accurately.
该freeze命令将生成模块的一个长长的清单,其中一些可能不会安装在ReadTheDocs(Ubuntu的具体的,例如)。 您必须遵循构建阶段中的错误并将它们逐个从文件中删除,直到达到工作requirements文件为止,或者直到RTD改进其构建报告以更准确地标记错误为止。
For all intents and purposes, a file such as this one should be perfectly fine:
出于所有目的和目的,像这样的文件应该非常好:
Babel==2.0
CommonMark==0.5.4
Jinja2==2.8
MarkupSafe==0.23
PyYAML==3.11
Pygments==2.0.2
Sphinx==1.3.1
sphinxcontrib-phpdomain==0.1.4
alabaster==0.7.6
argh==0.26.1
argparse==1.2.1
docutils==0.12
html5lib==0.999
meld3==0.6.10
pathtools==0.1.2
pytz==2015.4
recommonmark==0.2.0
six==1.5.2
snowballstemmer==1.2.0
sphinx-autobuild==0.5.2
sphinx-rtd-theme==0.1.8
wheel==0.24.0
After re-running the online build (happens automatically) the documented PHP class should be available, just as it was when we tested locally.
重新运行在线构建(自动发生)后,已记录PHP类应该可用,就像我们在本地测试时一样。
故障排除 (Troubleshooting)
ValueError:unknon语言环境:UTF-8 (ValueError: unknon locale: UTF-8)
It’s possible you’ll get the error ValueError: unknown locale: UTF-8 on OS X after running either sphinx-quickstart or make html. If this happens, open the file ~/.bashrc (create it if it doesn’t exist), put in the content:
运行sphinx-quickstart或make html后,可能会在OS X上收到错误ValueError: unknown locale: UTF-8 。 如果发生这种情况,请打开文件~/.bashrc (如果不存在,请创建文件),然后输入内容:
export LC_ALL=en_US.UTF-8
export LANG=en_US.UTF-8
… save and close it, and then load it with the command source ~/.bashrc. The error should now no longer show up.
…保存并关闭它,然后使用命令source ~/.bashrc加载它。 该错误现在应该不再显示。
目录不显示/过时 (Table of Contents does not display / outdated)
Sometimes when adding new files to include into index.rst, the ToC in the left sidebar will be out of date. For example, clicking on a file that was built before the new file was added will show a ToC with the latest file’s heading missing. The cause of this is unknown but it’s easily fixed by forcing a full rebuild:
有时,当添加新文件以将其包含到index.rst ,左侧边栏中的目录将过时。 例如,单击在添加新文件之前生成的文件,将显示一个ToC,其中缺少最新文件的标题。 造成这种情况的原因未知,但可以通过强制完全重建来轻松解决:
rm -rf build/
make html
The first command removes the build folder’s contents completely, forcing Sphinx to regenerate everything on make html.
第一个命令将完全删除构建文件夹的内容,从而迫使Sphinx重新生成make html上的所有内容。
建立失败 (Build Failed)
If your builds fail and you can’t discern the reason, explicitly defining the location of conf.py under Advanced settings in Admin sometimes helps.
如果您的构建失败并且无法识别原因,有时可以在Admin Advanced settings下明确定义conf.py的位置。
结论 (Conclusion)
In this tutorial, we learned how we can quickly set up a Sphinx documentation workflow for PHP projects in an isolated VM, so that the installations don’t interfere with our host operating system. We installed the PHP highlighter, configured the table of contents, installed a custom theme, went through some basic ReST syntax and hosted our docs on ReadTheDocs. In a followup post, we’ll focus on styling, documentation versions and localization.
在本教程中,我们学习了如何在隔离的VM中为PHP项目快速设置Sphinx文档工作流程,从而使安装不会干扰我们的主机操作系统。 我们安装了PHP荧光笔,配置了目录,安装了自定义主题,使用了一些基本的ReST语法,并将我们的文档托管在ReadTheDocs上。 在后续文章中,我们将重点关注样式,文档版本和本地化。
Do you use another documentation writing workflow? If so, which and why? Any other Sphinx/RTD tips? Let us know!
您是否使用其他文档编写工作流程? 如果是这样,那又为什么? 还有其他Sphinx / RTD提示吗? 让我们知道!
翻译自: https://www.sitepoint.com/using-sphinx-for-php-project-documentation/
sphinx 文档


 622
622


 被折叠的 条评论
为什么被折叠?


