


This article was sponsored by Syncano. Thank you for supporting the sponsors who make SitePoint possible.
本文由Syncano赞助。 感谢您支持使SitePoint成为可能的赞助商。
Syncano is a really fascinating platform that gives you a hand with the backend and middleware of applications. We had a look at the capabilities of Syncano in my last article on How to Build a Daily Affirmations SMS Service with Stripe & Syncano where we put together a service that sent out daily SMS affirmations in a subscription service. All the backend and middleware is taken care of by Syncano. Very neat!
Syncano是一个非常引人入胜的平台,可帮助您使用应用程序的后端和中间件。 在上一篇有关如何使用Stripe&Syncano建立每日确认短信服务的文章中 ,我们讨论了Syncano的功能 ,我们在一项订阅服务中汇总了发送每日SMS确认的服务。 Syncano负责所有后端和中间件。 井井有条!
In this article, we are going to focus on Syncano’s concept of CodeBoxes more closely — what CodeBoxes are, how we make and run them in Syncano, and how we can connect them to external APIs. We’ll put together a demo using GitHub’s API to showcase just what is possible.
在本文中,我们将更加关注Syncano的CodeBoxes概念-什么是CodeBoxes,如何在Syncano中制作和运行它们以及如何将它们连接到外部API。 我们将使用GitHub的API编写一个演示,以展示可能的结果。
什么是CodeBox? (What is a CodeBox?)
A CodeBox is a snippet of code that can be run in the cloud in a number of ways. Each CodeBox is intended to provide a single piece of our web application puzzle — one bit of functionality that contributes to the app as a whole.
CodeBox是可以以多种方式在云中运行的代码片段。 每个CodeBox旨在提供我们Web应用程序难题的一部分-一点点功能对整个应用程序有所帮助。
To provide specifics about what we’d like the CodeBox to do in our web application, we can pass in arguments to a CodeBox, just as you would pass in arguments to a HTTP request. For example, we could have a CodeBox that looks up song lyrics stored in a database. It would accept two parameters, the song name and artist. A sample input for that CodeBox could be “Jack Sparrow” and “The Lonely Island”. The CodeBox would run using those parameters and provide the song lyrics if it knew the song. If not, it’d return a message saying it couldn’t find them.
为了提供有关我们希望CodeBox在Web应用程序中执行的操作的详细信息,我们可以将参数传递给CodeBox,就像将参数传递给HTTP请求一样。 例如,我们可以使用一个CodeBox来查找存储在数据库中的歌曲歌词。 它将接受两个参数,歌曲名称和艺术家。 该CodeBox的示例输入可以是“ Jack Sparrow”和“ The Lonely Island”。 CodeBox将使用这些参数运行,并在知道歌曲的情况下提供歌曲歌词。 如果没有,它将返回一条消息,指出找不到它们。
One of my favourite things about CodeBoxes is that they can be created in a number of different languages. Syncano supports CodeBoxes written in Python, Golang, Node.js, Swift, PHP and Ruby. Not only that — CodeBoxes written in different languages can all work together to create a functioning web application. It is incredibly flexible!
我对CodeBoxes的最喜欢的事情之一是可以用多种不同的语言来创建它们。 Syncano支持以Python,Golang,Node.js,Swift,PHP和Ruby编写的CodeBox。 不仅如此-用不同语言编写的CodeBox可以一起工作以创建正常运行的Web应用程序。 它非常灵活!
代码 (The Code)
For those who would like to follow along with the examples, the working code is available on GitHub. Use it, enjoy it, expand it — do as you wish.
对于那些希望跟随示例的人,可以在GitHub上找到工作代码。 使用,享受,扩展它-随心所欲。
如何创建一个CodeBox (How to Create a CodeBox)
To illustrate the use of CodeBoxes in a Syncano application, we’ll be putting together a really simple app that looks up pull requests from a GitHub repo. It’s about time we had a way to keep an eye on how our GitHub team projects are going right?
为了说明在Syncano应用程序中使用CodeBoxes,我们将组装一个非常简单的应用程序,该程序可以查找来自GitHub存储库的拉取请求。 现在该到了我们有办法关注我们的GitHub团队项目进展如何的时候了吗?
To begin, we head to the Syncano Dashboard and create a new app. If you’re totally new to Syncano and need a bit of guidance on this, have a look at the previous SitePoint article on Syncano — it should help you out.
首先,我们进入Syncano仪表板并创建一个新应用。 如果您是Syncano的新手,并且需要一些指导,请阅读Syncano上的上一篇SitePoint文章 -它应该可以为您提供帮助。
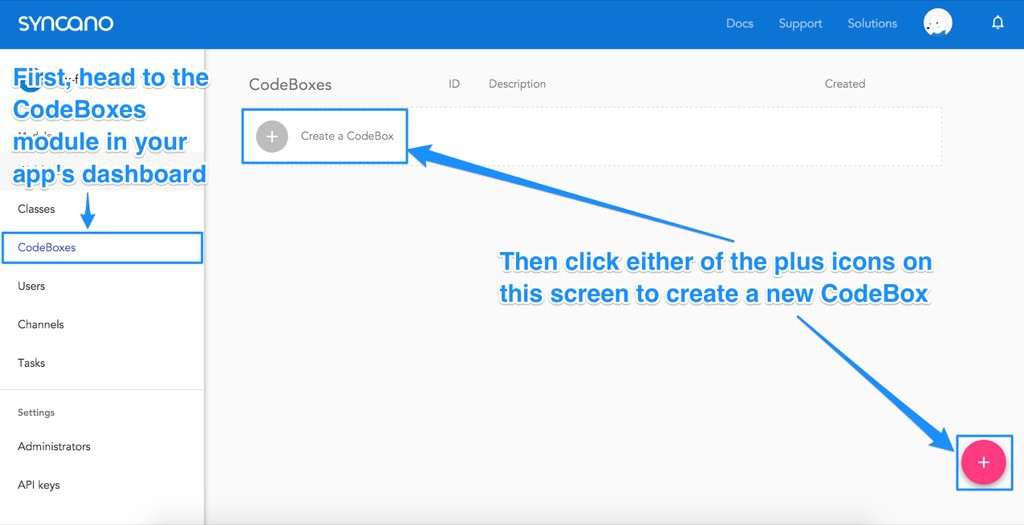
Then, we head to the “CodeBoxes” section on the left and click either of the icons with a plus on it to create a new CodeBox:
然后,我们转到左侧的“ CodeBoxes”部分,然后单击上面带有加号的任一图标以创建新的CodeBox:
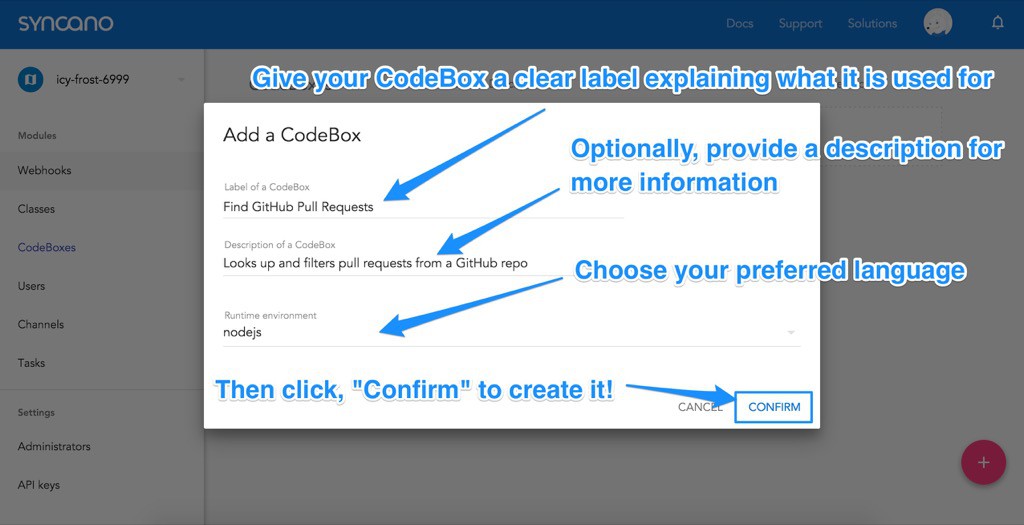
Then, in the popup box that appears:
然后,在出现的弹出框中:
- Enter in a title for your CodeBox – This can be a short but clear label to help you find it in the Dashboard, e.g. “Find GitHub Pull Requests”. 为您的CodeBox输入标题-这可以是一个简短但清晰的标签,以帮助您在仪表板中找到它,例如“ Find GitHub Pull Requests”。
- Enter in a description for your CodeBox – This isn’t needed but I prefer to use it to include more details on exactly how the CodeBox is going to work, e.g. “Looks up and filters pull requests from a GitHub repo”. 输入您的CodeBox的描述-不需要,但是我更喜欢使用它来包含有关CodeBox确切工作方式的更多详细信息,例如“查找并过滤来自GitHub存储库的请求”。
- Choose the runtime environment you’d prefer to work in – In this article, we’ll be using Node.js, so if you’d like to follow along directly, choose that one! 选择您想要使用的运行时环境–在本文中,我们将使用Node.js,因此,如果您想直接遵循,请选择一个!
- Click “Confirm” to create that CodeBox! 单击“确认”创建该CodeBox!
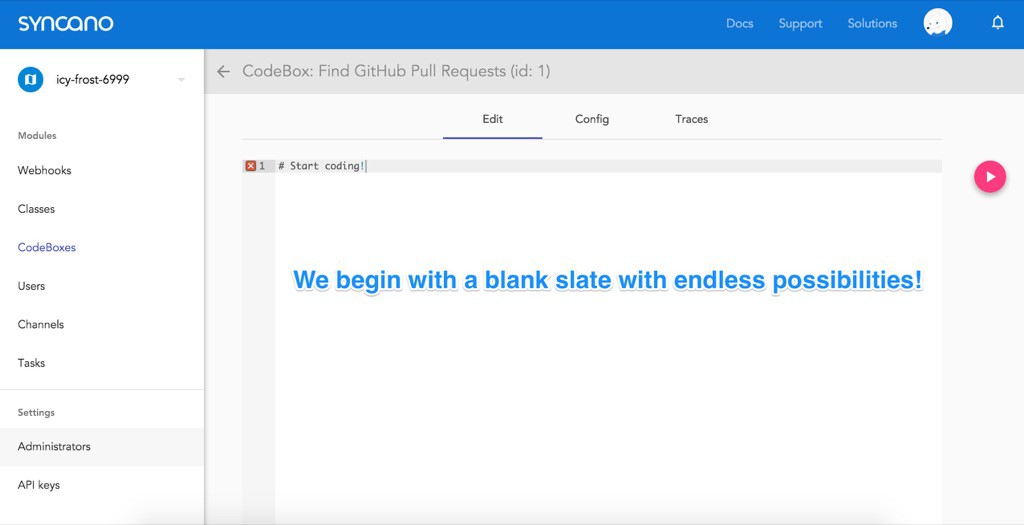
Once you have created your CodeBox, Syncano should bring you straight to the CodeBox editing screen. You’ll see a blank page with the text # Start coding!. We should follow that instruction and put something simple in there as an initial test run.
一旦创建了CodeBox,Syncano应该会带您直接进入CodeBox编辑屏幕。 您会看到空白页面,上面显示文字# Start coding! 。 我们应该按照该说明进行操作,并在其中进行一些简单的初始测试。
运行CodeBox (Running a CodeBox)
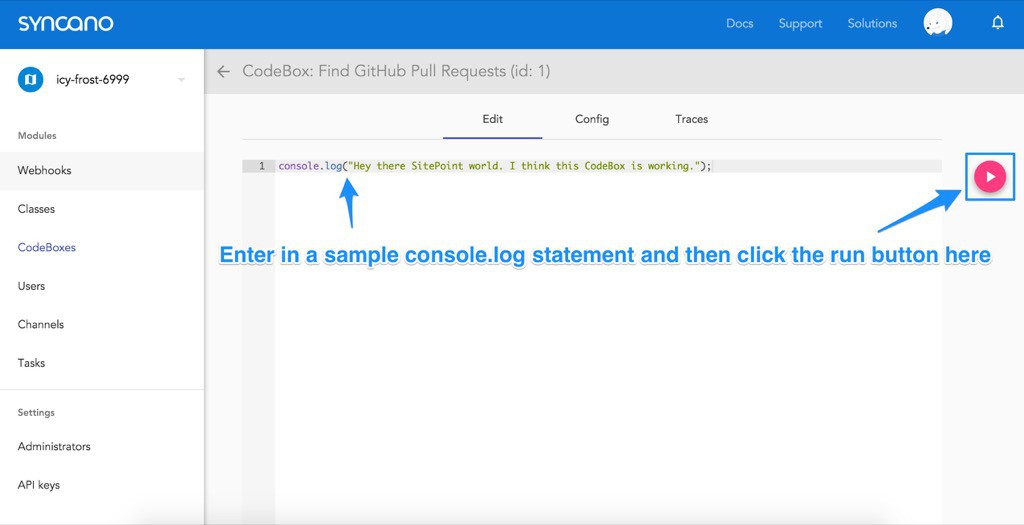
Enter in a simple console.log() statement and then click the run button to the right to give it a test run:
输入一个简单的console.log()语句,然后单击右侧的run按钮对其进行测试运行:
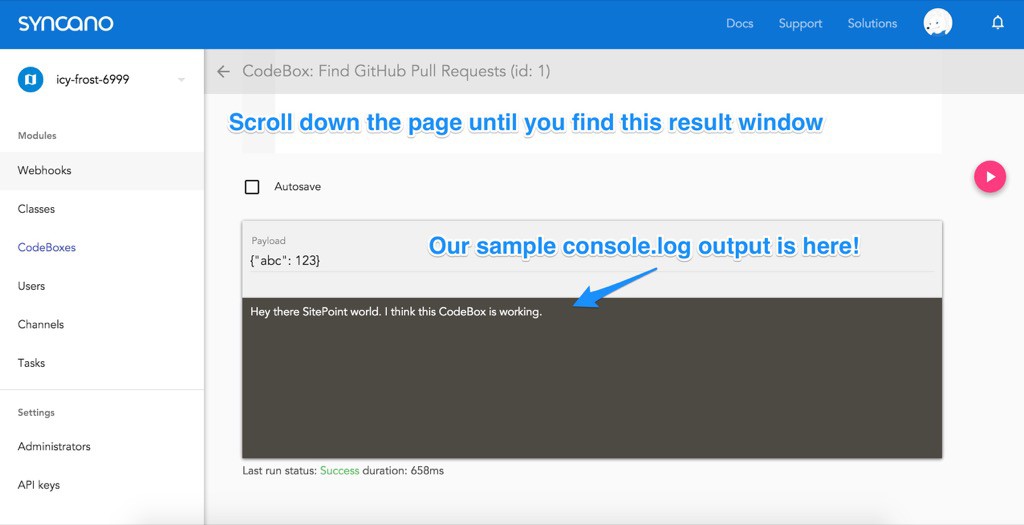
Then, if we scroll down the page, we find a result screen with the successful output:
然后,如果我们向下滚动页面,我们将找到一个包含成功输出的结果屏幕:
从Syncano外部运行 (Running From Outside Syncano)
We can also run a CodeBox from outside Syncano. This is where the true power lies! There are two methods of receiving access to our CodeBoxes from outside Syncano — running the CodeBox directly via cURL, JavaScript or Python or running the CodeBox via a Webhook. Running a CodeBox directly requires an account key (and thus admin access) and causes the CodeBox to be run in the background. Your result is not returned immediately which can be messy. Webhooks on the other hand, do not require an account key and are run synchronously — you’ll receive the result of the CodeBox’s execution in the response.
我们还可以从Syncano外部运行CodeBox。 这才是真正的力量所在! 有两种方法可以从Syncano外部接收对我们的CodeBox的访问权限-直接通过cURL,JavaScript或Python运行CodeBox或通过Webhook运行CodeBox。 直接运行CodeBox需要一个帐户密钥(并因此需要管理员访问权限),并使CodeBox在后台运行。 您的结果不会立即返回,可能会很混乱。 另一方面,Webhooks不需要帐户密钥,并且可以同步运行-您将在响应中收到CodeBox执行的结果。
As two examples, we will look at accessing a CodeBox directly via the cURL command and via a Webhook.
作为两个示例,我们将研究直接通过cURL命令和Webhook访问CodeBox。
To access the CodeBox via cURL, we need our account key to prove we are authorized to do so. Webhooks do not require account keys, so if you aren’t interested in knowing how to use cURL, feel free to skip to the next section! However, it can be quite handy to know where to find your account key.
要通过cURL访问CodeBox,我们需要我们的帐户密钥以证明我们有权这样做。 Webhooks不需要帐户密钥,因此,如果您对知道如何使用cURL不感兴趣,请随时跳到下一部分! 但是,知道在哪里可以找到您的帐户密钥可能非常方便。
查找您的帐户密钥 (Finding Your Account Key)
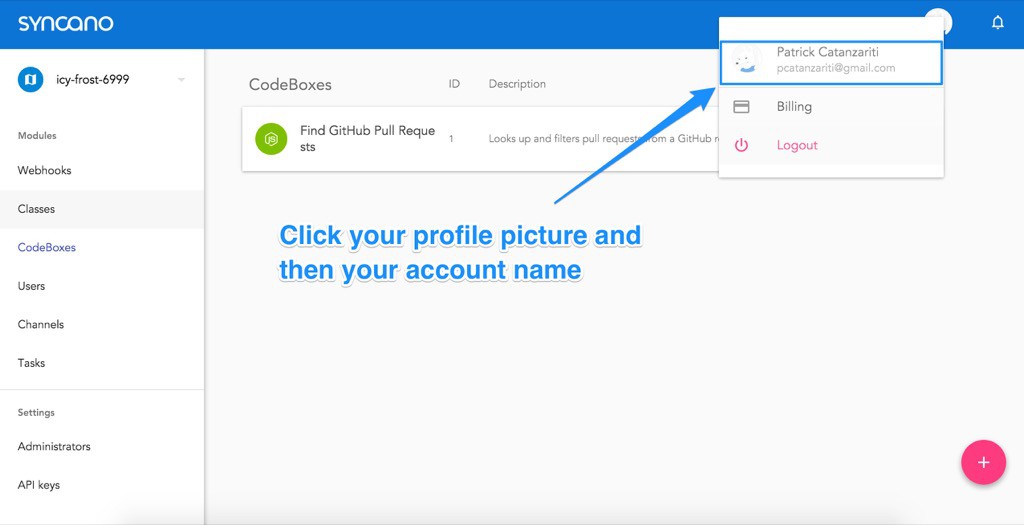
To find your account key, click on your profile picture at the top right of the Syncano Dashboard and click your account name:
要找到您的帐户密钥,请单击Syncano仪表板右上方的个人资料图片,然后单击您的帐户名称:
From this page, click the “Authentication” section on the right hand side. This screen shows your account key. Copy that key by pressing the “Copy” button on that screen or by copying the key that you see beside the button manually:
在此页面上,单击右侧的“身份验证”部分。 此屏幕显示您的帐户密钥。 通过按该屏幕上的“复制”按钮或通过手动复制按钮旁边看到的密钥来复制该键:

Store that key somewhere safe, we will be using it in the next step!
将该密钥存储在安全的地方,我们将在下一步中使用它!
通过cURL运行CodeBox (Running a CodeBox via cURL)
Our first option for running a CodeBox remotely is via the cURL command which you can run from the command line. For those interested, you can install it on Windows 64 bit and 32 bit by following those links. For those using OS X, Apple has already provided cURL for you as part of the OS.
我们远程运行CodeBox的第一个选择是通过cURL命令,您可以从命令行运行它。 对于那些感兴趣的人,可以通过以下链接将其安装在Windows 64位和32位上 。 对于使用OS X的用户,Apple已经为您提供了cURL作为OS的一部分。
Open up your command prompt and enter the following, replacing YOUR_ACCOUNT_KEY_YOU_COPIED_EARLIER with your account key and YOUR_INSTANCE_NAME with your instance name (mine was icy-frost-6999). The 1 is your CodeBox ID. If you only have one CodeBox so far, its ID will be 1:
打开命令提示符,然后输入以下内容,将YOUR_ACCOUNT_KEY_YOU_COPIED_EARLIER替换为您的帐户密钥,并将YOUR_INSTANCE_NAME替换为您的实例名称(mine为icy-frost-6999 )。 1是您的CodeBox ID。 如果到目前为止只有一个CodeBox,则其ID为1:
curl -X POST \
-H "X-API-KEY: YOUR_ACCOUNT_KEY_YOU_COPIED_EARLIER" \
-H "Content-Type: application/json" \
"https://api.syncano.io/v1/instances/YOUR_INSTANCE_NAME/codeboxes/1/run/"
When this runs, it should result in the following:
运行时,将导致以下结果:
{"status":"pending","links":{"self":"\/v1\/instances\/icy-frost-6999\/codeboxes\/1\/traces\/3\/"},"executed_at":null,"result":{},"duration":null,"id":3}This doesn’t show us the result yet, as the trace of the result is accessible via a different command. Within this response, we can see one main piece of information we will need to trace the result — "id":3. This is the ID of our trace we want to look at. To see whether our console.log() has run in that trace, we run the following cURL command with our CodeBox ID of 1 and our trace ID of 3:
这还没有显示结果,因为可以通过其他命令访问结果的跟踪。 在此响应中,我们可以看到跟踪结果所需的一条主要信息- "id":3 。 这是我们要查看的跟踪的ID。 要查看我们的console.log()是否已在该跟踪中运行,我们运行以下cURL命令,其中CodeBox ID为1,跟踪ID为3:
curl \
-H "X-API-KEY: YOUR_ACCOUNT_KEY_YOUCOPIED_EARLIER" \
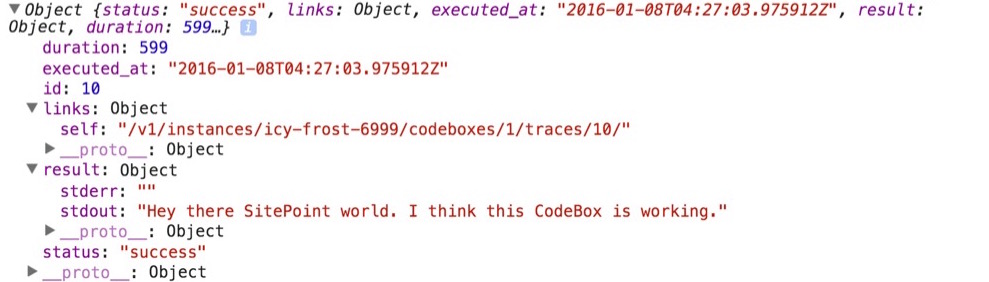
"https://api.syncano.io/v1/instances/YOUR_INSTANCE_NAME/codeboxes/1/traces/3/The result should look like so:
结果应如下所示:
{"status":"success","links":{"self":"\/v1\/instances\/icy-frost-6999\/codeboxes\/1\/traces\/3\/"},"executed_at":"2016-01-08T03:25:53.881717Z","result":{"stderr":"","stdout":"Hey there SitePoint world. I think this CodeBox is working."},"duration":1489,"id":3}Our console.log() has run successfully!
我们的console.log()已成功运行!
通过Webhooks运行CodeBox (Running a CodeBox via Webhooks)
For our web app, we will want to be able to run our CodeBox via JavaScript on the front end. In order to run a CodeBox publicly without exposing the account key, we set up something called a Webhook. A Webhook gives us a public URL to send a POST request to in order to run the CodeBox.
对于我们的Web应用程序,我们希望能够在前端通过JavaScript运行我们的CodeBox。 为了在不公开帐户密钥的情况下公开运行CodeBox,我们设置了一个Webhook。 Webhook为我们提供了一个公共URL,以发送POST请求以运行CodeBox。
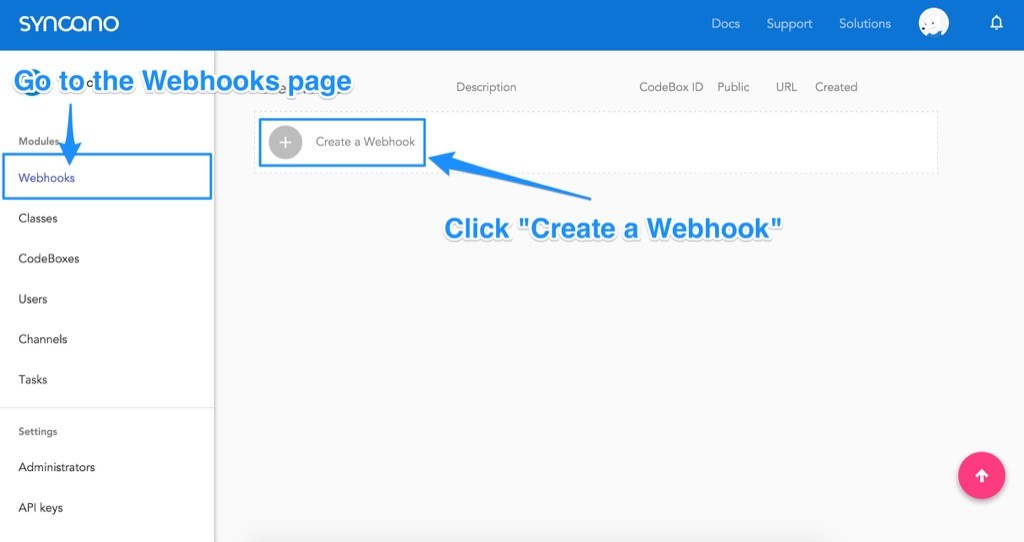
To set up a public Webhook, go to the Syncano Dashboard for your instance and click the “Webhooks” menu item on the left. Then click “Create a Webhook”:
要设置公共Webhook,请转到您实例的Syncano仪表板,然后单击左侧的“ Webhooks”菜单项。 然后单击“创建Webhook”:
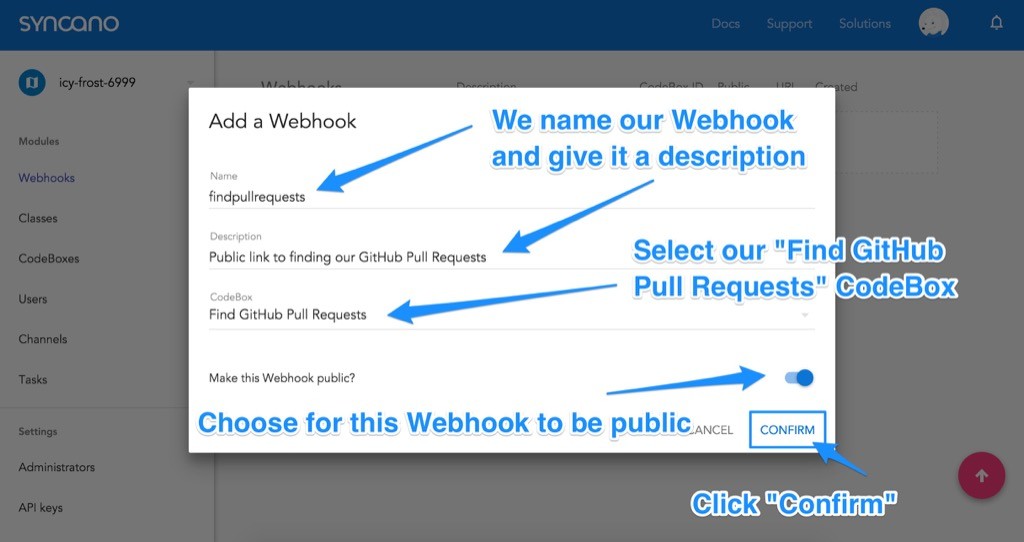
In the pop up that appears, we call the Webhook “findpullrequests” and give it a description of “Public link to finding our GitHub Pull Requests”. The description is solely for your own reference so feel free to describe it in any way that you would like! Then, we choose our CodeBox in the last field to set it as the CodeBox that will be run. Click to “Make this Webhook public” and click “Confirm” when ready:
在出现的弹出窗口中,我们将Webhook称为“ findpullrequests”,并对其进行“对找到我们的GitHub Pull Requests的公共链接”的描述。 该说明仅供您自己参考,请随时以任何您想要的方式对其进行说明! 然后,我们在最后一个字段中选择我们的CodeBox,将其设置为将要运行的CodeBox。 单击以“将此Webhook公开”,并在准备好后单击“确认”:
Syncano then returns us to our list of Webhooks, revealing our new Webhook. There is a link on this Webhook under the URL column — we click that to copy the public URL we will use to run our CodeBox.
然后,Syncano将我们返回到Webhooks列表中,显示了新的Webhook。 此Webhook的URL列下有一个链接-单击此链接可复制将用于运行CodeBox的公共URL。
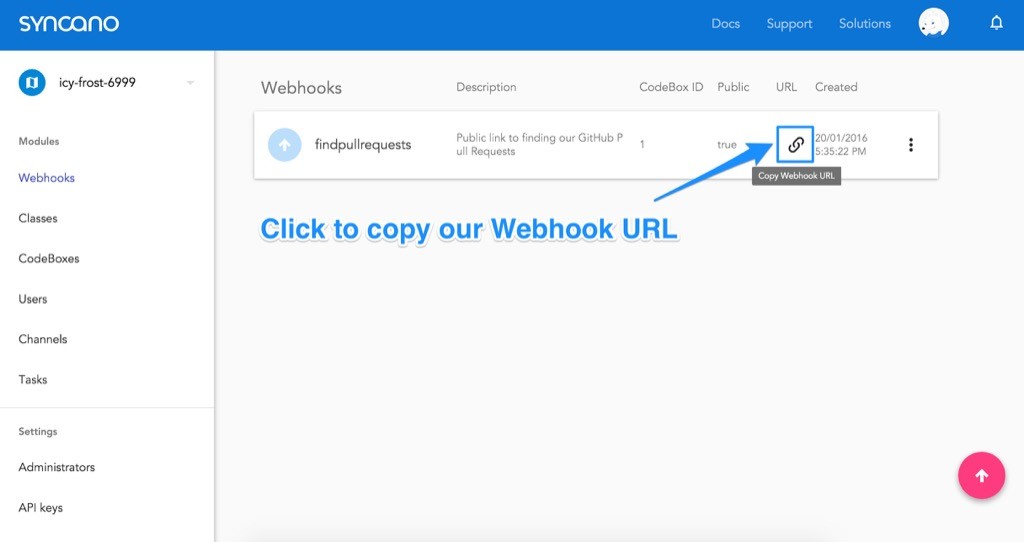
It is worth noting — you can paste this link into your browser to test Webhooks without needing to create an entire app initially.
值得注意的是-您可以将此链接粘贴到浏览器中以测试Webhooks,而无需最初创建整个应用程序。
通过JavaScript和Webhooks运行CodeBox (Running a CodeBox via JavaScript and Webhooks)
Our front end HTML is going to be incredibly simple. You could use a JavaScript framework for various examples in this article, however to keep things simple and as general as possible, we’ve stuck with simple JavaScript on the front end with jQuery for our POST request.
我们的前端HTML将非常简单。 您可以在本文的各种示例中使用JavaScript框架,但是为了使事情变得简单和尽可能通用,我们在POST请求的前端使用jQuery保留了简单JavaScript。
<!doctype html>
<html>
  <head>
    <title>GitHub Pull Request Checker</title>
  </head>
  <body>
    <div id="main">
      <h1>Pull Requests</h1>

      <div id="pull-requests">

      </div><!-- pull-requests -->
    </div><!-- main -->

    <script src="js/vendor/jquery.min.js"></script>
    <script src="js/vendor/syncano.min.js"></script>
    <script src="js/app.js"></script>
  </body>
</html>
The main line of code to note here is our inclusion of the Syncano JavaScript file after jQuery (you can get the Syncano JavaScript file from their GitHub):
这里要注意的主要代码行是我们在jQuery之后包含Syncano JavaScript文件( 您可以从其GitHub获取Syncano JavaScript文件 ):
<script src="js/syncano.min.js"></script>Within our own JavaScript, which we’ve called app.js, we will create a JavaScript file with the following code:
在我们自己的名为app.jsJavaScript中,我们将使用以下代码创建一个JavaScript文件:
(function() {
  $.ajax({
    type: "POST",
    url: "https://api.syncano.io/v1/instances/YOUR-INSTANCE-NAME/webhooks/p/abcd/findpullrequests/"
  })
  .done(function(res) {
    console.log('Response:');
    console.log(res);
  });
}());
We copy in the webhook URL into the jQuery AJAX POST request’s url field:
我们将webhook URL复制到jQuery AJAX POST请求的url字段中:
$.ajax({
  type: "POST",
  url: "https://api.syncano.io/v1/instances/YOUR-INSTANCE-NAME/webhooks/p/abcd/findpullrequests/",
The .done() callback runs when our request returns successfully. Within our callback function, we start by logging that it has successfully ran and then we log what the response was. The response from our Syncano CodeBox returns a res variable with the data response.
当我们的请求成功返回时, .done()回调运行。 在回调函数中,我们首先记录它已成功运行,然后记录响应是什么。 来自Syncano CodeBox的响应返回带有数据响应的res变量。
If we run our web app with this code in place, it shows our console.log() in all of its glory:
如果我们使用适当的代码运行Web应用程序,则它会在所有荣耀中显示我们的console.log() :
We are now ready to improve this CodeBox to give us some useful information, let’s get it to read in our latest GitHub pull requests.
现在,我们准备改进此CodeBox,以向我们提供一些有用的信息,让我们在最新的GitHub pull请求中阅读它。
将我们的CodeBox连接到GitHub (Connecting our CodeBox to GitHub)
To get our CodeBox to read from Github we have a few bits of functionality to add. We need the ability to:
为了让我们的CodeBox可以从Github中读取,我们需要添加一些功能。 我们需要具备以下能力:
Make HTTP requests – We will use the
requestnode module to do so in our CodeBox.requestHTTP请求–我们将在CodeBox中使用request节点模块进行request。Make a HTTP request to the GitHub API – In particular, we want to retrieve pull requests.
向GitHub API发出HTTP请求-特别是,我们要检索拉取请求。
Tell the CodeBox our GitHub username and repo name – We want to be able to reuse this CodeBox for any GitHub repo by anyone, so we set these as arguments for our CodeBox.
告诉CodeBox我们的GitHub用户名和存储库名称–我们希望任何人都可以将该CodeBox重复用于任何GitHub存储库,因此我们将它们设置为CodeBox的参数。
Filter these requests by label – We want to be able to ask the CodeBox to give us pull requests with a certain label, so we set this as an optional argument for our CodeBox too. We will be using the
lodashnode module to look through the data.按标签过滤这些请求–我们希望能够要求CodeBox为我们提供带有特定标签的拉取请求,因此我们也将其设置为CodeBox的可选参数。 我们将使用
lodash节点模块浏览数据。Return the title, URL and labels for each pull request – These are what we will be displaying in our web app. We don’t need any other data.
返回每个请求请求的标题,URL和标签-这些是我们将在Web应用程序中显示的内容。 我们不需要任何其他数据。
In order to achieve this, our CodeBox looks like so:
为了实现这一点,我们的CodeBox如下所示:
var request = require("request"),
    _ = require("lodash"),
    username = ARGS.POST.username,
    repo = ARGS.POST.repo,
    pullLabel = ARGS.POST.label;

var options = {
  url: "https://api.github.com/repos/" + username + "/" + repo + "/issues?state=all",
  headers: {
    "User-Agent": "syncano-sample-pull-app"
  }
};

if (!username || !repo) {
    console.log("Error: Need more info!"); return false;
}

request(options, function (error, response, body) {
  if (error) {
    console.log("Error: ", JSON.stringify(error));
  } else if (!error && response.statusCode == 200) {
    var pulls = JSON.parse(body),
        returnValue = "[";

    _(pulls).forEach(function(pull) {
      var display = false;

      if (pullLabel) {
          if (_.filter(pull.labels, _.matches({"name": pullLabel})).length > 0) {
            display = true;
          }
      } else {
        display = true;
      }
      if (display) {
        returnValue += "{\"title\":\"" + pull.title + "\", \"url\":\"" + pull.html_url + "\",  \"state\":\"" + pull.state + "\",  \"labels\":" + JSON.stringify(pull.labels) + "},";
      }
    }).value();
    returnValue = returnValue.substring(0, returnValue.length - 1);
    returnValue += "]";
    console.log(returnValue);
  }
});
我们的代码箱说明 (Our CodeBox Explained)
The CodeBox begins with require statements for the request and lodash modules that we mentioned above:
CodeBox以我们上面提到的request和lodash模块的require语句开头:
var request = require("request"),
    _ = require("lodash"),
Then, we set up the arguments our CodeBox can accept using ARGS.POST.theargumentname format. For it to receive arguments outside of POST requests, you can instead use ARGS.theargumentname.
然后,我们使用ARGS.POST.theargumentname格式设置CodeBox可以接受的参数。 为了使其能够接收POST请求之外的参数,可以改用ARGS.theargumentname 。
username = ARGS.POST.username,
repo = ARGS.POST.repo,
pullLabel = ARGS.POST.label;
We then begin setting up our HTTP request that we want to make to GitHub. We set up the URL we want to send a HTTP request to the GitHub’s Issues API. In my own example, I’m looking to request https://api.github.com/repos/patcat/GreatestRepoOfAllTime/issues?state=all. I set state to all so that both open and closed pull requests come through. Technically this call will retrieve both issues and pull requests, so we could rename the title to “Issues and Pull Requests” on our page if we wanted to! I’ve left it as is as my repo doesn’t have any issues.
然后,我们开始设置我们要向GitHub发送的HTTP请求。 我们设置了要向GitHub的Issues API发送HTTP请求的URL。 在我自己的示例中,我希望请求https://api.github.com/repos/patcat/GreatestRepoOfAllTime/issues?state=all 。 我将state设置为all以便同时打开和关闭拉取请求。 从技术上讲,此调用将检索问题和请求请求,因此如果需要,我们可以在页面上将标题重命名为“问题和请求请求”! 我将其保留为原样,因为我的存储库没有任何问题。
var options = {
  url: "https://api.github.com/repos/" + username + "/" + repo + "/issues?state=all",
Another important option for our HTTP request is to include a User-Agent header as GitHub uses these to keep track of where calls are coming from. You can call yours anything you’d like, just try to make it unique.
HTTP请求的另一个重要选项是包括User-Agent标头,因为GitHub使用这些标头来跟踪调用的来源。 您可以随心所欲地调用自己的名称,只需使其独特即可。
headers: {
    "User-Agent": "syncano-sample-pull-app"
  }
};
If our CodeBox has not been given a username or repo name in the arguments, it returns an error and does not go any further.
如果在参数中未为我们的CodeBox提供用户名或存储库名称,则它将返回错误,并且不会继续进行。
if (!username || !repo) {
  console.log("Error: Need more info!"); return false;
}
Otherwise, we run the HTTP request we defined above. If there’s an error, it will appear in the error variable. We will detect that variable and log it. If there are no errors and we have a successful HTTP 200 response, our CodeBox will continue interpreting the pull request data it has received.
否则,我们将运行上面定义的HTTP请求。 如果有错误,它将显示在error变量中。 我们将检测到该变量并将其记录下来。 如果没有错误,并且我们有成功的HTTP 200响应,我们的CodeBox将继续解释它收到的请求请求数据。
request(options, function (error, response, body) {
  if (error) {
    console.log("Error: ", JSON.stringify(error));
  } else if (!error && response.statusCode == 200) {
Our pull request data will be in the body variable that is returned. It is in the form of a JSON string, so we parse that into something JavaScript can look through and save it in a variable called pulls. We also start a new variable called returnValue which is where we will compile the array of JSON data we will provide as a result to whoever runs the CodeBox.
我们的请求请求数据将在返回的body变量中。 它采用JSON字符串的形式,因此我们将其解析为JavaScript可以浏览的内容并将其保存在名为pulls的变量中。 我们还启动了一个名为returnValue的新变量,在该变量中,我们将编译提供给运行CodeBox的人的JSON数据数组。
var pulls = JSON.parse(body),
    returnValue = "[";
We then use the lodash module’s forEach() function to look through each pull request that GitHub returns and work with it:
然后,我们使用lodash模块的forEach()函数查看GitHub返回的每个pull请求并对其进行处理:
_(pulls).forEach(function(pull) {
  ...
}
Within that forEach() function, we set a new variable called display which will determine if each pull request should be displayed to whoever requested the pull requests from the CodeBox. If the CodeBox has a pullLabel argument, it knows that we are looking for results from one particular label. In that case, it loops through each of the labels within the pull.labels returned from GitHub and if there are any matches, it sets this pull request to be displayed.
在该forEach()函数中,我们设置了一个名为display的新变量,该变量将确定是否应将每个拉取请求显示给从CodeBox请求拉取请求的人。 如果CodeBox具有pullLabel参数,则它知道我们正在从一个特定标签中寻找结果。 在这种情况下,它将pull.labels从GitHub返回的pull.labels每个标签,并且如果存在匹配项,则会设置要显示的拉取请求。
var display = false;

if (pullLabel) {
    if (_.filter(pull.labels, _.matches({"name": pullLabel})).length > 0) {
      display = true;
    }
}
Otherwise, if there is no pullLabel argument, then we aren’t filtering by label and we definitely want this pull request to be shown.
否则,如果没有pullLabel参数,那么我们就不会按标签进行过滤,我们当然希望显示此pull请求。
else {
  display = true;
}
After deciding whether or not we want to show the pull request, we check that display variable and then add a JSON string to our returnValue with pull.title, pull.state and pull.labels. pull.labels is turned into a JSON string as there can be multiple labels returned from GitHub and we want these to nest nicely in the JSON we return.
在决定是否要显示请求请求之后,我们检查该display变量,然后使用pull.title , pull.state和pull.labels将JSON字符串添加到returnValue 。 pull.labels变成JSON字符串,因为从GitHub返回了多个标签,我们希望它们很好地嵌套在返回的JSON中。
if (display) {
    returnValue += "{\"title\":\"" + pull.title + "\", \"url\":\"" + pull.html_url + "\",  \"state\":\"" + pull.state + "\",  \"labels\":" + JSON.stringify(pull.labels) + "},";
  }
}).value();
One we have looked through each pull request, we remove the final character from returnValue (it is a trailing comma because each pull request loop added in a comma to that string) and we then close the array of JSON objects.
我们查看了每个拉取请求,然后从returnValue删除了最后一个字符(这是一个尾随的逗号,因为每个拉取循环都以逗号添加到该字符串),然后关闭JSON对象数组。
returnValue = returnValue.substring(0, returnValue.length - 1);
returnValue += "]";
To finalize this and send off that data, we log it to the console so it can be picked up by our web app.
为了完成并发送该数据,我们将其记录到控制台,以便我们的Web应用程序可以将其提取。
console.log(returnValue);
  }
});
更新我们应用HTML (Updating Our App’s HTML)
The front end code of our app is quite simple. We’ve added some styles to make it look a bit cleaner and we have updated the JavaScript to look like so:
我们应用程序的前端代码非常简单。 我们添加了一些样式,使其看起来更整洁,并且对JavaScript进行了更新,如下所示:
(function() {
  $.ajax({
    type: "POST",
    url: "https://api.syncano.io/v1/instances/YOUR-INSTANCE-NAME/webhooks/p/abcd/findpullrequests/",
    data: {"username":"patcat", "repo":"GreatestRepoOfAllTime", "label":"invalid"}
  })
  .done(function(res) {
    var pulls = JSON.parse(res.result.stdout),
        pullsHTML = "";

    for (var i = 0; i " + pulls[i].labels[j].name + "";
      }
      pullsHTML += "" + pulls[i].title + stateHTML + ""
    }

    document.getElementById('pull-requests').innerHTML = pullsHTML;
  });
}());
我们的前端JavaScript更新介绍了 (Our Front End JavaScript Updates Explained)
The parts of the CodeBox which have been adjusted are:
已调整的CodeBox部分为:
Our CodeBox running function now has a payload of arguments we wish to send in the data value — this allows us to ask for the specific username, repository and label we want to get pull requests from. For my own example, I am only showing pull requests with the name “invalid”:
现在,我们的CodeBox运行函数具有我们希望发送data值的参数的有效负载-这使我们能够请求要从中获取提取请求的特定用户名,存储库和标签。 对于我自己的示例,我只显示名称为“ invalid”的拉取请求:
data: {"username":"patcat", "repo":"GreatestRepoOfAllTime", "label":"invalid"}Once the request is successful, we parse the JSON string from our CodeBox’s res.result.stdout response (that is where the console.log response can be found) and save it in a variable called pulls. We also set up a variable called pullsHTML for our HTML output we will be putting onto the page.
一旦请求成功,我们将从CodeBox的res.result.stdout响应(可以在其中找到console.log响应)中解析JSON字符串,并将其保存在名为pulls的变量中。 我们还为将要放在页面上HTML输出设置了一个名为pullsHTML的变量。
var pulls = JSON.parse(res.result.stdout),
    pullsHTML = "";
Similar to how we looked through our GitHub array, but without lodash (you could bring in lodash into your front end if you wanted to!), we loop through each pull request and display it as a link. If there are any labels, we also add those into the mix. We also style the state of pull requests with a class called either pull-open or pull-closed.
类似于我们通过GitHub数组查看的方式,但是没有lodash(如果需要,可以将lodash引入前端!),我们遍历每个pull请求并将其显示为链接。 如果有标签,我们也将它们添加到组合中。 我们还使用称为pull-open或pull-closed的类设置了pull请求的状态。
for (var i = 0; i < pulls.length; i++) {
    var stateHTML = "";
    for (var j = 0; j < pulls[i].labels.length; j++) {
        stateHTML += "<div class=\"label\">" + pulls[i].labels[j].name + "</div>";
    }
    pullsHTML += "<a class=\"pull pull-" + pulls[i].state + "\" href=\"" + pulls[i].url + "\" target=\"_blank\">" + pulls[i].title + stateHTML + "</a>"
}
Finally, we place that code into our #pull-requests element on the page:
最后,我们将该代码放入页面上的#pull-requests元素中:
document.getElementById('pull-requests').innerHTML = pullsHTML;行动中 (In Action)
If we take a look at my GitHub repo we’ll be using as an example, we can see four pull requests waiting. Two of these are labeled as invalid and one of the invalid pull requests is closed:
如果我们看一下我的GitHub存储库,我们将以它为例,可以看到有四个请求在等待。 其中两个标记为无效,并且其中一个无效的拉取请求已关闭:
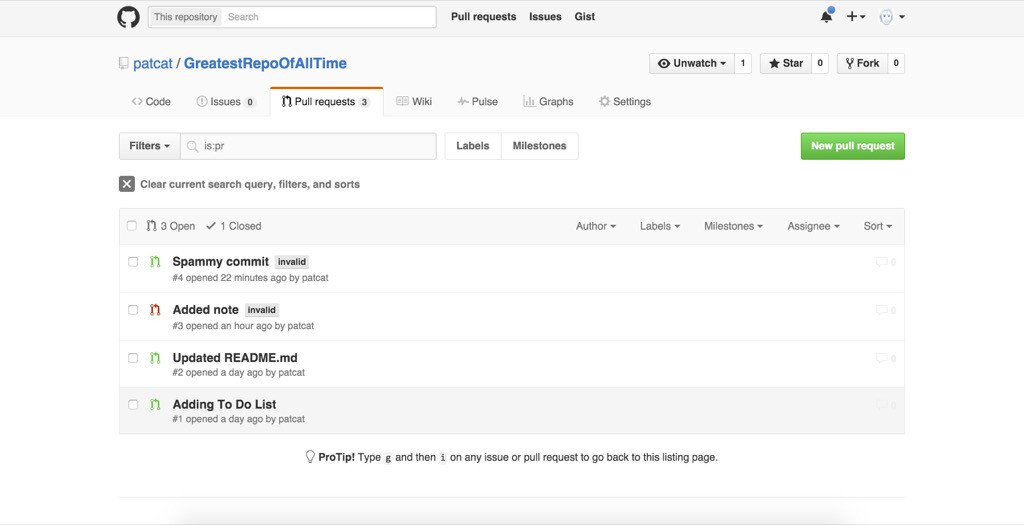
If we run our web app by loading index.html, Syncano provides our app with only two of the GitHub pull requests — the two requests marked as invalid. One of the requests is crossed out, which is part of the styling for a closed ticket in my sample CSS (you could style the whole app anyway you would like or take a look at the demo code!).
如果我们通过加载index.html运行Web应用程序,则Syncano仅向我们的应用程序提供两个GitHub拉取请求-这两个请求标记为无效。 其中一个请求被删除,这是我的示例CSS中封闭票证样式的一部分(您可以根据需要对整个应用程序进行样式设置或查看演示代码!)。

结论 (Conclusion)
CodeBoxes and Syncano bring a really nice and simple way of setting up a modular and reusable serverless platform for your web applications. The GitHub pull request example runs entirely on Syncano’s service, with only a static HTML page with some basic JavaScript to pull in the data. For those who aren’t too excited by the idea of setting up a backend environment for your next project, Syncano and its CodeBoxes could be the perfect choice.
CodeBoxes和Syncano为您的Web应用程序提供了一种非常好的,简单的方法来设置模块化和可重用的无服务器平台。 GitHub拉取请求示例完全在Syncano的服务上运行,只有一个静态HTML页面和一些基本JavaScript来拉入数据。 对于那些对为下一个项目设置后端环境的想法不太满意的人,Syncano及其CodeBoxes可能是理想的选择。
翻译自: https://www.sitepoint.com/getting-started-with-microservices-using-syncanos-codeboxes/


 被折叠的 条评论
为什么被折叠?
被折叠的 条评论
为什么被折叠?
 到【灌水乐园】发言


