


Why should we PHP warriors care at all about Apple’s Passbook? Well first because Apple made this technology open (well, sort of…), second because it can be used outside iOS devices, and third because it involves a lot of well-known and loved technologies like JSON and RESTful APIs. I’d also add that it’s a very interesting piece of technology, but that’s my personal opinion.
为什么PHP勇士们应该完全关心Apple的Passbook? 首先是因为Apple将该技术开放(很好,等等),其次是因为它可以在iOS设备之外使用,其次是因为它涉及许多众所周知的技术,如JSON和RESTful API。 我还要补充一点,它是一项非常有趣的技术,但这是我个人的看法。
In this article I’ll show you how I built a sample web application that creates and distributes passes in the form of a “PHPMaster Membership Card”. It is not a full-featured product, but it’s a nice base to build on for more serious real world uses. You can download the demo code for the article from GitHub.
在本文中,我将向您展示如何构建一个示例Web应用程序,该应用程序以“ PHPMaster会员卡”的形式创建和分发通行证。 它不是功能齐全的产品,但它是在更严格的现实世界中使用的良好基础。 您可以从GitHub 下载该文章的演示代码 。
Please note: In order to run this article’s code, you (or your client) must be registered to one of the paid Apple iOS Developer Programs which allows you to create the necessary certificates to sign your passes. For this reason I’ve also made a dummy application available online for you to play with.
请注意:为了运行本文的代码,您(或您的客户)必须注册到其中一个付费的Apple iOS开发人员计划,该计划允许您创建必要的证书来签署通行证。 因此,我还在线提供了一个虚拟应用程序供您使用。
什么是通行证,我该如何使用? (What’s a Pass and How do I Use One?)
A pass is a digitally signed document such as a ticket, membership card, or coupon that can be distributed by email or a web download. It can be opened with the Passbook app on iOS or with an app like PassWallet on Android. On iOS, a pass can also be linked to a companion app, for example the Eventbrite app which allows you to buy tickets and add them to your device’s Passbook, but that’s not mandatory.
通行证是经过数字签名的文档,例如票证,会员卡或优惠券,可以通过电子邮件或网络下载进行分发。 可以使用iOS上的Passbook应用或Android上的PassWallet之类的应用打开它。 在iOS上,通行证也可以链接到配套应用程序,例如Eventbrite应用程序,该应用程序允许您购买门票并将其添加到设备的存折中,但这不是强制性的。
Apple’s specs outline four main pass types:
苹果的规格概述了四种主要的通行证类型:
- Boarding passes 登机证
- Event tickets 活动门票
- Retail coupons 零售优惠券
- Store cards 储值卡
There’s also a Generic pass type that covers other purposes, and this the type of pass I’m using here.
还有一种通用的通行证类型涵盖了其他目的,这就是我在这里使用的通行证类型。
Each pass contains various bits of data. Some, such as a member name and bar code are displayed visually on the “front side” of the pass. Other data is located on the “back” of the pass and triggered by the “i” icon. Passes can also contain some hidden information such as a time and location which can be used to display relevant notifications.
每遍都包含各种数据位。 在通行证的“正面”上会直观地显示一些名称,例如会员名称和条形码。 其他数据位于通行证的“背面”,并由“ i”图标触发。 通行证还可以包含一些隐藏的信息,例如时间和位置,可用于显示相关的通知。
On Apple’s Passbook Developers page you can find official guides and some sample code.
在Apple的Passbook开发人员页面上,您可以找到官方指南和一些示例代码。
应用程序概念:PHPMaster会员卡 (App Concept: PHPMaster Membership Card)
The sample application has two main features:
该示例应用程序具有两个主要功能:
- Create and store passes 创建和存储通行证
- Implement the register/unregister web service API 实现注册/注销Web服务API
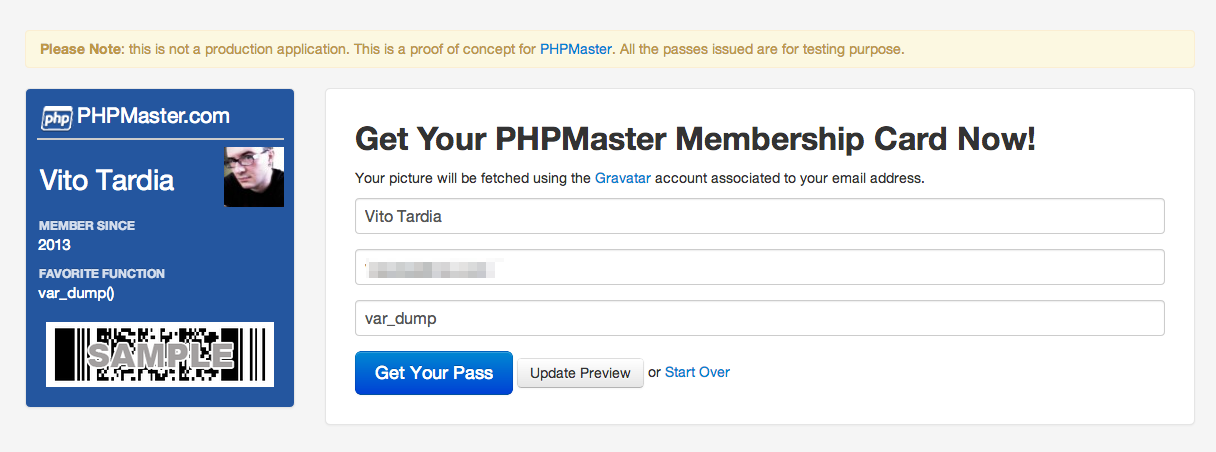
The main form prompts the user for a full name, an email address, and an optional favorite function. The member picture is fetched using the Gravatar API. The backend code then saves the provided data to a database, generates the pass, and sends a copy to the subscriber’s email.
主窗体提示用户输入全名,电子邮件地址和可选的“收藏夹”功能。 成员图片是使用Gravatar API获取的。 然后,后端代码将提供的数据保存到数据库,生成通行证,并将副本发送到订户的电子邮件。
The pass contains the URL and access codes for a web service, so when the subscriber adds the pass to his collection the Passbook app will call a predefined registration URL that must be implemented to check and store the provided data for later use.
该通行证包含Web服务的URL和访问代码,因此,当订户将通行证添加到其收藏夹时,Passbook应用程序将调用预定义的注册URL,必须实施该注册URL才能检查和存储所提供的数据以供以后使用。
应用程式结构 (App Structure)
Since the core of this writeup is to understand pass-related code, I’ll start from a base of well known open source components available on GitHub and using Composer.
由于本文的核心是理解与通行证相关的代码,因此我将从GitHub上使用Composer的知名开源组件开始。
The application is built using Slim Framework since it’s lightweight and well suited for both RESTful development and web-GUI applications. Slim’s default PHP template engine is used as well the DateTimeLogWriter from the Slim Extras package.
该应用程序是使用Slim Framework构建的,因为它轻巧并且非常适合RESTful开发和Web-GUI应用程序。 Slim的默认PHP模板引擎以及Slim Extras软件包中的DateTimeLogWriter都将使用。
The data and model layer is covered by Idiorm and Paris. Idiorm takes care of database work, while Paris provides a simple and clean model interface. This allows us to work with a Pass and a Subscriber object and call, for example, $pass->pack() to generate the pass package.
数据和模型层由Idiorm和Paris覆盖。 Idiorm负责数据库工作,而Paris提供了一个简单干净的模型界面。 这使我们可以使用Pass和Subscriber对象并调用,例如$pass->pack()来生成pass包。
通过定义 (Pass Definition)
The first step is to define the pass; how will it look and what data will contain?
第一步是定义通行证; 它看起来如何,将包含哪些数据?
With this information at hand, we can create a pass template directory containing the basic assets:
有了这些信息,我们可以创建包含基本资产的传递模板目录:
templates/passes/PHPMaster.raw/
    logo.png
    icon.png
    pass.json
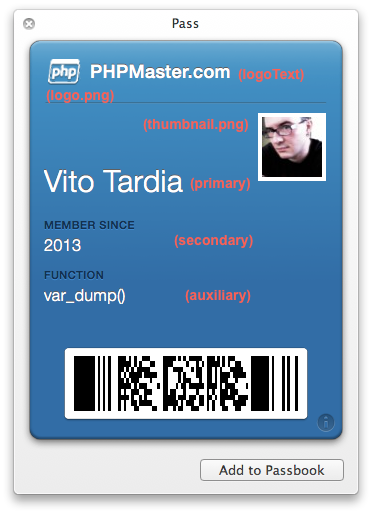
Each of the images can have a corresponding ImageName@2x.png version that can be used on retina devices if present. The logo is displayed in the top left of the pass, while the icon is displayed in the push notification box and iOS mail app. pass.json contains the data for the pass.
每个图像可以具有对应的ImageName @2x.png版本,可以在视网膜设备上使用它们(如果存在)。 徽标显示在通行证的左上方,而图标显示在推送通知框和iOS邮件应用中。 pass.json包含通过数据。
Inside pass.json, teamIdentifier is assigned to us by Apple when we subscribe to the Developer Program. passTypeIdentifier is a unique reverse-domain ID for our pass type, for example pass.com.phpmaster.membership-test (the “.pass” prefix is required). The serialNumber field must be unique to each pass, so a good value to use is the primary key from the database table that stores passes.
在pass.json ,当我们订阅开发人员计划时,Apple teamIdentifier分配给我们。 passTypeIdentifier是我们的密码类型的唯一反向域ID,例如pass.com.phpmaster.membership-test (需要“ .pass”前缀)。 serialNumber字段对于每个通行证必须是唯一的,因此要使用的一个很好的值是存储通行证的数据库表中的主键。
The generic key indicates the pass type we are using and contains the specific fields for the pass. Each pass type has a set of primaryFields, secondaryFields, and auxiliaryFields displayed in different places on the front side; it can also have a number of backFields displayed on the reverse side. Each field has a label (displayed publicly), a key (for internal reference), and a value.
generic密钥指示我们正在使用的通行证类型,并包含通行证的特定字段。 每种通行证类型都有一组primaryFields , secondaryFields和auxiliaryFields显示在正面的不同位置。 它的背面也可以显示许多backFields 。 每个字段都有一个标签(公开显示),一个键(供内部参考)和一个值。
The webServiceURL and authenticationToken fields are defined later in the application and are filled with the base URL of and the access credentials used by the device to register itself on our server.
webServiceURL和authenticationToken字段在应用程序的后面定义,并用设备的基本URL和访问凭证填充,以在我们的服务器上注册自己。
证明书 (Certificates)
The next step is to obtain the certificate used for pass generation. The Apple Developer’s provisioning panel is used to request certificates and there is a nice video tutorial on the PassKit wiki. You need a specific certificate for each pass type; the certificate’s common name must match the passTypeIdentifier of the pass.
下一步是获取用于生成通行证的证书。 Apple Developer的供应面板用于请求证书,PassKit Wiki上有一个不错的视频教程 。 每种通行证类型都需要特定的证书; 证书的通用名称必须与通行证的passTypeIdentifier匹配。
Each pass’s signature must also include the public Apple WWDR Intermediate Certificate.
每个通行证的签名还必须包括公开的Apple WWDR中级证书 。
目录和文件布局 (Directory and File Layout)
Here’s what the layout of the application looks like:
应用程序的布局如下所示:
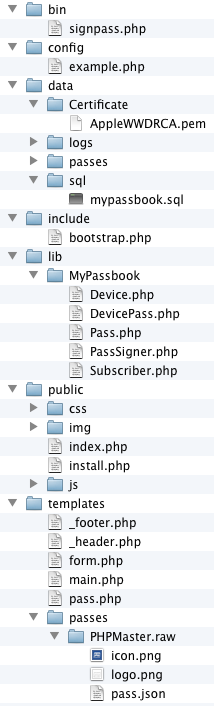
The bin directory contains the command line utility signpass.php. This program is a PHP port of Apple’s console utilities written in Objective-C and Ruby. It can be used to validate a pass or to create one from a given directory. It uses the PassSigner library which I detail later.
bin目录包含命令行实用程序signpass.php 。 该程序是用Objective-C和Ruby编写的Apple控制台实用程序PHP端口。 它可用于验证通行证或从给定目录创建通行证。 它使用PassSigner库,我稍后会详细介绍。
The config directory holds the configuration files. Make a copy of the sample and name it after your environment (stage, dev, prod, etc). To define a custom environment, create a text file named .mode inside the root directory containing the desired name of your environment. The $config['db'] array in the configuration file is used by Idiorm, and the $config['app'] array is passed directly to the Slim application’s constructor.
config目录包含配置文件。 复制样本并根据您的环境(阶段,开发,生产等)命名。 要定义自定义环境,请在根目录内创建一个名为.mode的文本文件,其中包含所需的环境名称。 Idiorm使用配置文件中的$config['db']数组,并将$config['app']数组直接传递给Slim应用程序的构造函数。
The data directory holds log files, generated passes, the SQL dump file, and the Certificate directory that must contain Apple’s public certificate and the certificate for your pass, both in PEM format. Certificates are distributed in CER or P12 format and can be converted with the openssl utility like so:
data目录以PEM格式保存日志文件,生成的通行证,SQL转储文件以及必须包含Apple的公共证书和通行证的证书的Certificate目录。 证书以CER或P12格式分发,可以使用openssl实用程序进行转换,如下所示:
openssl pkcs12 -in data/Certificate/PHPMaster.p12 -out data/Certificate/PHPMaster.pem
The templates directory holds the front-end template files. There’s two pages, the home (main.php) and the result page (pass.php), which share the header and footer elements. The subscription form has its own file (form.php).
templates目录包含前端模板文件。 有两个页面,即主页( main.php )和结果页面( pass.php ),它们共享页眉和页脚元素。 订阅表单具有其自己的文件( form.php )。
The passes subdirectory holds templates for each pass type. Each pass’ templates are organized into directories named PassTypeOrName.raw containing the necessary files.
passes子目录包含每种通过类型的模板。 每个阶段的模板都组织到名为PassTypeOrName .raw目录中,其中包含必要的文件。
The custom library code resides in lib/MyPassbook. Inside this directory there is:
定制库代码位于lib/MyPassbook 。 在此目录中有:
- the PassSigner library, responsible for pass signing and validation PassSigner库,负责通过签名和验证
the model classes built upon the core objects
Subscriber,Pass, andDevice在核心对象
Subscriber,Pass和Device构建的模型类
DevicePass is an intermediate class needed by Paris and manages the many-to-many relationship between devices and passes; as defined in the Passbook specs, each device can contain many passes and a copy of each pass can be stored in many devices.
DevicePass是巴黎所需的中级课程,它管理设备和通行证之间的多对多关系。 根据Passbook规范中的定义,每个设备可以包含许多通行证,并且每个通行证的副本可以存储在许多设备中。
The application’s public directory contains the controller files. index.php is the main controller. The controller includes include/bootstrap.php which is responsible for the application’s startup, loading the configuration file, setting up some defaults, connecting ORM to the database, and starting the log writer. In particular, the script also sets some code to the slim.before event hook used to capture the special Authentication HTTP header.
应用程序的public目录包含控制器文件。 index.php是主控制器。 该控制器包括include/bootstrap.php ,它负责应用程序的启动,加载配置文件,设置一些默认值,将ORM连接到数据库以及启动日志编写器。 特别地,该脚本还将一些代码设置为slim.before事件挂钩,用于捕获特殊的Authentication HTTP标头。
The install.php file is just a quick-and-dirty script that resets the application; there’s probably no need to say that it must be removed after you’ve set everything up!
install.php文件只是用于重置应用程序的快捷脚本。 设置完所有内容后,无需赘述!
There should also be a .htaccess file that redirects all non-file URIs to index.php and adds a custom mime type for our passes:
还应该有一个.htaccess文件,该文件将所有非文件URI重定向到index.php并为我们的传递添加自定义的mime类型:
AddType application/vnd.apple.pkpass pkpass
This allows Safari to open the pass with the PassViewer utility.
这使Safari可以使用PassViewer实用程序打开通行证。
编写申请 (Writing the Application)
The most important components of the application are the PassSigner class and the index.php front controller. Paris gives us the ability to use model classes so that the underlying database logic is transparent and managed by Idiorm. Creating a model class is as simple as:
该应用程序最重要的组件是PassSigner类和index.php前端控制器。 Paris为我们提供了使用模型类的能力,从而使基础数据库逻辑透明并由Idiorm管理。 创建模型类非常简单:
<?php
class Subscriber extends Model { }
There’s three classes that need to be created: Pass, Device, and Subscriber.
需要创建三个类: Pass , Device和Subscriber 。
The basic methods such as create(), find_many(), delete(), and so on are inherited from the base class. We can modify the basic properties (for example the linked database table or column ID), enhance the default methods, and add custom methods as needed.
基本方法(例如create() , find_many() , delete()等)是从基类继承的。 我们可以修改基本属性(例如,链接数据库表或列ID),增强默认方法,并根据需要添加自定义方法。
I added three methods to the Subscriber class:
我向Subscriber类添加了三种方法:
pass()– implement a one-to-one relationship with aPassobject and return this object.pass()–与Pass对象实现一对一关系并返回该对象。create()– override the defaultcreate()method allowing an array of data to be passed.create()–覆盖默认的create()方法,该方法允许传递数据数组。createPass()– create aPassobject linked to the current subscriber.createPass()–创建链接到当前订户的Pass对象。
And these are the six methods I added to the Pass class:
这些是我添加到Pass类的六个方法:
subscriber()– implement a one-to-one relationship with aSubscriberobject and return this object.subscriber()–与Subscriber对象实现一对一的关系,并返回该对象。devices()– define the many-to-many relationship with theDeviceobject. It has a correspondingpasses()method on theDeviceclass.devices()–定义与Device对象的多对多关系。 它在Device类上具有相应的passes()方法。create()– same as thecreate()method of theSubscriberclass.create()–与Subscriber类的create()方法相同。delete()– override the default method; delete the linkedDevicesandSubscriberobjects.delete()–覆盖默认方法; 删除链接的Devices和Subscriber对象。filename()– calculate and return the file name for the pass on disk.filename()–计算并返回磁盘上传递的文件名。pack()– save the pass to disk using the PassSigner library.pack()–使用PassSigner库将通行证保存到磁盘。
PassSigner库 (The PassSigner library)
PassSigner provides two main public methods for pass management:
PassSigner提供两种主要的公共方法来进行通行管理:
signPass()– take a directory containing data for a single pass and the certificate data and produce a zipped PKPASS file.signPass()–获取一个包含单次通过数据和证书数据的目录,并生成一个压缩的PKPASS文件。verifyPassSignature()take a PKPASS file and validate its structure and signature.verifyPassSignature()获取PKPASS文件并验证其结构和签名。
There are also two utility methods rcopy() and rrmdir() for recursive copy and deletion of directories, and some internal protected methods. The library makes extensive use of exceptions validation functions, and the two important methods check for the Apple certificate which must be defined by the constant APPLE_CERTIFICATE with the certificate path.
还有两个实用程序方法rcopy()和rrmdir()用于递归复制和删除目录,以及一些内部受保护的方法。 该库大量使用异常验证功能,并且两种重要的方法检查Apple证书,这些证书必须由带有证书路径的常量APPLE_CERTIFICATE定义。
To sign a pass, a file named manifest.json must be produced using the pass directory’s contents. This file must be signed with your certificate and include Apple’s public certificate. The signature data is saved in a file named signature.
要签署通行证,必须使用通行证目录的内容生成一个名为manifest.json的文件。 该文件必须使用您的证书签名,并包括Apple的公共证书。 签名数据保存在名为signature的文件中。
Let’s say that we have a directory that contain the pass data:
假设我们有一个包含通过数据的目录:
data/passes/PassForUser001.raw
    info.png
    logo.png
    thumbnail.png
    pass.json
The first step is to recursively copy all of the contents to a temporary directory (/tmp/PassForUser001 for example). Make sure there’s no “junk” files that shouldn’t be included, like the annoying .DS_Store files if you’re on OSX. If any of these files in included in the zipped pass but not in the manifest, the pass is invalid.
第一步是将所有内容递归复制到一个临时目录(例如/tmp/PassForUser001 )。 确保没有不应该包含的“垃圾”文件,例如,如果您使用的是OSX,则讨厌的.DS_Store文件。 如果这些文件中的任何文件包含在压缩过的通行证中,但未包含在清单中,则该通行证无效。
Then create the associative array to store the manifest data. There is an item for each file in the pass directory, the relative path is the item’s key while the value is the SHA1 hash of the file. The array is encoded and saved as manifest.json in the pass directory.
然后创建关联数组以存储清单数据。 pass目录中的每个文件都有一个项目,相对路径是项目的键,而值是文件的SHA1哈希。 数组被编码并保存为pass目录中的manifest.json 。
<?php
$manifestData = array();
$files = new DirectoryIterator($passPath);
foreach ($files as $file) {
    if ($file->isDot() || $file->getFilename() == ".DS_Store") {
        continue;
    }
    $key = trim(str_replace($passPath, "", $file->getPathName()), "/");
    $manifestData[$key] = sha1_file($file->getPathName());
}
Now for the signature… basically, we sign the manifest.json file using our certificate and password, including Apple’s WWDR certificate. The binary output is written to signature. However, there’s a problem here: the the binary option for PHP’s openssl_* functions seems buggy and still generates a text-encoded signature. I’ve worked around this by calling the shell command from PHP instead:
现在进行签名...基本上,我们使用我们的证书和密码(包括Apple的WWDR证书)对manifest.json文件进行签名。 二进制输出被写入signature 。 但是,这里存在一个问题:PHP的openssl_*函数的二进制选项似乎有错误,并且仍会生成文本编码的签名。 我通过从PHP调用shell命令来解决此问题:
<?php
$signCommand = sprintf(
    "openssl smime -binary -sign -certfile %s -signer %s -inkey %s -in %s -out %s -outform DER -passin pass:%s",
    APPLE_CERTIFICATE,
    $certPath,
    $certPath,
    $manifestPath,
    $signaturePath,
    $certPassword
);

$signResult = false;
$signOut = array(); // needed but unused
exec($signCommand, $signOut, $signResult);
unset($signOut);
If the $zip option is enabled (with by default it is) the pass is packed using the ZipArchive class.
如果启用了$zip选项(默认情况下为启用),则使用ZipArchive类打包密码。
To verify the pass, verifyPassSignature() extracts the given pass to a temporary directory and then calls the internal validateManifest() and validateSignature() methods. Both methods must return true.
为了验证该通行证, verifyPassSignature()将给定的通行证提取到一个临时目录,然后调用内部的validateManifest()和validateSignature()方法。 两种方法都必须返回true。
<?php
foreach ($files as $file) {
    ...

    // Check that each file is present in the manifest
    if (!array_key_exists((string)$file, $manifestData)) {
        throw new Exception("No entry in manifest for file '{$file}'"), 506);
    }

    // Check SHA1 hash for each file
    $hash = sha1_file($file->getPathname());
    if ($hash == false || $hash != $manifestData[(string)$file]) {
        throw new Exception(
            sprintf(
                "For file %s, manifest's listed SHA1 hash %s doesn't match computed hash, %s",
                $file,
                $manifestData[(string)$file],
                $hash
            ),
            507
        );
    }
}
A manifest is valid if the pass directory contains only the files declared inside the manifest, the manifest itself, and the signature file. If a file is missing or there are files not listed then the pass is invalid. Also, the SHA1 hash for each file must match with the one stored in the manifest.
如果传递目录仅包含在清单内部声明的文件,清单本身和签名文件,则清单有效。 如果缺少文件或未列出文件,则该通行证无效。 此外,每个文件的SHA1哈希必须与清单中存储的SHA1哈希匹配。
The signature is also validated using openssl in three steps. First we verify the manifest’s contents with its signature. The option -noverify tells OpenSSL to skip the signer’s certificate verification.
还可以通过三个步骤使用openssl验证签名。 首先,我们用清单的签名验证清单的内容。 选项-noverify告诉OpenSSL跳过签名者的证书验证。
$verifyCommand = sprintf(
    'openssl smime -verify -binary -inform DER -in %s -content %s -noverify 2> /dev/null',
    $signaturePath,
    $manifestPath
);
Then the certificates are extracted from the signature:
然后从签名中提取证书:
<?php
$exportCommand = sprintf(
    'openssl smime -pk7out -in %s -content %s -inform DER -outform PEM',
    $signaturePath,
    $manifestPath
);
The command’s output is passed to the internal parseCertificates() method which I won’t discuss here. It uses a mix of OpenSSL and regex to extract certificates from the given data to an array of associative arrays which is used for a certificate-checking loop:
命令的输出传递到内部parseCertificates()方法,在此不做讨论。 它使用OpenSSL和regex的混合,从给定的数据中提取证书到关联数组数组,该数组用于证书检查循环:
<?php
$certs = self::parseCertificates($pemData);
$foundWWDRCert = false;
for ($i = 0; $i < count($certs); $i++) {
    $commonName = $certs[$i]['subject']['CN'];

    if ($commonName == APPLE_CERTIFICATE_CN) {
        $foundWWDRCert = true;
    }
}
The Index Controller
索引控制器
The controller index.php is responsible for providing both the web-GUI app and the RESTful API. It consists of two URIs: the homepage via GET and the same page via POST. The first page displays only the empty form, but the second is more interesting.
控制器index.php负责提供Web GUI应用程序和RESTful API。 它由两个URI组成:通过GET的主页和通过POST的同一页面。 第一页仅显示空白表格,但第二页更有趣。
To ensure each email address is unique, it asks Paris which in turn checks the database:
为了确保每个电子邮件地址都是唯一的,它要求Paris依次检查数据库:
<?php
$subscriber = Model::factory('MyPassbookSubscriber')
    ->where_equal('email', $memberMail)
    ->find_one();

if ($subscriber !== false) {
    $errors['membermail'] = sprintf("The email address '%s' is not available", $memberMail);
}
The subscriber thumbnail URL is picked from Gravatar:
订户缩略图URL选自Gravatar:
<?php
if (empty($errors['membermail'])) {
    $memberThumbnail = "https://www.gravatar.com/avatar/" . md5(strtolower(trim($memberMail))) . "?s=60";
}
And now it can create a new subscriber:
现在,它可以创建一个新的订户:
<?php
try {
    $subscriber = Model::factory('MyPassbookSubscriber')->create(
        array(
            'name' => $memberName,
            'email' => $memberMail,
            'created' => date('Y-m-d H:i:s', $memberSubscription),
            'function' => $memberFavFunction,
            'picture' => $memberThumbnail
            )
    );
    $subscriber->save();
}
catch (Exception $e) {
    $errors['subscriber'] = "Error creating subscriber profile";
}
The pass’s JSON template file is loaded into $data and all of the placeholders are filled with real user and app data:
通行证的JSON模板文件已加载到$data并且所有占位符均填充有真实用户和应用程序数据:
<?php
$data['serialNumber'] = $subscriber->id;
$data['webServiceURL'] = sprintf('https://%s/%s/', $env['SERVER_NAME'], $app->request()->getRootUri());
$data['authenticationToken'] = md5($subscriber->id);
$data['barcode']['message'] = $subscriber->id;
$data['generic']['primaryFields'][0]['value'] = $subscriber->name;
$data['generic']['secondaryFields'][0]['value'] = date('Y', $memberSubscription);
$data['generic']['auxiliaryFields'][0]['value'] = $subscriber->function . '()';
$data['generic']['backFields'][0]['value'] = $subscriber->id;
$data['generic']['backFields'][1]['value'] = $subscriber->created;
$data['generic']['backFields'][2]['value'] = $subscriber->email;
Using the custom model methods, the new $pass is created with $subscriber->createPass() and, if everything is right, the $pass can pack itself.
使用自定义模型方法,使用$subscriber->createPass()创建新的$pass ,如果一切正常,则$pass可以打包。
<?php
if ($pass = $subscriber->createPass($app->config('passes.passType'), $data)) {
    $pass->pack(
        $app->config('passes.path'),
        $app->config('passes.store'),
        $app->config('passes.certfile'),
        $app->config('passes.certpass')
    );

...

}
else {
    $errors['pass'] = 'Unable to create pass';
}
The pack() method is simple: it makes a temporary copy of the template directory, adds the pass-specific files, and calls PassSigner::signPass() on the working directory. The newly created pass is then sent by email and the pass.php template file is rendered to the user with the download link.
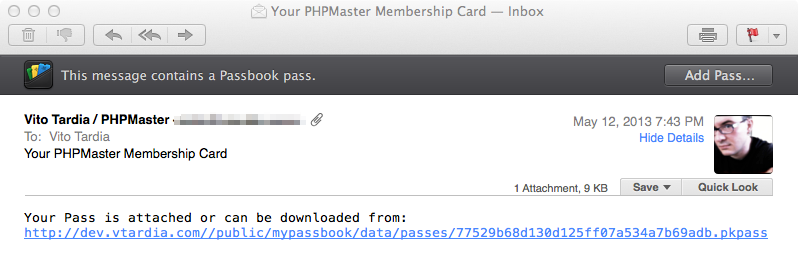
pack()方法很简单:它会临时创建模板目录的副本,添加特定于通行证的文件,然后在工作目录上调用PassSigner::signPass() 。 然后通过电子邮件发送新创建的通行证,并通过下载链接将pass.php模板文件呈现给用户。
变得RESTful (Going RESTful)
Since a web service URL is embedded inside the pass, Apple’s specs say that we must implement at least two endpoints for registering and unregistering devices. The URI is always /v1/devices/:deviceId/registrations/:passTypeId/:serialNo and is called via POST for registration and DELETE for unregistration.
由于通行证中嵌入了Web服务URL,因此Apple的规范规定,我们必须至少实现两个终结点来注册和注销设备。 URI始终为/ v1 / devices /:deviceId / registrations /:passTypeId /:serialNo,并通过POST进行调用以进行注册,并通过DELETE进行取消注册。
The Device ID, Pass Type ID, and Pass Serial Number are received from the URI while the auth token is found in the Authorization header. The auth token must be present in the header and linked to a pass in order to succeed, and a 401 response must be returned in the event of unauthorized access.
从URI接收设备ID,通过类型ID和通过序列号,同时在授权标头中找到auth令牌。 auth令牌必须存在于标头中并链接到传递,才能成功,并且在未经授权访问的情况下必须返回401响应。
During the registration process, a Push Token is sent as the body of the request in JSON format: {"pushToken": <pushToken>}. The registration process creates a new Device object in the database and fills the Device ID and Push Token fields provided. Then a DevicePass object is created to store the relationship between the device and the pass.
在注册过程中,将以JSON格式发送推送令牌作为请求的主体: {"pushToken": <pushToken> } 。 注册过程将在数据库中创建一个新的Device对象,并填充提供的Device ID和Push Token字段。 然后创建一个DevicePass对象,以存储设备和通道之间的关系。
If we need to update a pass, we use the Device ID and Push Token to send a push notification request to Apple Push Server (and obviously the update mechanisms need to be implemented as well).
如果我们需要更新通行证,则可以使用设备ID和推送令牌将推送通知请求发送到Apple Push Server(显然,还需要实现更新机制)。
The unregistration URI receives all of the same data except for the Push Token. All references for the given pass are deleted, including devices and relationships.
注销URI接收所有相同的数据,但推送令牌除外。 给定通行证的所有参考都将被删除,包括设备和关系。
结论 (Conclusion)
We’ve covered a lot in this article, and there’s still more to explore about Pass management. Feel free to start with the PassSigner library and build on top of it. You can easily create all sorts of Pass applications for you or your clients. Happy coding!
我们在本文中讨论了很多内容,关于通行证管理还有更多的探索要去。 随意从PassSigner库开始并在它之上进行构建。 您可以轻松地为您或您的客户创建各种Pass应用程序。 祝您编码愉快!
Image via Fotolia
图片来自Fotolia
翻译自: https://www.sitepoint.com/create-digital-tickets-with-php-and-apple-passbook/


 4320
4320


 被折叠的 条评论
为什么被折叠?
被折叠的 条评论
为什么被折叠?
 到【灌水乐园】发言


